|
|
Post by dusty350 on Oct 19, 2018 22:30:50 GMT 1
Following on from the Lc engine I built last year, I'm now doing another one, destined for the semi hybrid Lc. This engine came in boxes, along with the rolling chassis of the bike. The story is that the engine was rebuilt, but then stripped by a new owner as he wanted the cases vapour blasted I believe. Cases have been vapoured, and the bores and pistons of the 375 top end look new and unused, although I wont be using them. I'm going back to standard 350Lc cylinders and head. Most of the internal engine parts are all in a big box, so a bit of a jigsaw to sort out, but at first glance it all looks complete. As before, I will include part numbers and current prices where I can, and add lots of pics for reference. I will also add I am an amateur, but have built a few over the years. There is always more than one way of doing things so if anyone can add alternatives or extra info that can help others, please feel free to do so. Right. Cases first. When I get crankcases vapour blasted I always screw bolts onto all the bolt holes to stop blasting media entering them. Saves having to clean them out afterwards. Vapour blasting "slurry" isn't as aggressive as other forms of blasting media, but you still don't want it anywhere it shouldn't be. As I didn't get these done, the cases spent some time in the bath, with the shower hose dislodging anything left behind, which I'm pleased t say was virtually nothing. Once dry, I ran some lightly greased cotton buds down all the threaded holes in the casings, and no grit or slurry was found, so all good. Yamaha cases are line bored as a pair in the factory, and there are numbers engraved on the top and bottom cases that correspond to each other, proving them to be a pair. These numbers are found on the generator side of the cases, above and below where the crank emerges; 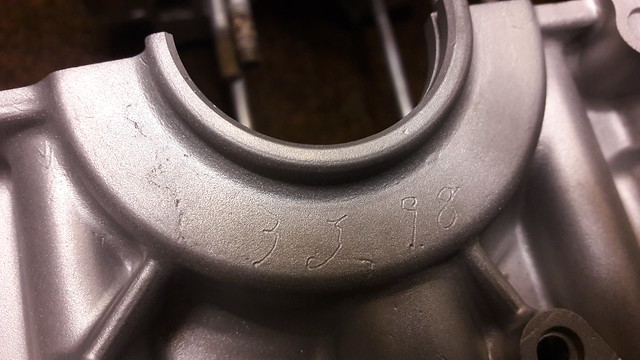 20181018_203132 20181018_203132 by David Miller, on Flickr 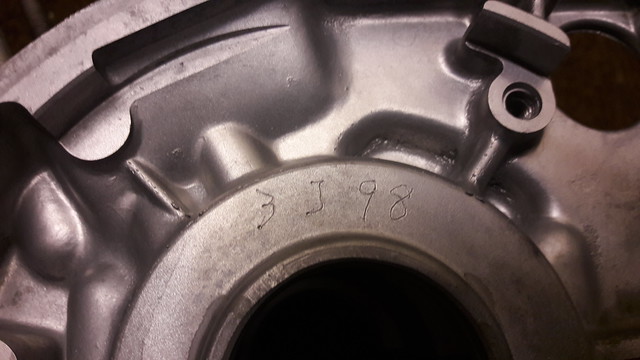 20181018_203125 20181018_203125 by David Miller, on Flickr Always worth checking to make sure you have the matching pair. So, if cases are clean and matching, and appear free from damage that may require remedial work, the next thing is the gear selector bush mod. The steel gearshaft emerges from the case on the generator (left) side of the bike. It passes through the alloy casing, and over time can wear the alloy. The seal then struggles to stay leak free. Yamaha recognised this problem, and fitted a steel bush into Pv cases from the start. Norbo supplies the steel bush for retro fitting into Lc cases, and it has the benefits of being Teflon coated on the inner surface, and slightly longer, protruding into the engine case and giving a bit more support to the gear shaft. The bottom case needs the hole to be reemed, allowing the bush to be pressed home, so ideally a job for empty cases. I take mine to my local engineering place and they've done a couple for me now. I know Muttsnuts can offer this service too; 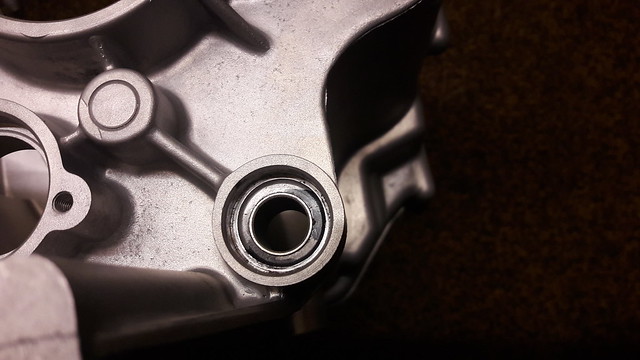 20181018_203150 20181018_203150 by David Miller, on Flickr 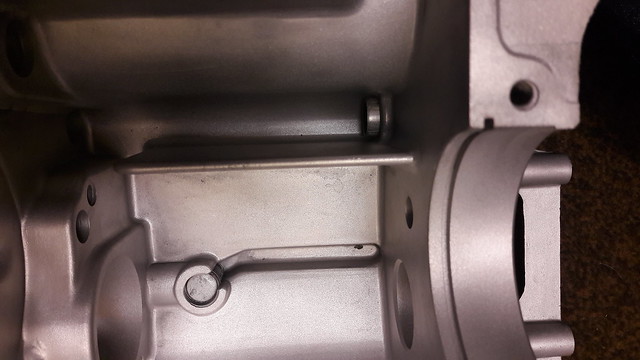 20181018_203209 20181018_203209 by David Miller, on Flickr A worthwhile job at this point as a "baggy" hole in the case will always be prone to leaks, even with a new gearshaft and seal. So, the trusty engine stand - made from offcuts of 3x2, gets pressed back into service, and the bottom case is ready to go; 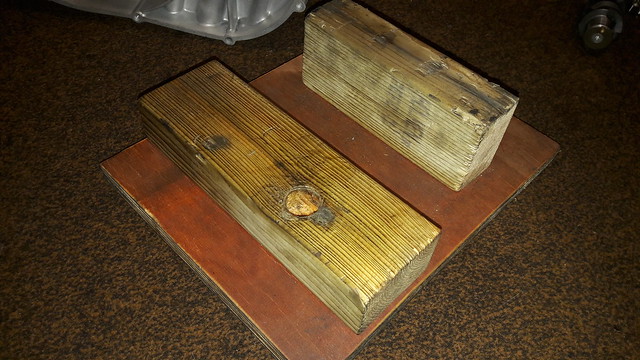 20181019_091620 20181019_091620 by David Miller, on Flickr 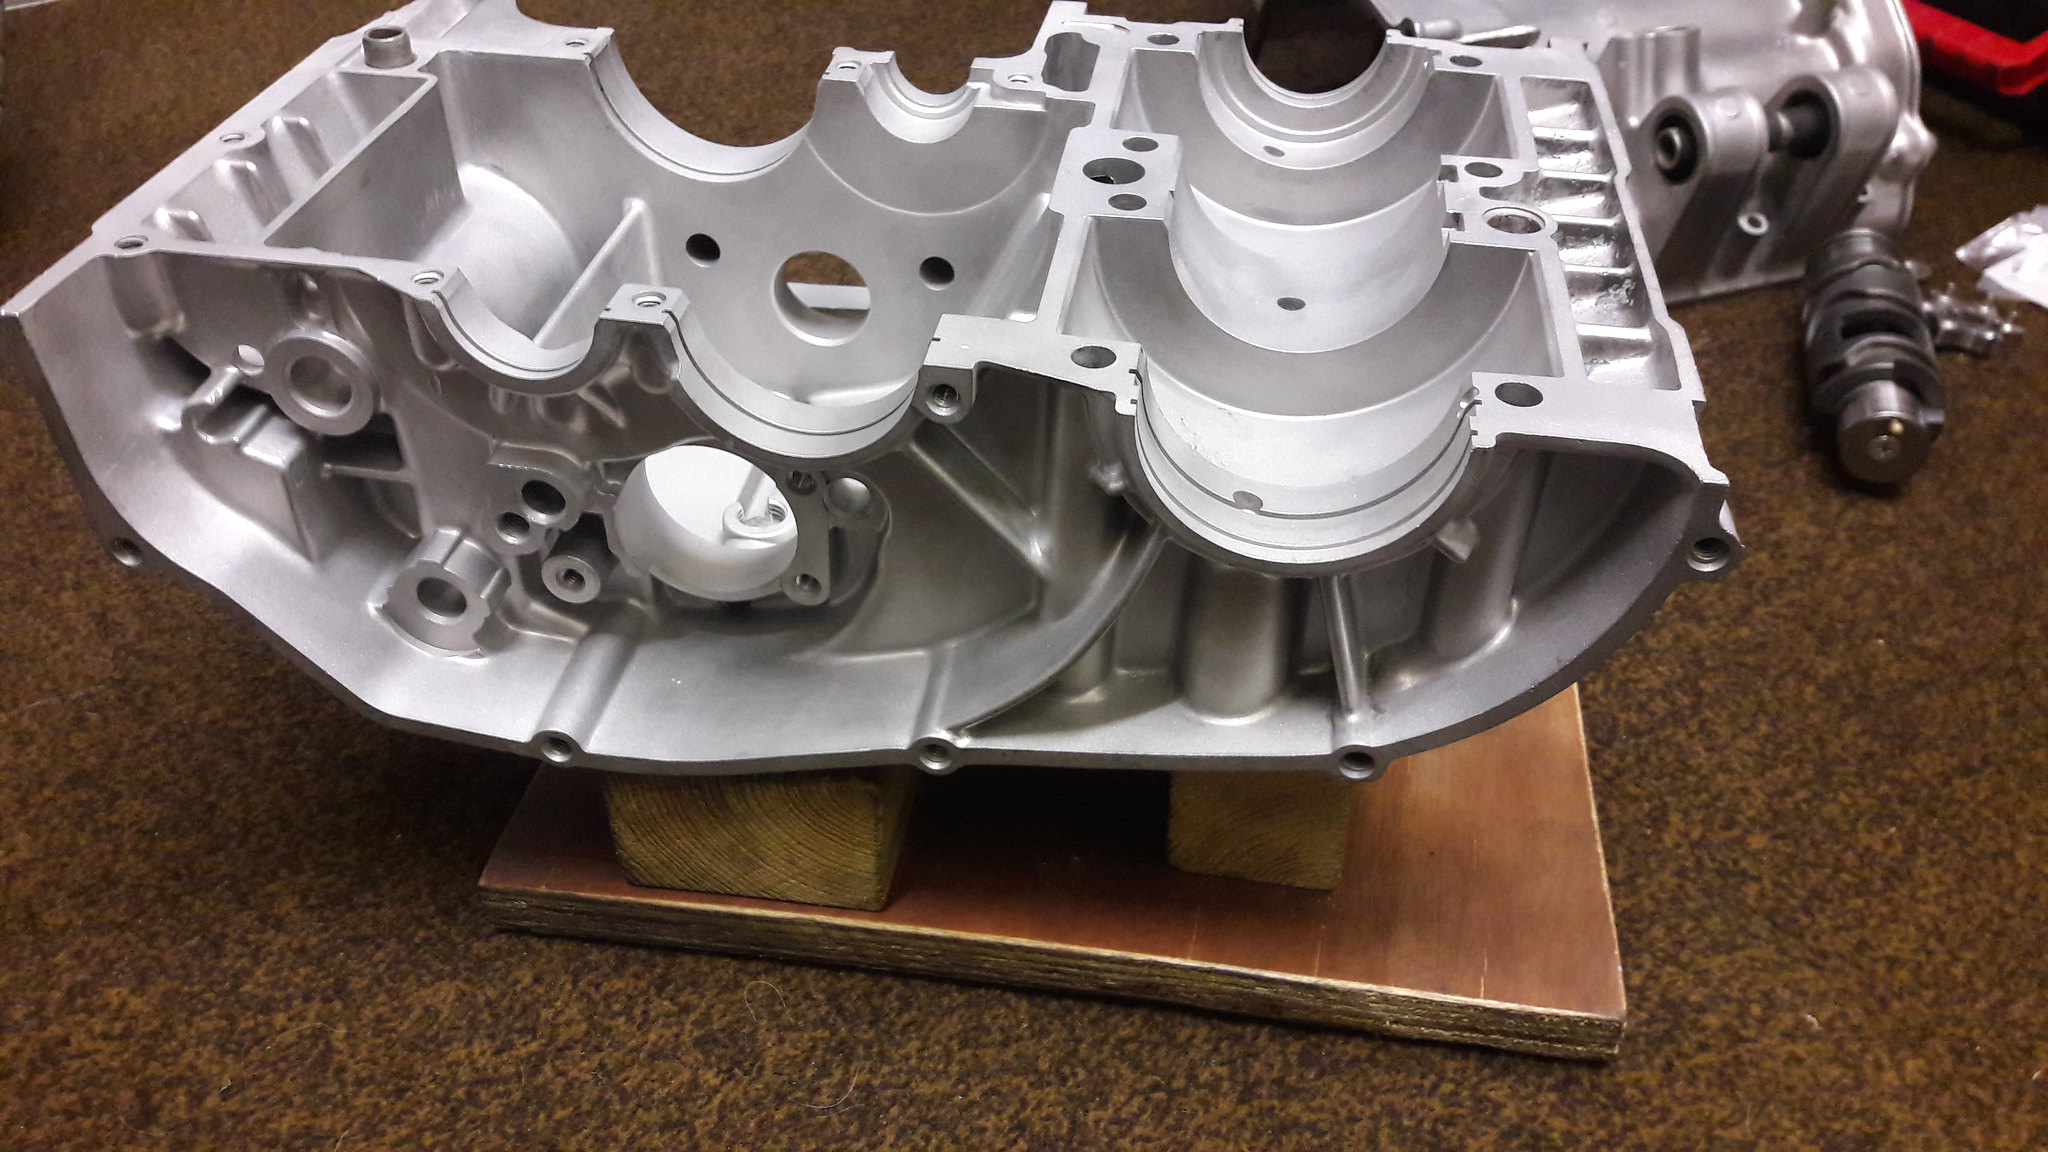 20181019_091649 20181019_091649 by David Miller, on Flickr Dusty  |
|
|
|
Post by marsbar350 on Oct 20, 2018 0:23:36 GMT 1
nice start dusty love your rebuild threads as good as Haynes  |
|
|
|
Post by donkeychomp on Oct 20, 2018 0:26:33 GMT 1
Ahh the trusty friend. I have it's twin, and very handy it is cheers Dusty. Going to follow this with keen interest as I will be doing this at some stage!
Alex
|
|
|
|
Post by mouse on Oct 20, 2018 7:59:52 GMT 1
Brilliant! Go Dusty!
Mouse
|
|
|
|
Post by 1966baz on Oct 20, 2018 8:28:21 GMT 1
Super thorough as usual Dusty, keep up the good work. Baths , showers , dish washers and ovens are banned in my house for bike parts so I just wait until the wifes out!
|
|
|
|
Post by earthman on Oct 20, 2018 8:38:42 GMT 1
nice start dusty love your rebuild threads as good as Haynes  Actually I'd say even better,....all the pictures will be in colour and show more detail for a start. |
|
|
|
Post by dusty350 on Oct 20, 2018 11:26:04 GMT 1
Cheers fellas  As with the last engine rebuild, I will try and show as much detail as possible. I know a lot of owners can build an engine but for first timers or anyone attempting it, hopefully it will help. I find the Haynes manuals hard to follow sometimes due to the low res black and white pics, plus all the oily thumbprints covering the pages !!  I learnt things from the input of members on the last build, so some things I will do slightly differently this time, but it will more or less mirror what I did before. So, with the cases ready to go, the first part to look at is the sump bolt. The washer that sits under the bolt has a superceded part number to the original fiche; 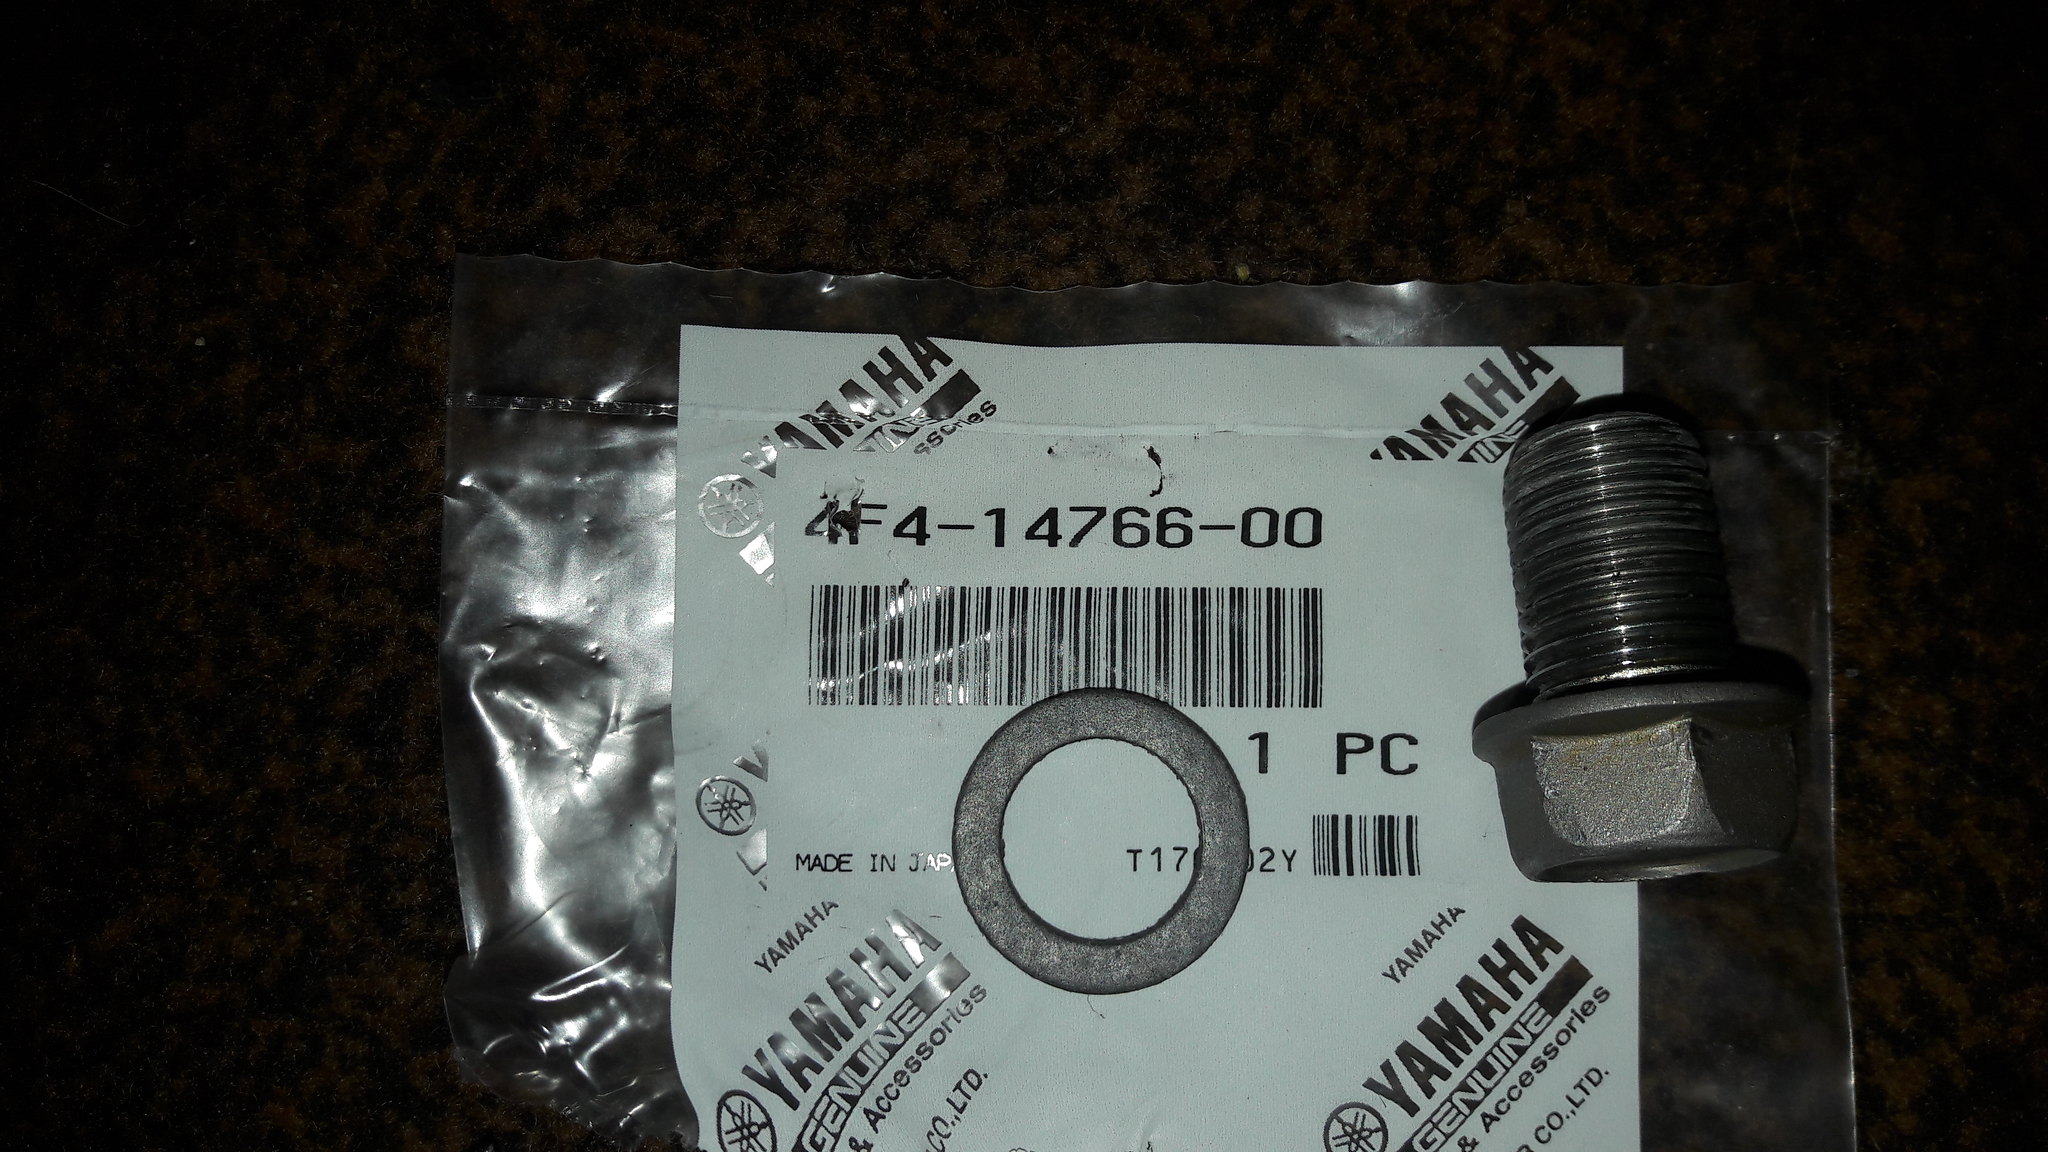 20181018_203458 20181018_203458 by David Miller, on Flickr Beware though. That 4f4 part costs £7.37 from Fowlers  An alternative, that I have used successfully in the past is part number 94109 14000, and costs .85p from Fowlers. Same size, and does the same job !! So I lightly grease the threads of the bolt, and fit it to the case; 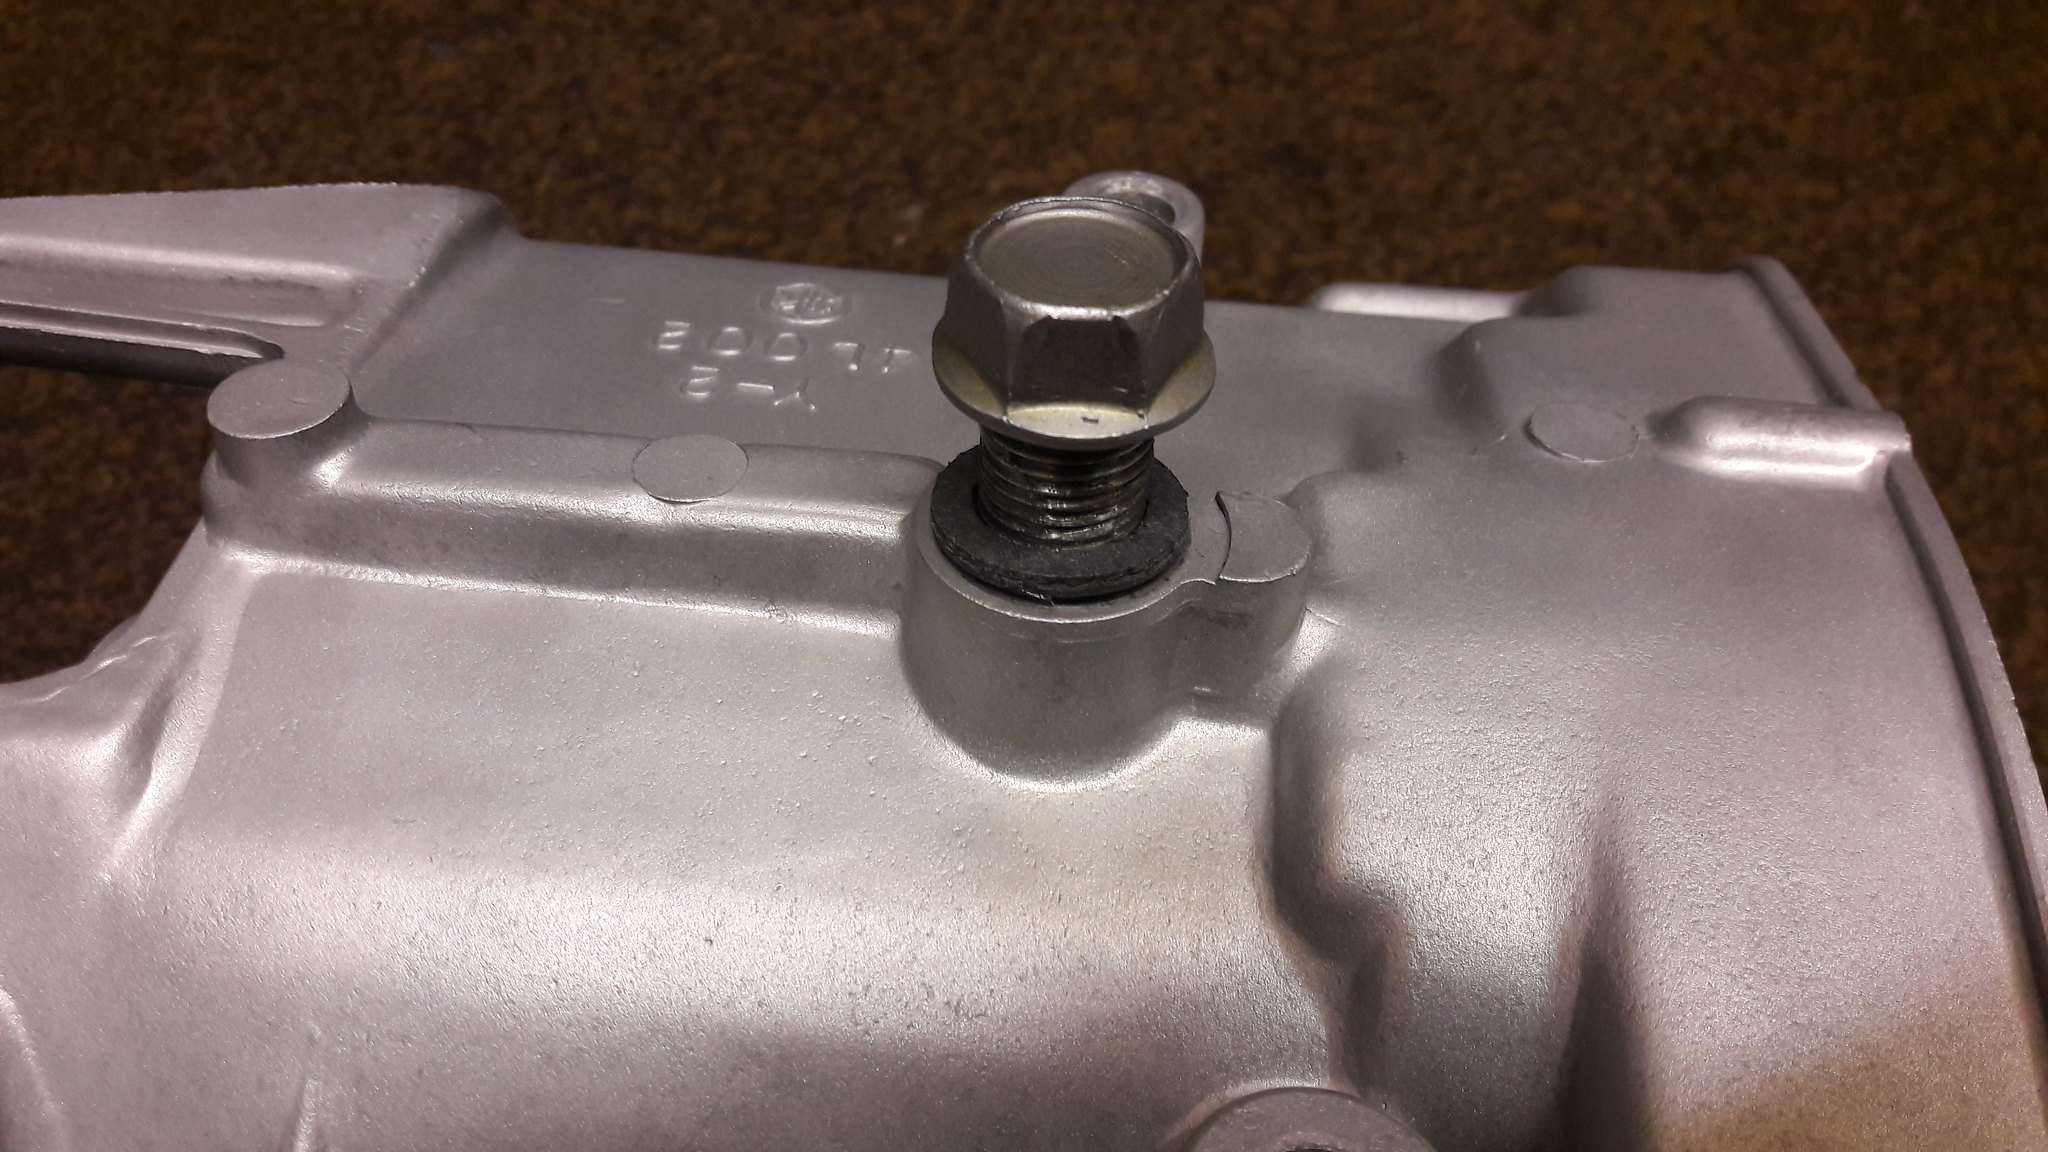 20181019_091405 20181019_091405 by David Miller, on Flickr The torque setting for the drain bolt is 14lbf/ft. I believe a lubricated fastener can make a difference to how much torque needs to be applied. I never overtighten anything, considering that these are 35year old cases, so tread carefully ! Next is the selector drum. Quite simple - a bearing and the shift star at one end and a brass spring loaded pin at the other so the neutral position of the gearbox can be displayed at the clocks. I had the choice of 3 from the box of parts; 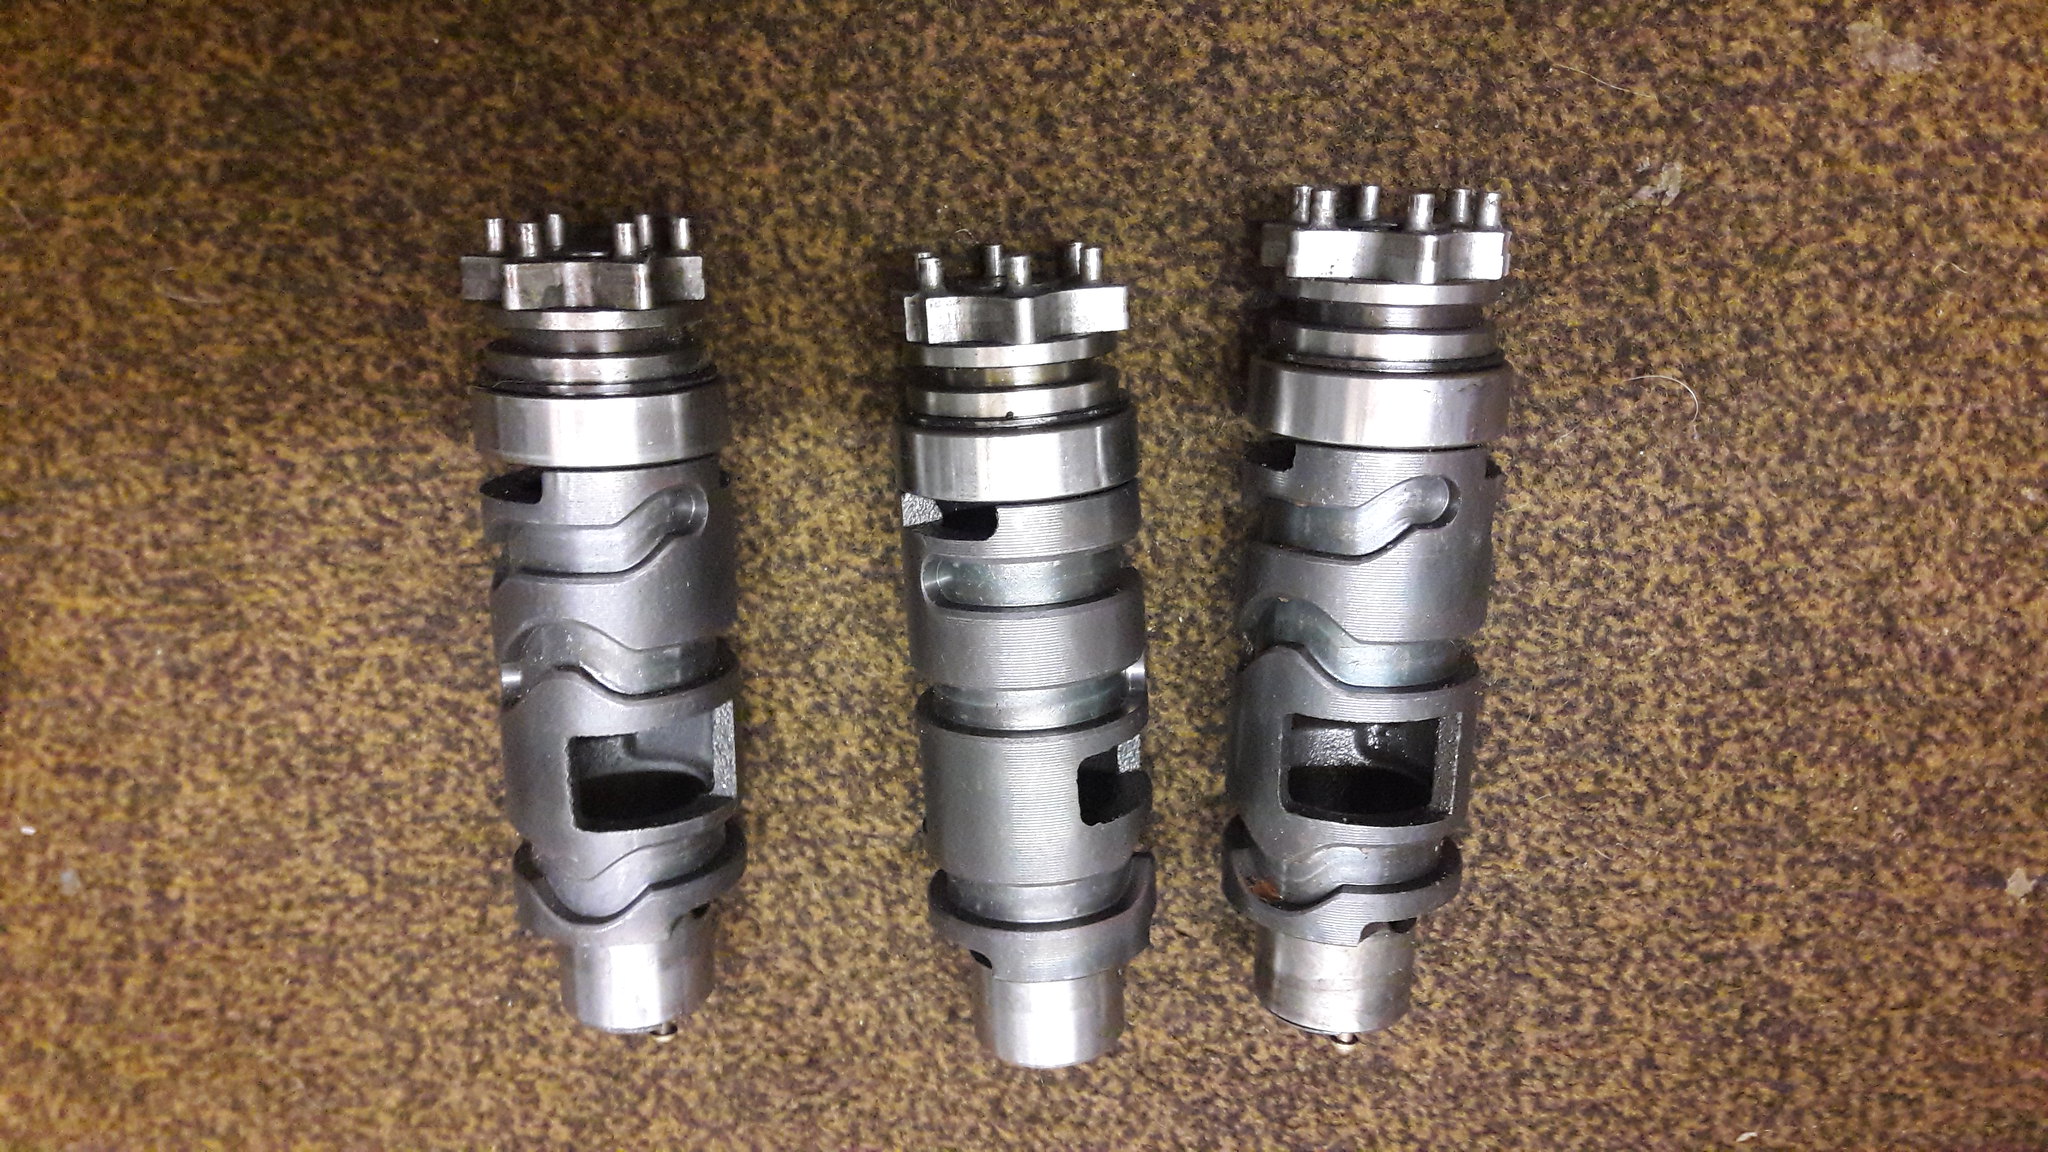 20181018_113719 20181018_113719 by David Miller, on Flickr So I selected a selector  , and off down the shed to the vice, so I can lightly clamp it; 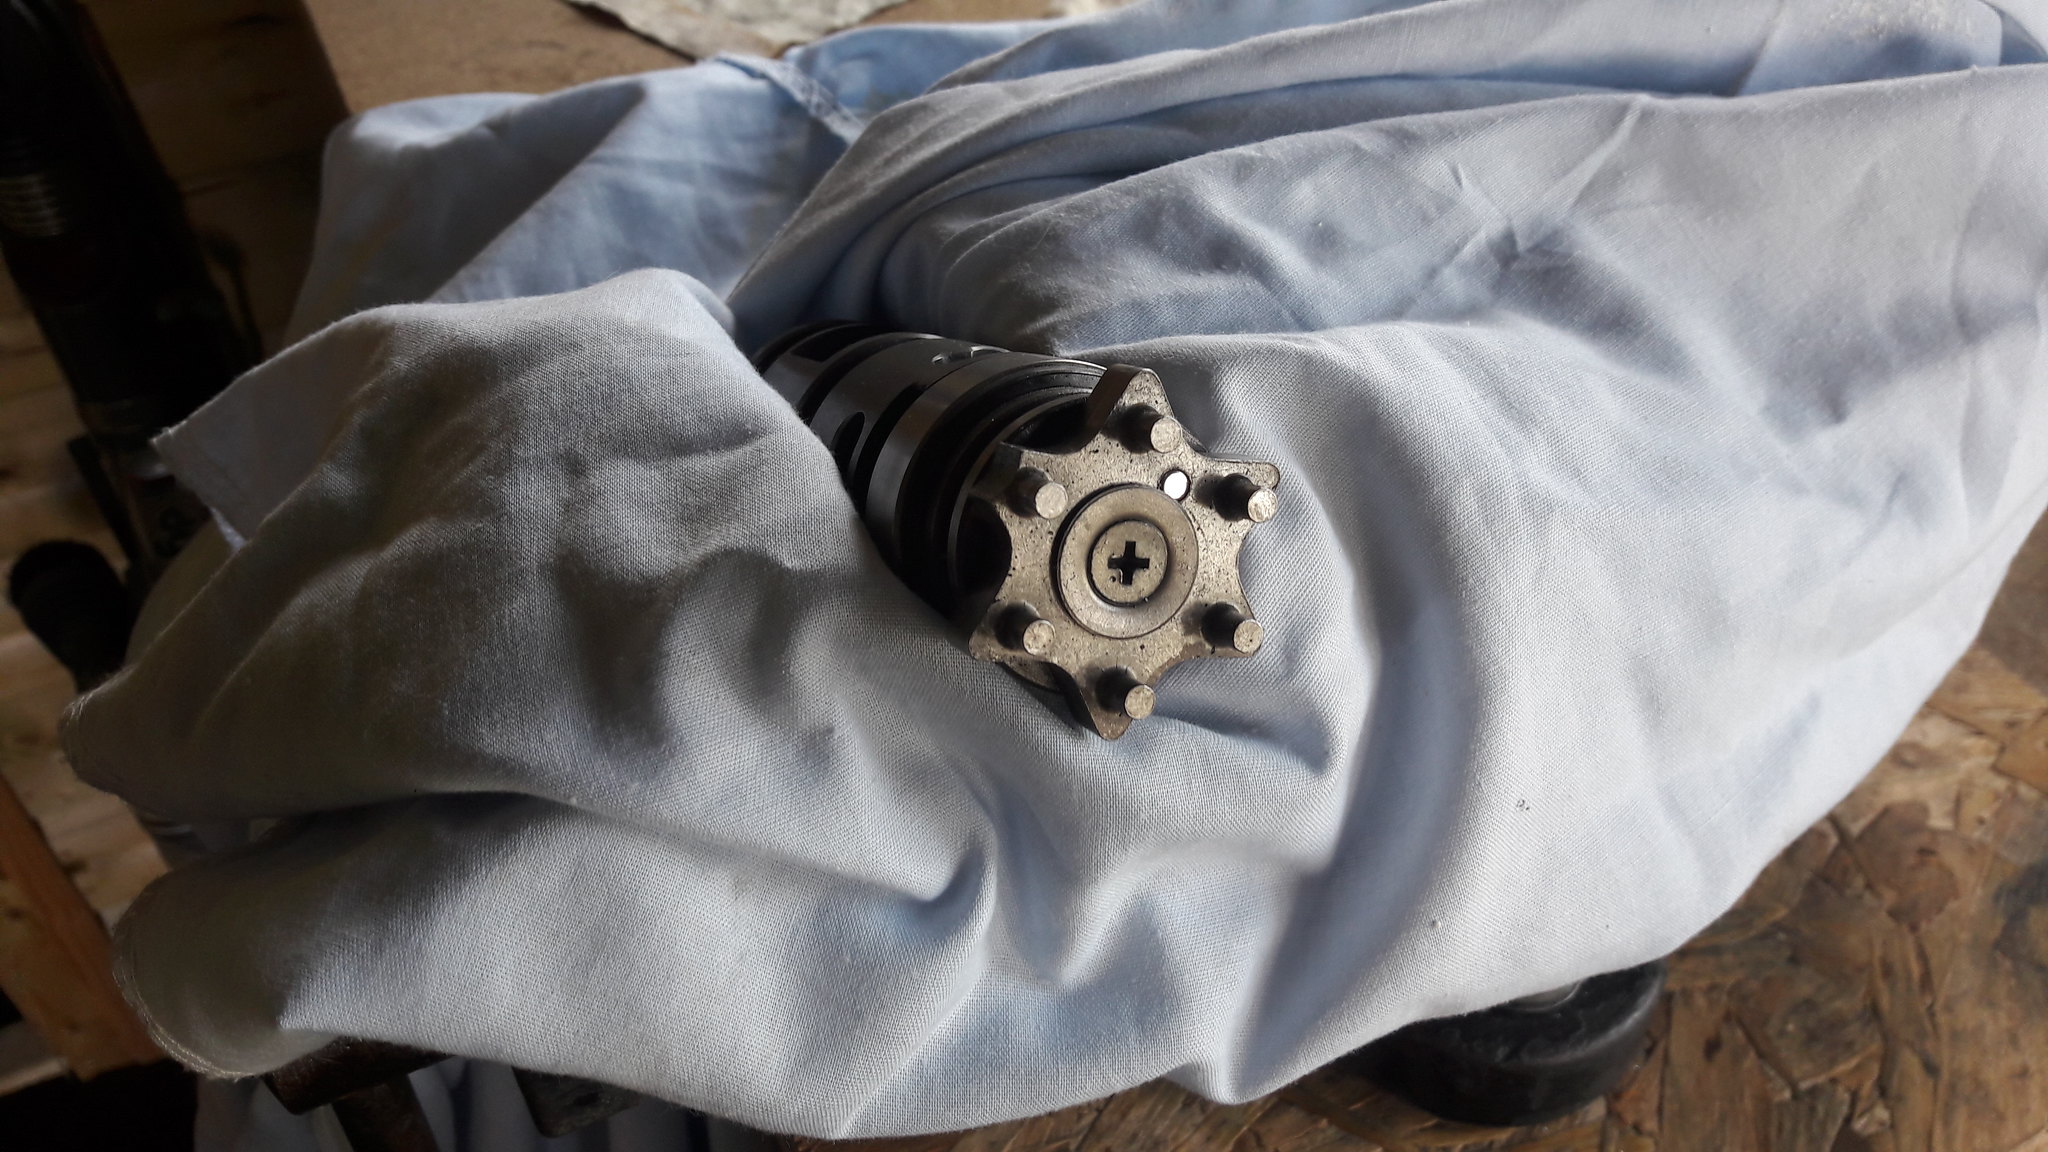 20181018_114218 20181018_114218 by David Miller, on Flickr So, a 5 pointed star with a sixth position "dished". This is where the selector locates the stopper arm at neutral. The central screw needs to be undone for the star head to be removed. I've never been able to remove this pesky screw without it chewing the head. I normally end up drilling off the screw head and once the star is off, a set of grips usually, easily removed the rest of the screw. This year, I have a new tool, my £20 impact drill from Lidl !!; 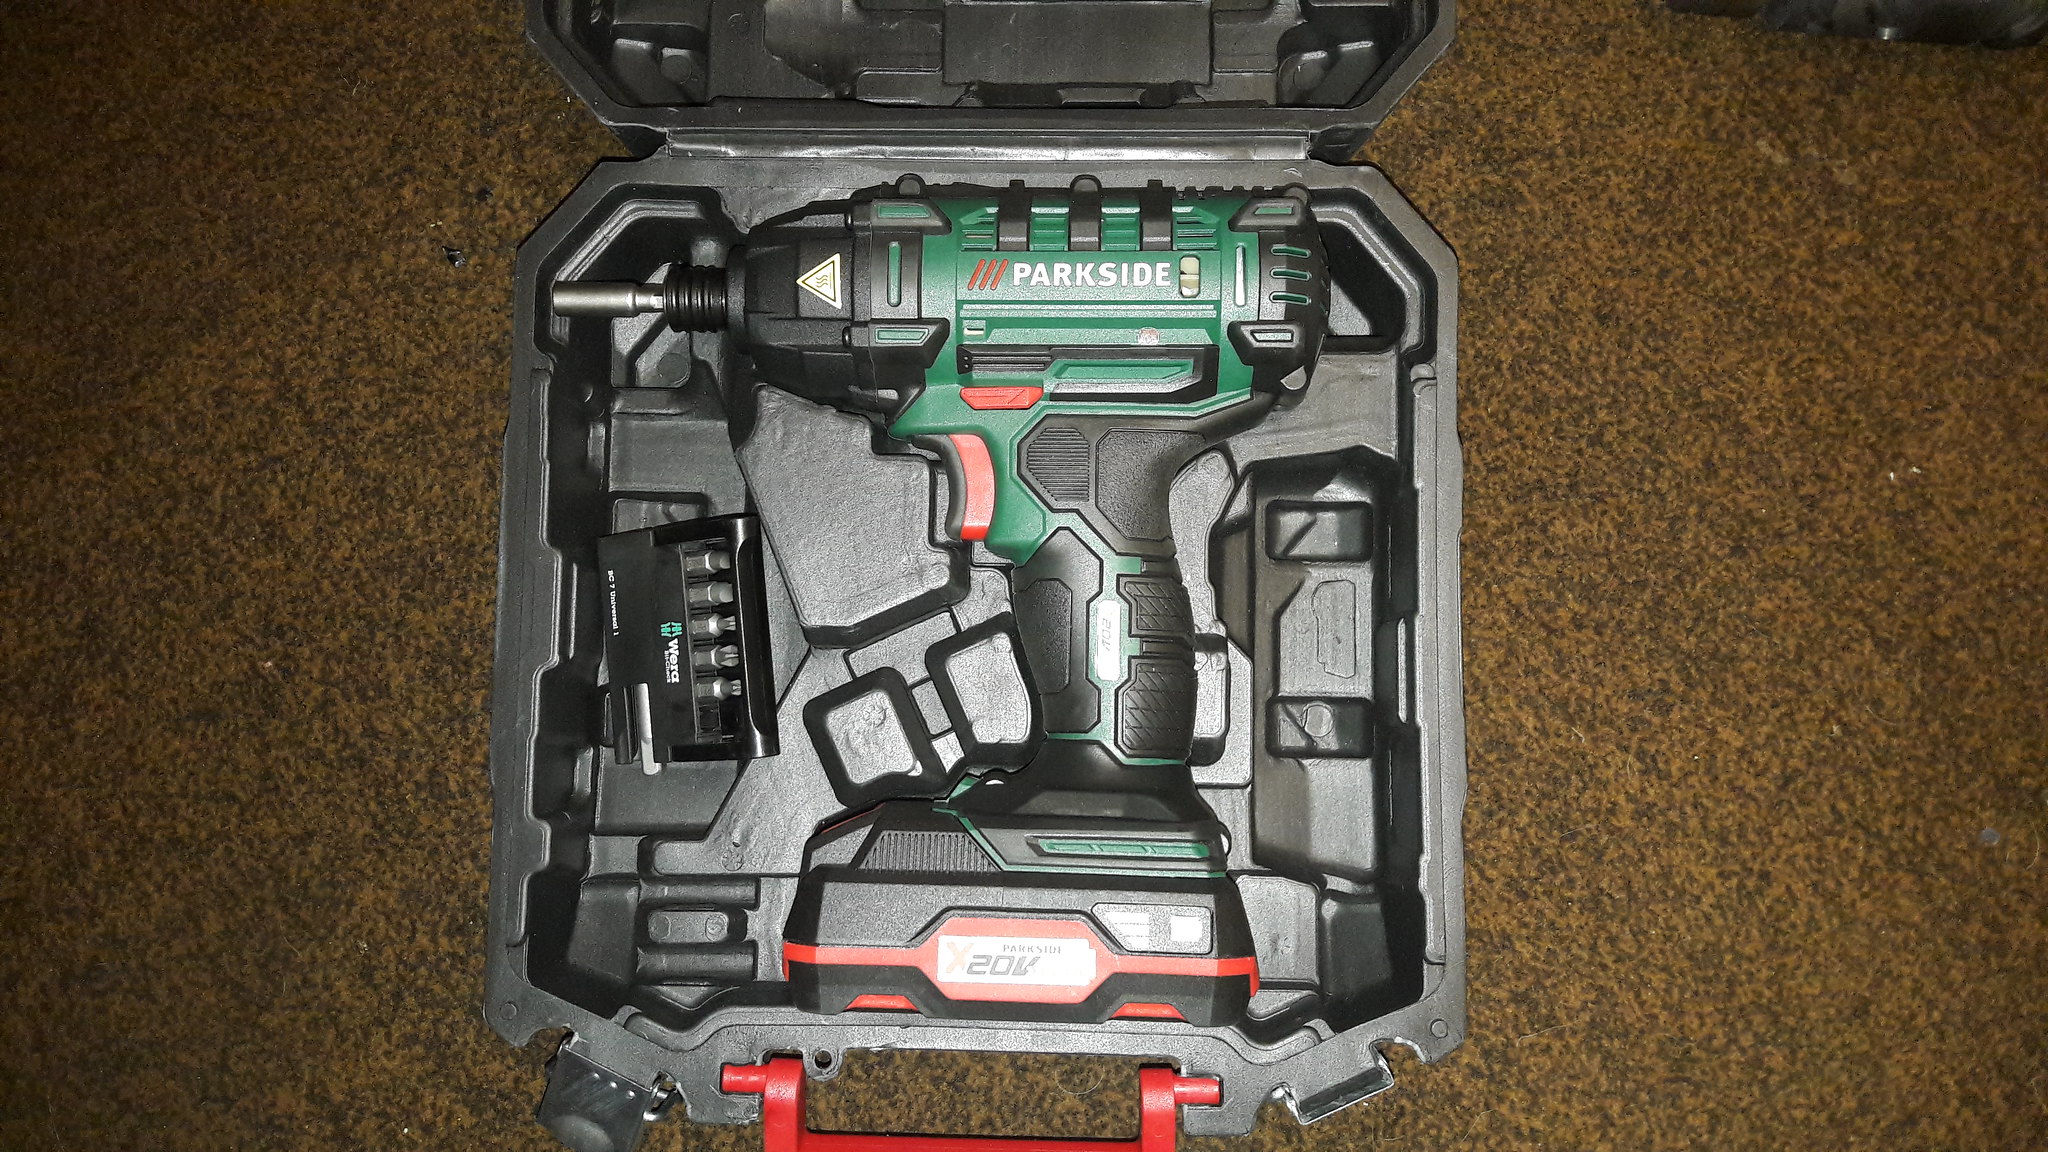 20181018_203115 20181018_203115 by David Miller, on Flickr Set to anticlockwise, it wizzed the screw straight out  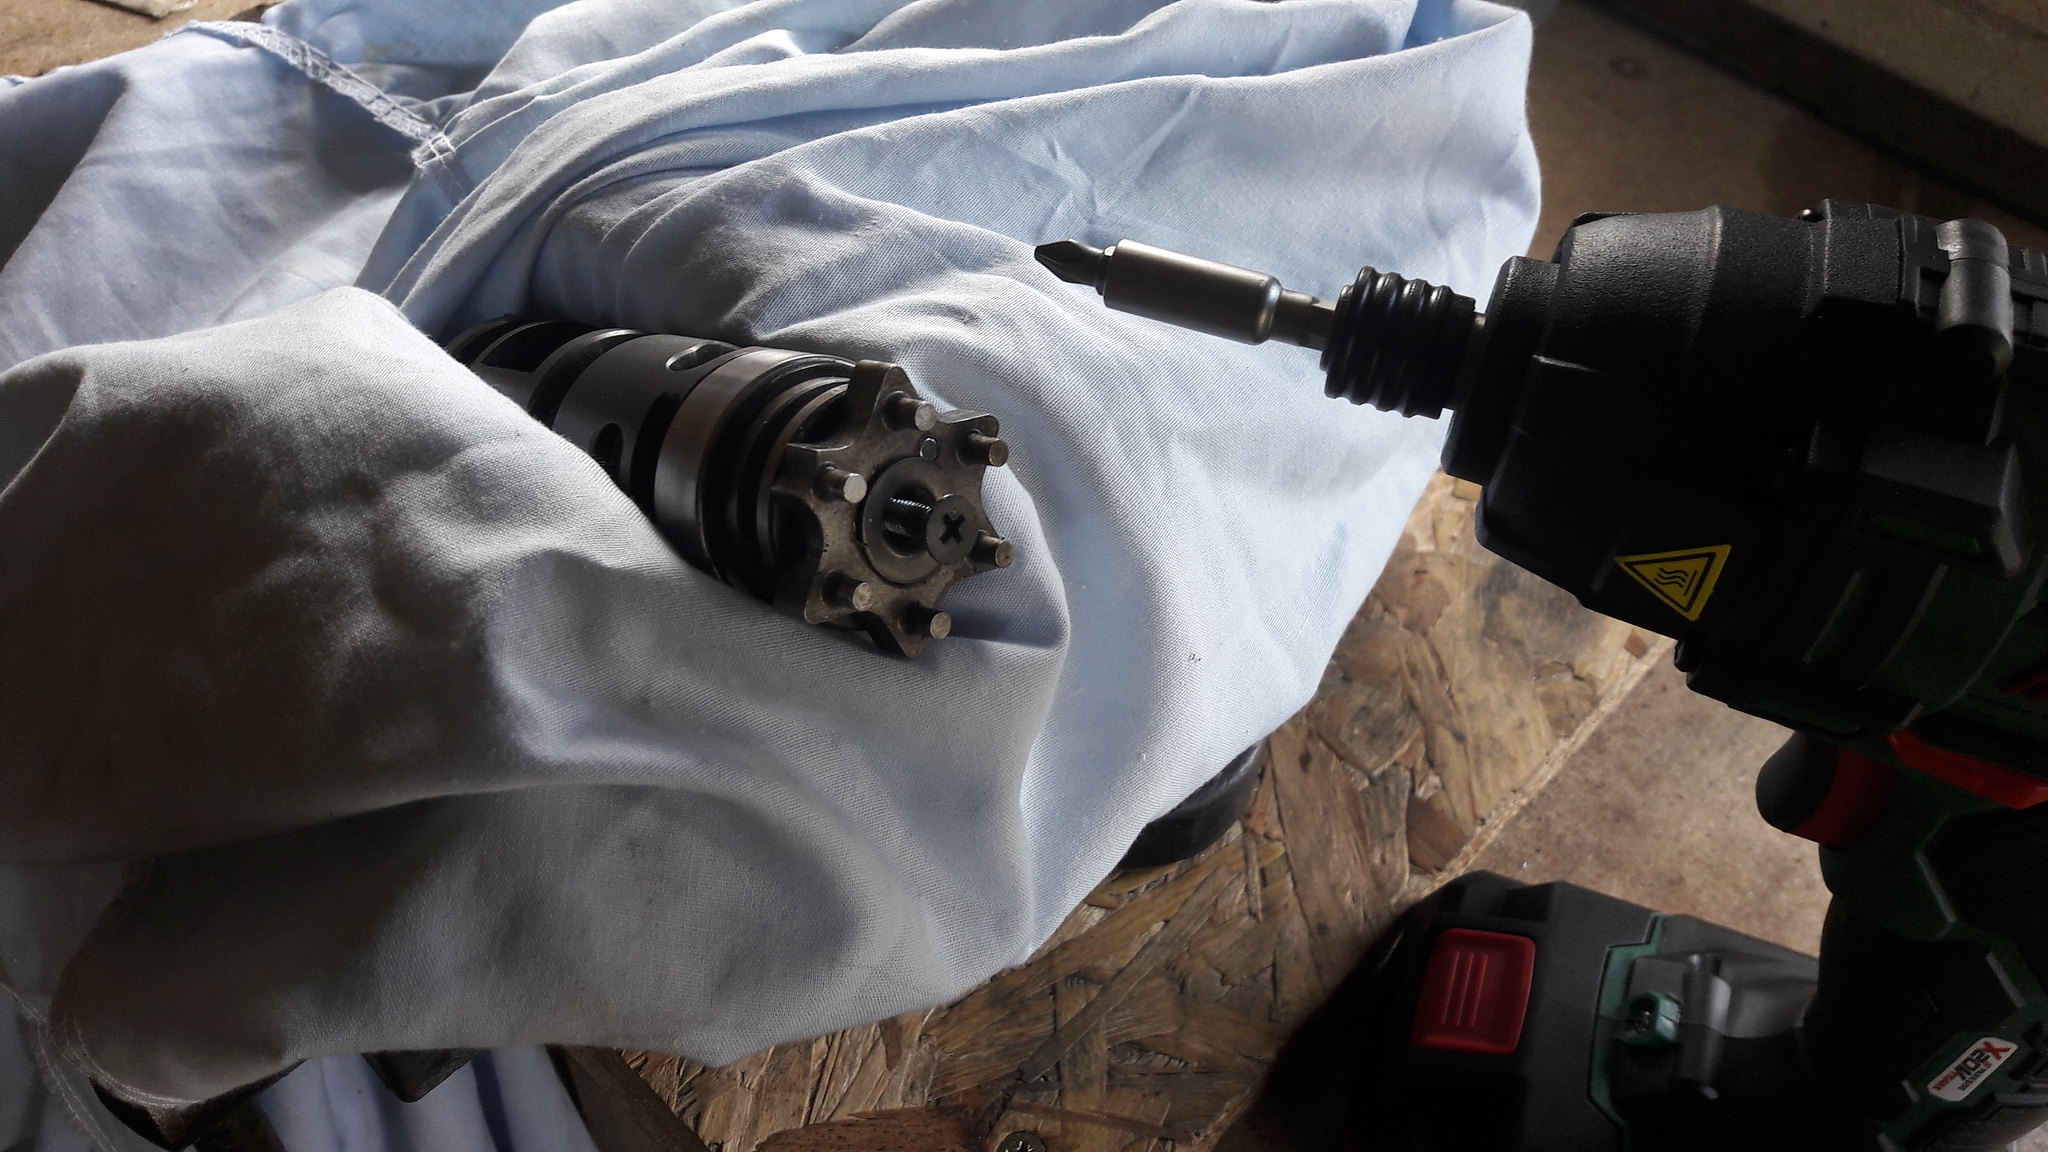 20181018_114340 20181018_114340 by David Miller, on Flickr This is great as drilling heads off bolts is not my favourite thing to do, and you wouldn't want to offer up a traditional impact driver and lump hammer to such a part. So, remove screw and the cup washer below it, and you can wiggle the star off. You'll notice a small pin in the star head - that matches to a hole in the end of the drum to help lock it in position. Once the star is off (it's a tight fit) you can remove the circlip that retains the shift drum bearing, which is the part I want to change; 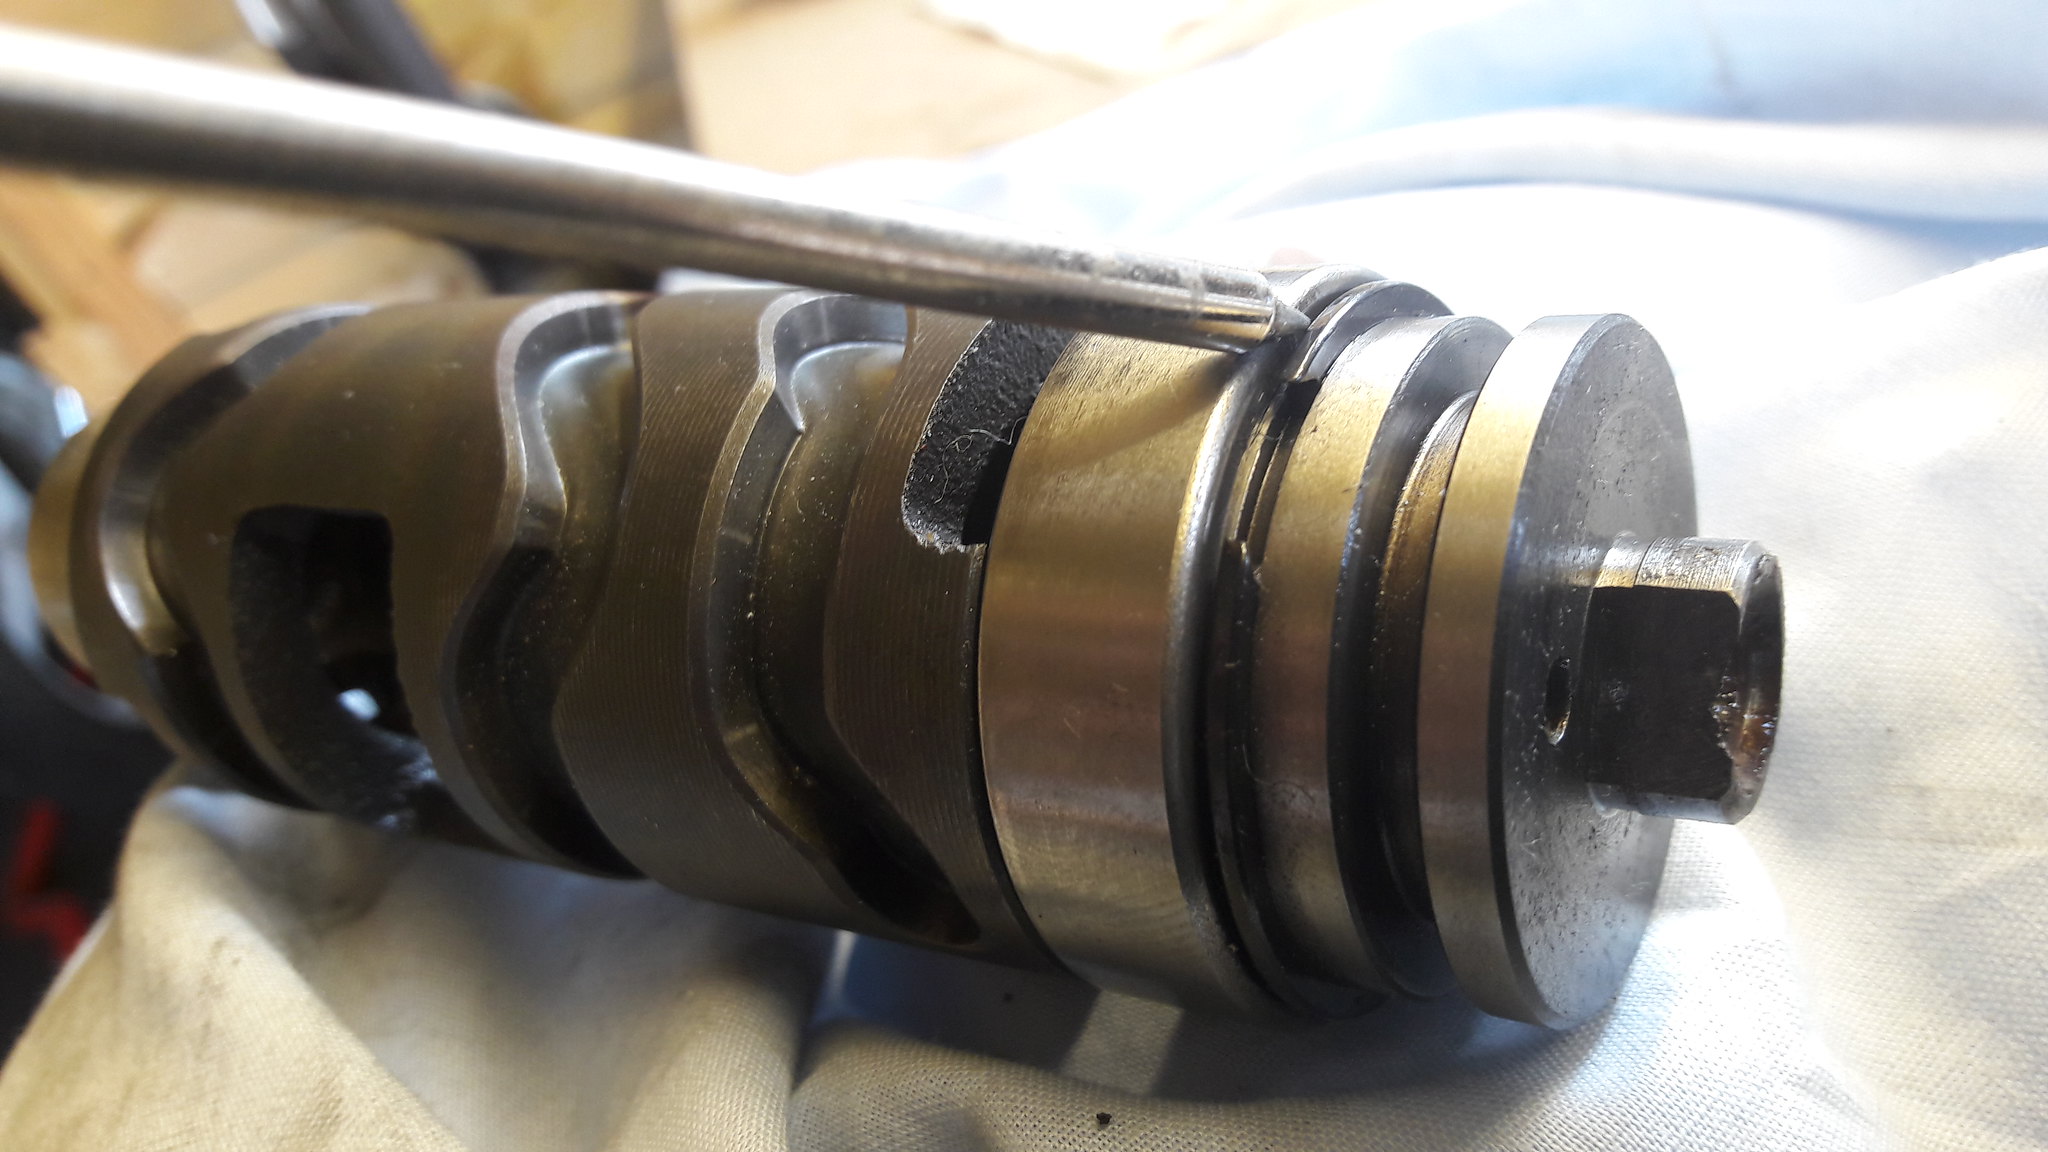 20181018_115450 20181018_115450 by David Miller, on Flickr Once the circlip is off the bearing slides off easily; 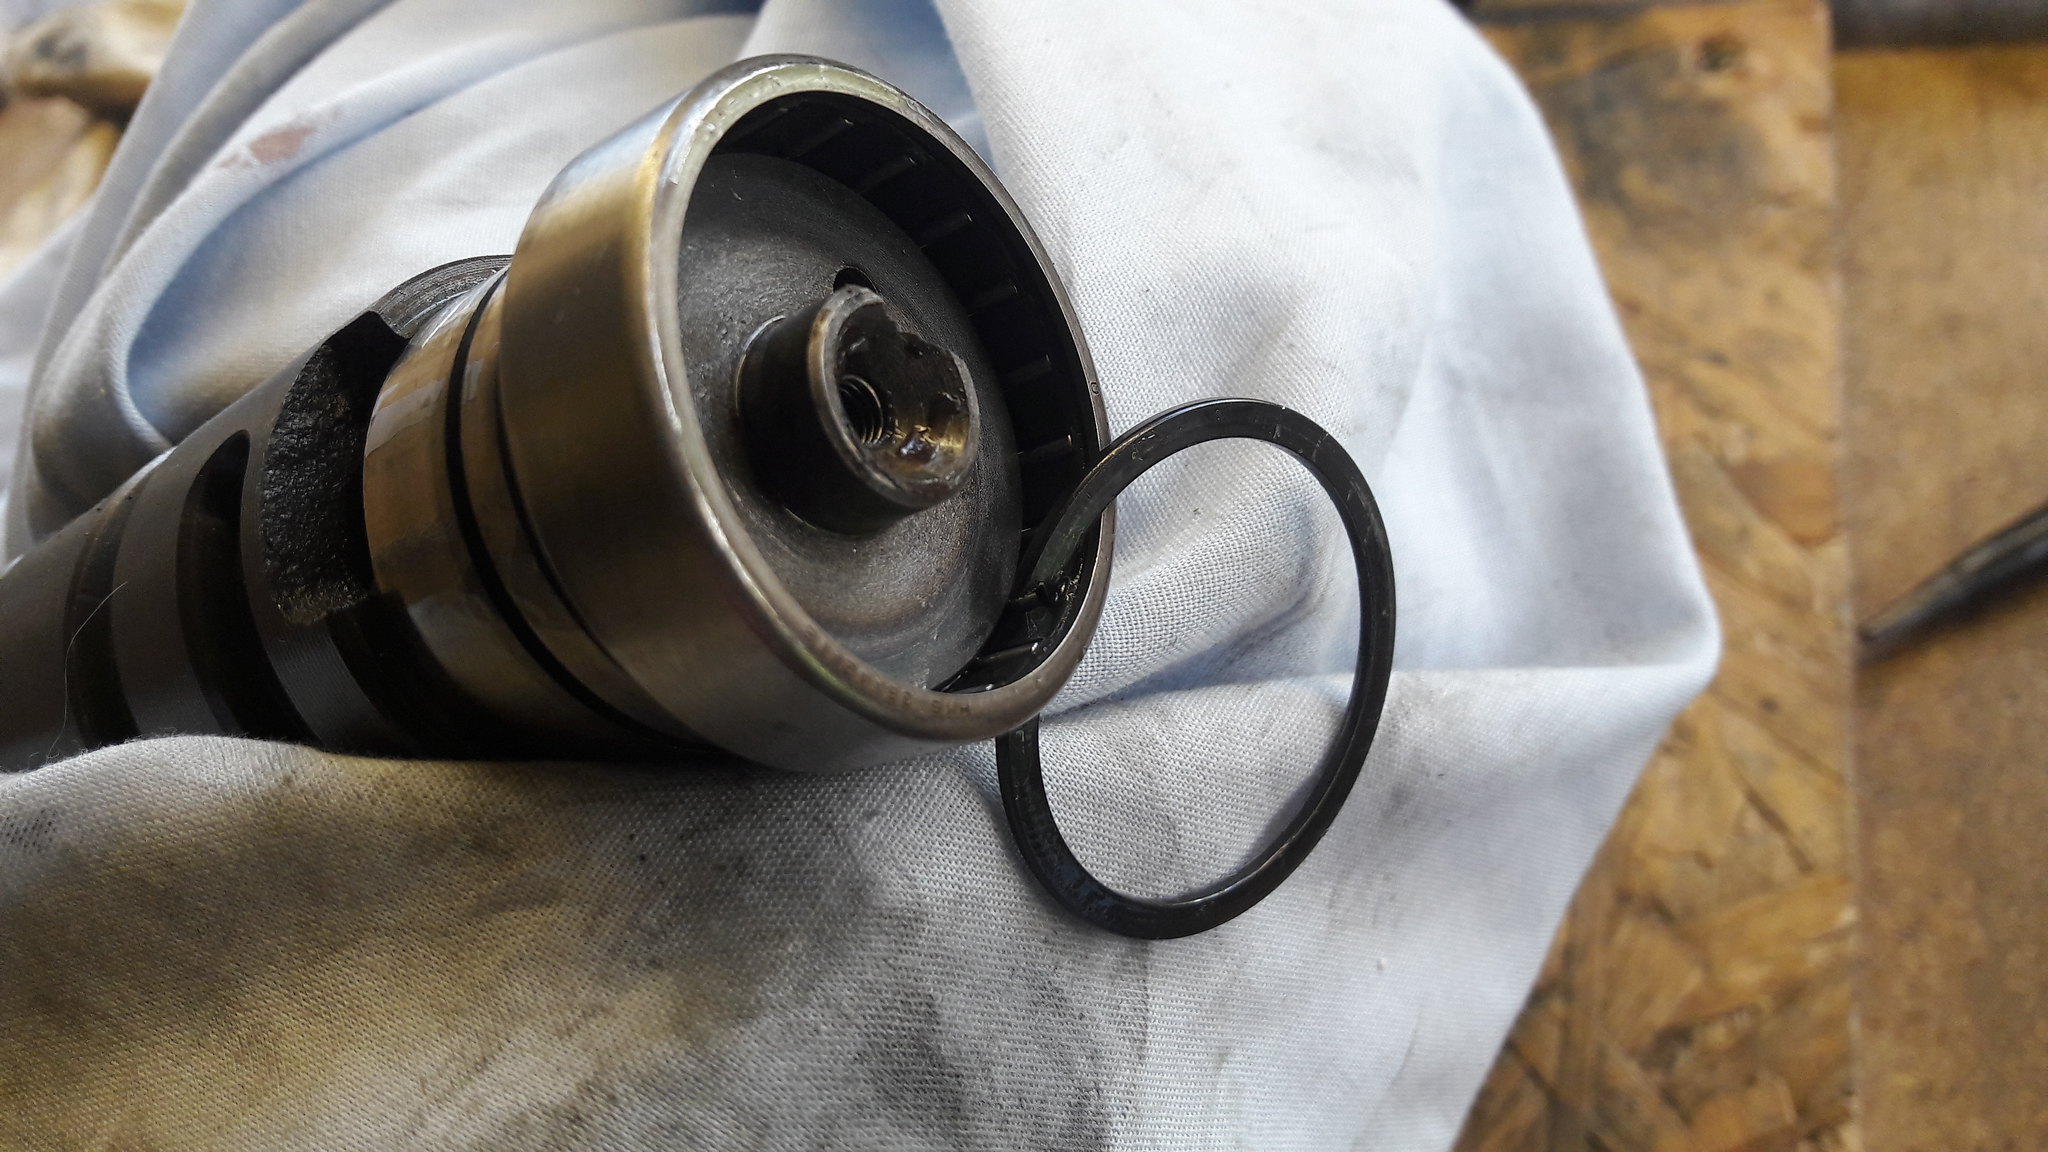 20181018_115640 20181018_115640 by David Miller, on Flickr All the components laid out; 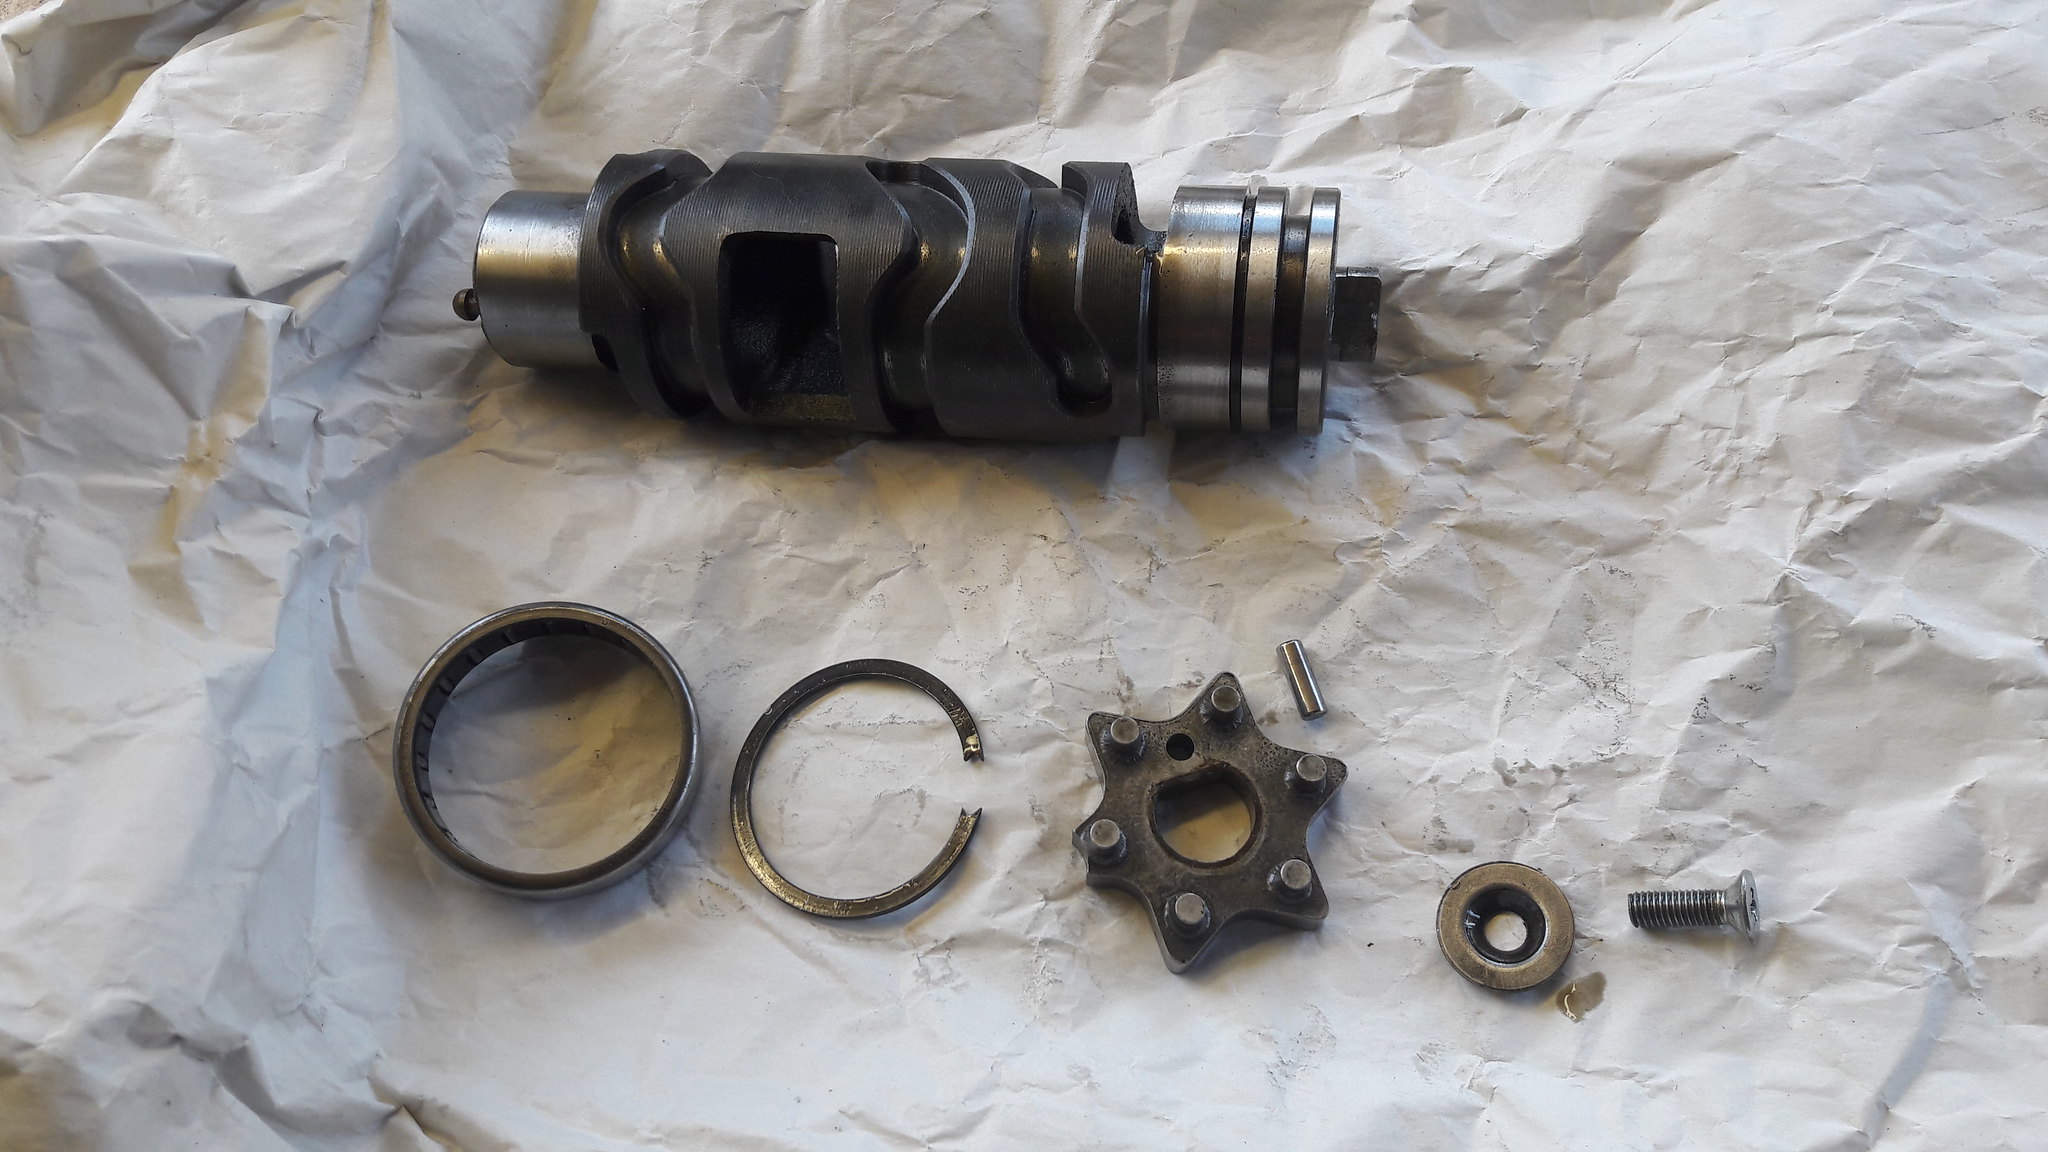 20181018_115803 20181018_115803 by David Miller, on Flickr You can see a rough edge where the screw locates. They all seem to break away a bit here, so I dress it back slightly with a Dremmel to tidy it up. Then wash it all in clean petrol; 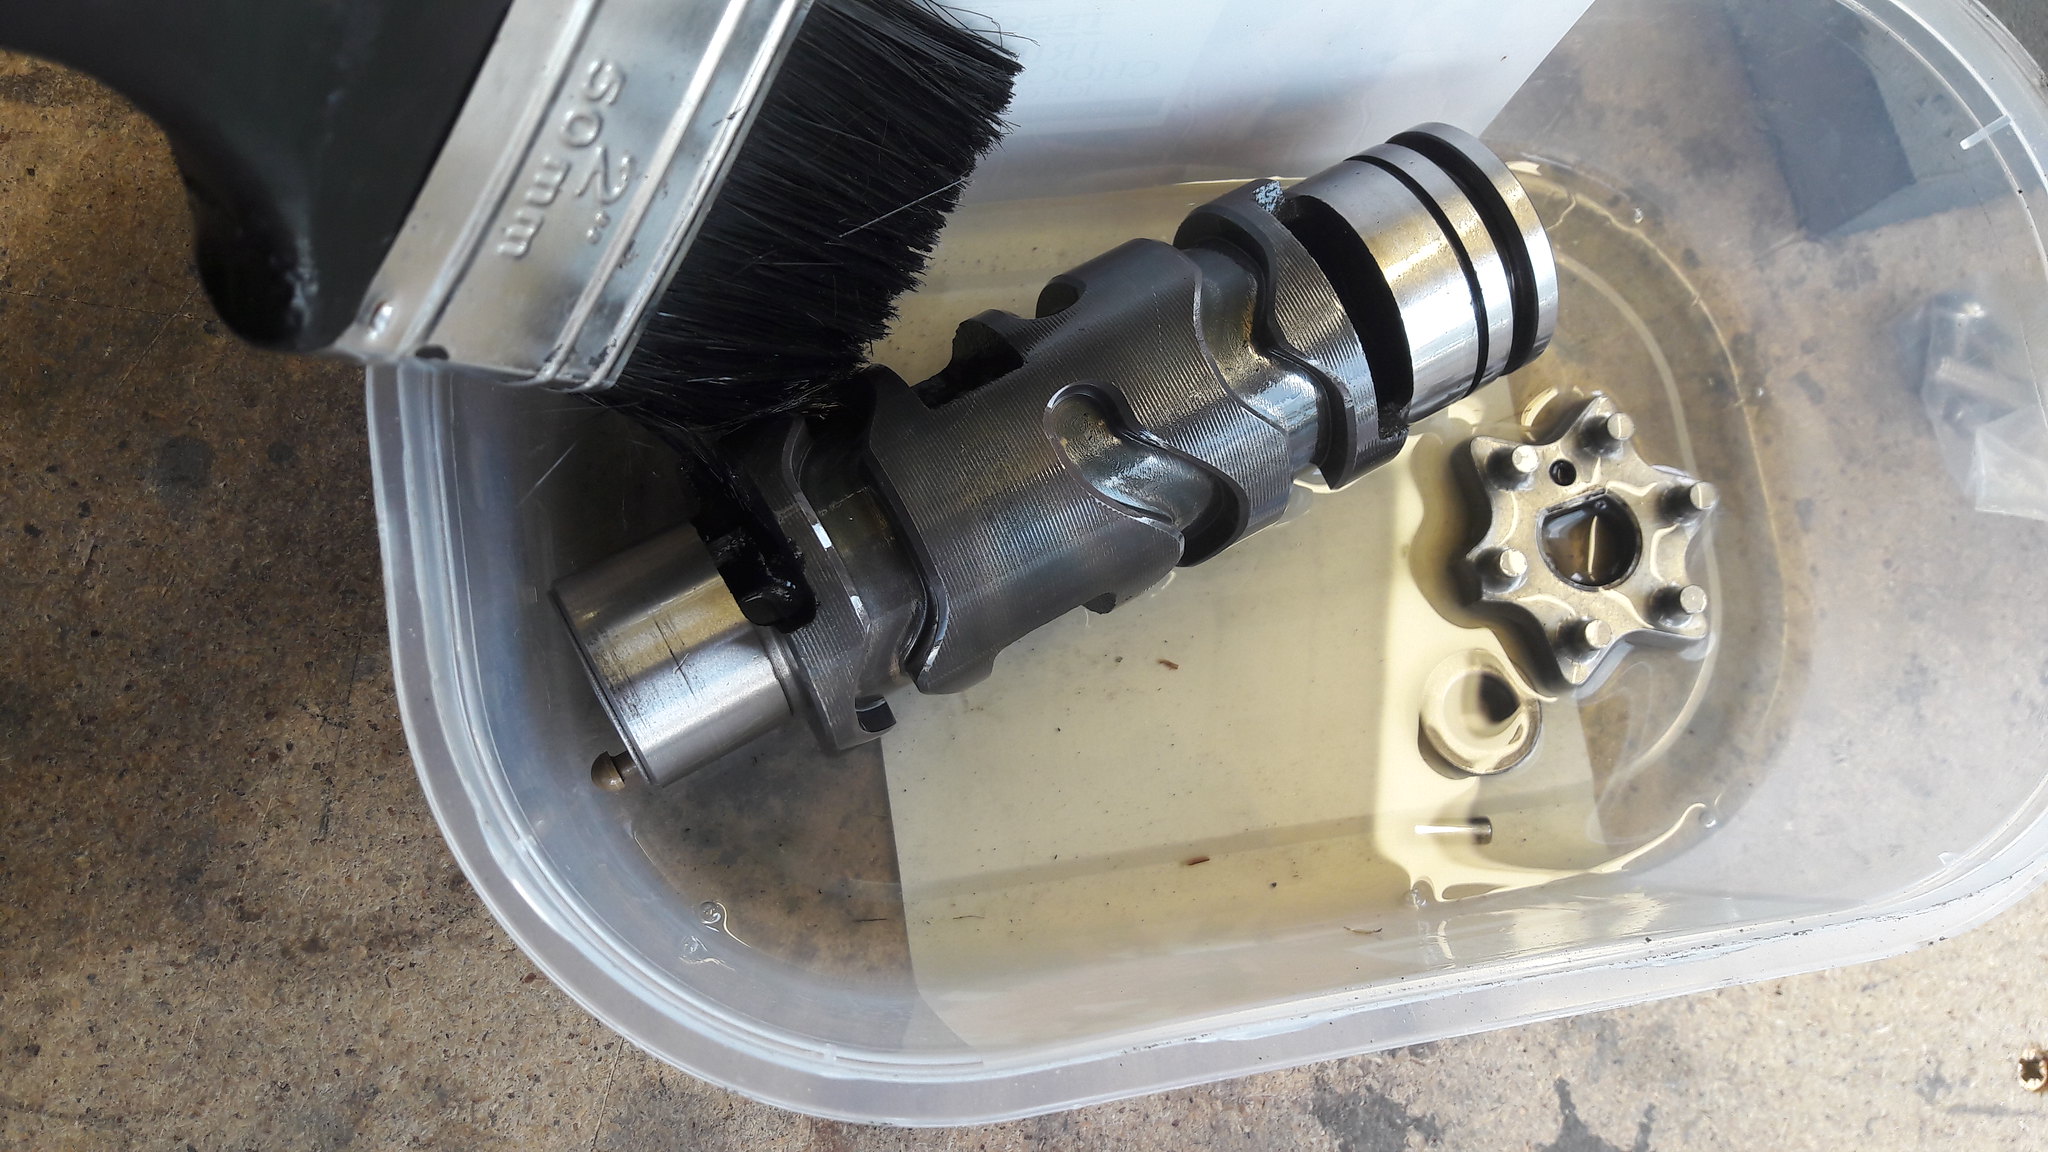 20181018_121010 20181018_121010 by David Miller, on Flickr The things I look for now is wear to the surface the bearing acts upon, and the star itself. These marks on the star are always present, but I run over them with a dremmel to clean them up; 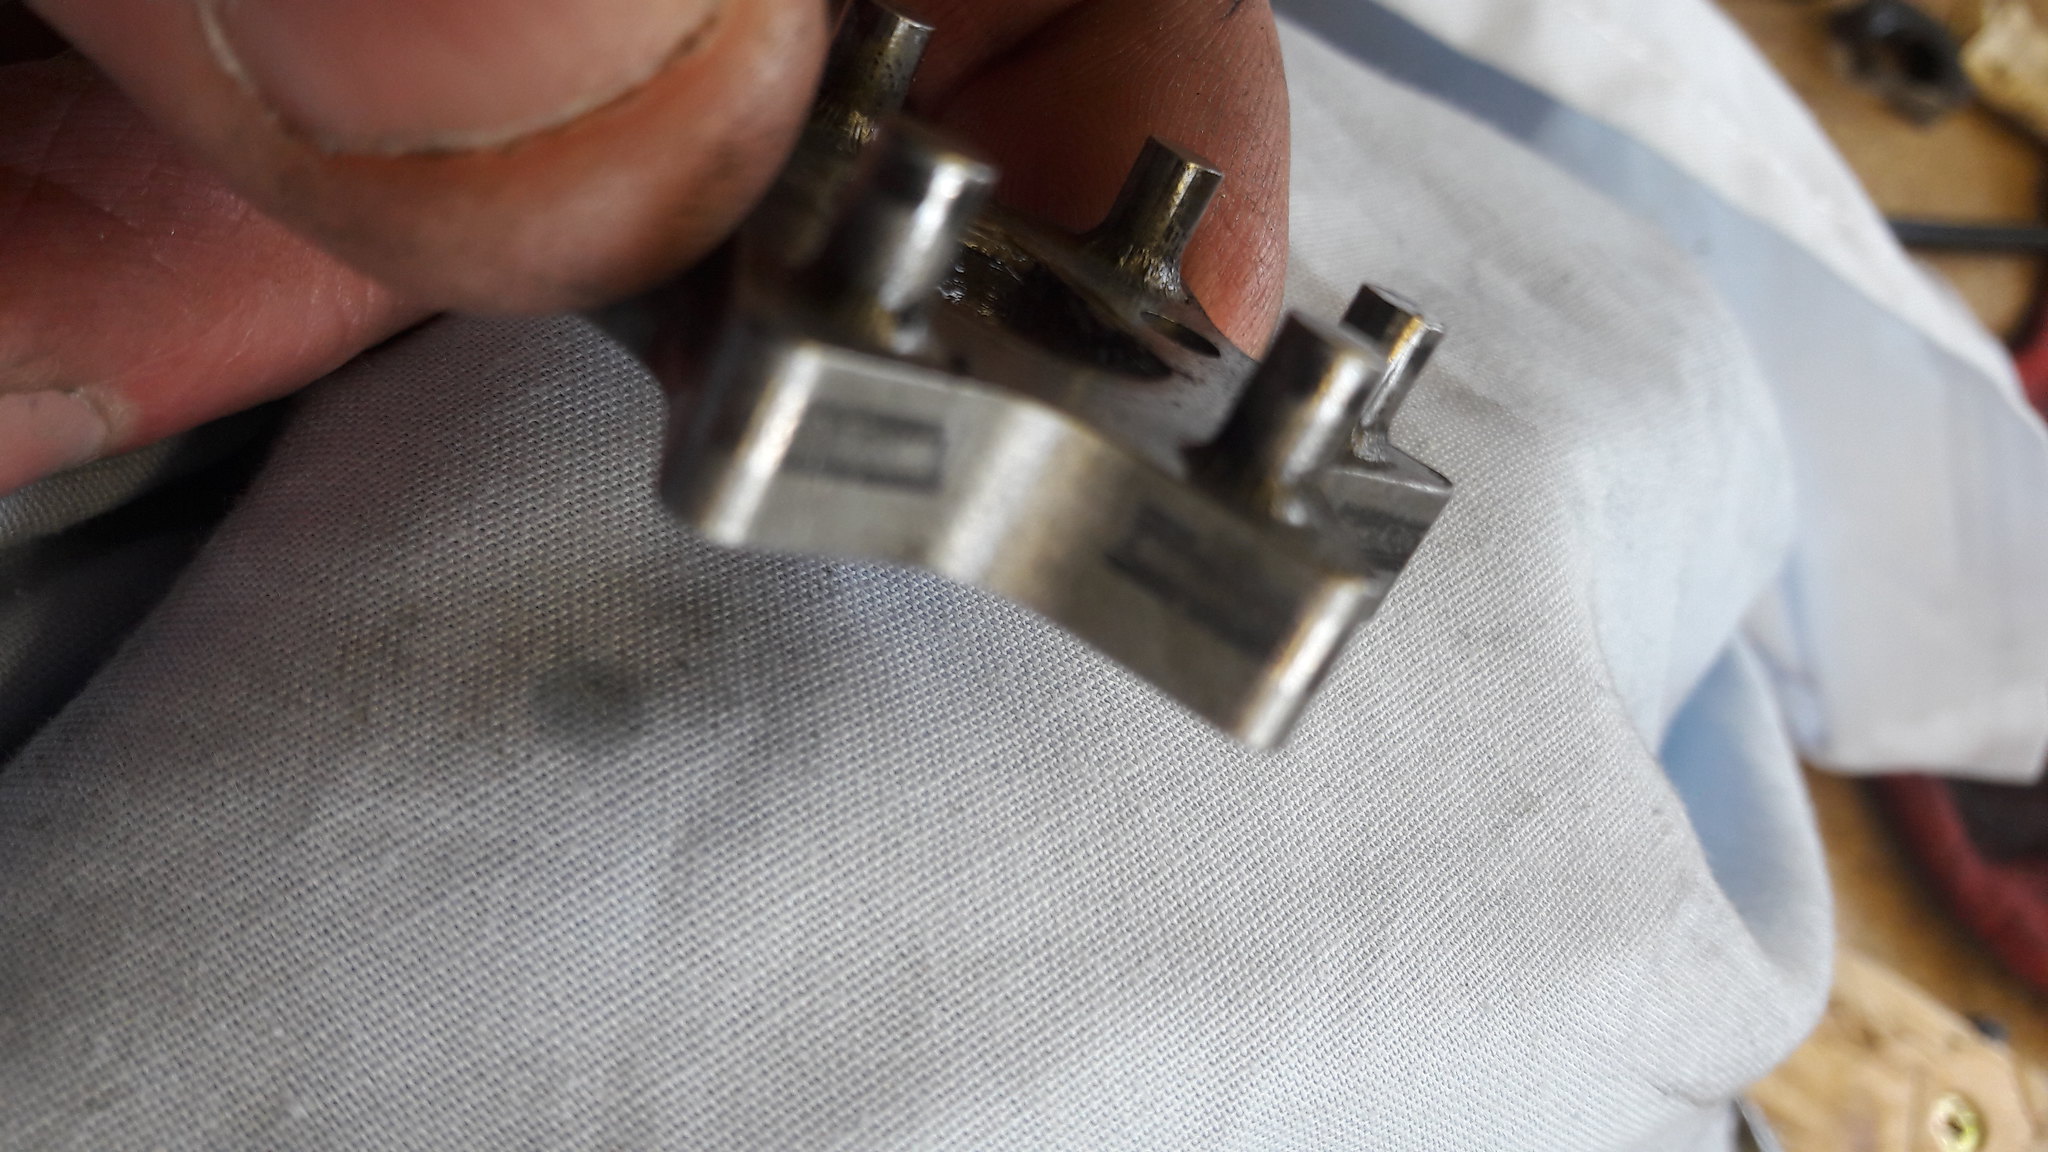 20181018_120318 20181018_120318 by David Miller, on Flickr 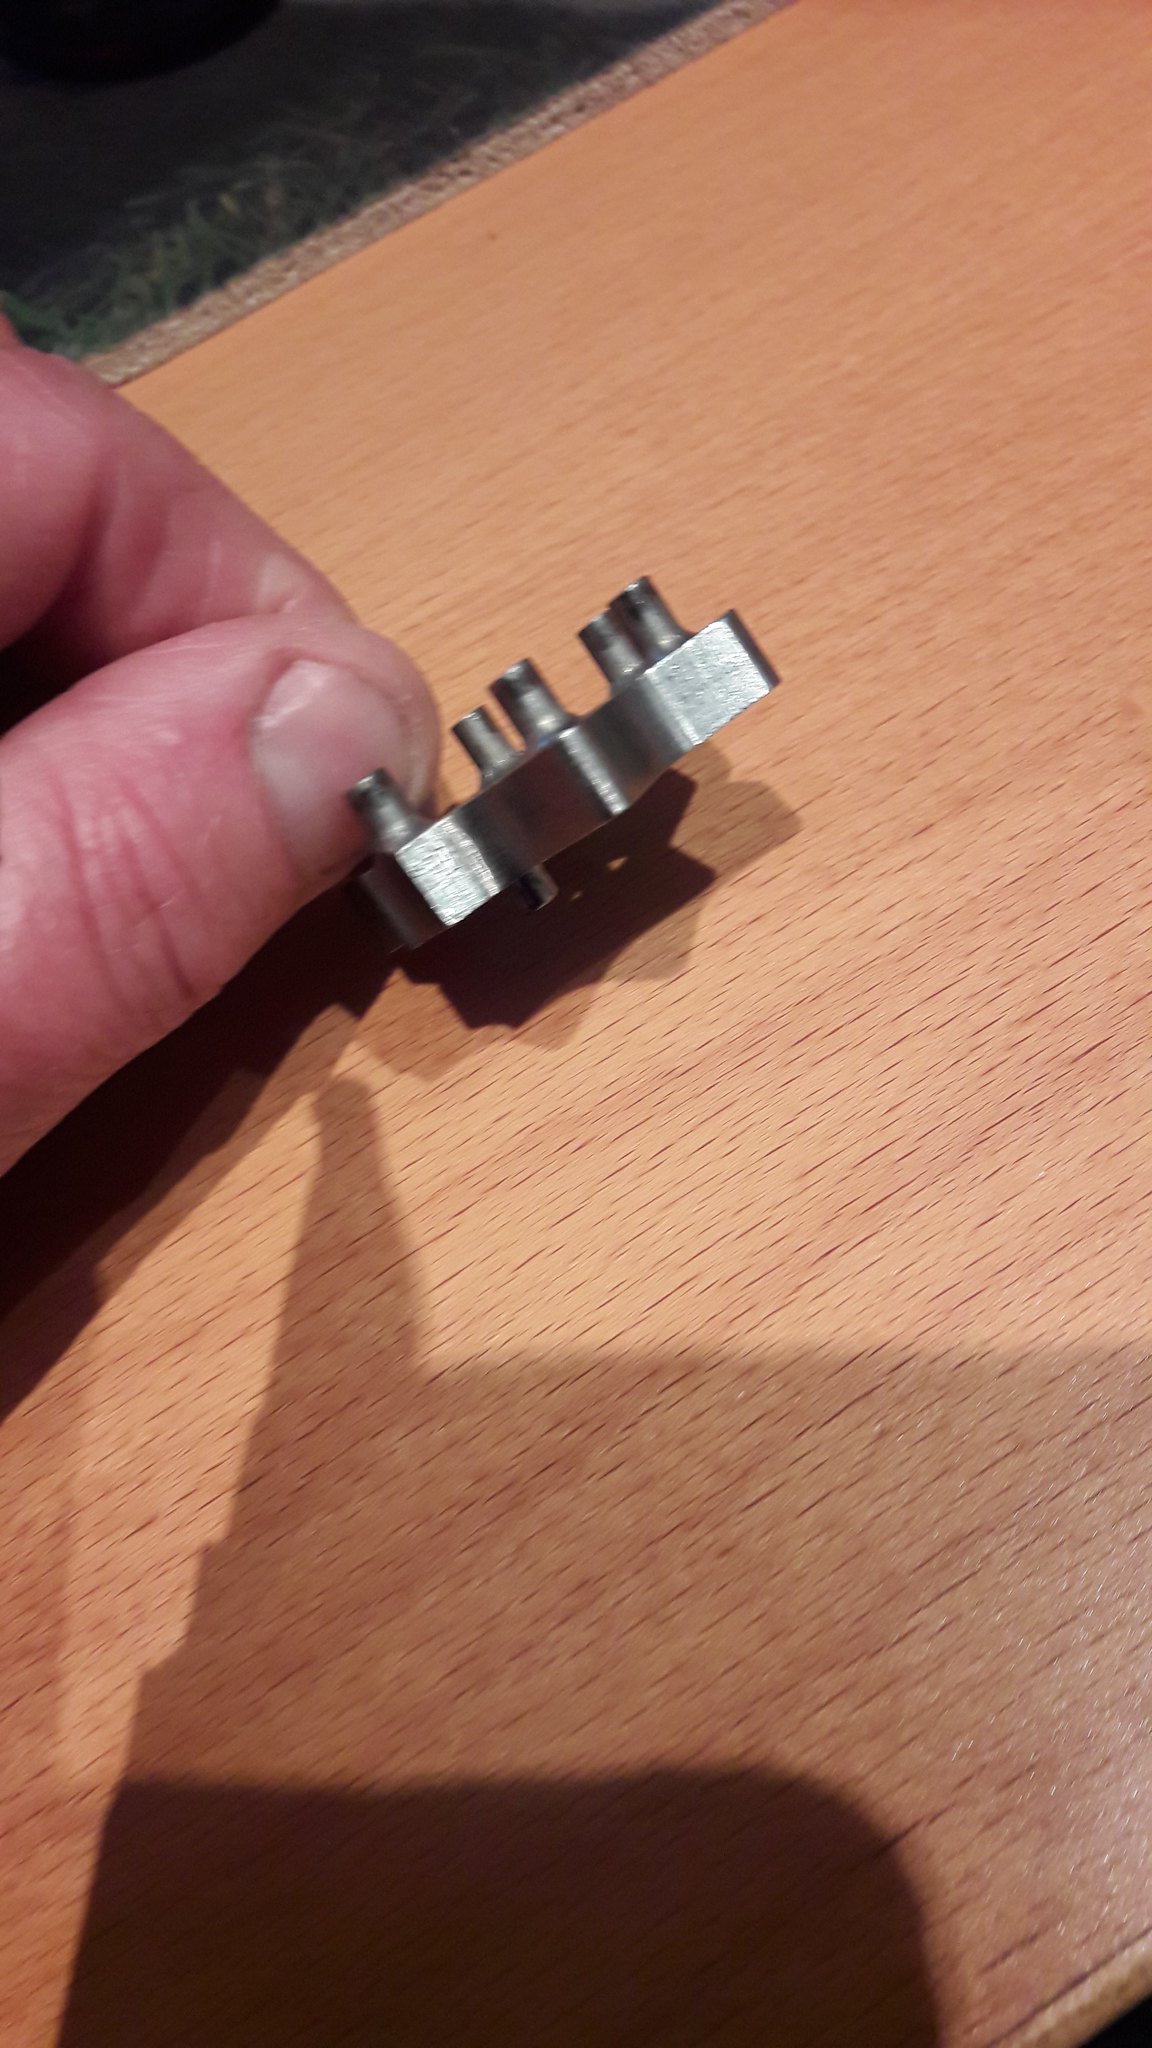 20181020_111418 20181020_111418 by David Miller, on Flickr The shift star is often cited as one of the reasons for poor neutral selection on a running engine. Guys do modify them by reducing the height of the "peaks" on the star. You can also buy a pre modded star that you just bolt on. Buoyed with the success of the impact driver, I thought I would be nosey and have a look under the plate at the other end of the drum. I have never removed it due to potentially having to drill the head off the screw, but my Lidl special had the screw out easily enough to reveal the workings of this end of the drum; 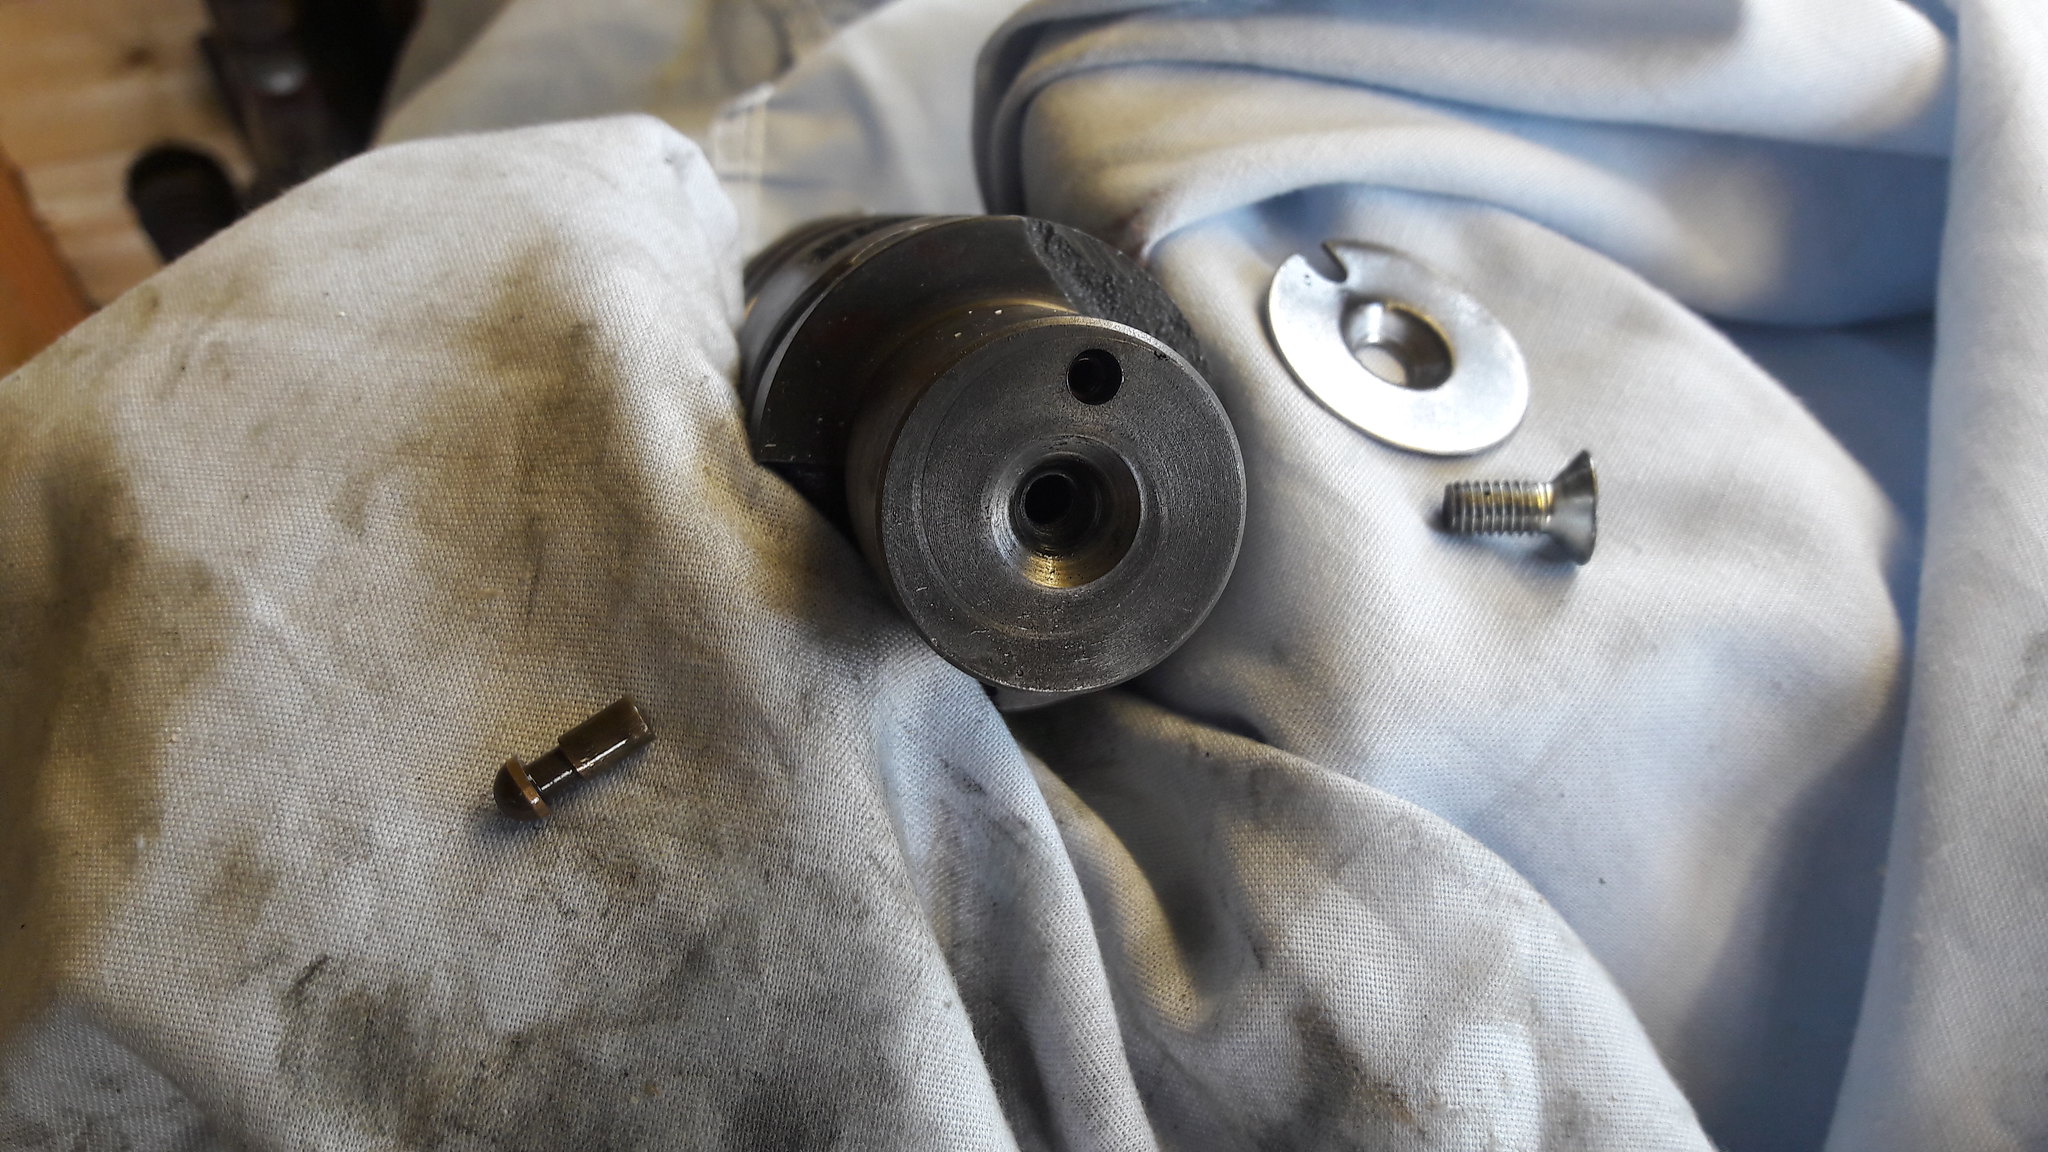 20181018_115928 20181018_115928 by David Miller, on Flickr No rocket science here then !! The blind hole contains a spring that presses against the brass pin, and the plate holds the pin in place. Just thought I would add that in case it kept you awake at night, wondering !!  Next will be reassembly with new parts. Dusty  |
|
|
|
Post by mikee on Oct 20, 2018 12:02:36 GMT 1
Enjoying this thread
Keep up the good work
Mike
|
|
|
|
Post by dusty350 on Oct 20, 2018 19:59:59 GMT 1
Cheers Mike  The new bearing and circlip for the selector drum; 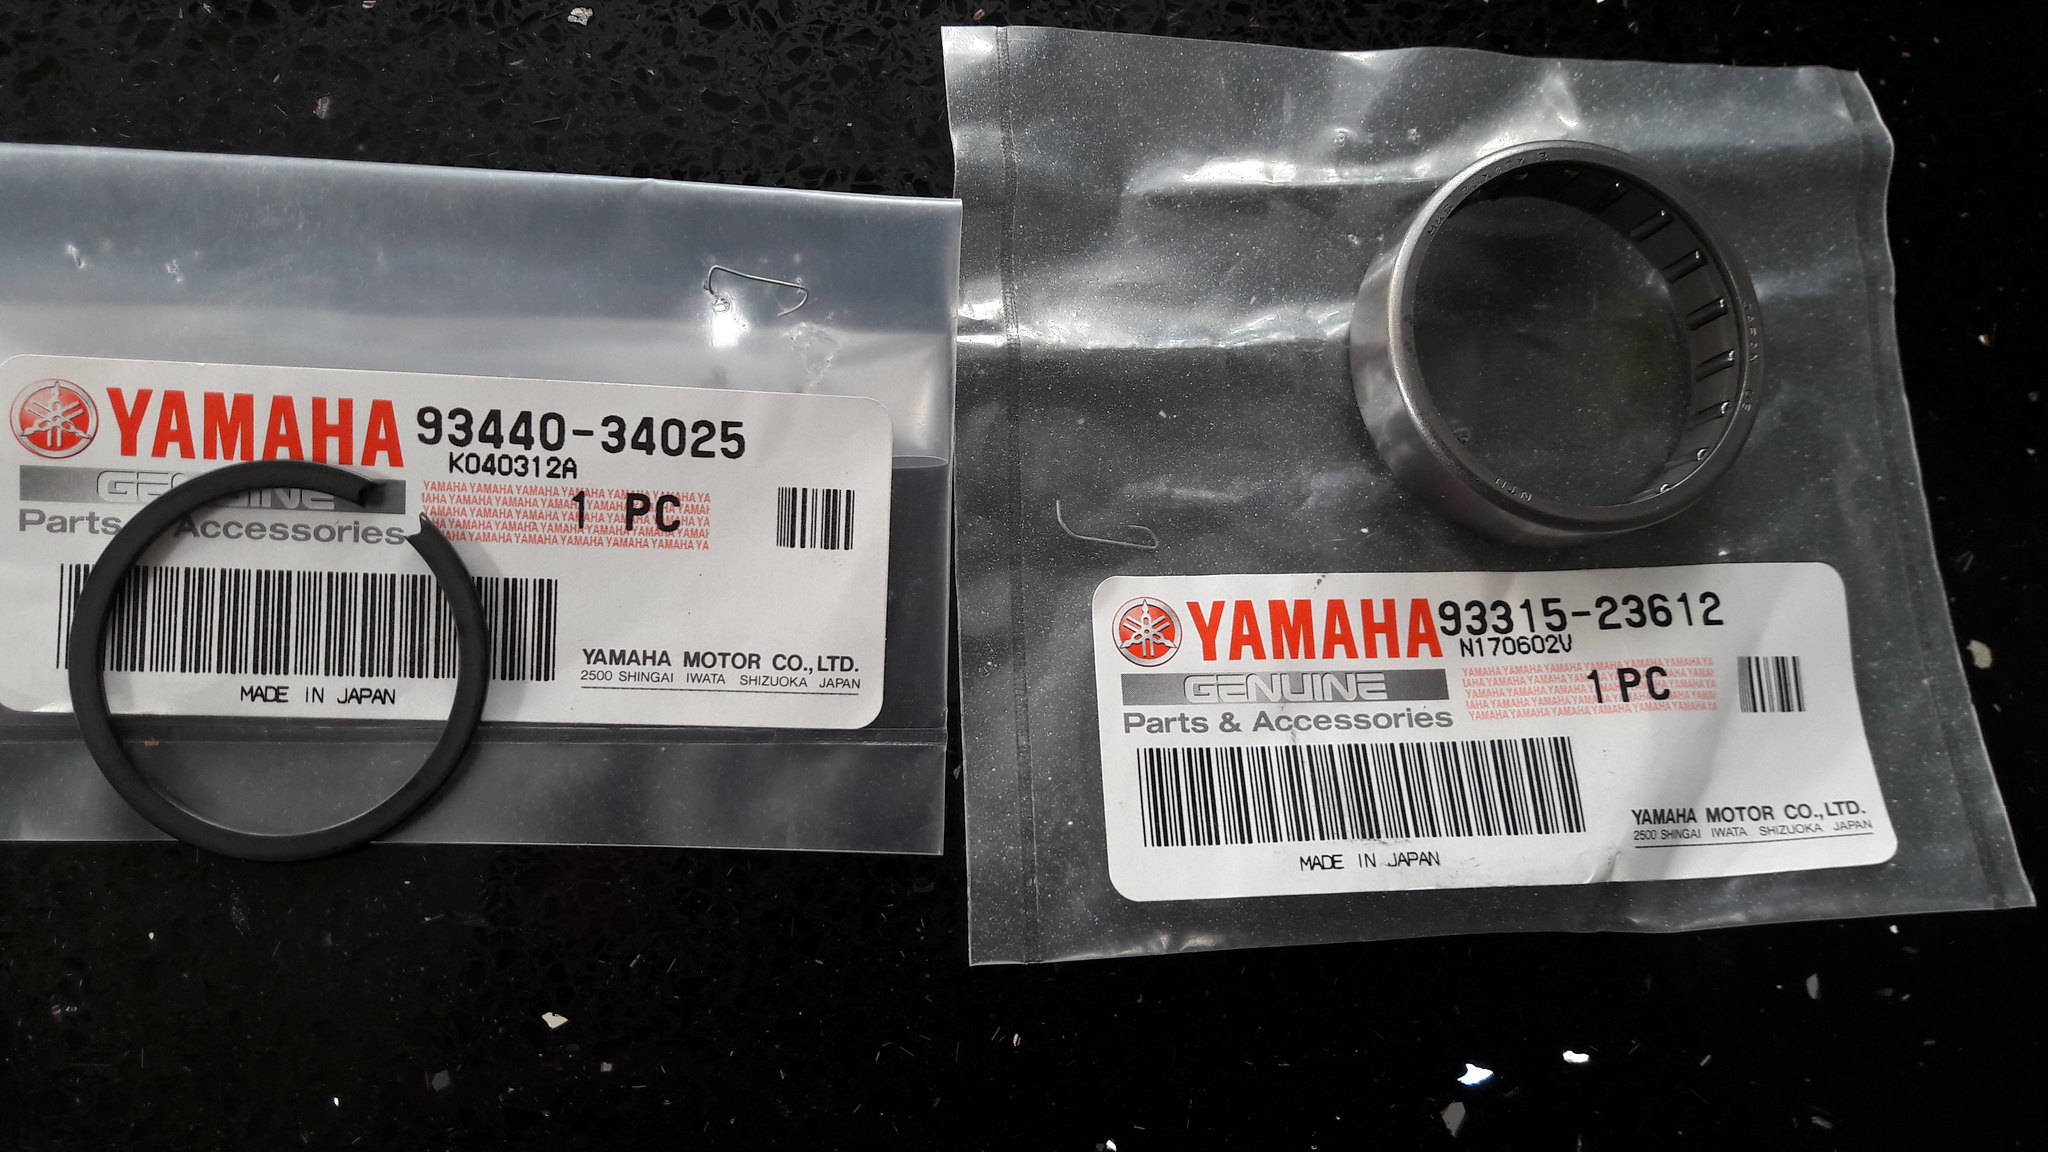 20181020_154104 20181020_154104 by David Miller, on Flickr The bearing is £12.80, and the circlip £3.38, from Fowlers. I lightly grease the bearing, then fit that and the circlip, and then the star can go back on. The cup washer helps trap the pin in the star head so it cant come out. I use some low strength Loctite on the new screw, and it's job done, and it can now be refitted to the case. I lightly grease each end of the drum so it slides into the casing easily; 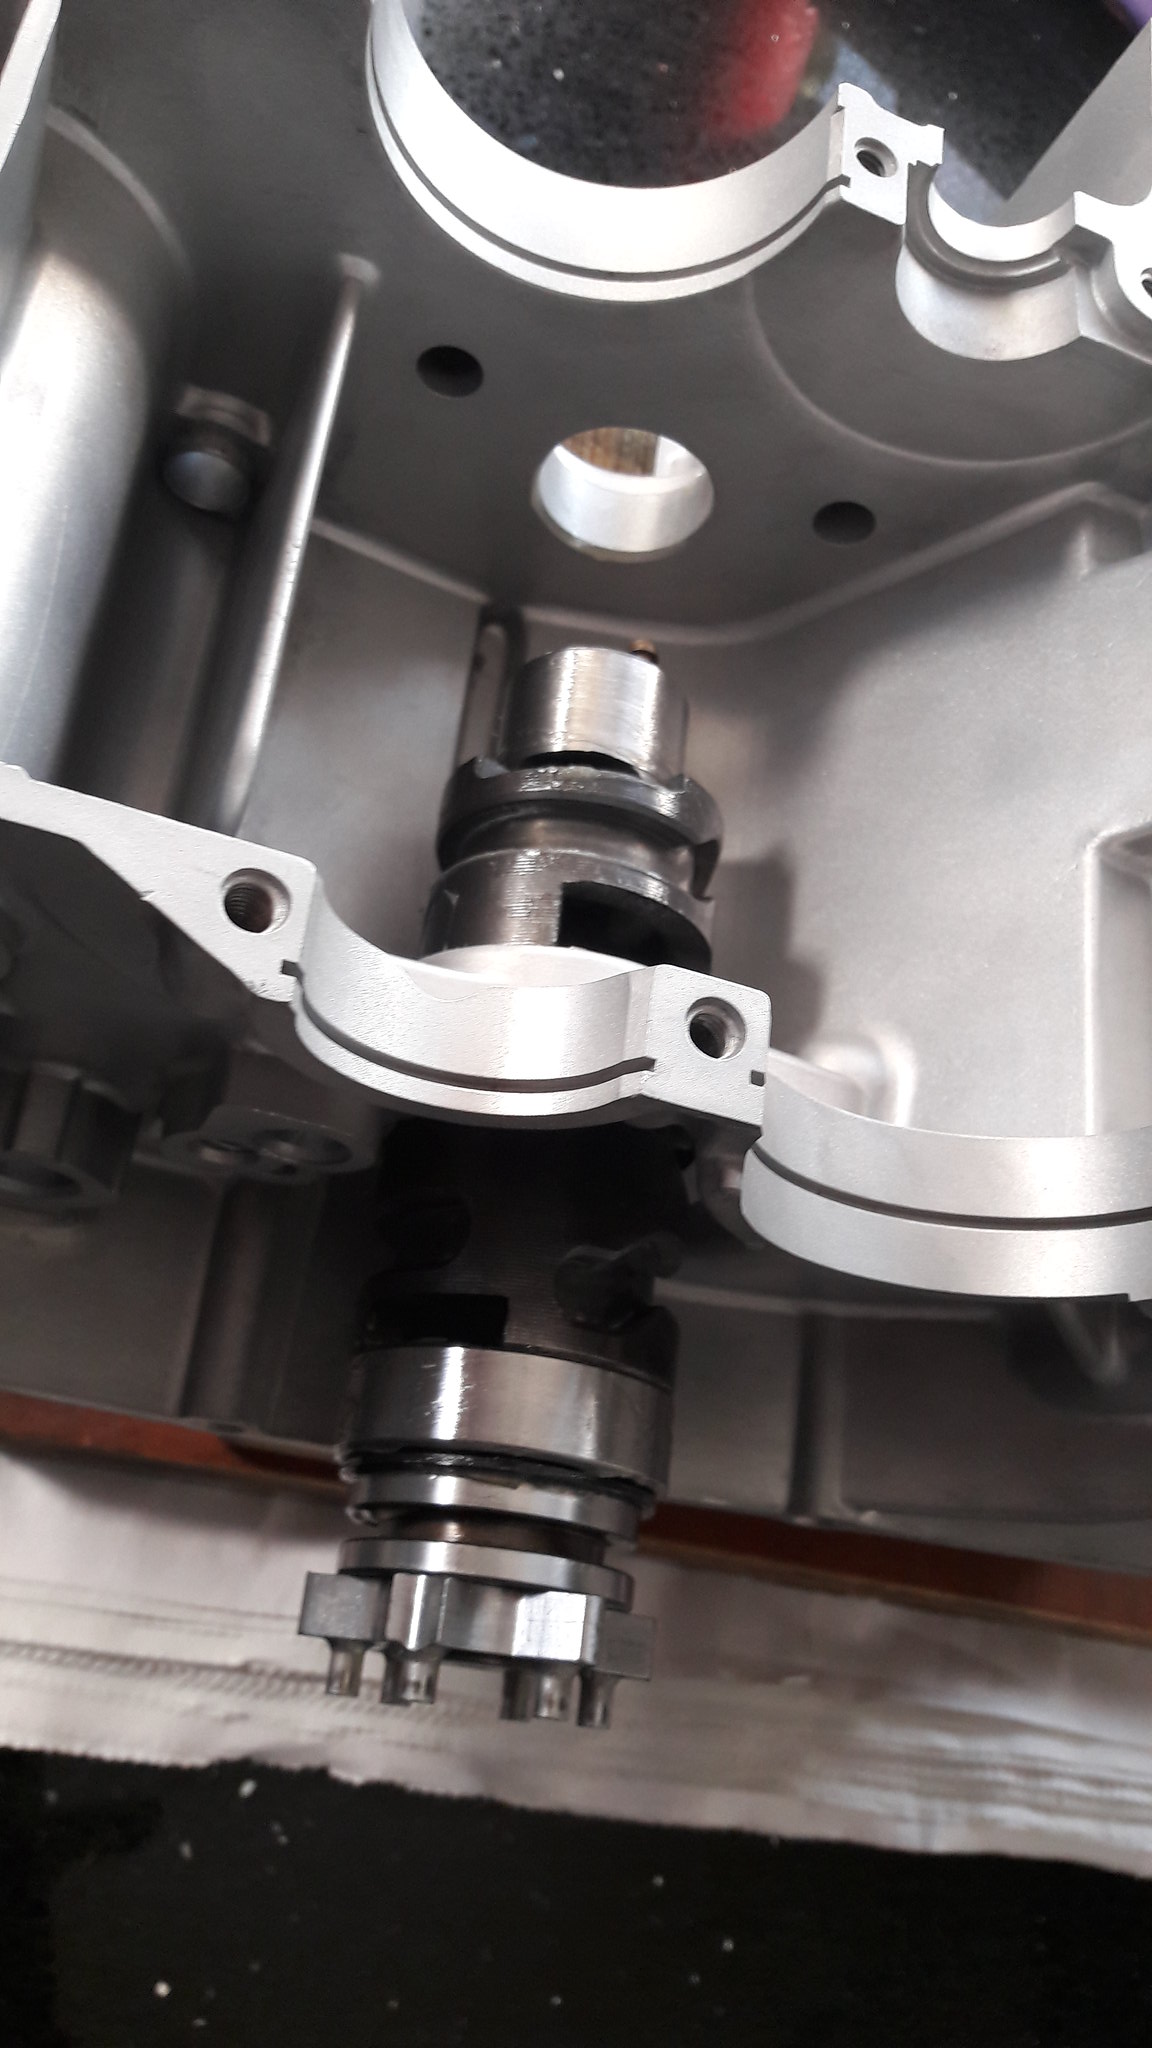 20181020_155926 20181020_155926 by David Miller, on Flickr 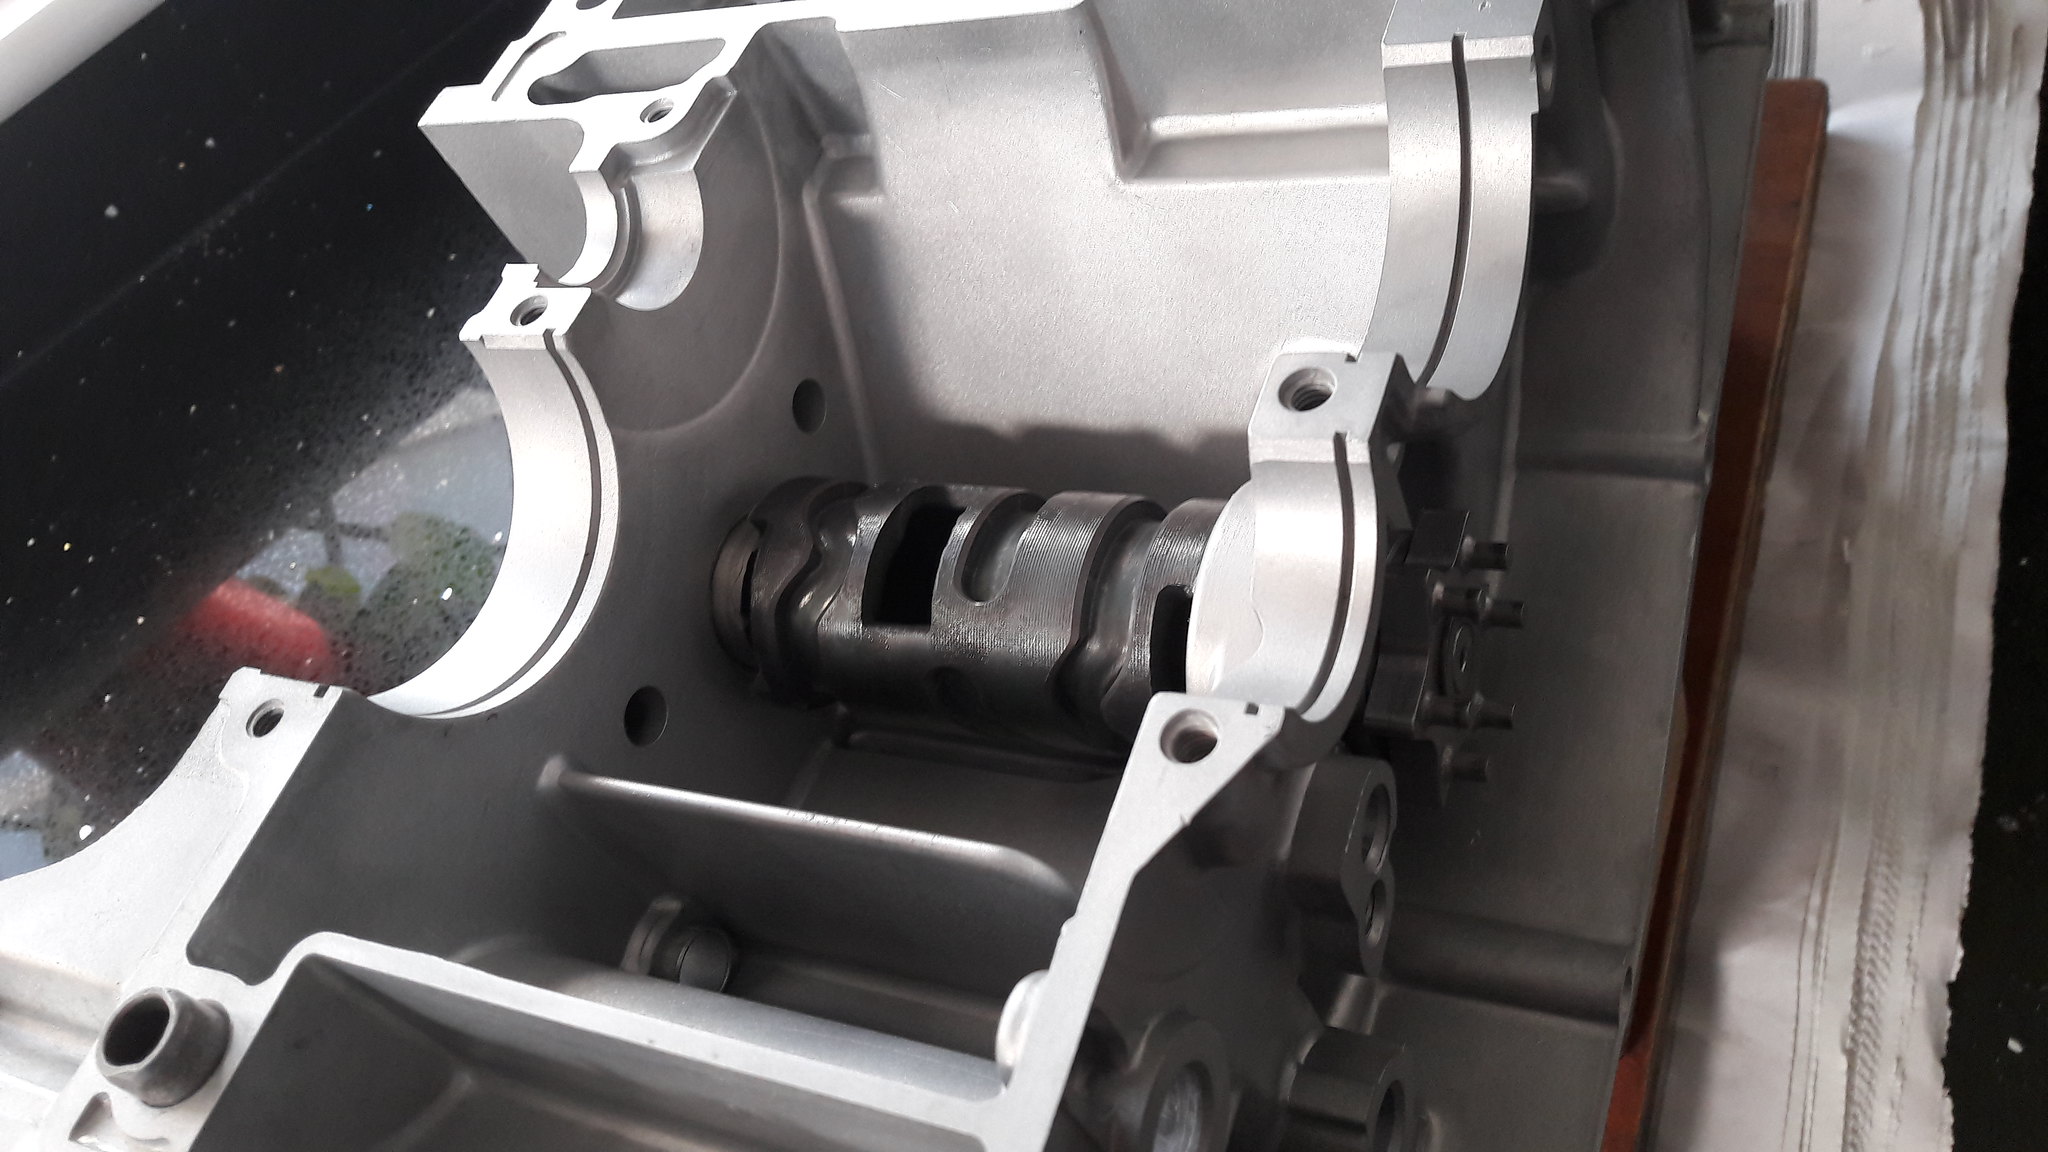 20181020_160013 20181020_160013 by David Miller, on Flickr You cant fit the retaining plate yet. You need to fit the forward selector fork shaft, as the drum retaining plate also retains the front shaft, so I fit both shafts and selector forks at this point; 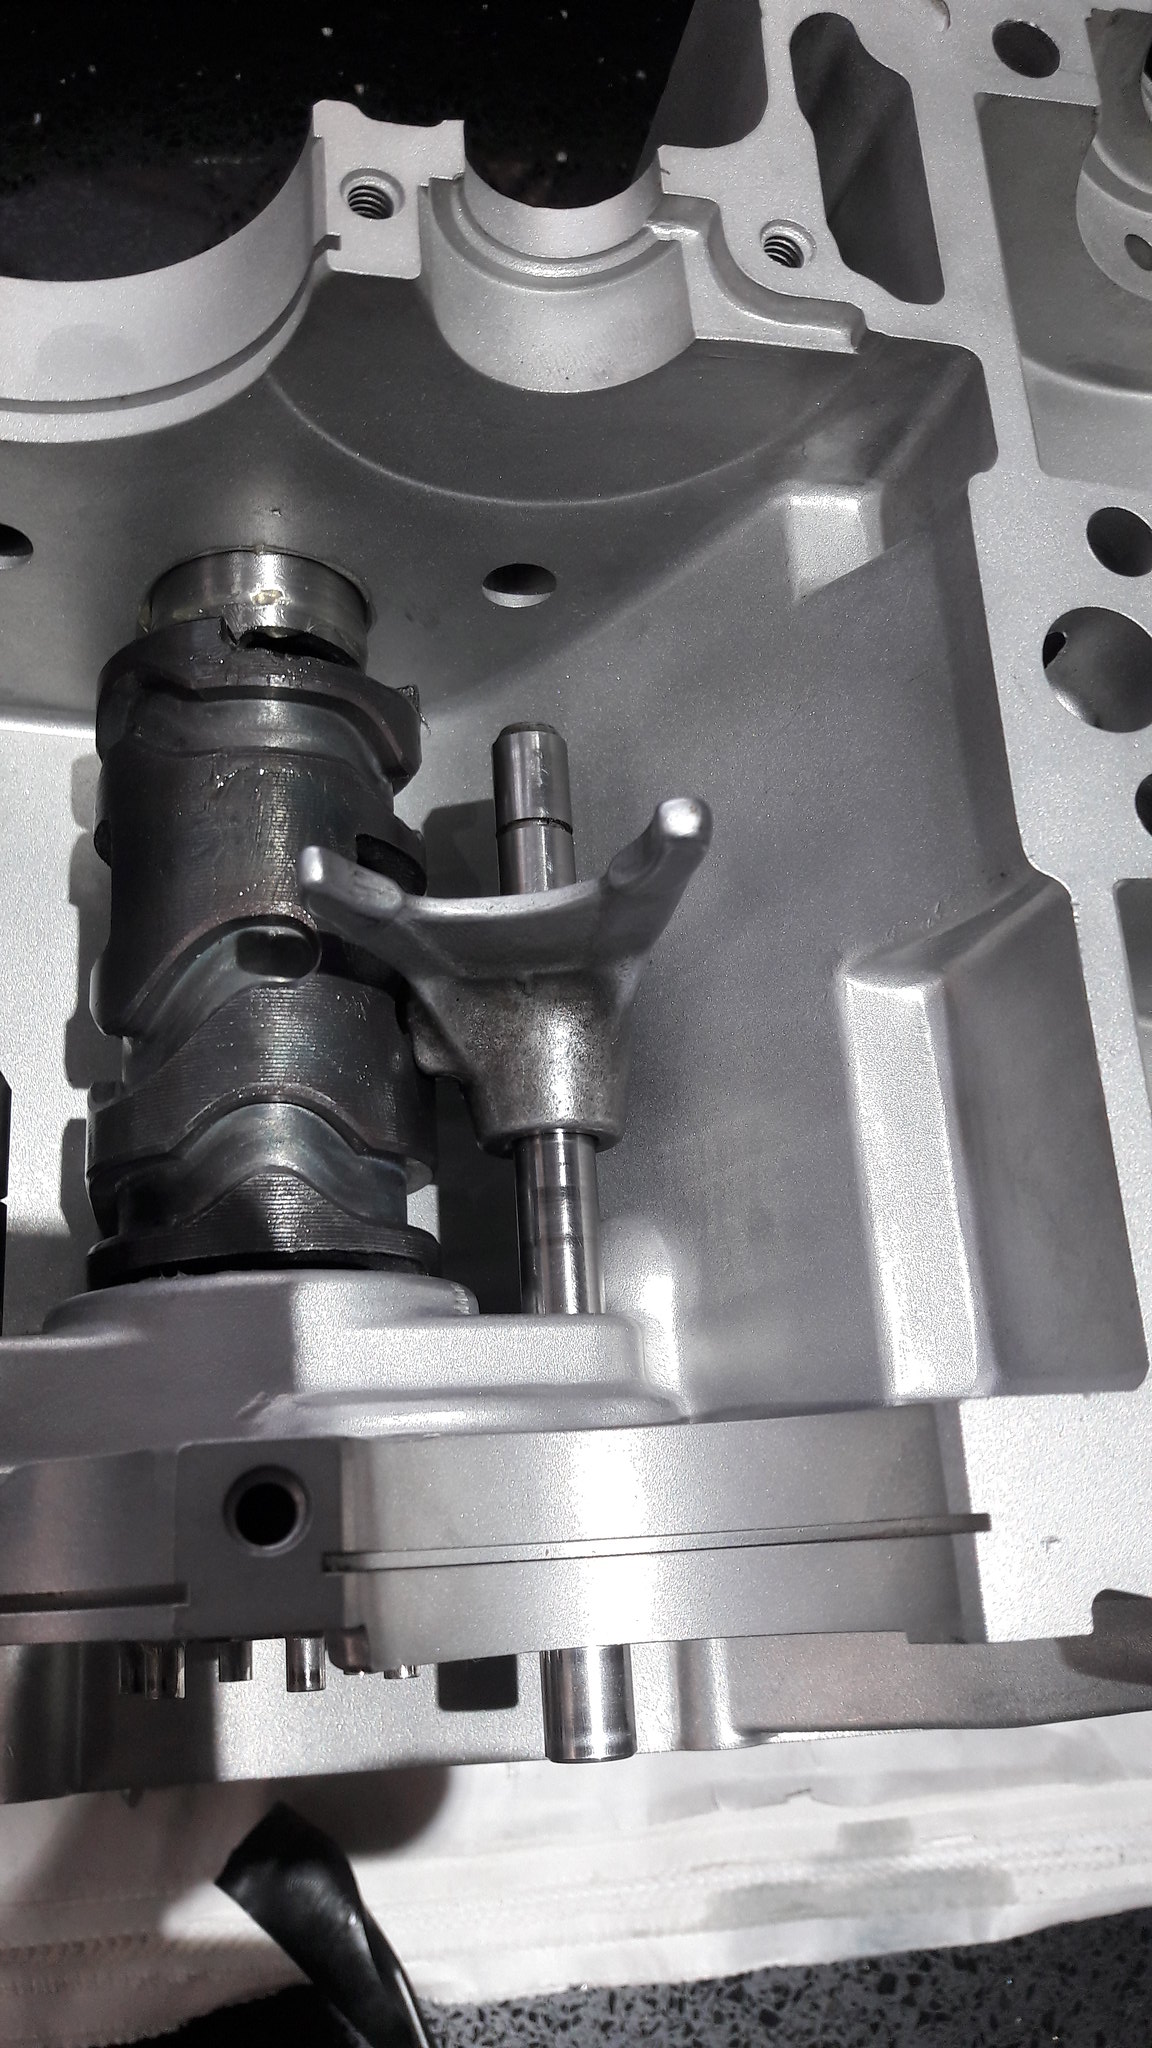 20181020_165732 20181020_165732 by David Miller, on Flickr You can see the ends of the shafts either side of the star; 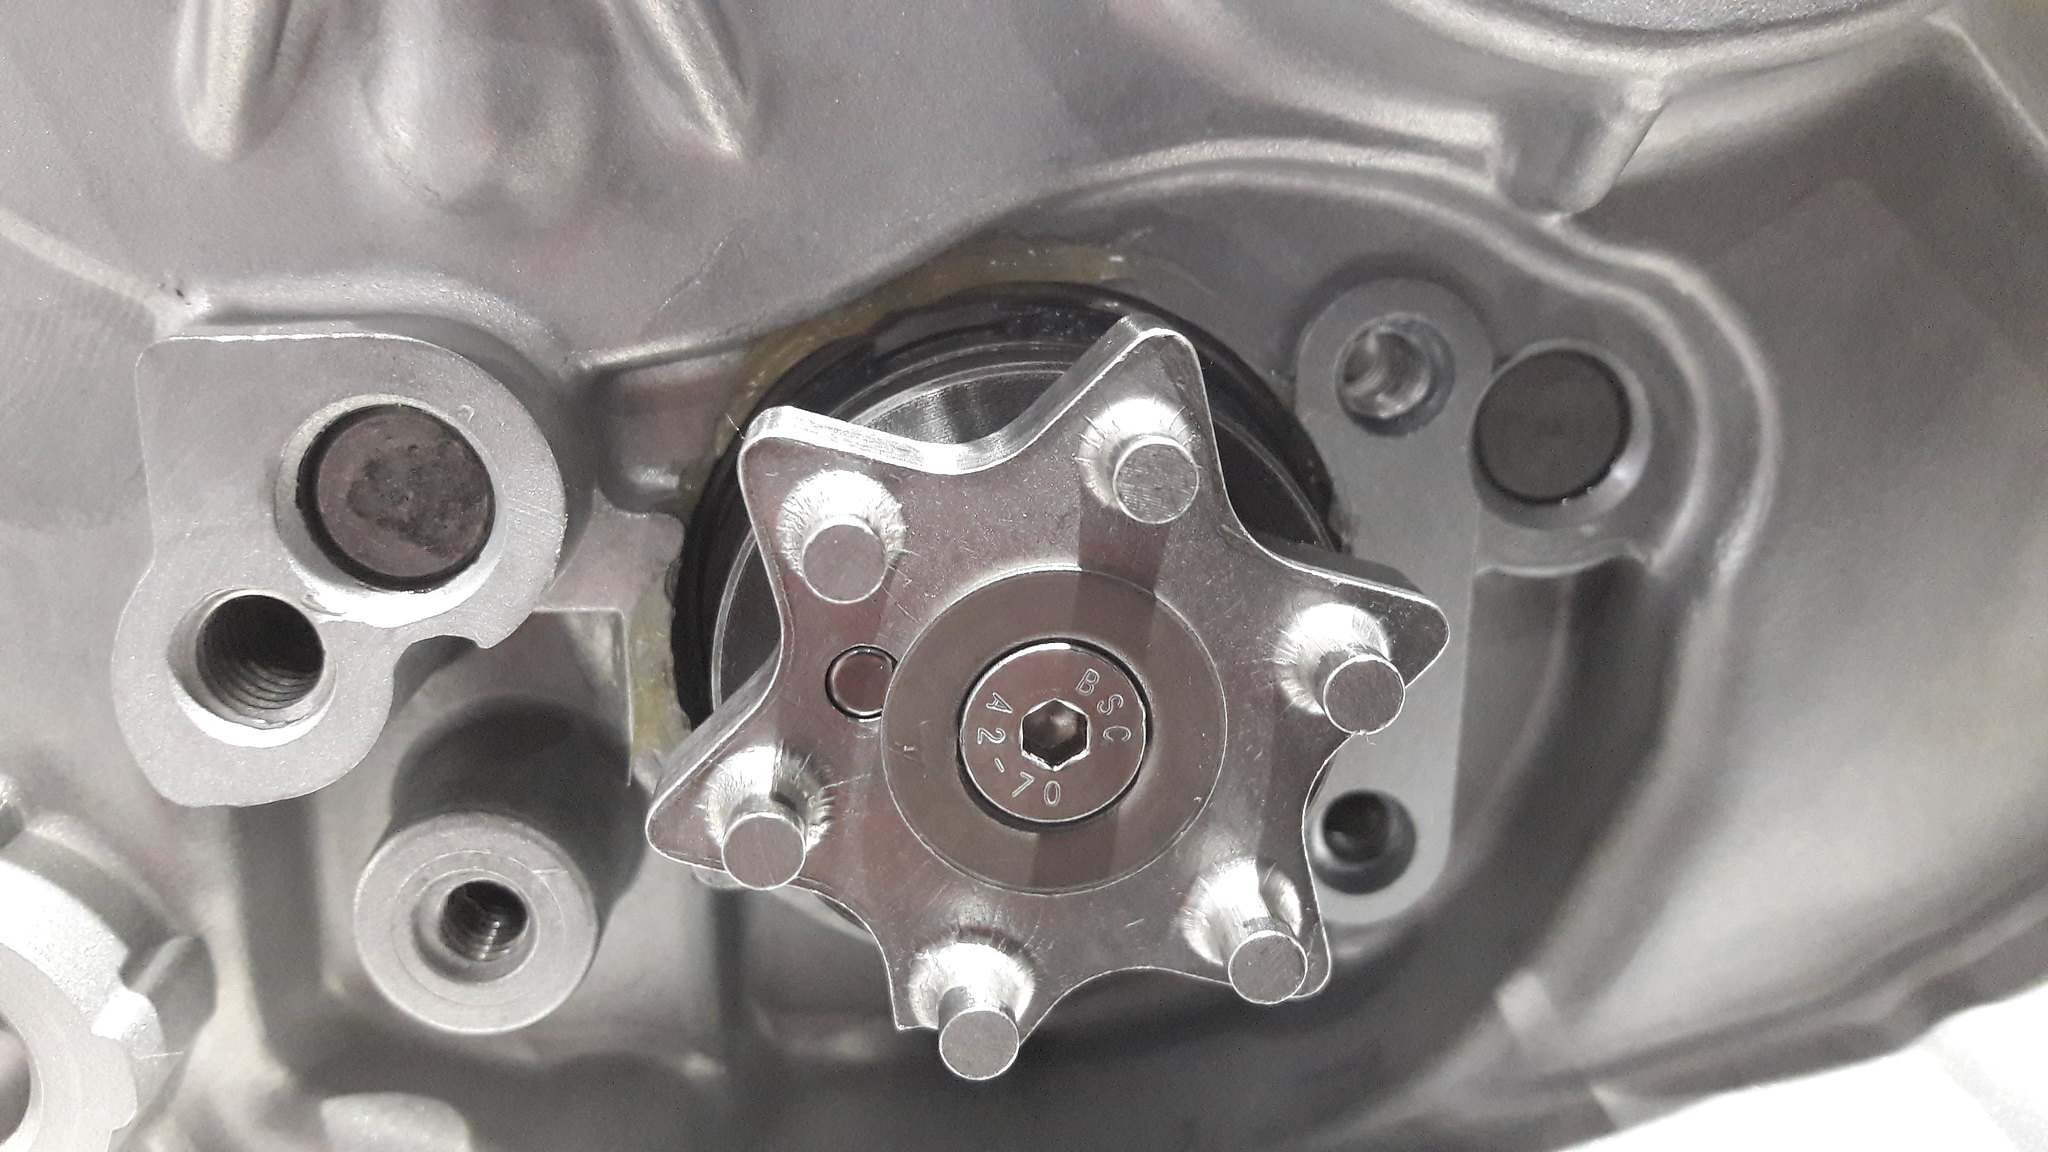 20181020_172742 20181020_172742 by David Miller, on Flickr And the view from above. Note that 2 of the 3 selector forks are the same - namely the top left and lower middle in the pic; 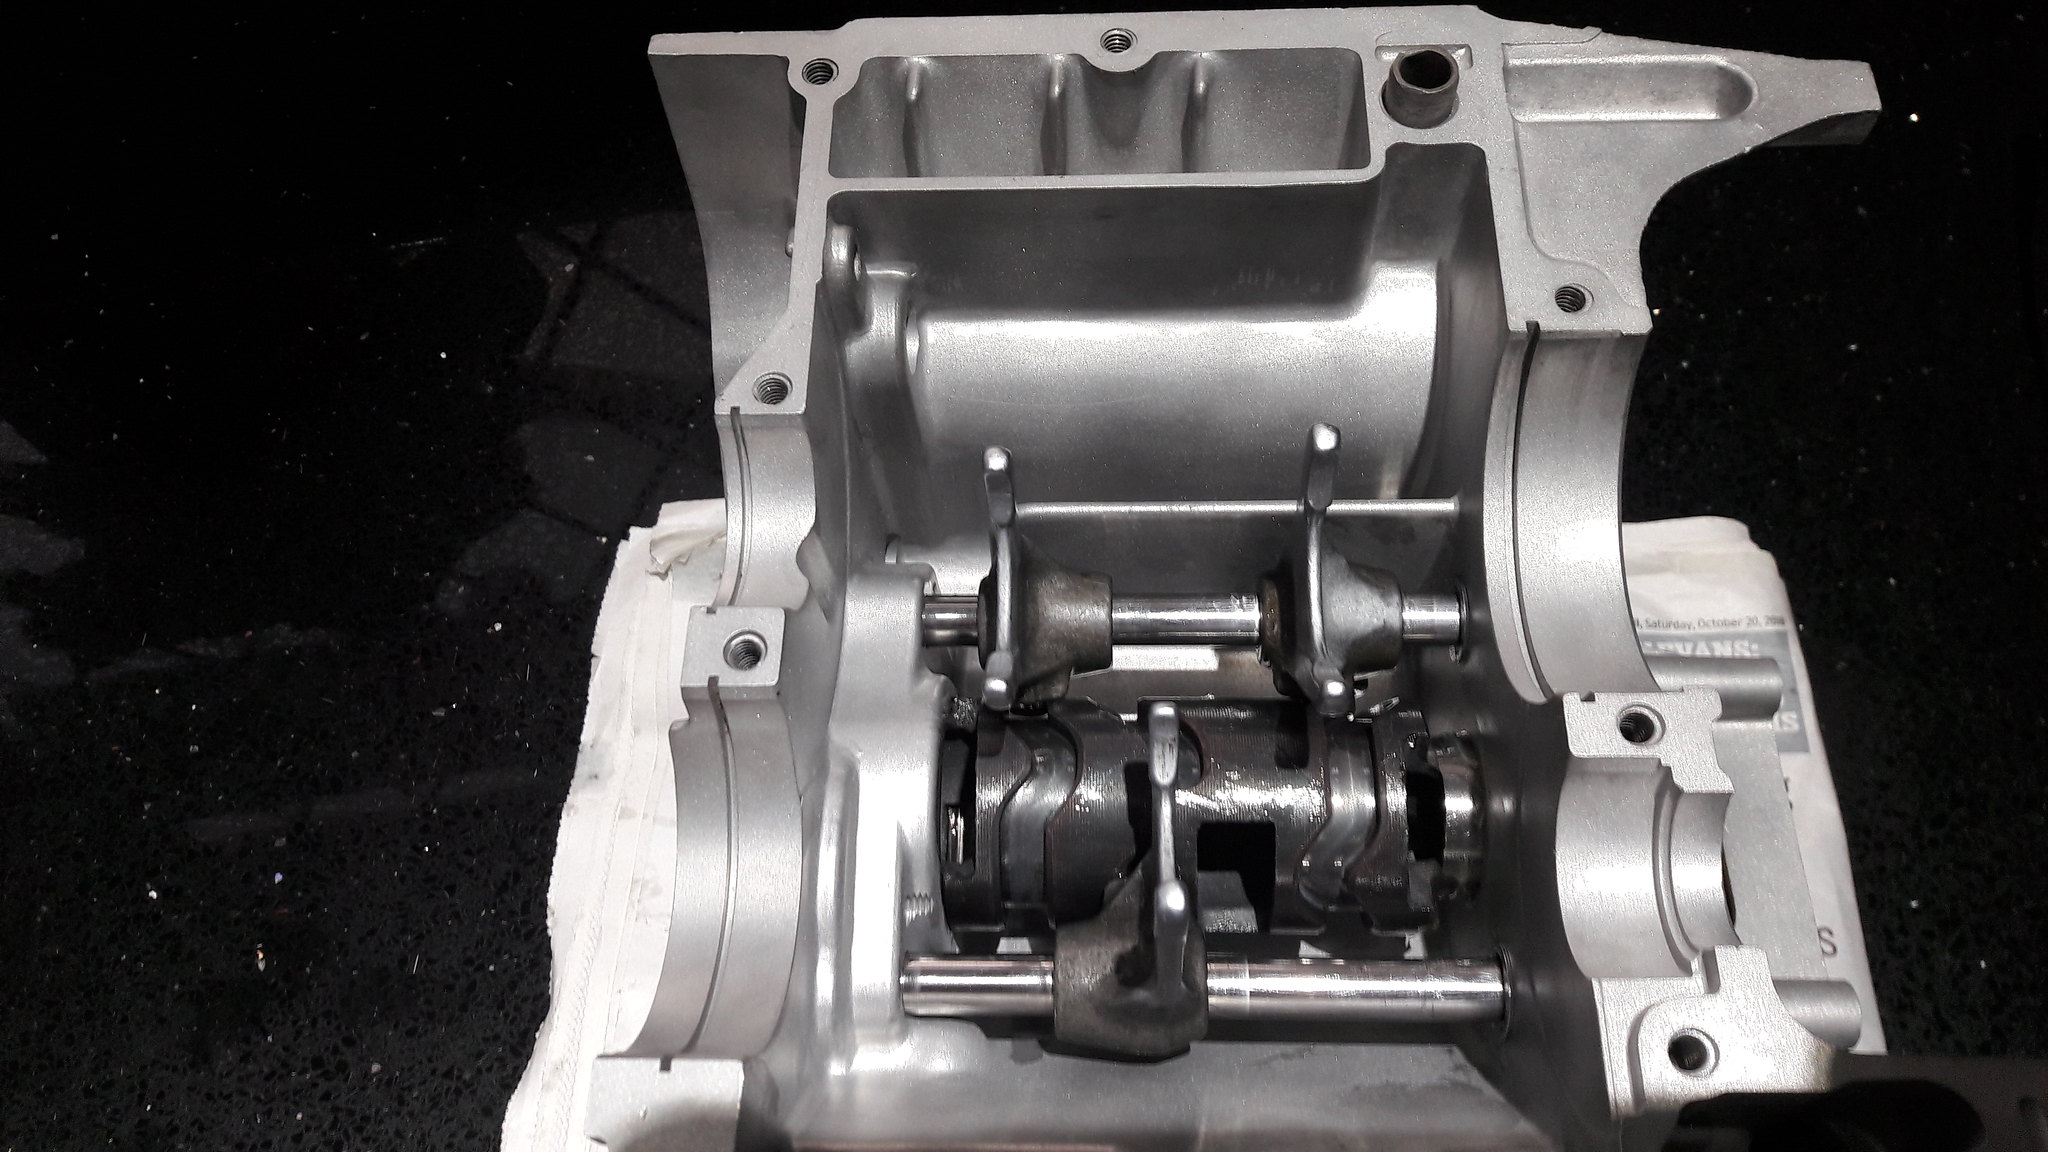 20181020_173849 20181020_173849 by David Miller, on Flickr They are both marked with the number "1", the other is marked with a "2", and is a slightly different shape. The rods are secured with a circlip; 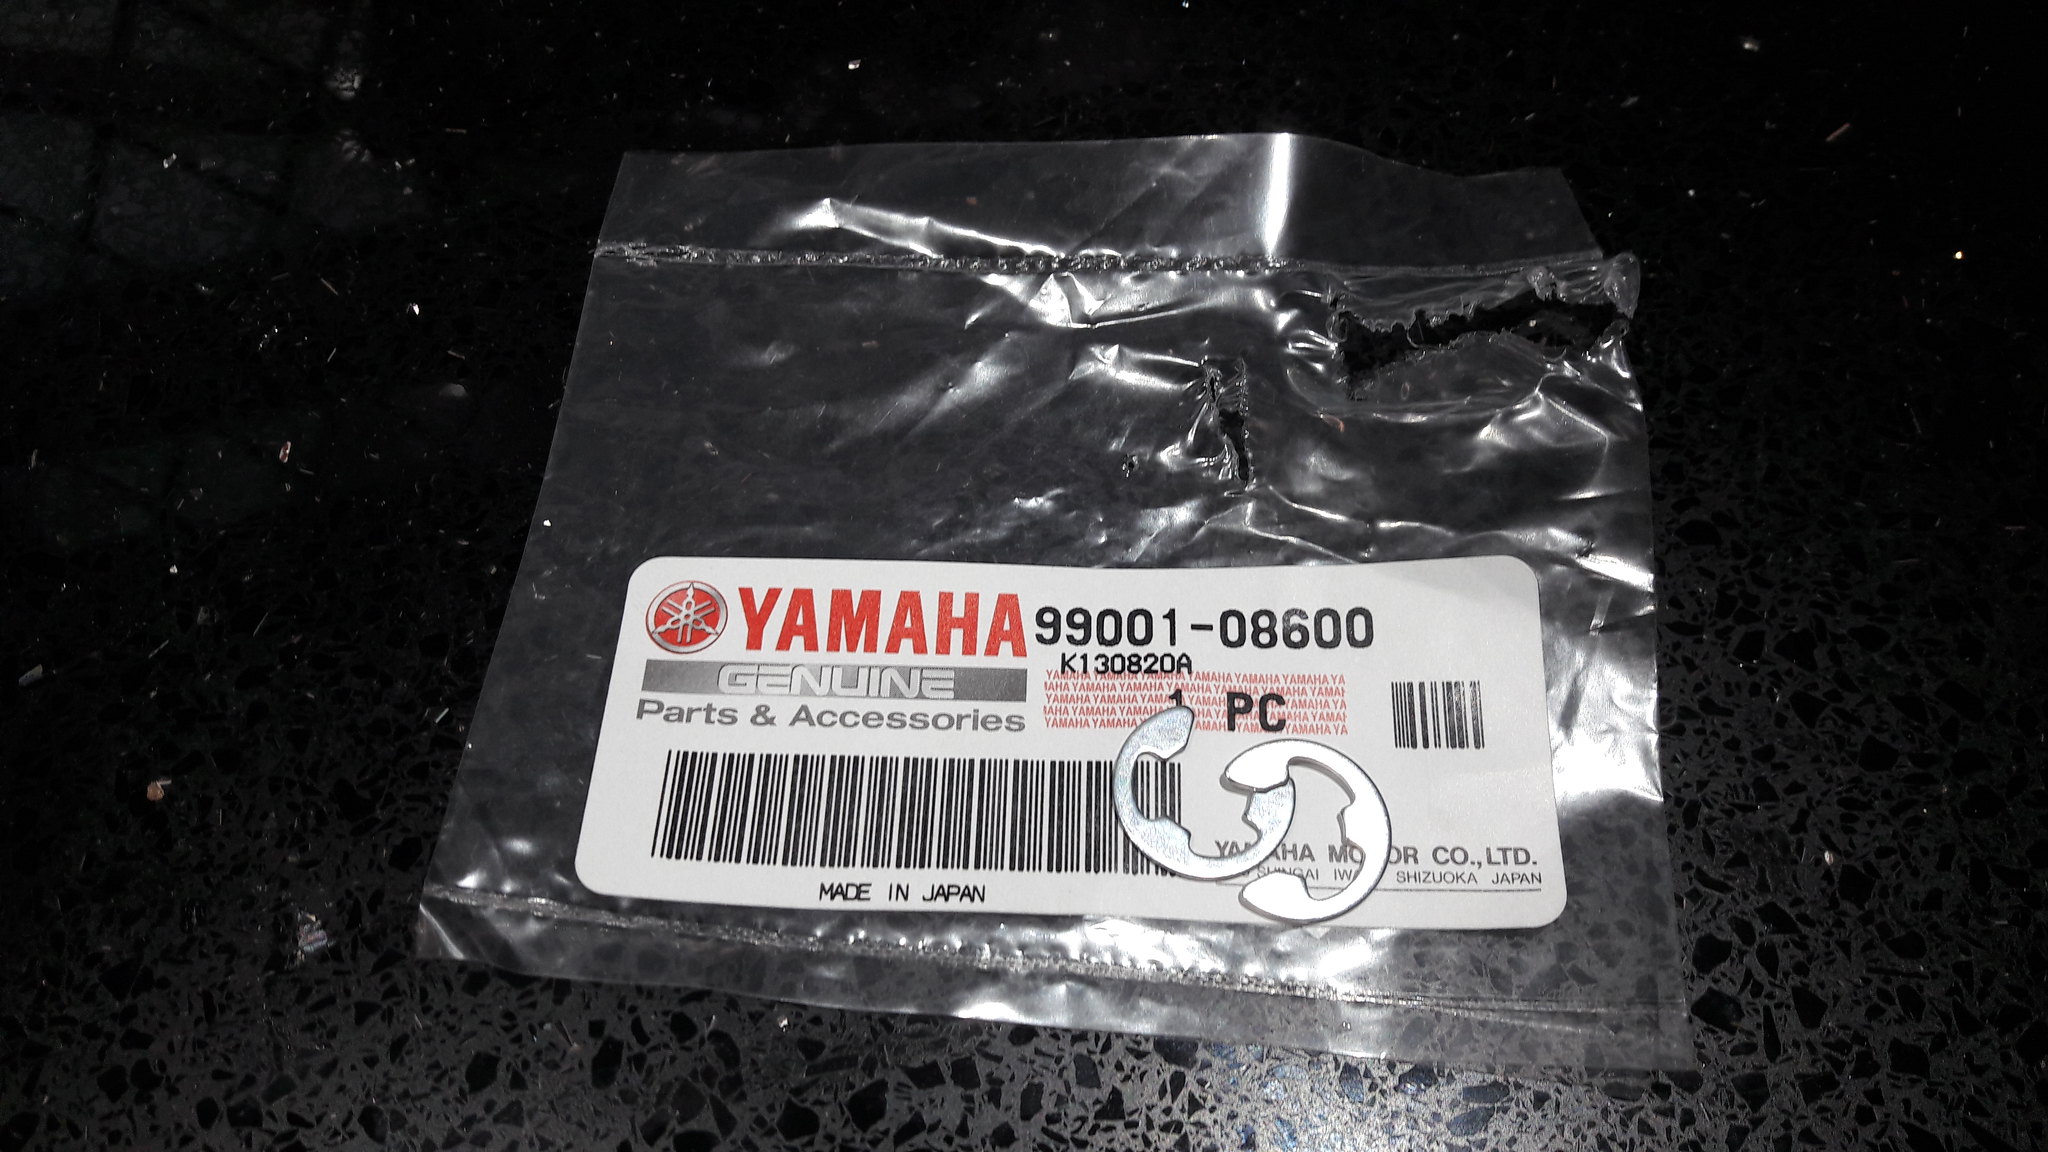 20181020_171724 20181020_171724 by David Miller, on Flickr These can be fiddly to fit. I dab some grease on the case above the rod and stick the circlip to it, right above the groove the circlip needs to locate to. Then either push or tap the circlip home with a suitable drift; 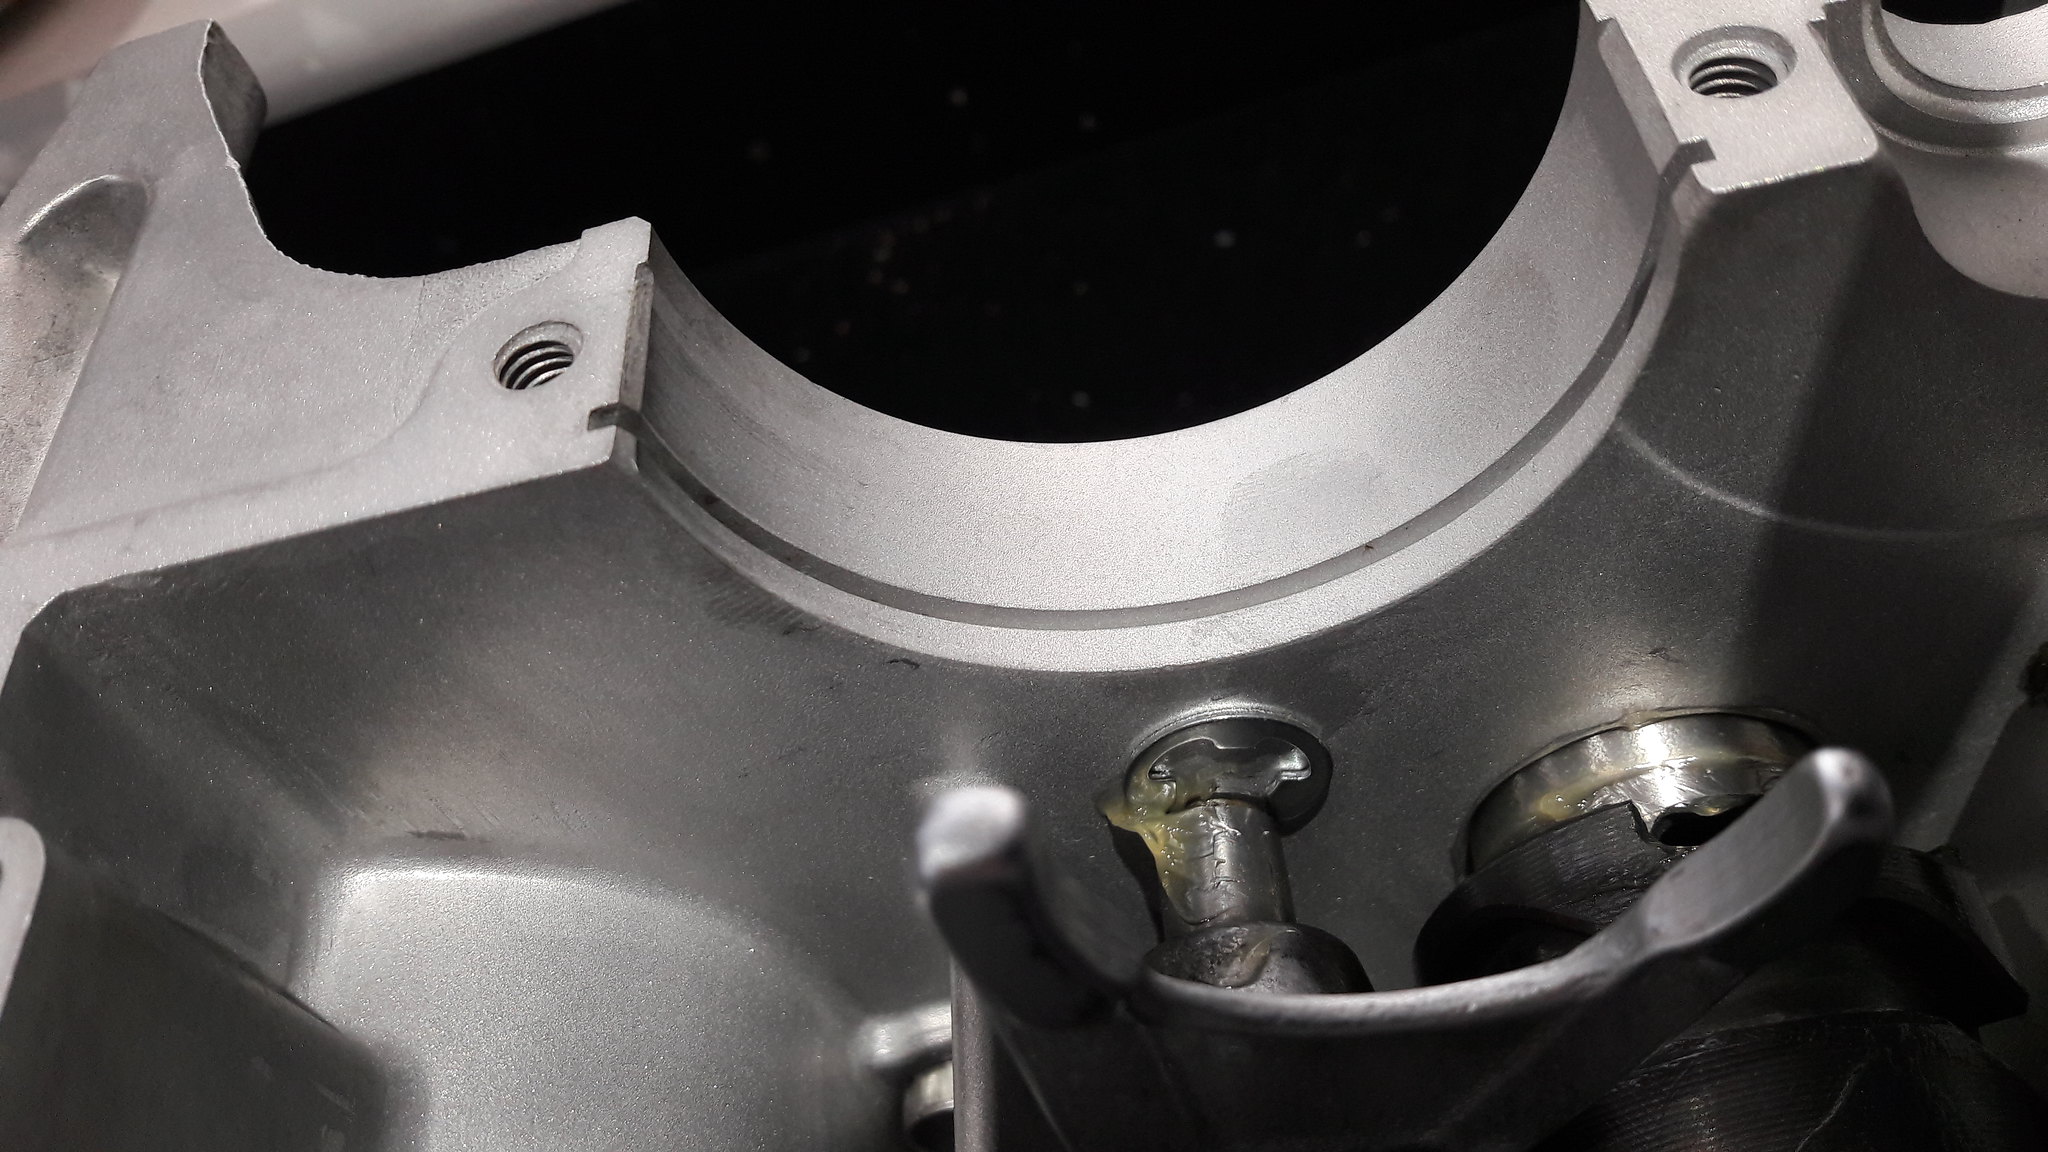 20181020_172014 20181020_172014 by David Miller, on Flickr Once both circlips are fitted, you can return to the drum retaining plate, and fit that, with some low strength Loctite; 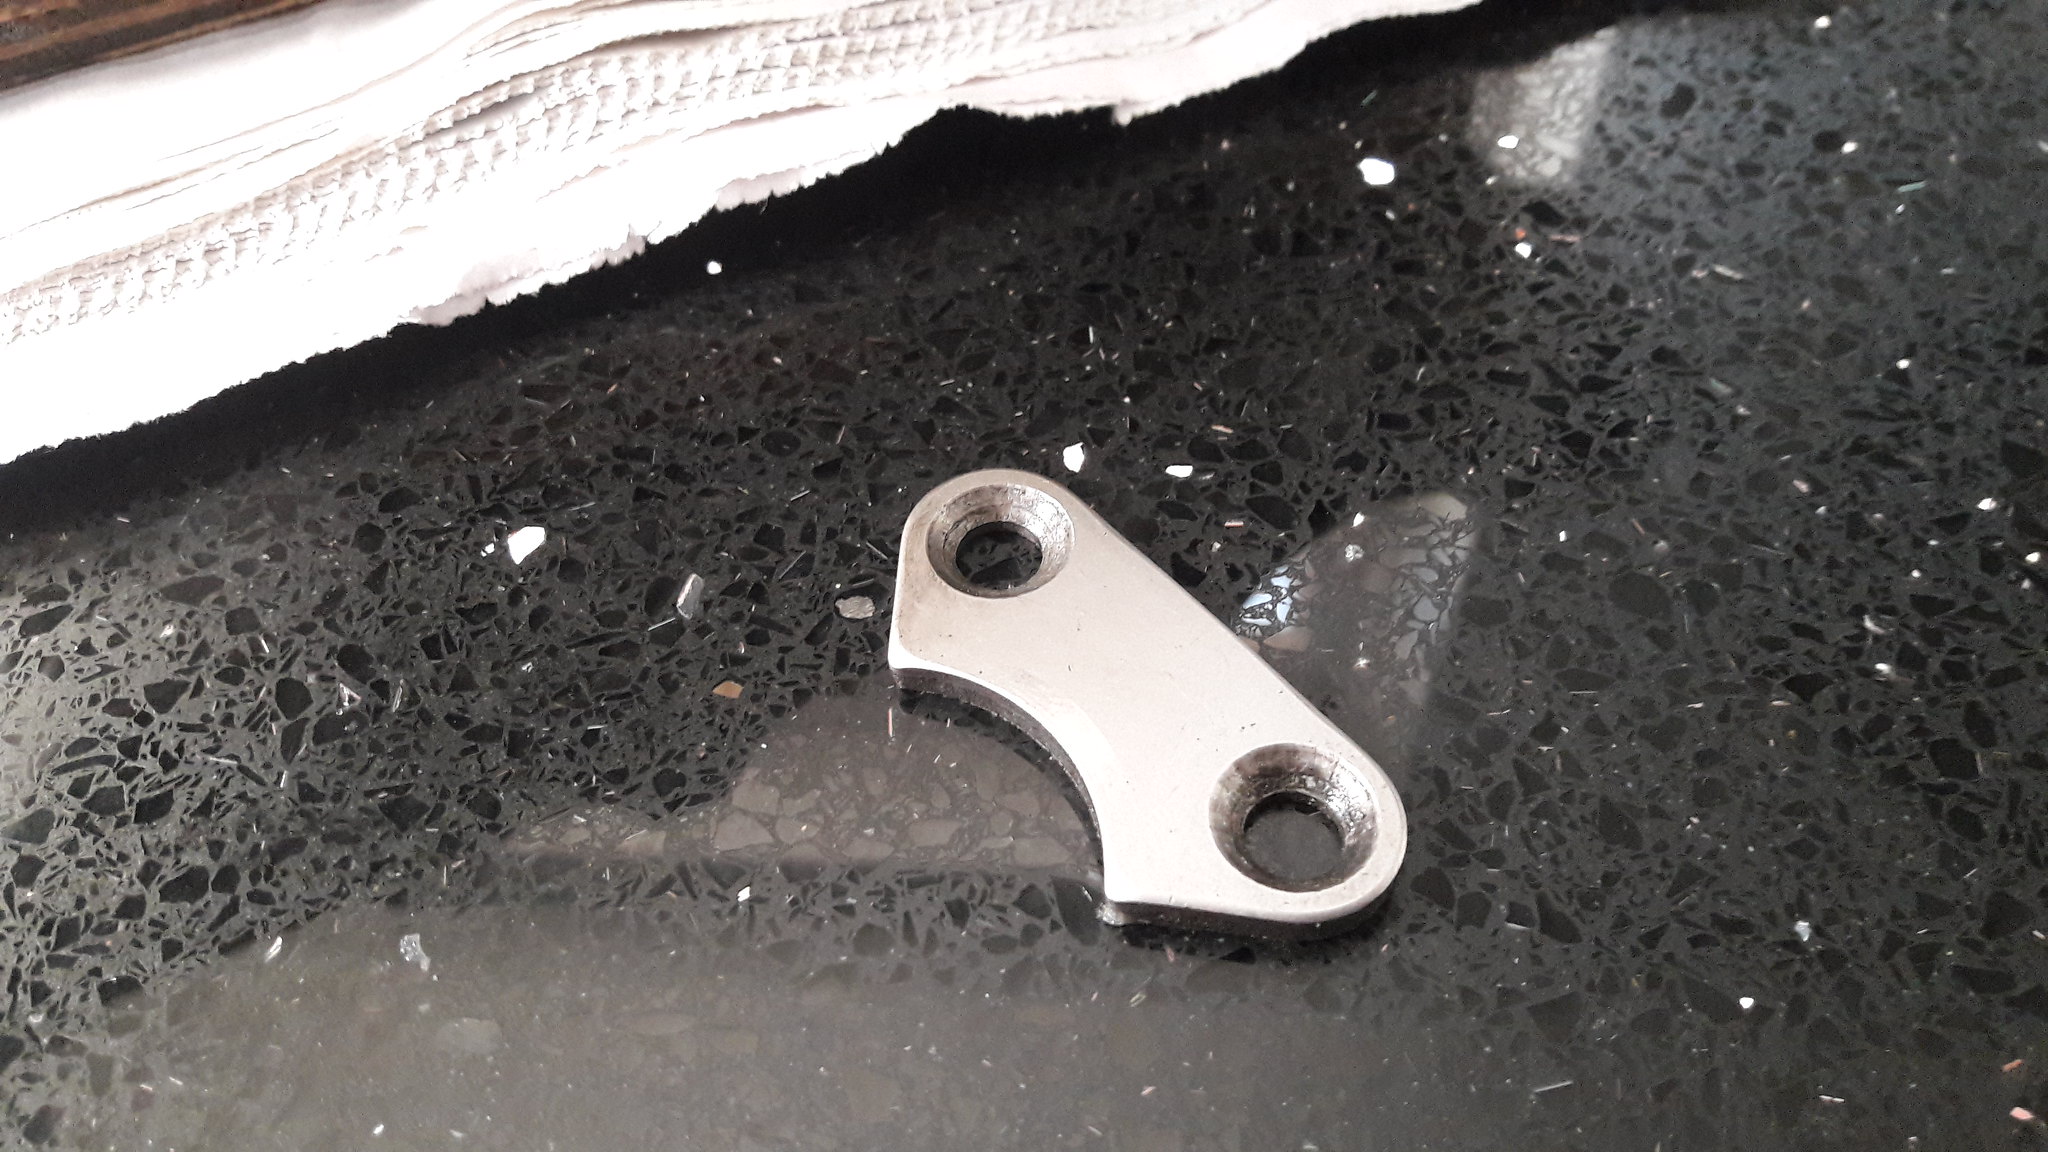 20181020_160504 20181020_160504 by David Miller, on Flickr You can now spin the motor around and fit the neutral switch; 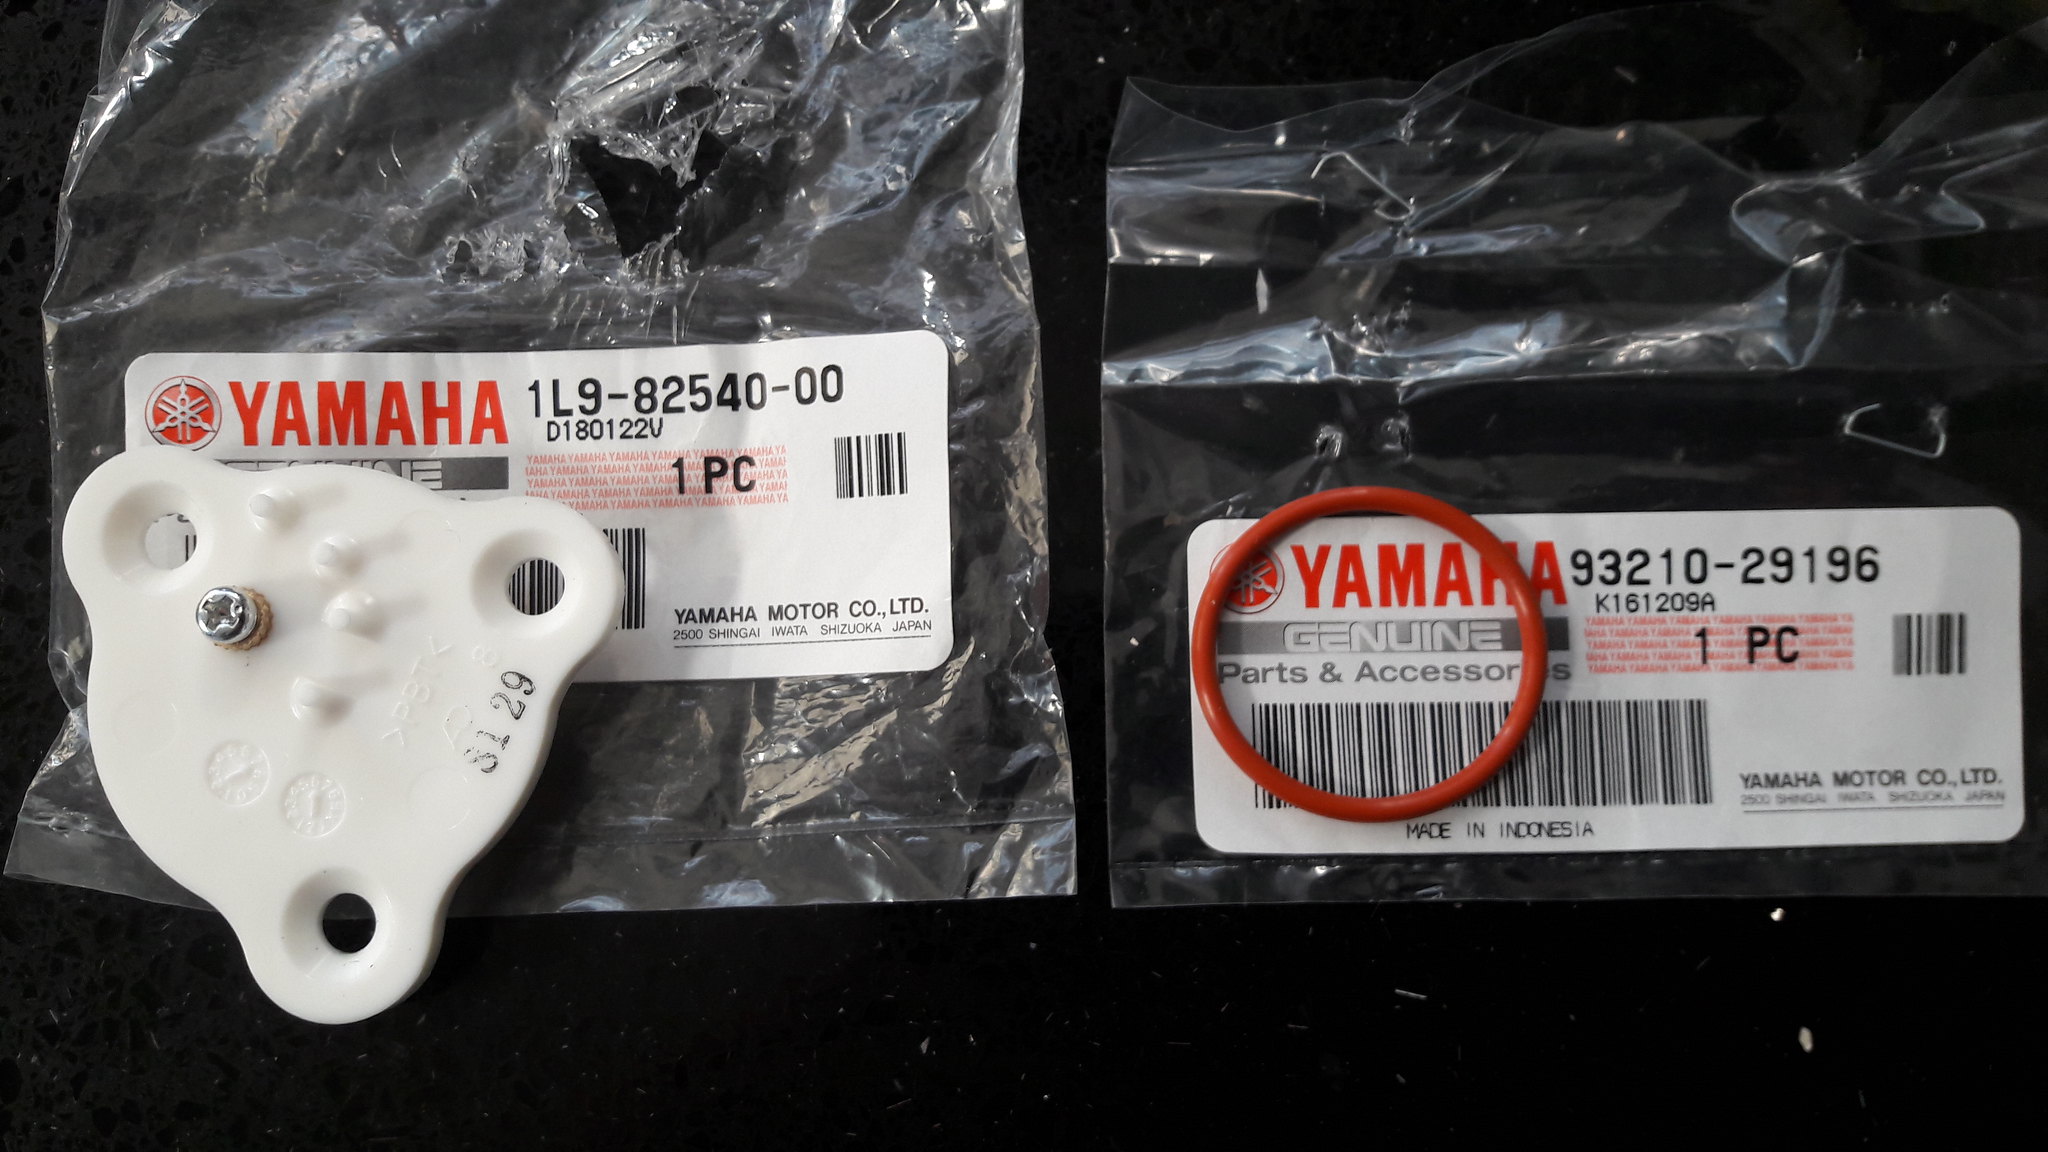 20181020_161039 20181020_161039 by David Miller, on Flickr The Neutral switch is £19.51, and the O ring is £3.00 (Fowlers). I bought a tub of red rubber grease, so with the O ring lubed up, you can ease the switch into place and secure it with new screws. Be careful not to overtighten as the plastic cover will split; 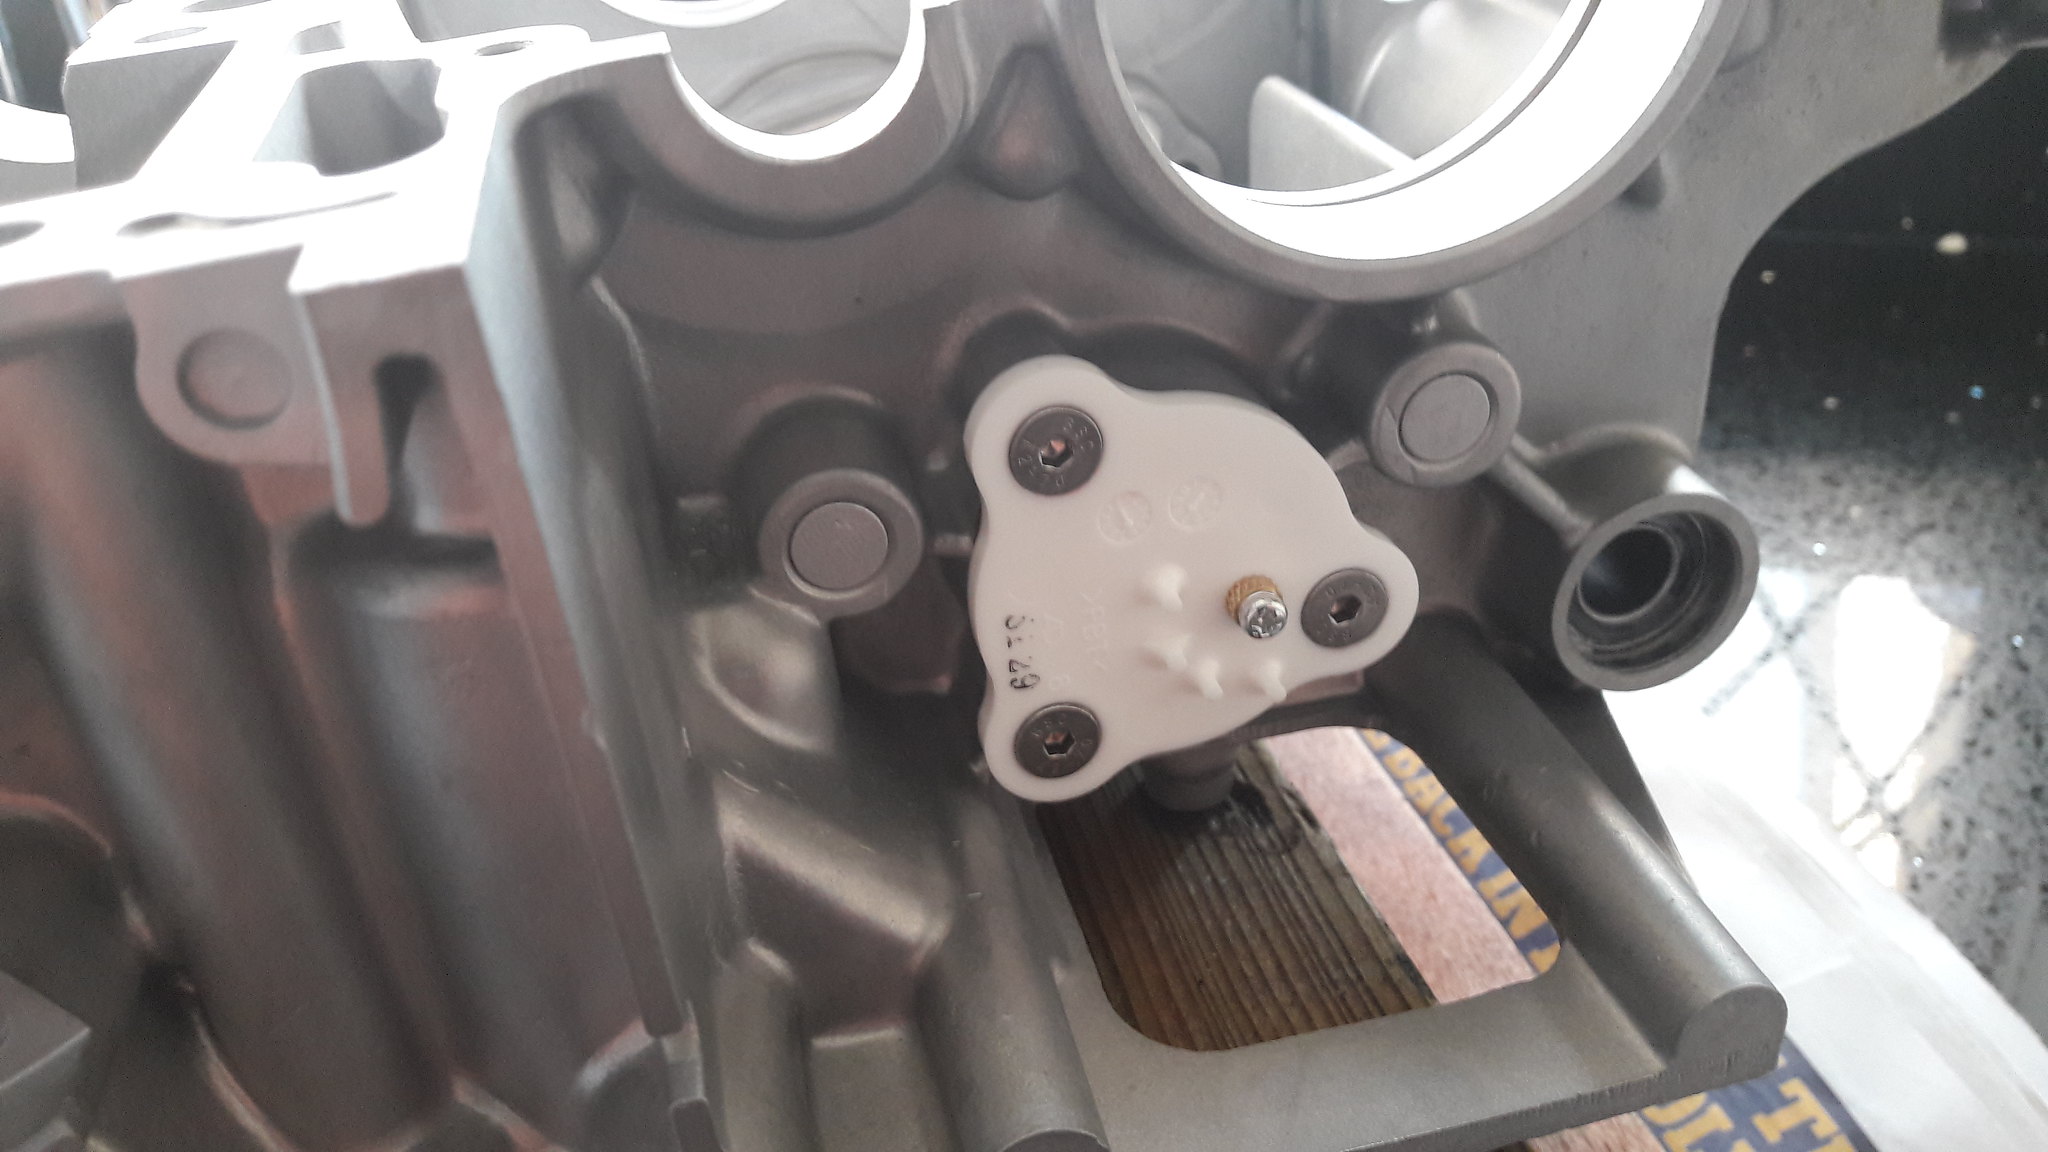 20181020_161755 20181020_161755 by David Miller, on Flickr Dusty  |
|
|
|
Post by mikee on Oct 20, 2018 20:40:10 GMT 1
Use dome head or low head screws to fit the neutral switch housing
The flat face won’t crack the plastic so easy
Mike
|
|
|
|
Post by mikee on Oct 20, 2018 20:41:32 GMT 1
Btw I’m going through a similar build on my yammagamma motor
Mike
|
|
|
|
Post by dusty350 on Oct 20, 2018 20:42:53 GMT 1
Countersunk are fine too, just don't overtighten. Especially at £20 a pop !! Dusty  |
|
|
|
Post by dusty350 on Oct 20, 2018 20:43:52 GMT 1
I love an engine rebuild. Doing my powervalve after this bike is finished - money permitting !! Dusty  |
|
|
|
Post by alankelly on Oct 20, 2018 22:06:35 GMT 1
Hi Dusty Nice post I will follow closely as I build my first 350LC engine Not new to engine rebuilds but ever little helps as never done a bike before 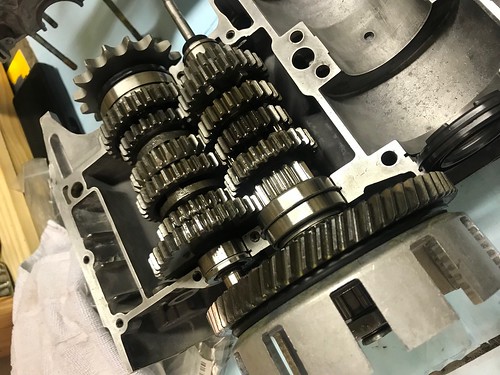 Engine Engine by Alan Kelly, on Flickr Barrels crank and head on way back from PJ this week so a busy week in the shed next week :-) Enjoy Best regards Al. |
|
|
|
Post by dusty350 on Oct 26, 2018 9:40:38 GMT 1
Had to order some parts from Fowlers this week which held me up a bit, but I did do some other jobs that will appear later in the thread , so as to keep it in order. The next part to fit is the Stopper arm. This engages the star on the end of the selector drum. It is often cited as being partly responsible for the difficulty in finding neutral on a running engine that some riders find, and a modified item, called a Shift Pro, can be bought to help overcome the problem. Poor neutral selection can be down to other issues though - worn/knackered parts, incorrect oil, poor clutch adjustment, and the star itself- the high peaks of the star possibly adding to the problem. I did fit a Shift Pro to my last engine build, but at £60, I decided to go with the standard Yam parts this time. Alan Kelly has done a mod to his stopper arm that mirrors the Shift Pro, and it seems such an easy and cheap conversion, I thought it worth doing too, so all credit to Alan  The standard Yam stopper arm is a very basic part - a large washer that can spin on the rivet that attaches it to the arm itself; 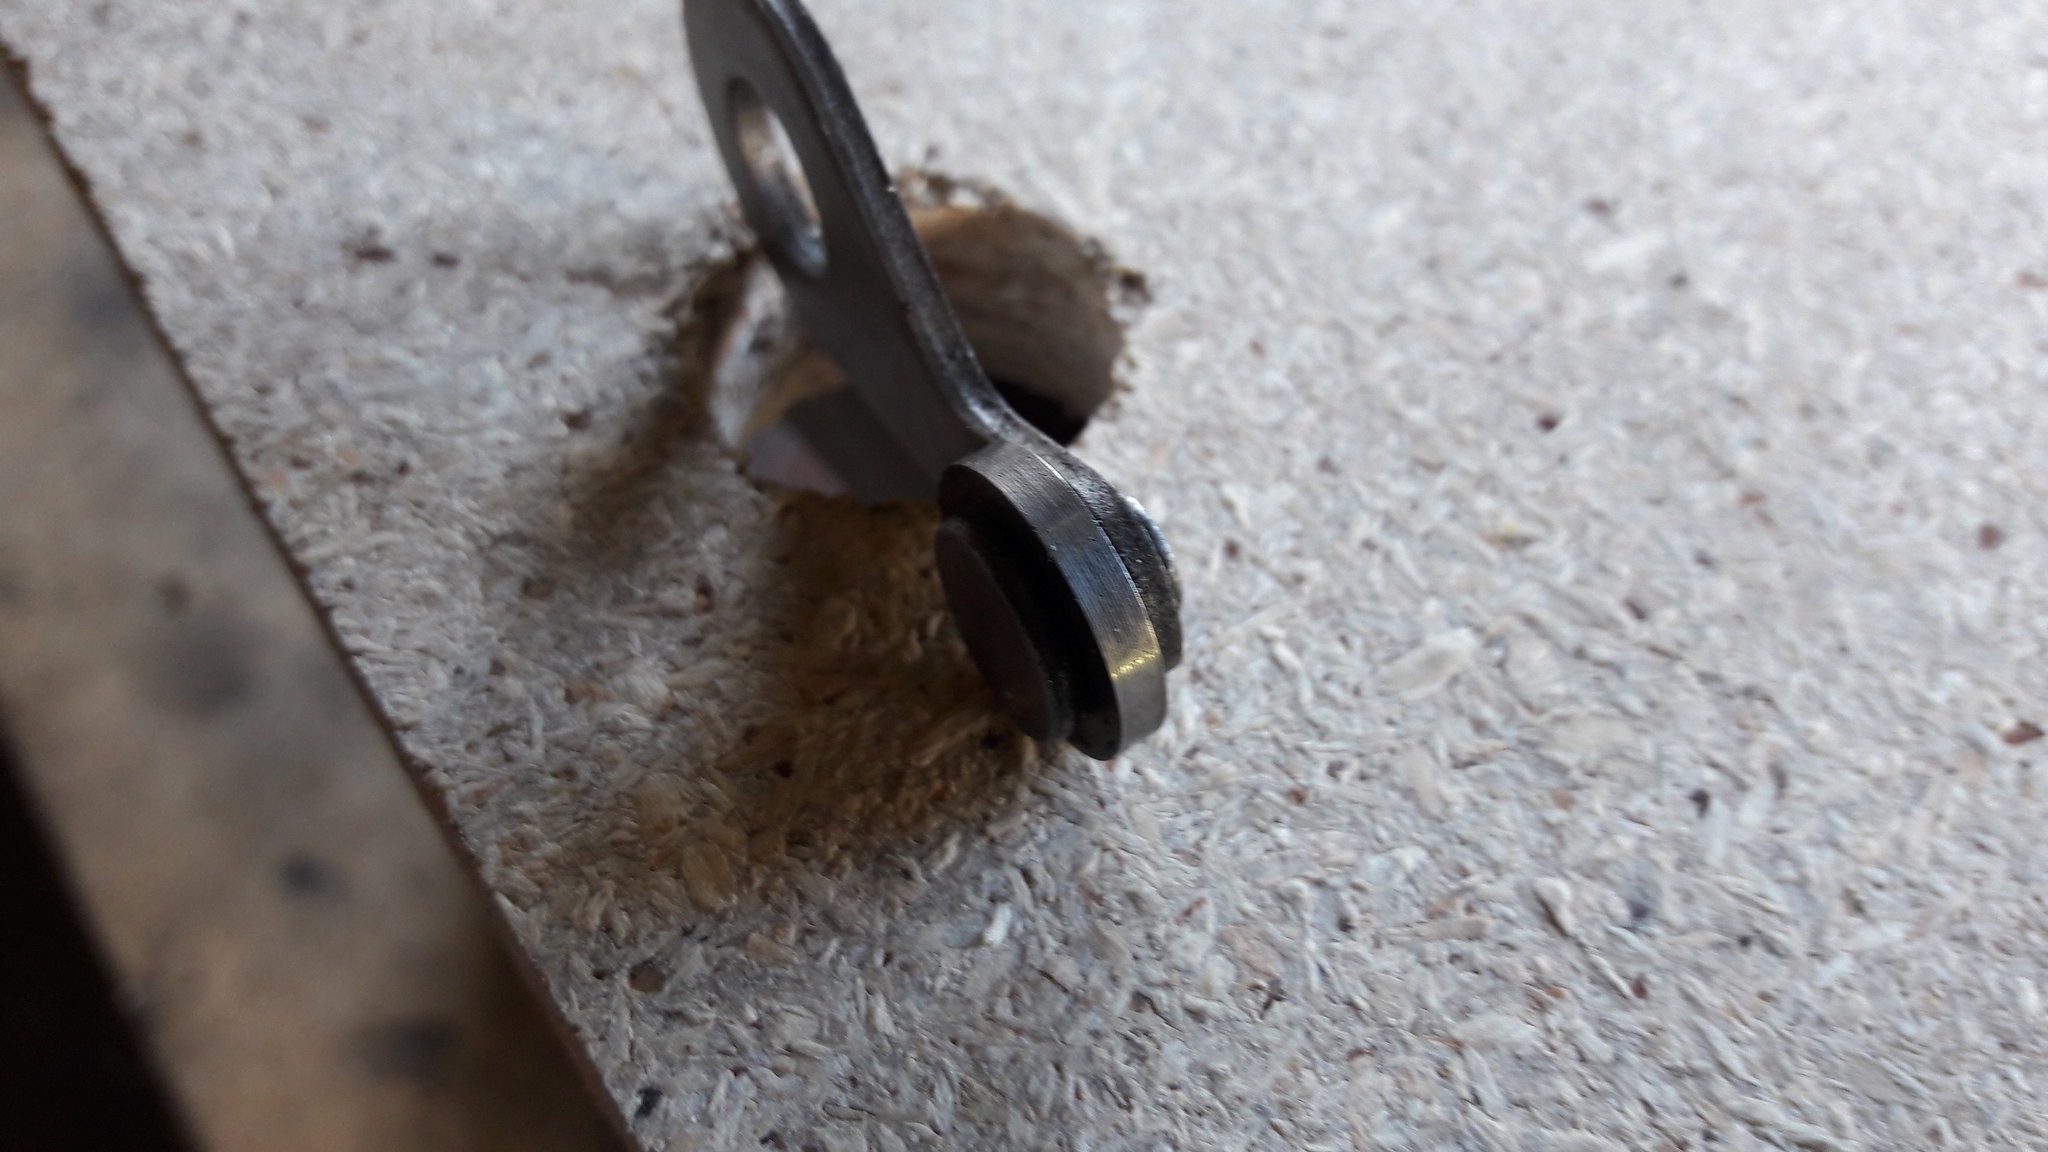 20181025_121918 20181025_121918 by David Miller, on Flickr So following what Alan did, I drilled the rivet out from the back; 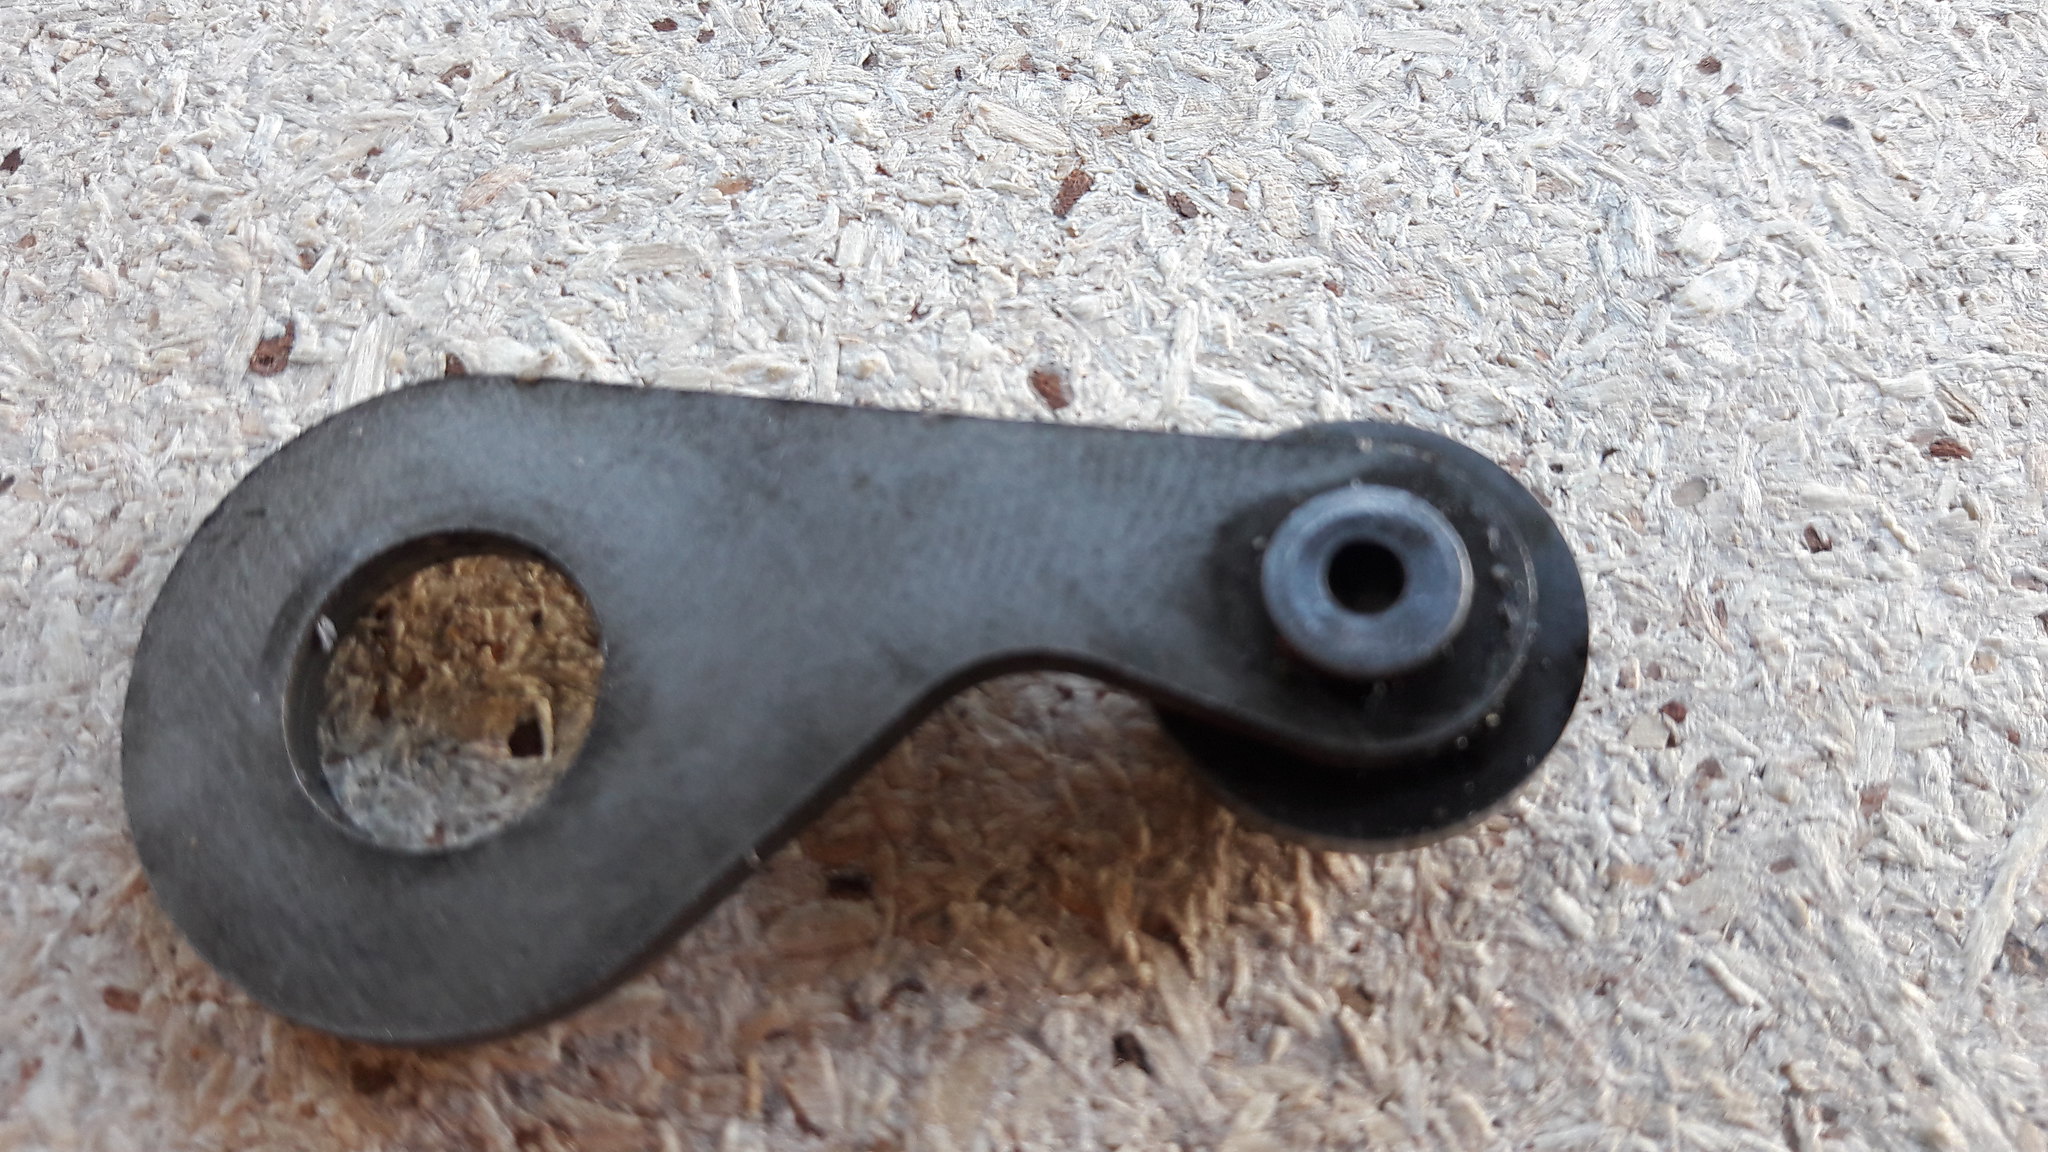 20181025_121929 20181025_121929 by David Miller, on Flickr Leaving you with; 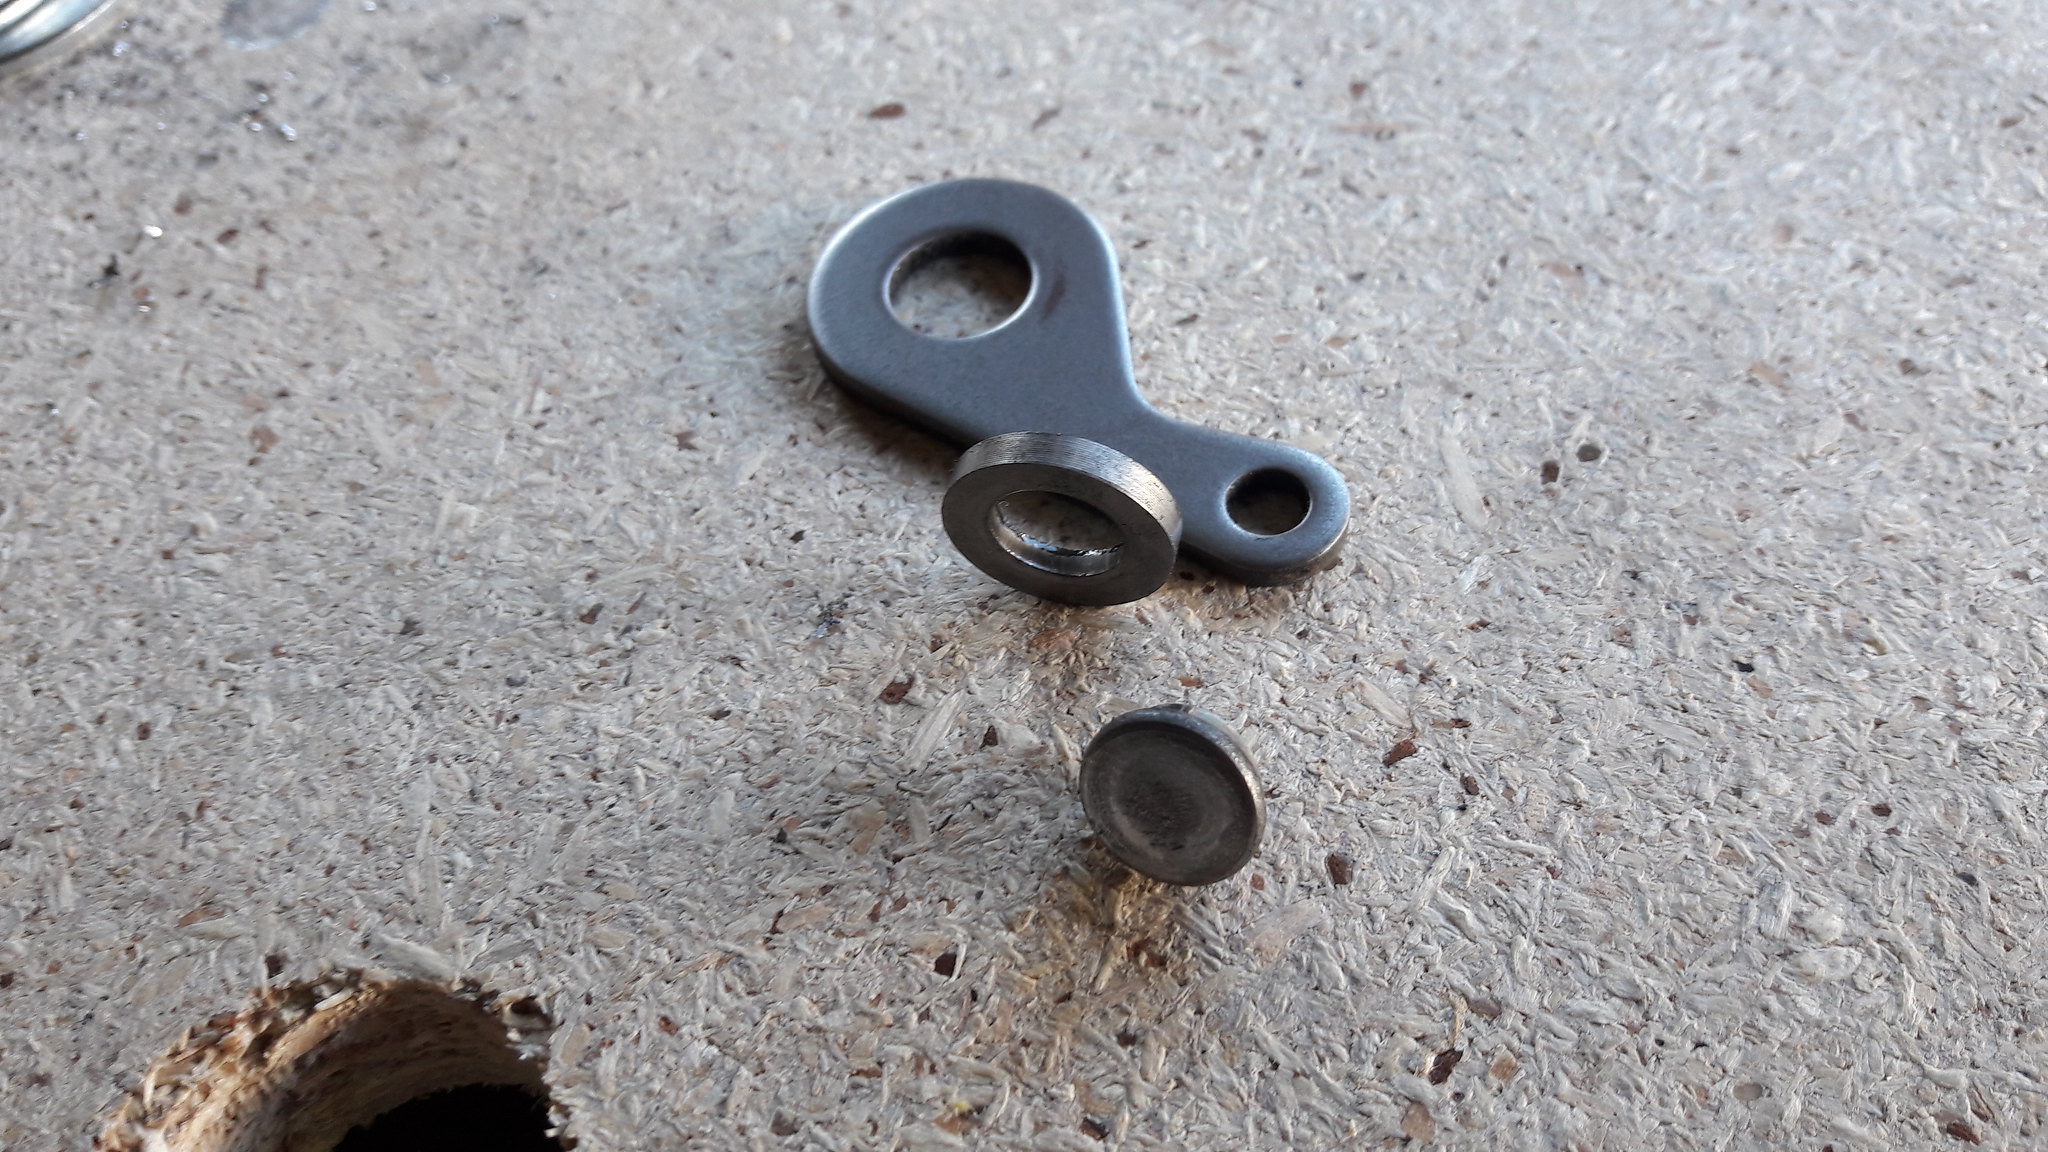 20181025_122621 20181025_122621 by David Miller, on Flickr You are replacing that washer for a bearing, and that mimics the Shift Pro. I used a button head bolt with a plain washer, then the bearing, then another plain washer just to space it away from the arm slightly, and then a nyloc on the back; 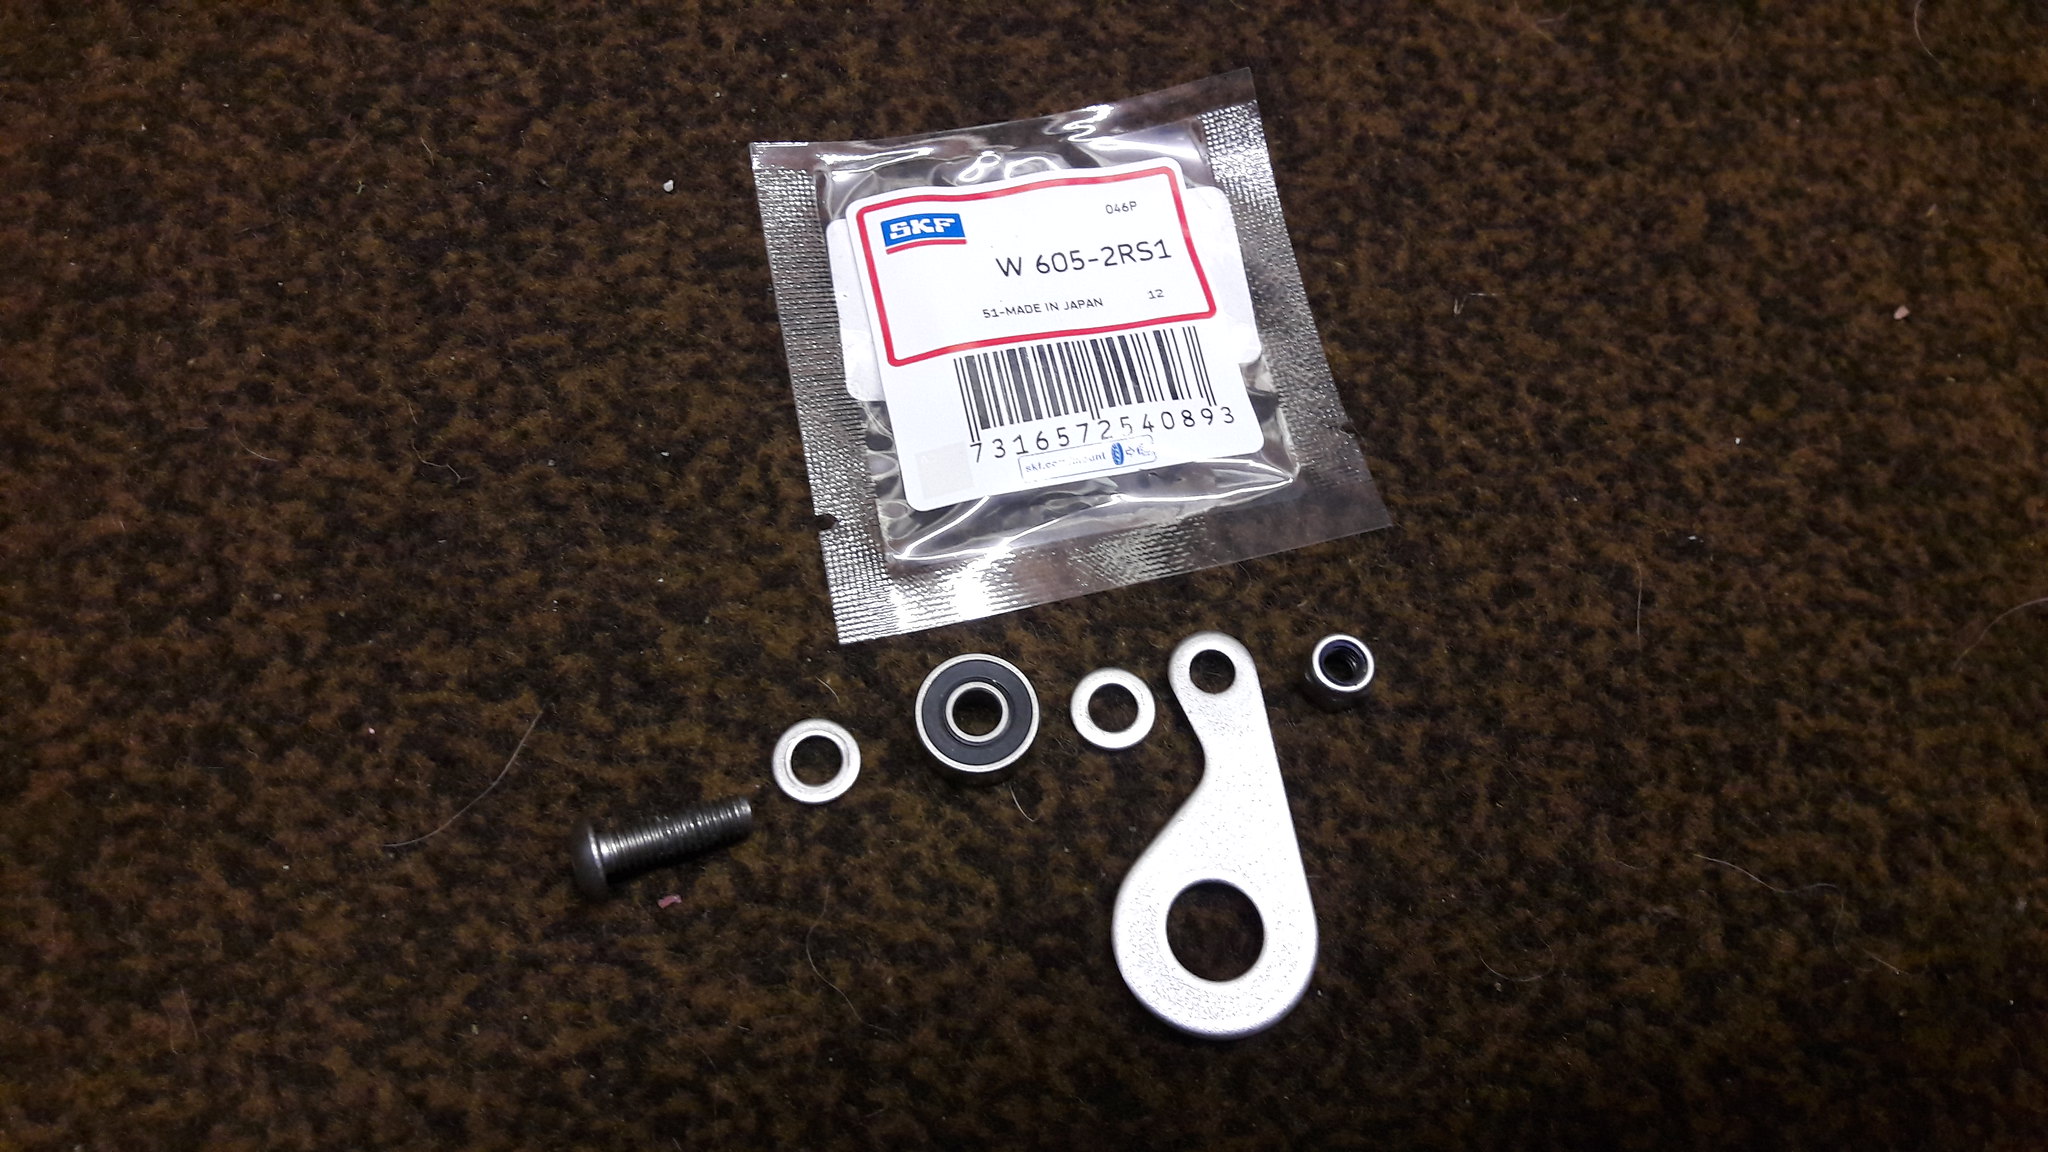 20181025_173253 20181025_173253 by David Miller, on Flickr And next to a standard stopper; 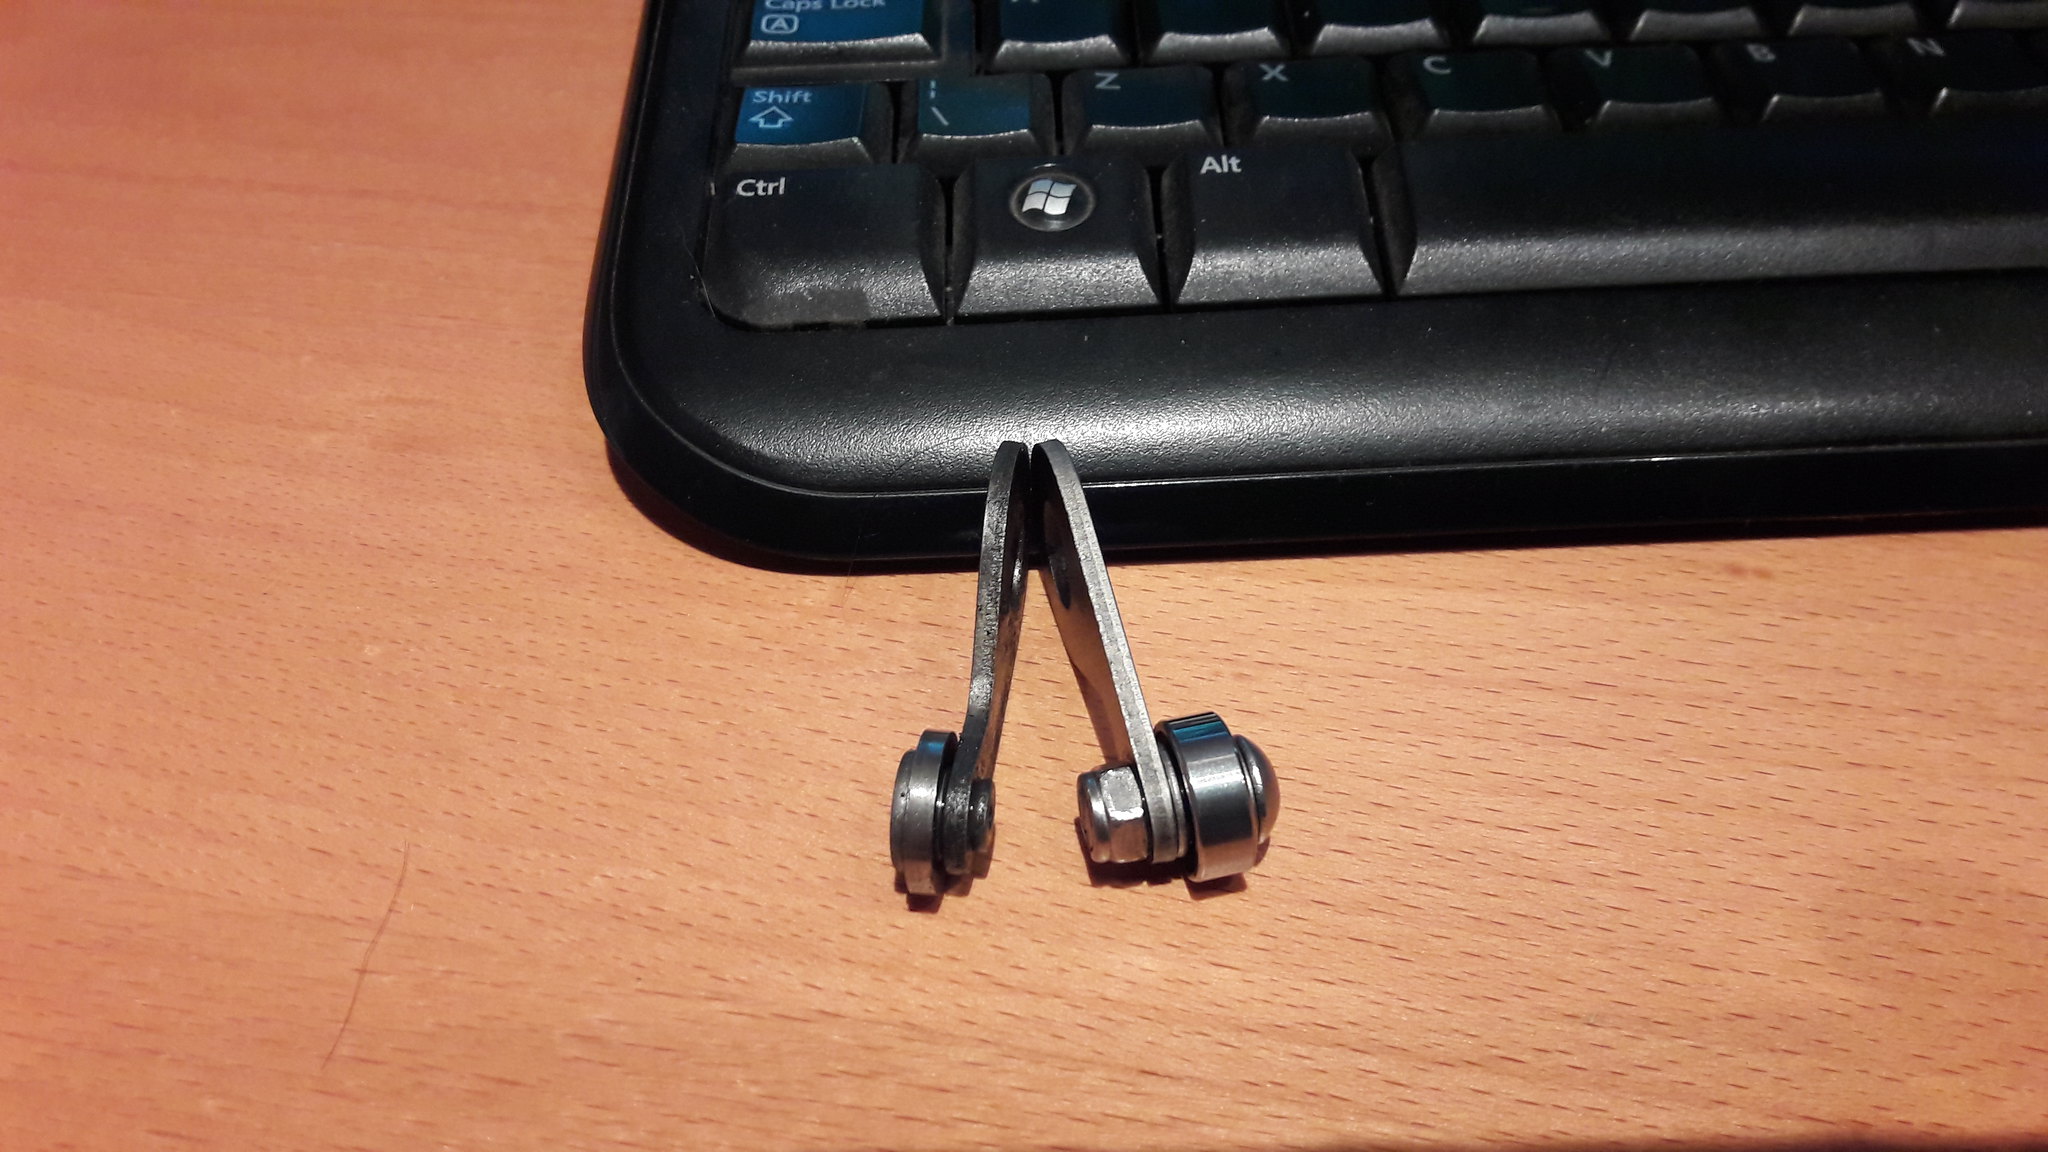 20181026_093143 20181026_093143 by David Miller, on Flickr I'm not suggesting this will make a difference on it's own - the shift pro also uses a weaker spring which is supposed to help, plus the best results seem to come from the Shift Pro being used with a modified star. I like the idea of a proper bearing in place of the thick washer though, and for less than £8 it's worth doing I think. Dusty  |
|
|
|
Post by alankelly on Oct 26, 2018 20:53:10 GMT 1
Hi Dusty You are more than welcome. Just so you know, when I modified the stopper arm, in the end I needed to use a very low profile screw so that is does not catch on the shift drum. But if you PM me your address I will make you up a little kit on Monday (as in the picture below) including the modified screw so that the bearing assembly fits your motor without catching the drum 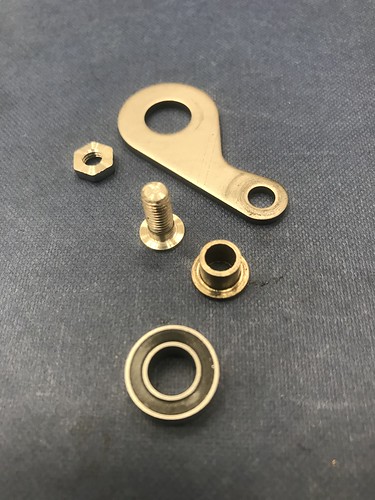 IMG_5476 IMG_5476 by Alan Kelly, on Flickr 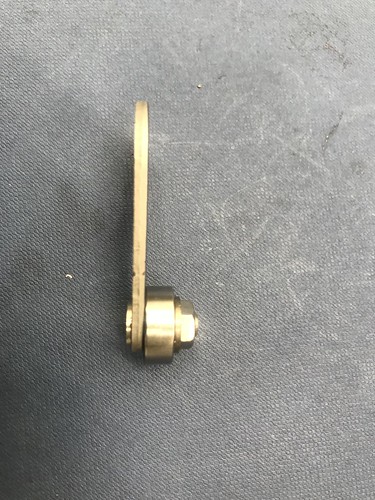 IMG_5478 IMG_5478 by Alan Kelly, on Flickr 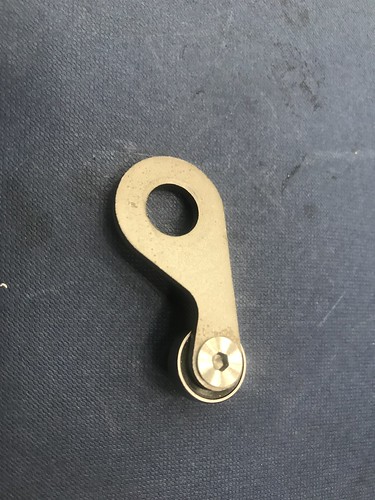 IMG_5479 IMG_5479 by Alan Kelly, on Flickr Now fitted mine, including modifying the shift star profile on the profile grinder at work the other night. And just turning the drum by hand the shift feels very smooth and the drum turns very easy. So should be an improvement over the standard shift once on the road. 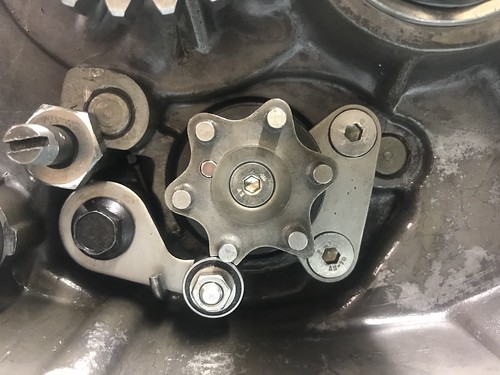 IMG_5480 IMG_5480 by Alan Kelly, on Flickr Now just need to decide if I should splash out on a new gear shift shaft, as not sure how worn mine is Alan |
|
|
|
Post by dusty350 on Oct 26, 2018 20:54:23 GMT 1
Components for the stopper arm; 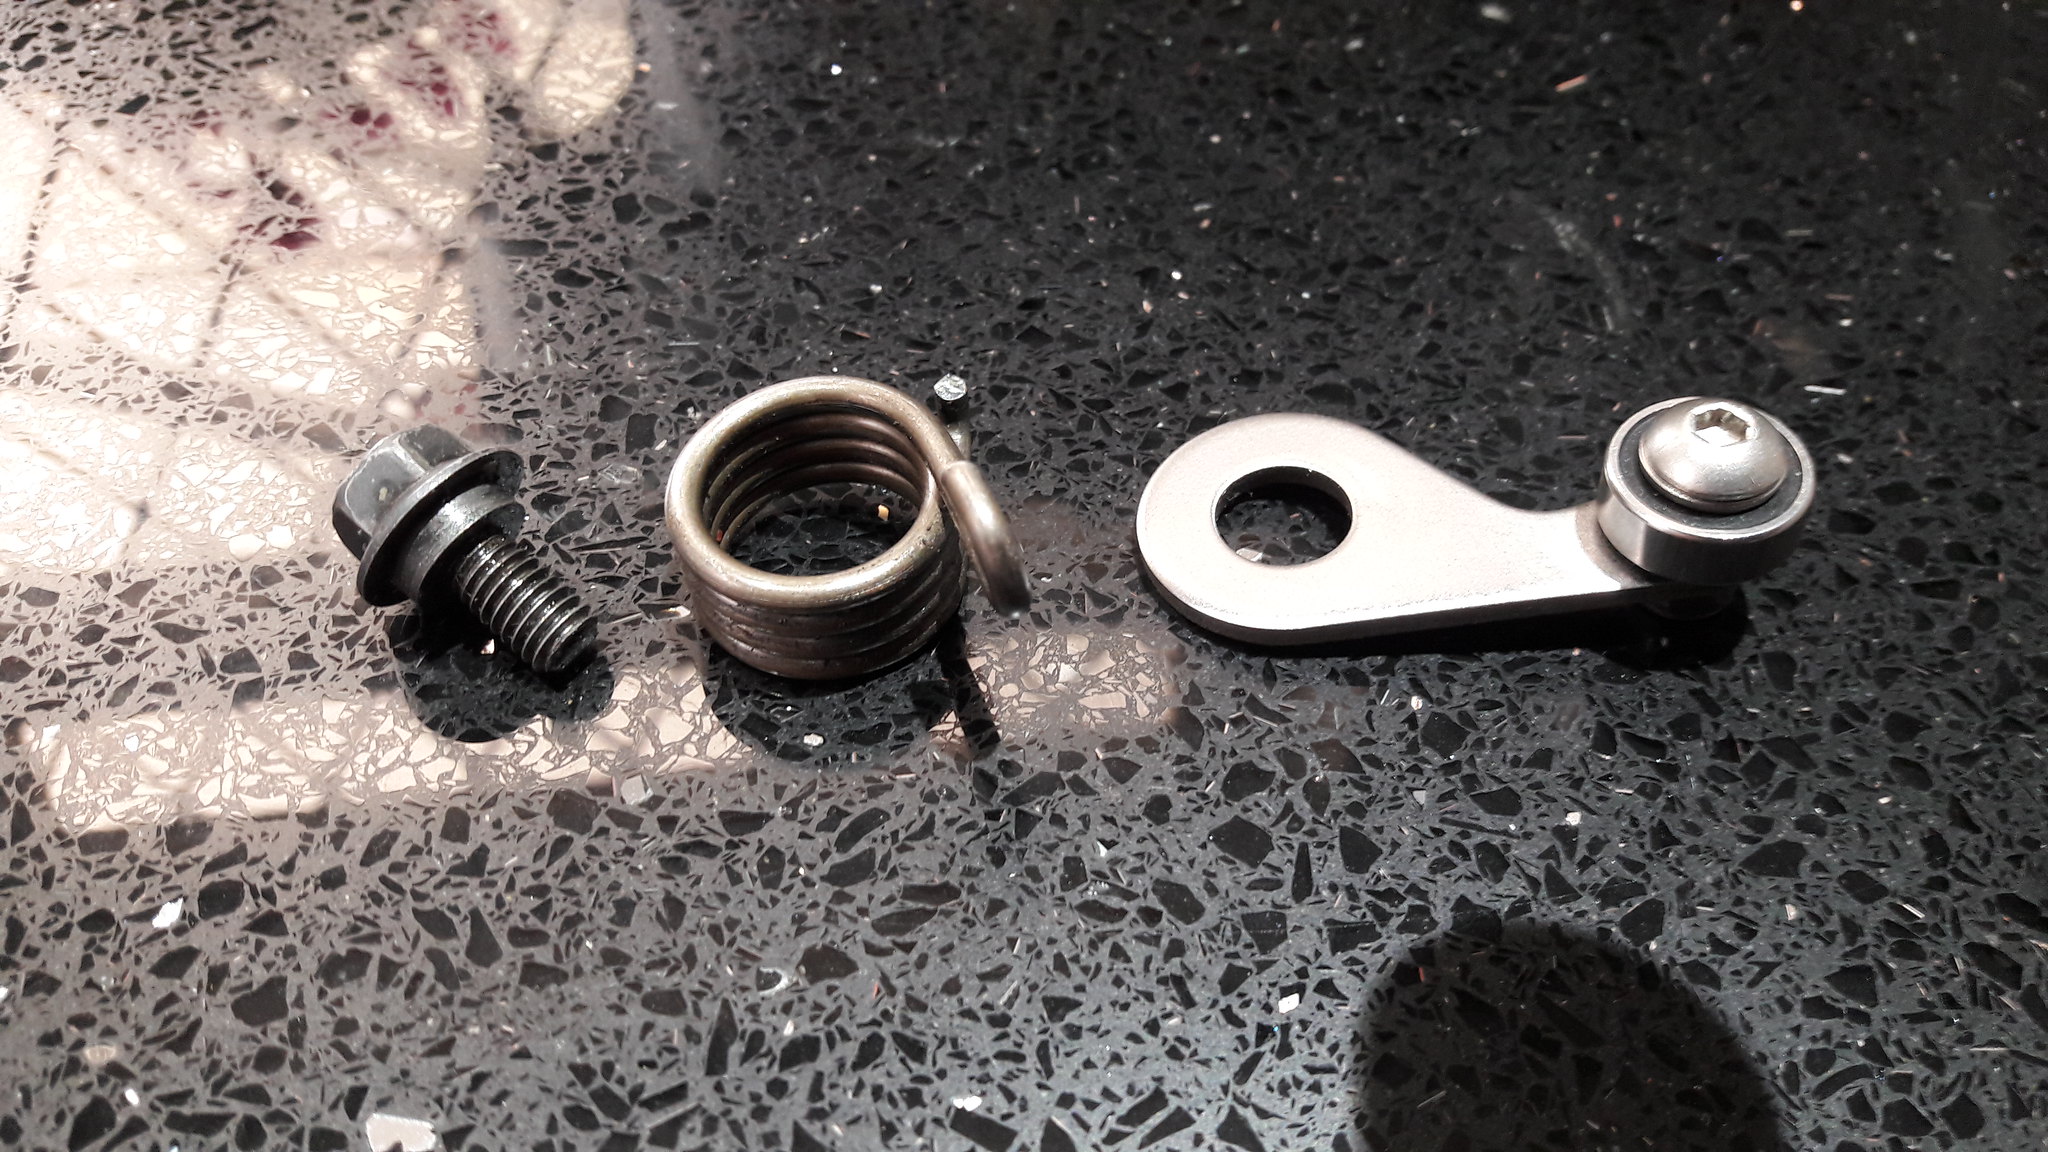 20181026_105157 20181026_105157 by David Miller, on Flickr This can be a bit fiddly to fit. I put the engine on it's side as it's a bit easier. This pic shows how the spring locates in the casing; 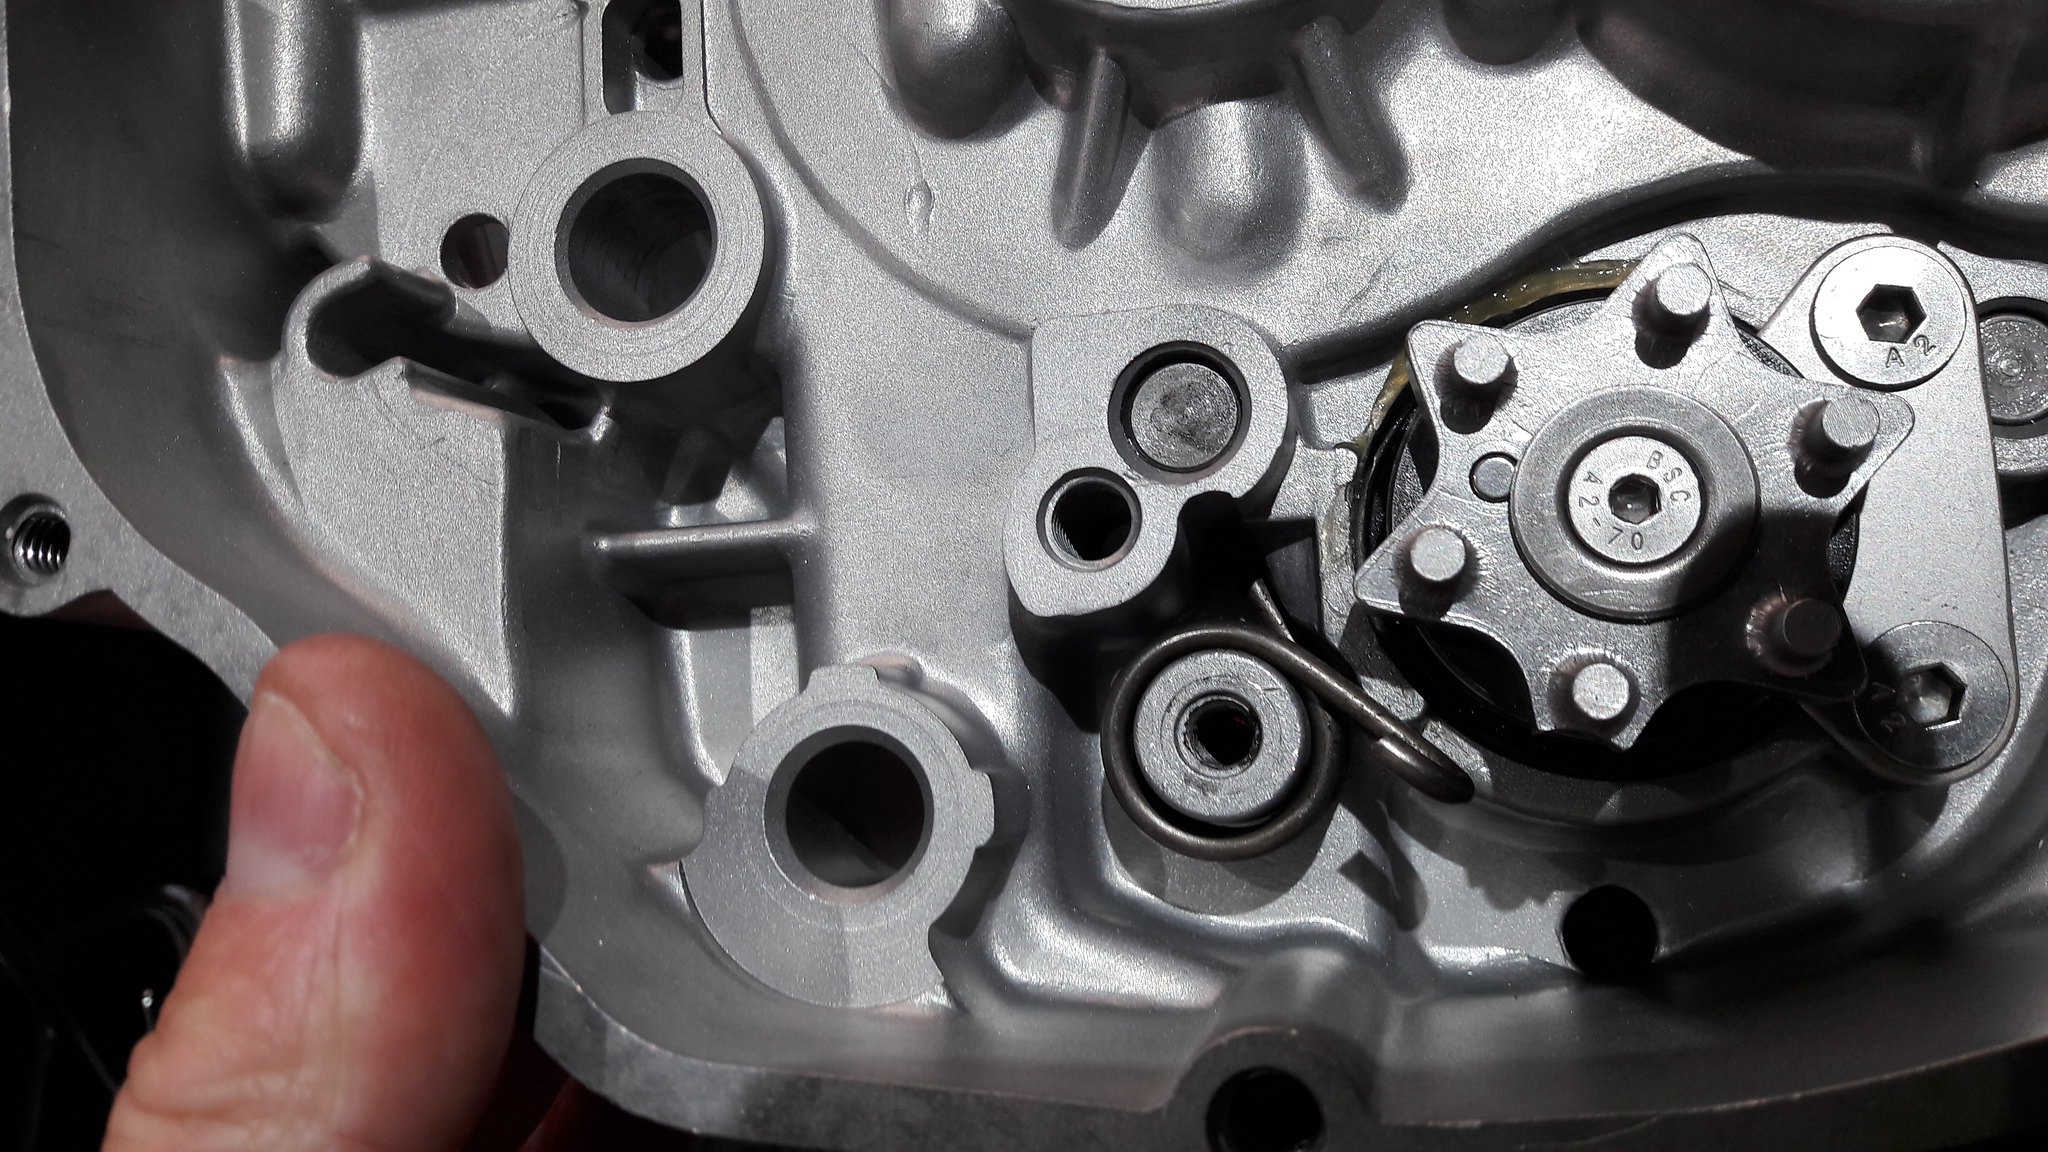 20181026_105514 20181026_105514 by David Miller, on Flickr I find it easier to fit the spring and the stopper together, and then fit it into the case. You may need to manipulate the spring into it's position with a screwdriver but it's fairly easy doing it this way - that spring is pretty strong !; 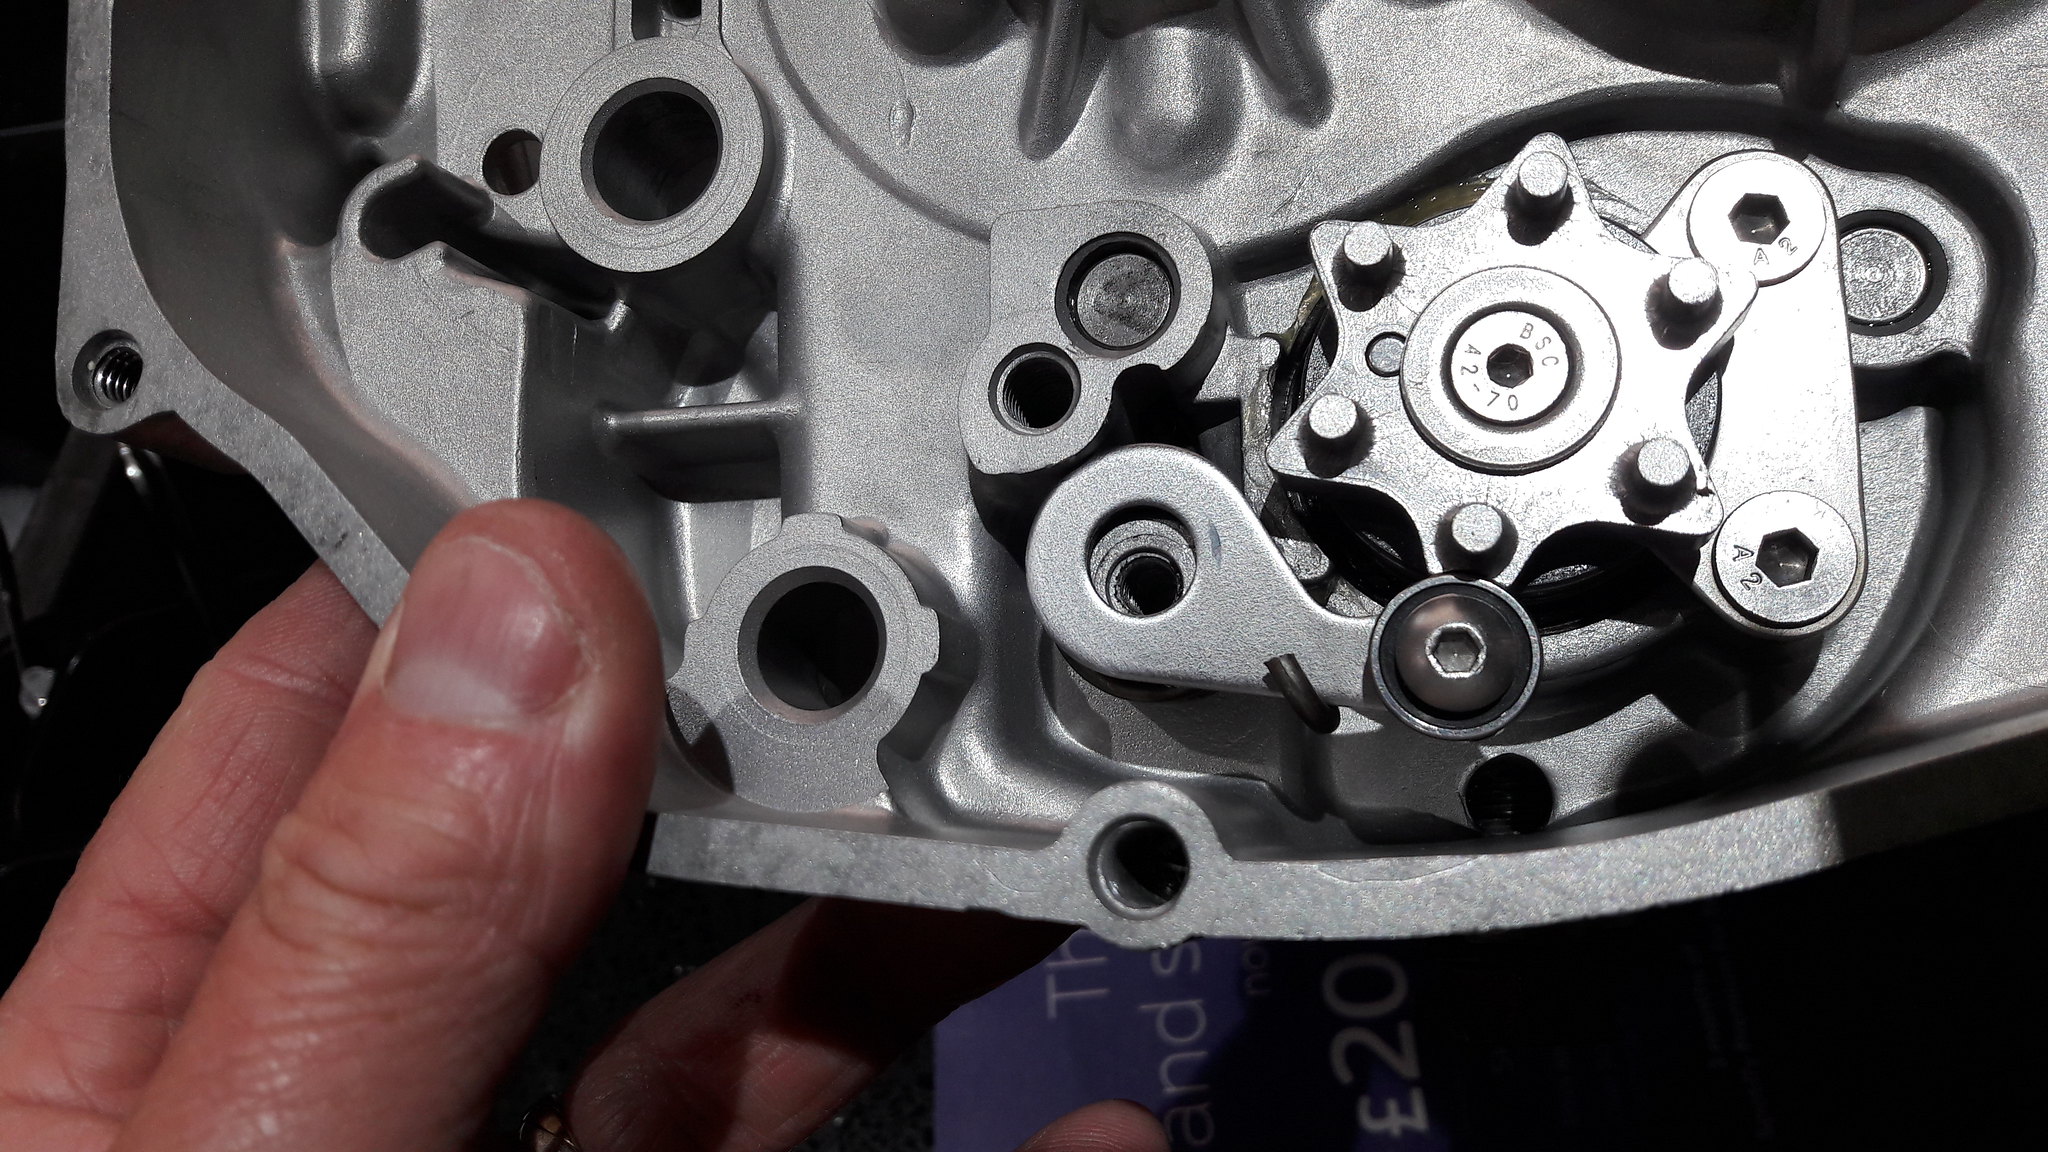 20181026_105640 20181026_105640 by David Miller, on Flickr You can then fit the bolt - I use some low strength Loctite on the thread, and just move the stopper a little bit so the shouldered part of the bolt locates, and tighten up; 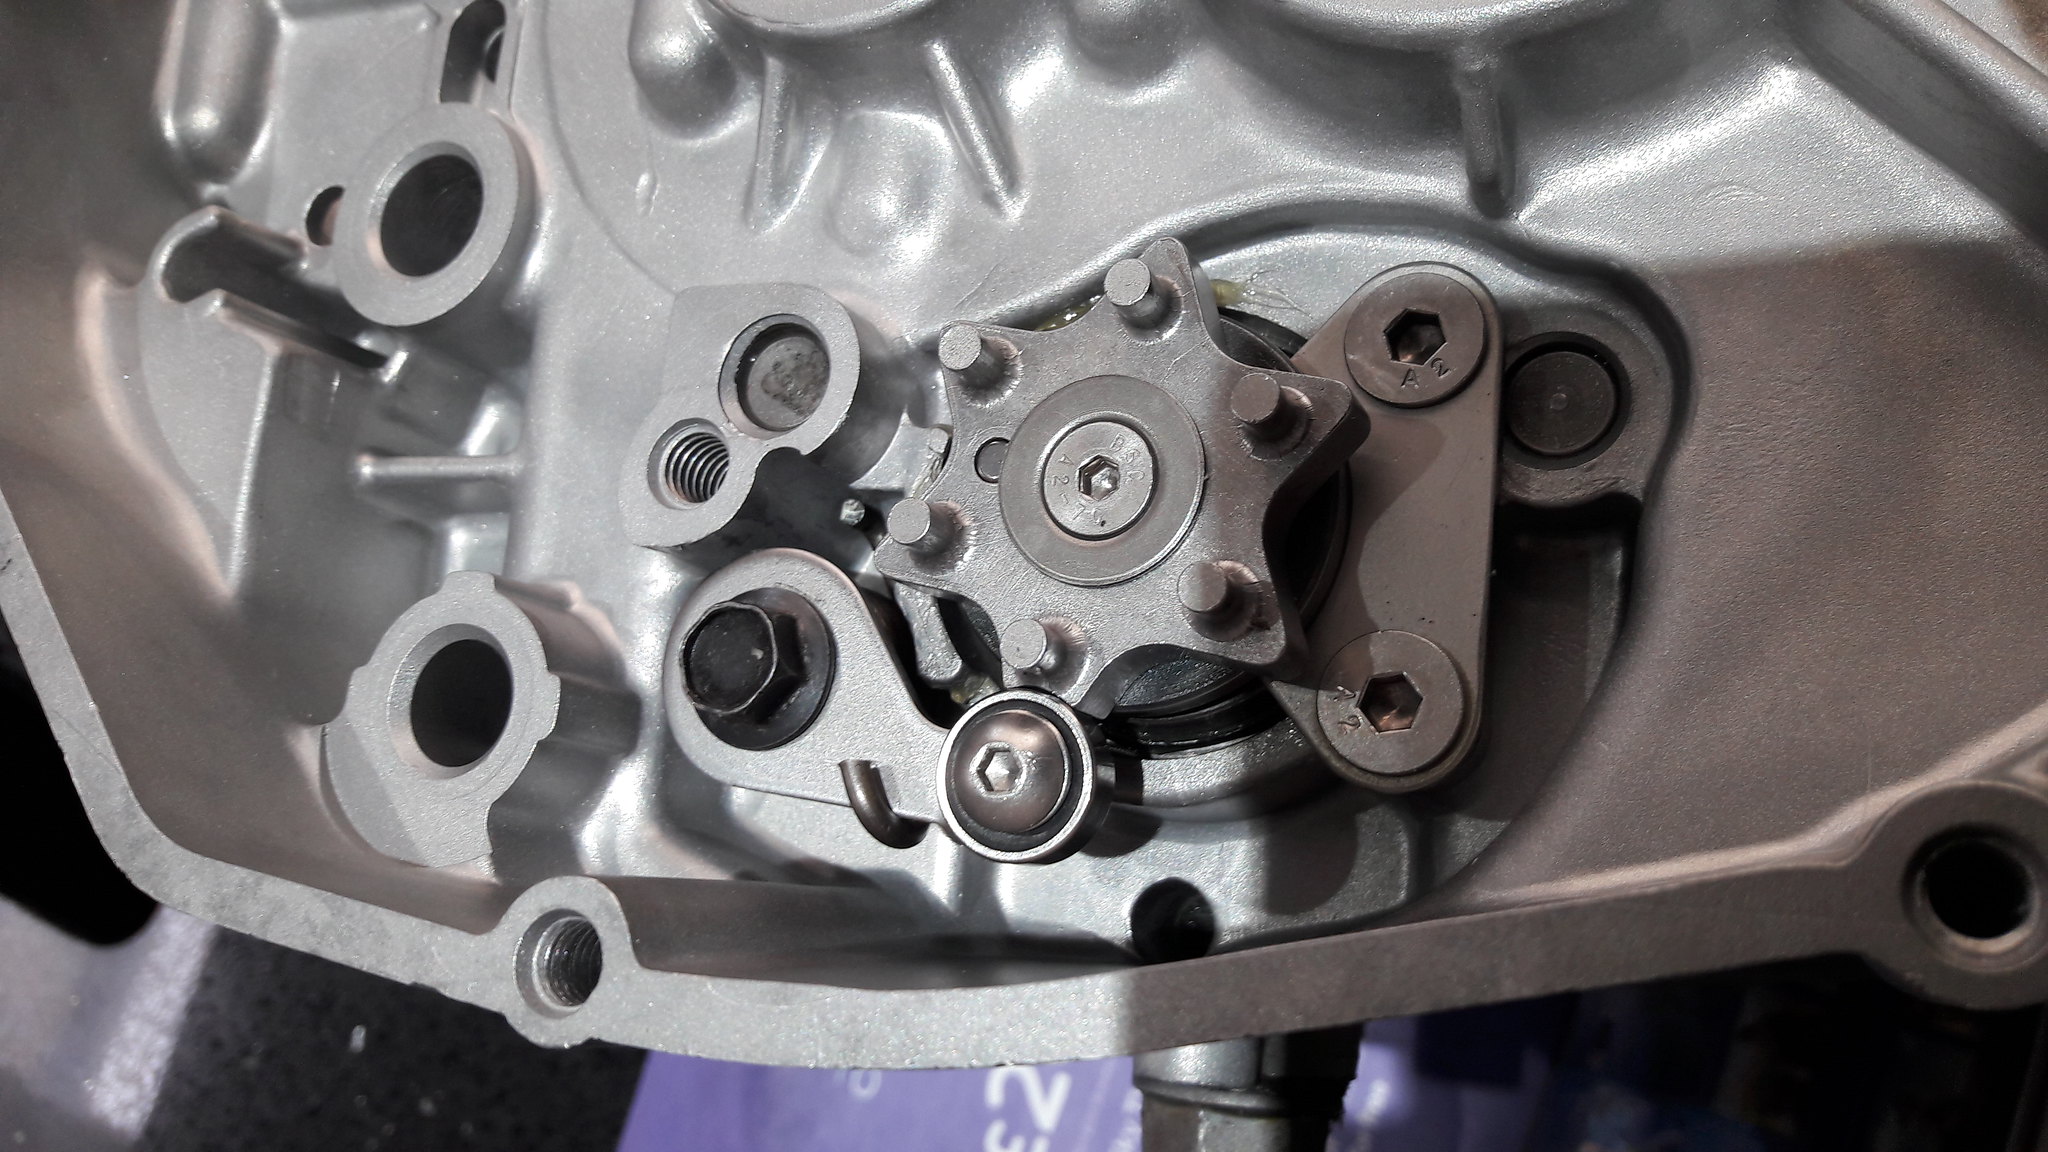 20181026_110151 20181026_110151 by David Miller, on Flickr And that's it done. You can see the bearing on the stopper arm is located on the dished part of the star - this is the neutral position on the selector drum. Next to fit is the gear selector adjusting bolt. It acts like a cam - hard to see, but you can make out it's uneven shape; 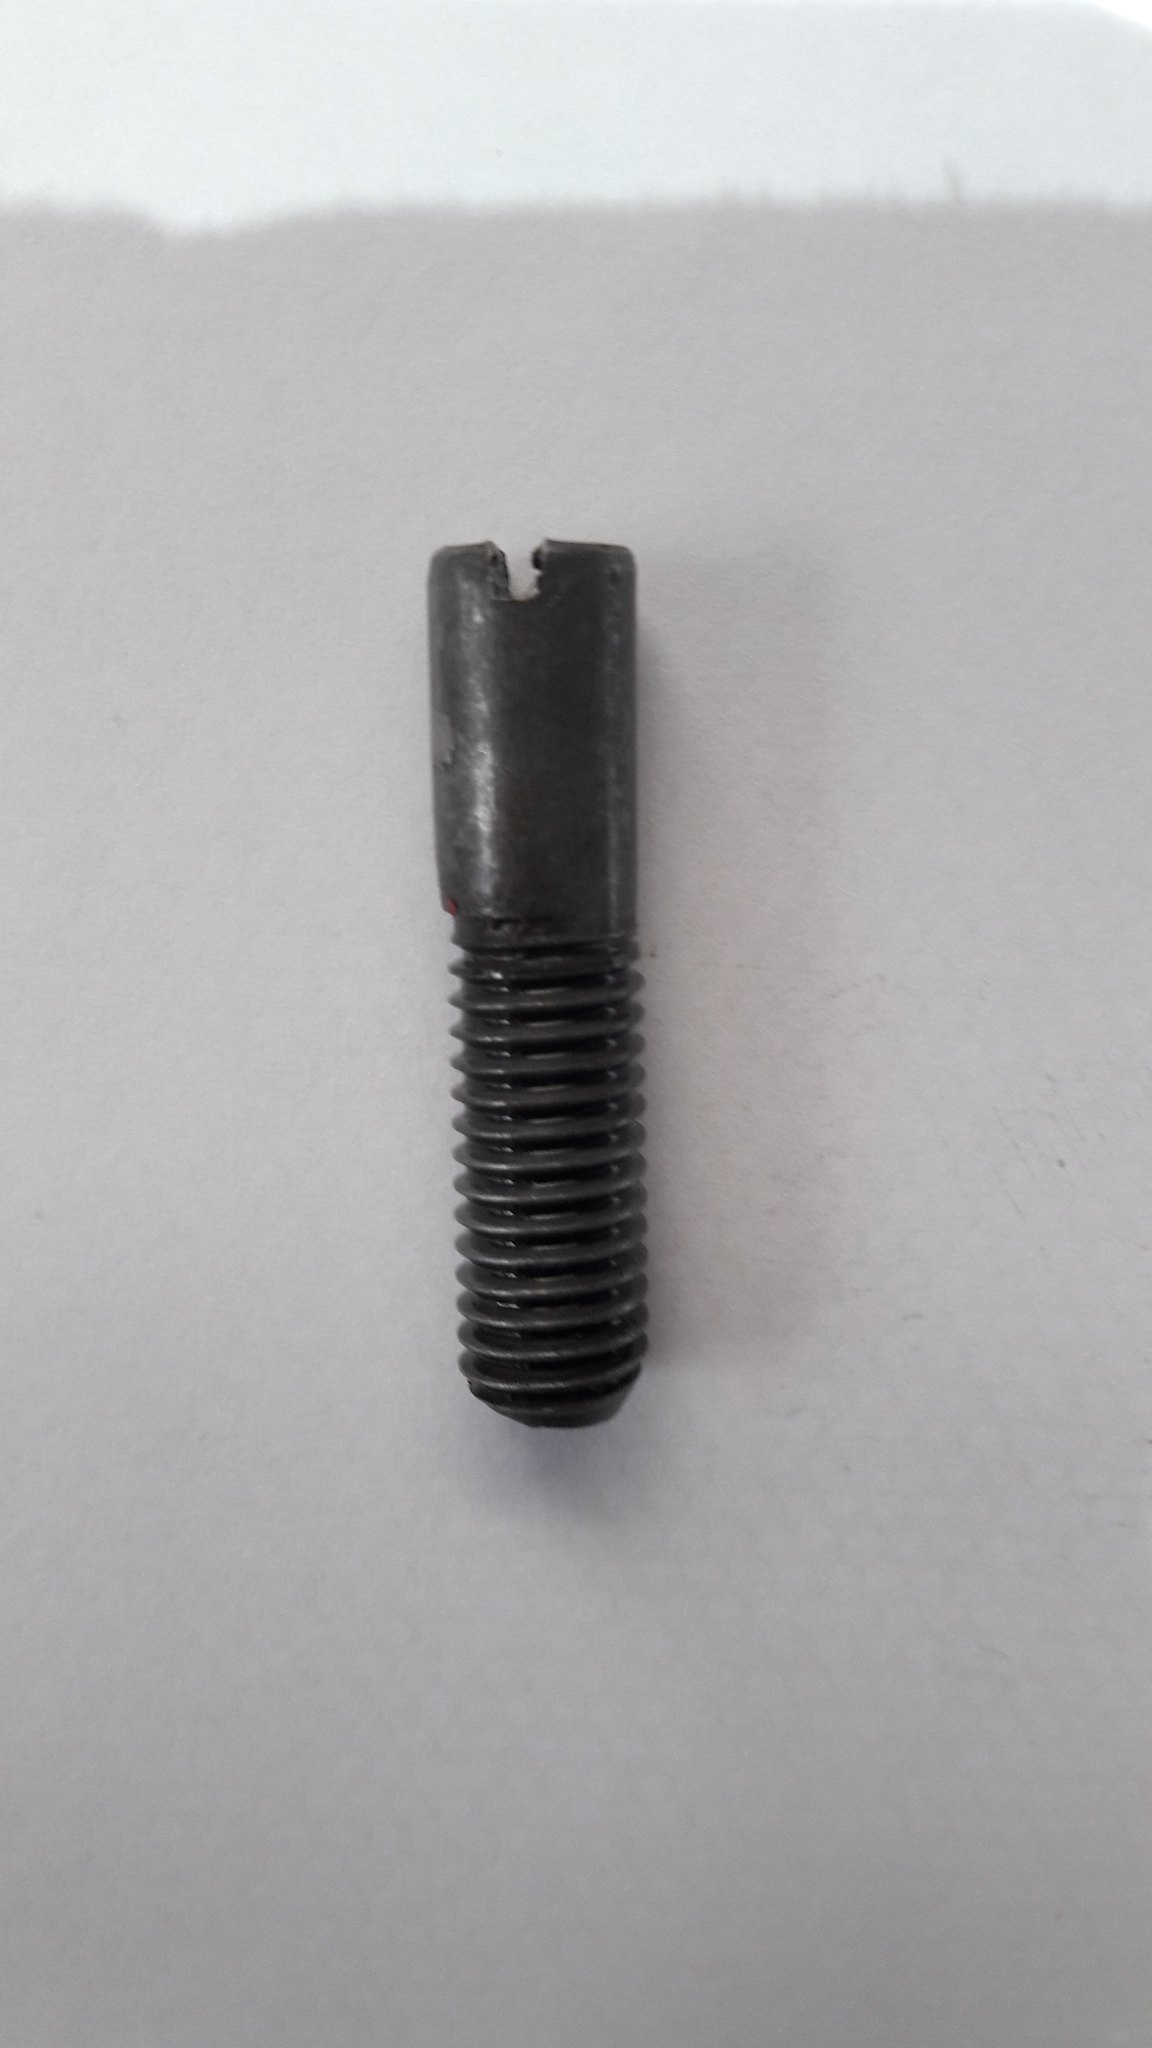 20181026_110521 20181026_110521 by David Miller, on Flickr You can adjust this bolt, once fitted, to get the correct operation for the selector to work on the shift star. They can develop a groove in use, so I always replace with new, so you get smooth adjustment; 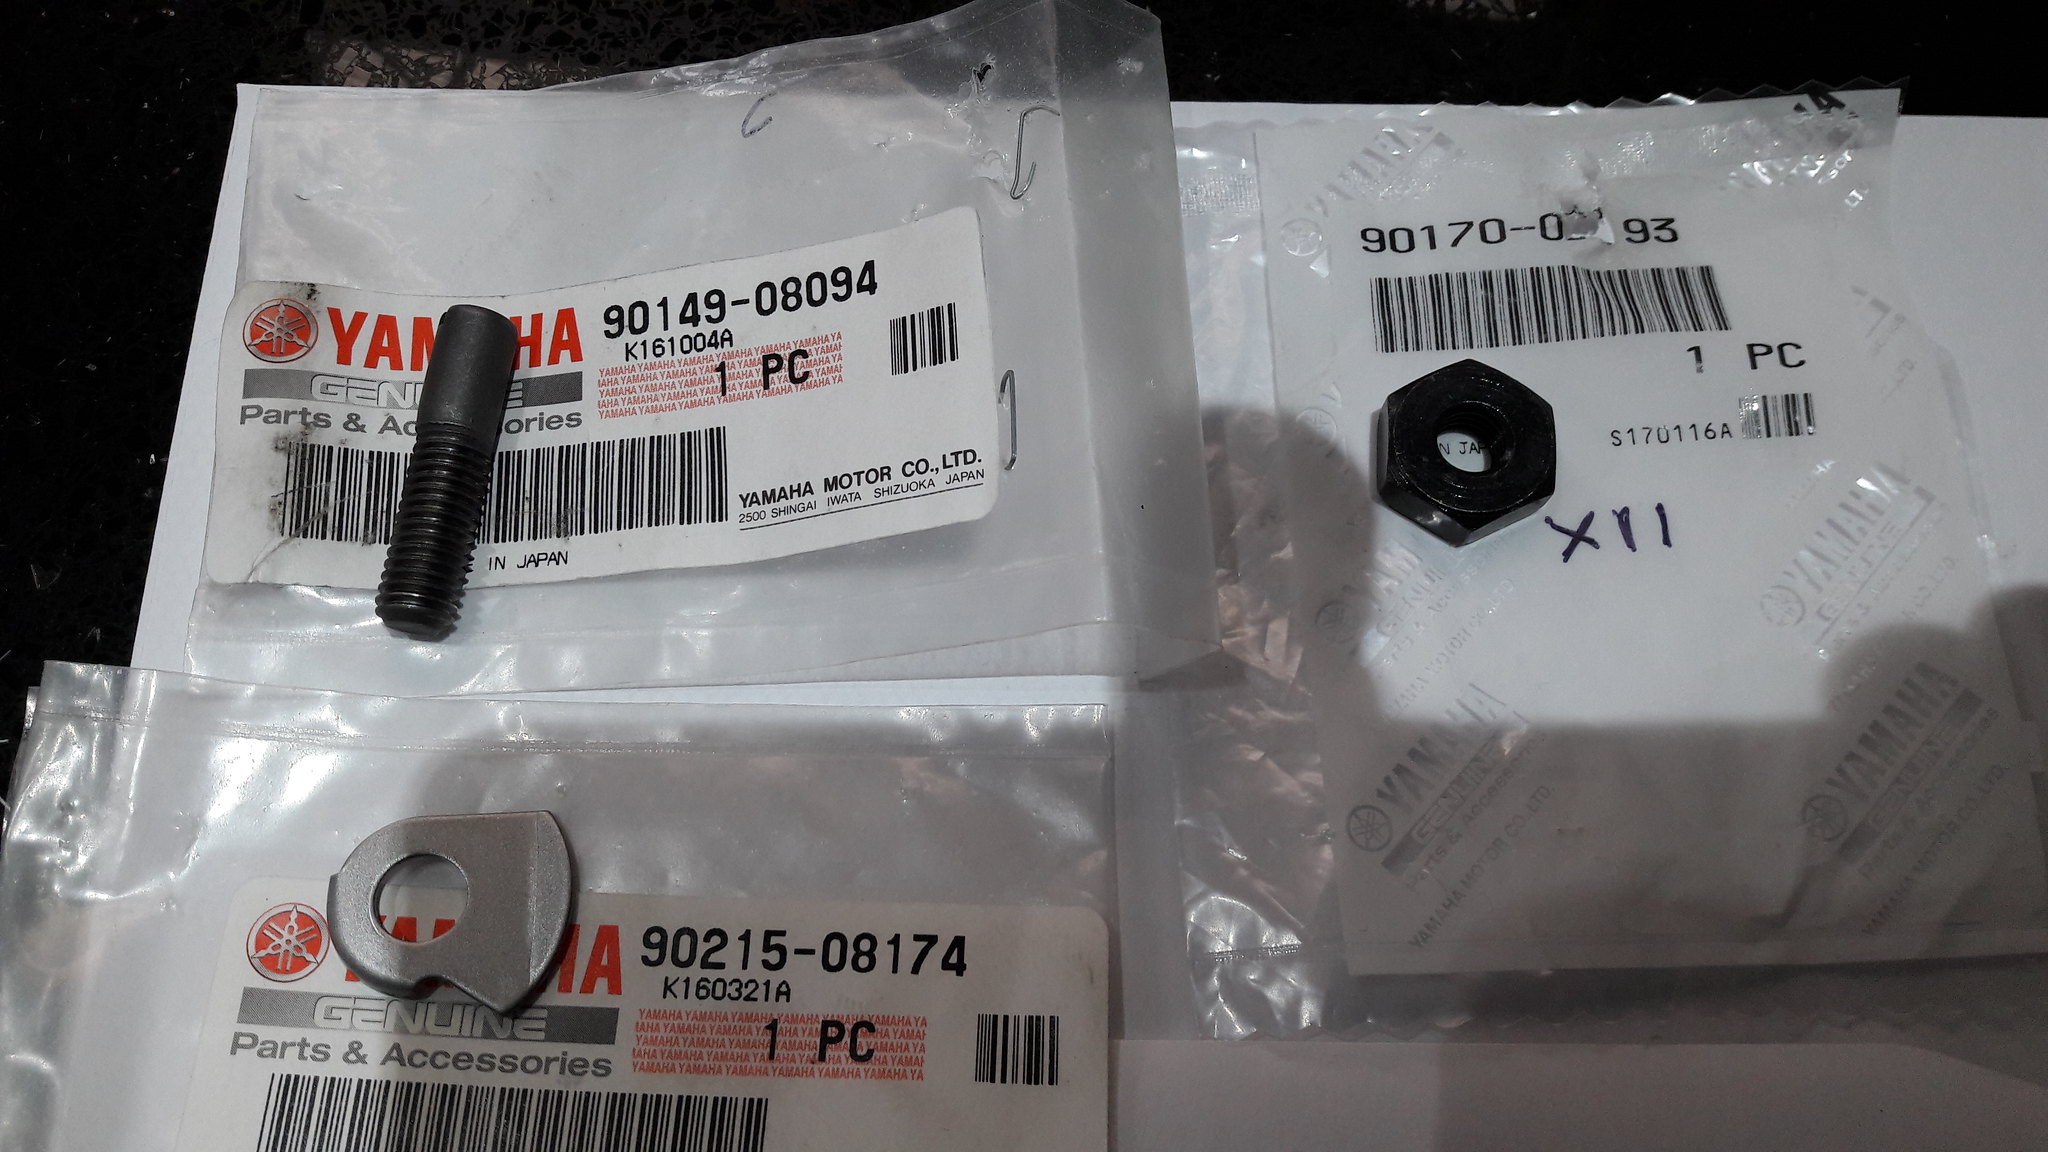 20181026_110828 20181026_110828 by David Miller, on Flickr Bolt is £2.94, nut is £3.00 and washer is £2.24 (Fowlers). No Loctite on this as you need to be able to move it once the gearchange shaft is fitted; 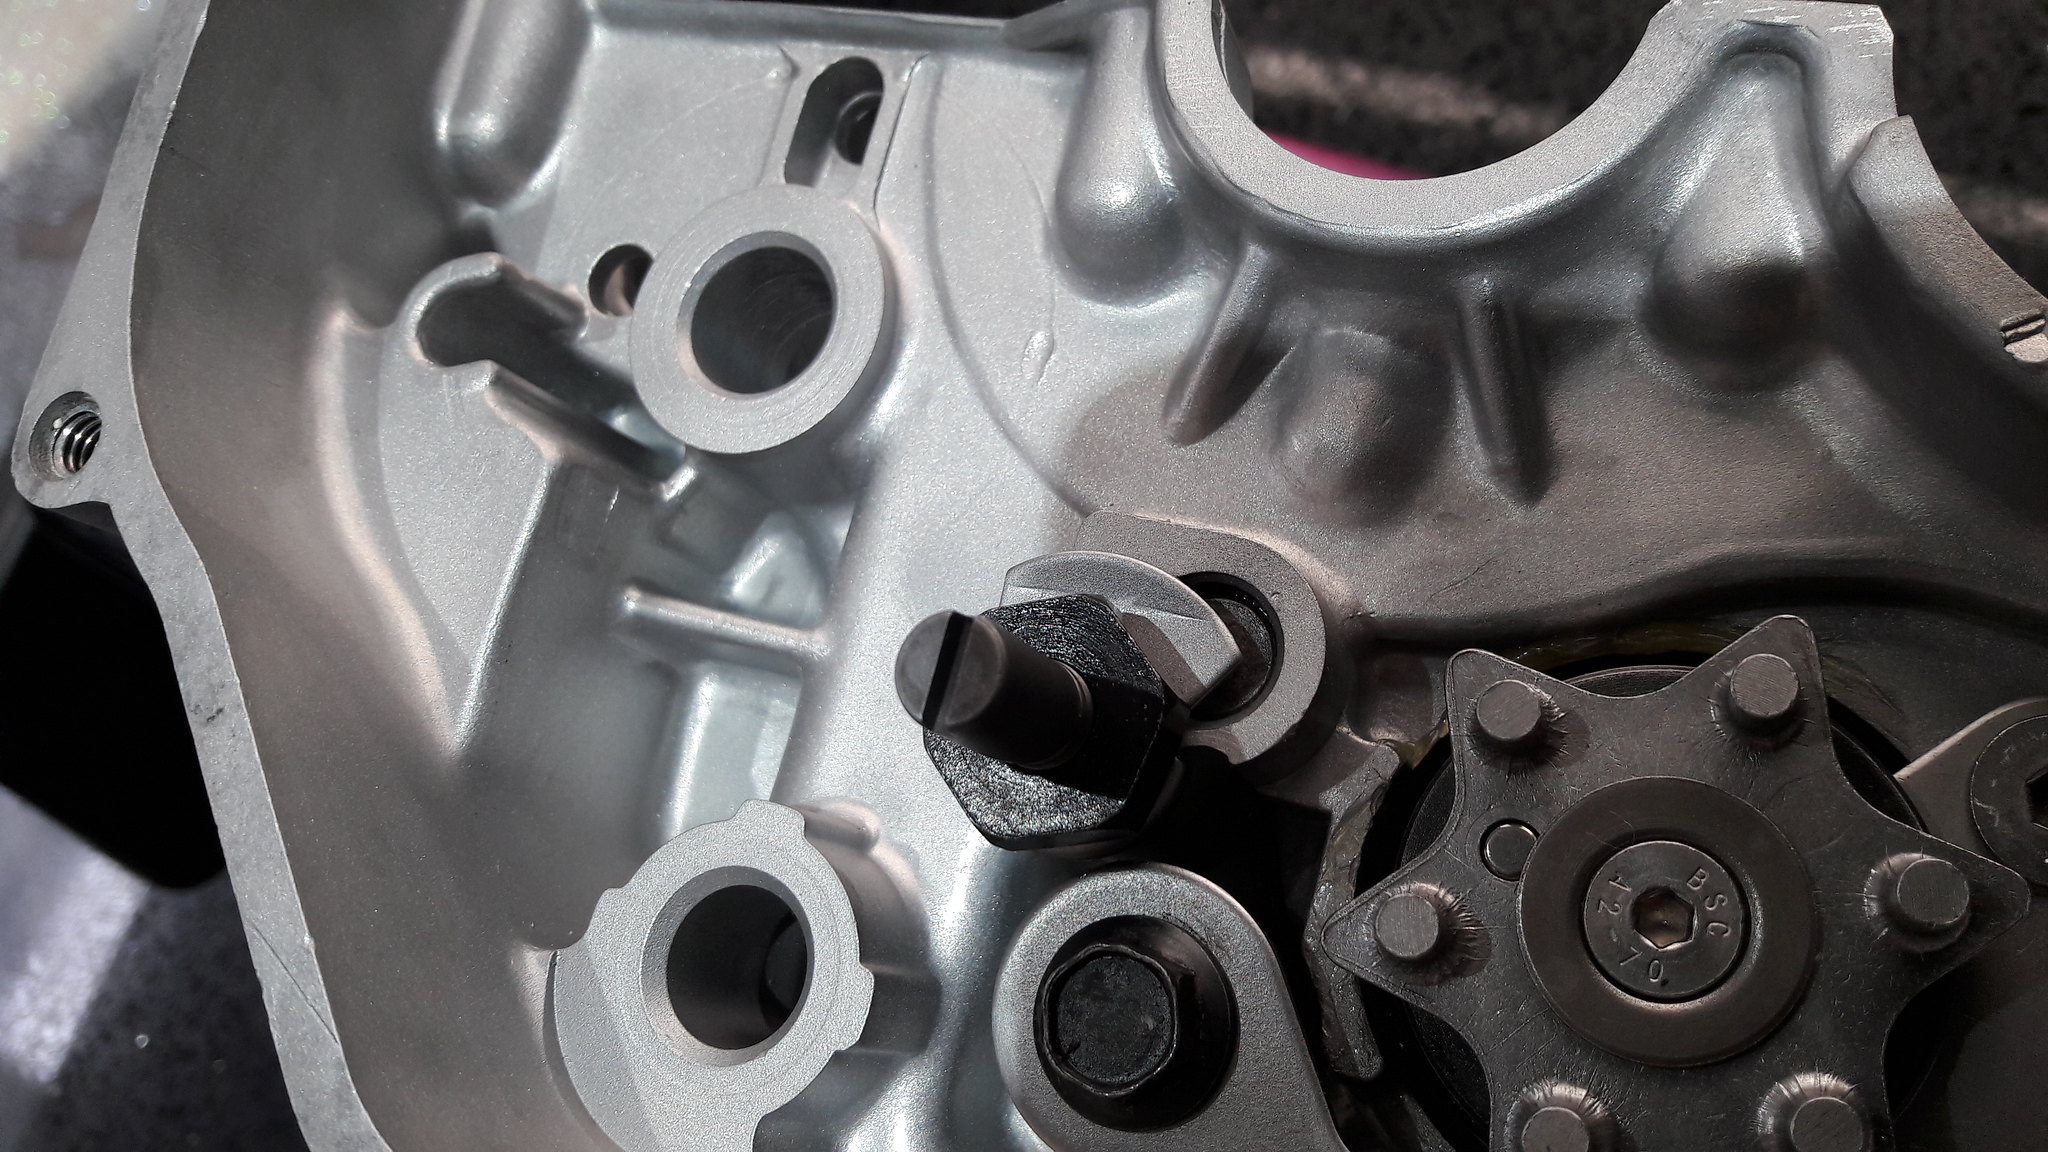 20181026_111012 20181026_111012 by David Miller, on Flickr Gearchange shaft is next. I bought a new one as the old one had a groove where it passes through the oil seal, and would have leaked; 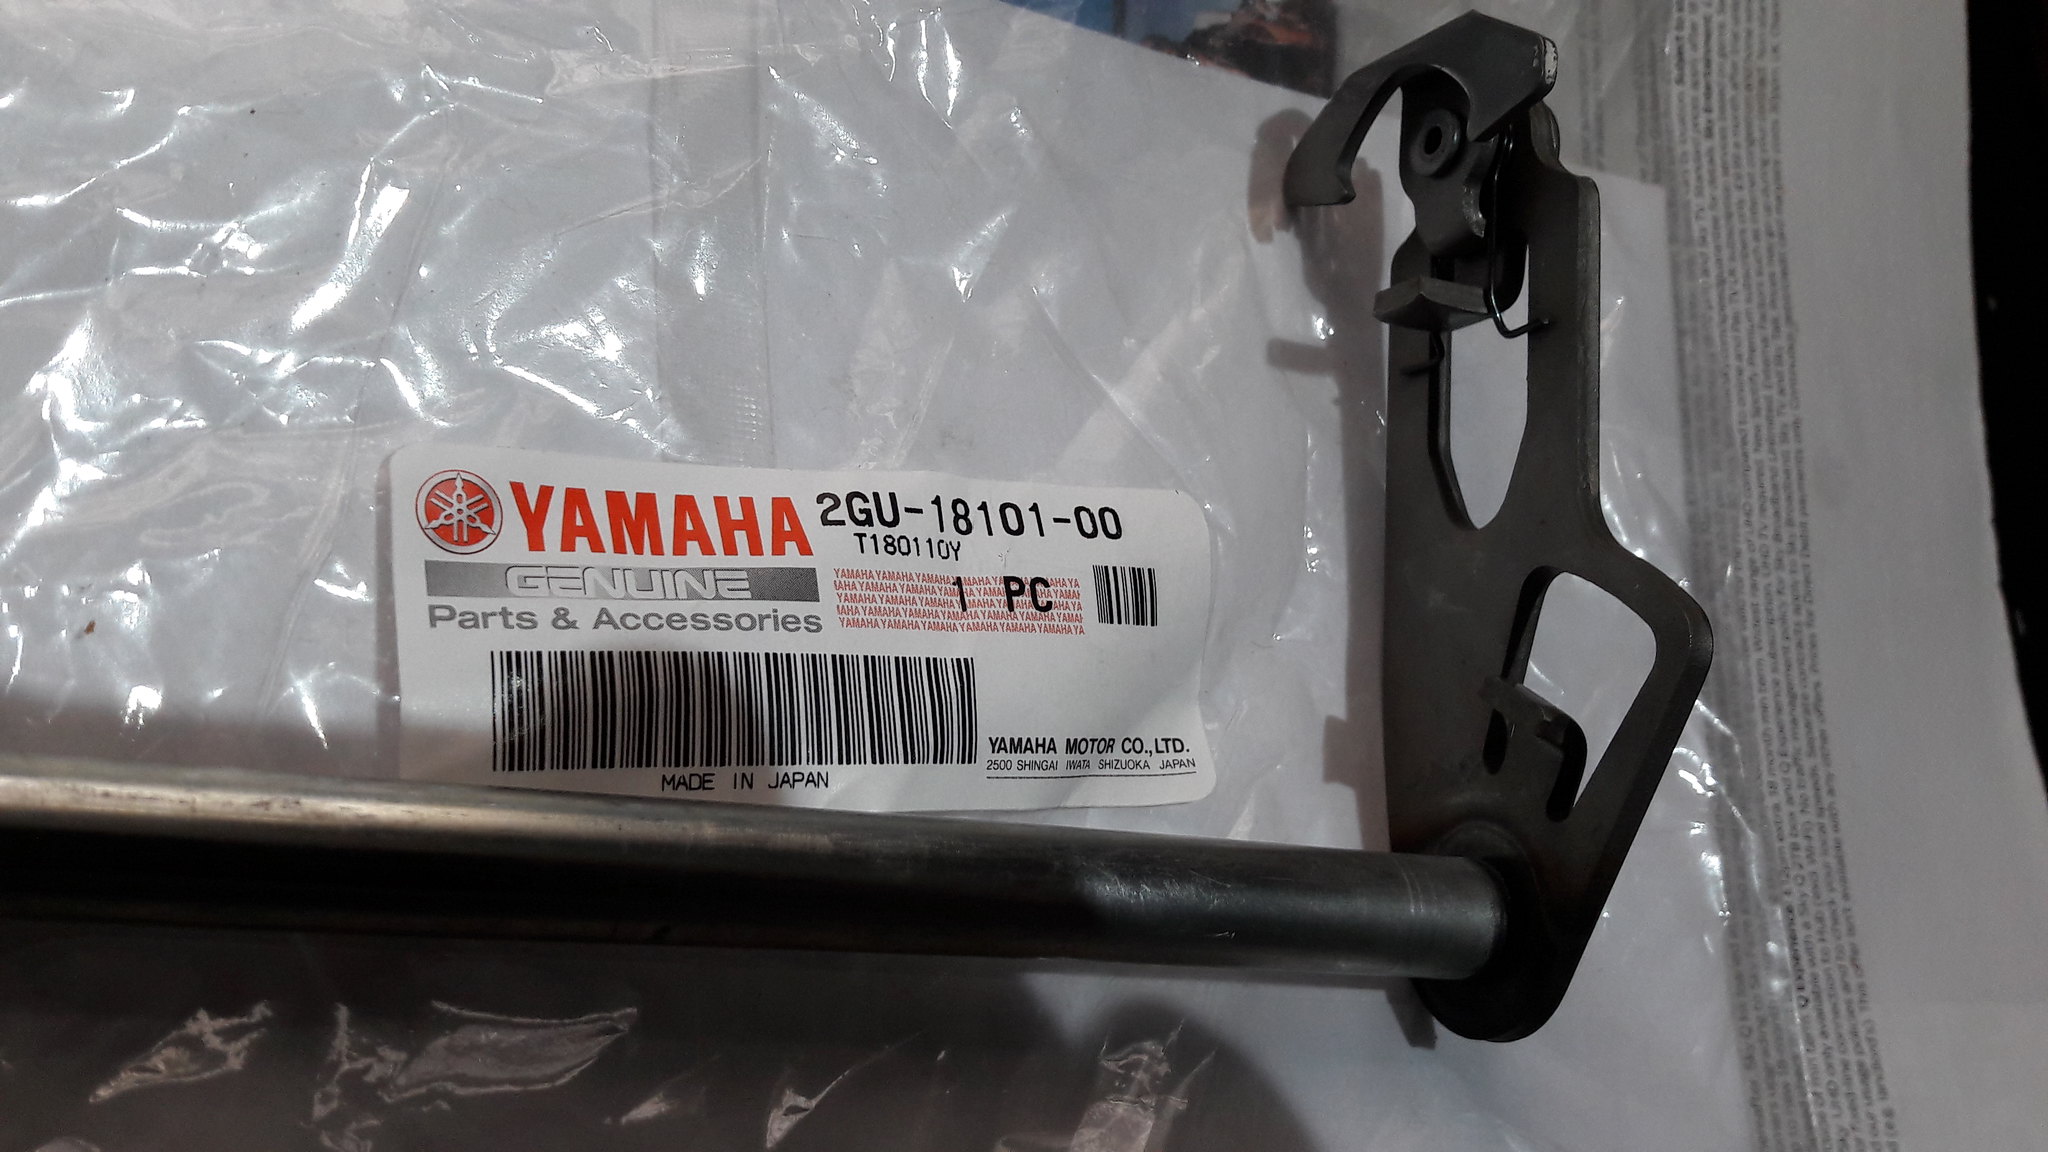 20181026_111202 20181026_111202 by David Miller, on Flickr Bit expensive at £86.23 (Fowlers) ! You have to transfer the spring and plastic spacer over from the old one; 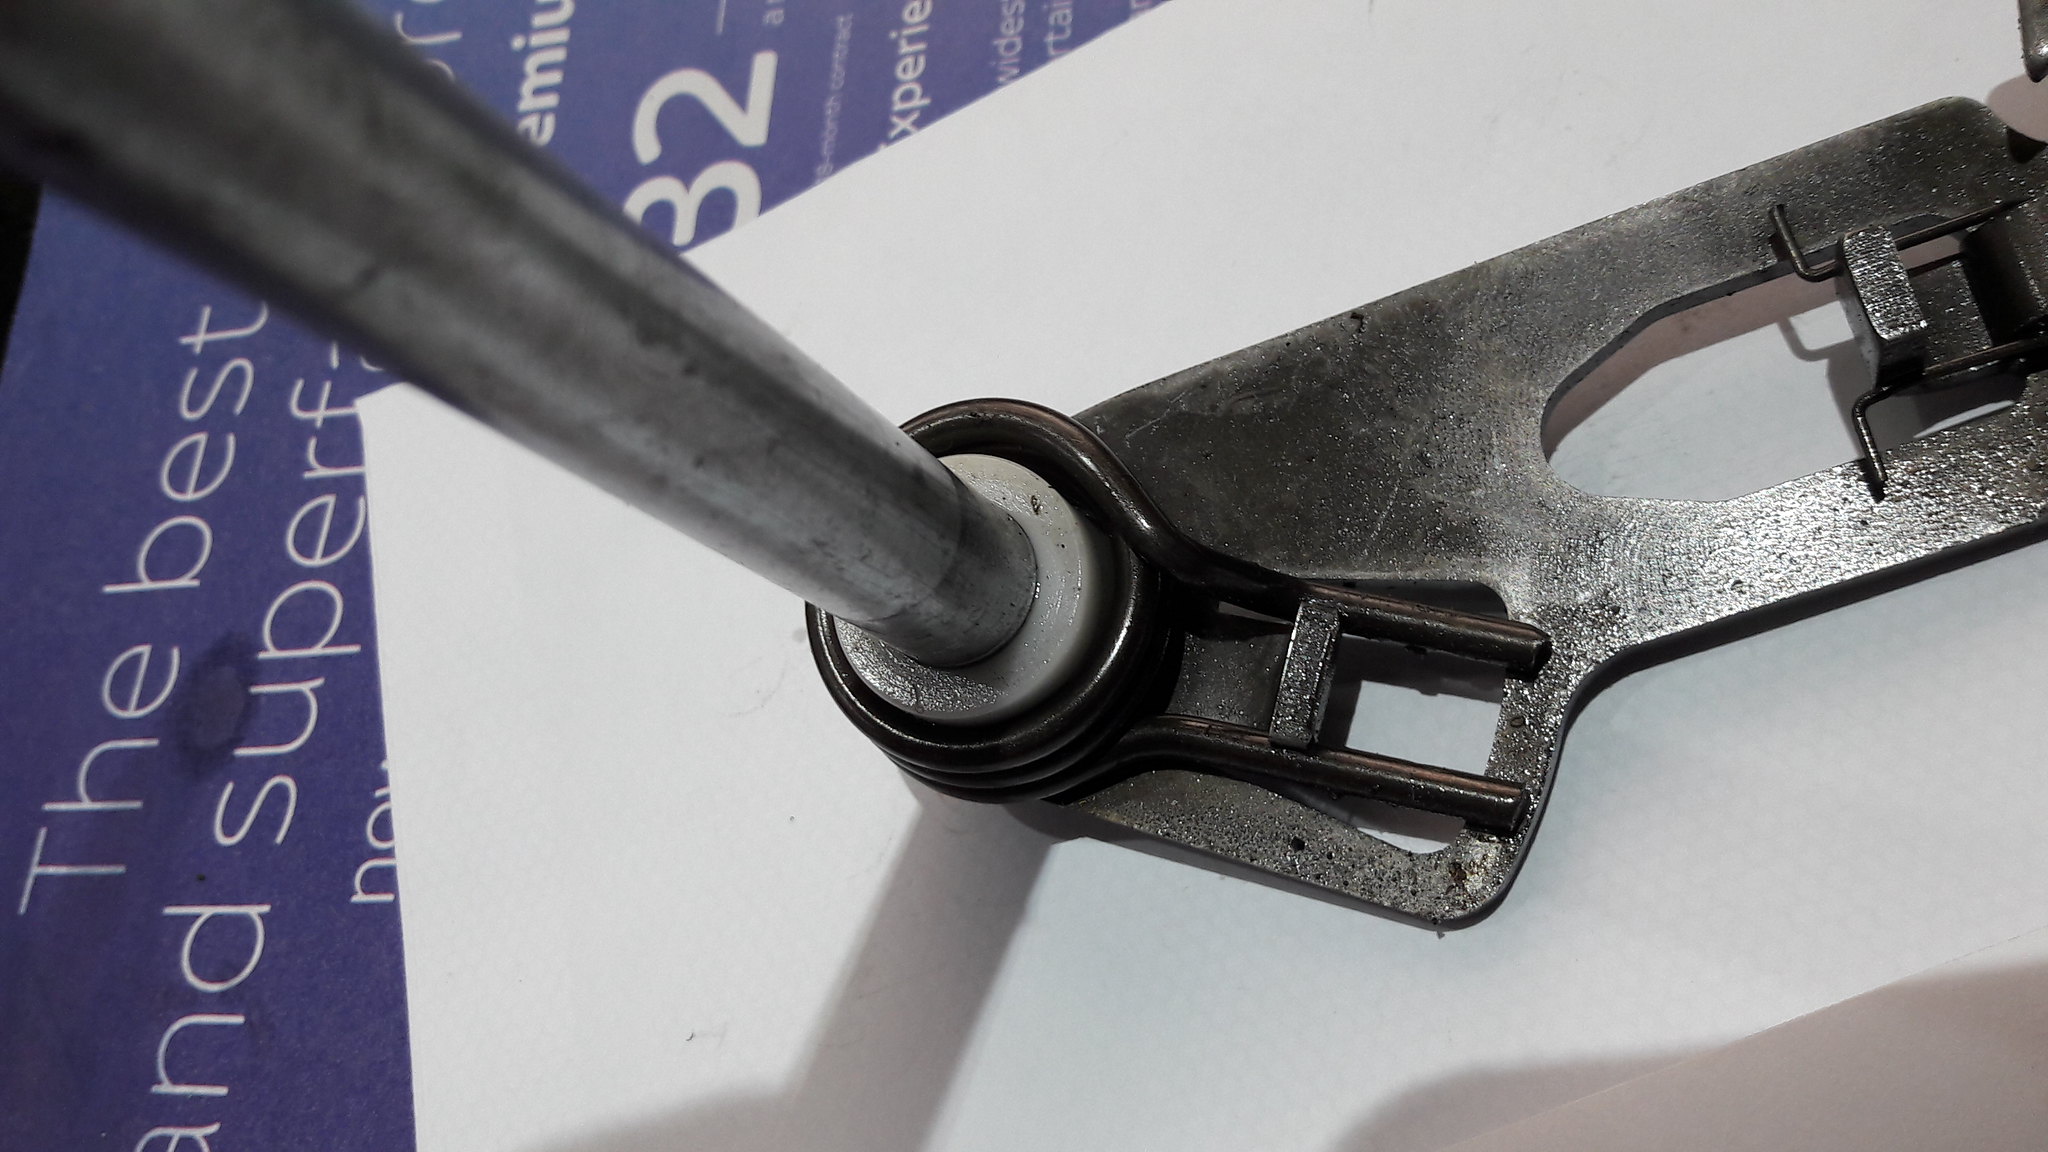 20181026_111415 20181026_111415 by David Miller, on Flickr 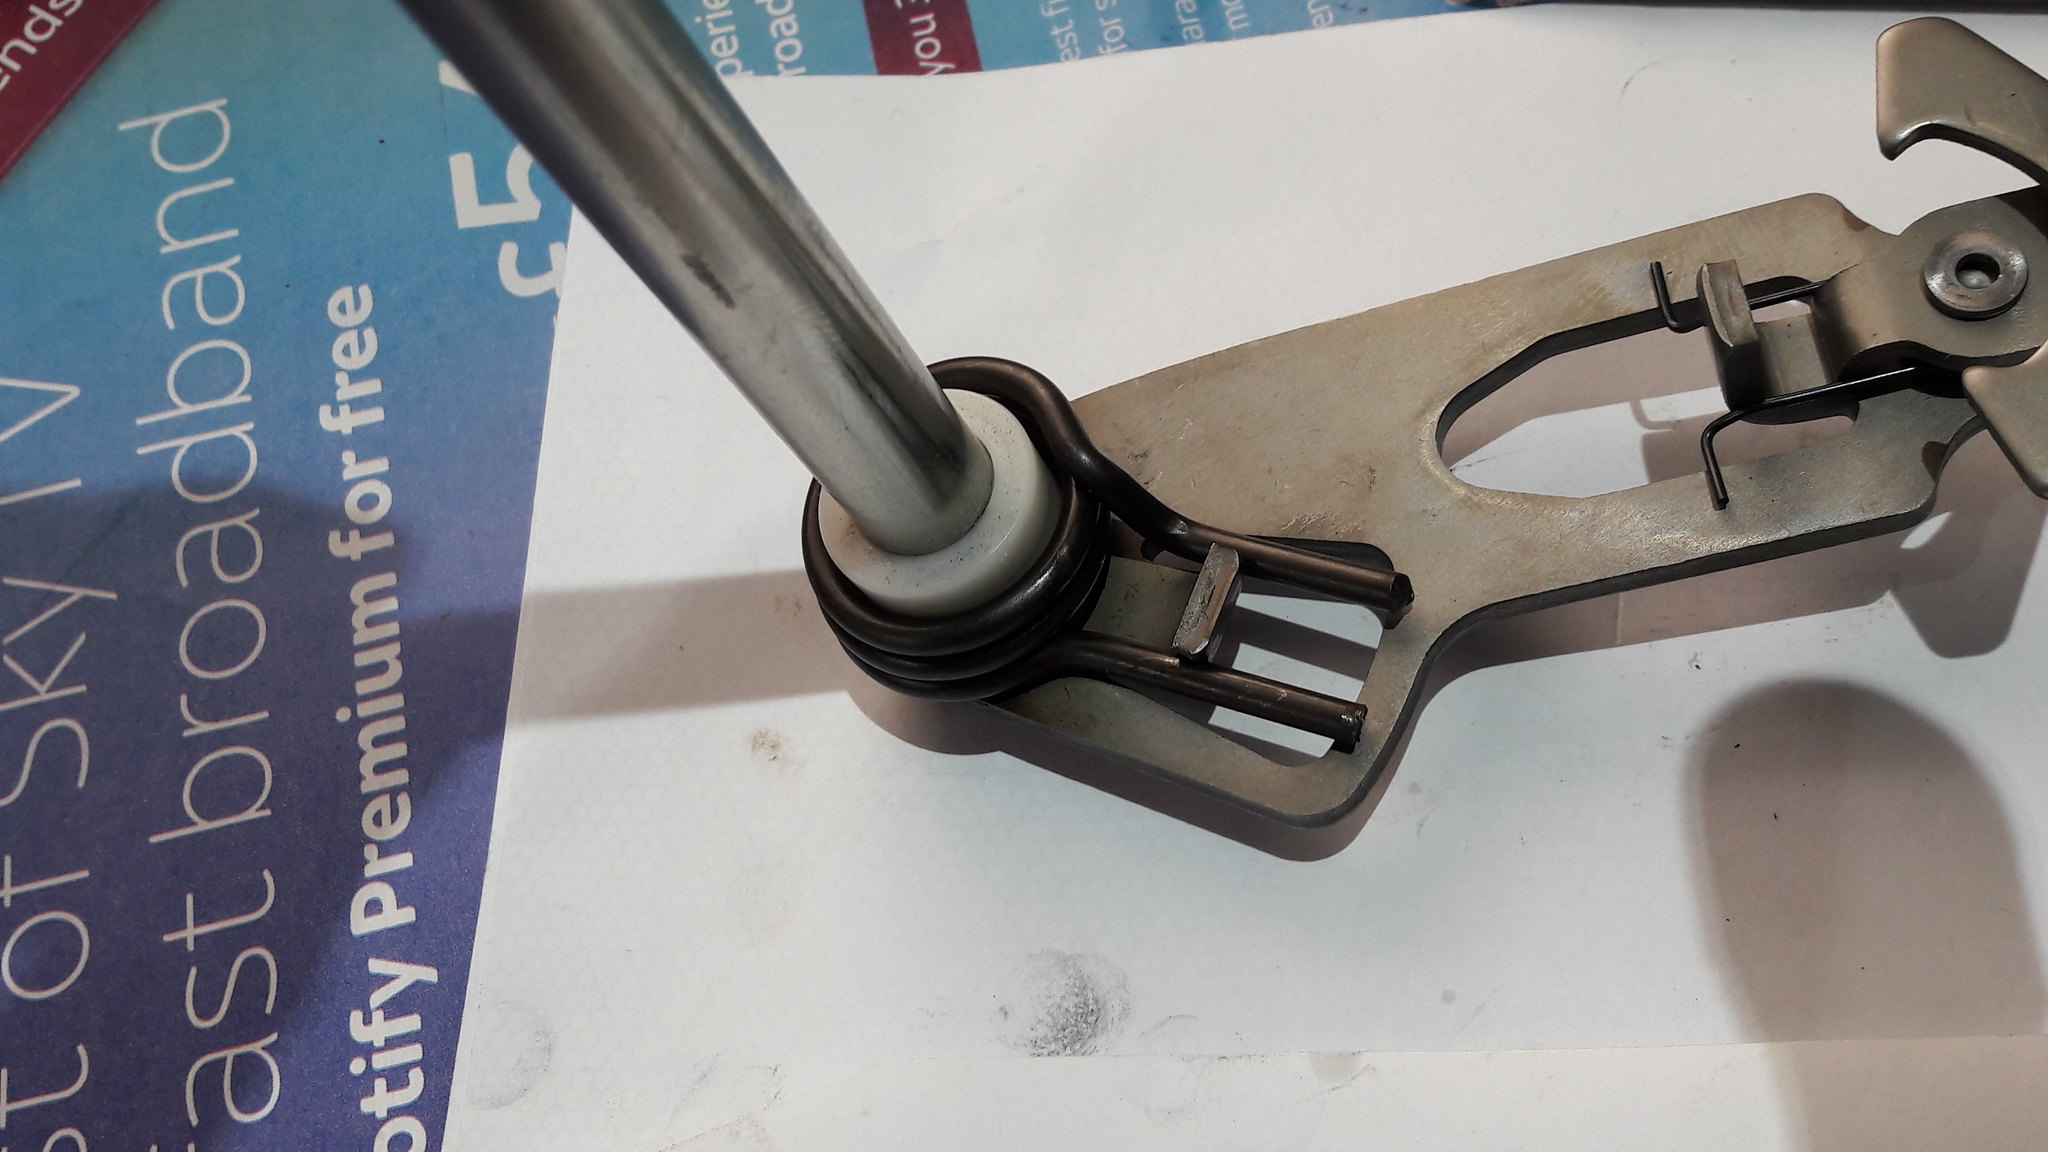 20181026_112748 20181026_112748 by David Miller, on Flickr I bought a new spring; 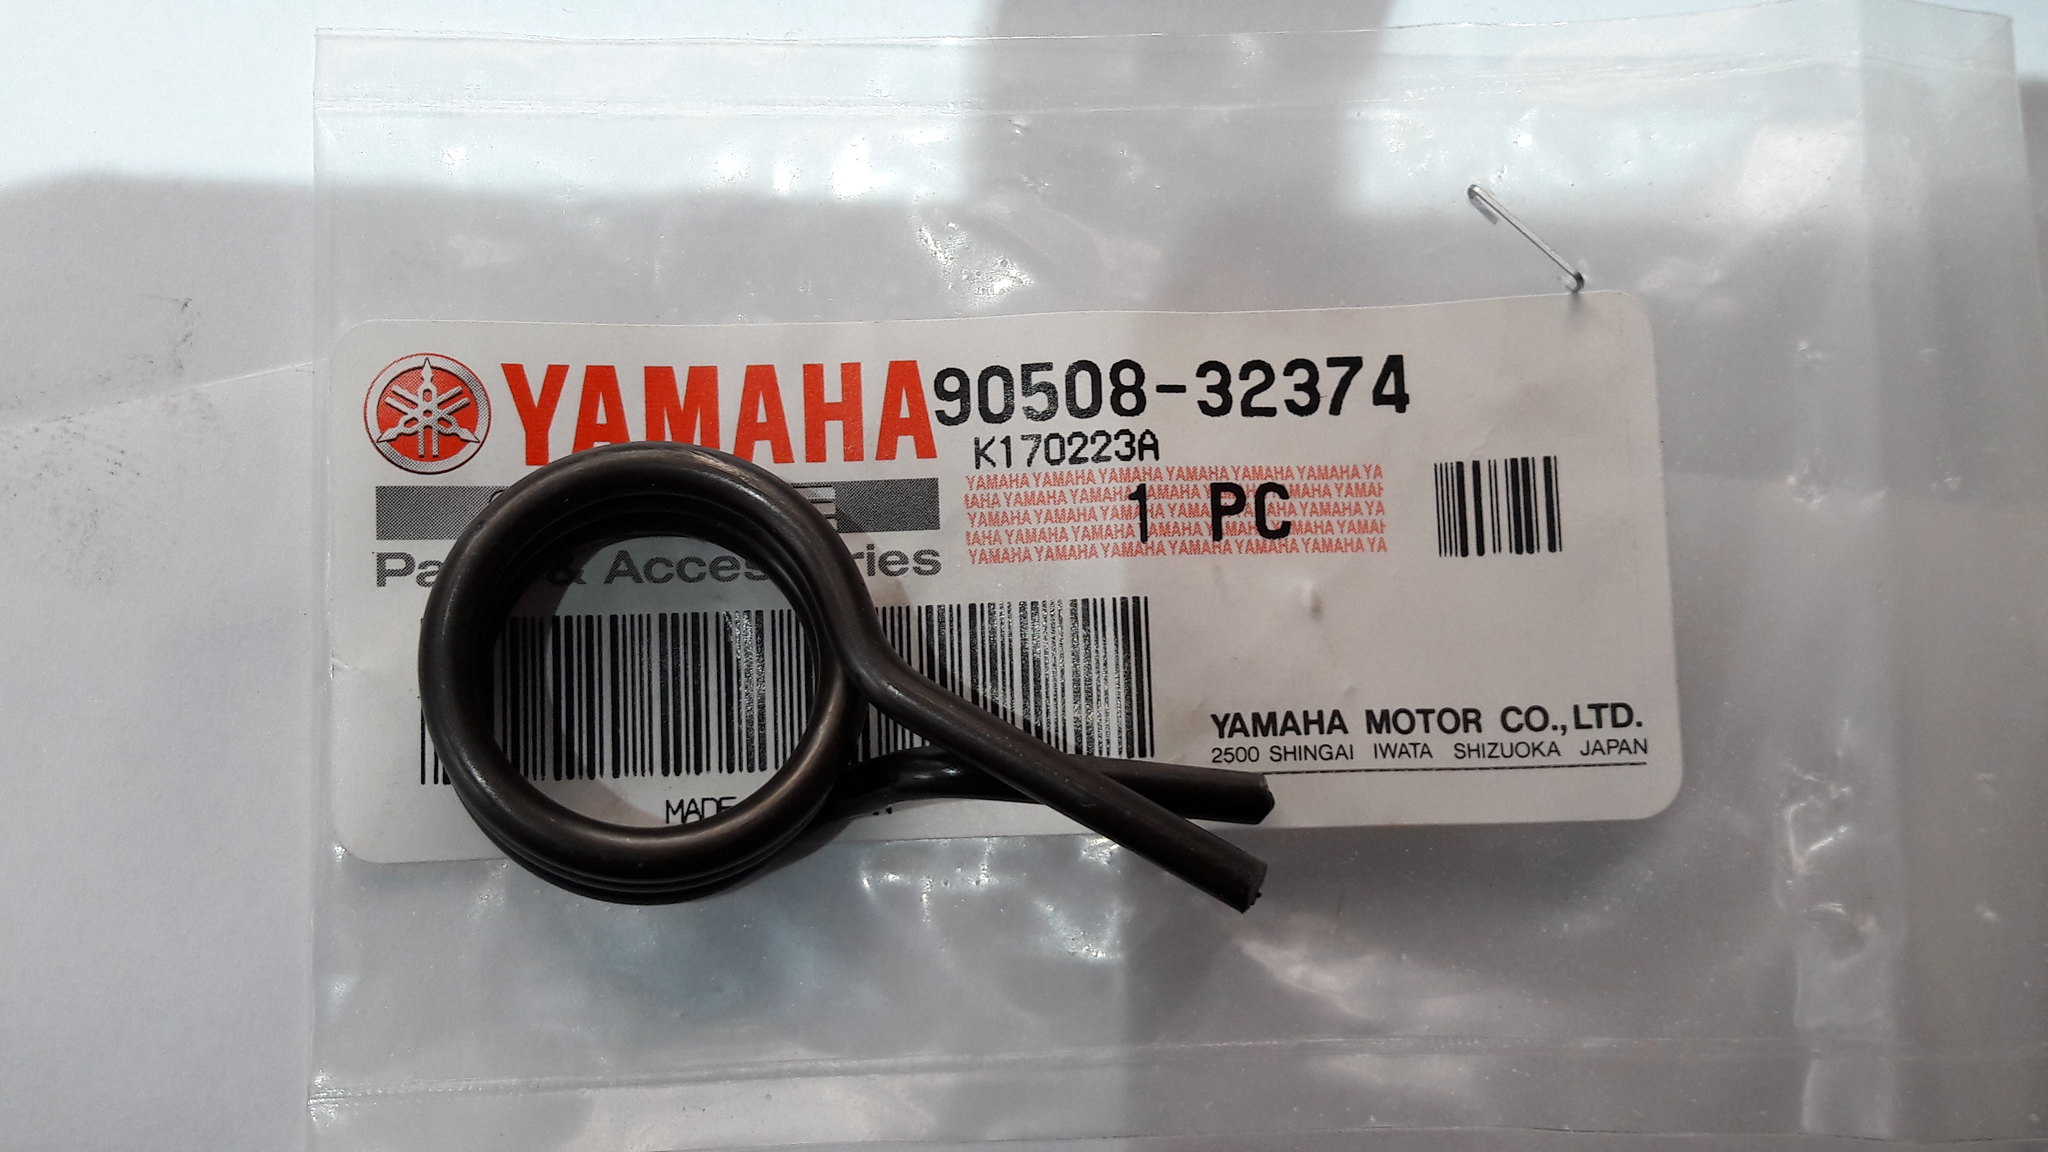 20181026_111233 20181026_111233 by David Miller, on Flickr £3.38. Once spring and plastic spacer are fitted, you can slide the arm into the casing, after lightly greasing it; 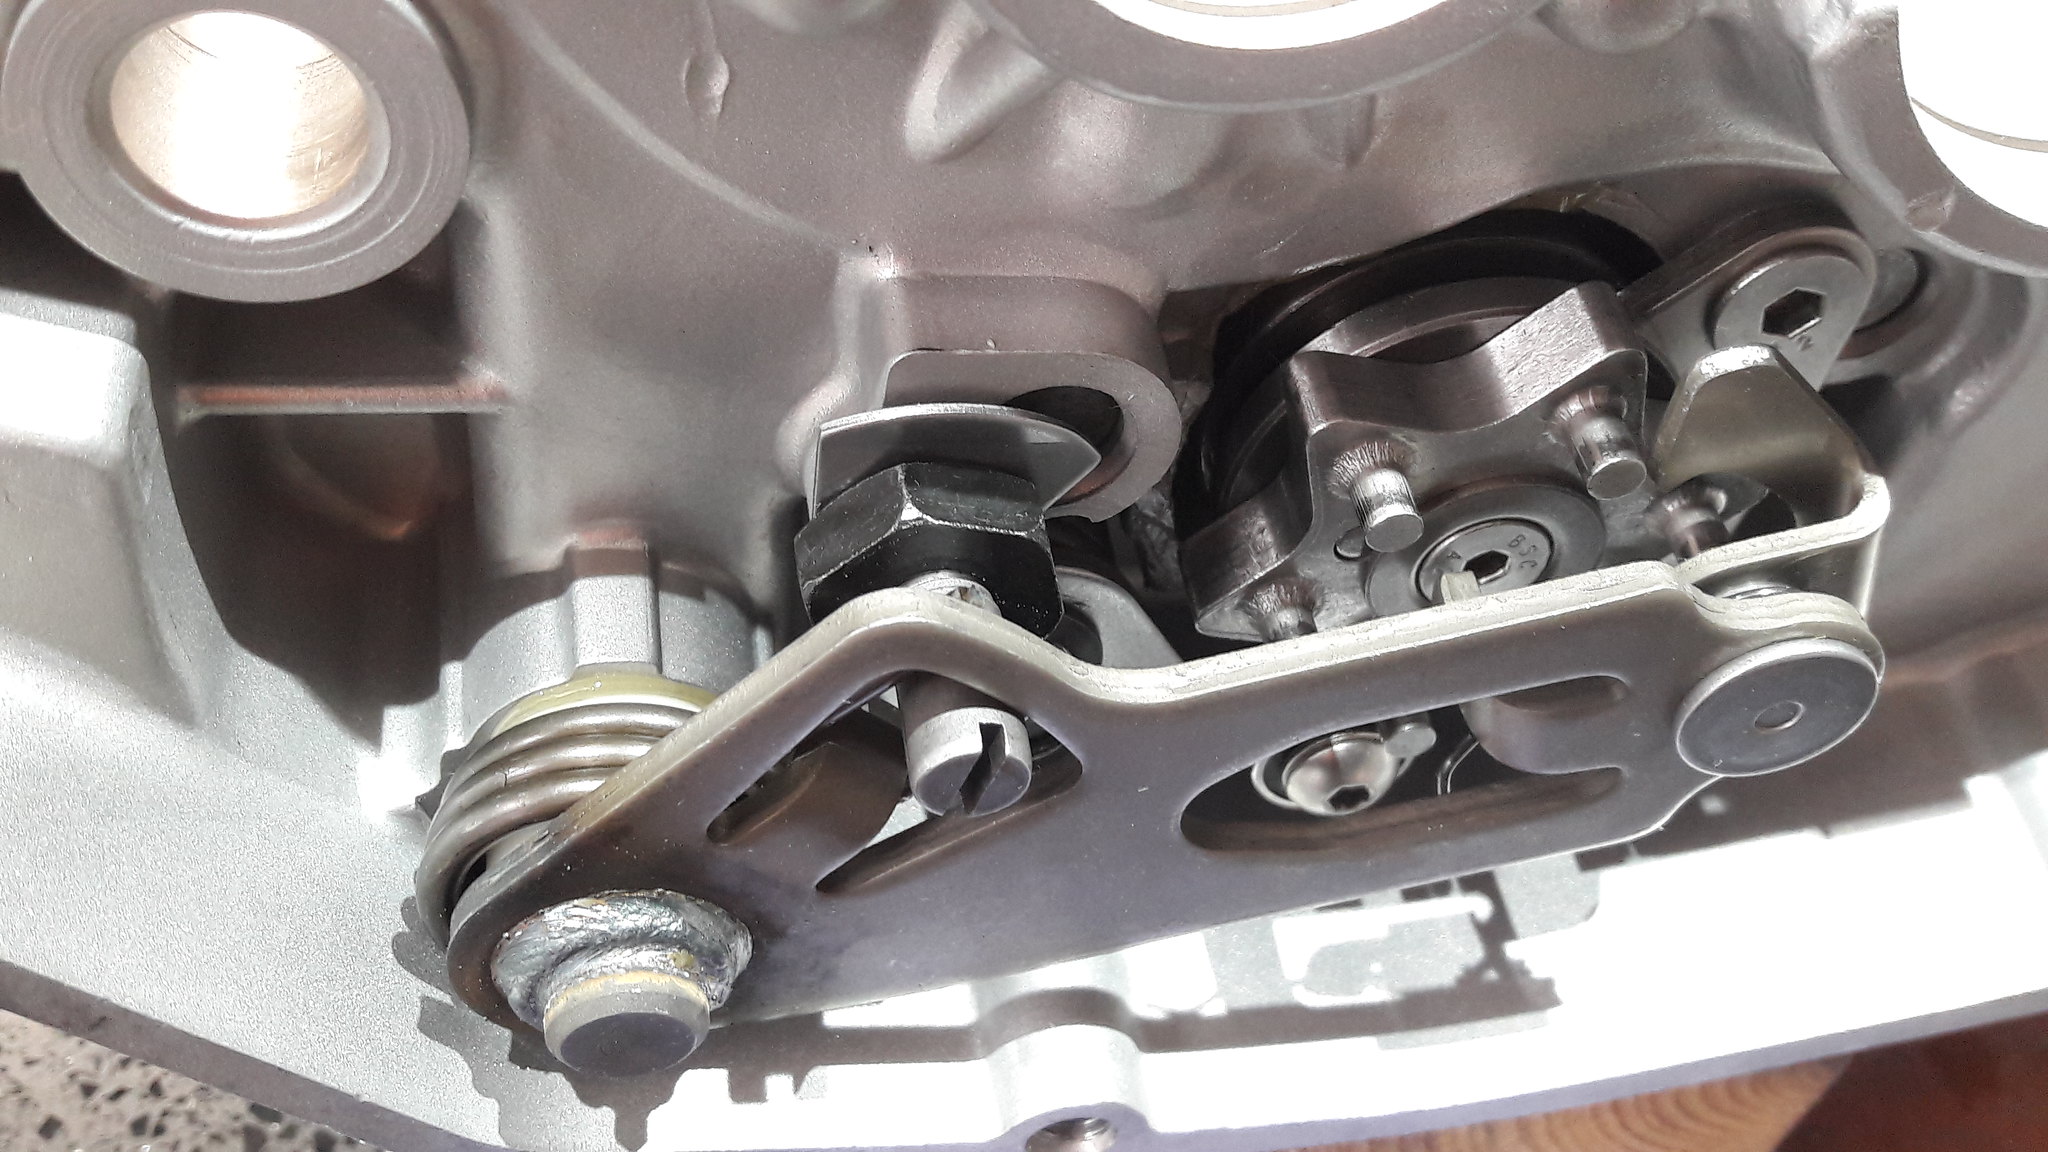 20181026_114503 20181026_114503 by David Miller, on Flickr Now you are ready to play with the adjuster bolt. As you turn it you will see the 2 claws move up and down; 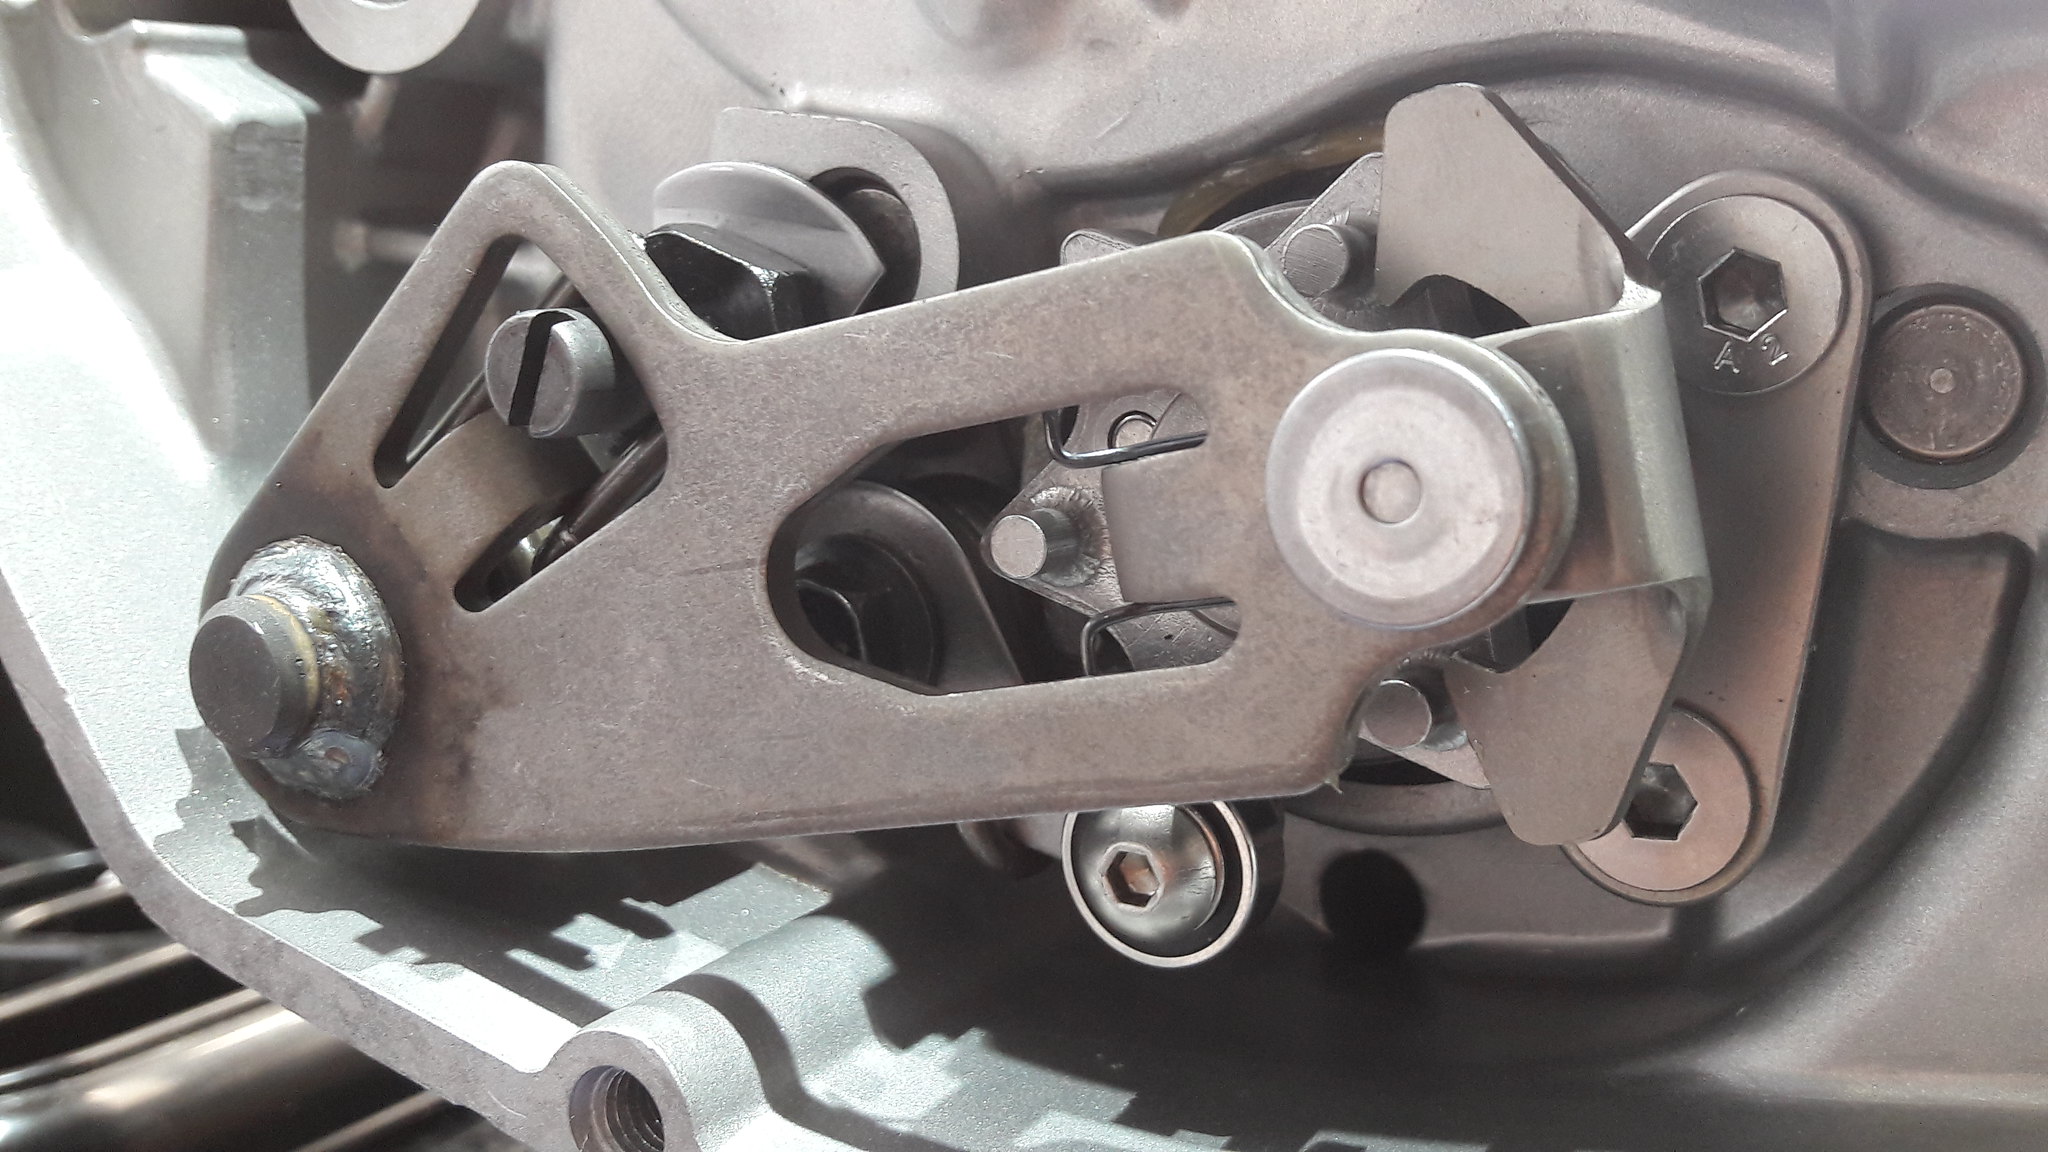 20181026_114453 20181026_114453 by David Miller, on Flickr The trick is to get the 2 claws equal distance to the pins they are closest to - if that make sense. Once you are happy, you can tighten the nut on the adjuster bolt, but I don't bend over the tab washer yet - I do that later, once the gear clusters have had a trial fit and gear selection tested. Spinning the engine round, you can fit the gearchange shaft oil seal; 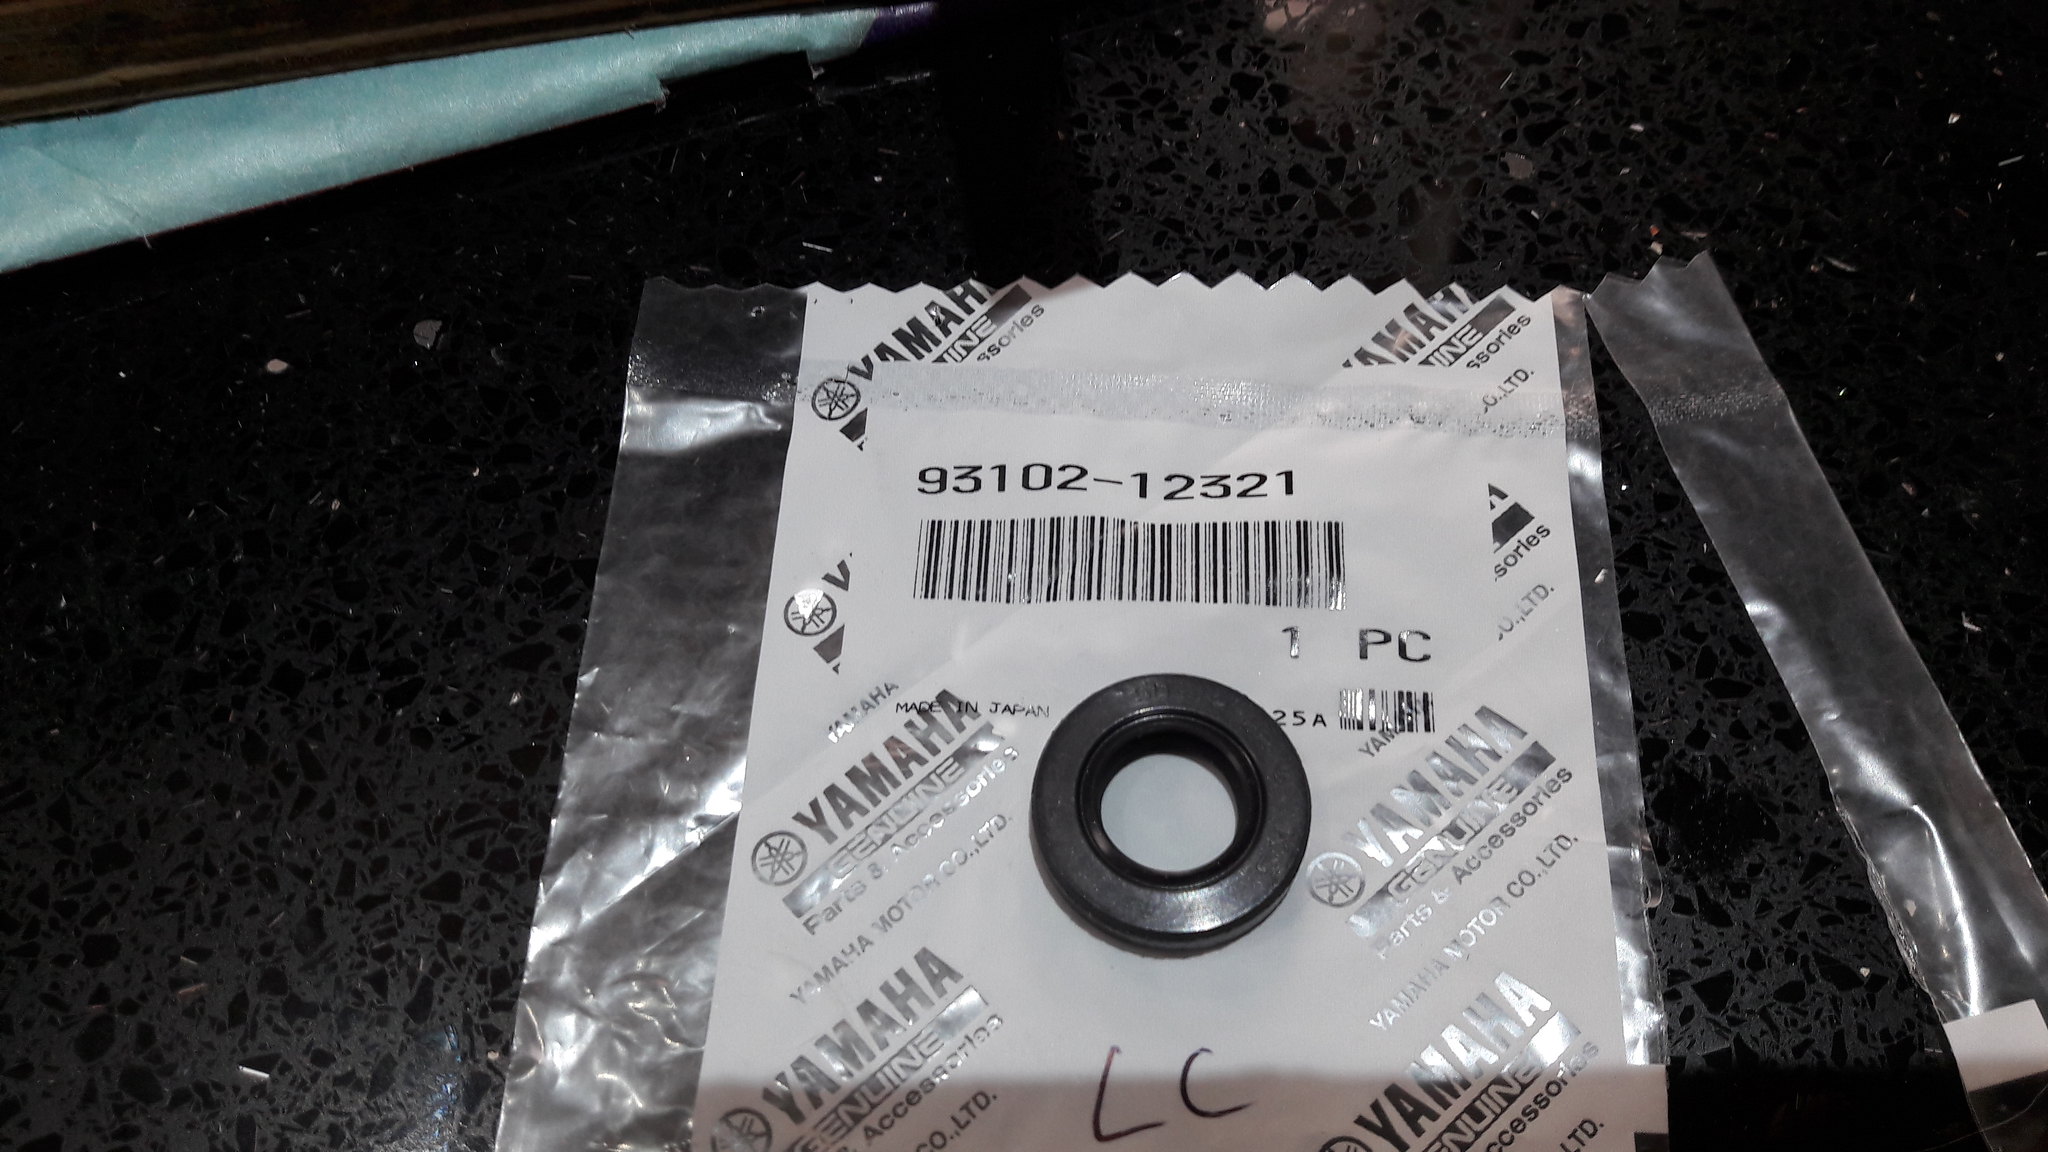 20181026_115023 20181026_115023 by David Miller, on Flickr £9.54. Wrap some tape over the splined end of the shaft to protect the seal lip, and grease with red rubber grease to help it on it's way, and give the seal some lubrication;  20181026_115314 20181026_115314 by David Miller, on Flickr And pushed into place; 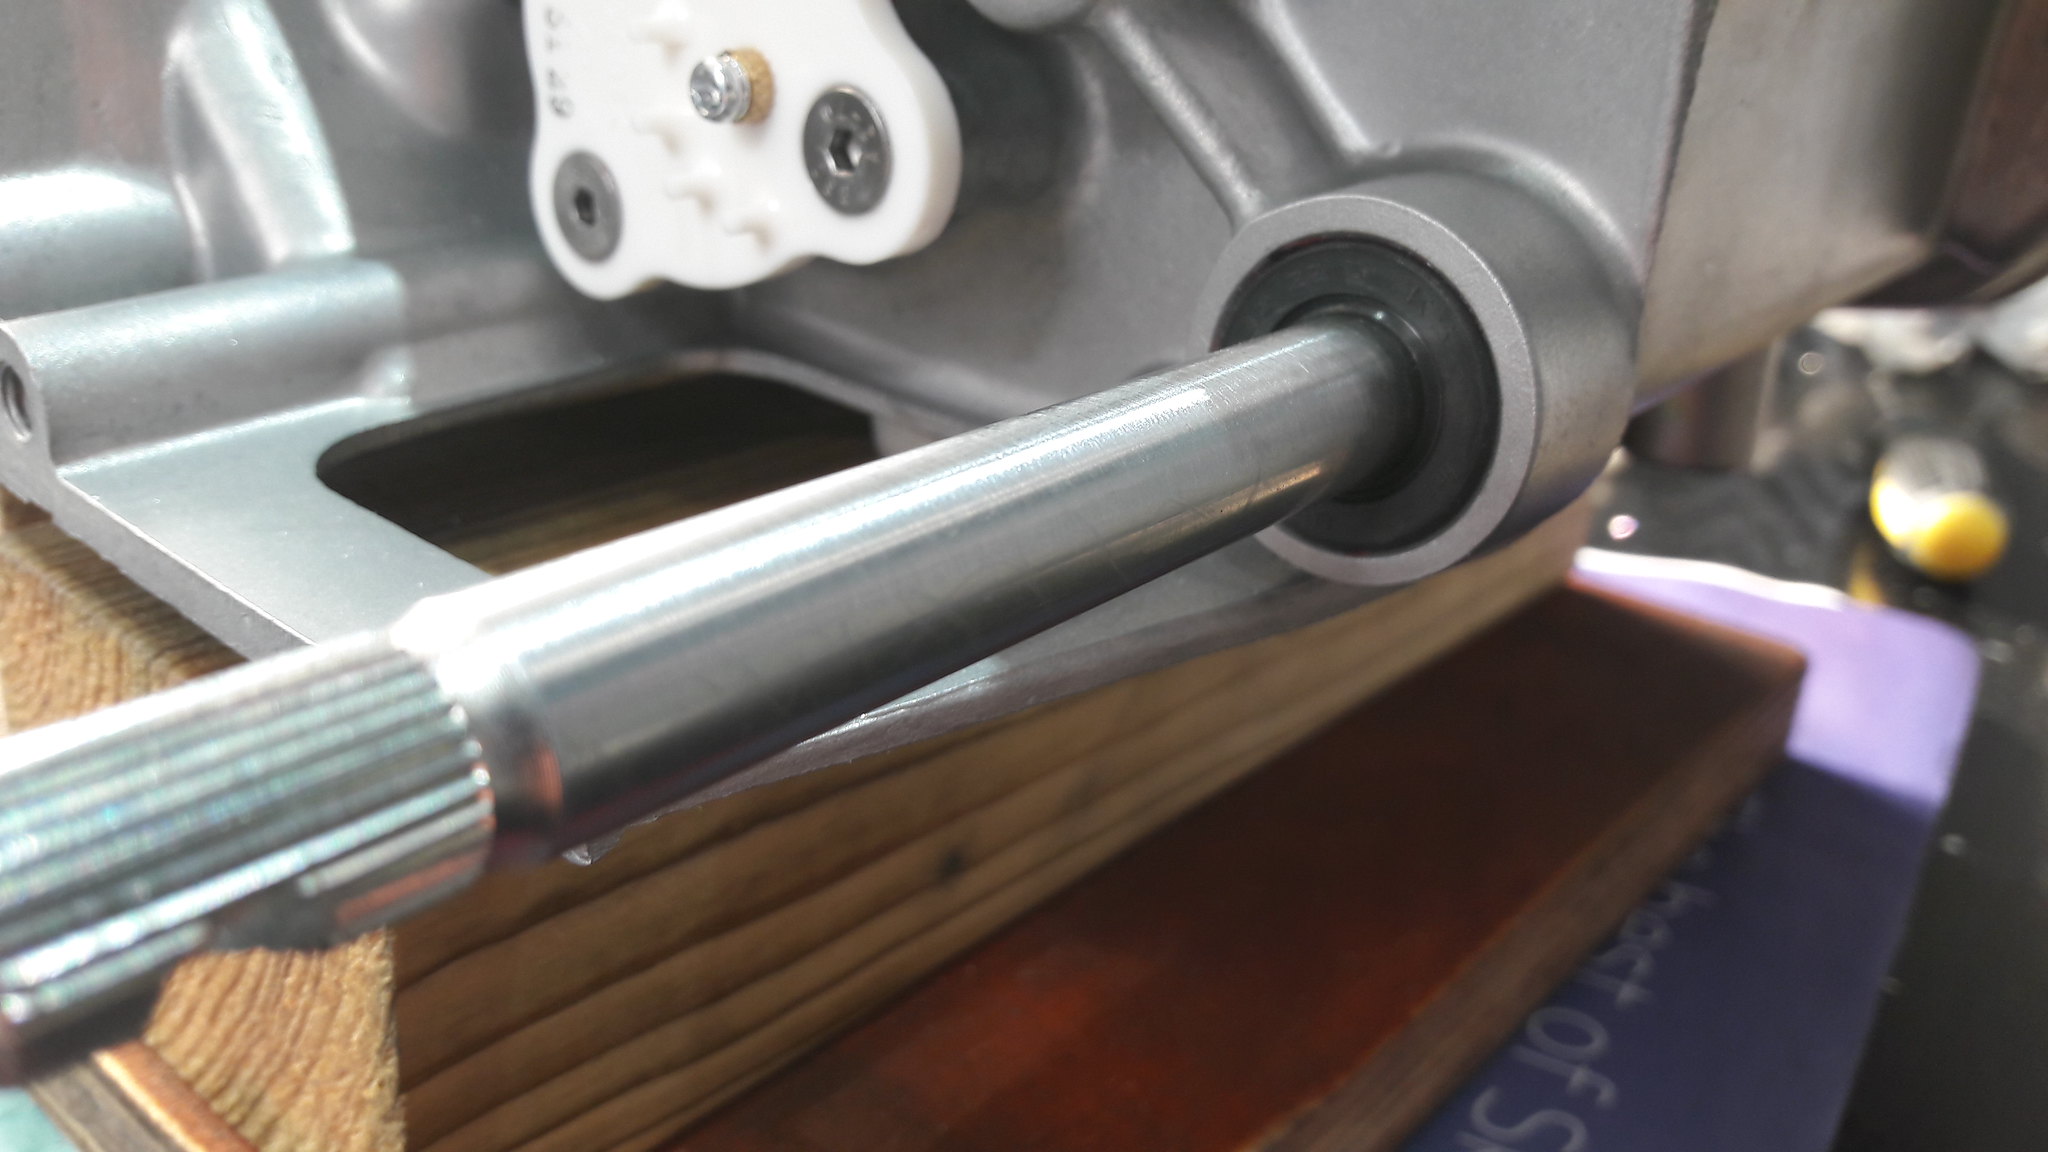 20181026_120814 20181026_120814 by David Miller, on Flickr Next will be gear clusters. Dusty  |
|
|
|
Post by dusty350 on Oct 26, 2018 21:04:00 GMT 1
Hi Alan Thanks for the reply. I did look at the possibility of the nut on the back of the stopper arm interfering with the drum. I'm pretty sure it clears it but I will have another look. That's a kind offer to machine up some parts. I will happily cover your costs  I nearly fitted the bearing with the bolt head at the back. but felt their was clearance to do it with the nut on the back. I will double check in the morning. Cheers mate Dusty  |
|
|
|
Post by alankelly on Oct 26, 2018 21:32:22 GMT 1
Hi Dusty
The issue I had was when the roller dropped into the normal gear position as it was held away from the bottom of the cam profile by the screw head catching on the drum outer diameter
It’s no problem making a kit at no cost as no doubt I may need some help at some point too from a forum member and the thing about forums is it’s nice that you can do something to help out like a simple machining job for someone who needs something easy
Catch up soon Al
|
|
|
|
Post by 4l04ever on Oct 26, 2018 22:18:45 GMT 1
|
|
|
|
Post by dusty350 on Oct 27, 2018 8:58:31 GMT 1
Hi I did look on the RS Components site for an open bearing but couldn't see one. My understanding of sealed bearings is that they are greased, and then sealed to prevent the ingress of dirt - perfect for something like a wheel bearing that is more open to the elements. Obviously not an issue in the gearbox, so I will pop the seals off to allow oil to get to the bearing rollers - good call - the more I think about it the more it makes sense  And I did remove the stopper arm and dug out another selector drum. The nyloc "just" touches the drum when it is in gear ie. in the valley between the peaks of the star. Couldn't see it when fitted - looked like it just cleared, but with parts in hand it does slightly contact, so Alan's solution will work without contact. Good info fellas - that what this thread is about - a collective input to get the best results  And thanks again for the offer Alan - I will fit your kit, thanks. And you are right regards the forum - like minded guys helping each other out - I'm a big fan of that and this forum has lots of good, knowledgable and generous members ready to offer help and knowledge  Cheers fellas Dusty  |
|
|
|
Post by mikee on Oct 27, 2018 11:44:12 GMT 1
The bearing won’t be rotating at any speed so open or sealed won’t make any difference tbh
Mike
|
|
|
|
Post by dusty350 on Oct 27, 2018 13:28:23 GMT 1
Hi Mike Yea, the amount that bearing will work wont be something like a wheel bearing of course, but it did cross my mind that it didn't need to be a sealed bearing. It's a really easy job to get the rubber covers off; 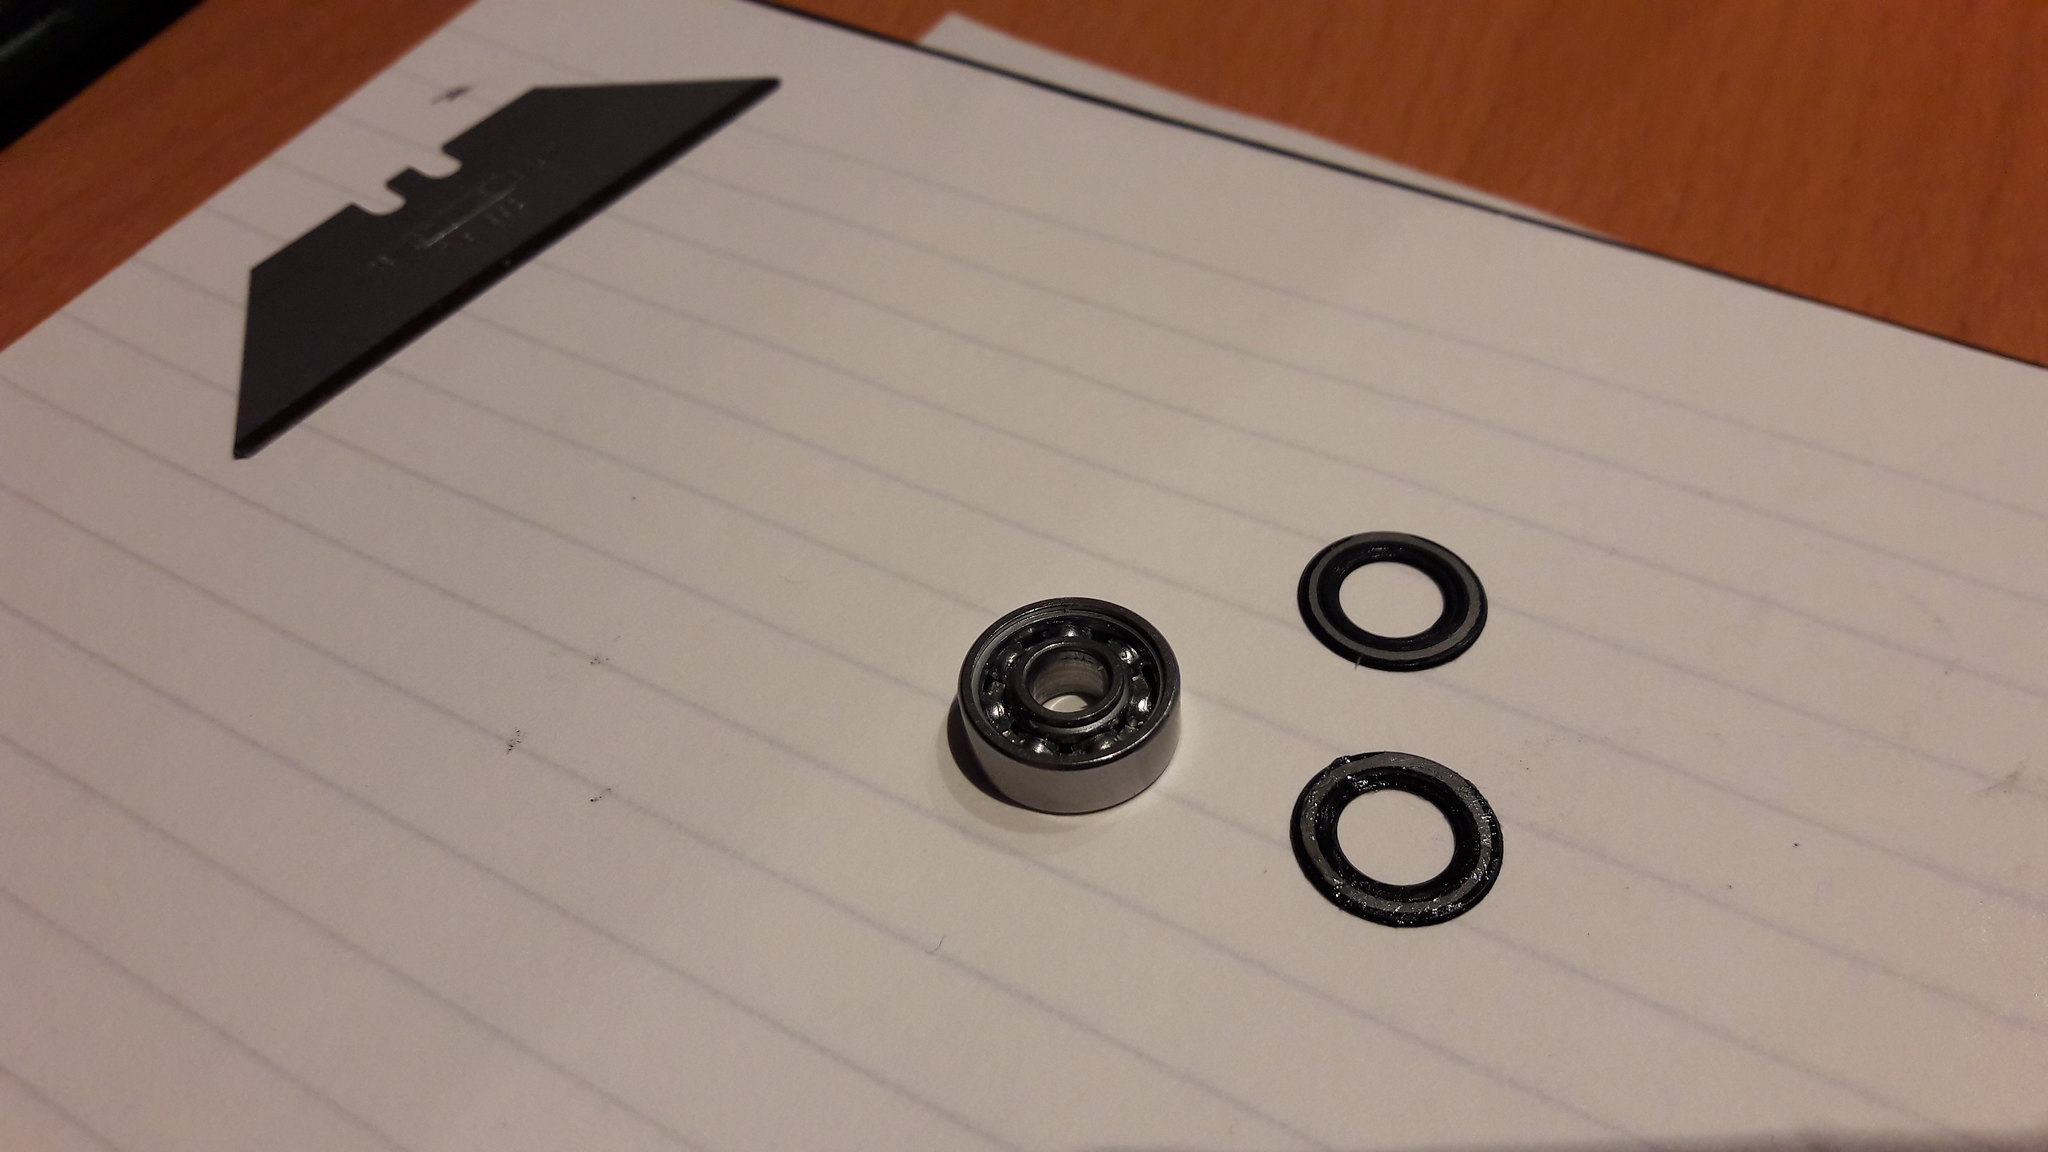 20181027_091612 20181027_091612 by David Miller, on Flickr It will work either with or without the rubbers I'm sure, but I'm now going without. Dusty  |
|
|
|
Post by Nicky on Oct 27, 2018 16:52:38 GMT 1
Dusty, Wow...what a fantastic series you are providing us here! Big thanks! I am doing cosmetic resto on my 250/350 which of course has gone much further (you will recall helping me out with that fork spacer?) but I'm hoping not to have to fettle the engine as it was running fine and dandy before I took the spanners to it. But I know it'll come at some stage and it's been 25 years since I last dismantled and rebuilt one of these, so your thread will be an invaluable guide!
|
|
|
|
Post by dusty350 on Oct 27, 2018 19:55:10 GMT 1
Glad it's useful Niikkio  The unfortunate thing with 2 strokes like ours is that they will need to be stripped and rebuilt at some point during ownership. But hopefully this thread, and the others on here, will show it's something that we can all do given the time, money and patience, and a few specific tools, and is not something to be worried about doing. Doing it yourself will save a fair chunk of money, and as you can see with the Yamaha parts prices, included where I've bought them, it can be an expensive rebuild before you hand it over to someone to put it all together for you. Great to hear yours is coming on now  Regards Dusty  |
|
|
|
Post by marrcel on Oct 27, 2018 20:45:03 GMT 1
Cheers Mike  The new bearing and circlip for the selector drum;  20181020_154104 20181020_154104 by David Miller, on Flickr The bearing is £12.80, and the circlip £3.38, from Fowlers. I lightly grease the bearing, then fit that and the circlip, and then the star can go back on. The cup washer helps trap the pin in the star head so it cant come out. I use some low strength Loctite on the new screw, and it's job done, and it can now be refitted to the case. I lightly grease each end of the drum so it slides into the casing easily;  20181020_155926 20181020_155926 by David Miller, on Flickr  20181020_160013 20181020_160013 by David Miller, on Flickr You cant fit the retaining plate yet. You need to fit the forward selector fork shaft, as the drum retaining plate also retains the front shaft, so I fit both shafts and selector forks at this point;  20181020_165732 20181020_165732 by David Miller, on Flickr You can see the ends of the shafts either side of the star;  20181020_172742 20181020_172742 by David Miller, on Flickr And the view from above. Note that 2 of the 3 selector forks are the same - namely the top left and lower middle in the pic;  20181020_173849 20181020_173849 by David Miller, on Flickr They are both marked with the number "1", the other is marked with a "2", and is a slightly different shape. The rods are secured with a circlip;  20181020_171724 20181020_171724 by David Miller, on Flickr These can be fiddly to fit. I dab some grease on the case above the rod and stick the circlip to it, right above the groove the circlip needs to locate to. Then either push or tap the circlip home with a suitable drift;  20181020_172014 20181020_172014 by David Miller, on Flickr Once both circlips are fitted, you can return to the drum retaining plate, and fit that, with some low strength Loctite;  20181020_160504 20181020_160504 by David Miller, on Flickr You can now spin the motor around and fit the neutral switch;  20181020_161039 20181020_161039 by David Miller, on Flickr The Neutral switch is £19.51, and the O ring is £3.00 (Fowlers). I bought a tub of red rubber grease, so with the O ring lubed up, you can ease the switch into place and secure it with new screws. Be careful not to overtighten as the plastic cover will split;  20181020_161755 20181020_161755 by David Miller, on Flickr Dusty  Love ur work Dusty👍 What are the sizes of the o-ring? Thx in advance👍 |
|
|
|
Post by dusty350 on Oct 27, 2018 20:50:43 GMT 1
Hi Marcel I'm away for a few days. Will try and find an old one to measure when I get back. Dusty  |
|
|
|
Post by donkeychomp on Oct 27, 2018 22:56:03 GMT 1
This is a brilliant write up mate. Amazed what you can still get from Fowlers!
Alex
|
|
|
|
Post by bezzer on Oct 28, 2018 11:15:35 GMT 1
Great thread Dusty, Clear photos, and a concise explanation of the process and some top tips thrown in. A superb reference source, and will give many (me included) the confidence to have a go at rebuilding their own engines.
Nice work Sir! 👍🏻
|
|
|
|
Post by earthman on Oct 28, 2018 16:53:37 GMT 1
Great thread Dusty, Clear photos, and a concise explanation of the process and some top tips thrown in. A superb reference source, and will give many (me included) the confidence to have a go at rebuilding their own engines. Nice work Sir! 👍🏻 +1 on all of the above. |
|
 20181018_203132 by David Miller, on Flickr
 20181018_203125 by David Miller, on Flickr
 20181018_203150 by David Miller, on Flickr
 20181018_203209 by David Miller, on Flickr
 20181019_091620 by David Miller, on Flickr
 20181019_091649 by David Miller, on Flickr
 20181018_203132 by David Miller, on Flickr
 20181018_203125 by David Miller, on Flickr
 20181018_203150 by David Miller, on Flickr
 20181018_203209 by David Miller, on Flickr
 20181019_091620 by David Miller, on Flickr
 20181019_091649 by David Miller, on Flickr


 An alternative, that I have used successfully in the past is part number 94109 14000, and costs .85p from Fowlers. Same size, and does the same job !! So I lightly grease the threads of the bolt, and fit it to the case;


