|
|
Post by dusty350 on Jun 2, 2019 8:39:42 GMT 1
Hi Been meaning to do a better pictorial of the kickstart mechanism, - my clutch case is off on the Pv engine so it's an ideal time to do it ! Lc and Pv mechanisms are exactly the same - part numbers and how they are fitted. There are 2 areas in the casing that locate the kickstart mechanism. Circled in red, the top is the horseshoe shaped casting for the spring clip, and the bottom is the casting for the stopper on the kick shaft;  20190602_074127 20190602_074127 by dusty miller, on Flickr The kickstart parts that locate the casing parts are, spring clip at the top, and the stopper at the bottom;  20190602_074108 20190602_074108 by dusty miller, on Flickr You can fit the mechanism as a whole or in parts. I fit complete but for the pics, I've broken it down. This is where the main shaft needs to sit;  20190602_074206 20190602_074206 by dusty miller, on Flickr You can see the stopper on the shaft rests against the casting of the case. It stops the kickstart turning 360 degrees ! The gear with the spring clip slides on next - you can see the spring clip locate in the horseshoe shaped hole;  20190602_074225 20190602_074225 by dusty miller, on Flickr With the spring clip in it's hole, the stopper should be against the engine casting. If it's not, just turn the kickshaft clockwise and you'll feel it butt against it - that's where it needs to be. Slide the spring on next;  20190602_074346 20190602_074346 by dusty miller, on Flickr The small knib on the sping locates in the hole on top of the shaft. Slide the spacer on next. It has a groove to accept the knib of the spring, and ends up butted against the worm gear of the main shaft;  20190602_074406 20190602_074406 by dusty miller, on Flickr The circled area shows the clearance between the teeth of the kickstart gear and the idler gear. When you test the operation of the kickstart, make show these teeth clear each other. Finally, lift the hooked part of the kickstart spring clockwise and up onto it's locating post;  20190602_074419 20190602_074419 by dusty miller, on Flickr Job done. You can test the operation at this point by fitted a kickstart and turning by hand. Press against the white plastic spacer otherwise the mechanism will twist out of it's housing. You will see the kickstart gear rotate out on the worm drive and locate on the idler gear. When you return the kickstart lever, the gear should move back inwards and be clear of the idler gear. I will add this to the engine build thread. Hth Dusty  |
|
|
|
Post by mak595 on Jun 3, 2019 17:32:42 GMT 1
Awesome, this thread will be so handy when I look at my pv motor....
|
|
|
|
Post by dusty350 on Jun 3, 2019 20:01:31 GMT 1
There are 2 Lc engine rebuild threads which go into far greater detail for rebuilding, and you can follow those for a Pv rebuild as the bottom end is virtually identical - only the clutch actuator differs between Lc and Pv. Dusty  |
|
|
|
Post by mak595 on Jun 3, 2019 20:09:20 GMT 1
There are 2 Lc engine rebuild threads which go into far greater detail for rebuilding, and you can follow those for a Pv rebuild as the bottom end is virtually identical - only the clutch actuator differs between Lc and Pv. Dusty  Spot on, im hoping i just need new seals and the top case painting black on mine, apparantly the crank has only done 30 miles but the motor has been stood for 10 years. The guy told me this before there was any mention of me buying the bike so hopfully its true. Dropped the gearbox oil and it was like new so backs it up.... |
|
|
|
Post by dusty350 on Jun 3, 2019 20:39:05 GMT 1
Ooops, had a bit of a brain fart !! Thought this was the Rd/Tz/Lc rebuild thread !!  Sounds like you have a decent engine. And you are right in changing the crank seals - take no chances with those  Enjoy the build Dusty  |
|
|
|
Post by Topman350 on Jun 3, 2019 22:14:16 GMT 1
Ooops, had a bit of a brain fart !! Thought this was the Rd/Tz/Lc rebuild thread !!  Sounds like you have a decent engine. And you are right in changing the crank seals - take no chances with those  Enjoy the build Dusty  Great explaination of the kickstart mechinsim Dusty should help a lot people on here my knowledge of it was to take it apart a number times and refit so I got it bang on 👍 |
|
|
|
Post by pdxjim on Jun 9, 2019 8:00:02 GMT 1
This thread is great help, Dusty. Thank you Sir.
Buttoning up my 4U0 that's been stood at least a decade before I got it.
Kicking myself I didn't spring for the clutch holding tool in my last order from Yambits, but I've done my TDR a few times and recently a KH400 without one so I'm sure I'll manage.
|
|
|
|
Post by dusty350 on Jun 9, 2019 8:21:55 GMT 1
Some guys weld a bar to an old steel clutch plate or 2. The bar is now the handle and you have yourself a clutch holding tool !! Dusty  |
|
|
|
Post by andrel on Jun 10, 2019 18:04:36 GMT 1
There are 2 Lc engine rebuild threads which go into far greater detail for rebuilding, and you can follow those for a Pv rebuild as the bottom end is virtually identical - only the clutch actuator differs between Lc and Pv. Dusty  I am so fixated on your two rebuilding threads now that i am busy building the bottom end (i have it opened on my tablet whilst working) that i pay scant attention to the (rather limited) manual, but i nearly got caught out on this aspect. I was mock assembling the cases - yes i have OCD too - and lightly torquing the top bolts when i first noticed the gaping hole where the clutch actuating lever goes. For a second i was a bit bewildered - thinking you missed something - then saw this and clicked  Maybe insert an edit near the appropriate step for us PV builders not to have a brainfart and forget to fit the clutch lever. |
|
tlmark
Drag-strip hero
 
Posts: 203
|
Post by tlmark on Jun 10, 2019 21:42:28 GMT 1
Not only a great and useful thread but clear and helpful pic's should be sticky'd
|
|
|
|
Post by earthman on Jun 10, 2019 21:47:56 GMT 1
Not only a great and useful thread but clear and helpful pic's should be sticky'd I totally agree.  |
|
|
|
Post by dusty350 on Jun 10, 2019 21:59:13 GMT 1
Hi If I ever do an in depth build on a Pv, I will include that, but as both engine build threads were Lc, I didn't feel it necessary at the time to add detailed info about the clutch actuator on a Pv. It is the main difference on the bottom end between the 2 models. Lots of Pv engine part numbers are the same as the Lc's, and some even the previous aircooled models. Bolting the cases together "dry" allows you to prove the smooth rotation of both the crank and the gears - I agree, maybe a bit OCD, but so much easier to rectify any issue without 3 bond goo everywhere !! And it only takes minutes to do in reality. It's the same concept as "measure twice, cut once" in my opinion  Glad you find the rebuild threads useful. My Lc manual from Haynes was a particularly badly printed version, and it spurred me on to do my own thread which would encourage others to have a go. The first one I did had a lot of input and tips from other members, which made the second version better and a bit more concise. It will be interesting to compare parts prices in a few years time against the prices I have listed in the thread, to see how much they increase. I've already noticed a difference in costs between the 2 builds, which were only about a year apart, if that  Good luck with your rebuild, and enjoy it  Dusty  |
|
|
|
Post by zig on May 23, 2020 20:36:26 GMT 1
Hi Dusty You are more than welcome. Just so you know, when I modified the stopper arm, in the end I needed to use a very low profile screw so that is does not catch on the shift drum. But if you PM me your address I will make you up a little kit on Monday (as in the picture below) including the modified screw so that the bearing assembly fits your motor without catching the drum 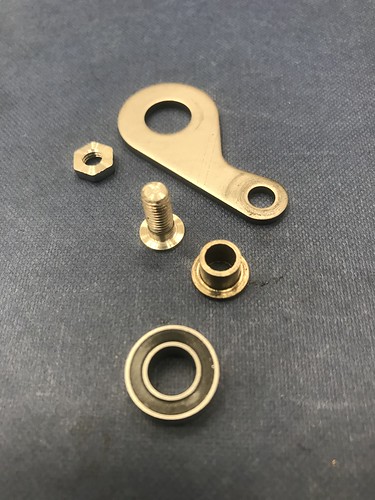 IMG_5476 IMG_5476 by Alan Kelly, on Flickr 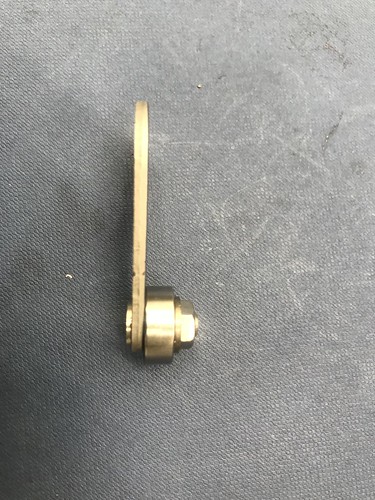 IMG_5478 IMG_5478 by Alan Kelly, on Flickr 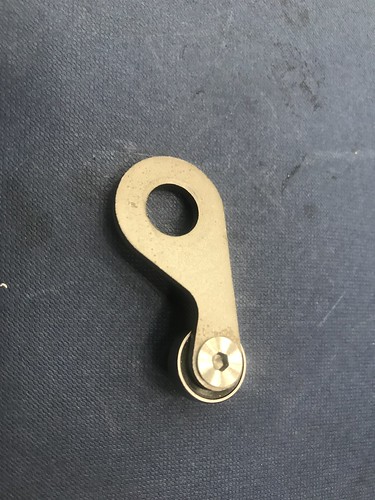 IMG_5479 IMG_5479 by Alan Kelly, on Flickr Now fitted mine, including modifying the shift star profile on the profile grinder at work the other night. And just turning the drum by hand the shift feels very smooth and the drum turns very easy. So should be an improvement over the standard shift once on the road. 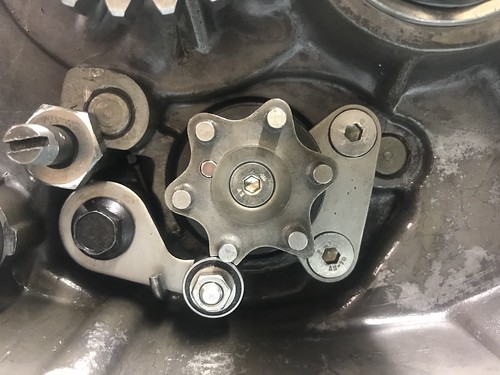 IMG_5480 IMG_5480 by Alan Kelly, on Flickr Now just need to decide if I should splash out on a new gear shift shaft, as not sure how worn mine is Alan Hi Alan.....have you any of these little kits for sale , just seeing your post on Dusty's Thread here and I am putting together a PV engine and would like to fit this upgrade?? ZiG |
|
|
|
Post by alankelly on May 23, 2020 20:46:49 GMT 1
Hi Zig
Pm sent
|
|
|
|
Post by roach3 on Jun 1, 2020 20:58:54 GMT 1
hi dusty....ive noticed you use a lot of those little allen bolts on the build like the ones used on the half moon crankcase joiner etc
where did you get these? or is it a full kit with all sizes
cheerz
charlie
|
|
|
|
Post by dusty350 on Jun 1, 2020 22:19:47 GMT 1
Hi Charlie I have a fasteners supplier a few miles from me, and when I do a rebuild I pop over and get an assortment so I have a stock of nuts, bolts washers etc. The fasteners for inside the case I bought in bulk a good few engine builds ago, and I'm short of a few now - just had enough to do the 400e engine ! Auto jumbles often have suppliers of the same fasteners, usually cheaper too. Trouble is, I think we are a way away from frequenting an auto jumble at the mo  . They bolts don't need to be stainless of course - just what I got at the time. Dusty  |
|
|
|
Post by steelerd on Jun 2, 2020 0:46:28 GMT 1
This is brilliant thanks for posting mate great refresher for me as it's been a while since I was inside an elsie engine the last one stayed trouble free for ages. Starting cases up on my build at the mo  |
|
|
|
Post by roach3 on Jun 2, 2020 1:09:21 GMT 1
Hi Charlie I have a fasteners supplier a few miles from me, and when I do a rebuild I pop over and get an assortment so I have a stock of nuts, bolts washers etc. The fasteners for inside the case I bought in bulk a good few engine builds ago, and I'm short of a few now - just had enough to do the 400e engine ! Auto jumbles often have suppliers of the same fasteners, usually cheaper too. Trouble is, I think we are a way away from frequenting an auto jumble at the mo  . They bolts don't need to be stainless of course - just what I got at the time. Dusty  thanks dusty, its those little countersunk ones they look dead neat and tucked away from fowling anything
i could do with a selection of these, ill be on the lookout
cheerz mate
|
|
|
|
Post by dusty350 on Jun 2, 2020 7:41:29 GMT 1
I originally went to the fastener place with the old bolts and they matched them up for me. There is 3 or 4 different sizes/heads, so I think I bought 10 of each so I had spares, and have done the same since. Need to go again now, but I'm not sure their trade counter is open yet ? Kempton auto jumble is only a couple of miles from me, and there is usually 4 or 5 different guys selling fasteners, and I always spend around a tenner on "stock", so nylocs, washers - plain and spring, bolts of various sizes etc. I change all the fasteners on my bikes - even the ones you'll never see, so I get through them at a fair rate ! Ebay has loads of sellers supplying the same parts, so if you get stuck, that is another way of getting them  Dusty  |
|
|
|
Post by roach3 on Jun 4, 2020 8:11:18 GMT 1
Thanks dusty that’s handy to know
|
|
|
|
Post by zig on Jul 14, 2020 18:18:11 GMT 1
Cheers Mr K  The clutch plates that I found in the box of engine parts looked a little tired, so I bought a set of Ebc plates and springs from Martin at MBD; 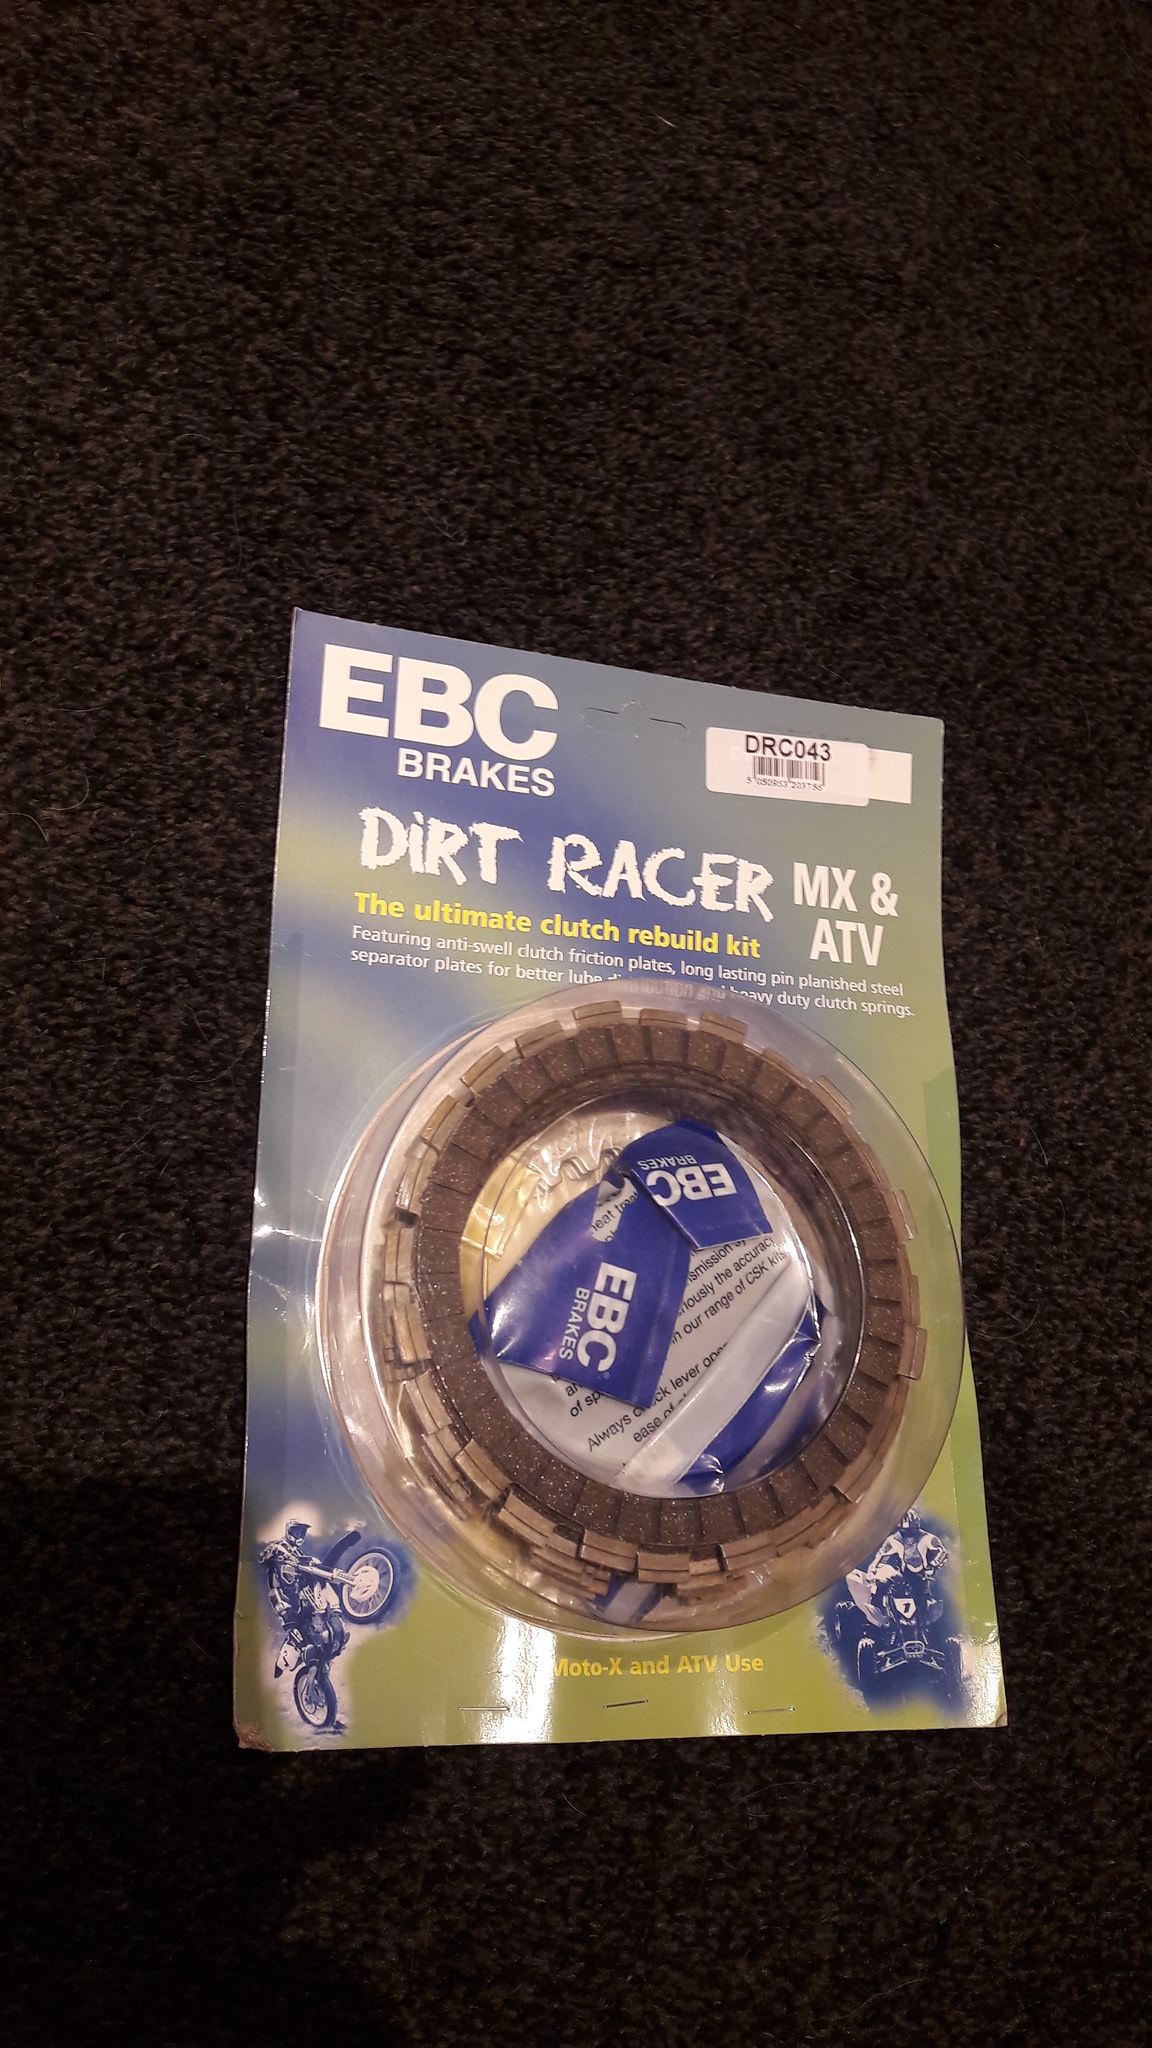 20181207_103737 20181207_103737 by David Miller, on Flickr First job is to soak the friction plates in fresh gear oil - I used the blister pack from the packaging it all came in; 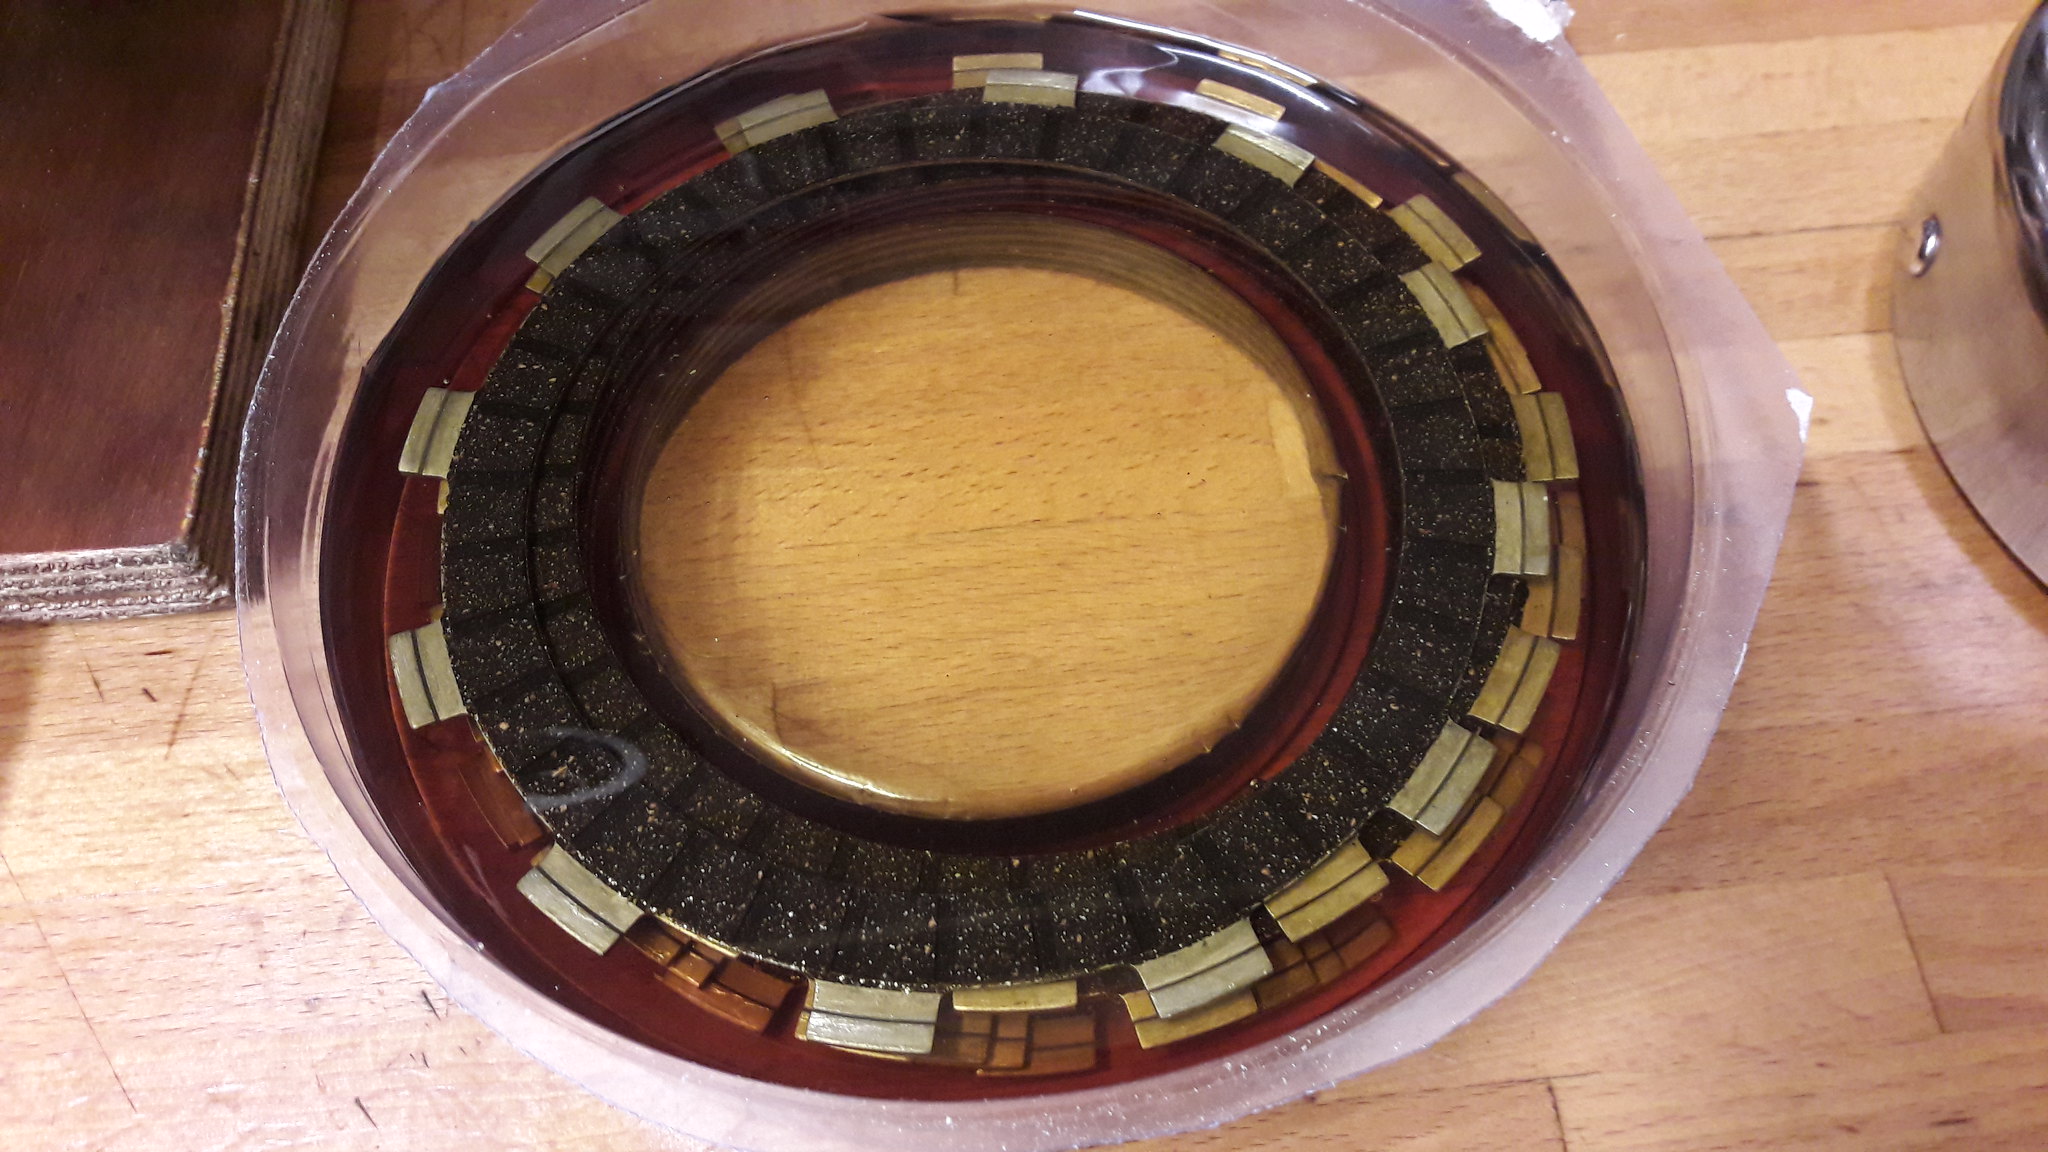 20181207_104034 20181207_104034 by David Miller, on Flickr I start with the mark on the inner hub at the 12 o clock position. A rubber damper goes on first; 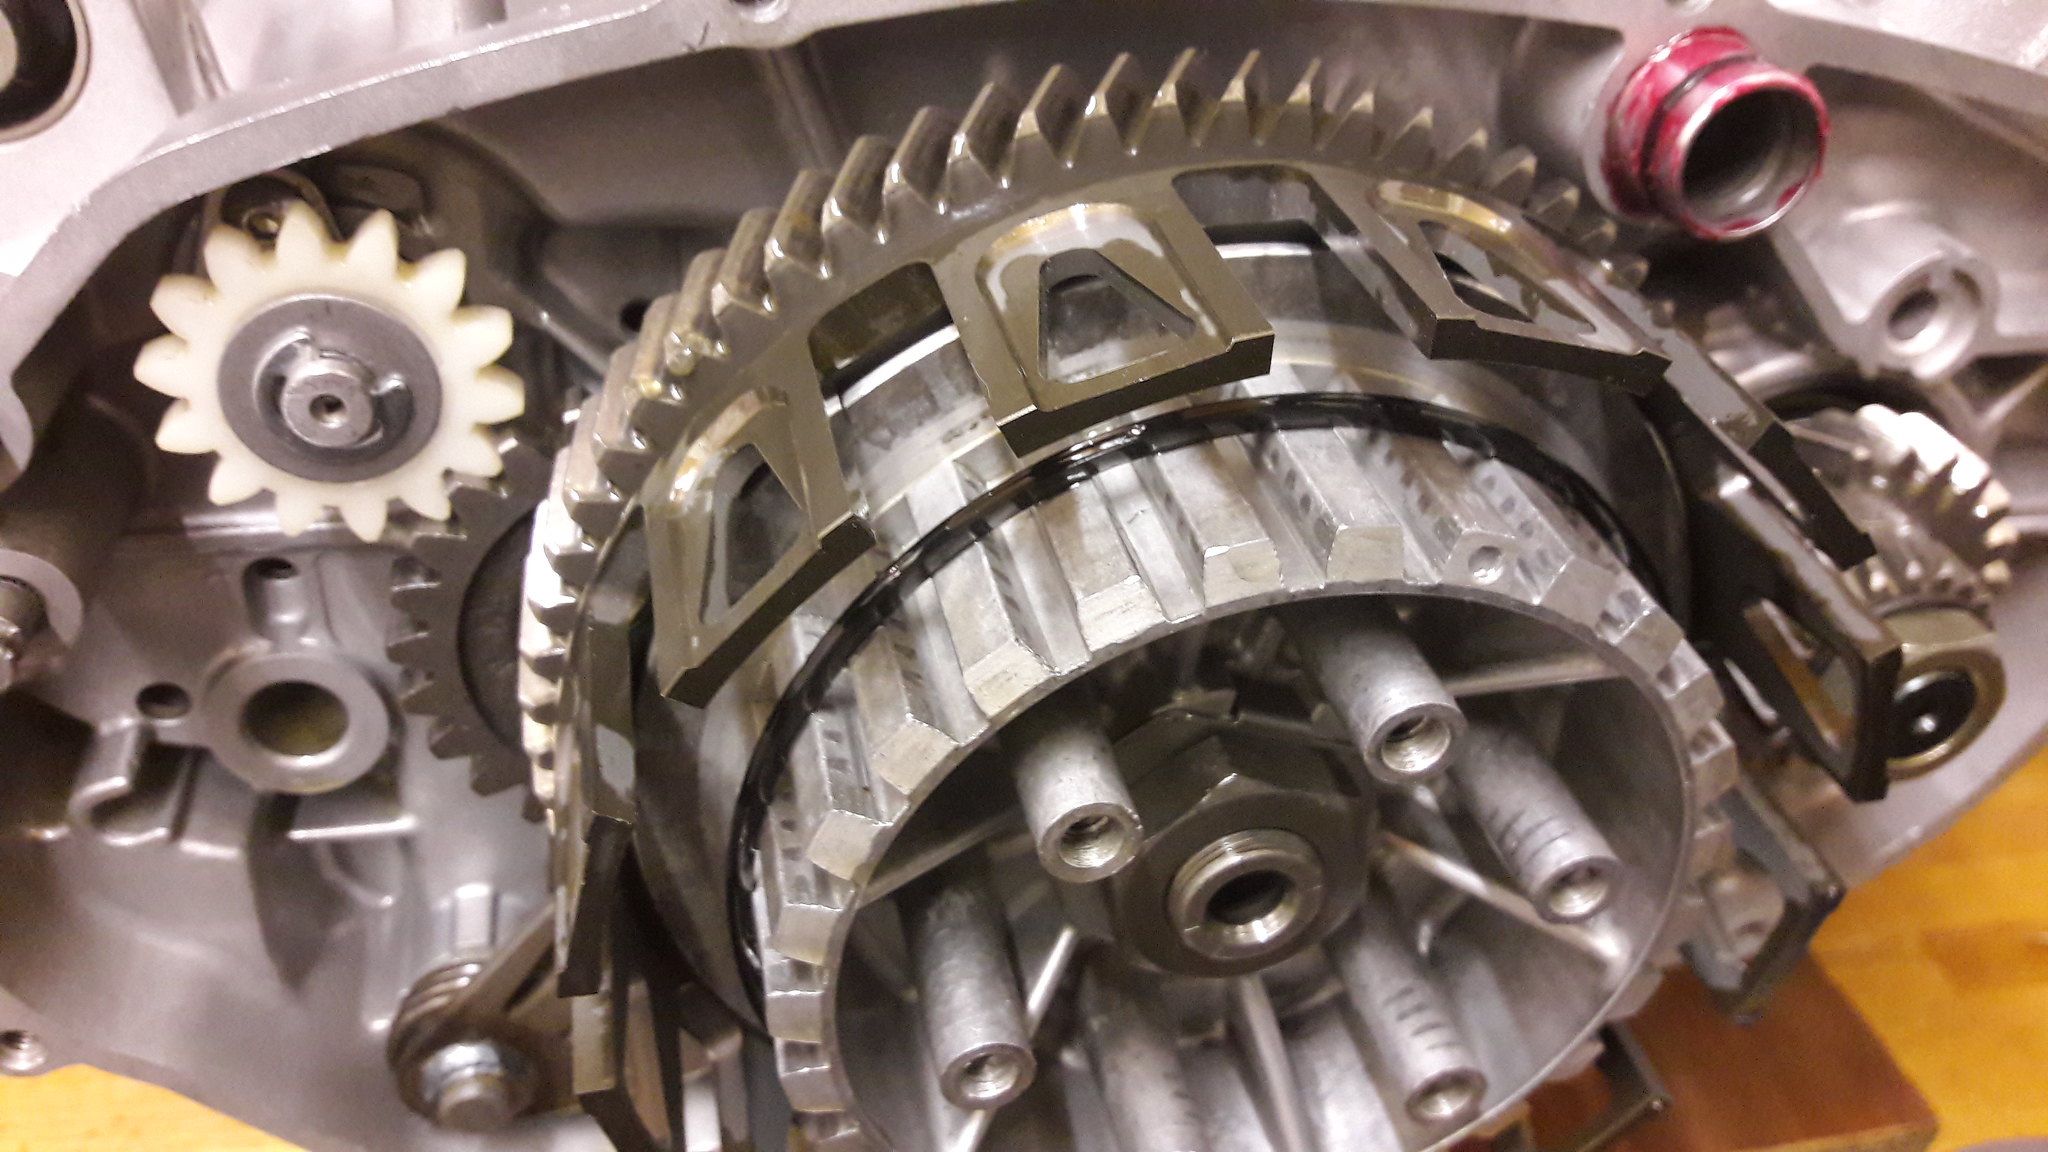 20181216_115111 20181216_115111 by David Miller, on Flickr Then a friction slides on - it actually sits on top of the damper ring so may need some gentle pressure; 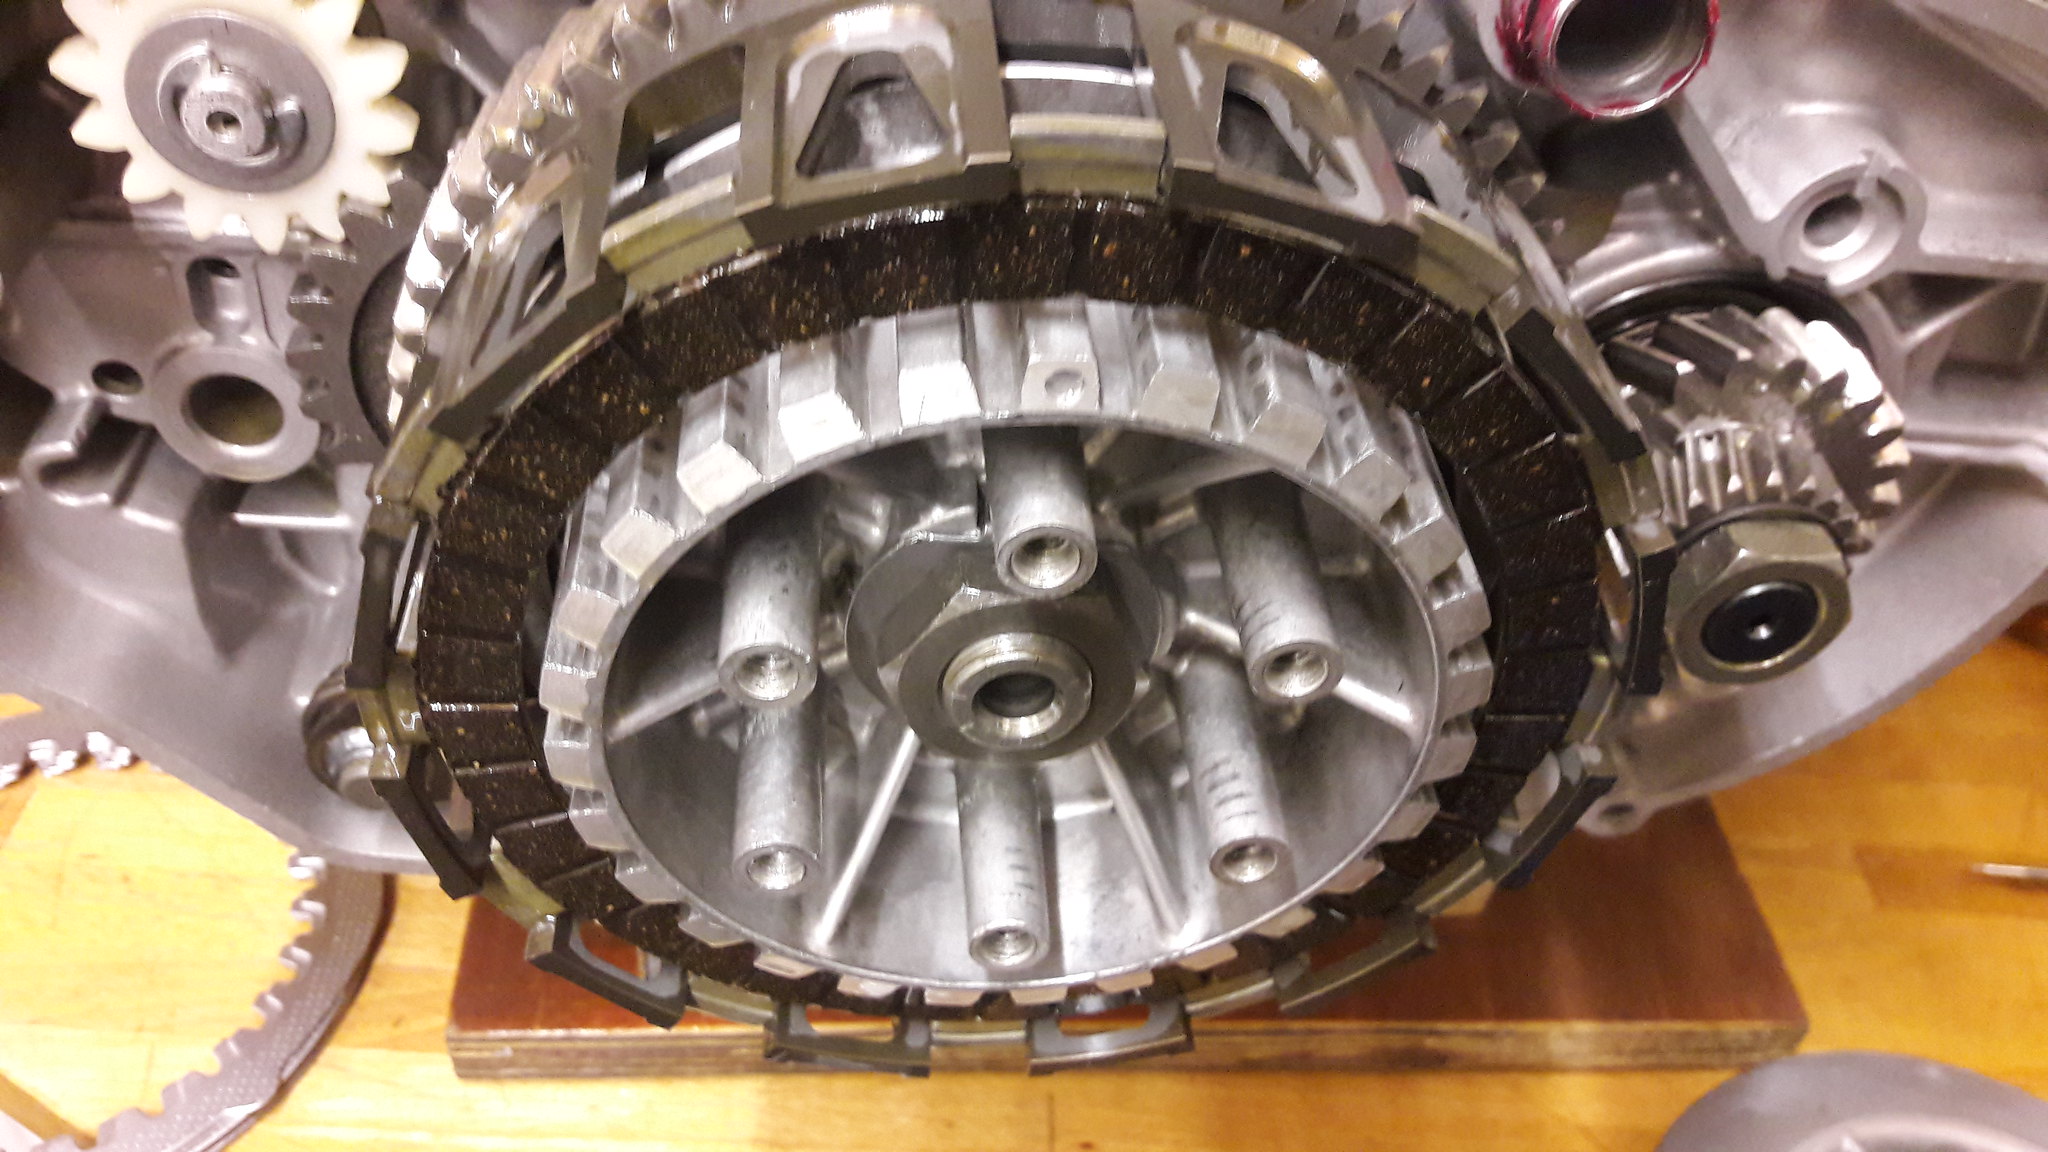 20181216_115304 20181216_115304 by David Miller, on Flickr Then a steel plate. Note the shaped "tab" on all the steels - fit this first one at the 12 o clock position; 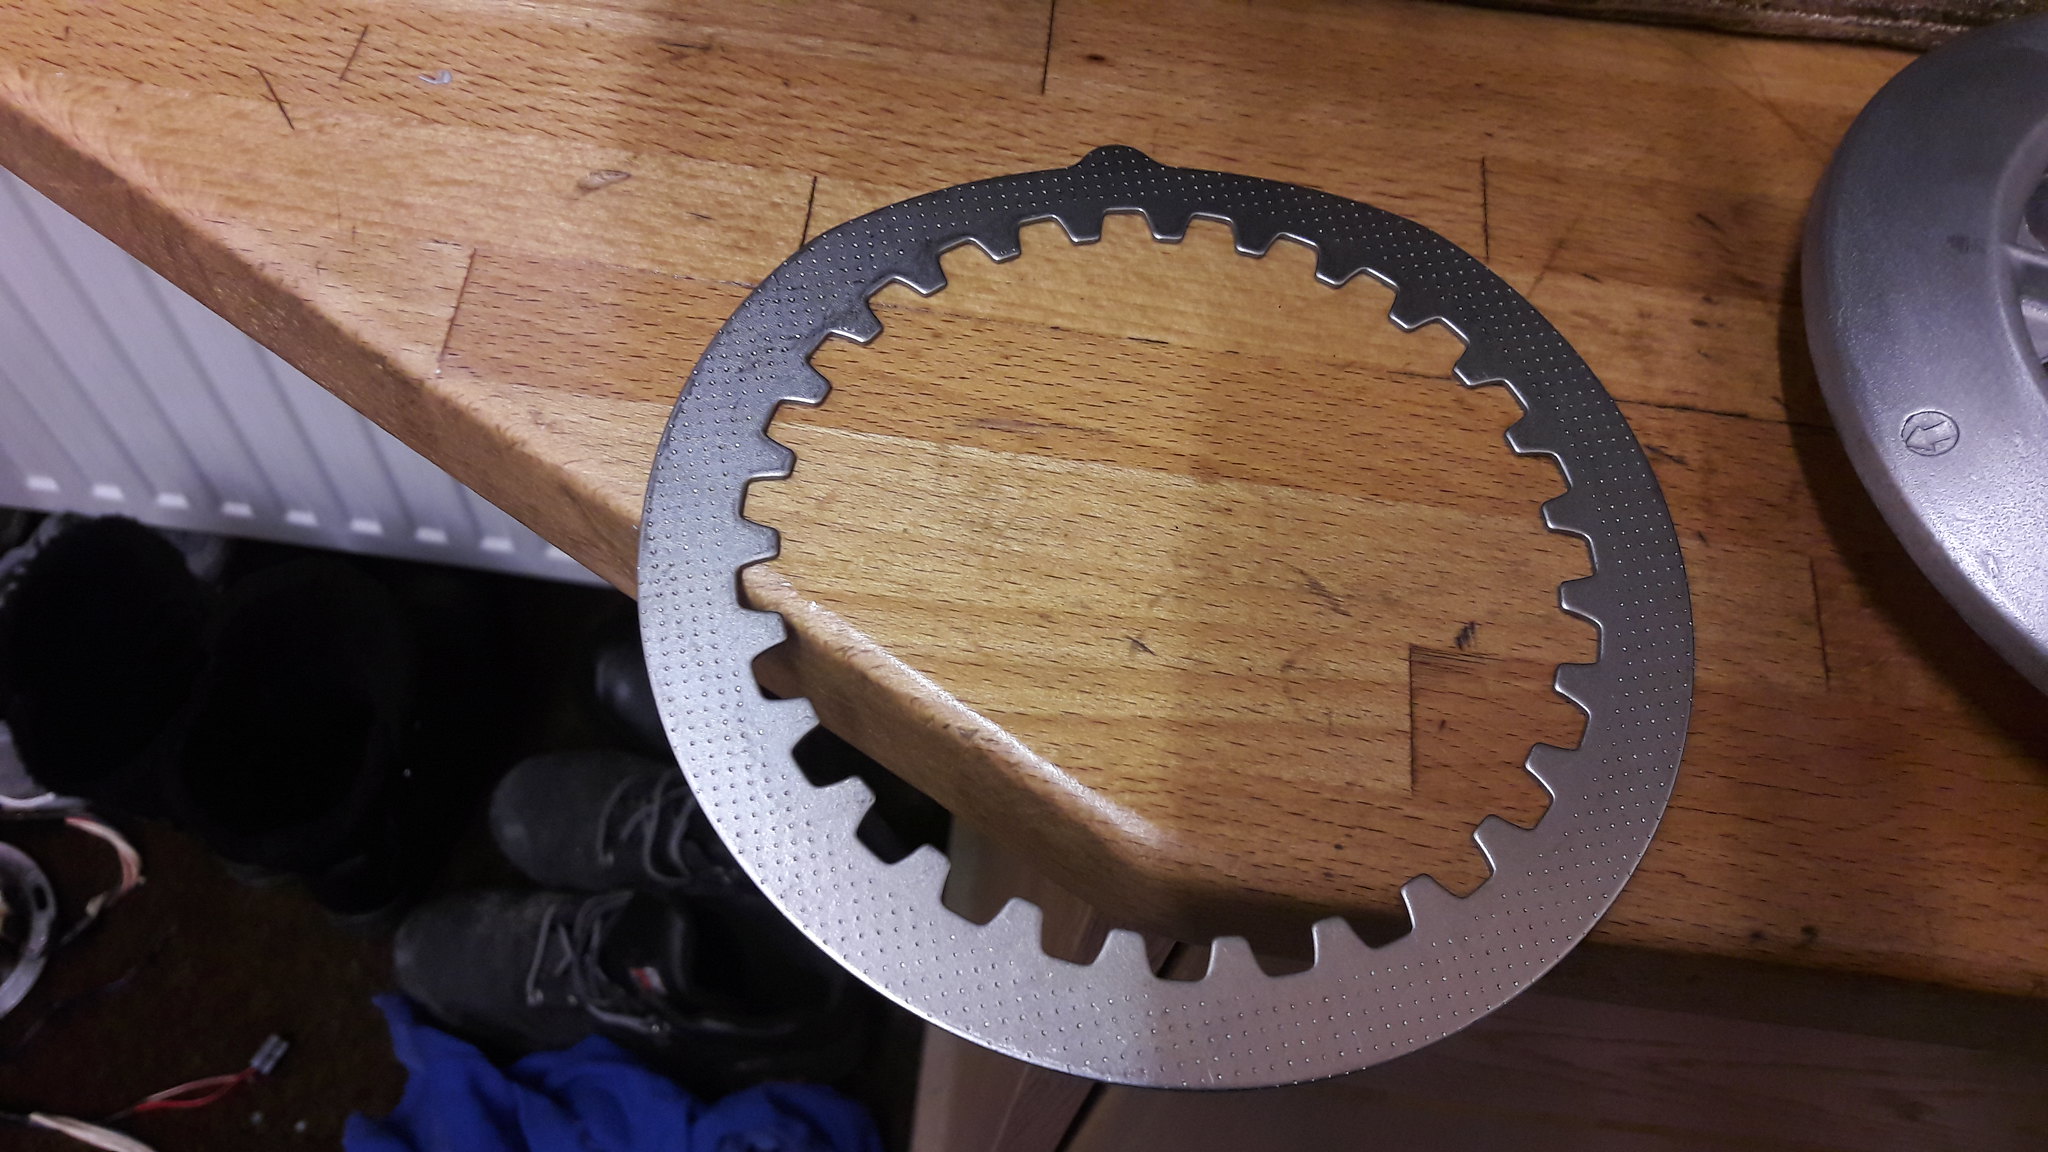 20181216_115253 20181216_115253 by David Miller, on Flickr 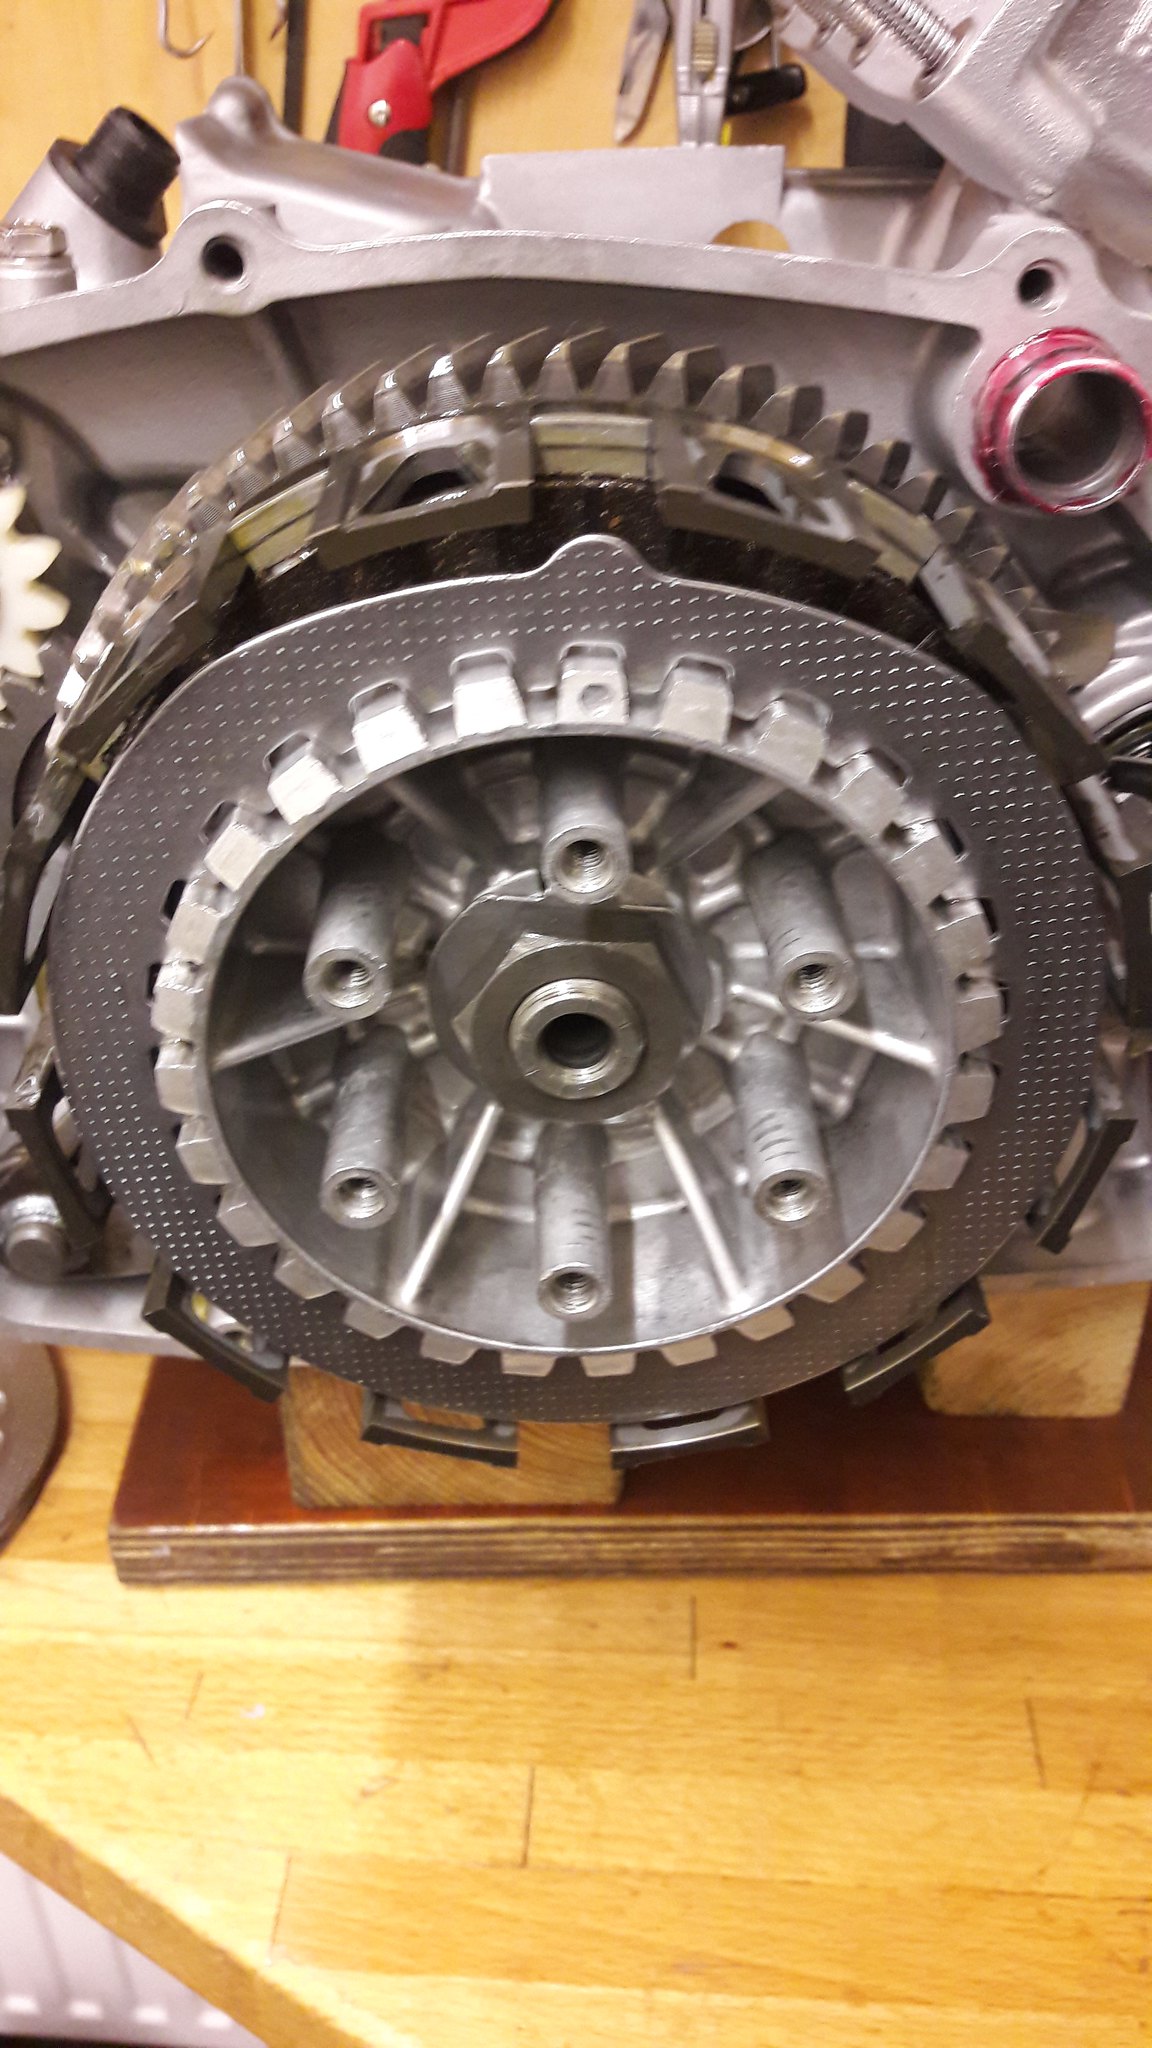 20181216_115426 20181216_115426 by David Miller, on Flickr Then another damper ring, friction plate and the next steel - put this one in so the tab points to the 2 o clock position; 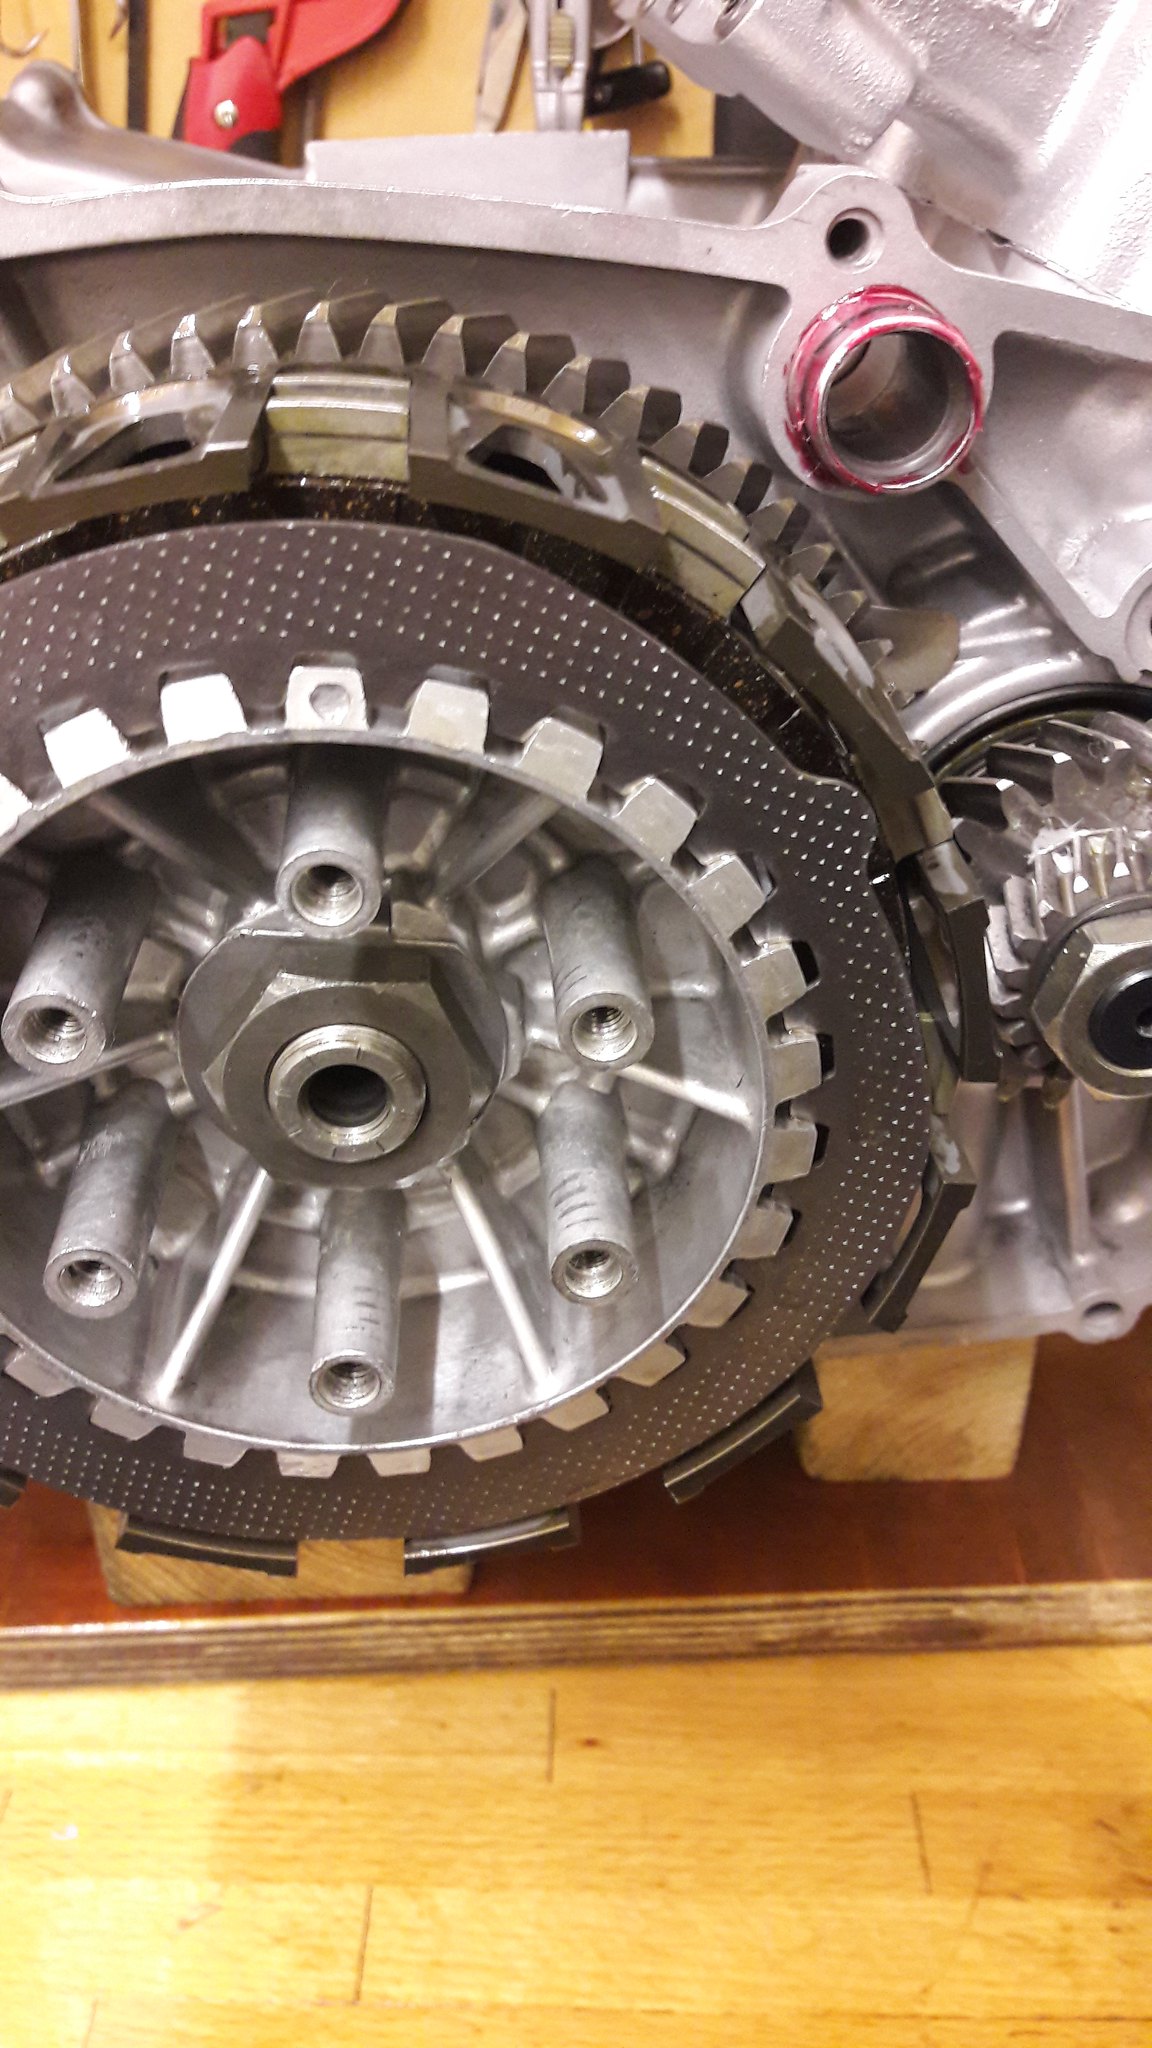 20181216_115634 20181216_115634 by David Miller, on Flickr Then damper, friction plate, and the next steel points to the 4 o clock position. Carry on like this so the steels then point to 6, 8 and 10 o clock. This helps reduce vibes in the spinning clutch basket. You finish with a friction plate, and now you can fit the clutch mushroom; 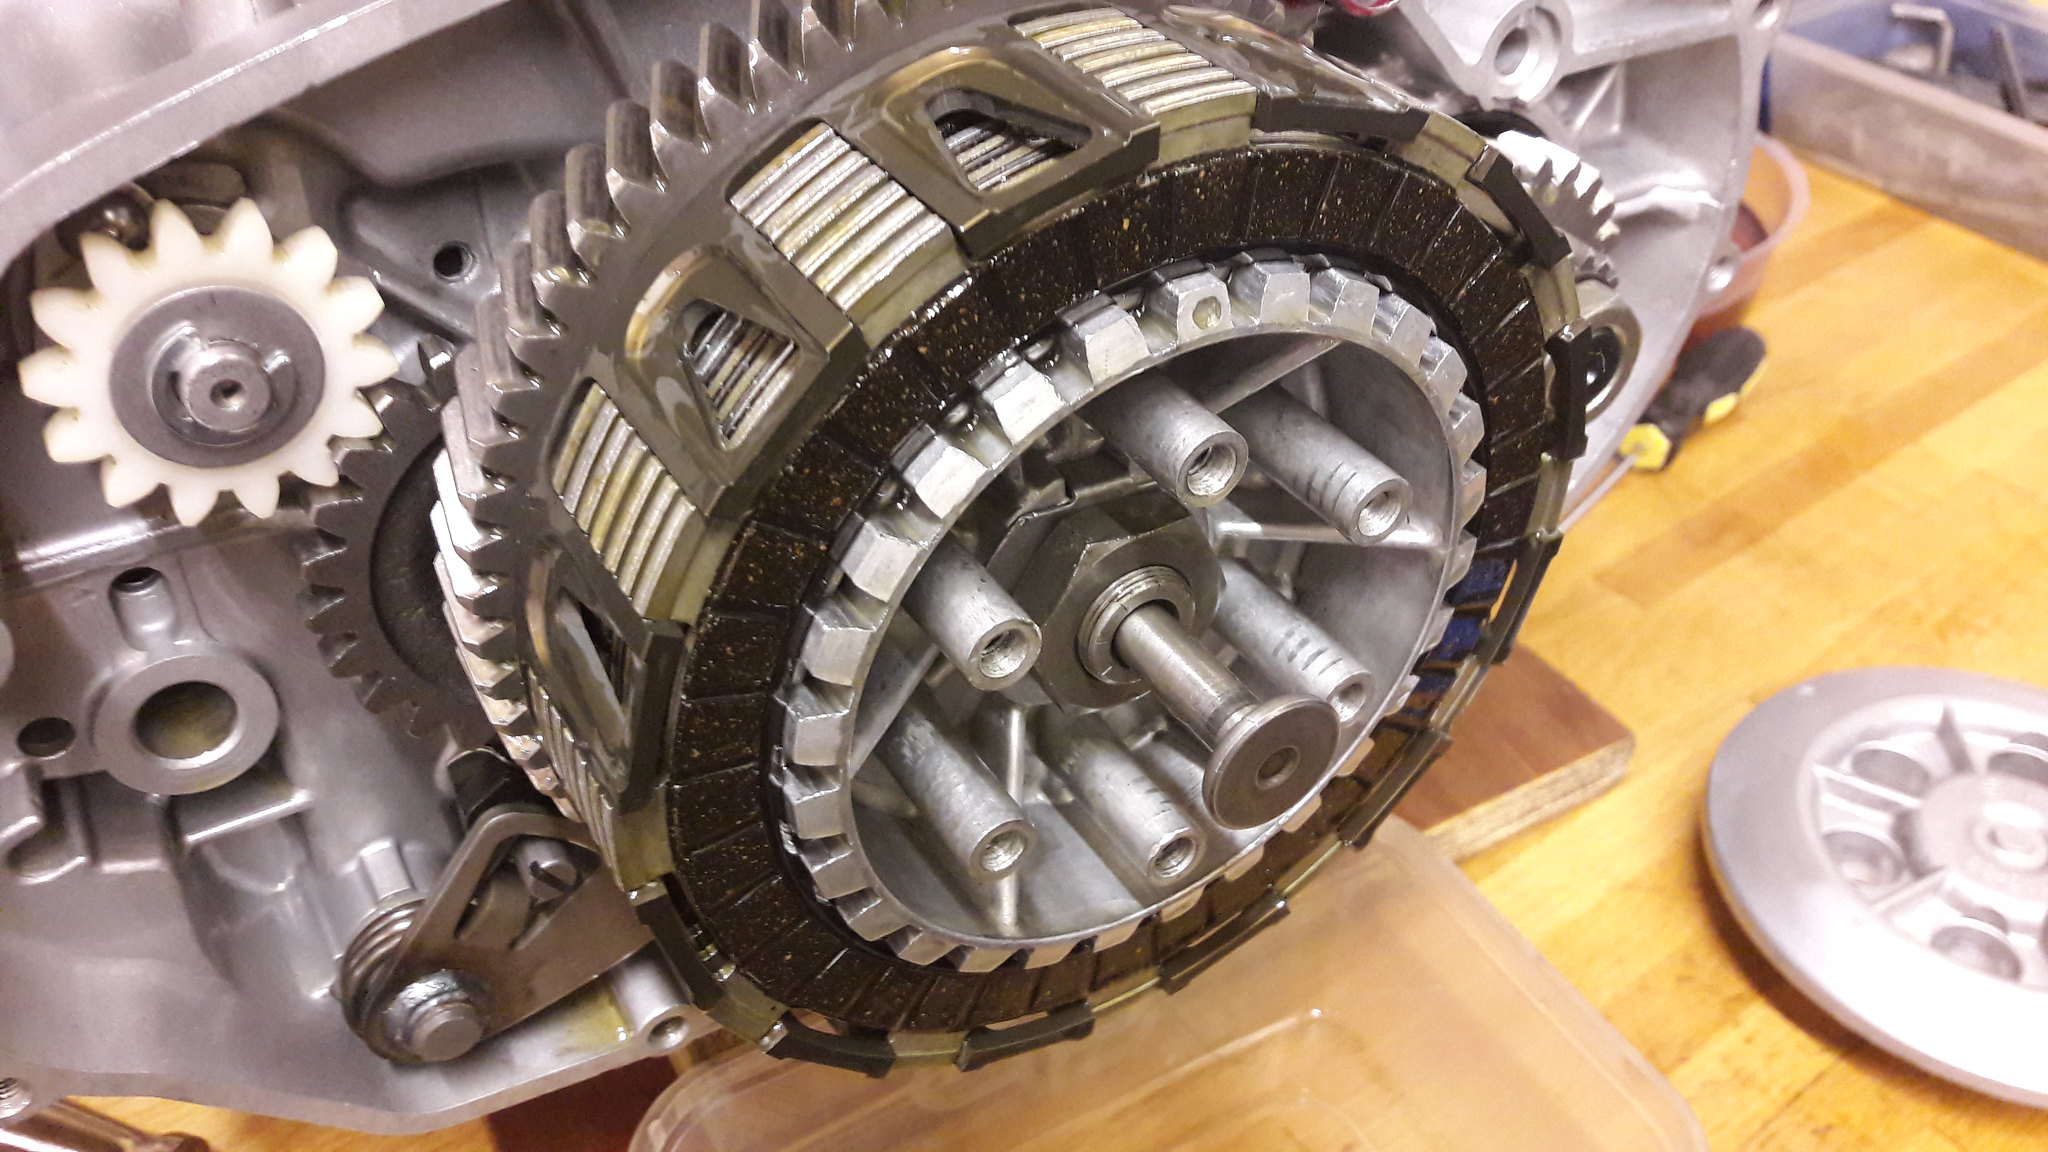 20181216_121103 20181216_121103 by David Miller, on Flickr Then the pressure plate can go on. Line one of the arrows on the plate with the mark on the inner hub. The Ebc kit comes with new uprated springs. The last engine I built I used all 6 springs and the clutch was quite heavy, so I'm going with 3 and 3 standard; 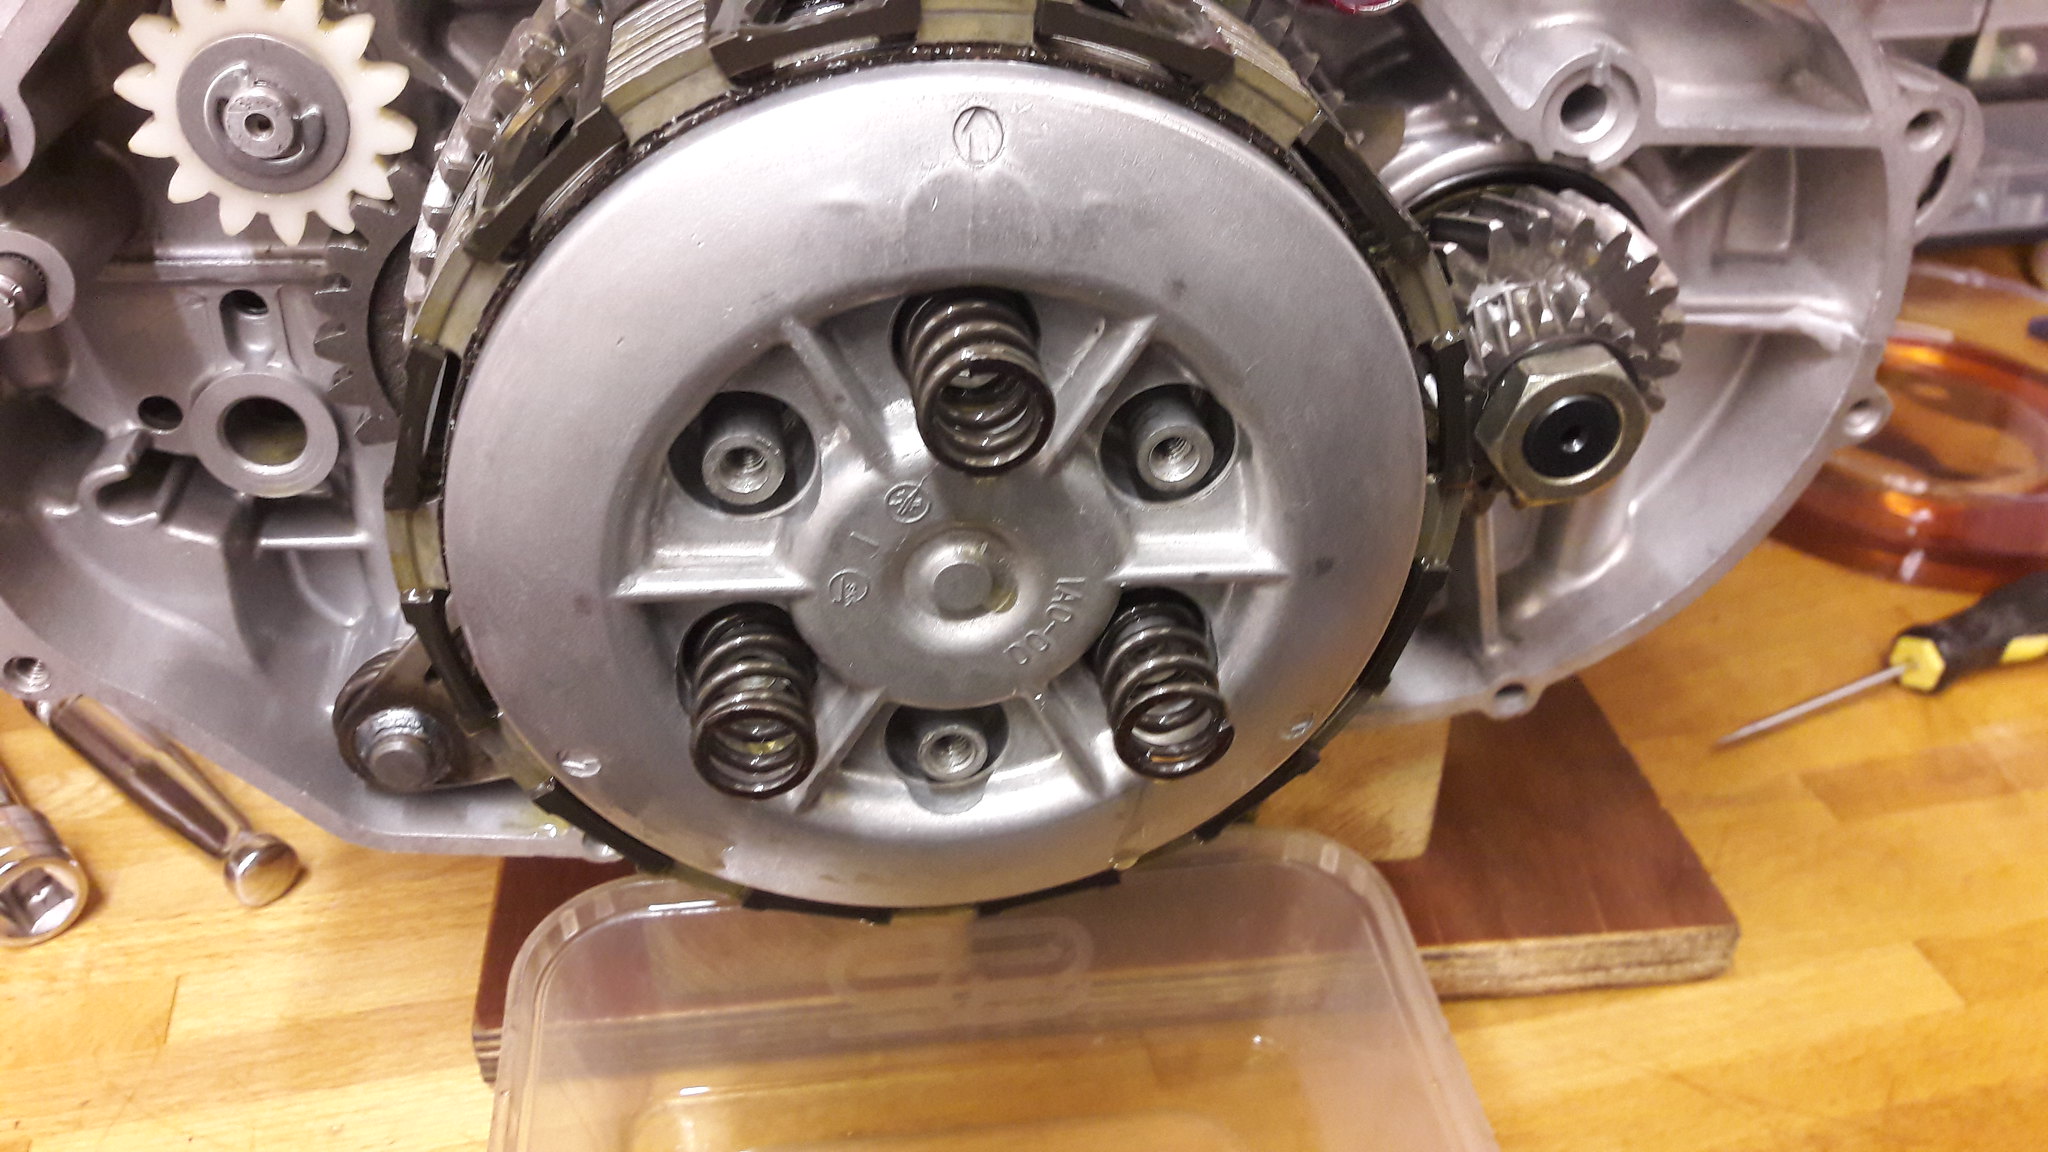 20181216_121405 20181216_121405 by David Miller, on Flickr Tighten the spring bolts progressively 1, 3 and 5 and 2, 4 and 6. Once done, you can spin the engine round and fit the new ball bearing and clutch pushrod; 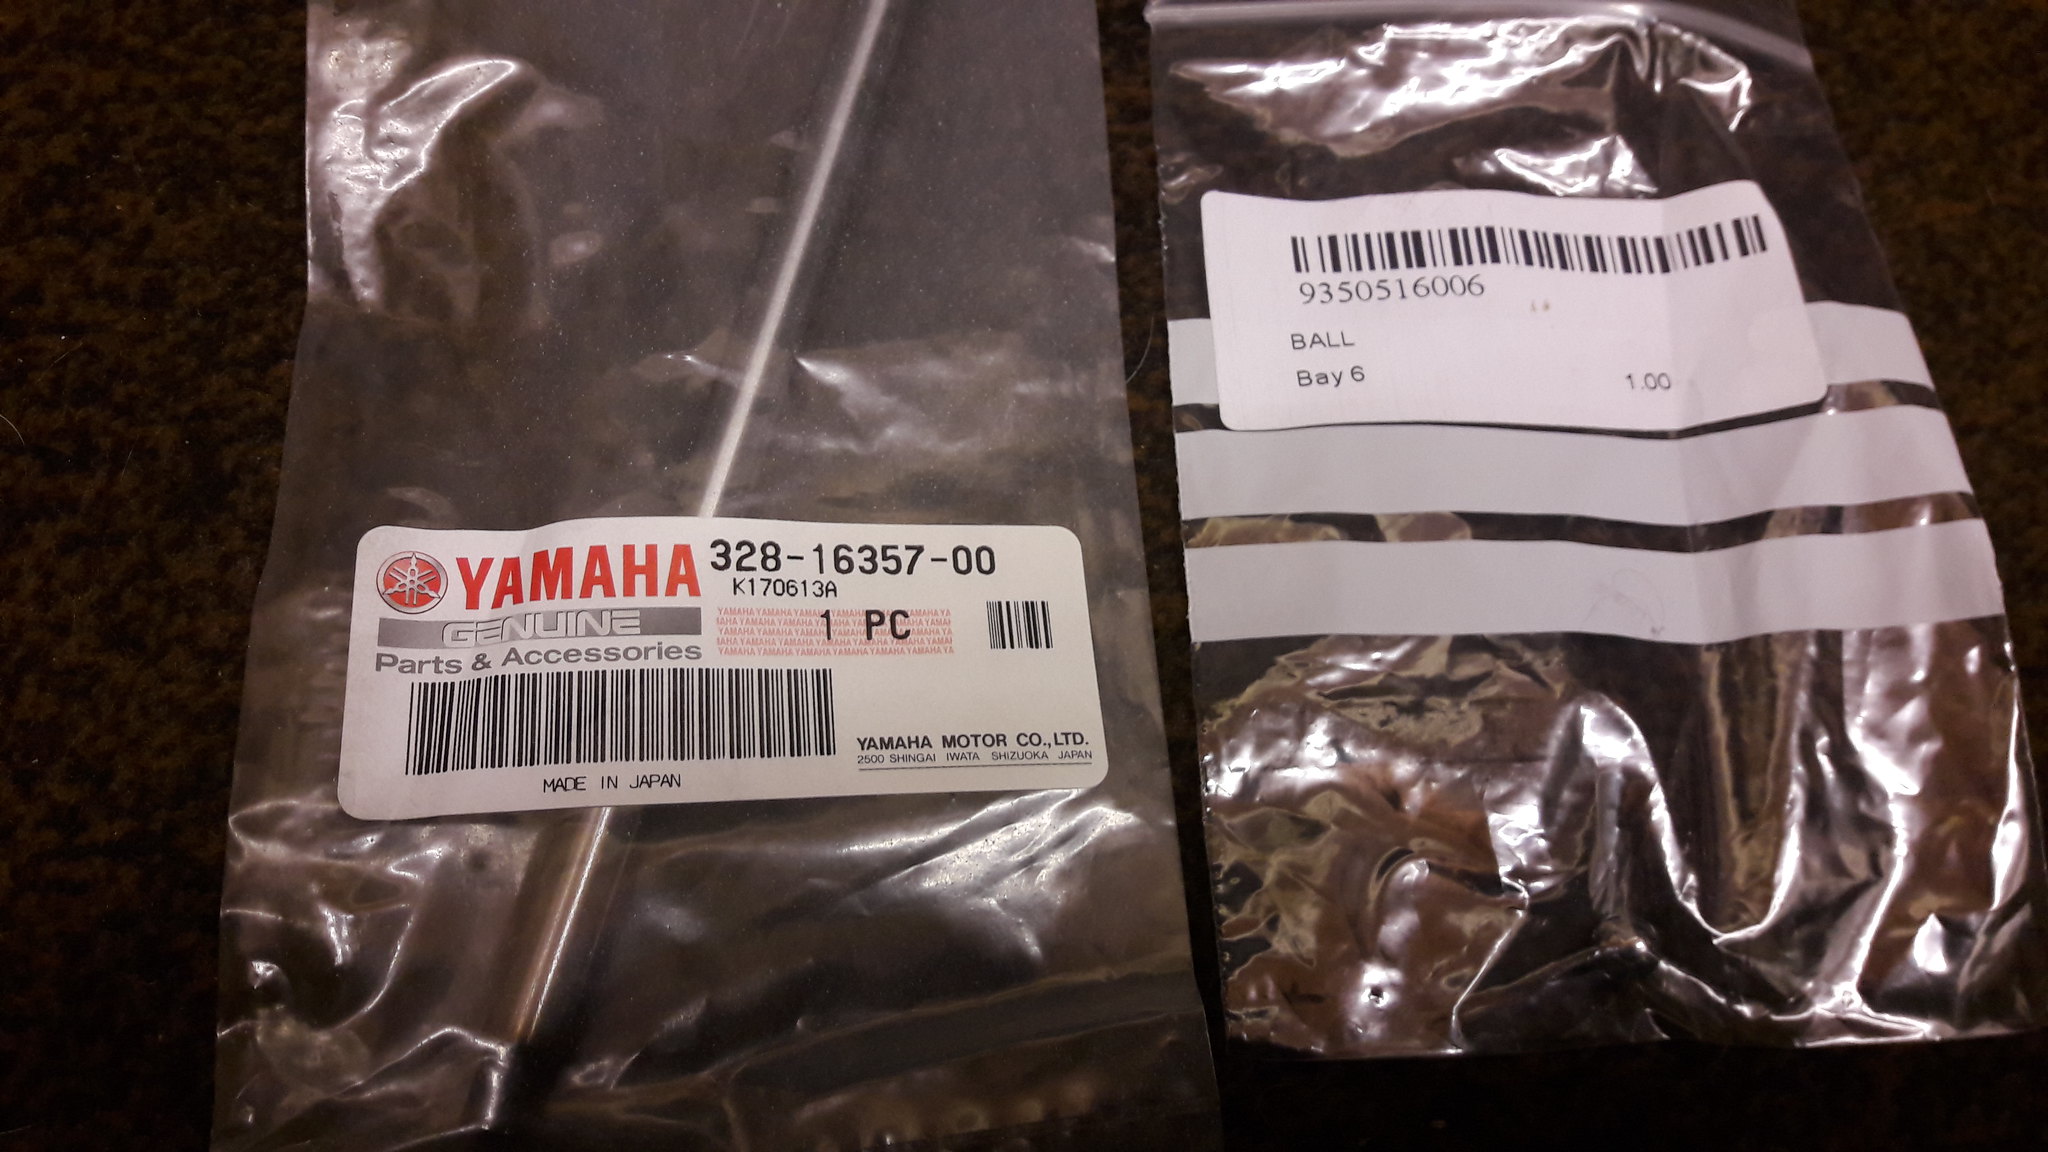 20181216_124431 20181216_124431 by David Miller, on Flickr Pushrod is £8.32 and ball is 23p. 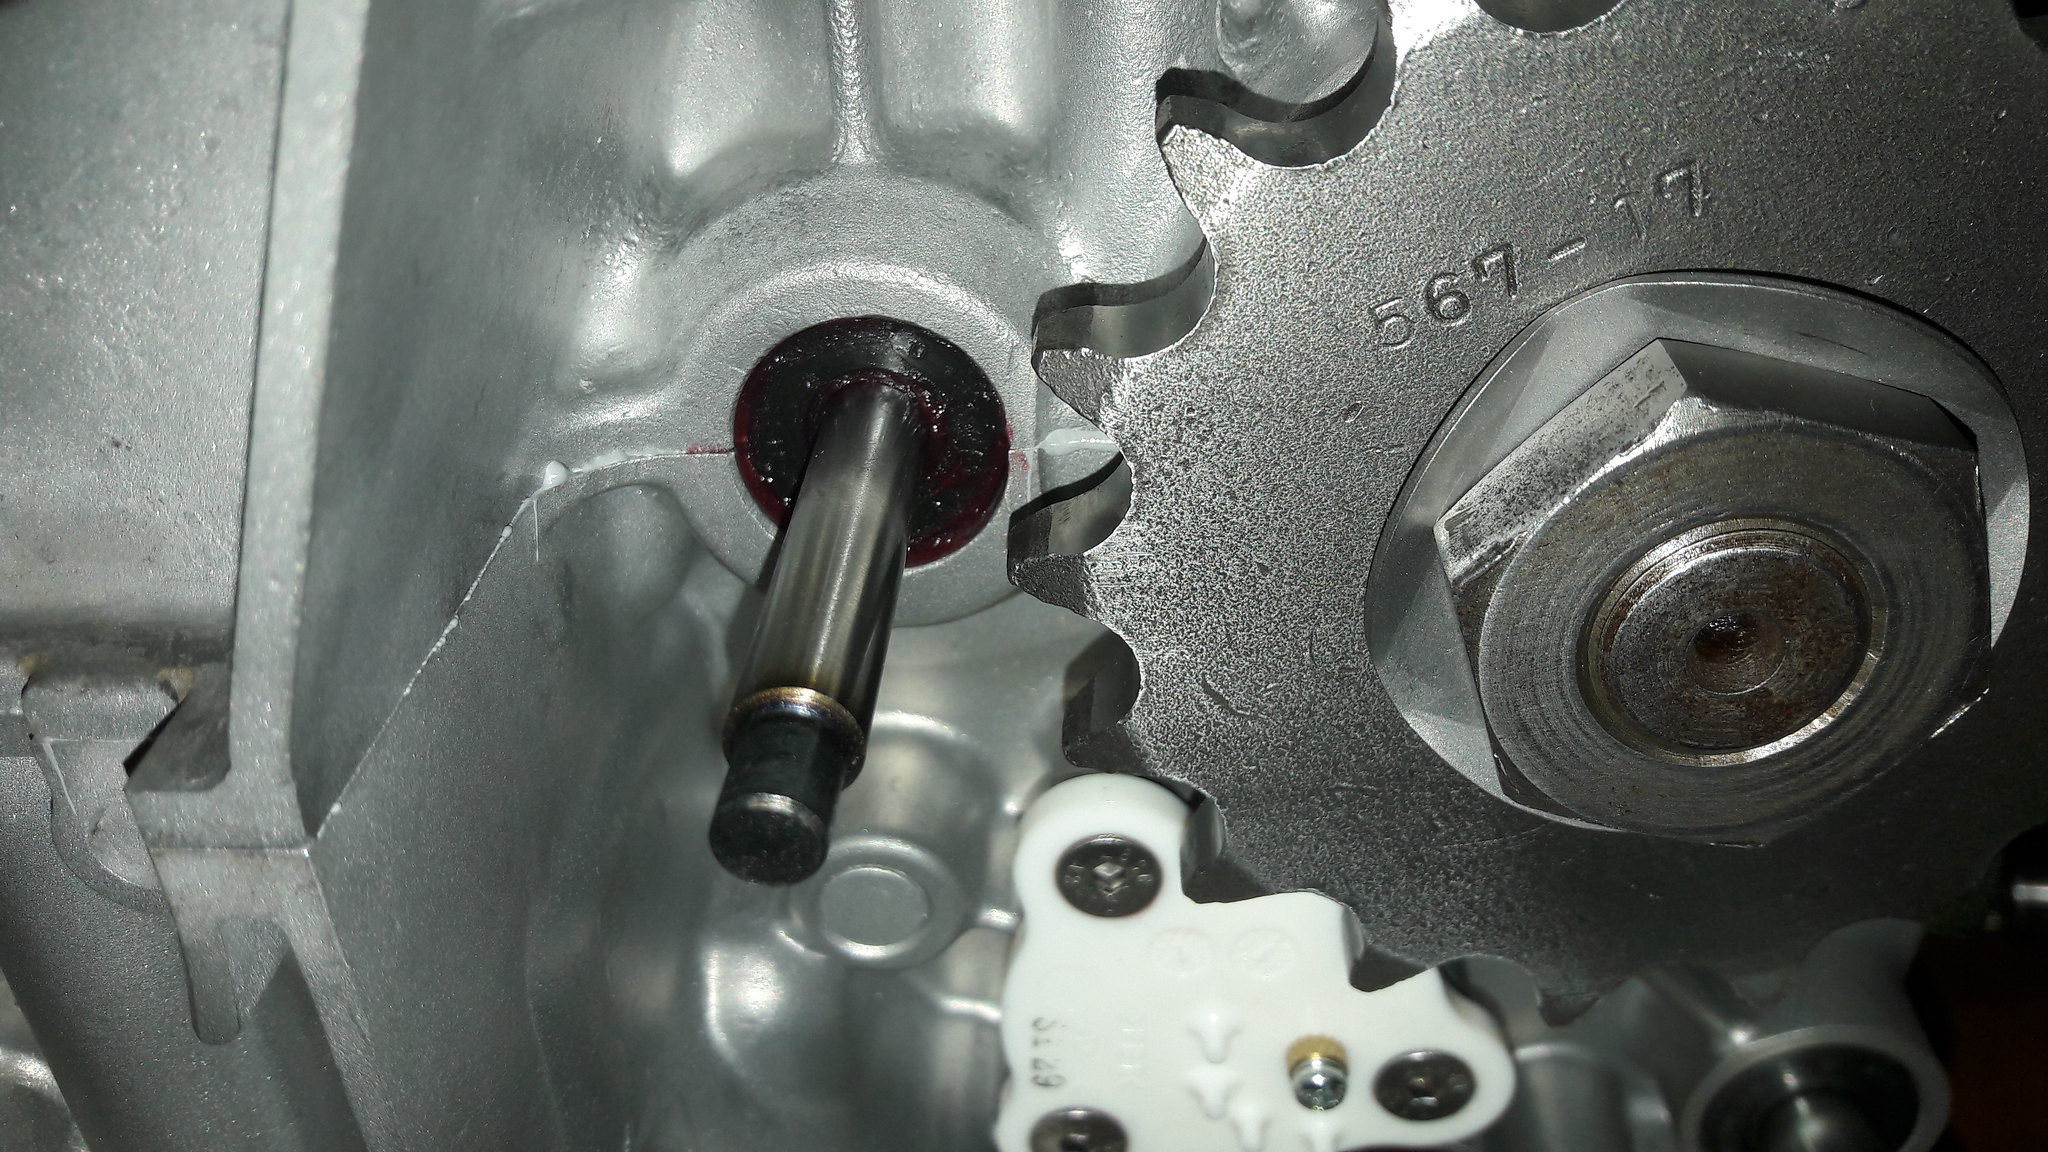 20181216_124811 20181216_124811 by David Miller, on Flickr Dusty  Hi Dusty.....the clutch kit you installed on your build DRC043 , have you run it ok without any problem's....i am interested in a set if all is o.k for my rd250lc with the same HD basket ZiG |
|
|
|
Post by dusty350 on Jul 14, 2020 18:52:14 GMT 1
The new owner of the bike has had no problems with it. Last time we spoke it had approx. 1000 miles on the rebuilt engine and was working well. I've used that kit in most of my builds with no issues. Plus, if Muttsnuts sells the kit, you know it's good !  Dusty  |
|
 20190602_074127 by dusty miller, on Flickr
 20190602_074108 by dusty miller, on Flickr
 20190602_074206 by dusty miller, on Flickr
 20190602_074225 by dusty miller, on Flickr
 20190602_074346 by dusty miller, on Flickr
 20190602_074406 by dusty miller, on Flickr
 20190602_074419 by dusty miller, on Flickr
 20190602_074127 by dusty miller, on Flickr
 20190602_074108 by dusty miller, on Flickr
 20190602_074206 by dusty miller, on Flickr
 20190602_074225 by dusty miller, on Flickr
 20190602_074346 by dusty miller, on Flickr
 20190602_074406 by dusty miller, on Flickr
 20190602_074419 by dusty miller, on Flickr


 . They bolts don't need to be stainless of course - just what I got at the time.


