|
|
Post by alankelly on Dec 22, 2018 19:10:22 GMT 1
Hi all . Well it’s been two years now since starting my first ever RD rebuild and the Yellow peril is now nearing completion ready for next spring. At first it was going to be taken back to an original White and blue 81 bike but decided to keep the RDLC theme but with a twist . Then a couple of week ago my better half asked what I want to do next and at first I thought about doing a TZR as a stable mate, but to be honest I have really been bitten by the RD bug and doing something non standard, so I have decided to build a special / hybrid instead. and after a little chat with friends and some of the guys on the forum to check my sanity (Thanks to all you know who you are), on Friday I had an early visit from Santa (Thanks Mike) and in the garage is my new project. 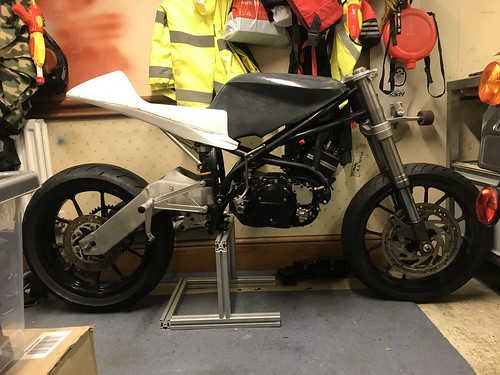 IMG_5966 IMG_5966 by Alan Kelly, on Flickr The project itself was owned by another member but due to other commitments has sadly decide to move it on. (Thanks Chris) The frame has been made by Tigcraft and is fitted out with a NSR MC21 swing arm fitted with a Ohlin’s rear shock and the front end is Cagiva USD forks and the wheels are KTM 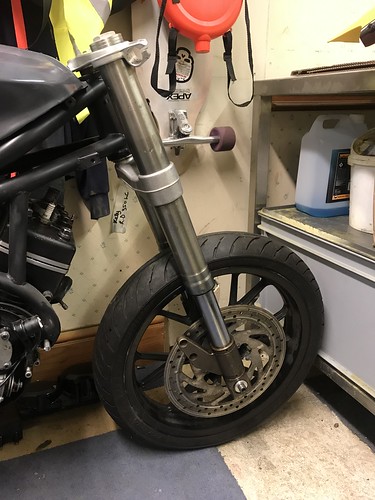 IMG_5964 IMG_5964 by Alan Kelly, on Flickr 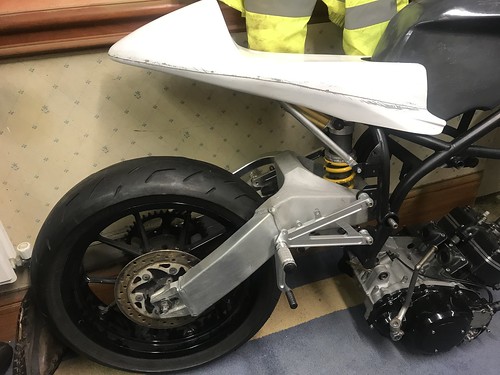 IMG_5953 IMG_5953 by Alan Kelly, on Flickr 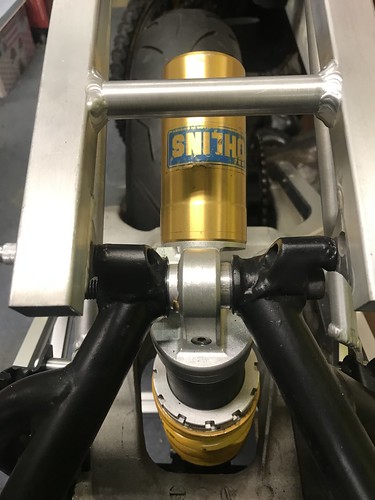 IMG_5971 IMG_5971 by Alan Kelly, on Flickr Also fitted in my donor engine today and all looks good even though the engine is a snug fit and fitting a custom radiator and pipes will require an bit of thought and planning as not much space 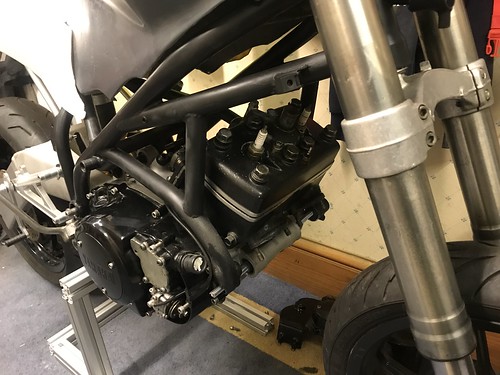 IMG_5968 IMG_5968 by Alan Kelly, on Flickr 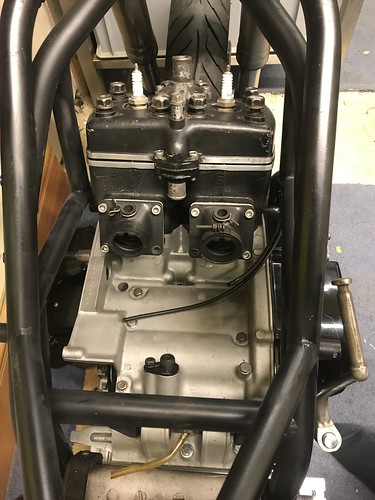 IMG_5969 IMG_5969 by Alan Kelly, on Flickr 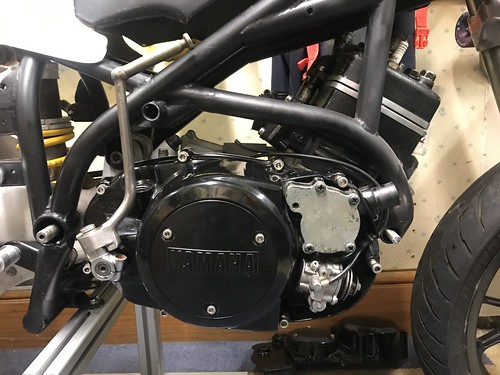 IMG_5962 IMG_5962 by Alan Kelly, on Flickr Not sure how the final bike will look but already thinking that as well as using a standard looking 4L0 engine, it would look nice with some nice standard clocks maybe just to keep the RDLC theme But the first part of the project will be to measure up all over the Christmas break, then in the new year spend some time in the evenings in the tool room to machine up all the require spacers and spindles for both the front and back wheels, some spacers to set up the headstock bearings correctly, some spacers to complete the engine mounting and then add some handle bars so that the frame become a finished and buttoned up “roller” Then once that process is finished I will look at how I can fit a centre stand or add a separate side stand sub frame, and also contact some rad' and exhaust manufactures as until I know where the rad will be mounted, its size / shape etc. and the route of the exhausts and final design I cannot really think or plan the other many bits of the project that will be needed to complete the bike Lastly to make things even more of a challenge and as I had a donor engine / frame with a SORN’ed V5C, I am planning to build the bike to MSVA test reg’s using the donors bikes paperwork / documentation, and having put two kit cars thru a SVA / IVA in the past I feel that this approach is the best. Yes is a bit of a pain but the thing to do is before you design / make / fit something, read the MSVA manual and build to the requirement rather that just build first then need to change later (and most of the requirements are common sense) Will update all once the bike is a roller Have a great Christmas and new year Best wishes Al. |
|
|
|
Post by mikee on Dec 22, 2018 19:43:10 GMT 1
Kin’ell Alan that’s nice
Get on with it then
Mike
|
|
|
|
Post by Mr Kipling on Dec 22, 2018 20:22:49 GMT 1
Nice project u got there Atb with the build....
|
|
|
|
Post by Dangerous on Dec 22, 2018 20:30:12 GMT 1
Wow that looks great, you do like to keep your self busy👍👍
|
|
|
|
Post by veg on Dec 22, 2018 20:39:29 GMT 1
Lovely and welcome to the world of complexity and non non standard, chris is a top bloke enjoy and I will be watching this
|
|
kopite30
Thrash Merchant
   http://www.motomovers.uk
Posts: 492
|
Post by kopite30 on Dec 22, 2018 21:11:07 GMT 1
Hi Al
No worries bud,glad your happy with the service,
Didn’t take long to put together looking good so far bud,
|
|
|
|
Post by stusco on Dec 22, 2018 22:19:02 GMT 1
Nice n different will be something special
|
|
|
|
Post by dusty350 on Dec 23, 2018 11:09:39 GMT 1
|
|
|
|
Post by ypvs400 on Dec 23, 2018 11:49:13 GMT 1
Looking good already and I look forward to seeing it progress.
|
|
|
|
Post by Tobyjugs on Dec 23, 2018 19:33:43 GMT 1
Great project Allen.
Will the engine pass the rules for emissions? or are based on they year the engine was made?
|
|
|
|
Post by alankelly on Dec 23, 2018 19:47:29 GMT 1
Hi Tobyjugs
Yes MSVA states emissions are based on the age of the donor bike in this case my SORN 1981 Rd350lc and MSVA states engines made before 1993 are exempt as this is pre cat era
Did the same for my dax rush project engine was a new crate 2001 rover v8 engine meaning it should have been fitted with fuel injection and cats but to get around this requirement bought a scrap 1991 ford serria then registered the engine Into this donor so the engine became the same age as the donor vehicle so I could run a quad set of downdrafts without cats etc👍👍
Best wishes Al
|
|
|
|
Post by Tobyjugs on Dec 23, 2018 19:53:19 GMT 1
That is good news, i will be watching this project like a hawk
|
|
|
|
Post by 4l04ever on Dec 24, 2018 19:21:12 GMT 1
Is it done yet?? :-)
|
|
|
|
Post by alankelly on Dec 24, 2018 20:07:17 GMT 1
Hi Rob
Think this one going to be a long haul and need to get the yellow one finished first👍
But it will make a change from repairing buggered bits to making new one offs
Best xmas wishes Al
|
|
|
|
Post by tipfinchy on Dec 24, 2018 21:14:22 GMT 1
looks stunning , so lightweight and minimalistic even when you have sorted the pipes and rad etc it will still look bare bones , love it
mart
|
|
|
|
Post by alankelly on Dec 24, 2018 22:39:16 GMT 1
Hi all
Just thought I would like to say a big thank you to all the positive comments👍👍
Shall now go and vegetate after Boxing Day in the shed with a tape measure, digital vernier and a laptop to draw up all the bits to create my roller in the new year
Best wishes Al
|
|
|
|
Post by mikee on Dec 24, 2018 22:54:33 GMT 1
Looking forward to progress Alan
Mike
|
|
Deleted
Deleted Member
Posts: 0
|
Post by Deleted on Dec 26, 2018 5:26:27 GMT 1
Good on ya. Will be great when done.
Problem on this site is so many great builds. Its hard to keep track of them all.
|
|
|
|
Post by alankelly on Dec 29, 2018 20:44:14 GMT 1
Hi all. Well project number two is now officially underway!!! So much to do but just need to do one thing at a time so started this afternoon to design / model up the rear wheel mounting system so that the KTM rear wheel mates up correctly with the Honda MC21 swing arm, so when I am back at work I can make all the required bits to get the bike as a roller. Plan is to use the standard Honda wheel adjusters, and then manufacture the required adapter sleeves and spacers, so that the standard KTM 15mm spindle fits neatly in the standard Honda arm which looks to have been designed for 20mm spindle??  Rear wheel 1 Rear wheel 1 by Alan Kelly, on Flickr 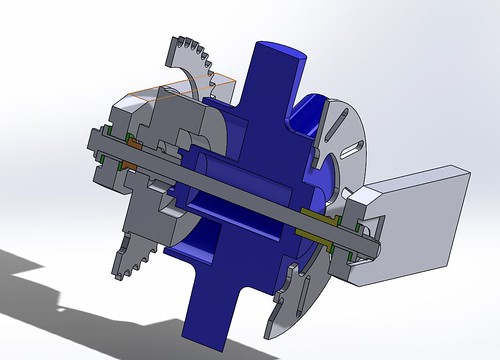 Rear wheel 2 Rear wheel 2 by Alan Kelly, on Flickr Solid modelling make things sooooo easy to design, and you know once the parts are made should go together first time, And the only thing that will need an extra mod is the spacer on the disc side to accommodate sometime in the future caliper hanger bracket:-) Plan next is to crack on with the front end wheel mounting design :-) Wishing everybody a happy new year. Best wishes Al. |
|
|
|
Post by dusty350 on Dec 30, 2018 10:36:18 GMT 1
And not a cardboard template in sight !!  Cereal boxes are safe from butchery in the Kelly household !!   Looks great mate - there will be a lot of interest in this build I'm sure. Dusty  |
|
|
|
Post by 4l04ever on Dec 30, 2018 14:52:19 GMT 1
At least you can stay in the warm while you work on your computer :-)
|
|
|
|
Post by Tobyjugs on Dec 30, 2018 19:03:13 GMT 1
Very nice skills i wish i possessed.
|
|
|
|
Post by alankelly on Dec 30, 2018 19:33:07 GMT 1
And not a cardboard template in sight !!  Cereal boxes are safe from butchery in the Kelly household !!   Looks great mate - there will be a lot of interest in this build I'm sure. Dusty  Hi Dusty Was never any good with a pair of scissors anyway 😁😁😁 Best wishes Al |
|
|
|
Post by alankelly on Dec 31, 2018 1:04:11 GMT 1
Hi all Got front end all modeled up tonight and not a cardboard box, craft knife or pair of scissors in sight  Spacers and adapters have been designed to cover up the original speedo drive as planning to use a pick up sensor mounted on the back wheel to keep the front end tidy Also lower forks will require a bit of modification to fit the width of the KTM RC wheel. But as I need to strip out the forks (to replace all the seals) machining them on the mill to complete the required changes will be a doddle. Once fitted only other mod will be to the wheel to move disc inboard a bit later in the project by machine the wheel hub, so that it is aligned with the chosen brake caliper (Yet to be decided) 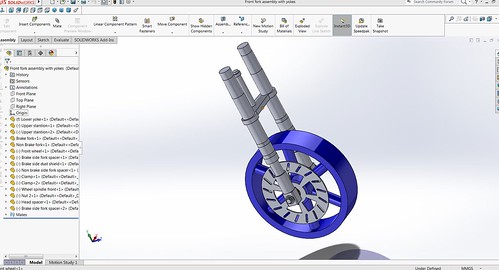 Front wheel assembly Front wheel assembly by Alan Kelly, on Flickr 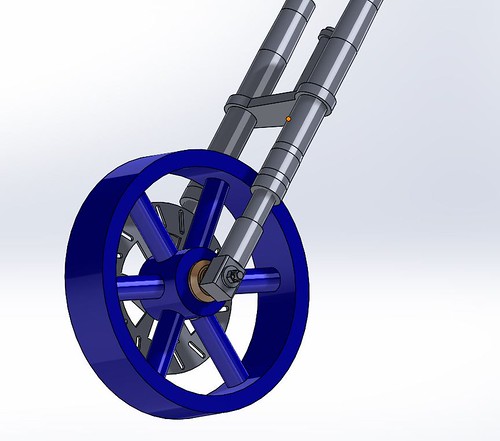 Front wheel assembly 3 Front wheel assembly 3 by Alan Kelly, on Flickr 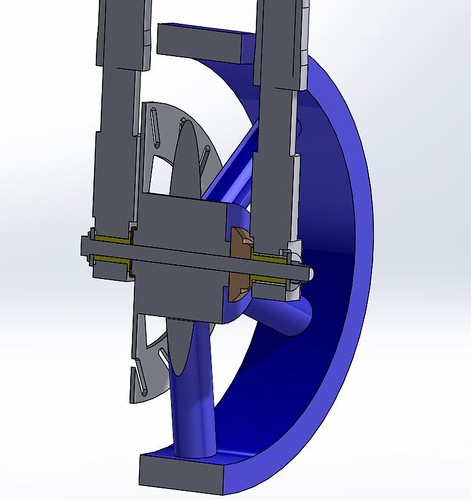 Front wheel assembly 2 Front wheel assembly 2 by Alan Kelly, on Flickr Never thought I would say this but actually looking forward to going back to work to spend some quality time in the machine shop for a few evenings  All have a good new year Best wishes Al. |
|
|
|
Post by jon on Dec 31, 2018 11:04:05 GMT 1
Al, When you get round to the real thing, you might want to actuadlly bolt the disks on the right way round.
Jon
|
|
|
|
Post by alankelly on Jan 7, 2019 22:57:15 GMT 1
Hi all Hope you are all well. Well at last managed to get some quality time in the machine shop at work, and have started to complete the modifications to the front end of the Tigcraft project bike. First thing was to modify the lower Cagiva USD fork castings by machining both sides to create a known datum / zero point relative to the fork stanchion center line, so that all my required spacer stack up sizes were correct to place the wheel in the middle of the forks, (and also needed to remove the cast boss on the R/H leg that was preventing the KTM RC wheel from moving over to the correct center line position within the forks). And then once the fork lower modification was completed, finished off the fork lowers by turning up some custom fork adapter sleeves that fit in the original 25mm /30mm lower fork casting bores, so that I can fit on final assembly a 15mm wheel spindle as required by the KTM wheel. 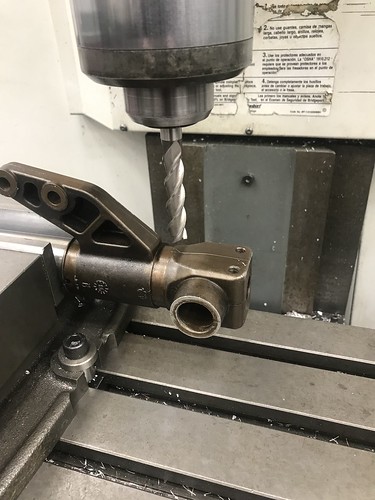 IMG_6068 IMG_6068 by Alan Kelly, on Flickr 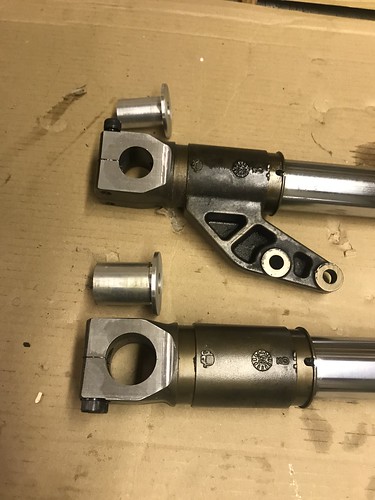 IMG_6071 IMG_6071 by Alan Kelly, on Flickr 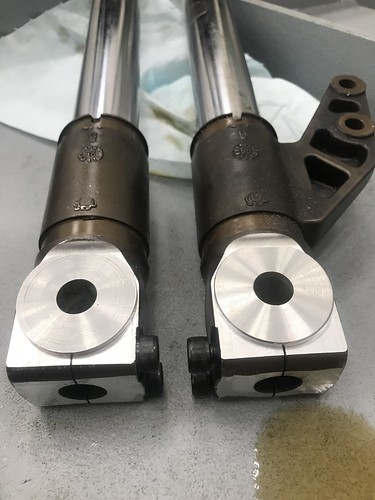 IMG_6070 IMG_6070 by Alan Kelly, on Flickr Modification looks spot on, and when I get the lower stanchions replaced, I will get the lower casting re anodized in the colour I want. Also while working on the front end, as I needed to sort out the correct assembly of the headstock taper bearing assembly, also machined up a "kit" consisting of a upper and lower bearing covers (to keep dirt out of the bearings) and a spacer piece to allow the correct preload on the taper races to remove any play in the system. 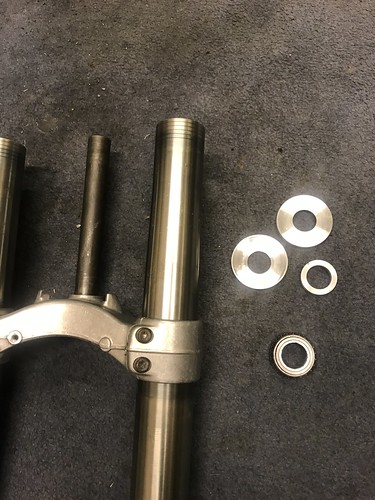 IMG_6074 IMG_6074 by Alan Kelly, on Flickr And tonight as now had all the required modified / new parts, I have now completed the final "dry assembly" of both the headstock and front wheel. 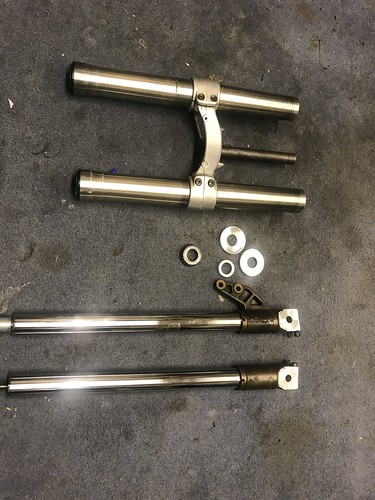 IMG_6075 IMG_6075 by Alan Kelly, on Flickr Final head stock assembly 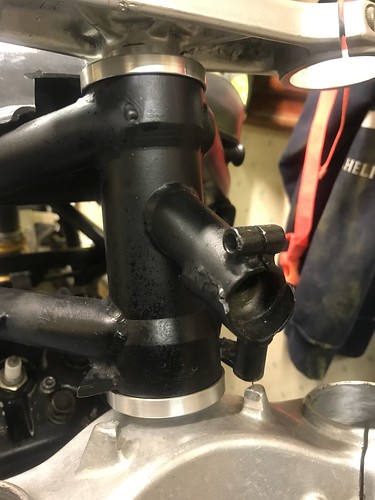 IMG_6078 IMG_6078 by Alan Kelly, on Flickr 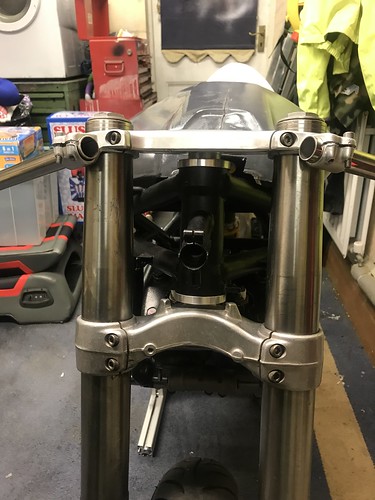 IMG_6082 IMG_6082 by Alan Kelly, on Flickr Final wheel assembly including the two required spacers (Speedo drive cover to follow) 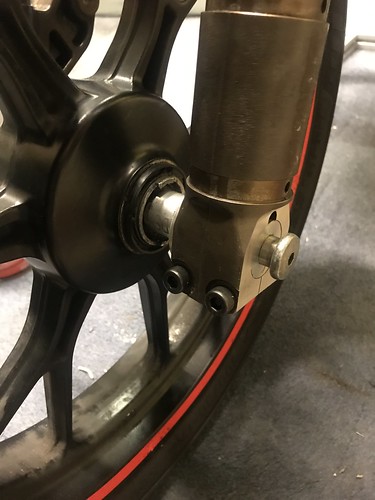 IMG_6079 IMG_6079 by Alan Kelly, on Flickr 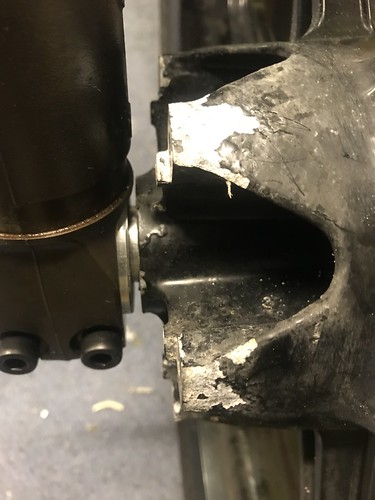 IMG_6084 IMG_6084 by Alan Kelly, on Flickr 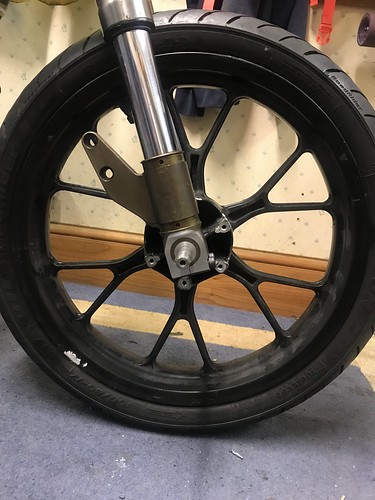 IMG_6086 IMG_6086 by Alan Kelly, on Flickr 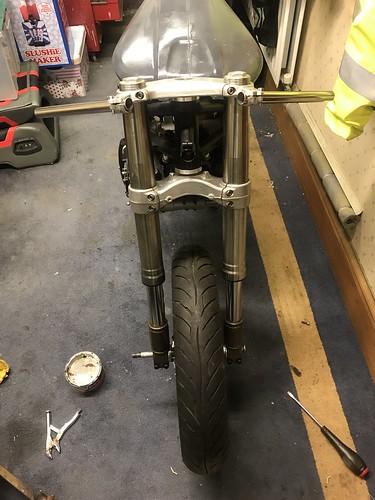 IZKR1278 IZKR1278 by Alan Kelly, on Flickr So far very pleased with the front end modifications, and all that is really need to finish the front end off is to machine up a custom size wheel spindle, a speedo drive cover, and then once I can source a front Brembo caliper (Cagiva again) and a new 320mm front disc, I will then sort out the actual correct disc offset by modifying the wheel hub so that it matches the caliper position :-) But for now plan now is to strip out the back end, sort out spacers for the NSR swingarm to remove any play in this area and then continue to the back wheel so that it is sorted like the front end. Think thats all for now. Have a great week all. Best wishes Al. |
|
|
|
Post by Tobyjugs on Jan 7, 2019 23:08:10 GMT 1
Top job Alan
|
|
|
|
Post by dusty350 on Jan 8, 2019 8:27:36 GMT 1
Brilliant work Al - I love seeing the work and technical details that go into doing these jobs. For most of us I expect, we drop bits off and pick them up done by the engineering guys, and never see the processes involved with modifying our bikes. Keep those pics coming  Dusty  |
|
markw
L plate rider.
 
Posts: 19
|
Post by markw on Jan 8, 2019 19:26:41 GMT 1
What a fantastic project looking forward to seeing how it comes out. You’re skills are another level
|
|
|
|
Post by alankelly on Feb 9, 2019 16:55:37 GMT 1
Hi all. Hope all is well. Well the hybrid is progressing very slowly but surely. At last the project is a roller!! A couple of weeks ago managed to finish of the front wheel assembly, that includes a custom S/S wheel spindle and alloy spacers 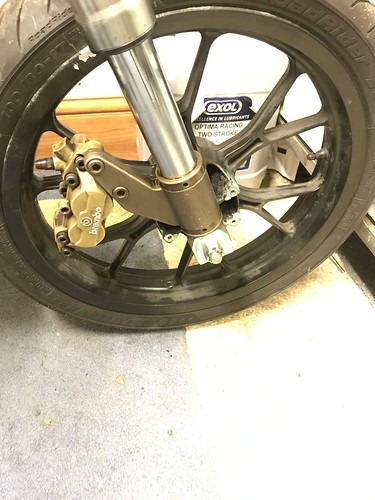 IMG_6302 IMG_6302 by Alan Kelly, on Flickr Also finished off all the required swing arm parts to correctly shim out the Honda MC21 swing arm within the Tigcraft frame swing arm mounts to prevent any lateral movement. And made all the spaces / shims up to finish off the swing arm linkage.  IMG_6320 IMG_6320 by Alan Kelly, on Flickr As for the back wheel, decided to scrap the original idea of using a pair of Honda wheel pulls, and spent some time in the tool room machining up some custom wheel pull assemblies that included again a S/S spindle that once finished will be anodized in a chosen colour, and look way more cool than the original Honda items :-)  IMG_6248 IMG_6248 by Alan Kelly, on Flickr 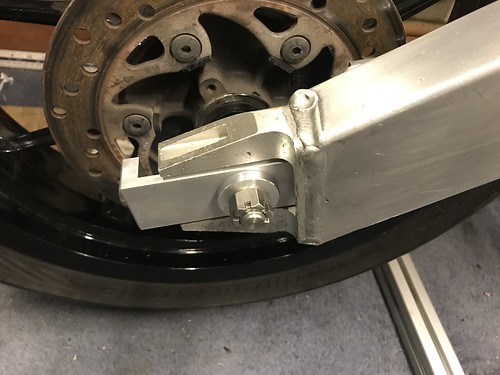 IMG_6281 IMG_6281 by Alan Kelly, on Flickr Bike now is really starting to come together as a rolling project, and really please with progress so far, even though there is still a one thousandth and one jobs to complete but just need to do one at a time. To be honest it reminds me of a small 125 (but fitted out with a 350 lump as it is so petite and lightweight!!!) 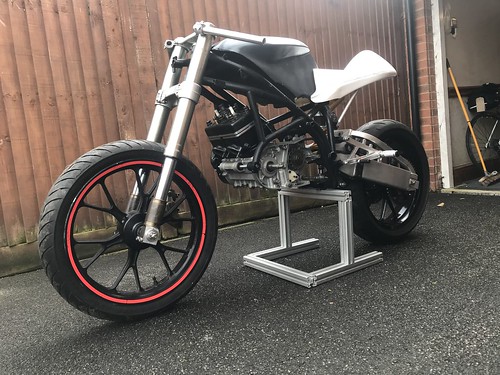 IMG_6334 IMG_6334 by Alan Kelly, on Flickr 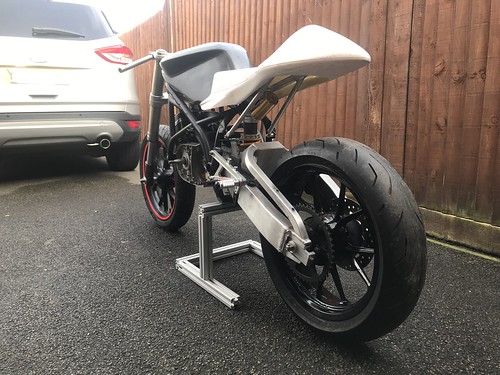 IMG_6335 IMG_6335 by Alan Kelly, on Flickr 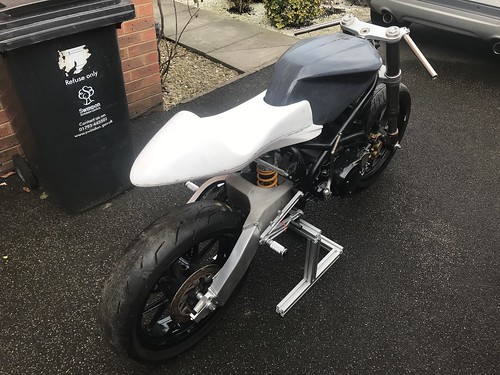 IMG_6321 IMG_6321 by Alan Kelly, on Flickr 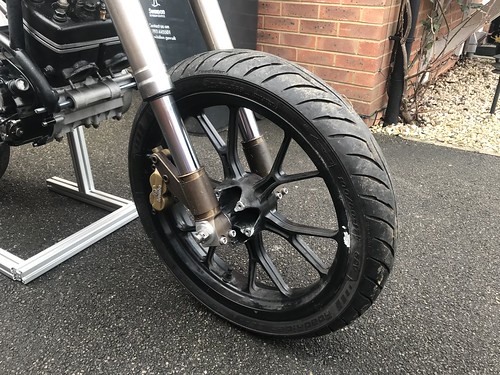 IMG_6317 IMG_6317 by Alan Kelly, on Flickr 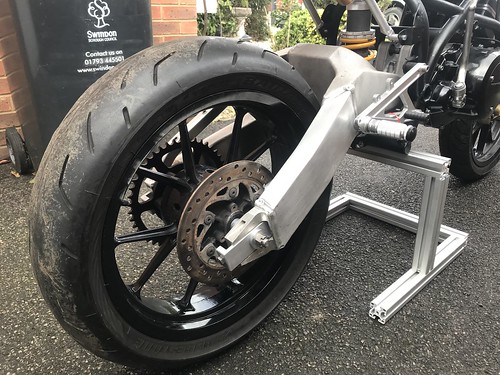 IMG_6318 IMG_6318 by Alan Kelly, on Flick  Next job is to fit and space out and align with the original KTM disc the rear 2 pot Cagiva Mito Brembo caliper (when it arrives) so that I can finish off the correct spacers and caliper torque arm mount for this part of the rear wheel assembly. Also now I have the front Mito 4 pot Brembo caliper fitted, found out it is a bit close to the wheel spokes, so going to "tweak" its position slightly to give about 4mm clearance.  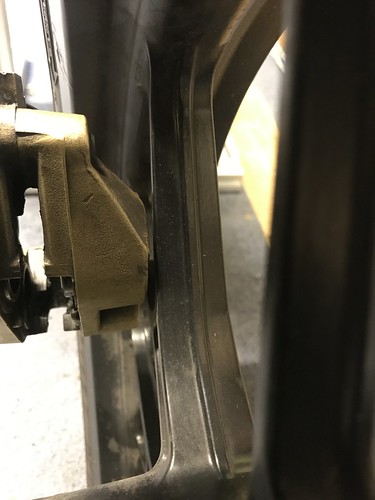 IMG_6301 IMG_6301 by Alan Kelly, on Flickr And then once I have the caliper in its final position, I can use the borrowed Mito disc (Many thanks to Donkeychomp for helping out with the lend) to calculate how much I need to machine off / modify the front wheel hub by, so that I can fit an adapter ring to allow me to bolt a Mito front disc to the KTM RC wheel. Think that's all for now folks, but will try to update all once the brake caliper / disc set ups are completed. Have a great weekend. Best wishes Al. |
|
 IMG_5966 by Alan Kelly, on Flickr
 IMG_5964 by Alan Kelly, on Flickr
 IMG_5953 by Alan Kelly, on Flickr
 IMG_5971 by Alan Kelly, on Flickr
 IMG_5968 by Alan Kelly, on Flickr
 IMG_5969 by Alan Kelly, on Flickr
 IMG_5962 by Alan Kelly, on Flickr
 IMG_5966 by Alan Kelly, on Flickr
 IMG_5964 by Alan Kelly, on Flickr
 IMG_5953 by Alan Kelly, on Flickr
 IMG_5971 by Alan Kelly, on Flickr
 IMG_5968 by Alan Kelly, on Flickr
 IMG_5969 by Alan Kelly, on Flickr
 IMG_5962 by Alan Kelly, on Flickr



 Cereal boxes are safe from butchery in the Kelly household !!


