|
|
Post by dusty350 on Feb 5, 2016 12:22:37 GMT 1
Hi I thought I would start a thread on the rebuild of my spare 350lc engine. This came out of my blue hybrid, and originally was going to go back in it until I decided to use my rebuilt F2 motor. So it is basically a spare engine. I hope it will be in a future special - need to find a frame first, but I thought I would rebuild it completely so it will be ready to slot straight in when the time comes. It will be a slow build due to funds, but I thought it may help fellas who have never done one before. I will include part numbers where I can and places I source the parts from. It will be a mainly standard build - I'm not interested in tuning it, and I will use genuine Yam parts where I can. This was the engine in the bike when I got it;  DSCN3742 DSCN3742 by David Miller, on Flickr It's had a previous rebuild, and everything came apart nice and easily. I bagged all the parts up and labelled them for the future rebuild. First job was to get the cases vapour blasted by R.D.Cox in Reading. Been going there for years and always really happy with the results; 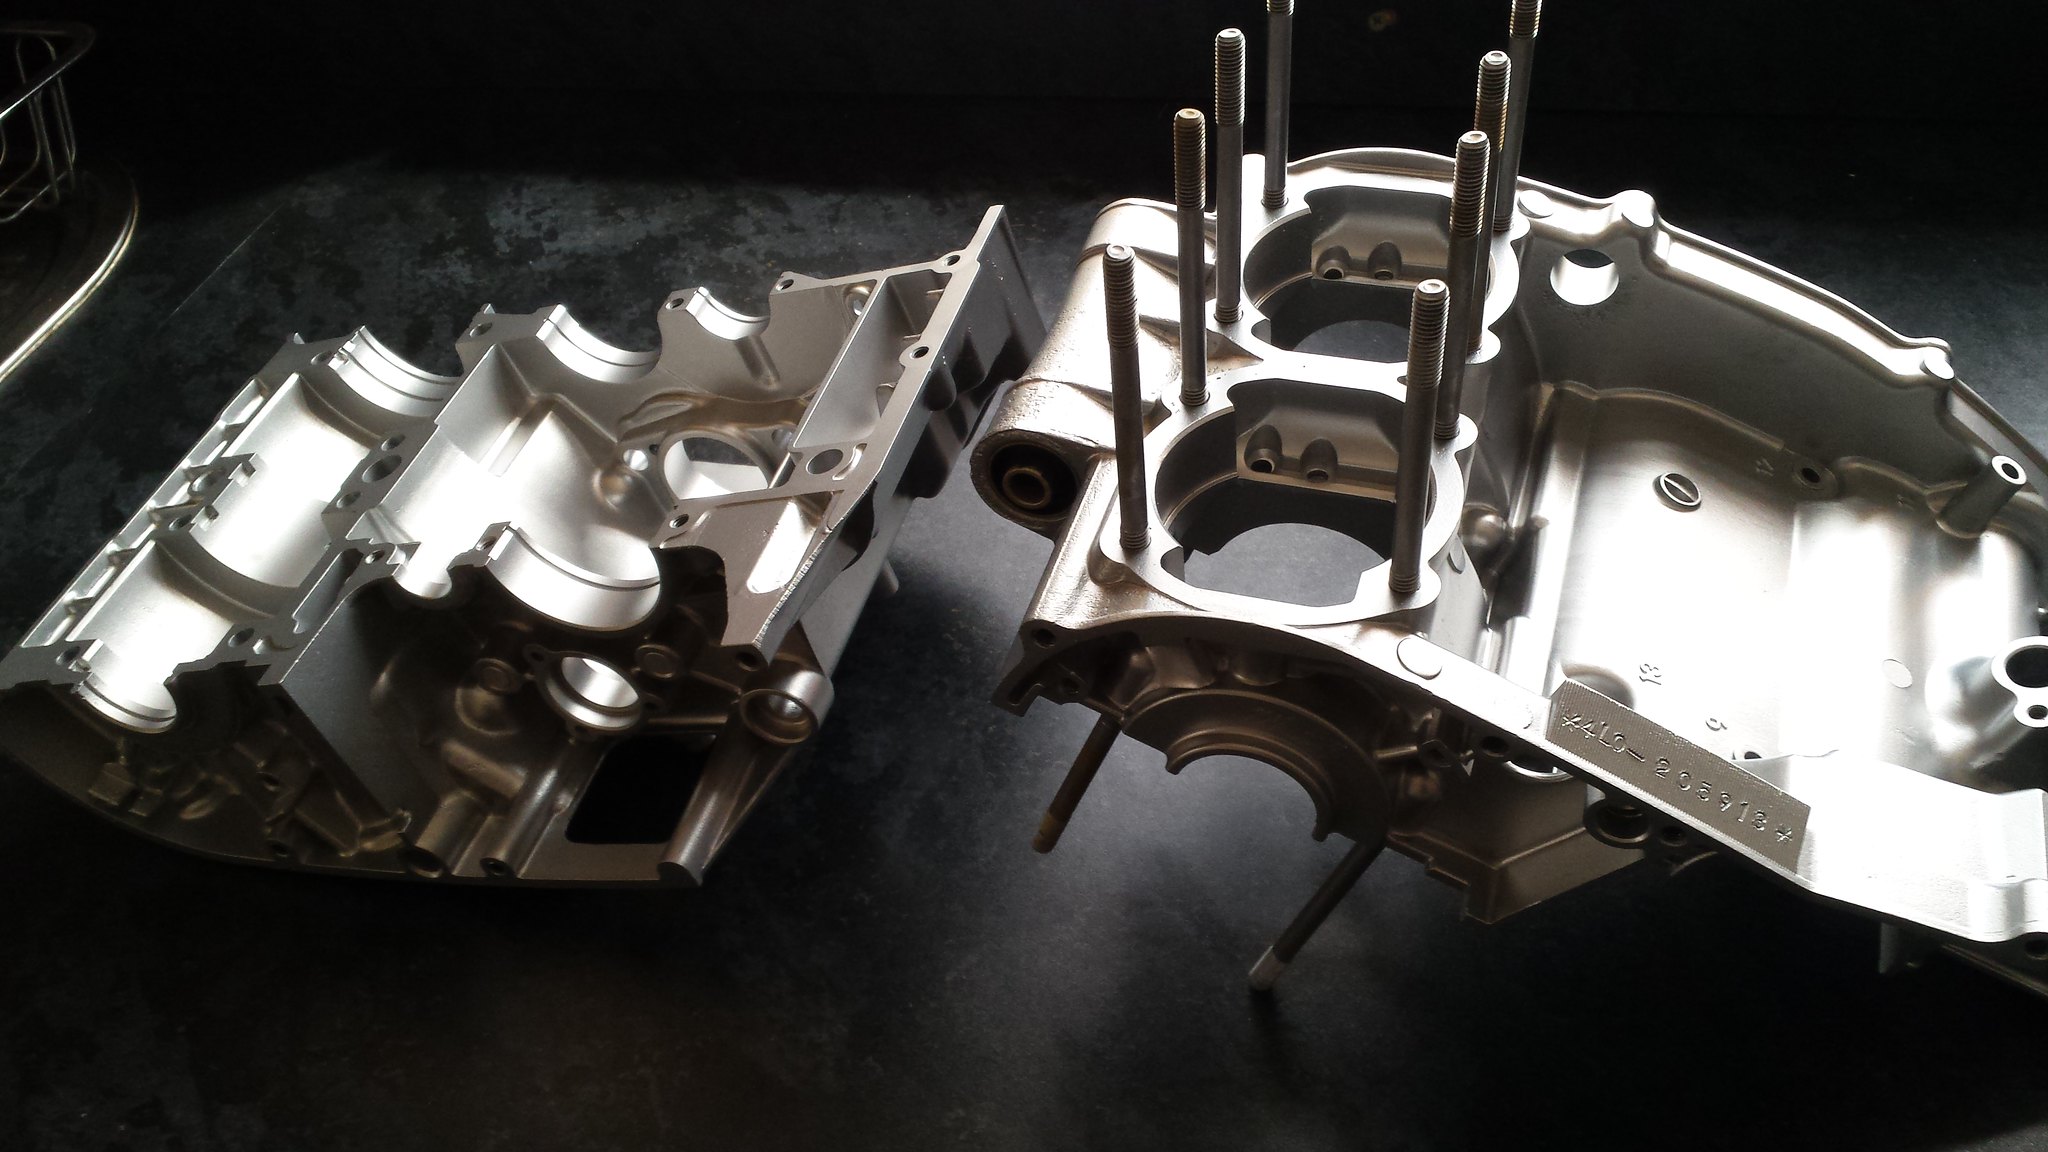 20150710_152445 20150710_152445 by David Miller, on Flickr  20150627_100226 20150627_100226 by David Miller, on Flickr I really like the finish vapour blasting gives and always start my engine rebuilds like this. I also use a home made engine stand, using some offcuts of wood I had in the shed. It keeps the engine fairly level and secure. The sump bolt sits in the hole in the wood, and the castings on the underside of the engine sit on the front piece of wood. There are felt pads stuck to the underside of the base ply so you can slide it around on the bench; 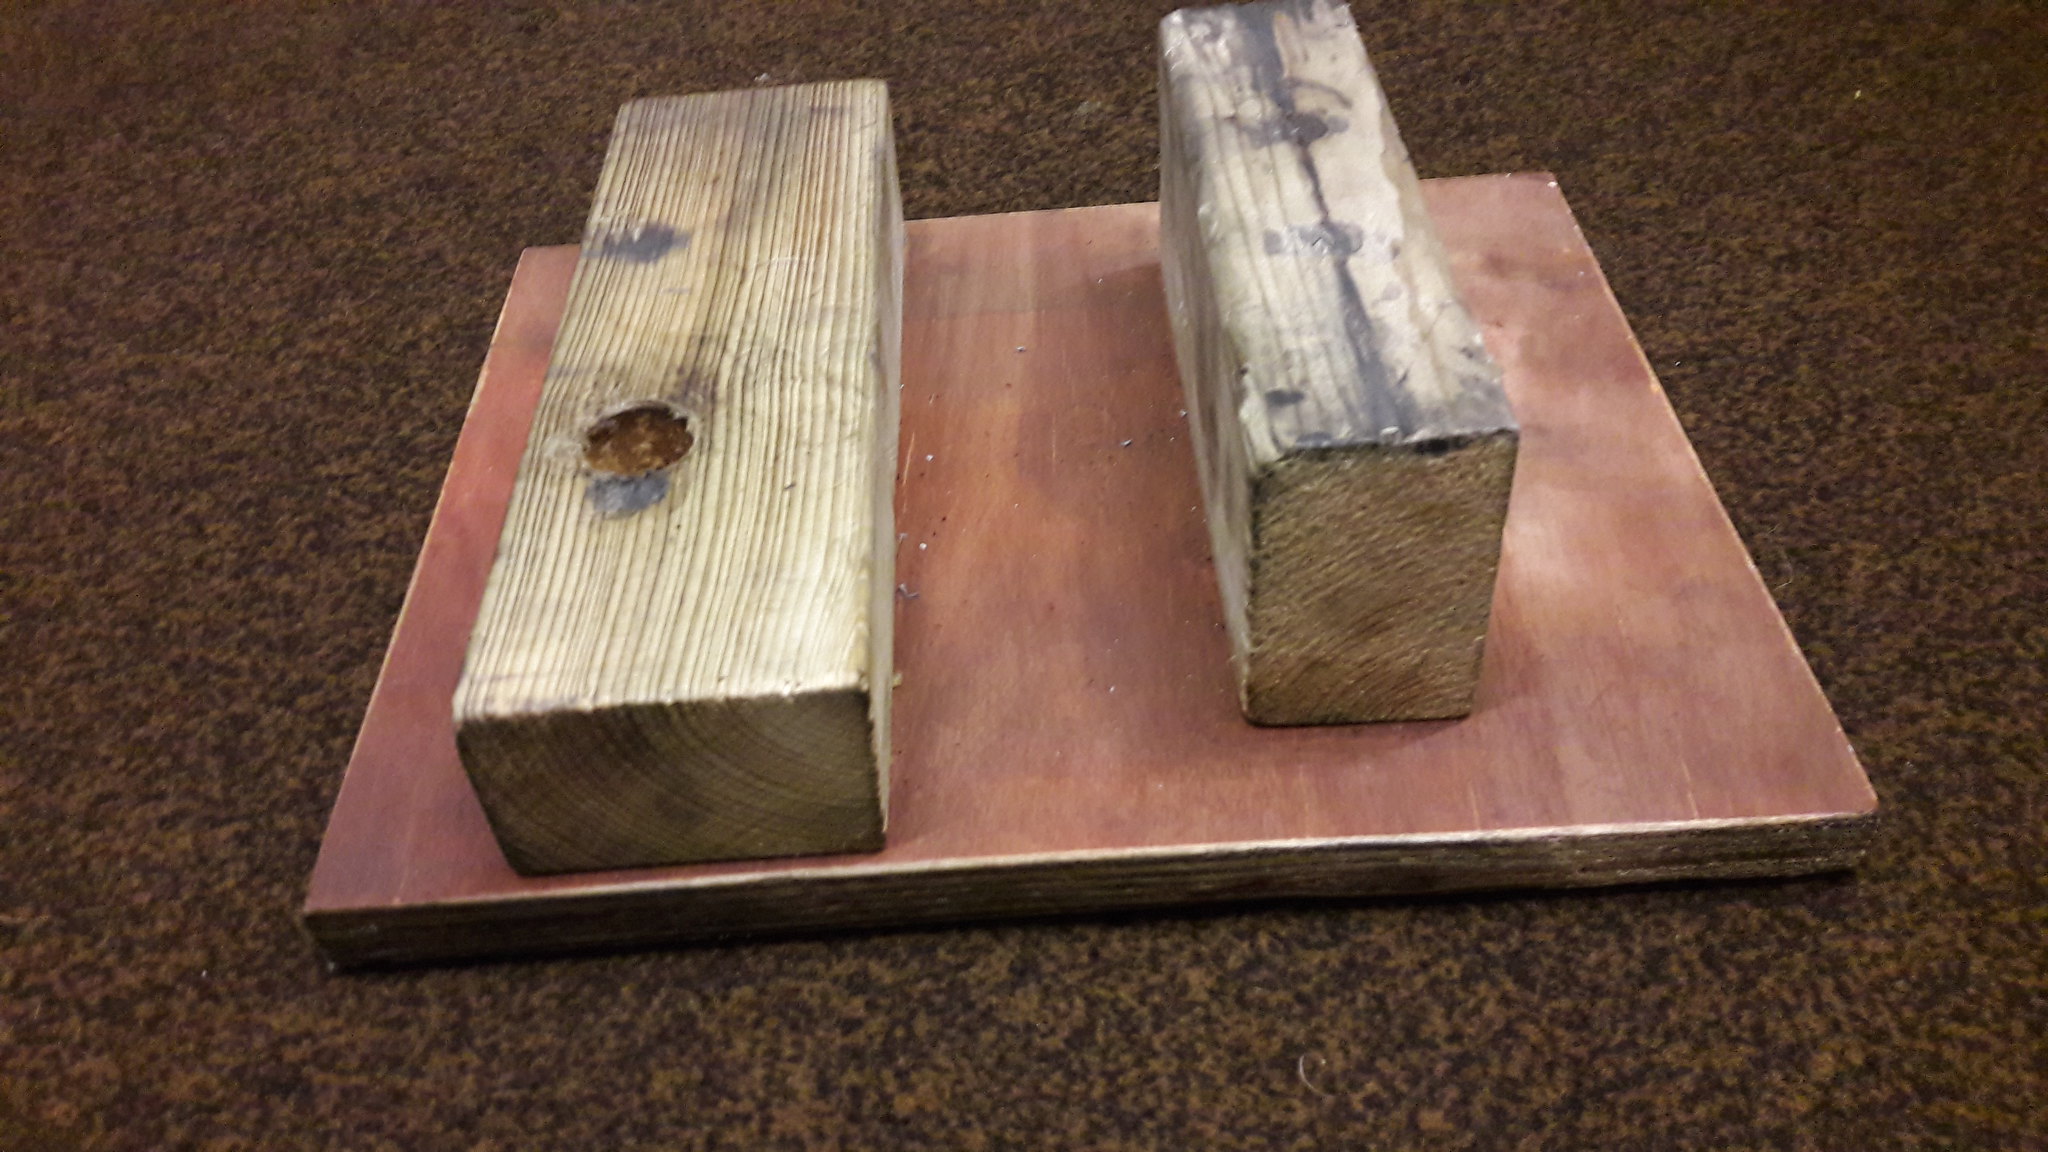 20171008_104417 20171008_104417 by David Miller, on Flickr First job to do was get the gear shaft bush fitted. I bought this from Norbo. This helps to support the shaft and hopefully eliminate oil leaks that come from there due to worn ally cases. I did buy a cheap reamer off ebay, and I did post a thread asking how to do it and got some very helpful replies, but considering the cost of engine cases and the tight tolerances involved, I bottled out of doing it myself and took it to my local engineering place. They did the necessary and then pressed the bush carefully into place. The bush is Teflon coated on the inner surface and also longer than the casting it passes through, so hopefully helps support the gear shaft better than it did before; 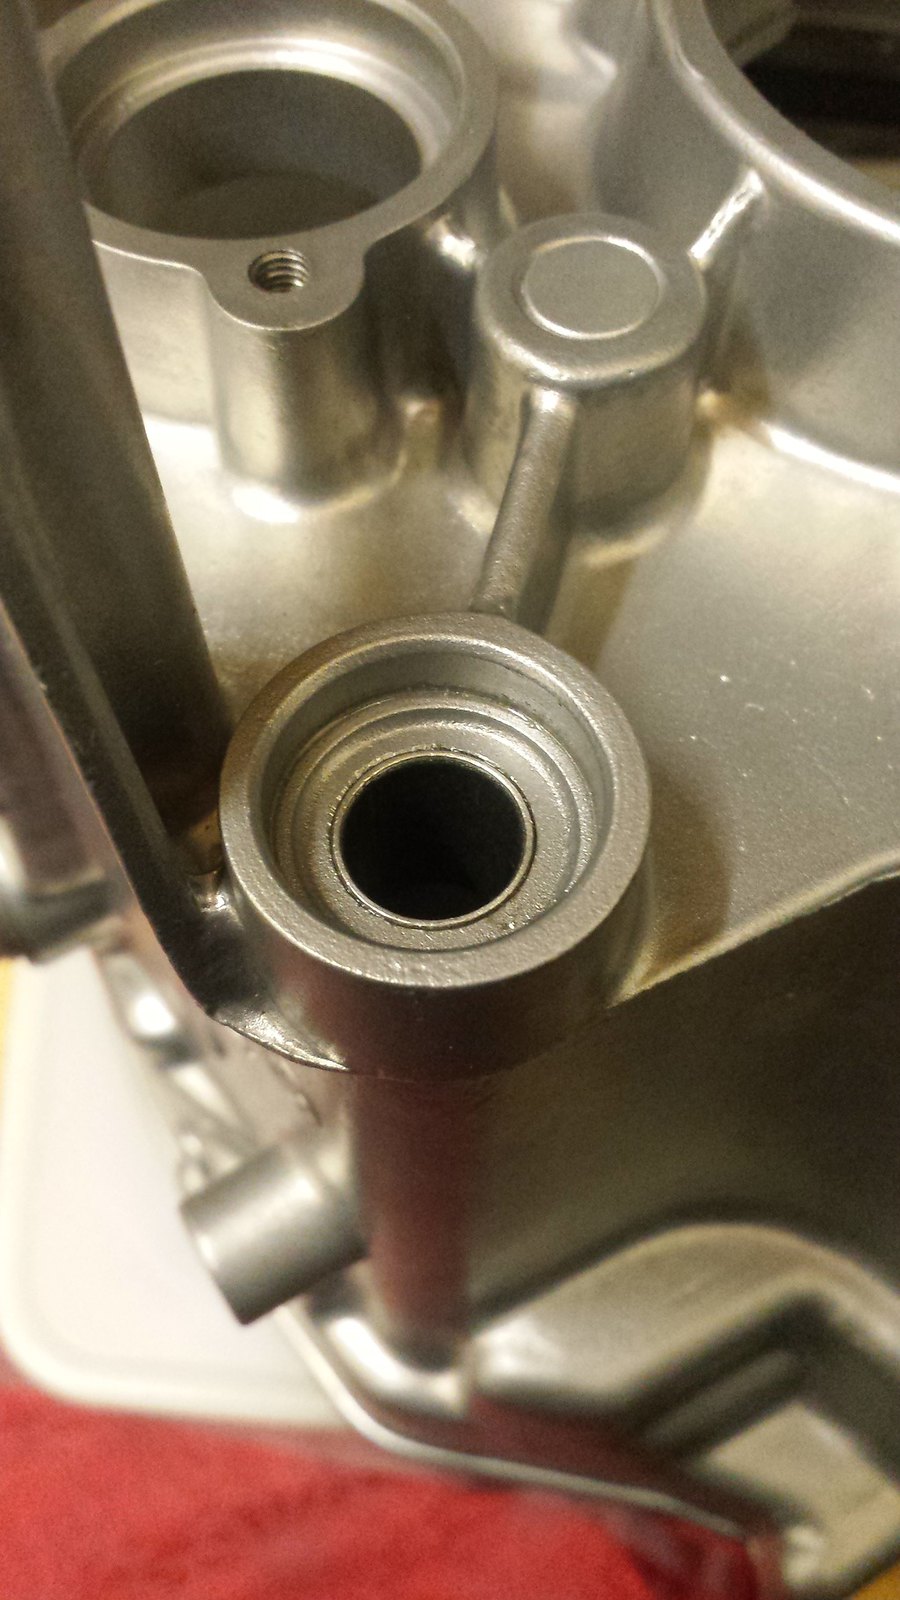 20160205_094843_zpsmgdcjhuu 20160205_094843_zpsmgdcjhuu by David Miller, on Flickr  20160205_094906_zpsgtjuo5xf 20160205_094906_zpsgtjuo5xf by David Miller, on Flickr Next job will be selector drum. Regards Dusty  |
|
|
|
Post by jumpstart on Feb 5, 2016 13:30:09 GMT 1
good thread dusty will be doing this later... so keep up the good work mate
|
|
|
|
Post by jumpstart on Feb 5, 2016 13:36:15 GMT 1
Dusty  would you be interested in selling me the front and rear pegs of the blue bike  |
|
|
|
Post by mick858 on Feb 5, 2016 16:25:56 GMT 1
I'll be watching this build, it'll be a big help when I get round to doing mine.
|
|
|
|
Post by dusty350 on Feb 5, 2016 16:28:25 GMT 1
Hi Jumpstart They've already made it back onto the bike I'm afraid, but only after I polished the anodised finish off them as it had worn through in places. What a job that was ! Dusty  |
|
|
|
Post by jumpstart on Feb 5, 2016 16:46:01 GMT 1
Ok mate ive got a link for some in a german website....so all not lost lol
|
|
|
|
Post by budgie on Feb 5, 2016 17:54:56 GMT 1
Keep up the good work, Dusty...I love building engines... I always find it the best bit of the rebuild... and so nice when your dealing with nice new shiny parts.... very rewarding..!!!
Gav
|
|
|
|
Post by stusco on Feb 5, 2016 18:25:09 GMT 1
Keep up the good work, Dusty...I love building engines... I always find it the best bit of the rebuild... and so nice when your dealing with nice new shiny parts.... very rewarding..!!! Gav +1 |
|
|
|
Post by lrcarl on Feb 5, 2016 20:26:47 GMT 1
hi dusty,do you put anything on your casings to keep them looking that nice
thanks carl
|
|
|
|
Post by rigga on Feb 5, 2016 21:53:39 GMT 1
Nice thread Dusty, always good to have a reference when doing one in the future, lots of pics always helps.
Engine stand is a neat idea too
|
|
|
|
Post by dusty350 on Feb 7, 2016 18:54:33 GMT 1
Hi all I thought it worth doing a thread as although many of us have done them before, some guys haven't, plus we all like looking at Rd pictures don't we !!  I did buy a lot of parts back last year when I thought I would be using this engine so the initial progress will seem quick, but then slow when it comes to large cost items such as crank rebuild. I'm layed up with a nasty flu bug at the mo so cant get in the garage for a few days but I will update soon, Ircarl, I personally don't use anything on the cases, but something like ACF50 would be good. Vapour blasting seals the pores in the alloy so a regular clean gets them looking good again. It's also worth knowing that the finish of the vapour blasting can be adjusted to give varying degrees of shininess, although I personally never go too blingy on cases. Dusty  |
|
|
|
Post by muttsnuts on Feb 7, 2016 19:51:49 GMT 1
Dusty, good idea, one point, after vapour blatsing do you run a tap down each of the various threaded holes to make sure all of the blasting sand etc is removed and also blow out all of the orifices in case any sand has been left lurking ?
I do it on all of my engine rebuilds and its amazing how much crap comes out, plus it means it all goes back togther easier and things torque up to the right setting without too much hassle
HTH
|
|
|
|
Post by paulba on Feb 7, 2016 20:13:02 GMT 1
Good tread dusty will help me with mine next month
|
|
|
|
Post by lrcarl on Feb 7, 2016 20:53:54 GMT 1
thanks dusty
carl
|
|
|
|
Post by dusty350 on Feb 8, 2016 10:42:50 GMT 1
Hi Dave Good point about the blasting media  I always do some prep work on the parts before I take them for blasting. I clean the cases as best I can in petrol getting them as clean as possible, allowing me to check for any damage/cracks in the alloy that might require work before they go for blasting. I then wind old bolts fully into all the threadways to keep blasting media out. I've heard before that media sat in the bottom of a hole can push a hole through a casting when a bolt is tightened up on rebuild - a bit like using too long a bolt. So I always wind the bolts in fully. Cox's are very good, they always rinse well in hot water and then blast with compressed air, but I always rinse again when I get them home - taking all the bolts out first. I run cotton buds down the threadways to make sure they are clean - all a bit anal I know but it has to be right. Some years back my brother decided to get back into bikes and bought a nicely restored Z650 from a well known firm that advertise restored classics in the pages of CMM. He hadn't done many miles on it before it started making horrible noise from the top end. Long story short, the restored engine hadn't been flushed of blasting media, resulting in very gritty oil sloshing around his engine ! He got a full refund after they had the bike back for inspection and realised their mistake. I've been extra careful ever since !!  Dusty  |
|
|
|
Post by 4l04ever on Feb 8, 2016 11:36:44 GMT 1
I let me engine case dry well after vapour blasting, then use a very small bore air dusting attachment on the air line and go down each threaded hole to make sure they are all clean. The smaller bore gets even more pressure down the holes and cleans any remains out pretty good.
|
|
|
|
Post by lrcarl on Feb 8, 2016 13:21:53 GMT 1
got mine done at tsr vapour blasting when i asked if i should put old bolts in threads he laughed and said no need was a bit worried but came back spot on all threads clean
carl
|
|
|
|
Post by jon on Feb 8, 2016 13:56:18 GMT 1
4l04ever, I blow out threads with air after blasting too (glass beads).
I too dunk in warm water before blowing any grit out.
Best of all is I like the sound it makes (I know I'm weird).
Jon
|
|
|
|
Post by dusty350 on Feb 9, 2016 19:47:55 GMT 1
Hi Starting at the very bottom of the engine, I ordered a new sump washer from Granbys (last year). Yam part number is 137 - 15353 - 00. Granbys offered me an identical Honda part for 60p rather than the £6 odd Yam item. I've had the Honda part before on my Ypvs builds and they work fine so that's what I went with. Part number is 94109- 14000. Costs 59p from Fowlers; 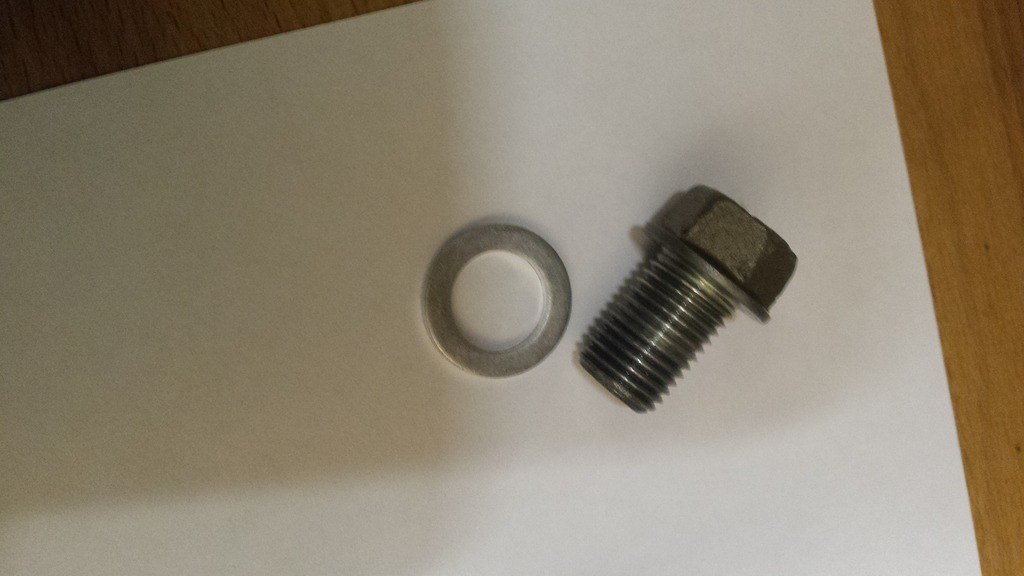 20160209_161721_zpsptzo1jtx 20160209_161721_zpsptzo1jtx by David Miller, on Flickr Some coppaslip on the bolt and I fitted it hand tight for the moment - I'm considering getting a magnetic sump plug in the future. So next job is selector drum  |
|
|
|
Post by dusty350 on Feb 9, 2016 19:53:46 GMT 1
To remove the bearing on the selector drum means removing the cross head screw first. I've never had one yet that's come out easily so I drill the head off, remove the cup washer and star head, which just pulls off, and then you can get some grips on the bolts shank and that usually turns out quite easily. Ignore the bolt in the pic, it's the new one;  20160209_161952_zpsal2l6sei 20160209_161952_zpsal2l6sei by David Miller, on Flickr 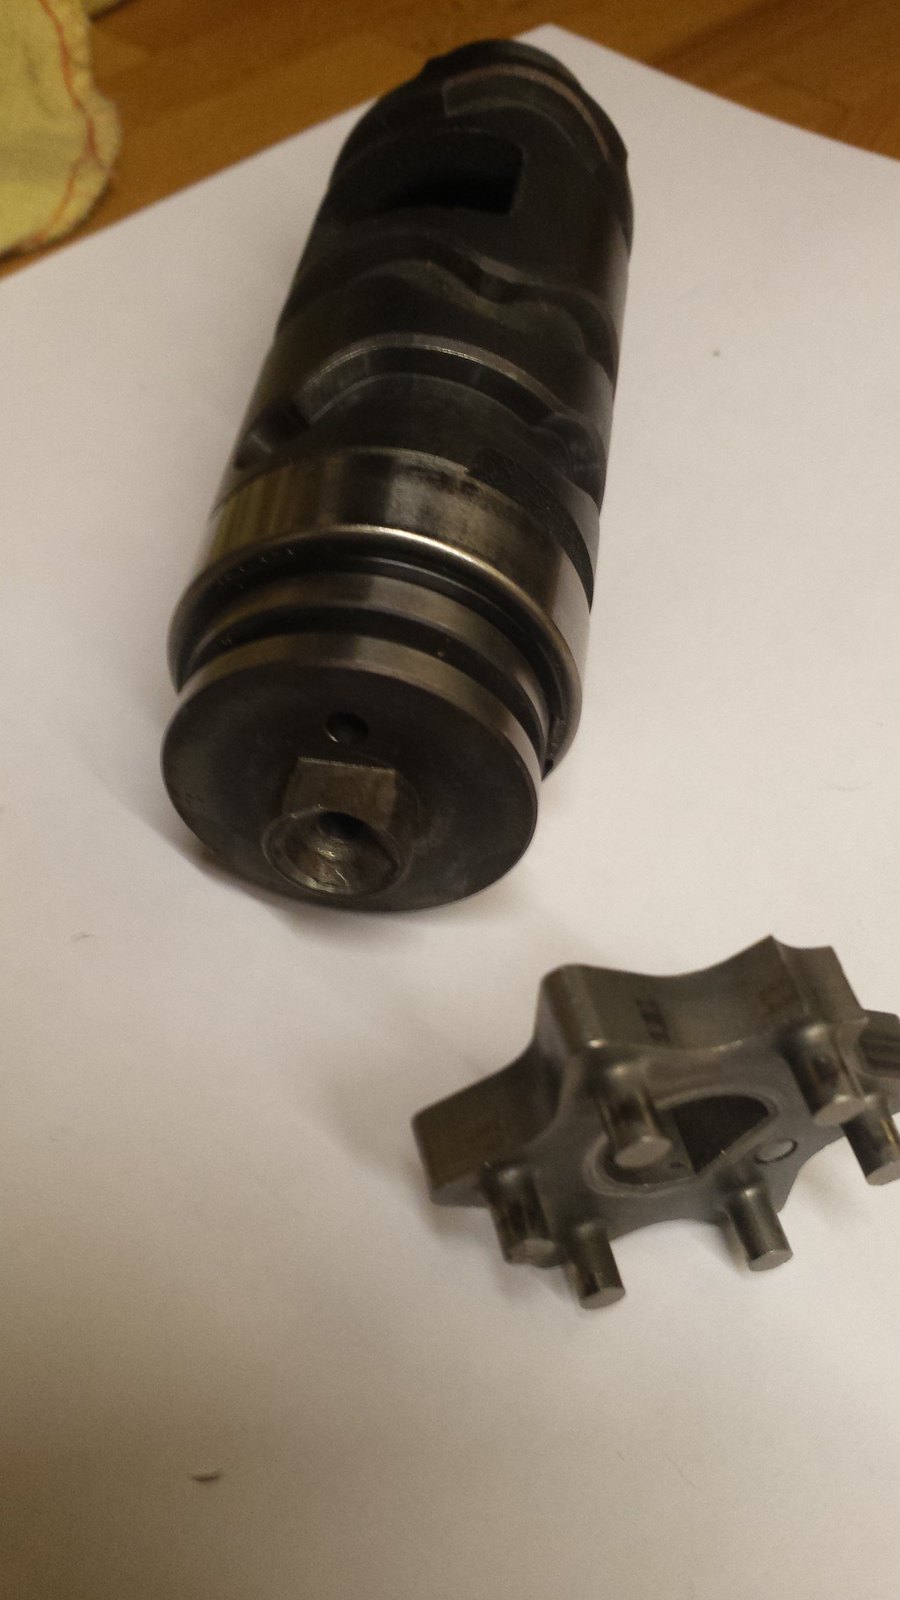 20160209_162055_zpssxnkgn5g 20160209_162055_zpssxnkgn5g by David Miller, on Flickr Once the star head is off you face a fiddly circlip, located directly above the bearing;  20160209_162300_zps1hmxefk0 20160209_162300_zps1hmxefk0 by David Miller, on Flickr I gently prise it up with a small screwdriver. Once off the bearing just lifts off. I check the surface the bearing rotates on is in good nic and then it's a case replacing with new parts; 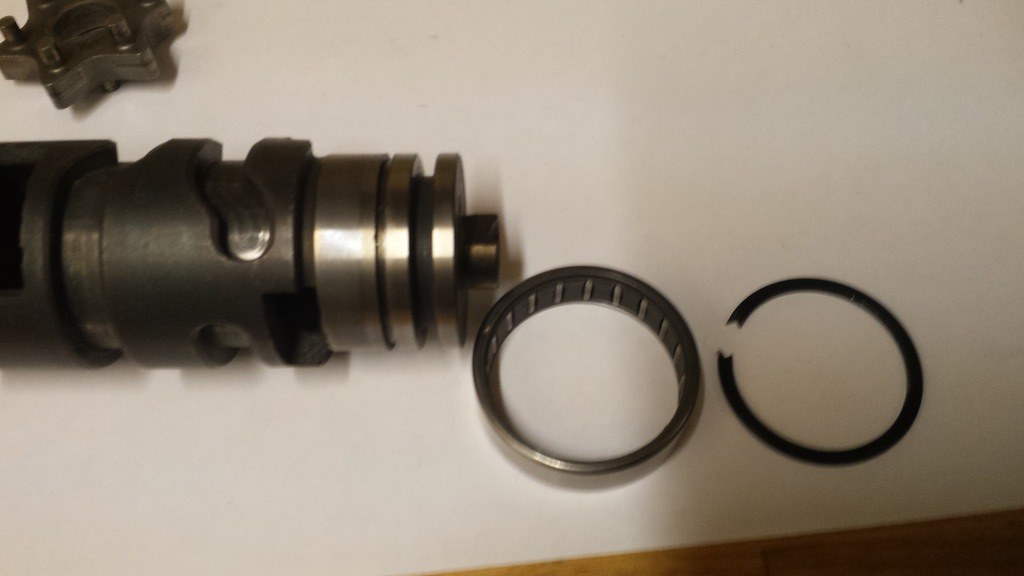 20160209_162757_zps1h8atygb 20160209_162757_zps1h8atygb by David Miller, on Flickr 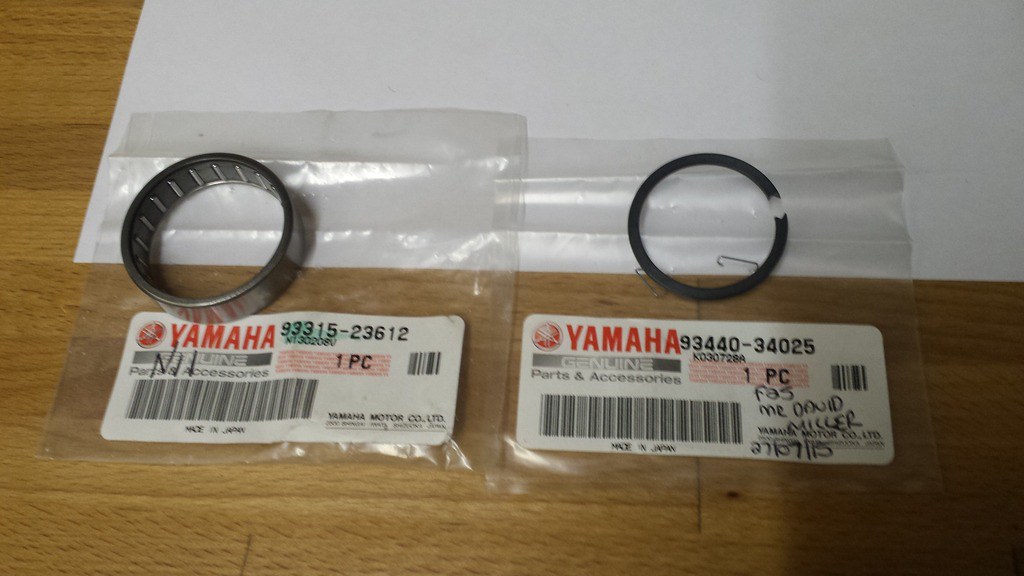 20160209_163038_zpso1pvxgzo 20160209_163038_zpso1pvxgzo by David Miller, on Flickr I submerge the new bearing in fresh gear oil before fitting. Worth checking the other end of the drum to make sure the brass plunger that makes contact for the neutral switch works properly by springing in and out;  20160209_162854_zpswirnxkws 20160209_162854_zpswirnxkws by David Miller, on Flickr With the new bearing and circlip fitted, the last thing to do is smooth down any rough surfaces on the shift star; 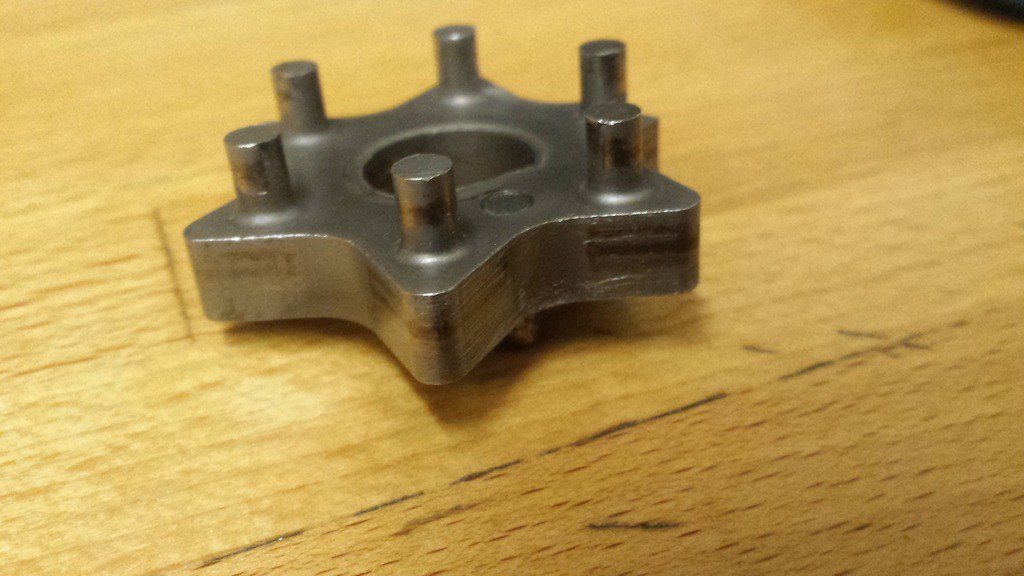 20160209_164538_zpsgthp91bu 20160209_164538_zpsgthp91bu by David Miller, on Flickr Looks worst than it is, the surface is marked but still fairly smooth to the touch. Still, a bit of emery paper makes it better. There is a pin on the star head that locates in a hole on the drum head, then the cup washer and then a new stainless cap head bolt - M5 12mm shank. I Loctite these in as I don't expect to change it again ! |
|
|
|
Post by dusty350 on Feb 9, 2016 20:26:41 GMT 1
Some gear oil is liberally applied to the casing where the drum passes through, plus the drum gets lightly covered, and then it slots back in; 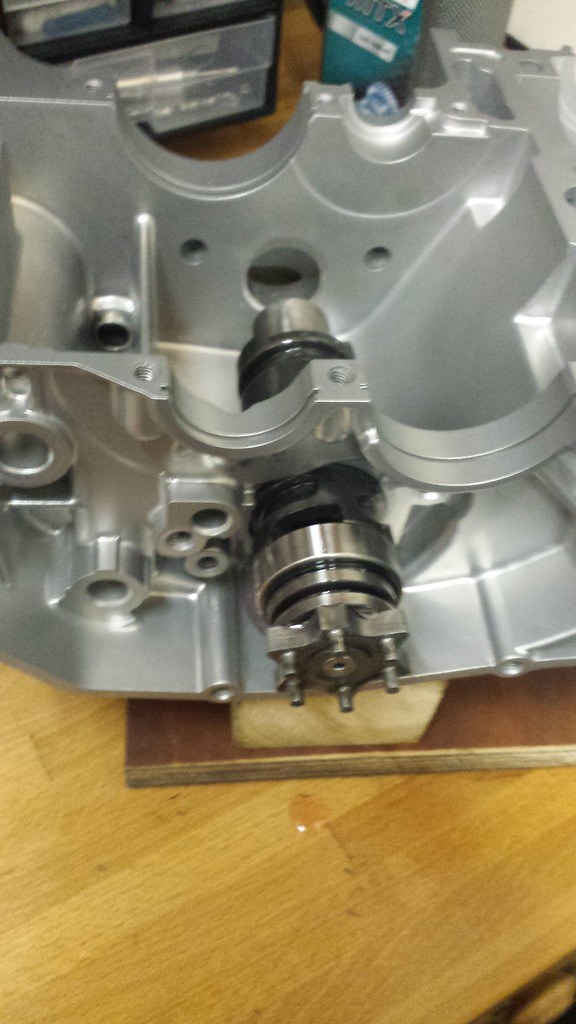 20160209_165957_zps5faotzcl (1) 20160209_165957_zps5faotzcl (1) by David Miller, on Flickr It doesn't push all the way in. A groove on the drum locates the retaining plate, and 2 new stainless cap head bolts - M6 12 mm shank - loctited in , but only after the gear dogs and shafts are fitted as the plate acts as a retainer for the front shaft. Old and new bolts; 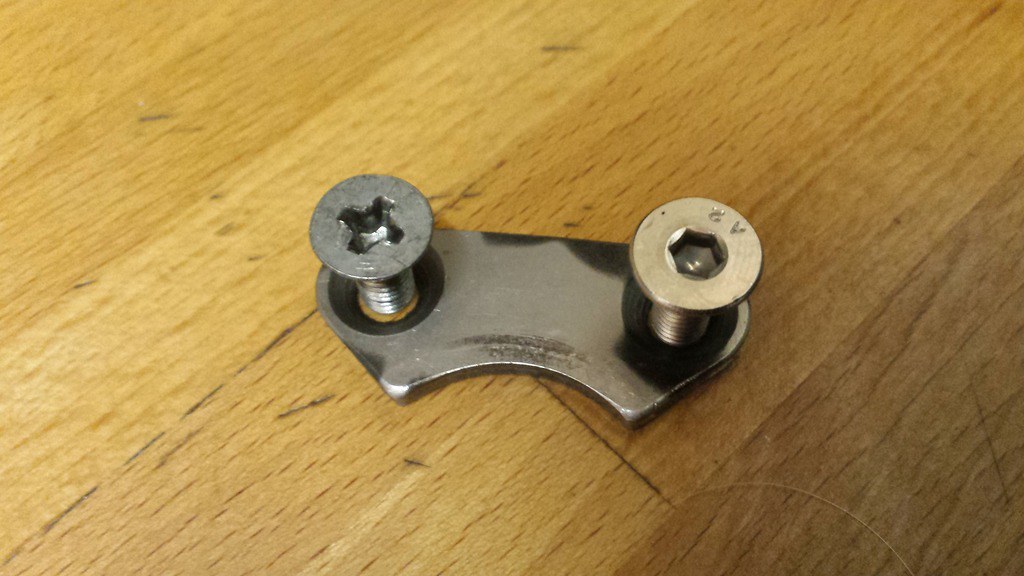 20160209_170857_zpsakcjsytc 20160209_170857_zpsakcjsytc by David Miller, on Flickr So that's the drum overhauled and fitted. The other end is the neutral switch and new O ring; 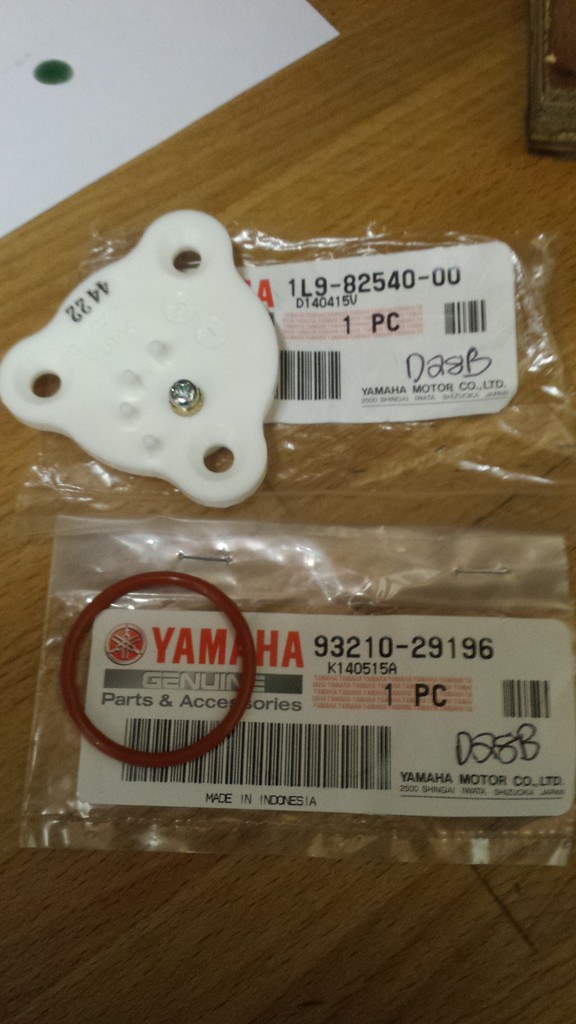 20160209_171804_zpsjrxh2jmg 20160209_171804_zpsjrxh2jmg by David Miller, on Flickr 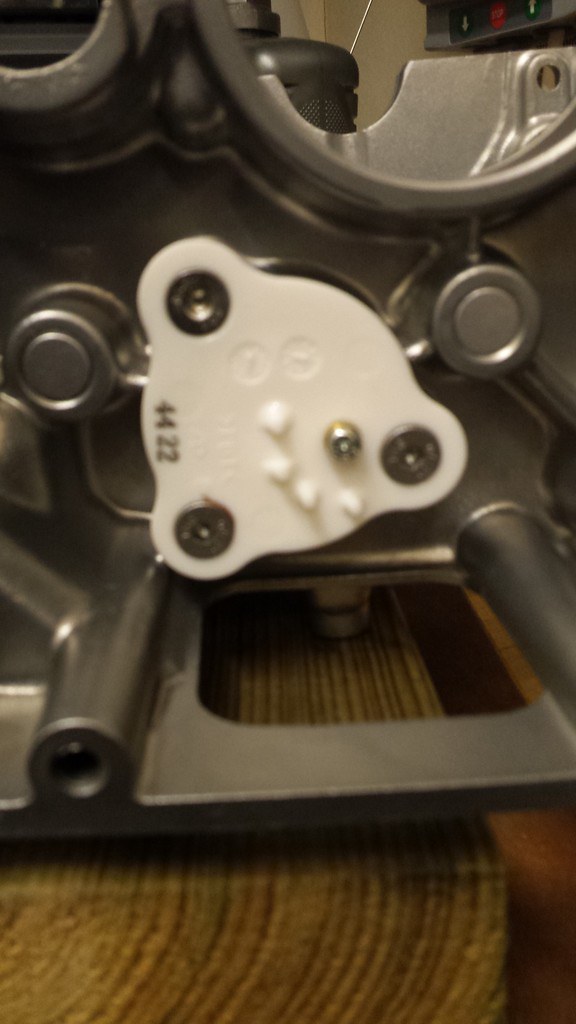 20160209_174050_zpsro25cg00 20160209_174050_zpsro25cg00 by David Miller, on Flickr Again, a bit of oil on all parts make fitting easier and looks after the O ring too. New stainless cap heads again, this time M5 8mm shank. Careful not to overtighten as the plastic cover can split. And that's it !! Next job will be gear selectors. Dusty  |
|
|
|
Post by dusty350 on Feb 9, 2016 23:42:32 GMT 1
So when I removed the gear selector dogs originally, I marked them with tape for easy rebuilding; 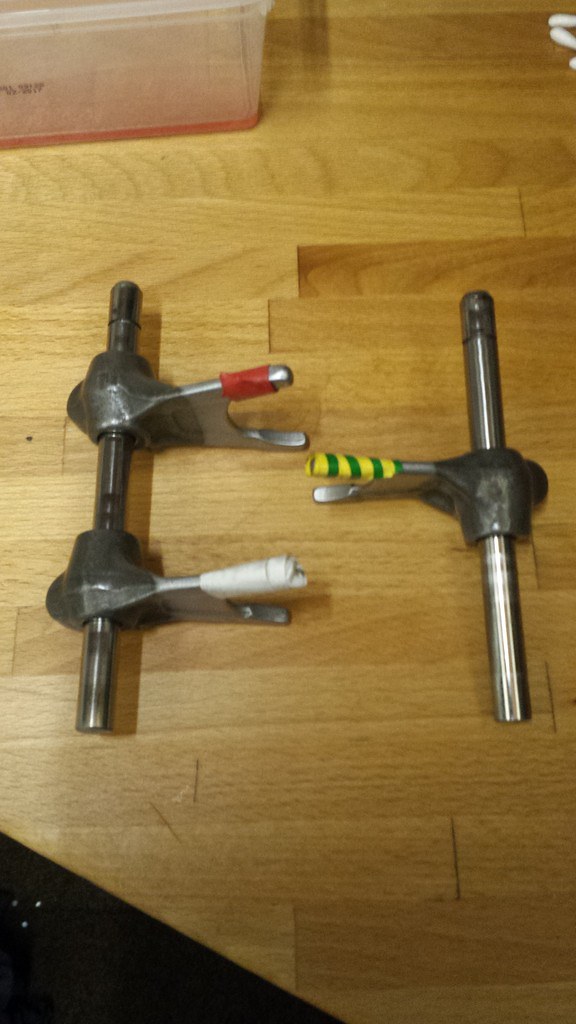 20160209_213554_zpsfizfjleg 20160209_213554_zpsfizfjleg by David Miller, on Flickr After cleaning, I fit the front shaft first; 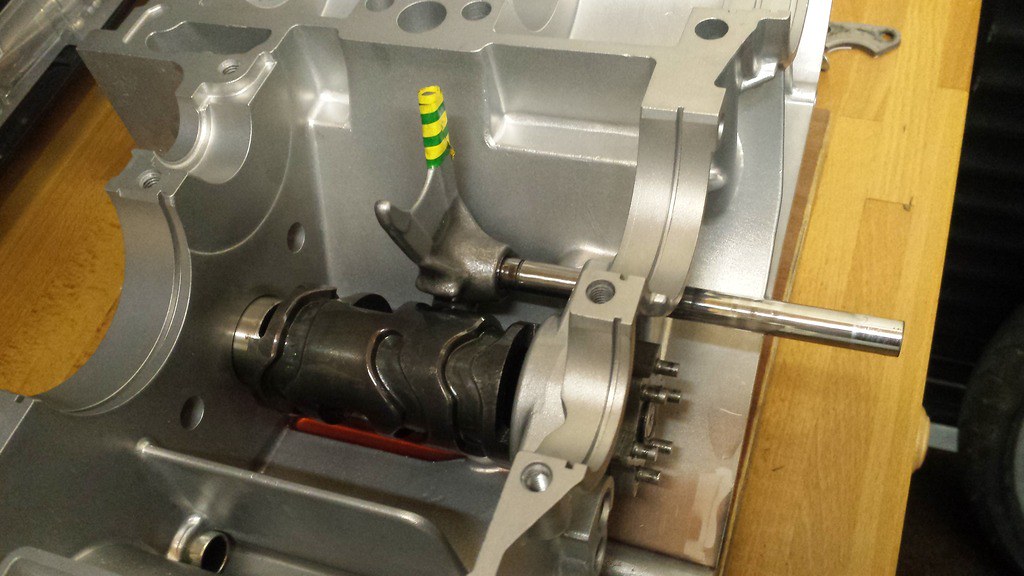 20160209_214053_zpsxgzbnfjh 20160209_214053_zpsxgzbnfjh by David Miller, on Flickr It pushes all the way through to locate in a blind hole on the left side of the engine. There is a groove for a circlip - Yam part no. 93430-08036, although that part number is now superceded. The part no. on the bags I got is 99001-08600. It can be fiddly to fit the circlips. I find it best to get the groove as close to the engine case as possible, and then you can slide the circlip down onto the groove and either push onto or tap onto the shaft. Have a magnetic pick up tool ready - those circlips easily find their way down under the drum !!  20160209_214805_zps2vemj3cd 20160209_214805_zps2vemj3cd by David Miller, on Flickr The rearward shaft goes in the same way, fitting the right side dog first and then the left; 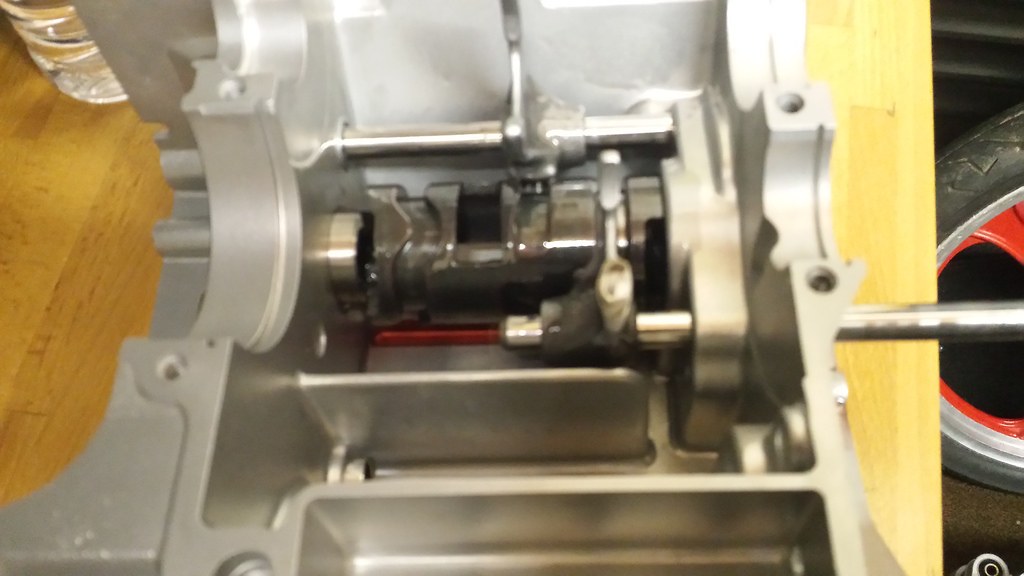 20160209_215637_zps0bwm991u 20160209_215637_zps0bwm991u by David Miller, on Flickr 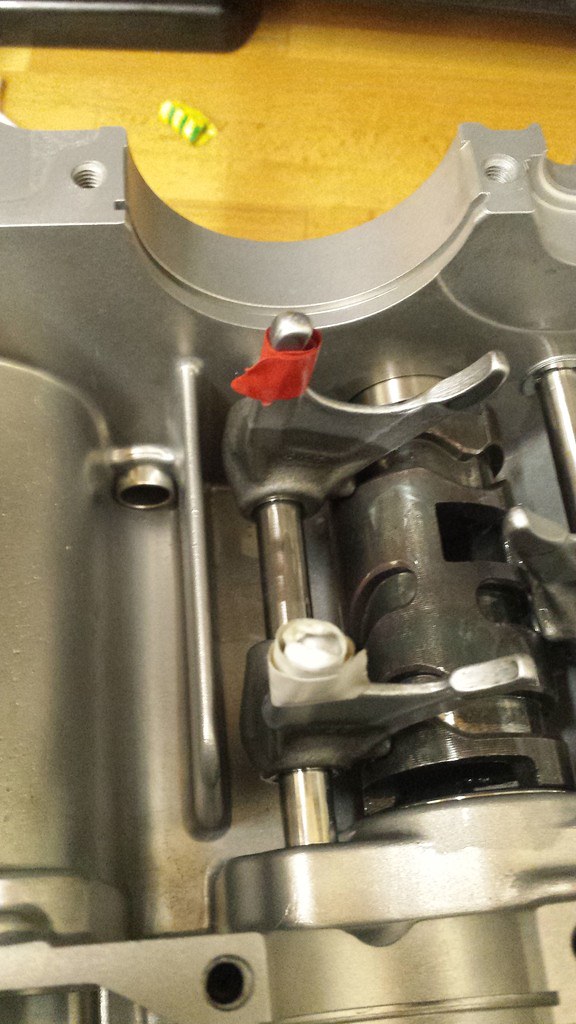 20160209_215707_zpsaoejeomh 20160209_215707_zpsaoejeomh by David Miller, on Flickr  20160209_221325_zpsw7osgwc8 20160209_221325_zpsw7osgwc8 by David Miller, on Flickr Fit the new circlip and they are in !! Last job is to final fit the drum retaining plate. It holds the drum but also retains the front shaft from working itself outwards; 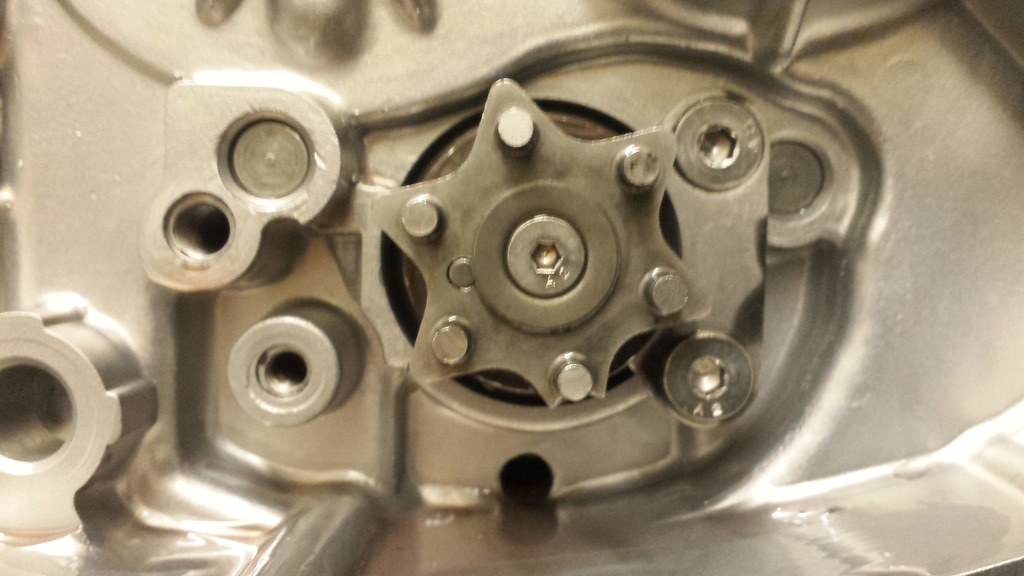 20160209_221339_zpsagxlmy4b 20160209_221339_zpsagxlmy4b by David Miller, on Flickr More soon Dusty  |
|
|
|
Post by lcyoungboy on Feb 10, 2016 9:35:40 GMT 1
This a great thread..I could've used it when I was building mine..keep the pics coming.
Dave
|
|
|
|
Post by rostrumorhospital on Feb 11, 2016 11:02:39 GMT 1
Will definitely be using this thread when building my engine, great photo's and explanation to go with it, cheers dusty
|
|
|
|
Post by dusty350 on Feb 11, 2016 12:40:41 GMT 1
Hi fellas You are welcome. I am by no means an engine expert, but I've built quite a few Rd's now and thought it a good idea to do a pic heavy thread, including part numbers, suppliers etc, as they are quite easy to build really, and if it encourages someone to have a go for the first time and save themselves a few quid, then great ! I always found the Haynes manual great, but some of the pics can be hard to follow so hopefully this thread will help that. Hopefully other experienced builders will add to the thread too if they have particular tips or ways of doing things. That way we can all benefit  In fact, I've just ordered a shift pro from Martin Brown, so I will show the comparison between that and the standard Yam shift arm - an item often cited in poor neutral selection, so when that lands on my mat then I will move the thread on some more  Regards Dusty  |
|
|
|
Post by arrow on Feb 11, 2016 15:28:23 GMT 1
Excellence as always Dusty. Lovely clear photos too. Superb.
|
|
|
|
Post by JonW on Feb 12, 2016 1:58:11 GMT 1
Nice work Dusty... on the pics/writeup as well as the bike  |
|
|
|
Post by bare on Feb 12, 2016 4:14:14 GMT 1
DO the shift star mod. It makes a Happy difference in shifting.
|
|
|
|
Post by dusty350 on Feb 12, 2016 9:18:13 GMT 1
Hi I was thinking of modding the shift star, and if I had a spare I might of tried it. A quick Google search found that you can buy a modded shift star, sometimes packaged with the shift pro. The points of the star are much lower than standard. In fact, I understand there may be a modded star fitted in my 385 ypvs - Mike certainly listed it in the spec when selling the bike, but I'm a long way from being able to report on the merits of it. I liked the idea of the Shift Pro as there is a bearing on the end rather than what is basically a washer on the standard item, which looks very basic. Dusty  |
|
|
|
Post by JonW on Feb 12, 2016 22:58:23 GMT 1
I have the the Shift Pro in a couple of my builds, it does help.
|
|
 DSCN3742 by David Miller, on Flickr
 20150710_152445 by David Miller, on Flickr
 20150627_100226 by David Miller, on Flickr
 20171008_104417 by David Miller, on Flickr
 20160205_094843_zpsmgdcjhuu by David Miller, on Flickr
 20160205_094906_zpsgtjuo5xf by David Miller, on Flickr
 DSCN3742 by David Miller, on Flickr
 20150710_152445 by David Miller, on Flickr
 20150627_100226 by David Miller, on Flickr
 20171008_104417 by David Miller, on Flickr
 20160205_094843_zpsmgdcjhuu by David Miller, on Flickr
 20160205_094906_zpsgtjuo5xf by David Miller, on Flickr


 I did buy a lot of parts back last year when I thought I would be using this engine so the initial progress will seem quick, but then slow when it comes to large cost items such as crank rebuild. I'm layed up with a nasty flu bug at the mo so cant get in the garage for a few days but I will update soon,
 I always do some prep work on the parts before I take them for blasting. I clean the cases as best I can in petrol getting them as clean as possible, allowing me to check for any damage/cracks in the alloy that might require work before they go for blasting. I then wind old bolts fully into all the threadways to keep blasting media out. I've heard before that media sat in the bottom of a hole can push a hole through a casting when a bolt is tightened up on rebuild - a bit like using too long a bolt. So I always wind the bolts in fully. Cox's are very good, they always rinse well in hot water and then blast with compressed air, but I always rinse again when I get them home - taking all the bolts out first. I run cotton buds down the threadways to make sure they are clean - all a bit anal I know but it has to be right.


