

Post by JonW on Sept 11, 2019 9:37:14 GMT 1
Hi All, Ive been posting about this build on the RDRZ350 forum but its not really their thing I reckon as its an LC and being an mostly US based forum there are few guys there with them, and almost no love for a 250 either. So... Im moving the posting this build to here where it might be of some interest.
These are a bunch of the posts Ive already made, so ignore the timeline stuff as this is mostly older posts
FWIW, Ive hosted the build on my website now:
2smoked.com/Yamaha_251LC_1982_RD251LC_Home.html
---
For a while now, a couple of years at least, Ive harboured a two fold plan to build an interesting LC... the ethos being:
1, To use as many of the parts Ive got left over from other projects, ‘restoring rather than buying parts’.
2, It will be a 250...! Eeek... I know... Really? Yes....
It will not be a standard build, but have a few nice and modded features, this keeps it away from trying to build a perfect restoration and also means I can use some cut down and modified parts. It will probably have Japanese spec paint, but I’ll leave that decision for nearer the time...
Ok, I know youre dying to know... Why a 250?! Well the plan was to use the coveted 51L 250 top end on a YPVS bottom end in the LC frame; essentially to be a fast 250LC. The idea was to call it the “251LC”... Thereby getting the 51L info onto the side cover and perhaps peaking the interest of those who know these bikes. The beauty of the 51L 250 top end is the addition of the Boysen port. Its the only cylinder Yamaha made with this configuration and the 84 (japan only) and 85 (Aus and Japan) 250s really worked well with this cylinder and the new type of exhausts, a real step up from the old 29L. Sadly I expect it was too expensive to licence the technology for the whole range so no 350 ever got it. Kawasaki did the same thing with its KDX250SR models in the 90s, they were the same cylinder as the KX with the boysen undrilled. Yeah, you just know what we all did to those The clever bit about the 51L engine is that its listed at 48bhp, and as such its smooth running and tractable. The LC 350 is actually 47bhp, less smooth (crank designed for a 250 not a 350) and has more of a powerband. Now of course the LC350 is no bad thing, we all love those but Im keen to find out what the same power in the later smaller capacity engine will be like in the same same frame. And I can always turn it into a 350 later if needed of course. 
What clinched the deal is that I already had the top end from my F1, I already had a spare ypvs bottom end and a bunch of other LC parts that Id acquired over the years but the main stumbling block was as ever downunder; finding a frame. I bought a whole 250LC a while back but it was too rusty to use having been left outside for 10+ years. That bike did give me the rest of the parts, well those that werent too rusty or worn out to use, as you can see it wasn’t exactly ‘pretty’.

The engine and frame were sold on and the tank on this bike is the one I cut open to show you how just because a PO says a bike holds fuel, doesn’t mean that its actually fuel or that its holding it. In fairness the PO probably didn’t know it wasn’t fuel, the cap was firmly stuck on and what was in it did ‘slosh’ about when it was shaken. I found when cutting it open that the water had seeped in through holes in the top metalwork... Eeek, a real mess.
Time is what you need when sourcing parts for projects like this and a few months back a good friend locally messaged me to say he’d located me a frame, he was looking harder than I was it seemed lol. Thanks mate! It was out in the countryside and he’d already bought the wheels and other parts from it. what was a bit scary was when asked for a photo he went outside and took this, at least it doesnt rain too much where he lived LOL

We got it home and it turned out to be a 350 frame, something quite rare in Aus.

Here it is stripped and keeping my 31k company in line waiting to be blasted and painted.

Of course if these all came about together it would have been better to use the 350 frame on my 421 and the 250 frame I modded for that on this build but hey its all bit late for that with all the mods done to the 421s frame, such is life, some would argue that I only got the offer of the new frame as Id just finished the 421 frame mods. Lol!
So what’s happening with this all now? Well I have the paint to paint the frame, I just need to clean and blast it. I will do that at the same time as the 31k project’s frame of course as Ive got to get set up to do that work. The rest of the progress has been to go about my usual process of doing small subprojects and squirreling them away for an easy rebuild later. With that in mind I’ve refurbished a set of switches from a bunch that a mate sent me as he was throwing them out. I’ve also started to refurb a set of footpegs, they just need rubbers and pins which can still be had from Yamaha. Both those tasks follow the first rule of my plan for this bike’s build as you can buy both those sets of parts brand new still from Yamaha, yet Ive enough good parts and access to blasting and powdercoating rigs so if anyone can/should restore these I can. Naturally rebuilds are cheaper than buying new, but time taken can not be had back.
Ive also put a bunch of original LC parts in for zinc plating, some of which are for this project and I've cleaned up and polished the black plastics and repaired and painted the center stand and the rear subframe. I had already restored a 250 rear wheel for my resto LC and then found a 350, so Ive got that put aside for this bike and just need to do the same work on the spare front wheel I have... If you’ve read the other threads you know that Ive powdercoated a bunch of bits recently and while I was doing bits for other bikes I also did bits for this one, so things like indicator stalks, headlight ears and tie bars are already in the box. A friend of mine also supplied me some clocks which Ive cleaned up and restored along a bunch of other really nice parts (clock cover, headlight rim, rad cover). Ive also sorted the YPVS wiring setup from an old F2 loom and located a PV controller and servo, just need an 85 250 CDI, anyone? In fact while im on the scrounge, if anyone has any LC parts they know they wont use but could be restored then feel free to contact me. I would really like to buy as few new bits for this one... not cos im stingy, more that I want to prove what can be restored if you put your mind to it.
--
I decided ages back that I wanted to do a bike with a clutch window. Yeah, I know its been done before... I know they get condensation in them ...and I realise that in all seriousness that this mod is really just a bit passé these days... but I have the lexan and seals already I just needed to get busy on a clutch cover. The problem with that is that on most of my builds Ive used brand new OEM banshee covers as the ones on my bikes were usually pretty rashed and no way was I attacking a brand new part with files and drills LOL
With my huge push to locate parts for plating and the recent build of the LC resto bike’s motor I’ve been going though my boxes of spare parts that anyone in their sane mind would have chucked out years ago. I decided that pretty much the stuff in those boxes that I deemed ‘marginal’ was either going to get restored/repurposed or put in the bin. During that search I pulled out 3 clutch covers, all RZ. One I couldn’t get the waterpump screws out and in the end had to drill them to reclaim the plate and impeller but as the cover had some deep gouges and lots of other damage in it I threw it in the trash... It had lived a long and by the looks of it, nightmareish life, RIP cover! Anyway, the throwing out was very liberating! LOL
That left me with two used covers, both damaged by a bike laying over. One was light damage and I managed to dress it out with a file and finished it up on a linisher, it looked ok and will be powdercoated later. Next up the other one was pretty nasty. The deep gouges were almost through the case and it was pretty much scrap as it had been left outside with the upper part’s paint removed so had oxidised. Someone at a wrecker had used their yellow pen to write ‘spares’ on it. They were dreaming. Anyway, I love a challenge so removed the rest of the paint and had my mate (Thanks Nick!) weld it up.

With a dress back with a flat file it looked much better and I figured this was the one that would be the ‘window’ version. I will linish the file marks out later of course.

Out with the drill:

Then a bunch of work with the files and a tidy up with a dremel sanding roll.
--
Ok, the bad news is that the work on the clutch side cover got shelved late last year due to my health issues, but I did remove all the powder and make up some Alumibrite at my mate’s workshop to dip this and other stuff in. When dipped the acid (its only about 2%) eats the oxidsation, the reaction is so vicious that you can't see whats happening and to make matters worse you can't leave anything in too long or it turns the alloy black... and you cant get it on yourself of course... nasty, but good, stuff! Anyway, the cover will get re-coated when I get back into the workshop, after another dip in case any oxidisation has come back.
FWIW I also spent a bit more time sanding down the edges of the cover to ensure none of the more serious sanding marks remain that would show through, powder is forgiving but things like that will still show through and this is a part that needs to be nice and flat as marks stand out and ruin the look of the engine, disappointing after so much work to build a motor. I'll do an initial powder and sand that area all back first as well to give it a kind of 'pre-coat', that will ensure that the final coat is nice and flat with no tell tales. Powder is amazing like that, you can powder over scratches and scrapes as a 'filler' if you know what you're doing. Ok, no business would bother to do it for you, but when doing it yourself you can save quite a few parts this way, eg. my F2's dented and scratched grab rail was saved with some welding, grinding and then extensive use of that technique.
So onto something I have actually done... A few weeks ago I did the ‘brass ball clean up’ on the resto LCs 4L0-01 carbs and this week it was the turn of the carbs for this project. The correct carbs for the ‘85 51L motor in Aus are 1GA. In Japan there was a 51L version, but those were the single pull type like the USA carbs on the RZ350, we didn't get those instead we got the 1GA which was the first of the PJ type that and the 1GAs continued with the Aussie 250s thereafter. Ive no idea why they did that, why not just ship us the whole 51L bikes as our RZ250R, hmm... Maybe we had an aversion to those single pull throttle linkages for some reason lol. Ok, its more likely that dealers knew how to service the bikes with the twin pulls and many parts are common, this would have saved training and spares holding costs. Anyway, ours make the same power as the Jap spec bikes, so its no bother, tho really you'd think being a PJ there must be some improvement while running as Yamaha moved to all PJs on the 350s as well in ‘86.
The carbs were pretty horrible that Im using. Obviously been left to stew with fuel and water in them for some time


And how on earth do you do this to an air screw? I had to heat the carb body up and spend a while on this to get it out. sigh.

I bought a kit from Cruzin Image on ebay which is for the RZ250R and actually contains needles and jets etc. The needles do look very much like the OEM 4N10s and the nozzles do look like the 345Pn units as well. The pilots were the correct 25s, but the mains were 180, OEM was 155. To be fair n the ebay listing he says that these are 180s. The rest of the kit is very nice, using a rubber gasket instead of the usual cardboard, but including the smaller carb top flat rubber washer as well as the larger one. The inclusion of the smaller one is bizarre, you cant change it on any RZ, only the LCs and then these washers are a special 3 piece bonded design, not straight rubber like the kit. I guess the kit is the same as the one for the LC The brass washer for the nozzle/main jet and the aircsrew were a nice touch as were new screws for the fuel shut off valve. sadly no idle adjuster screw, but no one else even supplies the airscrew so that’s a moot point lol. All in all a good kit for low dollars. Previously Ive used TourMax kits which are fine, but have less stuff and cost a little bit more.

After a full dismantle, balls out and an ultrasonic clean and then the new kit fitted, this is what they look like. I should add that vinegar is amazing stuff, it even eats carb poo and gives brass a good shine. I left the brass in for about 2 days and that worked very well indeed on those parts. I didnt leave the carb bodies in neat vinegar, that would ruin them, only the brass.

Of course I also rezinc'd the screws and the fuel hose T piece and the fuel hose clamps (not in shot of course) and no i didnt zinc the needles LOL!

Earlier I've spoken a bit about the 250 51L engine and why its special, but this pic (from LB’s N1 build) shows the extra port nicely.

Remember no other RZ has this technology, I know that the licence would have been costly from my work on KX and KDX motors back in the day and this makes me wonder why we had it at all. Perhaps one of Yam Aus’ execs rode the ‘84 51L in Japan and said ‘that’s the 250 we need to beat the RGs!’ or something. LOL!
--
Its been silly hot here again but Ive been out in the shed working my ass off on the NLA (except aftermarket from yambits, and maybe others tho ive not seen them) LC passenger peg mounts.
With a bit of juggling I worked out a way to utilise 4 sockets and a washer in my vice to return the twisted knackered bits of rusty bent junk into usable brackets again. With the metal back in shape I’ve just got to tidy them up and have them greened then fit all the other silver rezinc’d parts and I should have a working set of pegs for cheap, which makes a change LOL!
This plan to use up the old stuff I had lying around is part of the ethos of this build. You may recall that for my resto LC I bought all new peg parts and only reused the brackets as they were straight. In fact they’re off to be green’d now actually with this lot as back then I hadn’t found my plater. With this bike I will reuse the best of 7 rubber and 6 sets of steel parts that I had in my spares, I keep all sorts of rusted junk LOL! While this does represent a significant saving in parts it also removes the knackered spares that you couldn’t give away to other folk from my boxes and I do love turning what most people would bin into usable parts again as you know.
This also follows on from my plan to rebuild a set of front pegs as well. I actually have all the new (rubbers, pins, spring etc etc) and NOS (a spring) parts and had cleaned up the brackets and powdercoated them, but of course I now have the ability to do green, so I stripped off the powdercoat last week from those for my next plating run.
All I need to do now is sort out the rearset brackets... they need to be cleaned, blasted, polished and I'll powder them again like I did previously.
No pics, but I’ll do some when they're all done and built up.
--
I’ve been building up a set of 31k calipers for this bike. Its not so much that I think they will offer a massive step up from the LCs OEM brake calipers as I really don’t think they will noticeably different, but more that finding a set of 350 calipers in Aus is nigh on impossible now, plenty of single 250s, but not the other caliper to make up the set. These 31k calipers actually came from LB many years back when I couldn’t find LC calipers for my resto LC (in the end I got a set from Rob in Canada of course) and as a head start for this project they had already been blasted and painted with Caliper paint. A quick wire wheel of the seal lands and the slider tube muck removed, then a clean up in my mates parts washer and finally a blast with an airline to get the rinse water out and they were ready for building. New seals and pistons slipped in and all was going well until I struggled with one of the new slider rubber dust covers. I sourced these from Yambits and really both the small ones needed a trim as the edge that locates in the caliper was a little too large and had some flashing on it. When fitting the sliders it was tough going to get the slider past the rubber and that ‘one last push’ we all do to get something to click in place simply was too much material in the groove and it popped the ring that acts as a holder for the seal out!

To be honest I’d never considered that these were removable. I assumed they were a machined grove in the caliper as they are on the larger of these slider holes, but on the smaller one I guess getting the tool into the space wasn’t an option so they simply hammered in a steel ‘L’ shaped ring, edge out of course, to form the groove. Tapping it back in was no longer an option as it had lost its tension as while it would stay in place it would not hold the seal when pulled, so I glued it back in with high temp silicone as the slider doesn’t move very much and hence wont pull too hard on the seal. With the seal trimmed back to match the grove it all went back together with no hassle, leaving me to advise that everyone trim those dust covers if you buy them, a few mins careful work with some nail scissors pays dividends lol
In other news I’d been looking for one of the pad anti-rattle shims as one of mine was malformed and when bending back it started to crack.

A UK forumer (Thanks Lee!) came to my rescue. I know Rory mentioned that he ran without these, but I wanted to build this bike as close to OEM as possible and I can do that now, thanks to the help from the forums. Ive said it before and i'll say it again, but it not only makes it possible, but also so much more pleasurable, to build these bikes with the help of the forums. We really are lucky to have mates all over the world for advice and parts, weve never had it so good
So that’s the front brakes done. More cleaned and ready to use goodness in the box for this bike
--
As I gradually work through the boxes of junk in my garage once again trying to make up tubs for re-zinc'ing of parts I come across parts for this bike, like the calipers mentioned above. Those were sat on the end of my bench and while the parts had been ordered I just needed to spend the time to do a good clean and then put the parts in. Now that's done Im very happy indeed, parts are off my bench, my to-do list is smaller and I've more parts done for this bike. Win win win...!
Another part that was also taking up space on the end of a bench (with a stack of others) was the front wheel for this bike. Regular readers may recall that I already have a rear 250 LC wheel that had been refurbished for the resto-LC project, but while I was gathering parts for that build a rare-in-aus 350 wheel came up and once purchased I cleaned and polished that up instead, so without knowing it I was half way to having a set for this bike, even though I didn't even have the frame back then, just the idea...
After a clean up with car wheel cleaner yesterday, today I set about getting the worst of the gouges out and tidying up the polished area. I gave it a quick hit with some polish as a first run and I have to say that it doesnt look too bad. It will need more work but its great to see progress on a really nasty dirty part. Tomorrow I'll take the wheel to my mate's workshop and run it through his parts washer to try and get some more of the grime off the thing on the spokes and the hub which is really pretty nasty... like all used LC wheels I guess!
--
Ive since painted the front wheel and now it needs a final polish on my balancer and then I'll fit new bearings (I bought some Koyos for that) and I guess its time to look out the disks and sort them ready for fitting as Ive cleaned and zinc'd up the old bolts I had in readiness.
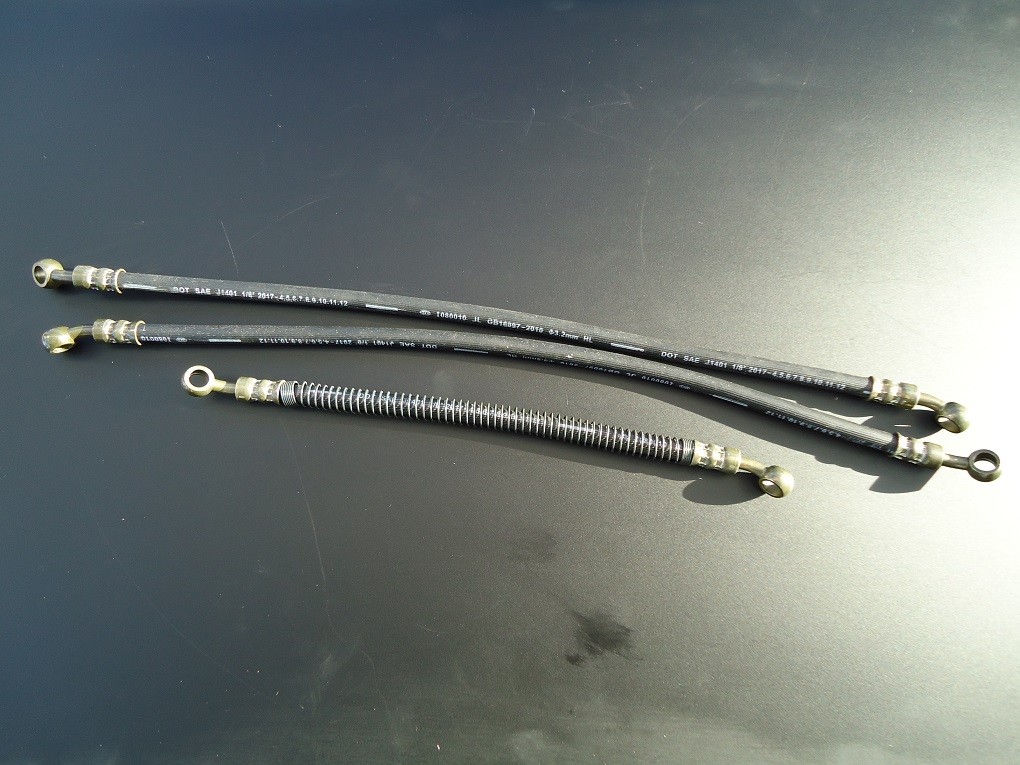
In the meantime Ive been doing some work on brake hoses. A while back Norbo and Legend started selling OEM look brake hoses. Norbo seems to not do these at the moment, but Legend and Yambits do. Ive the Yambits ones on my resto, but I was keen to know more and researched those hoses and compared them to Legend. Full info here: rdlccrazy.proboards.com/thread/43402/which-brake-hoses-4l0" onclick="window.open(this.href);return false;
Ive since bought a set of the Legend hoses as theyre much cheaper than Yambits, even with their VAT free pricing for overseas customers.
--
Ive been building up the dash for this bike today, Ive stripped the speedometer and cleaned and lubed it up. The tacho was plainly from another bike. really grubby dial and full of spiders webs. dial is now cleaned and as Im trying to reuse parts in this build Ive actually painted on the red line with what i think is average success. I will repaint the temp needle and build it back up i think, it will be fine.
I did have a new top cover for this dash but will reuse the bottom as its fine, the bracket has been green plated and Im only missing some rubbers and one loom.
--
These are the clocks as they stand now. The more I look at the pics, the more I need to swap the dial LOL. I annoy myself with my quest for perfection :/ But to be honest I figured Id give painting this one a go, i had the paint and some time. no brainer. The rev counter dial was all white, no red at all when i started. I also dropped over 30k off the speedo, it was not from this bike and in my mind better reflects the milage after the ground up resto etc. I could have lost the 71km, but why bother when you could chance messing up the lower number clickers.

This was the short rev counter loom I bought NOS, I bet this has been NLA for decades...

Ive also been busy with a set of OEM footrests and can report on them now that theyre done. For those that may have spoken to me and heard my hassles in the end I decided to carefully drill the new rivets and fit split pins as I couldnt get the rivets to flatten at all in a press or with a big hammer. Plus I dont know if anyone has noticed but the new yam footrests all seem to come wth the rivets upside down, ie peened over part is at the top. I did these the right way round
So lots of plating and a new (NLA) right spring, new rubbers and pins and here we go... Not bad for some rusty and delaminating junk. This was part of my 'restore it or chuck it away' ethos for the spares in my boxes. So while these cost about half what a new set costs and were considerably more work, I have the satisfaction of knowing i saved these from the bin and no longer have them in a spares box. win win win!


As for the fuel cap... Im not sure yet, I do have the Alloy one from my 421 and I could use that since I now have a Wicked billet alloy cap for that bike.... we'll see.... I also have a locking chrome cap in my spares... lol. watch this space I guess!
--
I finalised the wheels. The front got another polish and then new bearings were fitted and I located the disk bolts and lock tabs. The rear got a brand new JT sprocket and the correct nuts, all locked with re zinc'd tabs. I also located the cover plate and spacer, snap ring and huge washer - all had been re-zinc'd. These wheels were then put away until I build the bike when I will fit new tyres etc.
--
After much debate Ive finally decided on the pipes for this one... The original RZ 51L units. Wile I had a few options, these seemed like a no brainer they are the ones Yam developed for this very engine.
These are like the later 350 pipes but on the 51Ls the silencer is removable from the pipe and the baffles come out of course. Both junctions have gaskets that are now NLA of course.
The actual pipes I have are not that bad, just needing a lick of paint, but the cans was another matter... as anyone who's ever had a set of these will know. They suffer in any and every crash


They look much better in the pics really... theyre very dented. This is not helped by every owner realising that you can swap the cans over form left to right to hide your latest crash... then you crash again and theyre double dented and rashed. ok on a junk bike, but not on one of mine of course. The original finish is a dull chrome, I could replicate it in powdercoat pretty well, but i dont know what temp these cans get up to so think I will paint them, maybe all black, more 'LC' that way and as a mate said, 'easier to repair later'... hmm.
The baffles for these are very like the earlier models.


So... watch this space...
--
so far Ive pulled some dents, made the ends round again, sanded, blasted, welded, ground, sanded and then multiple times hit them with skims of JB weld and sanded each layer. They now have much the of correct profile again and im almost at the point of having to make the decision on the finish. The baffles were reshaped (how do you bend baffle end plates and gouge the exits?) then blasted and hit them with a high temp black paint.
--
Im still working on the silencers... theyve taken quite a lot of filling with JB weld to get a flat enough surface due to the dings and dents. Tomorrow I'll try powdercoating them gloss black. Gloss of course highlights any surface imperfections so dont be surprised if they come home satin instead lol
I also test fitted the PVs today. I was worried with a 1.5mm over bore that maybe they would need relieving for the pistons, but all was fine. Phew!
In pulling out the PVs I found I bought NOS PV holders a while back... last of the big spenders me lol At least the valves will be the best they can be with those and new seals.
-
Well, they are done! I'll put up some pics when I have a bit of time to get them done. But, I'll not leave you in suspense, the process went well.
Thanks for the kind words mate, I always hope that people read my posts and decide that if I can do it then they can too. Most of what I do isn't rocket science (in this instance; have you met any powdercoaters? i have... lol) and I hope me blundering my way through and learning as I go gives people the confidence to give things a go themselves. I haven't enjoyed all successes but nothing has been ruined. I've found that if you keep at it and use sound practices along with attention to detail you can usually do a nicer job than the lazy pro you have to pay, well that's always been my experience anyway. I started servicing my own bikes and cars as a teenager when I realised you could buy the tools and parts for about the same price of the first dealer service, the rest of the services saved you money etc. That ethos prevails and I try to do as much as possible myself as you guys know.
Actually the conductivity issue I was worried about wasn't a problem at all with these. I did clean up all the contacts on the hanging rig to make sure they had the best chance. We've found that over time the electrical conductivity drops off with the setup; older kit and also old powder buildup on the hangers doesnt help. When the setup was new it could zap you and give great pain if you didn't ground out the gun after switching off. These days that's no longer a worry. Originally you could shoot a spark if you got too close to the parts with the gun, these days you can get very close with no issues... so the current is plainly much lower.
Anyway, the JBWeld wasn't an issue at all for the coverage. I did heat the later coats as build up is never as easy when you have layers of powder on the part with this low power rig. The further from the metal the outer surface becomes means that getting a nice even coat isn't easy and what looks blotchy before heating can stay that way. Heat means the powder (it's a dust of plastic remember) lands and then stays where it lands, just what i needed.
I did 3 coats for a few reasons. On the first coats I did get some sinking into the thicker JB Weld areas, which are of course on the outside (ie the part you see) as thats where most of the damage had happened. This isn't like paint where its ghosting, its more like a rough area in the gloss. I also still had some areas on the cans that were not perfectly 'flat' and of course if you sand the powdercoated layer you can use it as a thin filler. Sand back to the metal and leave the powder in the dent, the recoat. I used 80 grit, that allows a good key and powdercoat has no issue flowing and leaving the next coat flat. Both of these reasons would have been less of an issue with the satin of course, by using gloss black I did pick the most difficult finish to get right. Any painter will tell you gloss black shows all the marks, dents and problems in the panel and means more work. But, what's the point if it's not a challenge? Kennedy told us that about landing a man on the moon... my concatenated paraphrase: 'we choose to do this, not because its easy, but because its hard'
I stopped after 3 coats as the OEM part numbers were getting lost. No big issue for me on this build, but they do let you know which way round the silencers fit when on the bike (they are in the inside edges, on the top, about 2 o'clock) and I wanted to preserve them if I could. By coat No.3 most of the dents and marks were gone and the surface was pretty flat. Ok, yes there are a few marks in the finish, but you get that when using a home setup. There is dust in the workshop floating around and to be honest there was all sorts of oils gassing off in the early coats, thats the problem of 2 stroke silencers no matter how much you clean them.
Ok, all that said, Ive set the scene... pics soon...
--
Ok, here are some pics:
I didnt take any photos of the initial stages. But I blasted the surface and went over the whole area with a Powerfile. I then welded up the scratches and dents as much as possible and ground back. I also pulled a couple of the bigger dents by welding on a piece of threaded bar and using a cheapo ebay dent puller.
The first fill with JB Weld. You can see there are quite some gaps that will need more coats. I used about 5 thin coats, making sure to feather the edges and also use a wide sanding block to get as much of the original cylindrical profile back as possible. They were very dented, much worse than the initial pics showed. :/ I tried to keep the original spot weld 'dents' where I could, They are original of course.


The final look of the JB Weld filler on one of the cans getting ready for the first powder coat:


We're Cooking!
(terrible photo but you get the idea) - Don't use the oven in the kitchen at home!

And finally the powder when done:


Ok, yes... well, the photos of the silencers completed doesn't look like much I guess. They are gloss black and the world is full of things they want to reflect, oil from fingerprints marks them as well of course. Shiny things are trouble...
Reflections do tell the story here tho, with gloss black any dent or imperfection would show up. Sure there are some there, im not suggesting there isnt. But compared to what I started with (see the photos further up the page) i'm pretty happy.
I just need to locate another of the sadly long-NLA baffle gaskets now and I'm set... 51L-14755 anyone? I found one NOS one... need another.

As as aside, one of the blokes in the workshop asked me why I didnt do them silver like OEM. LOL... Im going to get that a lot, arent I?! sigh...
--
The baffles were blasted and then hit with high temp paint, they will be covered in sooty oil soon so I didnt bother too much with making them beautiful...

After retapping the threads I fitted all new bolts, just need another gasket and these are done
--
Anyway, I carry on... Today I did the job that you all knew would happen. I rebuilt the dash again...
This time with new tacho and temp dials - from Simon5 (on the forums) Kateannwells (on ebay) I should add that these are a very nice product, Thanks Simon! I also fitted brand new needles for speedo and tacho from Yuniparts, they are the same as the XT500 and available on ebay. I also repainted the temp needle a colour that was closer to the needles, it's not quite as close as the pic (below) suggests, but is much better than I had it before with only the high vis paint, it needed toning down.
Removing and reusing the needle stop is always a pain with these, but I got it done. Yamaha seem to stake these on the back side to balloon the end slightly. In the end I ground it down and put some glue on the back. I think it will hold, but its not an exact science of course.
Getting the old needles off was a pain as ever with these. The tacho needle came off and left the brass part behind. I did wonder about reusing it and so gently bent it a little to straighten it, only a few mm... and snap! Bugger... as we say here in Aus. The speedo fought me as well, this time it left the black plastic and the brass part behind, damn! Pushing both new needles on was really hard work too, I had to use my plastic assembly hammer in the end. wow... wont want to get these off again, but they wont fall off when riding at least I guess!
Put it all back together and took this pic:

Arghhh! It wasn't until I was sat back in the house at my laptop looking at the photo that I could see there was a bit of cleaning oil that had come up one of the screw threads and was spreading out across the dial. This was residue from cleaning the workings and it's worked its way up onto the dial up through the thread. Grr... Live n learn as ever. I should have blown out the mech before building it back up. :smt012
Of course, as youve read before so you know what I am like... I felt that I'd already come this far.... so, back to the shed and I pulled it all apart again and cleaned off the oil with wax and grease remover... luckily that took all the oil off and left the dial like, er new again! phew!
So.... yes.... Im finally happy with these... :smt023
Just need the 2 missing rubbers and this dash is done :smt041
--
Ok, so more progress...
Yesterday I finally got round to powder coating the clutch cover I had welded (Thanks Nicko!), ground back, welded some more (Thanks gain Nicko!), ground and filed back some more and then cut for the window, all that was back on page one!
Now its done I can reveal the plan for this one... I also powder coated the clutch end plate, here is a mock up:

(and yes it blur to pink when running... Proper Subaru Sti pink as well!)
--
Been working on Brakes again... This time it was the turn of the master cylinder for this bike.
Im using a 250's 1/2" on this one for better brake feel, they look the same as the 350 so its no big deal of course, but should be nicer in use
I stripped, blasted, cleaned and powdercoated the cylinder and all the associated parts, being super careful with the bore. More of a job than you might think as some of these units have led a really hard life and they have many holes. I then cleaned the corrosion away with AluBrite and polished the bore a little to ensure it was clean.
I sourced a new OEM rebuild kit for the working parts and fitted it along with rezinc’d banjo bolts and new copper washers.
I cleaned up the OEM rubber with AluBrite to eat away the stuck on alloy corrosion and it came up ok, its still a bit pitted for years of encrusted corrosion and because of that is a little warped but its much better than it was and should seal now instead of crushing against the oxidisation.
The original clip in style sight glass was too far gone so I fitted one from a KTM Brembo after finding that it has similar dimensions online, very few masters have this kind of clip in style. I reused the LC’s o ring to pad it out and get the fit needed and while the outer edge is only 14mm to the LC's 16, the most obvious thing is I now have to 'MIN' marks, but you just follow the one cast into the mcyl body of course.
Finishing it will be a re-powdered original lever and I resued an old brake light switch that I checked was working along with new screws.
This looks news now, it was total junk before... Sadly no before pics :/
I also powdercoated the brake splitters as well. I noticed that the LC and the RZ versions are identical though the RZ unit has 47X (RD/RZ500 code) on it while the LC has no identifying marks.


Ive also been cutting some LC brake disks on a brake lathe at my mates workshop, After blasting the paint off I got them on the machine.
It wasnt all good... one to come up great and still well within specs, one looks great but was undersize and one was so warped it was a joke.
Anyone (locally i guess as they are heavy) have any spare disks? I now need one more... hmm..
NB: (please excuse my paint job, the idea is that the pads will clean off the paint edge in use


--
Bought a tank from Webike for this bike, this one as this bike will have the Japanese white colour scheme with the fitting name decal as its getting the RZ engine:
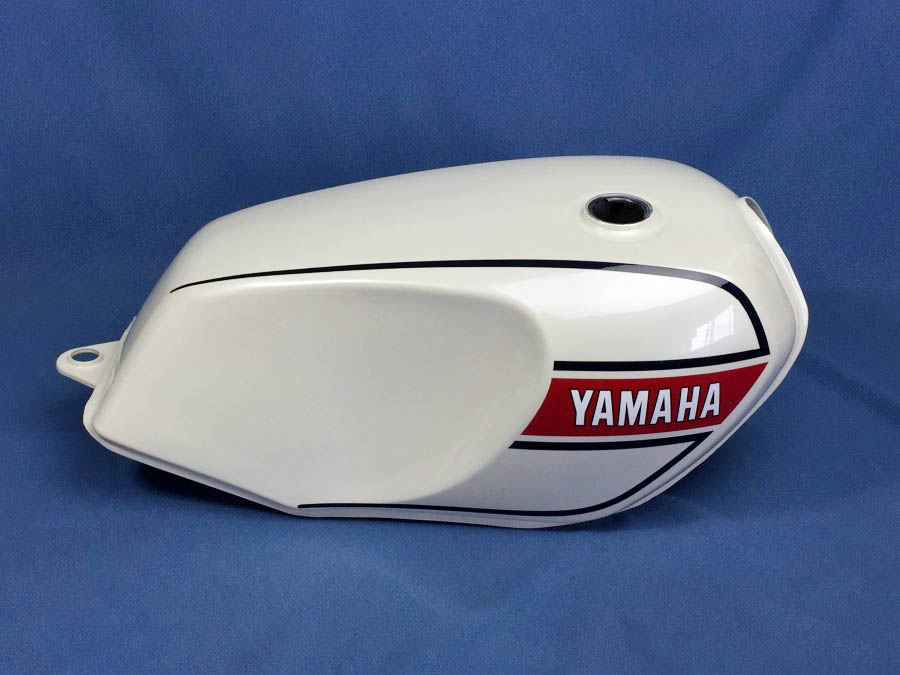
The tank arrived and its really quite something. Its quite gold in the pearl, different to my usual colours so im very happy, just got to paint the smaller parts to match now.
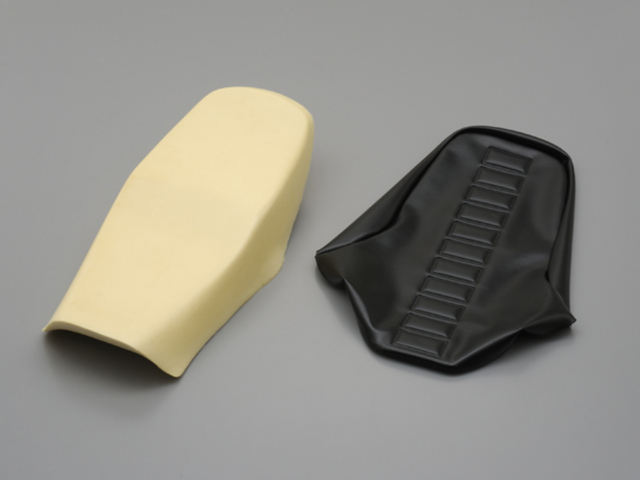
Ive also bought a seat foam and cover from Webike as well as I like this cover style, again to be different and more 'Japanese' with this one.
--
Ive been quiet of late, Ive been working on other things, not least the 500 I bought at the tail end of last year. 500s are a money and time sponge of course... and Ive been mostly hanging out on the 500 side of this forum of course. So, with that bike now fully stripped I finally took my zinc plating in as the buckets were as complete as I could make them (for now lol)... plus, I really wanted to move my projects on.......and first out of the traps was the seat for this bike! The plating buckets held the captive bolt plates that fit under the seat foam. I mean if youre going this far with work, you'd want these plates nice as well as the parts that bolt to them, right?!
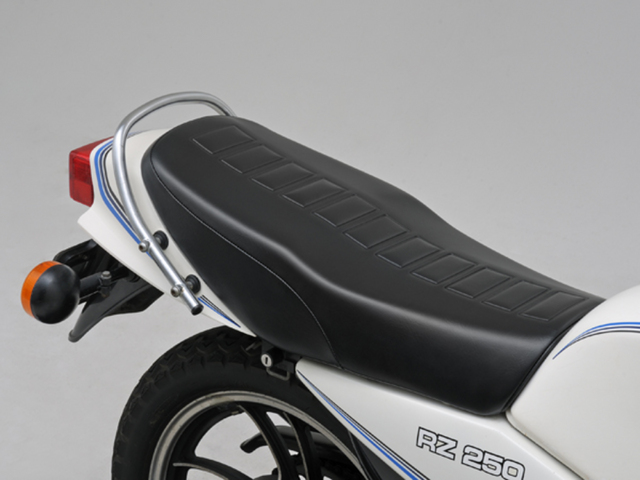
With the base all cleaned up back to its original white in my mates ozy juice parts washer, I fitted the plates and then fitted the brand new Daytona foam and JDM seat cover from Webbike. Quality stuff as you would expect from Daytona, with thick vinyl and the plush modern foam. It'll be interesting to feel how different this seat is compared to my resto LC's seat which has a brand new foam from a UK supplier and a nos OEM cover.
I dont have a pic at the mo, but it looks like the pic on webbike... lol
--
Finally been back in the garage and did some welding repairs to this frame and its now been picked up by a mate to take it to the blaster/powdercoaters. Amusingly after a few hours I'd rather forget where I fought some corrosion on one of the tubes my friend noticed I'd completely missed the fact one of the center stand welds had split... luckily he will attend to that before dropping it at the powder place. Proof, were it needed, that 2 sets of eyes are better than one!
I started going back through my boxes to order the last parts needed to start the build up and in the process came across some parts Id bought/restored-but-not-yet-fitted to some of my sub assemblies, like the rezinc'd dash bracket with the 2 rubbers I didnt have and the NOS tacho loom I bought from France last year. 10mins on the bench and I had a compete dashboard. Not bad considering how rough and missing parts it was when I got it.
--
And so it starts....
First up as ever was to add the Chassis plate back onto the frame. I found some nice stainless captive rivets for this that are used in roofing so the ends wont fall out and let any moisture in.
Even though the powdercoater plugged the threads I've found that it's still good practice to chase them before use as a damaged or blocked thread will only bite you later. This frame was unknown to me so worth cleaning them out of rust, blast media, any stray powdercoat that had got in and any damage they had incurred over the years of ham fisted mechanics.
Next up I fitted the steering bearings. This was a bit of a nightmare as over the years the lands had been damaged by people levering the bearings out. After much tidying the bearings went in nice and flat, phew. Fitted the re-zinc'd lower triple and powdered top triples with rezinc'd caps and nut.
With the center stand fitted and some forks in I now had something I could start to hang my restored parts on:

Then I started with the unrestored (lol) wiring as this loom not only needs some repairs but also to have the PV servo loom (robbed from an old F2 loom) incorporated into it and somehow I need to locate the 85 CDI and PV unit on the frame so I need to check space and work out what will work and what wont with the length of the wiring and connectors I have along with integrating the 85 CDI into the LC loom. That might be a day where progress is made but everything looks much the same... hmm...
I did fit the rebuilt ignition switch, powdercoated headlight ears and fitted some re-zinc'd short (LC2) indicator arms as I had them handy (I do have the originals as well if they look silly) but we all cut these down back in the day and this is an 'more yam' approach to having shorter arms I guess. All the fittings on this bike are either OEM rezin'd items or occasionally where I didnt have any spare (I usually buy bare frames and boxes of parts, not whole bikes so am often missing fixings) Im using stainless as this is not a restoration as such, more of a resto mod.

--
Next up I started bolting on some of those completed sub assemblies I have been doing over the past 12-18 months. Always a happy job for me
Started with the front end as I needed to run the wiring and I usually find that starting at one end is the way to do that, the front is usually preferable as there is a lot of connections in that headlight bowl and you want to make sure everything is long enough, but also not too long...
So, first up the headlight bowl went on... and I found I was missing one of the rubber washers on the mount, part 18. Sigh.... I searched high n low thru the boxes and couldn’t find one in all the headlight bowls and parts I have. Don’t s’pose anyone has a bunch of these spare do they? I’ve got lots of the other rubber/plastic headlight fixing parts, just none of these.

While trying to think of places I might find part number 18 I fitted the headlight adjuster and made sure everything else in this area was right, even adding the brake splitter and a brand new top brake hose. I was originally going to fit a single horn as this bike was originally a 250, but I didn't have one that fitted the restored bracket I had and as I have the 350 bracket parts I just decided I'd order the twin horns up as the new good quality re-pros are very nice indeed, plus the twin horns is part of the iconic look of the LC I think. When they arrive they will go on, tho I need to add extra wires to the 250 horn loom to run the second horn, easy job when Im doing the other wiring of course.
Keeping the momentum going I reassembled the headlight rim. The outer was one that I had re-chromed. It originally came from my mate Rob on this forum and he had had it re-chromed but the chromer had polished off some of the chrome so it wasn’t usable. I was able to put it back in for chrome when LB was chroming some parts and I picked it up last week when I collected this frame. It came out really well this time. Phew! The inner rim I had rezinc’d along with all the other small screws and headlight adjuster bolt and spring. I know the inners were chrome when new, but I couldn’t see the sense in doing that this time round, zinc is cheap and cheerful and I can easily redo it, chrome isnt like that round here. Assembling it was fiddly but intuitive enough and Im very happy with the result. These complete rims are very expensive now, and while I have an NOS outer on my site listed for sale, I would rather clean up and reuse and old part if I can since I had the time to get the parts done how I wanted etc.
The headlight bowl on this build is also a recycled part, new bowls used to be sensible money but suddenly prices skyrocketed and I’m glad I didn’t need to spring for a new one. I did have to buy new indicator rubbers as of course I had run out of them, another issue with buying bikes in parts I think, you often don’t get usable rubber parts. Fowlers provided these for sensible money actually.

I slipped on the bars, a new 55K set which is what Yamaha supplies now as new bars for LCs. They differ slightly from the 4L0 version (very slight bend difference and my feeling is that maybe they are slightly less wide - I need to check that, gloss not satin black etc) but work very well unlike he aftermarket bars I’ve tried before which never fit right and are end weighted as per the OEMs which aftermarkets never are. I put on the switches I restored from the junkers I’d collected over the years – powdercoated bodies, new decals and any switch parts as needed and full clean up of the connections, plus re-zinc of the steel parts of course. A new throttle was fitted and I have new leaf and grips to go on later. I also was able to add the refurbished 250 1/2” master cylinder (with a new rubber lid seal that I picked up recently) and clutch perch. Its so nice to be bolting on parts that look like new, knowing that you spent the time to refurbish them and now you get to finally use them
Next up the clocks went on as well, another of my previous refurbish jobs. Like many of us I do like the parts you see and touch when riding to look and feel the part. Those touch points make or break a bike for me and I’m very happy with how this is coming out so far.

My next issue is the wiring. I’ve already had to fix the front brake light switch connections in the bowl as one came off in my hand and now I’ve got to deal with the mess you here; At some point the regulator fitted to the bike this loom came from fried, taking out the fuse box and melting a side panel – I actually bought it as an almost whole bike which was to rusty to restore and could see the damage which when I worked through it made me feel like a forensic investigator haha! The PO had replaced it with a fuse box kit and I reckon it worked ok as the bike had been run like that, but the job wasn’t exactly beautiful, even less so when the loose tape was removed. I also spotted that one of the white wires is broken on the hexagon connector and there are some other repairs to sort out. I just need to get the soldering iron out and retape this all up when done in a prettier manner. Not a nightmare perhaps and typical of an old LC loom I guess.


To add a little more VP (Visible Progress) on went the battery box and regulator and with the repainted rear subframe, number plate holder and a refurbished rear light added it’s finally starting to look like a bike is appearing from the parts.

--
I added a few more parts after a bit of searching as this bike was always going to be tough to locate parts for, being bought in dribs and drabs and sourced from scratch, not a whole bike. I found some engine mount plates and bolts, got the swingarm pin in and a few other little bits and bobs that will make it easier as parts are now all in one place.

My next plan was to get this bike to be closer to being a roller. The easy part was to take the refurbished (painted, polished, new bearings) rims to a local tyre shop and have them bang on some rubber. I chose BT45s as they’re my go-to on our bikes for a good quality tyre that won’t break the bank. I fitted brand new Honda (OMG! Yes I did day that!) tubes. I found these for under US$9 each and of course with Honda part numbers on them you know they’re quality items. These were the best value tubes I could find and the tyre fitter was happy with them which was good to hear.
TUBE, RR. WHEEL (3.50-18")
Options: Old Sku: 42712-283-000
Item #42712-446-631
TUBE, TIRE (2.50-18)
Options: Old Sku: 44712-268-222
Item #44712-205-000
The fitter also fitted black weights to the black painted part of the wheel as we both knew that the polished rim is worse than rubbish for holding weights, the ones on the resto Lc fell off on a hot day... hmm.
I still need to clean up the black tyre soap and give them a polish before fitting.

The not so easy part was the forks... In my hurry to get going on this build I slipped in the first set of forks I came across and really I should have spent a bit of time working out which set to use and restoring them first. I had already restored some lower legs and wanted to the use the Goki Air Caps as I had them and wanted to try them plus so I only really needed to work out the best stanchions to use with them, check the rest of the parts and fit new oil etc. This is all much easier when you’ve not put forks on a bike, especially with all the headlight/clocks etc.
Ahh well, I don’t like to make my life too easy haha. Do as I say, not as I do....
--
Spent some time today redoing some of the dodgy wiring. Re-taped the parts that had come unwound and snipped off the burnt out stator 'hex' connector as one of the pins was totally burnt out and the PO had bypassed that pin with a fly lead. mental. Rather than try and shore up the mess I instead fitted a better complete connector with good pins and lengths of decent cable from a dead loom. I also remade the POs fix for the red wire (thinner blue extension cable seen in the earlier pics) on the regulator connector with the correct sized red wire and connector from the other loom. It's really nice to have enough spares to pop out a connector or splice in the bits you need using OEM parts.
I ended the day by making up a twin horn loom from two 250 horn looms I had, I could buy a new one, but why bother when I've got these two. I've still got to tackle the mess that is the POs fitting of the fuse box kit, but that's for another day.
--
The fuse box kit was more of a mess than I thought actually. He'd cut the fuse box off at the box and then added the 8 way connector supplied in the kit, this meant the fuse box was a good 15-20cm longer on the loom than it should have been. At least he did solder and tape the joints, although he did do them all in the one place leading to a thick lump in the loom. You can also see he had wires that were too long and folded and twisted them around to get the fit. Eeek... :smt009
I wondered about cutting the two plugs off and soldering on the 'new' fusebox in the correct place, but the wire colours were all wrong for an LC really and the fuse box wasn't wholly OEM looking as it used different fuse holder tabs, so I found a better one on an old loom and spliced it in at the correct length but offset the joints so as to not have a great big lump in the loom when taped. Not only are the connections improved but I think it looks much better now, almost OEM again, just needs the sticker in the fuse box which is on order.
Here it is before the wires in the fuse box were tidied up and the loom re-taped. The red sheath has been taped to hold it together before the main loom re-taping was done as I forgot I had a piece of red heat shrink in my box, tho not sure how well it would work on the cloth they used for that as its the non glue variety. Of course under that sheath the joint is heatshrink wrapped like the others. It's easy to forget that back in the day Yamaha didn't heat shrink its joints, they used electrical tape in random colours. The brown cable (at the bottom of this stack sadly so not easy to see) splits 3 ways here on these looms and that was soldered and wrapped in tape back in the day, tho the blue neutral wire in the earlier part I worked on was just clamped with a simple cleat as it was a simple one wire addition. Kedo tried to convince me Yamaha just twisted wires in the 70s and 80s "so the wires wouldn't break in use" on the XT500 loom when their half-arsed copy made intermittent connections on my bike, I proved to them that wasn't the case and it was proven again on this loom - makes me wonder how the aftermarket LC looms were done. hmm, I have one in my 421... been ok so far

and test fitted to the bike, this pic reminds me I really should remove some of the wire clamps from old fuse boxes and re-zinc them and fit them on old looms, the rust isn't endearing at all!

--
I will post updates here as the build progresses, but if anyone is interested in reading about what im doing with this one in a more condensed and rewritten form, Ive hosted the build on my website now:
2smoked.com/Yamaha_251LC_1982_RD251LC_Home.html
These are a bunch of the posts Ive already made, so ignore the timeline stuff as this is mostly older posts

FWIW, Ive hosted the build on my website now:
2smoked.com/Yamaha_251LC_1982_RD251LC_Home.html
---
For a while now, a couple of years at least, Ive harboured a two fold plan to build an interesting LC... the ethos being:
1, To use as many of the parts Ive got left over from other projects, ‘restoring rather than buying parts’.
2, It will be a 250...! Eeek... I know... Really? Yes....
It will not be a standard build, but have a few nice and modded features, this keeps it away from trying to build a perfect restoration and also means I can use some cut down and modified parts. It will probably have Japanese spec paint, but I’ll leave that decision for nearer the time...
Ok, I know youre dying to know... Why a 250?! Well the plan was to use the coveted 51L 250 top end on a YPVS bottom end in the LC frame; essentially to be a fast 250LC. The idea was to call it the “251LC”... Thereby getting the 51L info onto the side cover and perhaps peaking the interest of those who know these bikes. The beauty of the 51L 250 top end is the addition of the Boysen port. Its the only cylinder Yamaha made with this configuration and the 84 (japan only) and 85 (Aus and Japan) 250s really worked well with this cylinder and the new type of exhausts, a real step up from the old 29L. Sadly I expect it was too expensive to licence the technology for the whole range so no 350 ever got it. Kawasaki did the same thing with its KDX250SR models in the 90s, they were the same cylinder as the KX with the boysen undrilled. Yeah, you just know what we all did to those
The clever bit about the 51L engine is that its listed at 48bhp, and as such its smooth running and tractable. The LC 350 is actually 47bhp, less smooth (crank designed for a 250 not a 350) and has more of a powerband. Now of course the LC350 is no bad thing, we all love those but Im keen to find out what the same power in the later smaller capacity engine will be like in the same same frame. And I can always turn it into a 350 later if needed of course. 
What clinched the deal is that I already had the top end from my F1, I already had a spare ypvs bottom end and a bunch of other LC parts that Id acquired over the years but the main stumbling block was as ever downunder; finding a frame. I bought a whole 250LC a while back but it was too rusty to use having been left outside for 10+ years. That bike did give me the rest of the parts, well those that werent too rusty or worn out to use, as you can see it wasn’t exactly ‘pretty’.
The engine and frame were sold on and the tank on this bike is the one I cut open to show you how just because a PO says a bike holds fuel, doesn’t mean that its actually fuel or that its holding it. In fairness the PO probably didn’t know it wasn’t fuel, the cap was firmly stuck on and what was in it did ‘slosh’ about when it was shaken. I found when cutting it open that the water had seeped in through holes in the top metalwork... Eeek, a real mess.
Time is what you need when sourcing parts for projects like this and a few months back a good friend locally messaged me to say he’d located me a frame, he was looking harder than I was it seemed lol. Thanks mate! It was out in the countryside and he’d already bought the wheels and other parts from it. what was a bit scary was when asked for a photo he went outside and took this, at least it doesnt rain too much where he lived LOL
We got it home and it turned out to be a 350 frame, something quite rare in Aus.
Here it is stripped and keeping my 31k company in line waiting to be blasted and painted.
Of course if these all came about together it would have been better to use the 350 frame on my 421 and the 250 frame I modded for that on this build but hey its all bit late for that with all the mods done to the 421s frame, such is life, some would argue that I only got the offer of the new frame as Id just finished the 421 frame mods. Lol!
So what’s happening with this all now? Well I have the paint to paint the frame, I just need to clean and blast it. I will do that at the same time as the 31k project’s frame of course as Ive got to get set up to do that work. The rest of the progress has been to go about my usual process of doing small subprojects and squirreling them away for an easy rebuild later. With that in mind I’ve refurbished a set of switches from a bunch that a mate sent me as he was throwing them out. I’ve also started to refurb a set of footpegs, they just need rubbers and pins which can still be had from Yamaha. Both those tasks follow the first rule of my plan for this bike’s build as you can buy both those sets of parts brand new still from Yamaha, yet Ive enough good parts and access to blasting and powdercoating rigs so if anyone can/should restore these I can. Naturally rebuilds are cheaper than buying new, but time taken can not be had back.
Ive also put a bunch of original LC parts in for zinc plating, some of which are for this project and I've cleaned up and polished the black plastics and repaired and painted the center stand and the rear subframe. I had already restored a 250 rear wheel for my resto LC and then found a 350, so Ive got that put aside for this bike and just need to do the same work on the spare front wheel I have... If you’ve read the other threads you know that Ive powdercoated a bunch of bits recently and while I was doing bits for other bikes I also did bits for this one, so things like indicator stalks, headlight ears and tie bars are already in the box. A friend of mine also supplied me some clocks which Ive cleaned up and restored along a bunch of other really nice parts (clock cover, headlight rim, rad cover). Ive also sorted the YPVS wiring setup from an old F2 loom and located a PV controller and servo, just need an 85 250 CDI, anyone? In fact while im on the scrounge, if anyone has any LC parts they know they wont use but could be restored then feel free to contact me. I would really like to buy as few new bits for this one... not cos im stingy, more that I want to prove what can be restored if you put your mind to it.
--
I decided ages back that I wanted to do a bike with a clutch window. Yeah, I know its been done before... I know they get condensation in them ...and I realise that in all seriousness that this mod is really just a bit passé these days... but I have the lexan and seals already I just needed to get busy on a clutch cover. The problem with that is that on most of my builds Ive used brand new OEM banshee covers as the ones on my bikes were usually pretty rashed and no way was I attacking a brand new part with files and drills LOL
With my huge push to locate parts for plating and the recent build of the LC resto bike’s motor I’ve been going though my boxes of spare parts that anyone in their sane mind would have chucked out years ago. I decided that pretty much the stuff in those boxes that I deemed ‘marginal’ was either going to get restored/repurposed or put in the bin. During that search I pulled out 3 clutch covers, all RZ. One I couldn’t get the waterpump screws out and in the end had to drill them to reclaim the plate and impeller but as the cover had some deep gouges and lots of other damage in it I threw it in the trash... It had lived a long and by the looks of it, nightmareish life, RIP cover! Anyway, the throwing out was very liberating! LOL
That left me with two used covers, both damaged by a bike laying over. One was light damage and I managed to dress it out with a file and finished it up on a linisher, it looked ok and will be powdercoated later. Next up the other one was pretty nasty. The deep gouges were almost through the case and it was pretty much scrap as it had been left outside with the upper part’s paint removed so had oxidised. Someone at a wrecker had used their yellow pen to write ‘spares’ on it. They were dreaming. Anyway, I love a challenge so removed the rest of the paint and had my mate (Thanks Nick!) weld it up.
With a dress back with a flat file it looked much better and I figured this was the one that would be the ‘window’ version. I will linish the file marks out later of course.
Out with the drill:
Then a bunch of work with the files and a tidy up with a dremel sanding roll.
--
Ok, the bad news is that the work on the clutch side cover got shelved late last year due to my health issues, but I did remove all the powder and make up some Alumibrite at my mate’s workshop to dip this and other stuff in. When dipped the acid (its only about 2%) eats the oxidsation, the reaction is so vicious that you can't see whats happening and to make matters worse you can't leave anything in too long or it turns the alloy black... and you cant get it on yourself of course... nasty, but good, stuff! Anyway, the cover will get re-coated when I get back into the workshop, after another dip in case any oxidisation has come back.
FWIW I also spent a bit more time sanding down the edges of the cover to ensure none of the more serious sanding marks remain that would show through, powder is forgiving but things like that will still show through and this is a part that needs to be nice and flat as marks stand out and ruin the look of the engine, disappointing after so much work to build a motor. I'll do an initial powder and sand that area all back first as well to give it a kind of 'pre-coat', that will ensure that the final coat is nice and flat with no tell tales. Powder is amazing like that, you can powder over scratches and scrapes as a 'filler' if you know what you're doing. Ok, no business would bother to do it for you, but when doing it yourself you can save quite a few parts this way, eg. my F2's dented and scratched grab rail was saved with some welding, grinding and then extensive use of that technique.
So onto something I have actually done... A few weeks ago I did the ‘brass ball clean up’ on the resto LCs 4L0-01 carbs and this week it was the turn of the carbs for this project. The correct carbs for the ‘85 51L motor in Aus are 1GA. In Japan there was a 51L version, but those were the single pull type like the USA carbs on the RZ350, we didn't get those instead we got the 1GA which was the first of the PJ type that and the 1GAs continued with the Aussie 250s thereafter. Ive no idea why they did that, why not just ship us the whole 51L bikes as our RZ250R, hmm... Maybe we had an aversion to those single pull throttle linkages for some reason lol. Ok, its more likely that dealers knew how to service the bikes with the twin pulls and many parts are common, this would have saved training and spares holding costs. Anyway, ours make the same power as the Jap spec bikes, so its no bother, tho really you'd think being a PJ there must be some improvement while running as Yamaha moved to all PJs on the 350s as well in ‘86.
The carbs were pretty horrible that Im using. Obviously been left to stew with fuel and water in them for some time

And how on earth do you do this to an air screw? I had to heat the carb body up and spend a while on this to get it out. sigh.
I bought a kit from Cruzin Image on ebay which is for the RZ250R and actually contains needles and jets etc. The needles do look very much like the OEM 4N10s and the nozzles do look like the 345Pn units as well. The pilots were the correct 25s, but the mains were 180, OEM was 155. To be fair n the ebay listing he says that these are 180s. The rest of the kit is very nice, using a rubber gasket instead of the usual cardboard, but including the smaller carb top flat rubber washer as well as the larger one. The inclusion of the smaller one is bizarre, you cant change it on any RZ, only the LCs and then these washers are a special 3 piece bonded design, not straight rubber like the kit. I guess the kit is the same as the one for the LC
The brass washer for the nozzle/main jet and the aircsrew were a nice touch as were new screws for the fuel shut off valve. sadly no idle adjuster screw, but no one else even supplies the airscrew so that’s a moot point lol. All in all a good kit for low dollars. Previously Ive used TourMax kits which are fine, but have less stuff and cost a little bit more.After a full dismantle, balls out and an ultrasonic clean and then the new kit fitted, this is what they look like. I should add that vinegar is amazing stuff, it even eats carb poo and gives brass a good shine. I left the brass in for about 2 days and that worked very well indeed on those parts. I didnt leave the carb bodies in neat vinegar, that would ruin them, only the brass.
Of course I also rezinc'd the screws and the fuel hose T piece and the fuel hose clamps (not in shot of course) and no i didnt zinc the needles LOL!
Earlier I've spoken a bit about the 250 51L engine and why its special, but this pic (from LB’s N1 build) shows the extra port nicely.
Remember no other RZ has this technology, I know that the licence would have been costly from my work on KX and KDX motors back in the day and this makes me wonder why we had it at all. Perhaps one of Yam Aus’ execs rode the ‘84 51L in Japan and said ‘that’s the 250 we need to beat the RGs!’ or something. LOL!
--
Its been silly hot here again but Ive been out in the shed working my ass off on the NLA (except aftermarket from yambits, and maybe others tho ive not seen them) LC passenger peg mounts.
With a bit of juggling I worked out a way to utilise 4 sockets and a washer in my vice to return the twisted knackered bits of rusty bent junk into usable brackets again. With the metal back in shape I’ve just got to tidy them up and have them greened then fit all the other silver rezinc’d parts and I should have a working set of pegs for cheap, which makes a change LOL!
This plan to use up the old stuff I had lying around is part of the ethos of this build. You may recall that for my resto LC I bought all new peg parts and only reused the brackets as they were straight. In fact they’re off to be green’d now actually with this lot as back then I hadn’t found my plater. With this bike I will reuse the best of 7 rubber and 6 sets of steel parts that I had in my spares, I keep all sorts of rusted junk LOL! While this does represent a significant saving in parts it also removes the knackered spares that you couldn’t give away to other folk from my boxes and I do love turning what most people would bin into usable parts again as you know.
This also follows on from my plan to rebuild a set of front pegs as well. I actually have all the new (rubbers, pins, spring etc etc) and NOS (a spring) parts and had cleaned up the brackets and powdercoated them, but of course I now have the ability to do green, so I stripped off the powdercoat last week from those for my next plating run.
All I need to do now is sort out the rearset brackets... they need to be cleaned, blasted, polished and I'll powder them again like I did previously.
No pics, but I’ll do some when they're all done and built up.
--
I’ve been building up a set of 31k calipers for this bike. Its not so much that I think they will offer a massive step up from the LCs OEM brake calipers as I really don’t think they will noticeably different, but more that finding a set of 350 calipers in Aus is nigh on impossible now, plenty of single 250s, but not the other caliper to make up the set. These 31k calipers actually came from LB many years back when I couldn’t find LC calipers for my resto LC (in the end I got a set from Rob in Canada of course) and as a head start for this project they had already been blasted and painted with Caliper paint. A quick wire wheel of the seal lands and the slider tube muck removed, then a clean up in my mates parts washer and finally a blast with an airline to get the rinse water out and they were ready for building. New seals and pistons slipped in and all was going well until I struggled with one of the new slider rubber dust covers. I sourced these from Yambits and really both the small ones needed a trim as the edge that locates in the caliper was a little too large and had some flashing on it. When fitting the sliders it was tough going to get the slider past the rubber and that ‘one last push’ we all do to get something to click in place simply was too much material in the groove and it popped the ring that acts as a holder for the seal out!
To be honest I’d never considered that these were removable. I assumed they were a machined grove in the caliper as they are on the larger of these slider holes, but on the smaller one I guess getting the tool into the space wasn’t an option so they simply hammered in a steel ‘L’ shaped ring, edge out of course, to form the groove. Tapping it back in was no longer an option as it had lost its tension as while it would stay in place it would not hold the seal when pulled, so I glued it back in with high temp silicone as the slider doesn’t move very much and hence wont pull too hard on the seal. With the seal trimmed back to match the grove it all went back together with no hassle, leaving me to advise that everyone trim those dust covers if you buy them, a few mins careful work with some nail scissors pays dividends lol
In other news I’d been looking for one of the pad anti-rattle shims as one of mine was malformed and when bending back it started to crack.
A UK forumer (Thanks Lee!) came to my rescue. I know Rory mentioned that he ran without these, but I wanted to build this bike as close to OEM as possible and I can do that now, thanks to the help from the forums.
Ive said it before and i'll say it again, but it not only makes it possible, but also so much more pleasurable, to build these bikes with the help of the forums. We really are lucky to have mates all over the world for advice and parts, weve never had it so good So that’s the front brakes done. More cleaned and ready to use goodness in the box for this bike
--
As I gradually work through the boxes of junk in my garage once again trying to make up tubs for re-zinc'ing of parts I come across parts for this bike, like the calipers mentioned above. Those were sat on the end of my bench and while the parts had been ordered I just needed to spend the time to do a good clean and then put the parts in. Now that's done Im very happy indeed, parts are off my bench, my to-do list is smaller and I've more parts done for this bike. Win win win...!
Another part that was also taking up space on the end of a bench (with a stack of others) was the front wheel for this bike. Regular readers may recall that I already have a rear 250 LC wheel that had been refurbished for the resto-LC project, but while I was gathering parts for that build a rare-in-aus 350 wheel came up and once purchased I cleaned and polished that up instead, so without knowing it I was half way to having a set for this bike, even though I didn't even have the frame back then, just the idea...
After a clean up with car wheel cleaner yesterday, today I set about getting the worst of the gouges out and tidying up the polished area. I gave it a quick hit with some polish as a first run and I have to say that it doesnt look too bad. It will need more work but its great to see progress on a really nasty dirty part. Tomorrow I'll take the wheel to my mate's workshop and run it through his parts washer to try and get some more of the grime off the thing on the spokes and the hub which is really pretty nasty... like all used LC wheels I guess!
--
Ive since painted the front wheel and now it needs a final polish on my balancer and then I'll fit new bearings (I bought some Koyos for that) and I guess its time to look out the disks and sort them ready for fitting as Ive cleaned and zinc'd up the old bolts I had in readiness.
In the meantime Ive been doing some work on brake hoses. A while back Norbo and Legend started selling OEM look brake hoses. Norbo seems to not do these at the moment, but Legend and Yambits do. Ive the Yambits ones on my resto, but I was keen to know more and researched those hoses and compared them to Legend. Full info here: rdlccrazy.proboards.com/thread/43402/which-brake-hoses-4l0" onclick="window.open(this.href);return false;
Ive since bought a set of the Legend hoses as theyre much cheaper than Yambits, even with their VAT free pricing for overseas customers.
--
Ive been building up the dash for this bike today, Ive stripped the speedometer and cleaned and lubed it up. The tacho was plainly from another bike. really grubby dial and full of spiders webs. dial is now cleaned and as Im trying to reuse parts in this build Ive actually painted on the red line with what i think is average success. I will repaint the temp needle and build it back up i think, it will be fine.
I did have a new top cover for this dash but will reuse the bottom as its fine, the bracket has been green plated and Im only missing some rubbers and one loom.
--
These are the clocks as they stand now. The more I look at the pics, the more I need to swap the dial LOL. I annoy myself with my quest for perfection :/ But to be honest I figured Id give painting this one a go, i had the paint and some time. no brainer. The rev counter dial was all white, no red at all when i started. I also dropped over 30k off the speedo, it was not from this bike and in my mind better reflects the milage after the ground up resto etc. I could have lost the 71km, but why bother when you could chance messing up the lower number clickers.
This was the short rev counter loom I bought NOS, I bet this has been NLA for decades...
Ive also been busy with a set of OEM footrests and can report on them now that theyre done. For those that may have spoken to me and heard my hassles in the end I decided to carefully drill the new rivets and fit split pins as I couldnt get the rivets to flatten at all in a press or with a big hammer. Plus I dont know if anyone has noticed but the new yam footrests all seem to come wth the rivets upside down, ie peened over part is at the top. I did these the right way round
So lots of plating and a new (NLA) right spring, new rubbers and pins and here we go... Not bad for some rusty and delaminating junk. This was part of my 'restore it or chuck it away' ethos for the spares in my boxes. So while these cost about half what a new set costs and were considerably more work, I have the satisfaction of knowing i saved these from the bin and no longer have them in a spares box. win win win!
As for the fuel cap... Im not sure yet, I do have the Alloy one from my 421 and I could use that since I now have a Wicked billet alloy cap for that bike.... we'll see.... I also have a locking chrome cap in my spares... lol. watch this space I guess!
--
I finalised the wheels. The front got another polish and then new bearings were fitted and I located the disk bolts and lock tabs. The rear got a brand new JT sprocket and the correct nuts, all locked with re zinc'd tabs. I also located the cover plate and spacer, snap ring and huge washer - all had been re-zinc'd. These wheels were then put away until I build the bike when I will fit new tyres etc.
--
After much debate Ive finally decided on the pipes for this one... The original RZ 51L units. Wile I had a few options, these seemed like a no brainer they are the ones Yam developed for this very engine.
These are like the later 350 pipes but on the 51Ls the silencer is removable from the pipe and the baffles come out of course. Both junctions have gaskets that are now NLA of course.
The actual pipes I have are not that bad, just needing a lick of paint, but the cans was another matter... as anyone who's ever had a set of these will know. They suffer in any and every crash
They look much better in the pics really... theyre very dented. This is not helped by every owner realising that you can swap the cans over form left to right to hide your latest crash... then you crash again and theyre double dented and rashed. ok on a junk bike, but not on one of mine of course. The original finish is a dull chrome, I could replicate it in powdercoat pretty well, but i dont know what temp these cans get up to so think I will paint them, maybe all black, more 'LC' that way and as a mate said, 'easier to repair later'... hmm.
The baffles for these are very like the earlier models.
So... watch this space...
--
so far Ive pulled some dents, made the ends round again, sanded, blasted, welded, ground, sanded and then multiple times hit them with skims of JB weld and sanded each layer. They now have much the of correct profile again and im almost at the point of having to make the decision on the finish. The baffles were reshaped (how do you bend baffle end plates and gouge the exits?) then blasted and hit them with a high temp black paint.
--
Im still working on the silencers... theyve taken quite a lot of filling with JB weld to get a flat enough surface due to the dings and dents. Tomorrow I'll try powdercoating them gloss black. Gloss of course highlights any surface imperfections so dont be surprised if they come home satin instead lol
I also test fitted the PVs today. I was worried with a 1.5mm over bore that maybe they would need relieving for the pistons, but all was fine. Phew!
In pulling out the PVs I found I bought NOS PV holders a while back... last of the big spenders me lol At least the valves will be the best they can be with those and new seals.
-
Well, they are done! I'll put up some pics when I have a bit of time to get them done. But, I'll not leave you in suspense, the process went well.
Thanks for the kind words mate, I always hope that people read my posts and decide that if I can do it then they can too. Most of what I do isn't rocket science (in this instance; have you met any powdercoaters? i have... lol) and I hope me blundering my way through and learning as I go gives people the confidence to give things a go themselves. I haven't enjoyed all successes but nothing has been ruined. I've found that if you keep at it and use sound practices along with attention to detail you can usually do a nicer job than the lazy pro you have to pay, well that's always been my experience anyway. I started servicing my own bikes and cars as a teenager when I realised you could buy the tools and parts for about the same price of the first dealer service, the rest of the services saved you money etc. That ethos prevails and I try to do as much as possible myself as you guys know.
Actually the conductivity issue I was worried about wasn't a problem at all with these. I did clean up all the contacts on the hanging rig to make sure they had the best chance. We've found that over time the electrical conductivity drops off with the setup; older kit and also old powder buildup on the hangers doesnt help. When the setup was new it could zap you and give great pain if you didn't ground out the gun after switching off. These days that's no longer a worry. Originally you could shoot a spark if you got too close to the parts with the gun, these days you can get very close with no issues... so the current is plainly much lower.
Anyway, the JBWeld wasn't an issue at all for the coverage. I did heat the later coats as build up is never as easy when you have layers of powder on the part with this low power rig. The further from the metal the outer surface becomes means that getting a nice even coat isn't easy and what looks blotchy before heating can stay that way. Heat means the powder (it's a dust of plastic remember) lands and then stays where it lands, just what i needed.
I did 3 coats for a few reasons. On the first coats I did get some sinking into the thicker JB Weld areas, which are of course on the outside (ie the part you see) as thats where most of the damage had happened. This isn't like paint where its ghosting, its more like a rough area in the gloss. I also still had some areas on the cans that were not perfectly 'flat' and of course if you sand the powdercoated layer you can use it as a thin filler. Sand back to the metal and leave the powder in the dent, the recoat. I used 80 grit, that allows a good key and powdercoat has no issue flowing and leaving the next coat flat. Both of these reasons would have been less of an issue with the satin of course, by using gloss black I did pick the most difficult finish to get right. Any painter will tell you gloss black shows all the marks, dents and problems in the panel and means more work. But, what's the point if it's not a challenge? Kennedy told us that about landing a man on the moon... my concatenated paraphrase: 'we choose to do this, not because its easy, but because its hard'
I stopped after 3 coats as the OEM part numbers were getting lost. No big issue for me on this build, but they do let you know which way round the silencers fit when on the bike (they are in the inside edges, on the top, about 2 o'clock) and I wanted to preserve them if I could. By coat No.3 most of the dents and marks were gone and the surface was pretty flat. Ok, yes there are a few marks in the finish, but you get that when using a home setup. There is dust in the workshop floating around and to be honest there was all sorts of oils gassing off in the early coats, thats the problem of 2 stroke silencers no matter how much you clean them.
Ok, all that said, Ive set the scene... pics soon...
--
Ok, here are some pics:
I didnt take any photos of the initial stages. But I blasted the surface and went over the whole area with a Powerfile. I then welded up the scratches and dents as much as possible and ground back. I also pulled a couple of the bigger dents by welding on a piece of threaded bar and using a cheapo ebay dent puller.
The first fill with JB Weld. You can see there are quite some gaps that will need more coats. I used about 5 thin coats, making sure to feather the edges and also use a wide sanding block to get as much of the original cylindrical profile back as possible. They were very dented, much worse than the initial pics showed. :/ I tried to keep the original spot weld 'dents' where I could, They are original of course.
The final look of the JB Weld filler on one of the cans getting ready for the first powder coat:
We're Cooking!
(terrible photo but you get the idea) - Don't use the oven in the kitchen at home!
And finally the powder when done:
Ok, yes... well, the photos of the silencers completed doesn't look like much I guess. They are gloss black and the world is full of things they want to reflect, oil from fingerprints marks them as well of course. Shiny things are trouble...
Reflections do tell the story here tho, with gloss black any dent or imperfection would show up. Sure there are some there, im not suggesting there isnt. But compared to what I started with (see the photos further up the page) i'm pretty happy.
I just need to locate another of the sadly long-NLA baffle gaskets now and I'm set... 51L-14755 anyone? I found one NOS one... need another.
As as aside, one of the blokes in the workshop asked me why I didnt do them silver like OEM. LOL... Im going to get that a lot, arent I?! sigh...
--
The baffles were blasted and then hit with high temp paint, they will be covered in sooty oil soon so I didnt bother too much with making them beautiful...
After retapping the threads I fitted all new bolts, just need another gasket and these are done
--
Anyway, I carry on... Today I did the job that you all knew would happen. I rebuilt the dash again...
This time with new tacho and temp dials - from Simon5 (on the forums) Kateannwells (on ebay) I should add that these are a very nice product, Thanks Simon! I also fitted brand new needles for speedo and tacho from Yuniparts, they are the same as the XT500 and available on ebay. I also repainted the temp needle a colour that was closer to the needles, it's not quite as close as the pic (below) suggests, but is much better than I had it before with only the high vis paint, it needed toning down.
Removing and reusing the needle stop is always a pain with these, but I got it done. Yamaha seem to stake these on the back side to balloon the end slightly. In the end I ground it down and put some glue on the back. I think it will hold, but its not an exact science of course.
Getting the old needles off was a pain as ever with these. The tacho needle came off and left the brass part behind. I did wonder about reusing it and so gently bent it a little to straighten it, only a few mm... and snap! Bugger... as we say here in Aus. The speedo fought me as well, this time it left the black plastic and the brass part behind, damn! Pushing both new needles on was really hard work too, I had to use my plastic assembly hammer in the end. wow... wont want to get these off again, but they wont fall off when riding at least I guess!
Put it all back together and took this pic:
Arghhh! It wasn't until I was sat back in the house at my laptop looking at the photo that I could see there was a bit of cleaning oil that had come up one of the screw threads and was spreading out across the dial. This was residue from cleaning the workings and it's worked its way up onto the dial up through the thread. Grr... Live n learn as ever. I should have blown out the mech before building it back up. :smt012
Of course, as youve read before so you know what I am like... I felt that I'd already come this far.... so, back to the shed and I pulled it all apart again and cleaned off the oil with wax and grease remover... luckily that took all the oil off and left the dial like, er new again! phew!
So.... yes.... Im finally happy with these... :smt023
Just need the 2 missing rubbers and this dash is done :smt041
--
Ok, so more progress...
Yesterday I finally got round to powder coating the clutch cover I had welded (Thanks Nicko!), ground back, welded some more (Thanks gain Nicko!), ground and filed back some more and then cut for the window, all that was back on page one!
Now its done I can reveal the plan for this one... I also powder coated the clutch end plate, here is a mock up:
(and yes it blur to pink when running... Proper Subaru Sti pink as well!)
--
Been working on Brakes again... This time it was the turn of the master cylinder for this bike.
Im using a 250's 1/2" on this one for better brake feel, they look the same as the 350 so its no big deal of course, but should be nicer in use
I stripped, blasted, cleaned and powdercoated the cylinder and all the associated parts, being super careful with the bore. More of a job than you might think as some of these units have led a really hard life and they have many holes. I then cleaned the corrosion away with AluBrite and polished the bore a little to ensure it was clean.
I sourced a new OEM rebuild kit for the working parts and fitted it along with rezinc’d banjo bolts and new copper washers.
I cleaned up the OEM rubber with AluBrite to eat away the stuck on alloy corrosion and it came up ok, its still a bit pitted for years of encrusted corrosion and because of that is a little warped but its much better than it was and should seal now instead of crushing against the oxidisation.
The original clip in style sight glass was too far gone so I fitted one from a KTM Brembo after finding that it has similar dimensions online, very few masters have this kind of clip in style. I reused the LC’s o ring to pad it out and get the fit needed and while the outer edge is only 14mm to the LC's 16, the most obvious thing is I now have to 'MIN' marks, but you just follow the one cast into the mcyl body of course.
Finishing it will be a re-powdered original lever and I resued an old brake light switch that I checked was working along with new screws.
This looks news now, it was total junk before... Sadly no before pics :/
I also powdercoated the brake splitters as well. I noticed that the LC and the RZ versions are identical though the RZ unit has 47X (RD/RZ500 code) on it while the LC has no identifying marks.
Ive also been cutting some LC brake disks on a brake lathe at my mates workshop, After blasting the paint off I got them on the machine.
It wasnt all good... one to come up great and still well within specs, one looks great but was undersize and one was so warped it was a joke.
Anyone (locally i guess as they are heavy) have any spare disks? I now need one more... hmm..
NB: (please excuse my paint job, the idea is that the pads will clean off the paint edge in use
--
Bought a tank from Webike for this bike, this one as this bike will have the Japanese white colour scheme with the fitting name decal as its getting the RZ engine:
The tank arrived and its really quite something. Its quite gold in the pearl, different to my usual colours so im very happy, just got to paint the smaller parts to match now.
Ive also bought a seat foam and cover from Webike as well as I like this cover style, again to be different and more 'Japanese' with this one.
--
Ive been quiet of late, Ive been working on other things, not least the 500 I bought at the tail end of last year. 500s are a money and time sponge of course... and Ive been mostly hanging out on the 500 side of this forum of course. So, with that bike now fully stripped I finally took my zinc plating in as the buckets were as complete as I could make them (for now lol)... plus, I really wanted to move my projects on.......and first out of the traps was the seat for this bike! The plating buckets held the captive bolt plates that fit under the seat foam. I mean if youre going this far with work, you'd want these plates nice as well as the parts that bolt to them, right?!
With the base all cleaned up back to its original white in my mates ozy juice parts washer, I fitted the plates and then fitted the brand new Daytona foam and JDM seat cover from Webbike. Quality stuff as you would expect from Daytona, with thick vinyl and the plush modern foam. It'll be interesting to feel how different this seat is compared to my resto LC's seat which has a brand new foam from a UK supplier and a nos OEM cover.
I dont have a pic at the mo, but it looks like the pic on webbike... lol
--
Finally been back in the garage and did some welding repairs to this frame and its now been picked up by a mate to take it to the blaster/powdercoaters. Amusingly after a few hours I'd rather forget where I fought some corrosion on one of the tubes my friend noticed I'd completely missed the fact one of the center stand welds had split... luckily he will attend to that before dropping it at the powder place. Proof, were it needed, that 2 sets of eyes are better than one!
I started going back through my boxes to order the last parts needed to start the build up and in the process came across some parts Id bought/restored-but-not-yet-fitted to some of my sub assemblies, like the rezinc'd dash bracket with the 2 rubbers I didnt have and the NOS tacho loom I bought from France last year. 10mins on the bench and I had a compete dashboard. Not bad considering how rough and missing parts it was when I got it.
--
And so it starts....
First up as ever was to add the Chassis plate back onto the frame. I found some nice stainless captive rivets for this that are used in roofing so the ends wont fall out and let any moisture in.
Even though the powdercoater plugged the threads I've found that it's still good practice to chase them before use as a damaged or blocked thread will only bite you later. This frame was unknown to me so worth cleaning them out of rust, blast media, any stray powdercoat that had got in and any damage they had incurred over the years of ham fisted mechanics.
Next up I fitted the steering bearings. This was a bit of a nightmare as over the years the lands had been damaged by people levering the bearings out. After much tidying the bearings went in nice and flat, phew. Fitted the re-zinc'd lower triple and powdered top triples with rezinc'd caps and nut.
With the center stand fitted and some forks in I now had something I could start to hang my restored parts on:
Then I started with the unrestored (lol) wiring as this loom not only needs some repairs but also to have the PV servo loom (robbed from an old F2 loom) incorporated into it and somehow I need to locate the 85 CDI and PV unit on the frame so I need to check space and work out what will work and what wont with the length of the wiring and connectors I have along with integrating the 85 CDI into the LC loom. That might be a day where progress is made but everything looks much the same... hmm...
I did fit the rebuilt ignition switch, powdercoated headlight ears and fitted some re-zinc'd short (LC2) indicator arms as I had them handy (I do have the originals as well if they look silly) but we all cut these down back in the day and this is an 'more yam' approach to having shorter arms I guess. All the fittings on this bike are either OEM rezin'd items or occasionally where I didnt have any spare (I usually buy bare frames and boxes of parts, not whole bikes so am often missing fixings) Im using stainless as this is not a restoration as such, more of a resto mod.
--
Next up I started bolting on some of those completed sub assemblies I have been doing over the past 12-18 months. Always a happy job for me
Started with the front end as I needed to run the wiring and I usually find that starting at one end is the way to do that, the front is usually preferable as there is a lot of connections in that headlight bowl and you want to make sure everything is long enough, but also not too long...
So, first up the headlight bowl went on... and I found I was missing one of the rubber washers on the mount, part 18. Sigh.... I searched high n low thru the boxes and couldn’t find one in all the headlight bowls and parts I have. Don’t s’pose anyone has a bunch of these spare do they? I’ve got lots of the other rubber/plastic headlight fixing parts, just none of these.
While trying to think of places I might find part number 18 I fitted the headlight adjuster and made sure everything else in this area was right, even adding the brake splitter and a brand new top brake hose. I was originally going to fit a single horn as this bike was originally a 250, but I didn't have one that fitted the restored bracket I had and as I have the 350 bracket parts I just decided I'd order the twin horns up as the new good quality re-pros are very nice indeed, plus the twin horns is part of the iconic look of the LC I think. When they arrive they will go on, tho I need to add extra wires to the 250 horn loom to run the second horn, easy job when Im doing the other wiring of course.
Keeping the momentum going I reassembled the headlight rim. The outer was one that I had re-chromed. It originally came from my mate Rob on this forum and he had had it re-chromed but the chromer had polished off some of the chrome so it wasn’t usable. I was able to put it back in for chrome when LB was chroming some parts and I picked it up last week when I collected this frame. It came out really well this time. Phew! The inner rim I had rezinc’d along with all the other small screws and headlight adjuster bolt and spring. I know the inners were chrome when new, but I couldn’t see the sense in doing that this time round, zinc is cheap and cheerful and I can easily redo it, chrome isnt like that round here. Assembling it was fiddly but intuitive enough and Im very happy with the result. These complete rims are very expensive now, and while I have an NOS outer on my site listed for sale, I would rather clean up and reuse and old part if I can since I had the time to get the parts done how I wanted etc.
The headlight bowl on this build is also a recycled part, new bowls used to be sensible money but suddenly prices skyrocketed and I’m glad I didn’t need to spring for a new one. I did have to buy new indicator rubbers as of course I had run out of them, another issue with buying bikes in parts I think, you often don’t get usable rubber parts. Fowlers provided these for sensible money actually.
I slipped on the bars, a new 55K set which is what Yamaha supplies now as new bars for LCs. They differ slightly from the 4L0 version (very slight bend difference and my feeling is that maybe they are slightly less wide - I need to check that, gloss not satin black etc) but work very well unlike he aftermarket bars I’ve tried before which never fit right and are end weighted as per the OEMs which aftermarkets never are. I put on the switches I restored from the junkers I’d collected over the years – powdercoated bodies, new decals and any switch parts as needed and full clean up of the connections, plus re-zinc of the steel parts of course. A new throttle was fitted and I have new leaf and grips to go on later. I also was able to add the refurbished 250 1/2” master cylinder (with a new rubber lid seal that I picked up recently) and clutch perch. Its so nice to be bolting on parts that look like new, knowing that you spent the time to refurbish them and now you get to finally use them
Next up the clocks went on as well, another of my previous refurbish jobs. Like many of us I do like the parts you see and touch when riding to look and feel the part. Those touch points make or break a bike for me and I’m very happy with how this is coming out so far.
My next issue is the wiring. I’ve already had to fix the front brake light switch connections in the bowl as one came off in my hand and now I’ve got to deal with the mess you here; At some point the regulator fitted to the bike this loom came from fried, taking out the fuse box and melting a side panel – I actually bought it as an almost whole bike which was to rusty to restore and could see the damage which when I worked through it made me feel like a forensic investigator haha! The PO had replaced it with a fuse box kit and I reckon it worked ok as the bike had been run like that, but the job wasn’t exactly beautiful, even less so when the loose tape was removed. I also spotted that one of the white wires is broken on the hexagon connector and there are some other repairs to sort out. I just need to get the soldering iron out and retape this all up when done in a prettier manner. Not a nightmare perhaps and typical of an old LC loom I guess.
To add a little more VP (Visible Progress) on went the battery box and regulator and with the repainted rear subframe, number plate holder and a refurbished rear light added it’s finally starting to look like a bike is appearing from the parts.
--
I added a few more parts after a bit of searching as this bike was always going to be tough to locate parts for, being bought in dribs and drabs and sourced from scratch, not a whole bike. I found some engine mount plates and bolts, got the swingarm pin in and a few other little bits and bobs that will make it easier as parts are now all in one place.
My next plan was to get this bike to be closer to being a roller. The easy part was to take the refurbished (painted, polished, new bearings) rims to a local tyre shop and have them bang on some rubber. I chose BT45s as they’re my go-to on our bikes for a good quality tyre that won’t break the bank. I fitted brand new Honda (OMG! Yes I did day that!) tubes. I found these for under US$9 each and of course with Honda part numbers on them you know they’re quality items. These were the best value tubes I could find and the tyre fitter was happy with them which was good to hear.
TUBE, RR. WHEEL (3.50-18")
Options: Old Sku: 42712-283-000
Item #42712-446-631
TUBE, TIRE (2.50-18)
Options: Old Sku: 44712-268-222
Item #44712-205-000
The fitter also fitted black weights to the black painted part of the wheel as we both knew that the polished rim is worse than rubbish for holding weights, the ones on the resto Lc fell off on a hot day... hmm.
I still need to clean up the black tyre soap and give them a polish before fitting.
The not so easy part was the forks... In my hurry to get going on this build I slipped in the first set of forks I came across and really I should have spent a bit of time working out which set to use and restoring them first. I had already restored some lower legs and wanted to the use the Goki Air Caps as I had them and wanted to try them plus so I only really needed to work out the best stanchions to use with them, check the rest of the parts and fit new oil etc. This is all much easier when you’ve not put forks on a bike, especially with all the headlight/clocks etc.
Ahh well, I don’t like to make my life too easy haha. Do as I say, not as I do....
--
Spent some time today redoing some of the dodgy wiring. Re-taped the parts that had come unwound and snipped off the burnt out stator 'hex' connector as one of the pins was totally burnt out and the PO had bypassed that pin with a fly lead. mental. Rather than try and shore up the mess I instead fitted a better complete connector with good pins and lengths of decent cable from a dead loom. I also remade the POs fix for the red wire (thinner blue extension cable seen in the earlier pics) on the regulator connector with the correct sized red wire and connector from the other loom. It's really nice to have enough spares to pop out a connector or splice in the bits you need using OEM parts.
I ended the day by making up a twin horn loom from two 250 horn looms I had, I could buy a new one, but why bother when I've got these two. I've still got to tackle the mess that is the POs fitting of the fuse box kit, but that's for another day.
--
The fuse box kit was more of a mess than I thought actually. He'd cut the fuse box off at the box and then added the 8 way connector supplied in the kit, this meant the fuse box was a good 15-20cm longer on the loom than it should have been. At least he did solder and tape the joints, although he did do them all in the one place leading to a thick lump in the loom. You can also see he had wires that were too long and folded and twisted them around to get the fit. Eeek... :smt009
I wondered about cutting the two plugs off and soldering on the 'new' fusebox in the correct place, but the wire colours were all wrong for an LC really and the fuse box wasn't wholly OEM looking as it used different fuse holder tabs, so I found a better one on an old loom and spliced it in at the correct length but offset the joints so as to not have a great big lump in the loom when taped. Not only are the connections improved but I think it looks much better now, almost OEM again, just needs the sticker in the fuse box which is on order.
Here it is before the wires in the fuse box were tidied up and the loom re-taped. The red sheath has been taped to hold it together before the main loom re-taping was done as I forgot I had a piece of red heat shrink in my box, tho not sure how well it would work on the cloth they used for that as its the non glue variety. Of course under that sheath the joint is heatshrink wrapped like the others. It's easy to forget that back in the day Yamaha didn't heat shrink its joints, they used electrical tape in random colours. The brown cable (at the bottom of this stack sadly so not easy to see) splits 3 ways here on these looms and that was soldered and wrapped in tape back in the day, tho the blue neutral wire in the earlier part I worked on was just clamped with a simple cleat as it was a simple one wire addition. Kedo tried to convince me Yamaha just twisted wires in the 70s and 80s "so the wires wouldn't break in use" on the XT500 loom when their half-arsed copy made intermittent connections on my bike, I proved to them that wasn't the case and it was proven again on this loom - makes me wonder how the aftermarket LC looms were done. hmm, I have one in my 421... been ok so far
and test fitted to the bike, this pic reminds me I really should remove some of the wire clamps from old fuse boxes and re-zinc them and fit them on old looms, the rust isn't endearing at all!
--
I will post updates here as the build progresses, but if anyone is interested in reading about what im doing with this one in a more condensed and rewritten form, Ive hosted the build on my website now:
2smoked.com/Yamaha_251LC_1982_RD251LC_Home.html


 \
\


