|
|
Post by dusty350 on Dec 9, 2016 15:29:57 GMT 1
New YSS shock fitted now, along with a squeaky clean oil tank   And with the door up, you can see I don't have much room to move   Due to this bike getting some new bodywork, it will technically no longer be the "carbon" Lc ! That title goes to the 385 now   Gonna clean up the rear wheel next and then that can go back in. Dusty  |
|
|
|
Post by yamark on Dec 9, 2016 21:37:16 GMT 1
Dusty, you have that knack of making 30 year old bikes look brand new. Lovely oil tank |
|
|
|
Post by fozzy17 on Dec 9, 2016 22:05:43 GMT 1
Dusty you do some lovely bikes fair play, that rear light needs sinking in abit
|
|
|
|
Post by stusco on Dec 9, 2016 22:32:26 GMT 1
Dusty are you hiding Christmas presents in your man cave
|
|
|
|
Post by scootjockey on Dec 10, 2016 0:41:03 GMT 1
New YSS shock fitted now, along with a squeaky clean oil tank 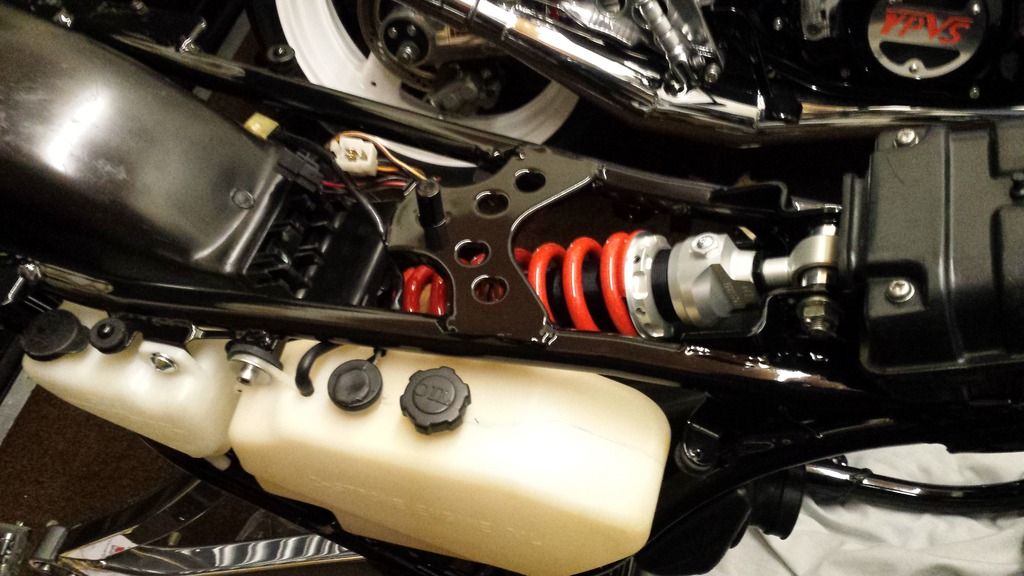 And with the door up, you can see I don't have much room to move 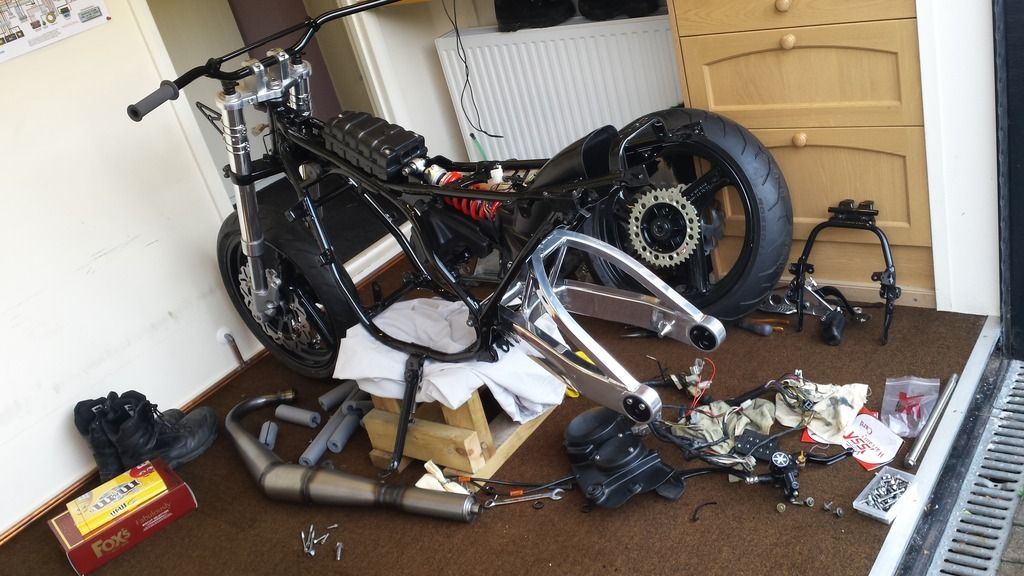 Due to this bike getting some new bodywork, it will technically no longer be the "carbon" Lc ! That title goes to the 385 now  Gonna clean up the rear wheel next and then that can go back in. Dusty |
|
|
|
Post by scootjockey on Dec 10, 2016 0:46:13 GMT 1
Ooh what I'd give to have a radiator in my garage ! Bikes looking very good
|
|
|
|
Post by dusty350 on Dec 10, 2016 9:17:23 GMT 1
Cheers fellas Yep, couple of Xmas prezzies - normally hidden under the bikes !! Mark - the oil tank was like new - seems a shame to put oil in it !! Cheers mate. The rear light lens will be changed for a red one - the paintwork will be white so a clear lens wont look right. I will recess it though. And that rad - it's way oversize for such a small space but when I had the new boiler fitted I completely redid the garage - it's lined with 18mm chipboard over 3" battens with rockwool insulation in the cavity. 18mm ply floor over the concrete base is carpeted with tiles. It's the warmest room in the house - it gets too hot sometimes and I have to turn the rad off, but I'd rather that than be freezing cold. Just wished it was big enough for a hydraulic ramp but there is no way that would fit in there, so I end up scrambling around on my knees, which doesn't help my back !! Hopefully get the back wheel in today then can remove the front end. Dusty |
|
|
|
Post by dusty350 on Dec 10, 2016 22:10:46 GMT 1
Hi Stalled a bit today. Was hoping to get the rear wheel in but when I removed the sprocket carrier I found it was missing the spacer that fits inside the sprocket hub bearing and sits against the wheel bearing ! Glad I checked it rather than take a chance. Will order one next week, and can then fit the wheel as I've polished it to within an inch of it's life. Also replaced the sprocket bolts and nuts for new. Rear wavy disc is new so just refitted that. I cleaned and re-blacked the battery box and fitted a refurbed reg/rectifier, and also cleaned and fitted the original coil, although that may get replaced for some thing better in the future. Once I get the rear wheel back in I plan to drop the forks out and give them a light buff on the machine. More soon Dusty |
|
|
|
Post by dusty350 on Dec 10, 2016 22:15:51 GMT 1
|
|
|
|
Post by tell7437 on Dec 11, 2016 22:38:52 GMT 1
How do you refurb the black plastic, mine needs everything tidying up including the clock cases that have a lot of scratch marks
|
|
|
|
Post by dusty350 on Dec 11, 2016 23:10:46 GMT 1
Hi There are various ways of getting the plastics back to black. First off I get them as clean as possible. Any scratches can be dressed with fine wet/dry. I use a liquid based black polish applied with a clean rag, left to dry and buffed over. I'm not looking for perfect, but I get them as nice as I can for not too much effort. Most are hidden anyway but I guess I have a bit of an ocd problem when it comes to building them  . Any effort made can show good results, virtually cost free. Just getting them free of 35 years of crud makes them look better, and it's the small jobs that add up to the overall look imo. Regards Dusty |
|
|
|
Carbon Lc
Dec 12, 2016 0:18:26 GMT 1
via mobile
Post by veg on Dec 12, 2016 0:18:26 GMT 1
Second that method same as indicator and brake light lenses cut back then use solvol then plastic polish. Looking good dusty.
|
|
|
|
Post by dusty350 on Dec 13, 2016 18:41:48 GMT 1
Cheers I ordered the missing Suzuki part today from Crooks Suzuki. Used to use them a lot in the past when I rebuilt my Gixxers and an Rg250. Anyway, the spacer is turned down at one end and that part fits inside the sprocket hub bearing, thus sleeving it to the correct diameter for the spindle. Without it the sprocket bearing has no contact at all with the spindle, so it's important it's fitted. Crooks reckon I should have it by the end of the week, so, keen to get the back wheel in, I pinched the spacer from the rear wheel of the 385 and fitted it to this - the 385 will get the new spacer fitted at the weekend. The rear wheel is now in and complete; 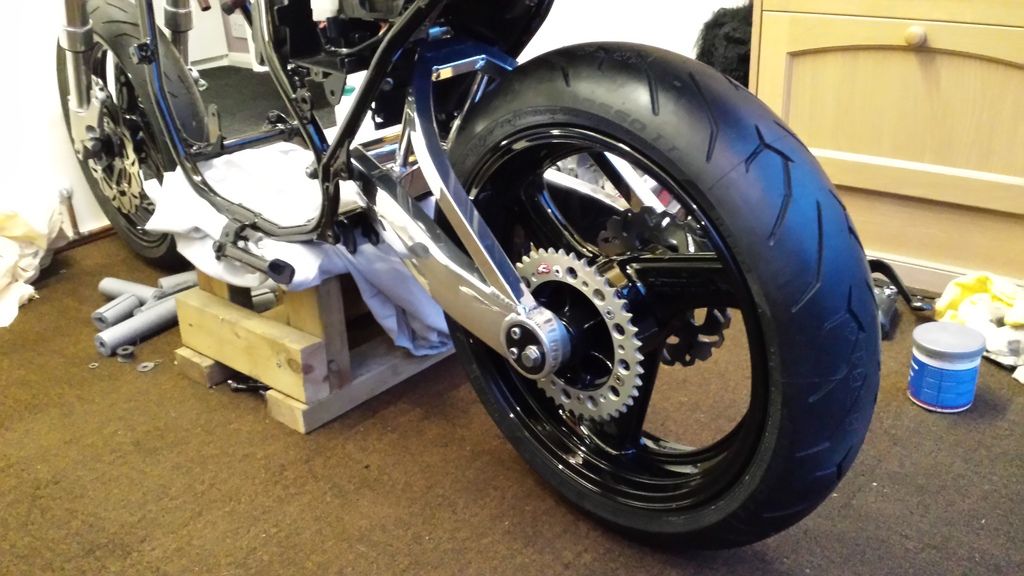 I've got an order for Norbo - lots of small parts really, and I had a WhatsApp message and photo from Mark Cordwell today saying my paintwork is ready. I am really excited about that as I have never had any bodywork pro painted on any bike I've ever owned, so knowing it's all new and freshly painted is great. This was originally going to be a quick clean up and ride bike, but it could end up being nicer than my blue hybrid !! Next job is strip the front end, clean and reassemble, hopefully before the weekend. Dusty |
|
|
|
Post by scootjockey on Dec 13, 2016 19:28:15 GMT 1
I'm pleased to see you've used Allen bolts for under the tank and seat latches was that intentional as they are easier to come by or from a mechanical point of view ? I'm not sure what route to go down standard Yamaha nuts bolts screws or stainless Allen type. I want to make my F2 standard as possible but find the OE heads just chew up after minor use. Also I've heard the pitch of thread is different from OE Japan screws to your uk metric is that right ??
|
|
|
|
Post by dusty350 on Dec 13, 2016 19:45:16 GMT 1
Hi I always use allen/cap head bolts on all my builds, but they are never standard builds anyway so original nuts bolts and screws aren't an issue. I will probably use button heads for the seat locks but allen heads everywhere else. Never had any issues using them, and it's only when you get to the larger sizes like the bolts that hold the footrest hangers on that the pitch changes, but you can get the correct length and pitch for those off ebay. I take a trip to a Fastener supplier about 3 or 4 times a year and keep a healthy stock of stainless bolts, washers and nylocs which makes a rebuild a lot easier. What you use will be dependant on how original you want it to be. Some guys go to a lot of trouble to get the minor parts correct. Regards Dusty |
|
|
|
Post by yamark on Dec 13, 2016 19:51:11 GMT 1
Dusty, great progress again. I cant believe how quickly your restoring this one. (I know a lot has been done to the bike already)
I thought Yogi's restorations were fast; he's not going to be happy with you taking his "speed crown"
Cant wait to see the paintwork mate |
|
|
|
Post by dusty350 on Dec 14, 2016 0:14:45 GMT 1
Hi Mark It will start slowing down soon !! As you say, most of the parts are new or already coated, polished or painted, but for peace of mind I wanted to strip it and check everything - glad I did when I found the spacer missing in the back wheel !! Really excited about the paintwork. I rang Mark to enquire about a second hand set he had on ebay, and next thing he had me sold on a brand new tank and panels - painted in a non standard but familiar paint scheme Only thing left is my front muddie which I will drop off to Mark when I pick the rest up. If I can sort the rolling chassis then I can concentrate on the engine over winter - I have ordered a billet clutch basket off Norbo and I have saved enough for the crank rebuild. I want to take a closer look at the engine I removed as I can see the pistons are new - may use the top end if it's on a low bore, although my other engine is pretty good anyway. Will sell an engine and the mars bar bodywork when I can to help recoup some costs !! Plus I need room in the garage - looks like someones lobbed a grenade in there !! And Yogi's speed crown is safe He is the Usain Bolt of the bike building world !! Regards Dusty |
|
|
|
Post by jakethepeg007 on Dec 14, 2016 0:49:39 GMT 1
I'm pleased to see you've used Allen bolts for under the tank and seat latches was that intentional as they are easier to come by or from a mechanical point of view ? I'm not sure what route to go down standard Yamaha nuts bolts screws or stainless Allen type. I want to make my F2 standard as possible but find the OE heads just chew up after minor use. Also I've heard the pitch of thread is different from OE Japan screws to your uk metric is that right ?? You can buy bolt kits like this for a rebuild, can be handy if you can't help yourself in the stores at work... www.ebay.co.uk/itm/360258955128 Cheers JTP |
|
|
|
Post by scootjockey on Dec 14, 2016 23:31:06 GMT 1
Thanks JTP that's a canny price on ebay ive seen some a lot more expensive than that. Cheers Gaz
|
|
|
|
Carbon Lc
Dec 14, 2016 23:41:21 GMT 1
via mobile
Post by Slabsideian on Dec 14, 2016 23:41:21 GMT 1
Less than two months!! Mighty impressive work dusty and gonna be another stunner.
|
|
|
|
Post by dusty350 on Dec 16, 2016 9:22:03 GMT 1
Hi Ian Thanks mate. I would have stripped it sooner but I was waiting on getting the Nova registration, otherwise it would have been a big collection of expensive parts ! Rear light tray went back on after a good clean and black polish, and I cut it out for a recessed rear light; 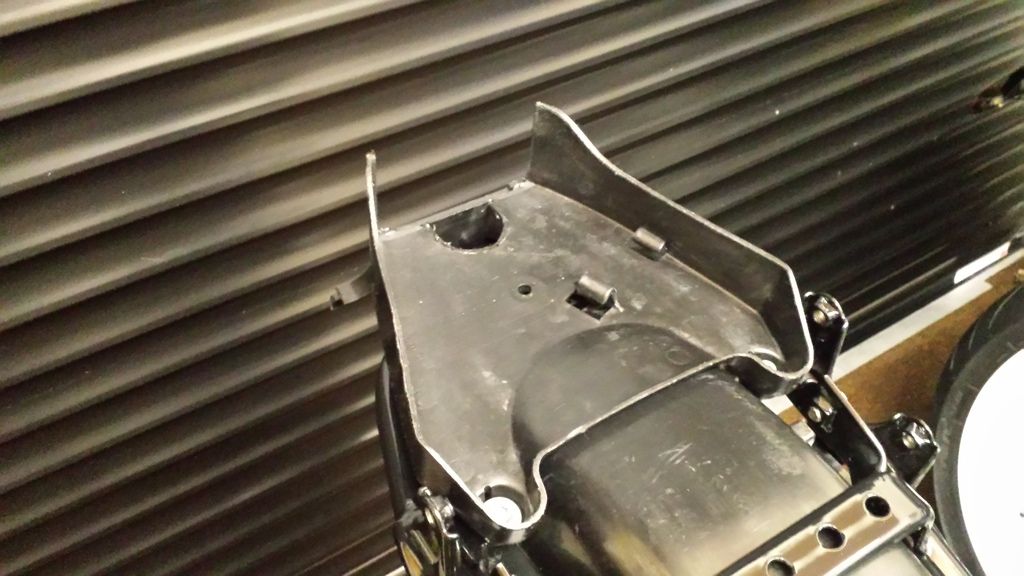 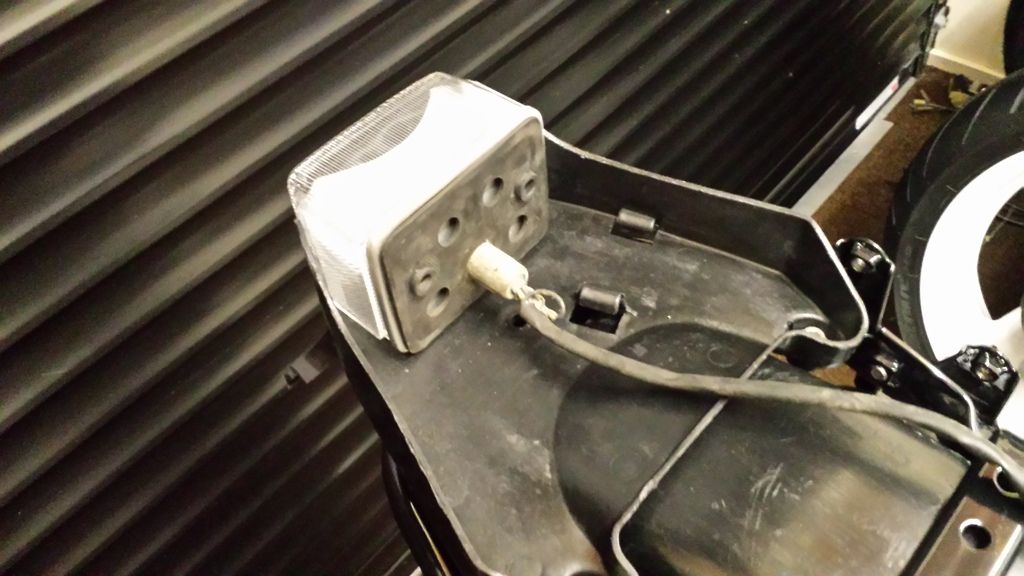 Had a polishing day yesterday. I stripped the front end out to polish some marks out of the forks. They have obviously been well polished in the past - the very fine ribs have been polished out, so it didn't take long to get the forks back up again. The hardest part was the fork tops. They had been painted black, and I thought I would get them back to ally, but when the paint came off I realised they had been painted to cover a blue anodising !! That took a lot of work to polish off but got there in the end. Gave the top yoke and risers a quick going over, but as normal, not too shiny; 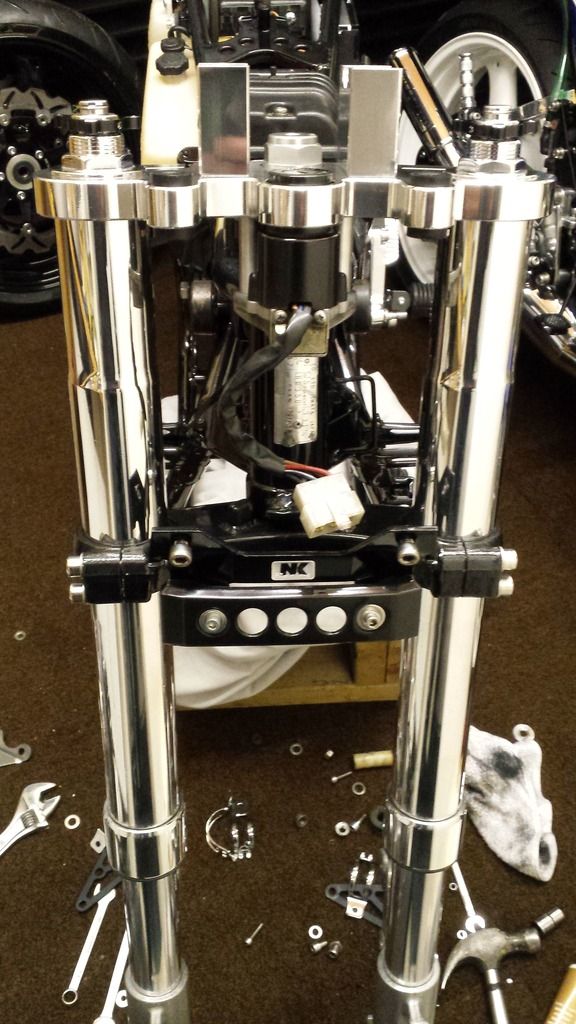 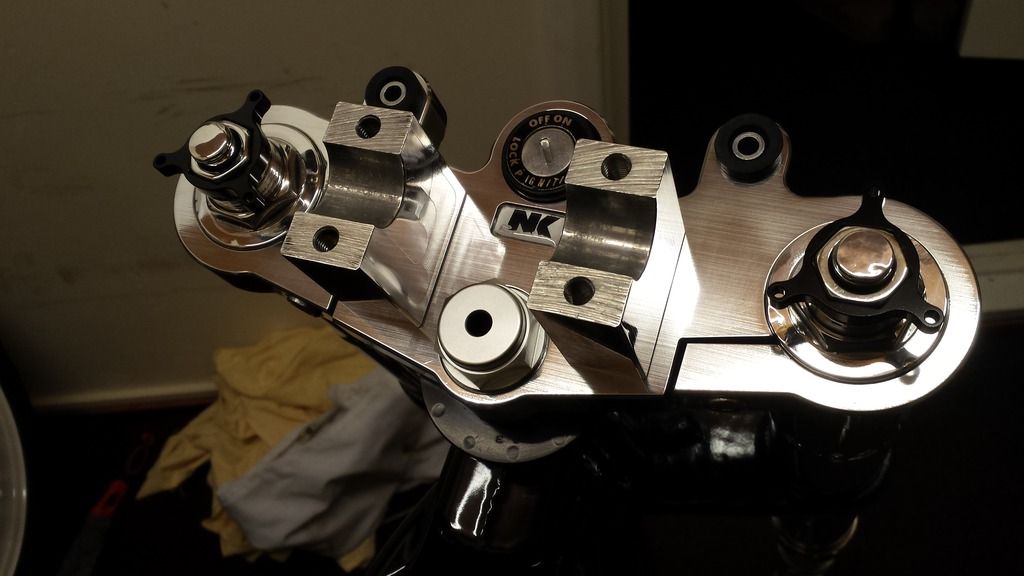 Will polish the front wheel today and get that back in, then can add some other parts. I'm collecting the new bodywork tomorrow so getting excited now Dusty |
|
|
|
Post by seanclarky on Dec 16, 2016 12:39:52 GMT 1
I've just caught up on this thread and I am amazed at the quality of your work dusty! It looks like a great bike in the making and definitely one that could grace norbos stand at a bike show. keep the pictures and updates coming!
|
|
|
|
Post by dusty350 on Dec 16, 2016 23:11:24 GMT 1
Hi Took the discs off the wheel and gave it a really good clean and polish them reassembled the front end. I had a new set of pads that came with the Beringers, but the ones that are fitted have very little wear so I kept the new ones for another time. There was some light corrosion on the retaining pin so I cleaned that up and refitted them; 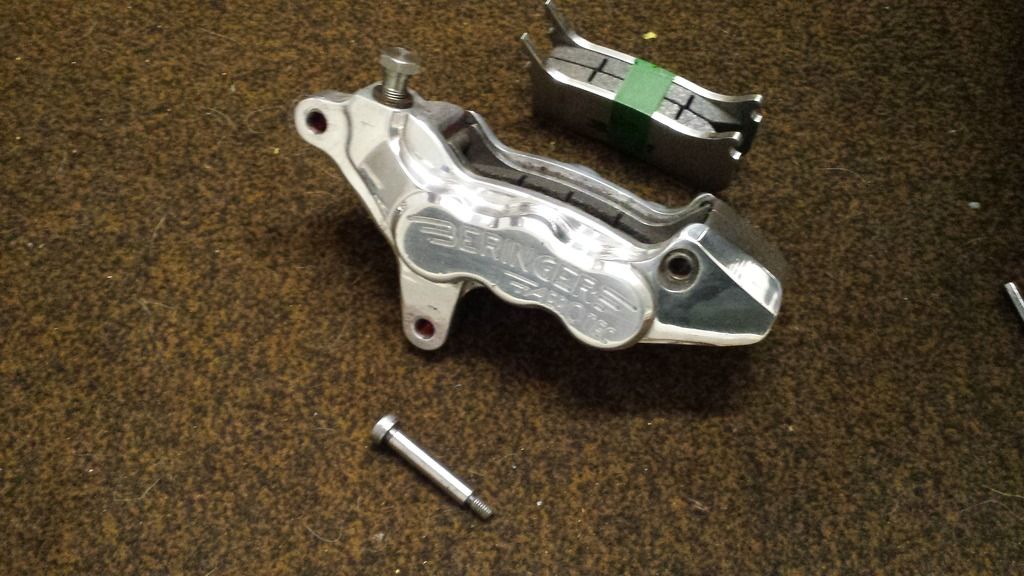 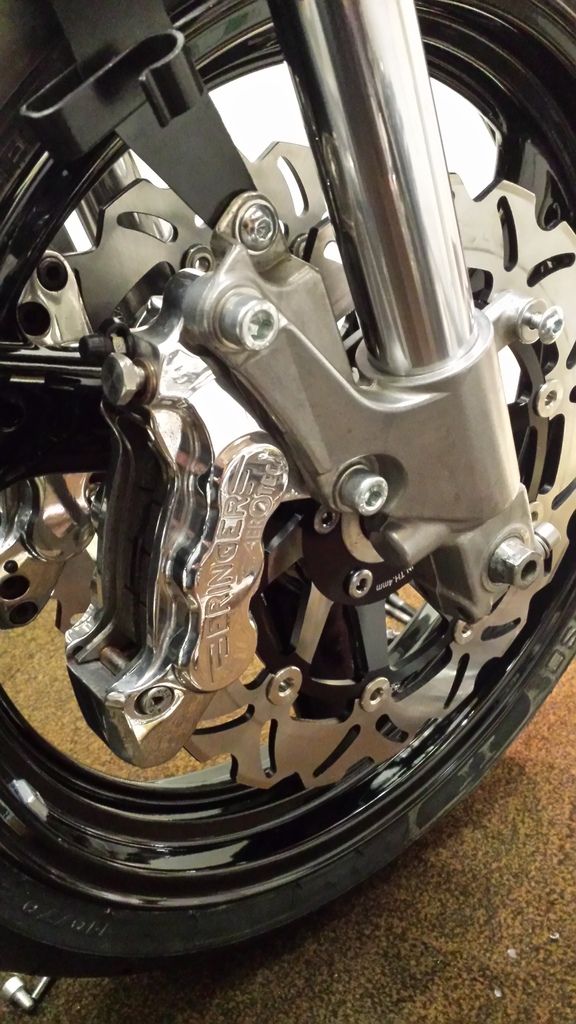 Headlight brackets will go on next, and clocks will get stripped and cleaned too and then refitted. Dusty |
|
|
|
Post by unrealedd on Dec 17, 2016 16:36:26 GMT 1
Dusty that bikes going to be shinier than a very shiny thing, looks mint.
|
|
|
|
Post by richclare on Dec 17, 2016 23:12:27 GMT 1
Hi Dusty,
Your threads/projects are great fun to read and follow. Always nicely written and full of useful info to help less competent builders, like me!
This current bike looks really nice with nice detailing. Looking forward to the new paintwork.
Just a little question - the allen hex bolts that appear all over the bike are s/s I assume. I would like to do something similar but having problems identifying the types as I live in France. Are they all M** numbered threads?
Have a warm weekend in your bike 'snug'.
Cheers
Rich
|
|
|
|
Post by dusty350 on Dec 18, 2016 10:19:04 GMT 1
Hi I am happy with the way it's going - wasn't meant to be a minter but I sort of let things get out of hand !! Took a drive to Derby yesterday - bit of a road trip as my lad came with me - had a real laugh there and back which made it all the more enjoyable, and picked up my paint set from Mark Cordwell. He is a really nice guy, and his workshop has been taken over by Lc tanks and panels !! His reputation is well earned and my set looks stunning - really happy He now has my Rgv front guard and he was gonna spray it yesterday so may get it before Xmas. Makes me want to get another band new set for the 385 but I will have some serious saving to do before that happens !! Regards the bolts, I take my old ones that I remove from the bike to my local fastener suppliers and they match them up. Over the years I regularly stock up on the more popular sizes so I always have a stock. They are nearly all easily obtainable. I did put a link to all the Lc bolt sizes in another thread, and here it is ; www.skills.plus.com/page2.htmlI always use stainless on all my builds and have never had any problems, and they polish up easily if that's what you like. Hope that helps. Regards Dusty |
|
|
|
Post by iwantalc on Dec 18, 2016 10:26:00 GMT 1
wheres the pictures of the new paintwork
|
|
|
|
Post by richclare on Dec 18, 2016 10:27:09 GMT 1
Hi Dusty,
That is some list of bolts ! Very useful, thank you very much.
Rich
|
|
|
|
Post by dusty350 on Dec 18, 2016 14:28:58 GMT 1
Hi Rich You are welcome mate. Ebay sell kits, so that my be a route you can take if you don't have a supplier near you. Now you know the sizes you can narrow down your search Des, I will get some pics of the paintwork but am working on recessing the rear light at the mo so only have the tail unit on the bike. It's a diy recess of the light unit so a bit of fiddling around. Hopefully get some pics of that too a bit later on Dusty |
|
|
|
Post by dusty350 on Dec 18, 2016 23:07:08 GMT 1
Hi So today I finished the recessed rear light. I used a specially made bracket bought from OEB on my blue hybrid but I know he sold them all, so I needed to make something up myself. As you can see from the previous pics, I pre cut the rear tray and offered up the light unit. Then a trip to my local builders merchant to buy 2 "L" brackets, which I then cut to suit and opened up some mounting holes to allow some ability to adjust the light unit. I mounted it onto some rubber sheet I had to add some damping and it was more or less job done ! 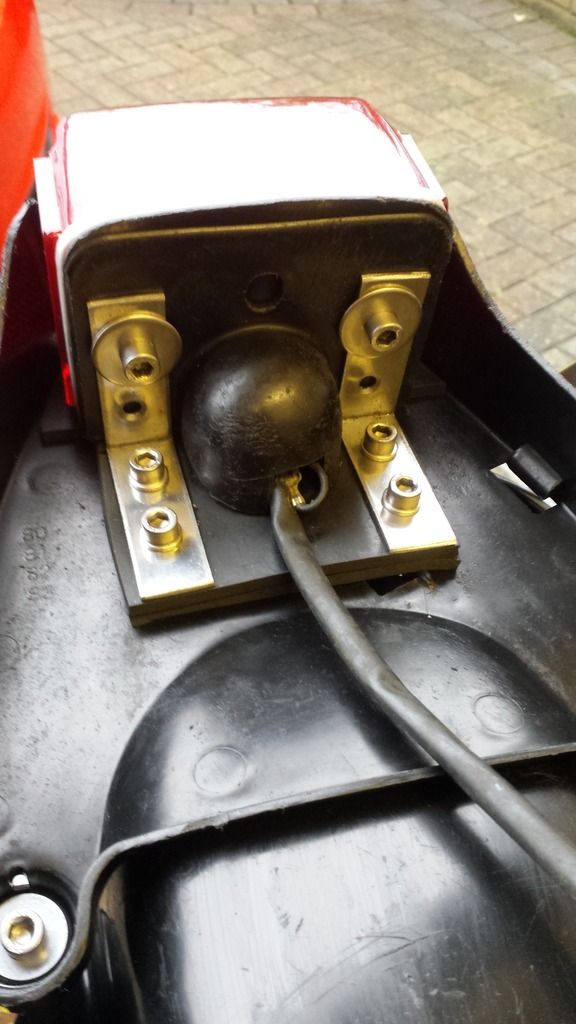 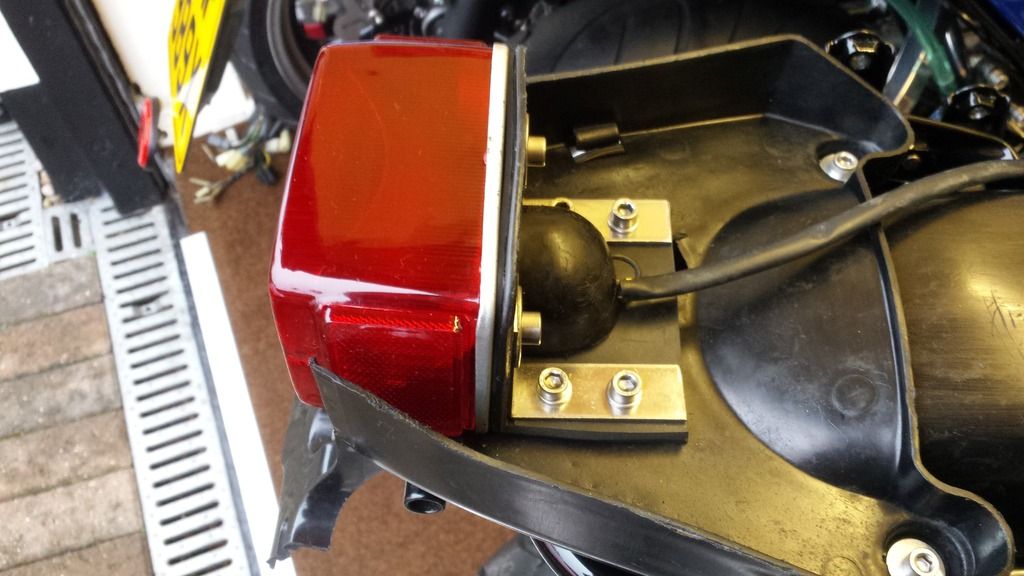 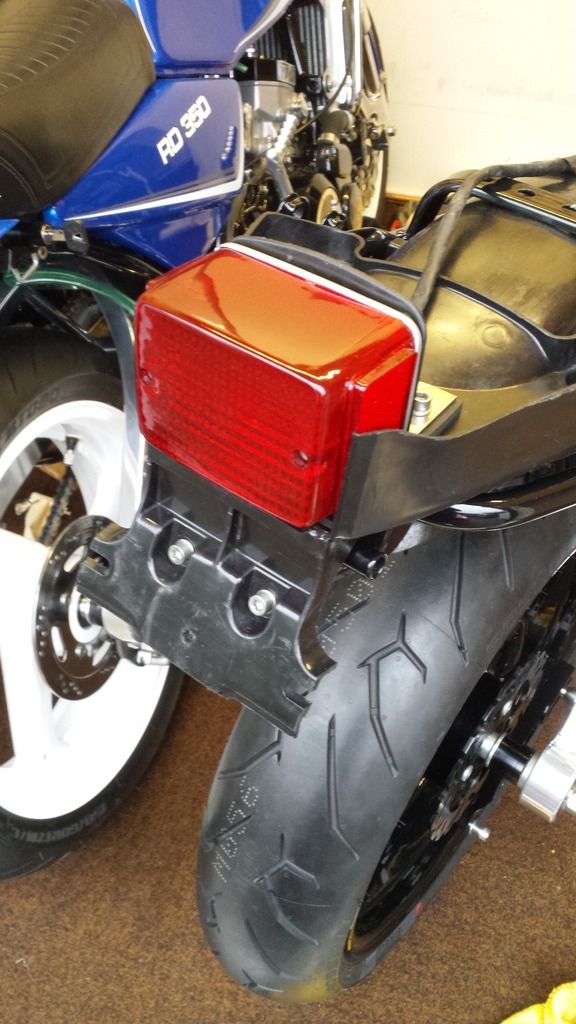 The brackets cost a grand total of 60p !! The rear light sits really well, and feels solid. I fitted a new red lens from Norbo which I think looks better than the clear lens. And with the new tail unit fitted, with new rubber mounting washers from Norbo, and grab rail bungs on the newly powdecoated grab rail; 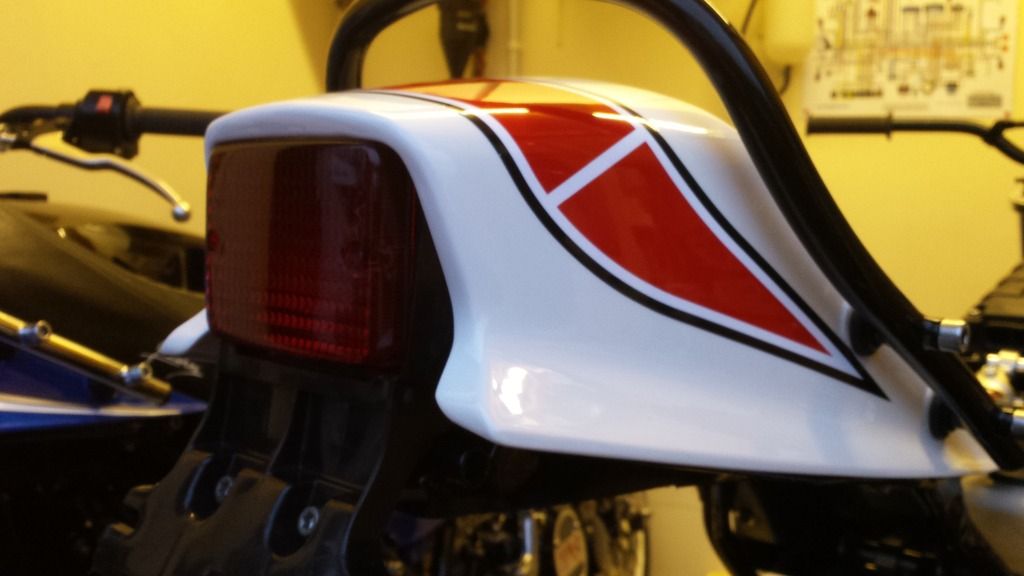 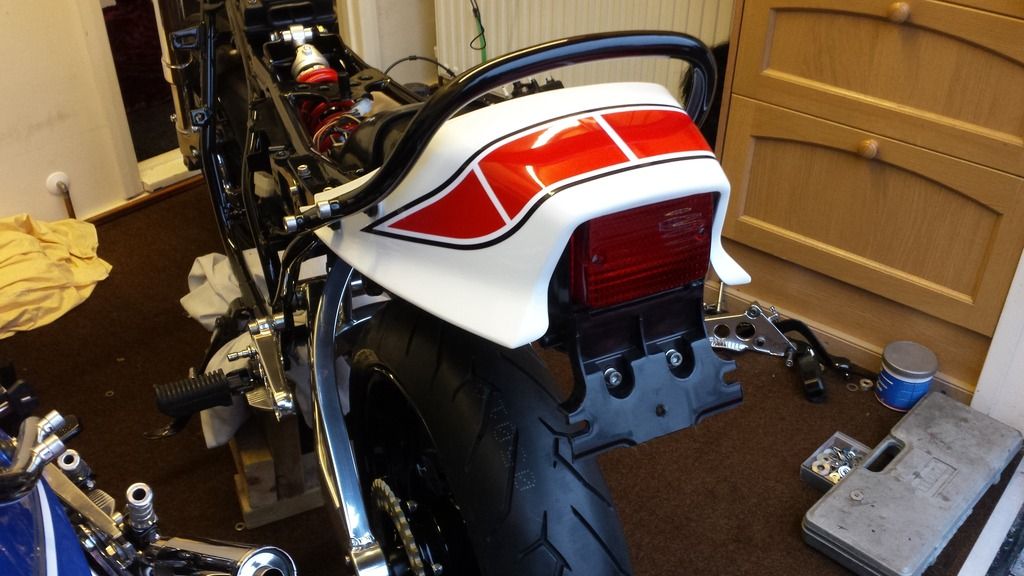 And the new tank and panels; 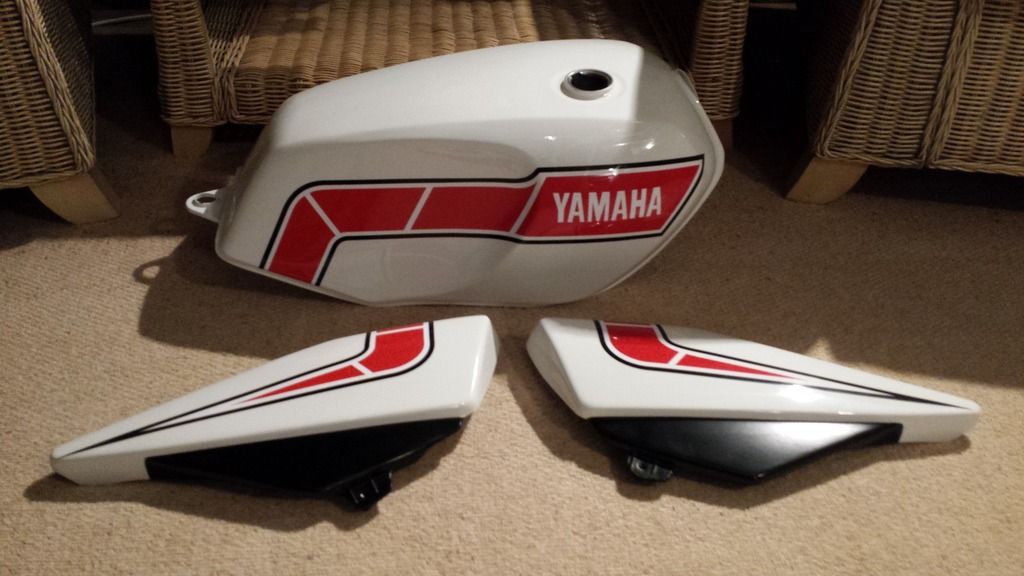 Dusty |
|


 . Any effort made can show good results, virtually cost free. Just getting them free of 35 years of crud makes them look better, and it's the small jobs that add up to the overall look imo.


