|
|
Post by dusty350 on Oct 22, 2016 19:08:46 GMT 1
Hi Don't really need another project in my life, but this unfinished build turned up on ebay and I hit the BIN button before I could talk myself out of it !! This is the bike at the moment; 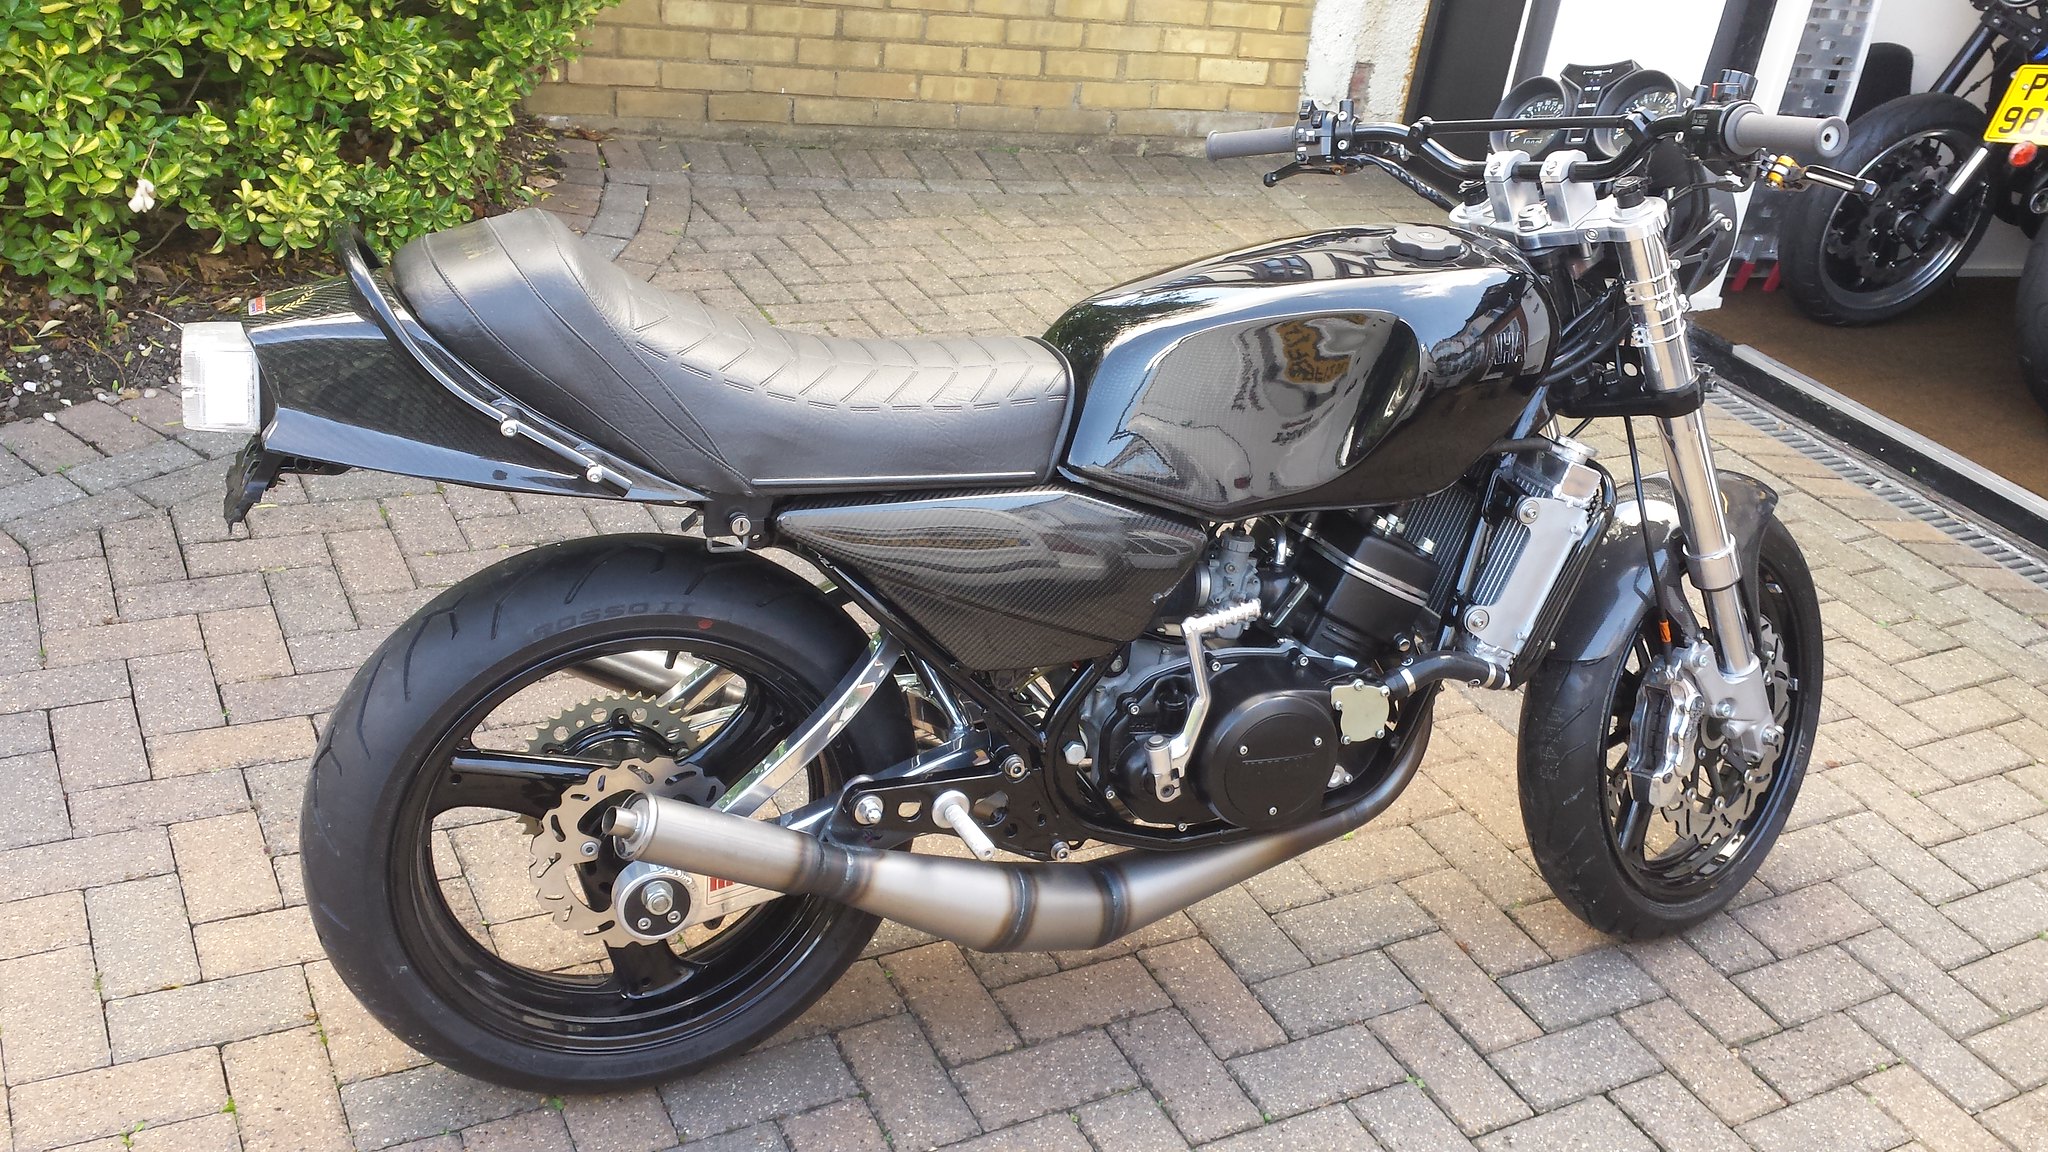 20161020_120553 20161020_120553 by David Miller, on Flickr Really nice fella owned it. Sold as he was moving house and had some big bills to pay  He got a friend who buys and sells Lc's to source as good a frame as he could find. So this German 4l0 was the start of the build, straight and with all lugs intact, It was treated to a gloss black powdercoat which is really nice. Rgv forks were sourced, oil and seals changed, and then polished. The bottom Rgv yoke was modded for new lock stops, and the top yoke is an alloy NK Racing item. Bars are powdercoated Renthals, NOS yam switch gear, and an Rgv master cylinder with alloy fluid pot. The shorty levers are made by Titax, but not sure what the clutch perch is from ? Clock bracket is coated and new clock cases have been fitted. The front wheel is powercoated, with a new Pirelli tyre fitted. Wavy front discs are gripped by some lovely 6 pot Beringer Aerotec calipers, and new Goodridge hoses. Rear wheel is Rgv, powdercoated, with a wavy disc and new Pirelli tyre. It's fitted to a new Metmachex Lc/Rgv swingarm. Footrest plates are cut down and powdercoated and currently have rear set style pegs fitted. The engine has been rebuilt apparently, but has no fluids. The carbs are running foam filters. The pipes are brand new steel Gibsons. The tail unit and side panels and front muddie are new carbon items, and the tank was resprayed in black and then hydro dipped to add a fading carbon effect. Seat is a fibre glass based item - looks a bit like a gully seat. So it's basically a dry build so far, and needs some work and a few parts to finish. The plan - sounds simple if I say it quickly !! Strip the bike, clean it and rebuild. Add a new YSS shock - it's got a tired standard shock fitted at the mo. Add indicators, and standard footrests rather than the rearsets. Fit an oil tank - currently missing one. Fit an airbox, I have a really nice one in the garage and prefer it to filters. I plan on using my 350 engine that is on the bench, halfway through a rebuild. Engine will be standard. Hopefully get the exhausts chromed, and that's about it !! I'll post pics as I do bits. Regards Dusty  . |
|
|
|
Post by yamark on Oct 22, 2016 19:31:02 GMT 1
Very good buy Dusty. So much that has been done looks to have been done very well. I have a clean, unstained two stroke tank if you need it mate 
(I knew you'd have the bike in a thousand bits before too long) |
|
|
|
Post by dusty350 on Oct 22, 2016 20:18:01 GMT 1
Pm'd you about the oil tank - cheers mate The previous owner recommended going through it as it was a dry build. Stripping it and getting back to a rolling chassis will take a day as everything is already done. Engine will come out and get a look over, but I may well sell it and fit my other 350 lc engine that needs finishing, so it will be a good reason to get it done. I know you have some good contacts - do you know anyone for chroming ? Dusty |
|
|
|
Post by yamark on Oct 22, 2016 20:24:52 GMT 1
PM sent
|
|
|
|
Carbon Lc
Oct 22, 2016 21:12:21 GMT 1
via mobile
Post by lcyoungboy on Oct 22, 2016 21:12:21 GMT 1
Looking forward to seeing this finished Dave |
|
|
|
Post by jon on Oct 23, 2016 9:40:11 GMT 1
Dusty, on the chroming front, why don't you ask Tony at Gibsons?
Last time I checked he was charging £150 on top to get his pipes chromed.
I think this is very good value personally.
I recently got a few small bits chromed (LC headlight rim, grab rail and kickstart) at my local platers. Cost was £115.
That reminds me I must post progress on my projects, as I haven't for months.
Jon
|
|
|
|
Post by dusty350 on Oct 23, 2016 13:17:08 GMT 1
Cheers Jon Yea, that would be a good call. I know he got the pipes on the 385 black chromed for the previous owner, and they weren't Gibsons. I will give them a call in the week. Cheers Dusty |
|
|
|
Post by 0h5h1t on Oct 23, 2016 17:09:50 GMT 1
the bike looks lovely Dusty, will look even better though when you have had it a month or two i'm sure.
|
|
|
|
Post by rostrumorhospital on Oct 23, 2016 20:07:36 GMT 1
looks real tidy, good luck with putting your stamp on it, no doubt it will be a cracker
|
|
|
|
Post by dusty350 on Oct 23, 2016 20:54:45 GMT 1
Cheers fellas, The hard work is done. Just strip it, clean it, make sure it's all ok which I'm pretty sure it is, then get the rolling chassis back together. I intend to use the engine that's on the bench as it's had everything done to it by the time it's finished, and I wont get my money back if I sell it - don't need a spare so I will probably move the one in the bike on. Add an airbox and oil tank too. I've got a list for Norbo, and will order my YSS tonight Hope to start on it soon Dusty |
|
|
|
Post by dusty350 on Oct 27, 2016 21:50:45 GMT 1
Hi Collected a few bits this week. Got my YSS from Brookesbarn, and Norbo came up trumps (as always), with 2 new footrests, rear brake spring, 2 grab rail bungs, a rubber buffer for the rear tank mount, a stainless top bearing cover and twin copy Lc horns. I bought a few stainless bolts today to replace a few tired fasteners, and found the spares that came with the bike; 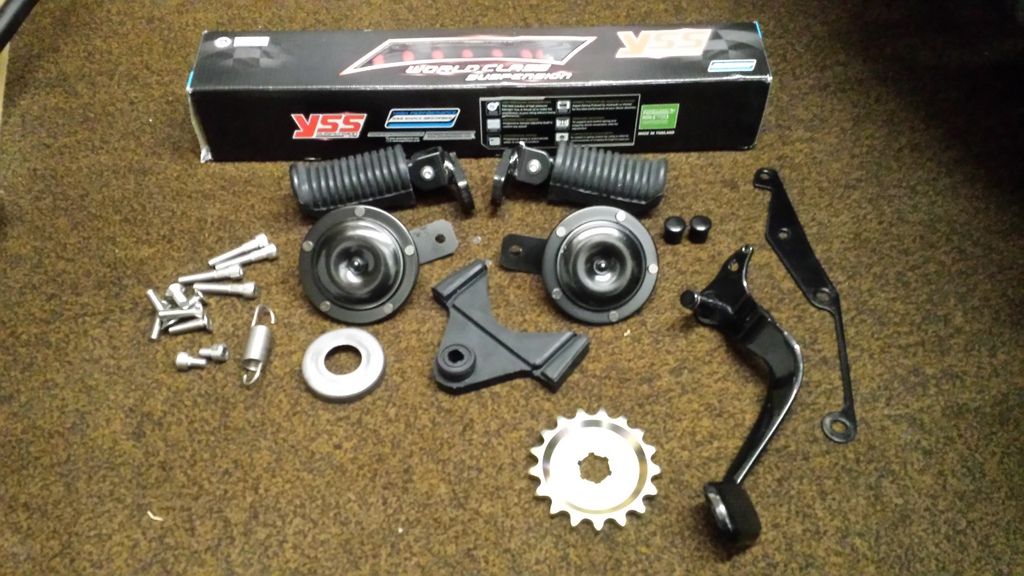 The footrsets fitted to the bike had rearset pegs that I didn't want, hence the standard ones from Norbo, but the standard plates had been modded by the previous owner as he had toyed with the idea of a thumb brake for the back but never actually bought it. The right side was modded so it was missing the heel rest, return spring pin and the alloy casting that located the lever adjusting bolt; 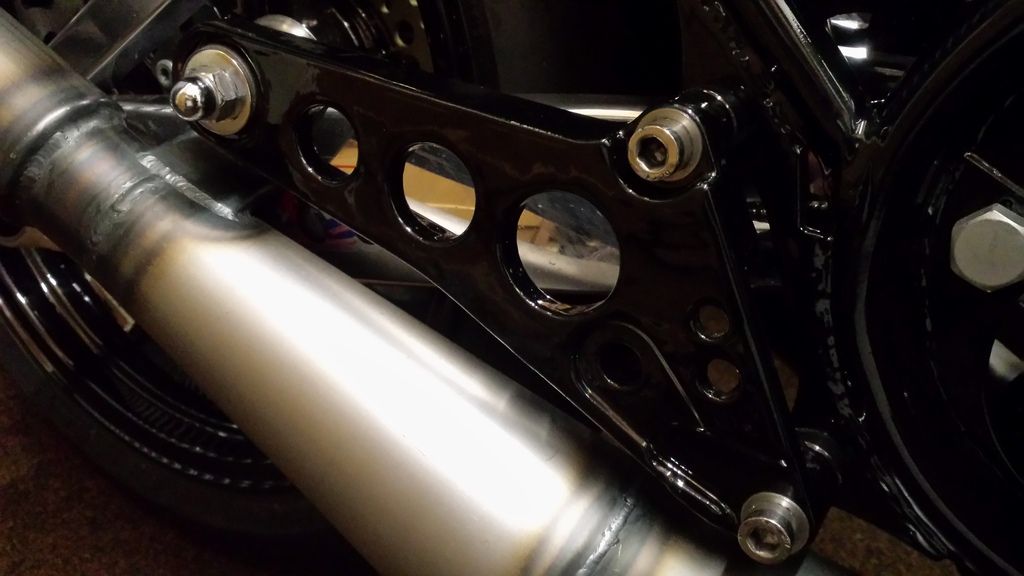 The left side was missing the standard mount for the gear change lever as it had a rearset peg and lever set up. I decided the best and easiest option to reinstate a standardish set up was to use some spare footplates I had in the shed. I like the look of the black plates as the pillion pegs had been cut off, so I spent an hour in the shed replicating them;  Will drop them at the powdercoaters tomorrow for gloss black. Other problem I found was a broken wire in the back of the generator, so need to get that sorted. Still some parts to buy, but hopefully start the strip down soon. Dusty |
|
|
|
Post by rostrumorhospital on Oct 27, 2016 22:57:53 GMT 1
Dusty - I got my footrest hangers powder coated silver, but the finish was terrible, was told the heat involved in powder coating brings out the dirt in the casting, was full of pin holes, and ended up rubbing them down and painting them.
Just a heads up on my experience, could maybe be different with other powder coaters.
HTH
|
|
|
|
Post by dusty350 on Oct 28, 2016 7:16:00 GMT 1
Hi I've had that experience too, mainly with the air escaping from the castings in wheels. The footrests already fitted have gone through the powdercoating process well but that doesn't mean the others will of course, but as it's too much work to alter those fitted I thought I would get these spares done. The only other thing that I did consider was polishing the new ones. There is a lot of black/dark grey on this bike and I feel that it could do with "lifting" it a bit. Chrome pipes will help and decals too but it's still predominantly a black bike. I might think a bit longer on it before going for powdercoat. Dusty |
|
|
|
Post by mouse on Oct 28, 2016 8:06:17 GMT 1
Think this going to be a really nice bike Dusty
Mouse
|
|
|
|
Post by yamark on Oct 28, 2016 8:50:38 GMT 1
I think polish them Dusty. Try them and if "over blingy" go the powdercoat route. Think a few more shiny bits would suit the bike. Good progress mate
|
|
|
|
Post by headcoats on Oct 28, 2016 9:19:17 GMT 1
Leave the alloy bare and don't cut off the rear footrest mounts , that's the law  |
|
|
|
Post by JonW on Oct 28, 2016 12:28:21 GMT 1
I powdercoated mine recently and they came up fine, the more you clean them, the better they come out.
Also, if you heat them first, ie do a full heat cycle hotter than the powdercoating will be it tends to let the gasses out, they call it out gassing or off gassing i think.
|
|
|
|
Post by jon on Oct 28, 2016 19:34:50 GMT 1
I've had a similar thing said to me by my local powder coaters.
They warned me my wheels may do a similar thing. More so if they had polished rims, as the polish sinks into the porous caring.
Not possible with wheels, but can you try ultrasonically cleaning the footrests first if you decide to powder coat?
Jon
|
|
|
|
Post by dusty350 on Oct 28, 2016 19:47:25 GMT 1
Well, decision made, for the time being 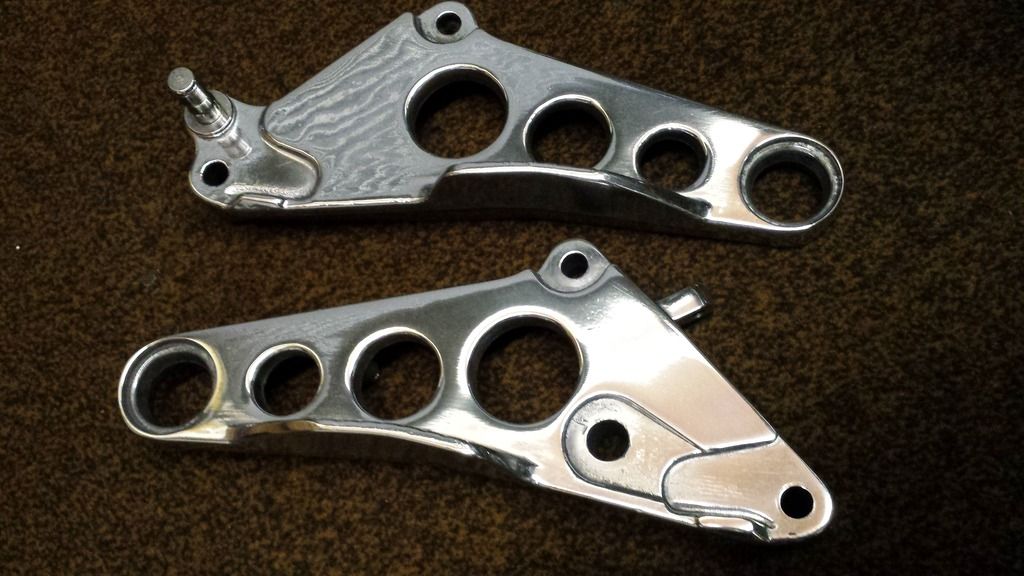 Spent about an hour on each one. Not too shiny but better than they were after rubbing them down. It was such a lovely afternoon I thought I would set the bench polisher up outside and go with polished rather than powdercoated, plus it saved me a trip to Windsor and probably 20 or 30 quid.I will need to mod the brake lever for the master cylinder and get a caliper, but otherwise I have all the components for the back brake. Other things I will change are the rear light - not sure if I like the clear lens although it may grow on me, plus I intend to recess the rear light too. And I might change the bars - they feel really wide compared to the straights I normally fit. Back end looks really low too when it's sat next to my blue hybrid; 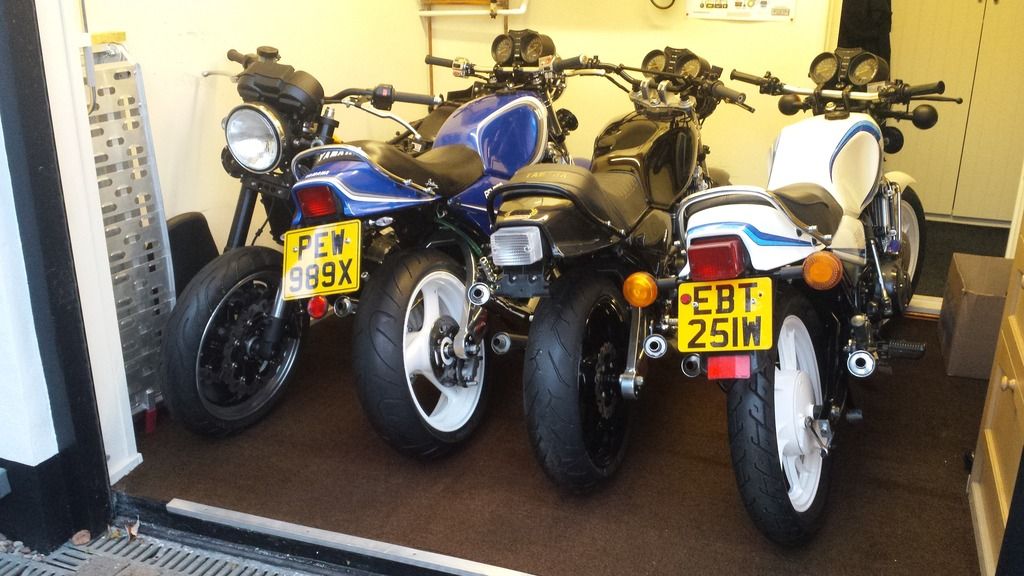 Difficult to gauge it in that pic. The Metmachex adjuster is set at the top of it's travel so that affects ride height, plus the blue bikes shock is at full extension so that adds another 10mm, so the carbon bike will sit a fair bit higher when it's rebuilt. Dusty |
|
|
|
Post by rostrumorhospital on Oct 28, 2016 20:01:51 GMT 1
super job on the hangers, think you've made the right choice, and have to agree the clear tail light does seem to be very promenant against the carbon tail unit but reckon if you recess it will look much better
|
|
|
|
Post by mouse on Oct 29, 2016 10:48:03 GMT 1
Hangers look great Dusty, i think that is the right choice, I like the black of the bike, but too much black can be a bit dull.
Keep going inspirational one!
Mouse
|
|
|
|
Post by dusty350 on Oct 29, 2016 13:03:55 GMT 1
Hi I did feel that maybe, with use, the black footrests would soon get marked by boots, so although I do like the look of the black footplates, polishing them is probably the best option. Plus as you say, it lessens the amount of black on the bike and it didn't cost me anything !! Trying to mod the plates that are on there would have taken time and hassle too. I'm thinking of pinching the Brembo caliper and Tyga caliper mount off the 385 to fit to this. The 385 is a long way from being started as a project so it would help get this one ready sooner. Dusty |
|
|
|
Post by dusty350 on Nov 5, 2016 16:28:57 GMT 1
Hi Still collecting parts for this. I want everything before I strip it so the build back up is quicker. Yamark came up with a very clean oil tank;  This airbox was originally destined for the blue hybrid until I decided to go with pod filters on that bike, so it can go on the carbon Lc. I treated it to new rubbers and a makeover to make it nice again; 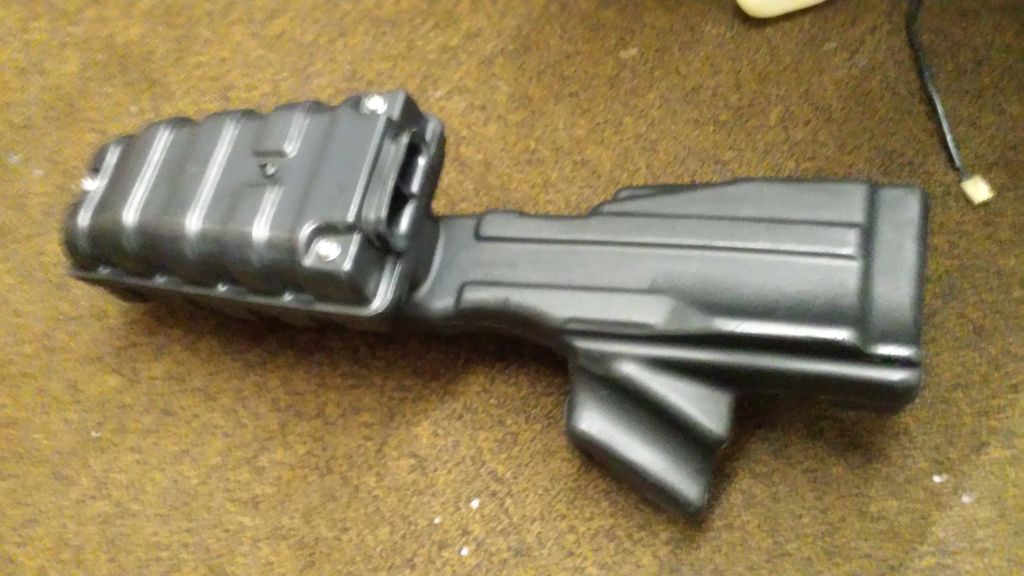 A nice, uncut coil cover was scrubbed up and restored back to black; 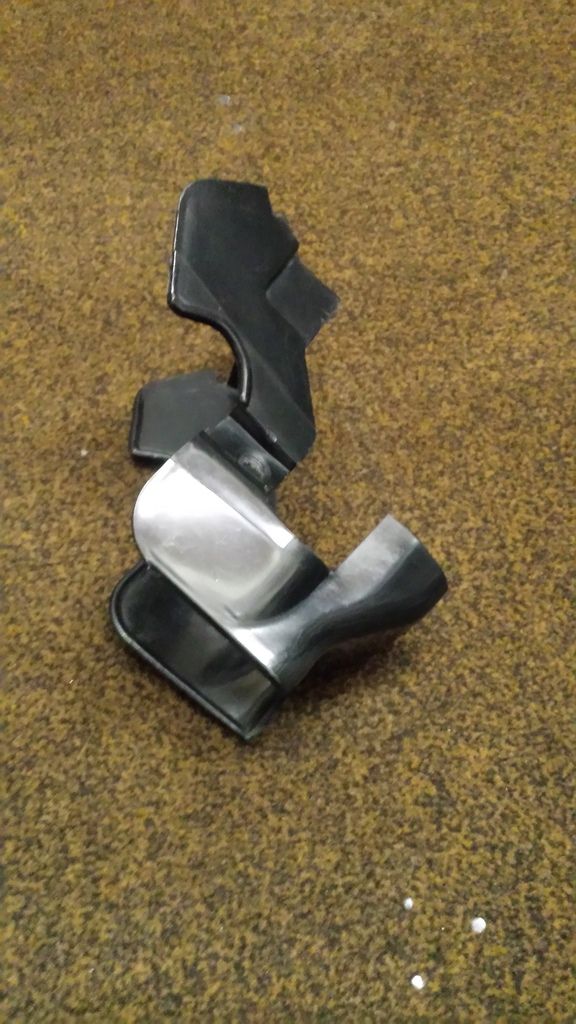 And a spare inner guard that was in really good condition was scrubbed up, and restored back to black again; 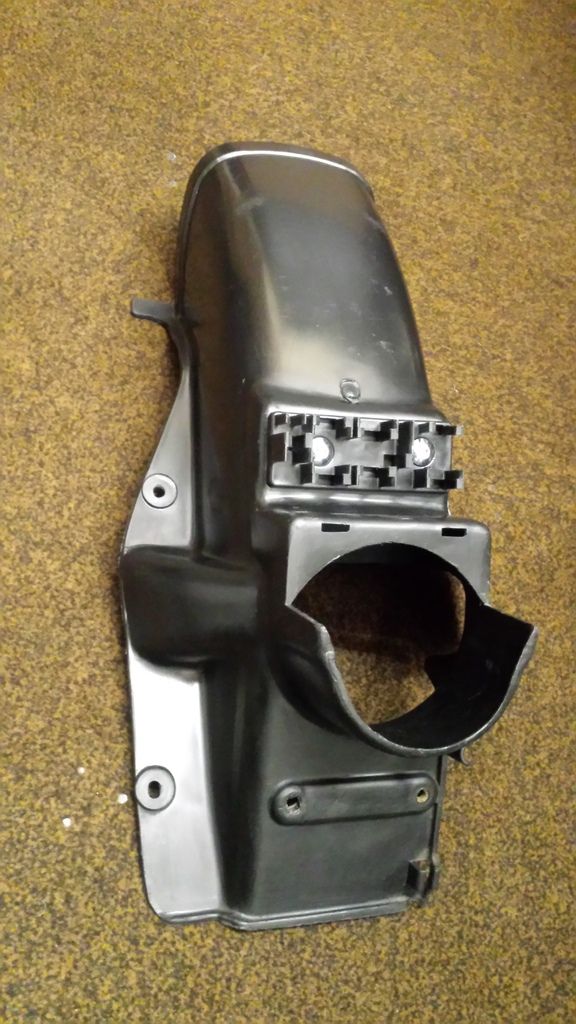 Dusty |
|
|
|
Post by yamark on Nov 5, 2016 17:34:22 GMT 1
I've not seen an inner mudguard that clean and un-marked for a while. Great to catch up yesterday mate , and cheers for all your offers/ suggestions
|
|
|
|
Post by dusty350 on Nov 5, 2016 19:44:01 GMT 1
Hi Cheers Mark. Yea it's pretty clean for a mudguard !! The one on the bike is actually pretty good but I was in cleaning/restoring mode yesterday afternoon so the spare got the treatment to save me taking the bike apart. I decided that I would use the back brake system from the 385 hybrid, so today I swapped the standard caliper carrier from the carbon bike over to the 385 and vice versa; 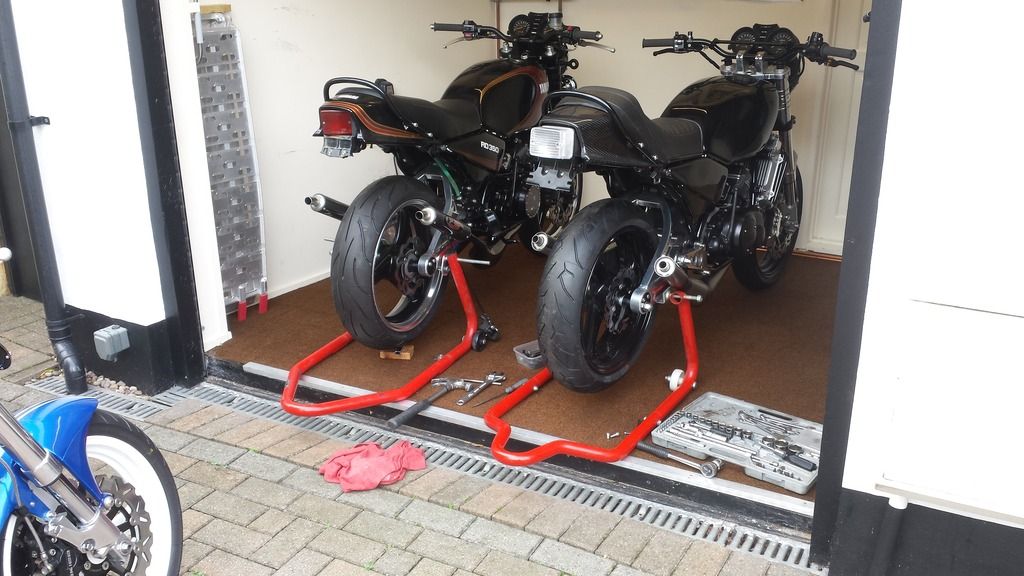 When I re assembled the carbon back end I set the Metmachex spindle to the 6 o clock position - it's amazing how much it lifts the back end. Sitting on the bike now feels much more comfortable - height wise. The polished hangers are now on the bike with the new footrests, and the 385's brake pedal which has the required modification for the actuating rod for the rear master cylinder;  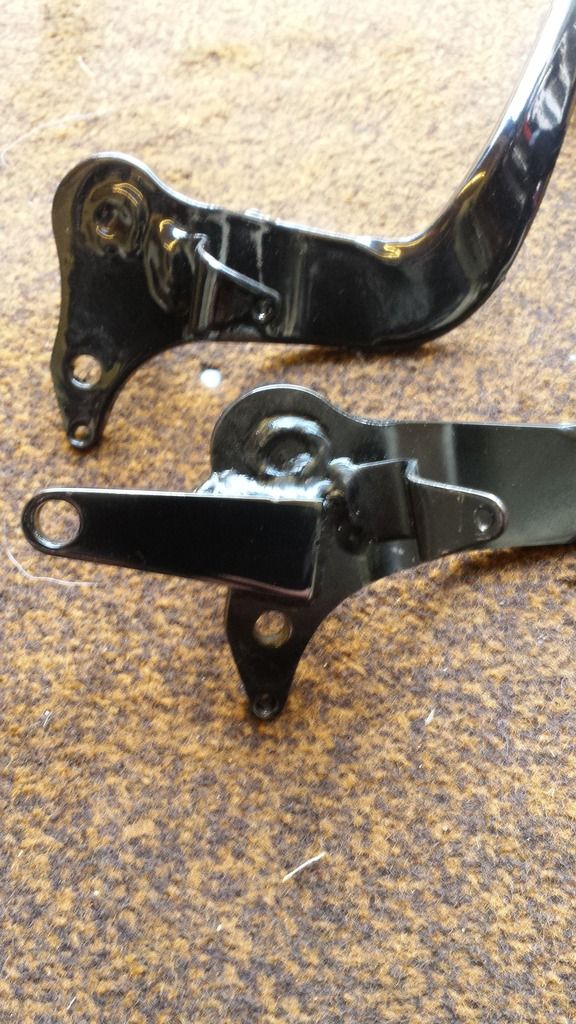 Will need to find a different brake return spring as the standard spring is too big and affects the rod pushing into the master cylinder - I've got one on the blue brid so will replicate that. Dusty |
|
|
|
Post by dusty350 on Nov 17, 2016 17:50:12 GMT 1
Hi So the carbon bike came with a lightened flywheel, which I thought I would try on the engine that I am rebuilding to go in the bike;  It had a bit of light corrosion on one edge so I polished it out. Just out of interest, I popped the standard rotor on the scales; 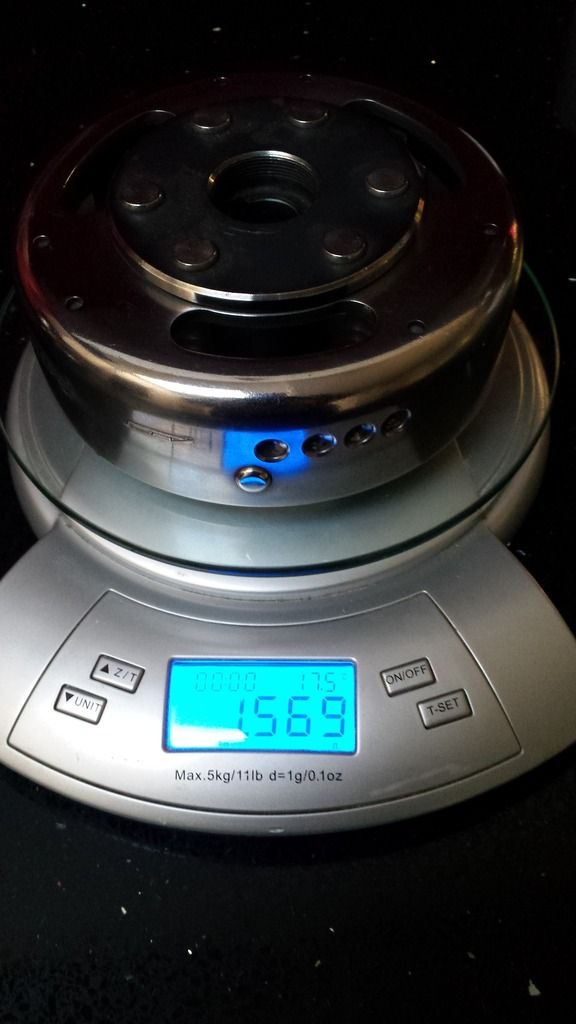 And then the lightened rotor; 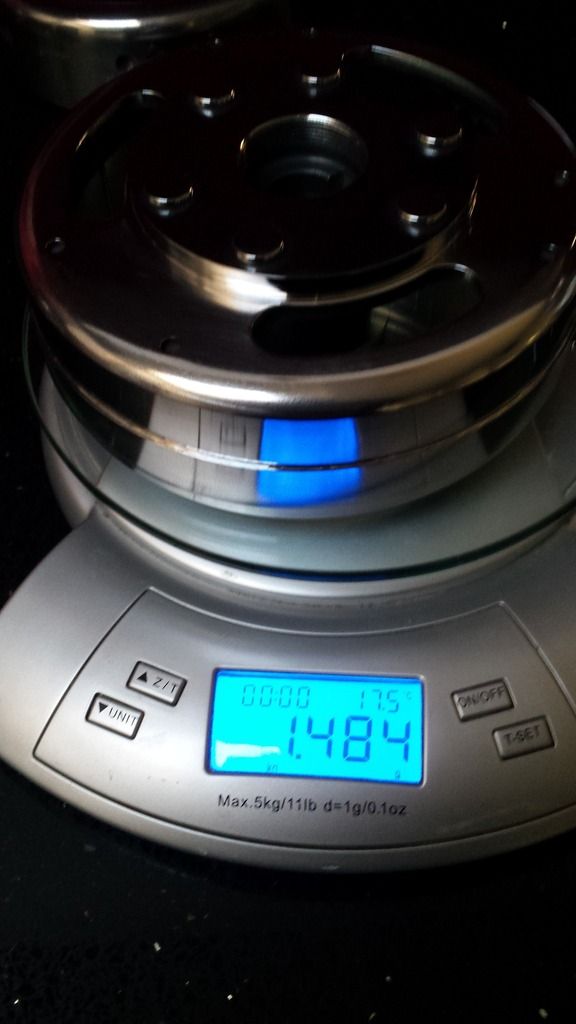 A difference of 85 grams, a saving of a little over 18% if I have done my sums right ? Not sure what that equates to in real world riding - faster pick up maybe and less stress on the left side of the crank but that's all I believe.Be interesting to hear what others think that are running with them. Regards Dusty |
|
|
|
Post by jon on Nov 17, 2016 21:11:12 GMT 1
IMO I don't think it's worth lightening an RD flywheel.
The amount of material you can remove before it is likely to self destruct is minimal.
Coupled with the fact that it is already quite light to start with. When the practice of lightening was considered on some other bikes it was because it was weigh (sic) heavier than the RD so made some sense.
Yes it's true that making a flywheel lighter will take some load off the crank IF it remains balanced. If not then you are actually increasing the load on the bearings.
Yamaha balanced their flywheels by drillings round the perimeter. It follows a flywheel with many drillings needed a lot o weight in one area.
When you lighten the you will upset the balance if it has any drillings. The more drillings the more you will in-balance it.
That of course assumes that when skimmed it is perfectly central, or more in-balance is introduced.
Jon
|
|
|
|
Post by dusty350 on Nov 18, 2016 8:17:10 GMT 1
Hi Jon, Interesting points there. I had a look at the exchange rotors in Norbo's shop and they look to have had much more material removed than mine, both from the circumference and the face of the rotor whereas mine seems to have left the front face untouched. The drillings are still visible - obviously shallower than standard. I reckon there has been maybe 1 or 1.5mm removed from the circumference of this rotor so not too radical. How would you go about checking it for balance ? Dusty |
|
|
|
Post by steeley on Nov 18, 2016 8:58:27 GMT 1
Hi dusty , I think I have some measurements of the rotor on my lc . had it machined by a friend of mine years ago /20 plus I think. I didn't have it balanced and have had no problems with it .there is a bit more missing on mine than yours . nice project by the way. oh I think you will find if there is a double seat fitted you will need rear foot pegs . you could incorporate a set to go at the exhaust mounts.
|
|
|
|
Post by dusty350 on Nov 18, 2016 9:31:31 GMT 1
Hi Steeley, Thanks for that - good to know. I have a spare pair of rear pegs - I thought that was the case regards pillion pegs - I will bolt them straight on to the exhaust mounting point then remove again after MOT. Thanks mate Regards Dusty |
|


