|
|
Post by 4l04ever on Nov 26, 2018 0:59:56 GMT 1
You may be able to get the seal surface built up then ground back down to perfect size. I have heard of this being done with crank shafts... Maybe something like this company does :- www.bmspc.co.uk/componentreclamation.htm |
|
|
|
Post by Tobyjugs on Nov 26, 2018 5:56:42 GMT 1
There are special thins sleeve's on the market which slide over the old running surfaces. These are wafer thin. I have used them to repair water pumps, i do not have an address. You warm them up and they shrink fit onto the old running surface.
i would try this first. You could also send it to some to get it metal sprayed (expensive). Or get in touch with Dejan on here and see if he has the correct size for sale
|
|
|
|
Post by dusty350 on Nov 26, 2018 8:12:43 GMT 1
Hi Alan Genuine crank seals everytime. There are horror stories on here when guys have used pattern - some failing after less than 1000 miles !!  The other place they can leak is from the square keyway on the primary gear end of the crank. That little block sits in a fairly big groove that can sometimes leak. I buy a new keyway every build - 90282 07023 - £2.94 from Fowlers, and they have them in stock for next day delivery. Hopefully a new genuine seal(s) and a new key will solve the issue. I "polish" the primary gear with a fine abrasive block normally, and now use red rubber grease to ease it into the new seal. Dusty  |
|
|
|
Post by alankelly on Nov 26, 2018 11:43:58 GMT 1
Hi all thanks for the info
I think I will first try a light polish, new Yamaha crank seals and key as per Dusty’s suggestion as if I still have a leak in this area it is easy to remove the gear for repair or replacement without splitting the cases again🙁
Also I like Dusty’s idea about the key being a possible source of the very small leak as I looked at this area to understand how the gear “seals” around the crank and you are relying on the gear and key being s perfect fit on the crank with no gaps to prevent a possible air leak down the bore or keyway of the primary gear. But I see there is a small counterbore in the back of the gear and maybe if an oring was added here you would create a perfect seal to prevent any possible air leak down thru the gear or keyway
Just an idea
Catch soon
Best wishes Al
|
|
|
|
Post by alankelly on Nov 26, 2018 12:43:35 GMT 1
Quick update
Grooves are about 0.04mm deep 😁 so will try to polish out first
|
|
|
|
Post by dusty350 on Nov 26, 2018 18:24:45 GMT 1
I think I'm right in saying that early aircooled's had an "O" ring on the end of the crank as standard ?? You can do the pressure test with the clutch casing off of course, so easy enough to do the soapy water test around that area. Dusty |
|
|
|
Post by 4l04ever on Nov 26, 2018 19:16:08 GMT 1
I put some Yamabond on the key and the back of the gear to make sure it was all sealed up.
|
|
|
|
Post by alankelly on Nov 26, 2018 19:40:09 GMT 1
Hi Dusty / 4l0l That some interesting information and make perfect sense to ensure a better seal where the primary gear mates with the main bearing / shaft So now looked into this o ring idea earlier today and have found an O ring that fits just right on the shaft and inside the tapered c/bore within the primary gear 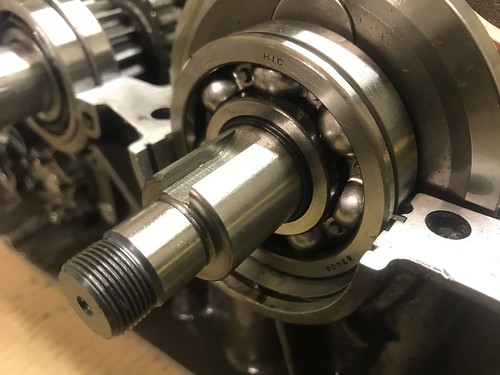 IMG_5775 IMG_5775 by Alan Kelly, on Flickr Also polished up the sealing face on the gear and looks good and it has only reduce the diameter in the seal area by 0.04mm and see no reason why I now should not get a good seal with the Yamaha crank seals when I fit them :-) 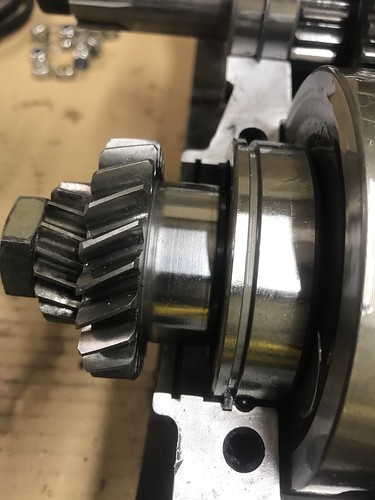 IMG_5781 IMG_5781 by Alan Kelly, on Flickr Lastly, I think I will also use a bit of Yamabond on the back of the key also (Thanks 4l04 that's a really good idea) to prevent any leak in this area so hopefully this part of the engine is 100% leak free All seems a bit OTT but they are really easy fixes Thanks to all. for all your help so far Catch up again soon Best regards Al. |
|
|
|
Post by 4l04ever on Nov 27, 2018 0:57:07 GMT 1
You can pull the crank primary gear after a leak down test if it is not perfect. Make sure to oil the crank where the seals fit. :-)
|
|
|
|
Post by bezzer on Nov 27, 2018 7:56:54 GMT 1
Quick update Grooves are about 0.04mm deep 😁 so will try to polish out first Hi Al, The build is really coming along 👍🏻, good to see the mods/improvements still flowing 🤗👍🏻 Out of interest, what method did you use to polish out the seal grooves?. With my rudimentary secondary school metal work skills, I remember using fine emery paper and oil while the work was rotated in a lathe Chuck! 😳😁 Top work Mate, thanks for sharing it. bezzer |
|
|
|
Post by dusty350 on Nov 27, 2018 8:17:42 GMT 1
I use a spongey abrasive block - you can buy different grades in Halfords or autojumbles. I use a fine grade, and the fact it's spongey means you wont be removing too much metal as it "gives" a bit when applying pressure - just basically polishing the metal and making it more uniform. The 2 lines made by the seal will polish out. Fitting a new Yam seal will make a massive difference I think, and allied with a new keyway and some Yamabond, I'm sure you will find it leak free  Dusty |
|
|
|
Post by bezzer on Nov 27, 2018 8:42:34 GMT 1
Cheers Dusty, I know the ones you mean, some have differing hardness of sponge side to side, if that makes sense?. Top tip 👍🏻
|
|
|
|
Post by alankelly on Nov 27, 2018 18:47:50 GMT 1
Hi Bezzer
Yes used some 600 wet and dry with a bit of oil and held it in a lathe chuck but first I polished at 90 degrees to the groove to lift out the worse as if you just spin it and polish in line with the grooves you can make the grooves worse
Then once the worst is polished out quickly finished with a quick spin to repolish again with some 800 paper in the direction of rotation
Hope that makes sense
Also genuine yam crank seals base gaskets and a fresh tube of Threebond 1104 have arrived so can restart the reassembly in the next few day👍
Catch up soon
Best regards Al
|
|
|
|
Post by dllc on Nov 27, 2018 19:24:41 GMT 1
Excellent work alan. care to share how you did the clutch conversion?
rgds
daire
|
|
|
|
Post by alankelly on Nov 27, 2018 19:34:30 GMT 1
Hi DLC
Did you mean the change over to a hydraulic
Best wishes Al
|
|
|
|
Post by dllc on Nov 27, 2018 19:45:51 GMT 1
yes alan. was thinking of attempting to try it
rgds
d
|
|
|
|
Post by alankelly on Nov 27, 2018 20:38:58 GMT 1
Hi Dllc Yes no problem to share, will add the fully story / details of the conversion on the site either to this thread or start a new one so watch this space!!! Also do you want just pictures or do you need actual drawings / 3d models? Happy to share what details you need to allow you to copy the design (or what anybody else want to know how it was done) as it was a really neat modification!! And again nice to have something unique on the bike that was made from scratch. And like I said early I have a manky wrist / hand due a skateboard accident four years ago with my lad :-) so it help this out too Here are some initial pictures of the design!! Section of the 3d model I created to initially design based around using a GSF1200 piston for my assembly. 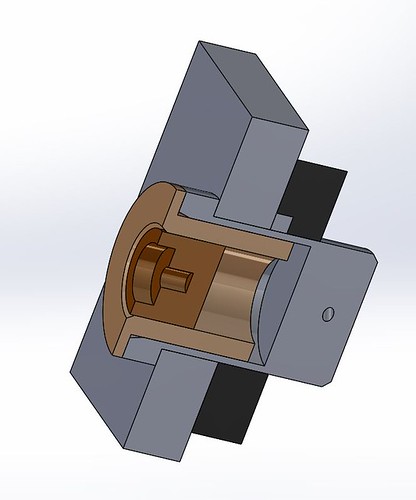 hydralic clutch hydralic clutch by Alan Kelly, on Flickr Cylinder assembly using the GSF piston / seal  IMG_3611 IMG_3611 by Alan Kelly, on Flickr Assembly in case during initial build 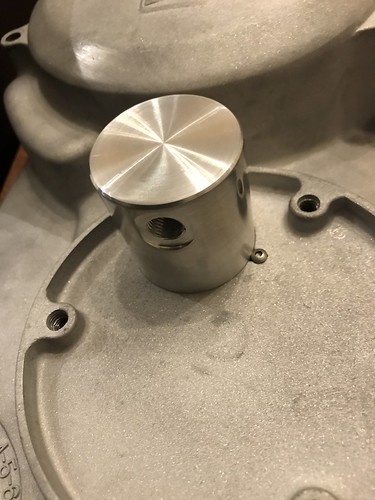 IMG_3616 IMG_3616 by Alan Kelly, on Flickr 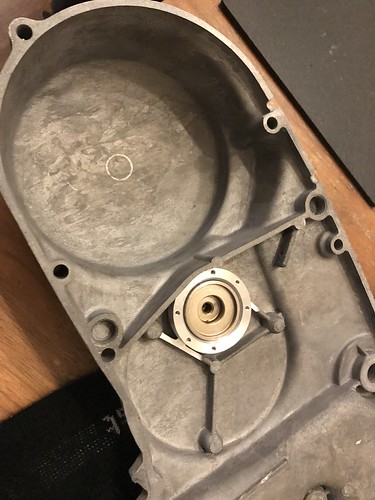 IMG_3618 IMG_3618 by Alan Kelly, on Flickr 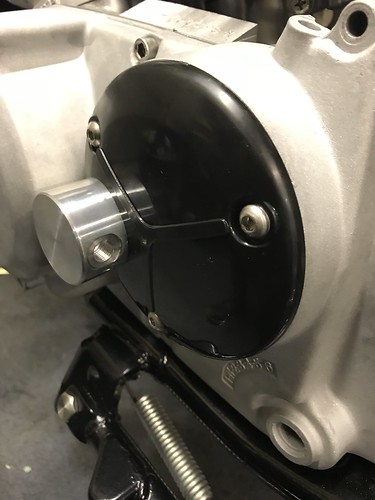 IMG_3619 IMG_3619 by Alan Kelly, on Flickr Final assembly on bike 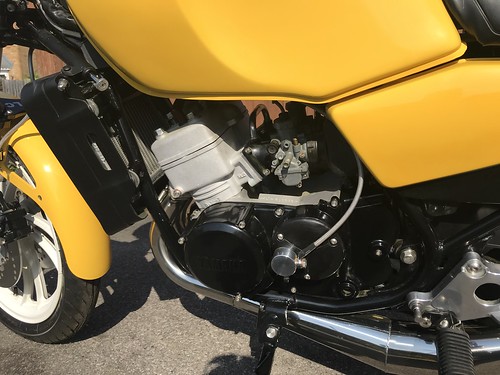 IMG_4470 IMG_4470 by Alan Kelly, on Flickr Like I said, what ever details you need just ask, Best wishes Al. |
|
|
|
Post by dusty350 on Nov 27, 2018 20:47:28 GMT 1
That looks really neat Alan Did you use a standard clutch push rod ? Reason I ask is that I did a hydraulic conversion on an Rd400 years back - same push rod design as the Lc, and I had to mod the push rod so I could make it adjustable for fine tuning the actuation. Dusty |
|
|
|
Post by alankelly on Nov 27, 2018 21:12:03 GMT 1
Hi Dusty Yes used the same clutch push rod and I have made up an adapter to match the GSF1200 piston to the push rod Picture of the fully assembly including now added "dust cover" and fitted adapter rod that fits onto the original LC push rod including the small ball bearing at each end :-) 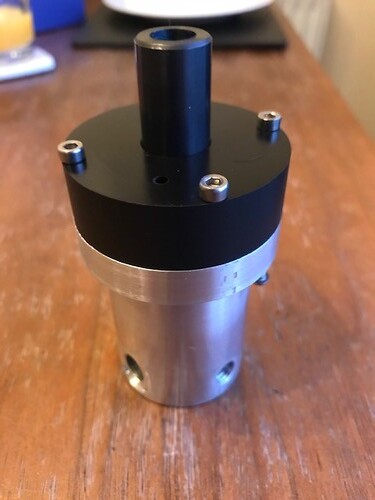 clutch assembly clutch assembly by Alan Kelly, on Flickr To create / work out the design, as I said I used bought on Ebay a cheap 2nd hand GSF1200 slave cylinder and master cylinder and then just used the GSF piston and created a designed a new slave cylinder to create a neat design rather that try to bolt on / bodge an original GSF1200 unit Also the original unit came with a spring inside that is used also in my design that ensures the piston maintains a light contact with the push rod so hopefully I do not need to add a separate adjuster but we will see. Also since then I have junked the original GSF master unit and fitted the following units so the master cylinders / handle bar units are matching  IMG_4824 IMG_4824 by Alan Kelly, on Flickr But with the new units fitted the master bore is 2mm less than the original GSF1200 unit so may need to reduce my clutch piston cylinder from the original 36mm OD to around 25mm OD to ensure about 2.5mm of basket movement but will check this out once engine is back in bike. Catch up soon Best wishes Al. |
|
|
|
Post by dllc on Nov 27, 2018 21:15:42 GMT 1
That's great Alan, plenty food for thought there.
Daire
|
|
|
|
Post by alankelly on Nov 27, 2018 21:18:07 GMT 1
Hi Daire No problem and glad to help. If you need anymore details just PM me and I will send over what you need other than the actual unit . Best wishes Al. |
|
|
|
Post by dusty350 on Nov 27, 2018 21:40:33 GMT 1
Really great job Alan - awesome skills Dusty |
|
|
|
Post by alankelly on Nov 28, 2018 19:26:25 GMT 1
Hi guys
Quick question please
Going to use some Threebond 1104 neo plus to assemble my cases tomorrow as it is what Dusty has used before
I see it much more runny than the loctite SI 5980 that I used first time which had the consistency of dough and I had to spread out with a spatula
Any tips besides ensuring the case faces are squicky clean should I leave it to spread out a little or assembly immediately?
Also as it’s more runny I will prop up the lowel case during application so it is level so it does not “run”
Any advice alway welcome
Thanks all
Best wishes Al
|
|
|
|
Post by alankelly on Nov 28, 2018 19:39:14 GMT 1
Hi Guys
Also wondered if the crank seal side on the alternator side is handed
I see it has some yellow marking on one side
Just want to make sure I do this rebuild right
Thanks to all
Best regards Al
|
|
|
|
Post by dllc on Nov 28, 2018 20:07:41 GMT 1
dont think there any "side" to the seal.
but i am sure dusty will be along to clarify
d
|
|
|
|
Post by midlifecrisisrd on Nov 28, 2018 20:27:01 GMT 1
Not sided
I think I usually face the metal showing side outward
Steve
|
|
|
|
Post by midlifecrisisrd on Nov 28, 2018 20:28:45 GMT 1
Oh and remember the rh side is the wrong way in the diagrams
Castles inward
Steve
|
|
|
|
Post by ian350n on Nov 28, 2018 22:33:17 GMT 1
Cracking looking bike with some great tweaks
|
|
|
|
Post by alankelly on Nov 28, 2018 22:48:23 GMT 1
Hi Ian
Thanks for compliments
Just got to get on top of this engine build and hopefully all will be sorted but thanks has to go to the guys on the forum for all their help advice and top tips
Best wishes Al
|
|
|
|
Post by dusty350 on Nov 29, 2018 8:21:09 GMT 1
Morning Al I agree with the guys, left hand crank seal isn't "sided" as such so either way fitted is fine. 1104 is a bit runny, and very "stringy". Don't think it will run much, but my casings are always on the engine stand so are level anyway. I apply it to the bottom case half which needs to be clean and dry, and I apply with a small flat bladed screwdriver, from the tube. You want a thin bead ideally, but it is a bit too fluid to form a bead if you know what I mean, but as long as there is a bit of depth to it you'll be fine. It's messy stuff - that's why I always do a dry run bolting up the cases and making sure nothing is tight before splitting again and adding the goo. It never fully hardens - just remains like a semi solid rubber, so if it oozes out in places after tightening, leave it a bit and pick it off to give a cleaner looking engine. Once you have applied it I leave it about a minute or two and then fit the top case - it air dries quite quickly Good luck Al, hopefully no more leaks Dusty |
|


