|
|
Post by iwantalc on Jun 27, 2015 19:33:29 GMT 1
dont think your find a genuine lc engine that has had as much done as your ypvs engine with zero road miles.. the bike is looking the dogs bollocks and i think every 1 knows the build on your lc engine is going to be done to perfection all the best dusty ..des
|
|
|
|
Post by fifty50 on Jun 30, 2015 15:57:37 GMT 1
Thank you  Couple more parts arrived this week. The Yss finally got here; 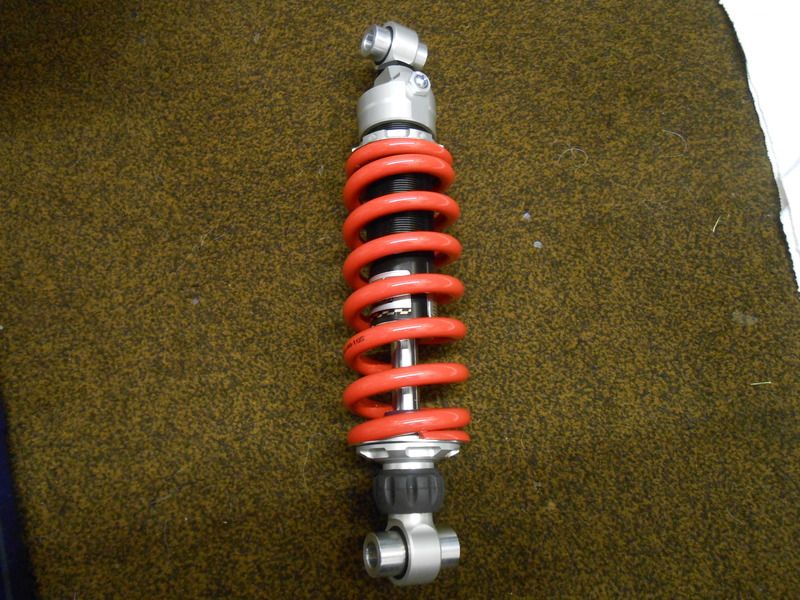 Looks great value for the outlay, so once I mod the chain slipper on the swingarm it can all bolt together. Also my uprated fork springs arrived from The Tuning Shop; 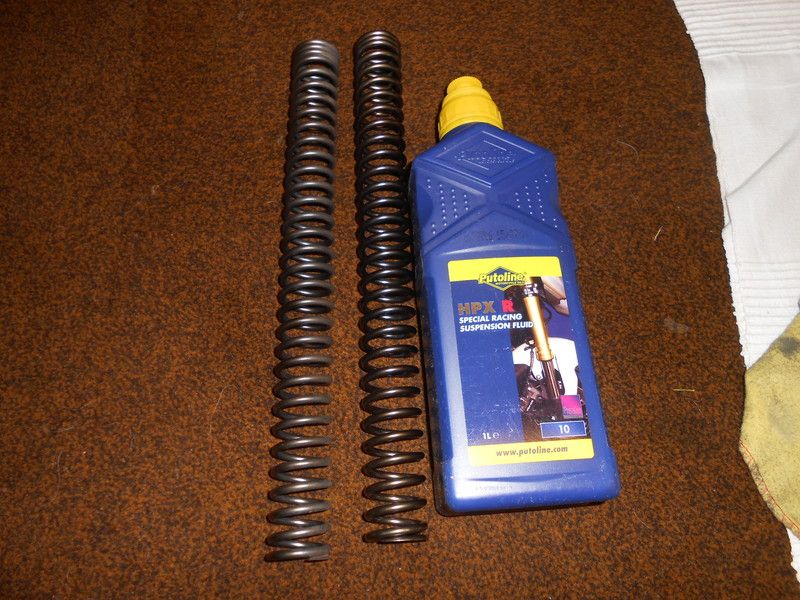 So hopefully the forks will get sorted this weekend, final polish and fit back in. Cheapest part was the indicator mount bought new off ebay for a tad under £9.00 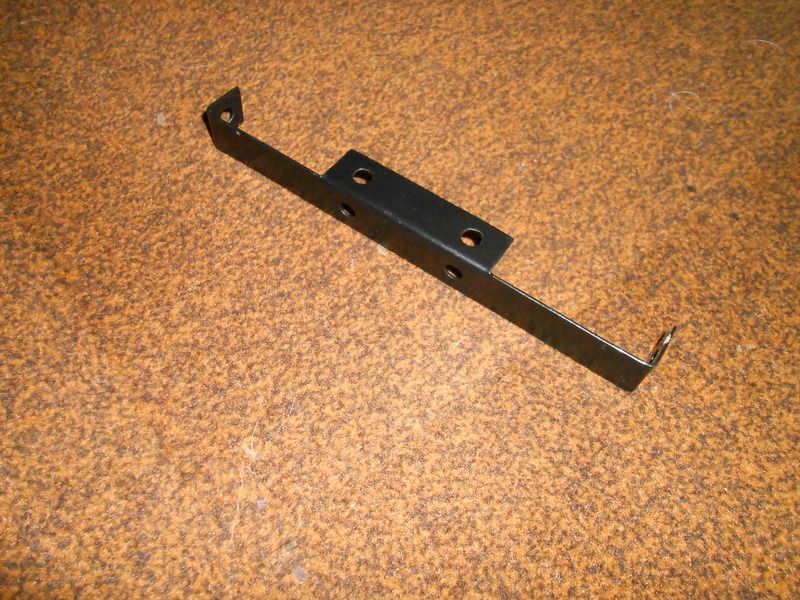 Amazingly, the pre drilled holes line up exactly with the 2 bolts that mount through the number plate mount A quick and easy option if you indicator mounts have been cut off like mine are  Dusty Hi dusty, very nice build, my indicator mounts have been cut off and that indicator mount does look alike a quick and easy option! Ive trawlled ebay cant seem to find anything like it, you wouldnt have a link to it by anychance? Thanks. |
|
|
|
Post by dusty350 on Jul 1, 2015 8:37:04 GMT 1
Hi
Just finishing a night shift so i will try and find the details today. I seem to remember it was advertised as a "universal small tail tidy" or something like that.
Dusty
|
|
|
|
Post by dusty350 on Jul 1, 2015 12:54:45 GMT 1
Hi Item no; 251922870668 Universal small tail tidy, powdercoated in black, pre drilled. Hope that helps. Dusty |
|
|
|
Post by fifty50 on Jul 1, 2015 18:12:53 GMT 1
Thanks dusty, just ordered one. |
|
|
|
Post by dusty350 on Jul 2, 2015 10:56:21 GMT 1
Hi Great - it is slightly flimsy but will do the job for sure Just starting the engine rebuild now. The crank cases are at Cox's in Reading for vapour blasting. They are snowed under at the mo so I've left them there for a week or so. I have just put in an order with Granby's - 4 new gear box bearings, shift drum bearing, all new e clips, new seals and a new pushrod, so when I get the cases back I will be able to start assembling straight away. I will get some stainless bolts and screws too. I will post some pics as I go. Dusty |
|
|
|
Post by dusty350 on Jul 3, 2015 18:05:53 GMT 1
Hi First lot of engine parts arrived from Granby's today. Everything in stock except 1 "E" clip 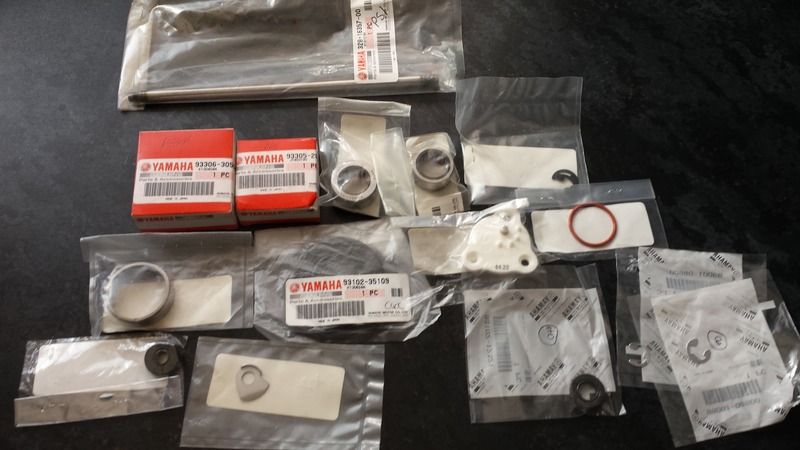 Can't do too much until I get the cases back in a week or so, but I will clean up a few parts like pistons and rotor. Still more parts to order and the crank needs checking over too. I did get my barrels back today with the two bad studs drilled out and helicoil inserts fitted. Turned out to be a bitch of a job but it's done now. The easy out kit I bought originally did come in usefull though when I tried to remove the bolt on the end of the shift drum. I have never yet got one out without drilling the head off, and this time there wasn't enough of the threaded part showing to get grips on, so I carefully drilled down into the shank with various drill bits, tapped in the stud extractor and managed to wind it out - thankfully 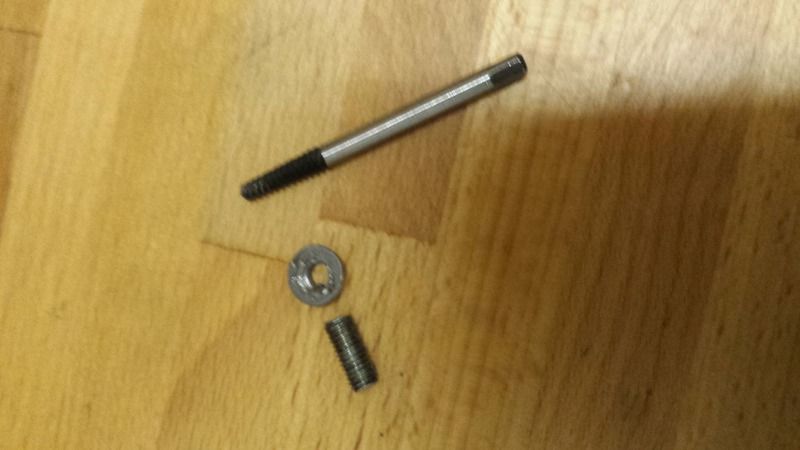 Dusty |
|
|
|
Post by dusty350 on Jul 4, 2015 11:08:25 GMT 1
Hi Cleaned the pistons up this morning, not too bad to start with; 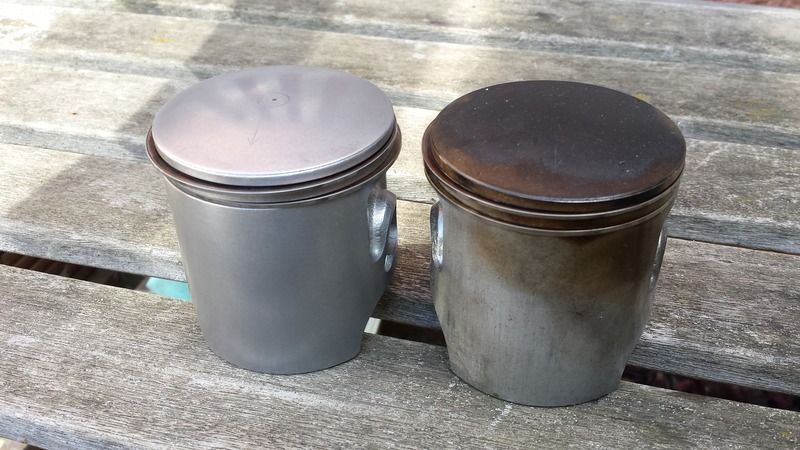 The rotor had patches of light corrosion, so that got cleaned too; 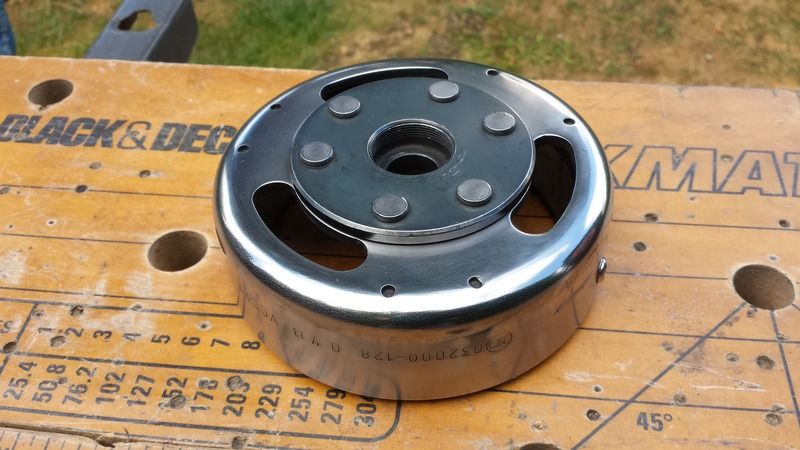 Dusty |
|
|
|
Post by dusty350 on Jul 10, 2015 18:34:54 GMT 1
Hi, Picked my cases up from Cox's today; 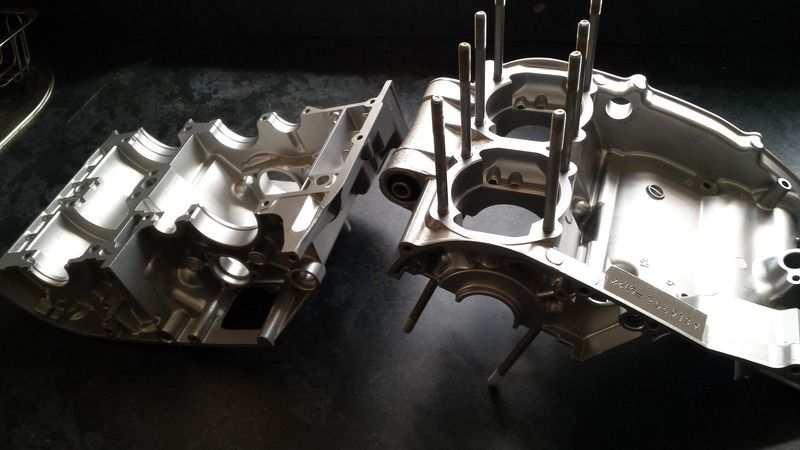 Was going to start rebuilding tonight, but I think I will get a gearshaft bush from Norbo first, so that will need fitting first. Really pleased with the finish on the cases, as usual, and I have given them a further rinse to clear any blasting media. More soon Dusty |
|
|
|
Post by iwantalc on Jul 10, 2015 19:51:09 GMT 1
must say dusty when you set out to do something you definatley dont f**k about cutting corners will be some build when finished cancel that meet up when finished will put my bike to shame lol ..des
|
|
|
|
Post by dusty350 on Jul 22, 2015 22:22:19 GMT 1
Hi Not much done lately. I have been collecting parts for the engine build - got a new gearchange shaft and Teflon bush from Norbo today. Once I work out how much to reem out the shaft hole, I can start to rebuild the gearbox. I ordered a new sump gasket and some o rings from Granby's which means I have all the parts to make a start. Another part I needed was the bracket that sits under the Rgv mudguard and has 2 "ears" for the brake lines. This is approx £55 from Suzuki which is a bit steep. When I went through the box of spares I got with the recently bought Hybrid, I found not 1 but 2 of these brackets ! Result, and I have now fitted it;  Engine build will start next ! Dusty |
|
|
|
Post by gazsellars on Jul 22, 2015 23:40:07 GMT 1
Hi Dusty,
Don't suppose you wanna sell your spare one do you? Didn't even realise I needed one til I saw this post!
Cheers
Gaz
|
|
|
|
Post by dusty350 on Jul 23, 2015 6:46:07 GMT 1
Hi Gaz The hybrid I just bought hasn't got one fitted either so I will be putting it on that. I would add though that before getting one, I imagined it was going to be a sturdy type of brace that was hidden beneath the muddie. It's actually quite a light construction, and it's only real benefit is to provide the "ears" for the brake lines. I wouldn't pay £50 odd for one- I would rather make a basic bracket for the lines to secure them. Regards Dusty |
|
|
|
Post by gazsellars on Jul 23, 2015 7:04:10 GMT 1
No worries Dusty. Thanks for the advice I think that's what I'll do. At least I know what it looks like now.
Cheers
Gaz
|
|
|
|
Post by dusty350 on Sept 3, 2015 10:00:50 GMT 1
Hi Not had much bike time lately, but did manage an hour in the garage to sort the back brake. The standard return spring fouled the master cylinder push rod when you pressed the pedal, so I found a smaller spring in my spares and re-spaced the master cylinder and now it clears it. I also found a nicer master cylinder in the spares I got with the 385lc, so I fitted that; 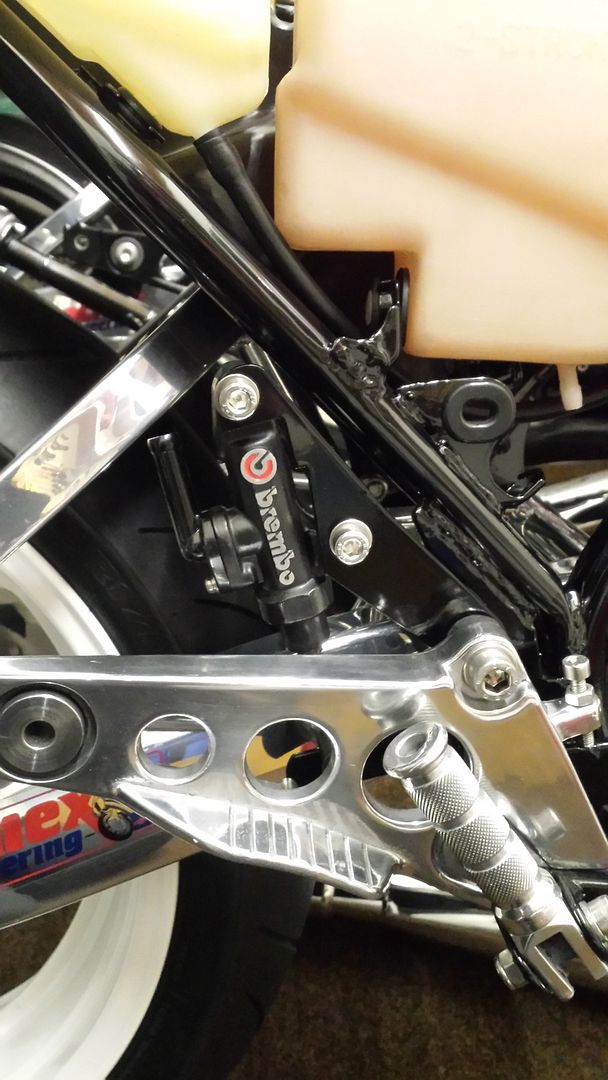 I swapped some parts with Yamark recently and got a better Rgv rear caliper which I will spray black before fitting. Also, I might be fitting the F2 engine after all - need to check a few things first. I will keep you updated !! Dusty |
|
|
|
Post by Topman350 on Sept 15, 2015 16:18:50 GMT 1
Lovely build mate look forward to seeing the end result :-)
Topman
|
|
|
|
Post by dusty350 on Sept 26, 2015 8:32:33 GMT 1
Thanks, I am going to try and move it forward a bit now The Ypvs engine that is sat on my bench, that I was going to sell, then changed my mind  is going into this bike - silly not to really as it is completely rebuilt with zero road miles, plus the servo motor mount was welded in before powdercoating. This engine did have an issue with losing coolant though, and I believe I tracked it down to 2 head studs on the left side which I swapped out for 2 new Yam items. This seemed to solve the issue, but me being me, I have decided to pull the cylinders to check the crank has no signs of corrosion. I was using waterless coolant, so hopefully it will be fine. I bought 2 new Yam base gaskets at immense cost for what they are  , plus a couple of bling parts that will not only look good but improve a couple of things over standard. Hope to pull the cylinder today and build back up. Once I'm happy, the engine can go in and the chrome Allspeeds can go on. I'm using the foam pods, so I've removed the airbox from the frame. I've also bought new silicon hoses in black to replace the red ones fitted, as the paint scheme on the bike is blue/white, and I will also change the red pv servo cables to black. I am probably going with the F2 loom and switchgear after all - electrics are a weak point for me and by using the F2 parts will save on potential problems. Here is the lump at the mo - a before pic 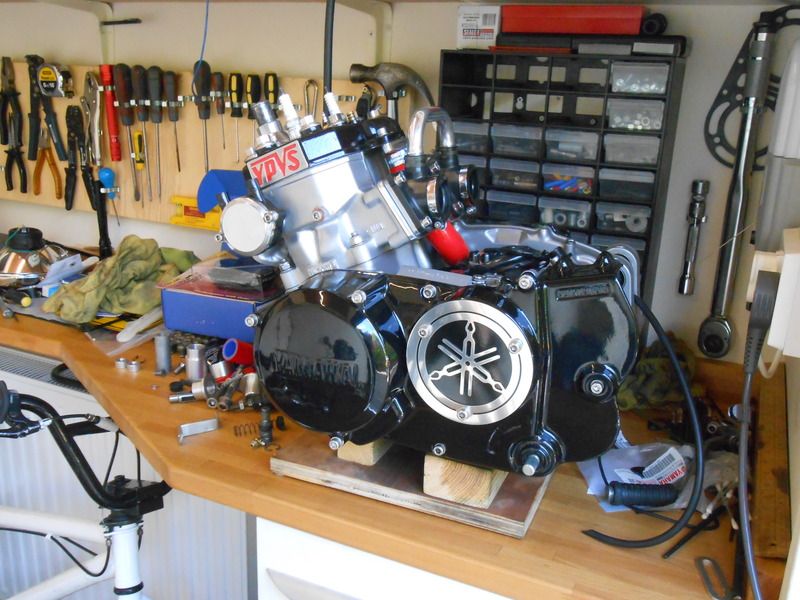  Dusty |
|
|
|
Post by gazsellars on Sept 26, 2015 12:09:32 GMT 1
Hi Dusty
I think you've made the right decision there that engine looks sweet mate.
|
|
|
|
Post by dusty350 on Sept 26, 2015 13:52:09 GMT 1
Thanks Gaz I've popped the head off and the barrel on the left side and the crank looks fine - no evidence of coolant in the case and the crank is nice and oily, so I will build it back up. This engine was a virtual nut and bolt rebuild so it makes sense to use it, which was the initial plan but then I thought as I have never had an Lc engined Lc, I would go with the engine it came with. Life is getting in the way though so to speed things up, the valve engine is going in. Dusty |
|
|
|
Post by dusty350 on Oct 1, 2015 21:16:33 GMT 1
Hi I ended up pulling both barrels to make sure there was no coolant damage on either side. Happy to say it's all fine, in fact the crank was nice and oily; 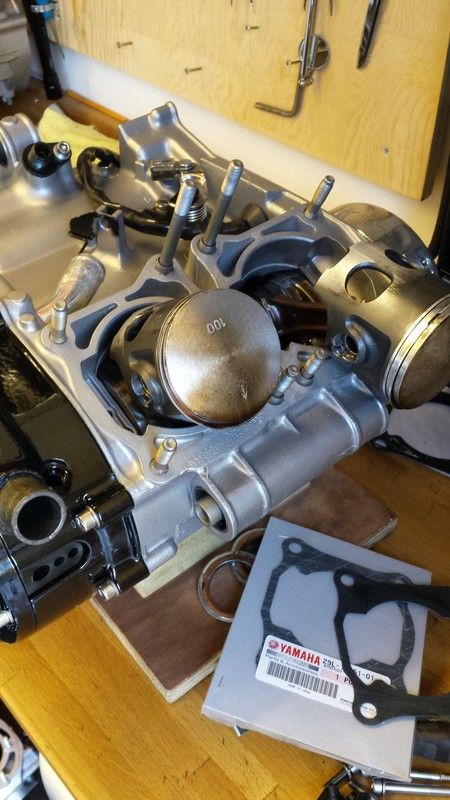 So I started to build the engine back up with new Yam base gaskets. Once the barrels were back on I could add the new Chariot inlet;  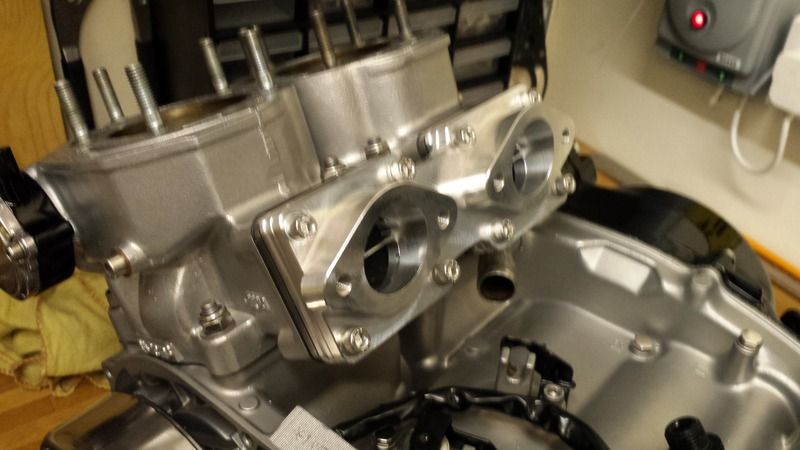 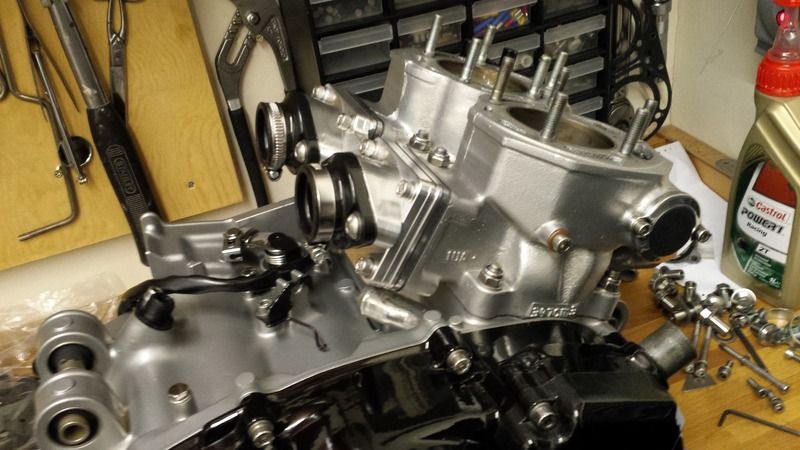 One of these inlets is fitted to my 385 and I really like the look, so I got one from Martin Brown at MBD, for this build, plus I thought it would look good with the other part I bought from Martin; 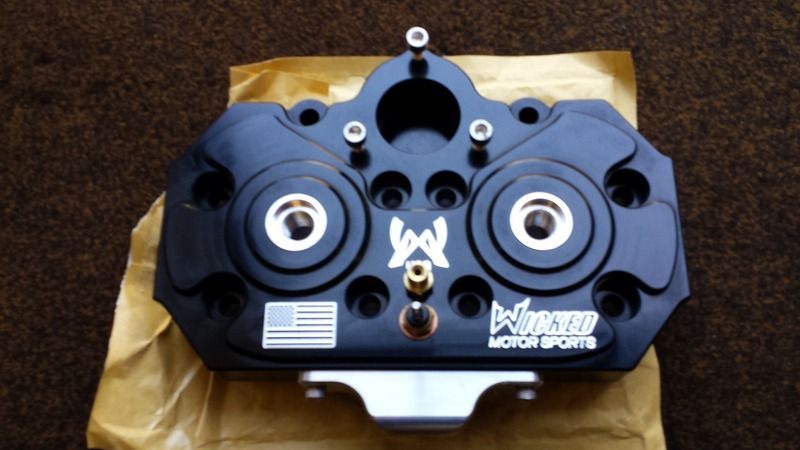 It's a Wicked Coolhead, anodised black. I hope to fit this in the next day or two. I've got new black silicon hoses too as there is no red on this bike. May be able to get the engine in the bike over the weekend hopefully Dusty |
|
|
|
Post by wallcraft on Oct 1, 2015 21:32:04 GMT 1
Hi Dusty what gains will the chariot give? What's your plans with the old lump?
|
|
|
|
Post by unrealedd on Oct 1, 2015 21:56:45 GMT 1
That is a very sweet looking motor dusty, really looking forward to seeing the whole thing together.
|
|
|
|
Post by arrow on Oct 1, 2015 23:00:27 GMT 1
How can I say this to sound right? "I always considered myself to be able to put a bike together in a decent fashion", but you take this to another level Dusty. Awesome work mate.
|
|
|
|
Post by dusty350 on Oct 2, 2015 7:21:06 GMT 1
Hi Thanks fellas. Gary, really nice of you to say that, but anyone can build these to a good standard if you take your time and give attention to detail. There are a lot of far more talented bike builders on here than me, and there are lots of members bikes that I would give my right arm to own The Chariot inlet eliminates the cross over tube, although it maintains the link between sides with an internal passageway. It has an internal vane that is supposed to help throttle response, but if I'm honest, I bought it coz it looks trick  and replaces old standard rubbers. As for the original engine, I had started collecting new Yam parts for a complete rebuild - just need to get the crank checked and a couple of Yam gaskets and I can start rebuilding it. Don't know whether to keep it spare or ..... Dusty |
|
|
|
Post by dusty350 on Oct 4, 2015 20:32:19 GMT 1
Hi Had a few hours in the garage today so moved the bike on a bit The Coolhead is now bolted on; 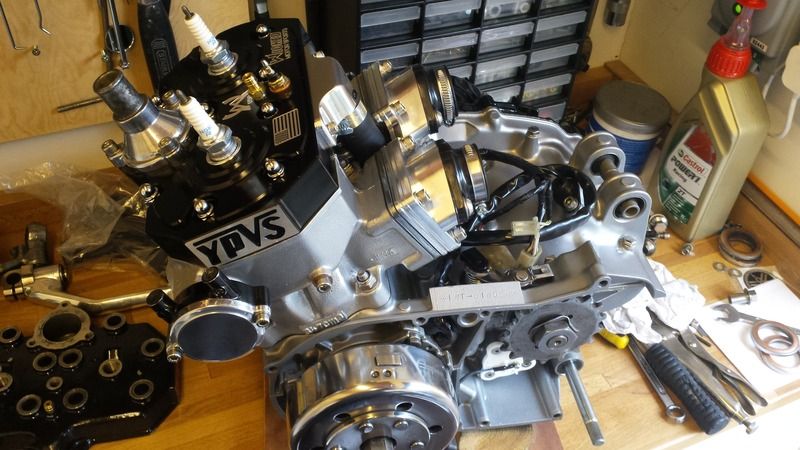 I transferred the thermostat housing and temp sender across from the original head, and it was ready to go into the frame; 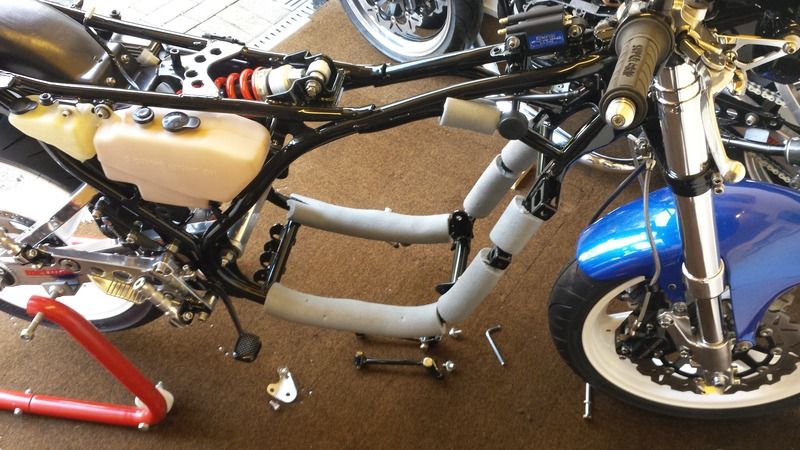 Engine went in with no dramas - the pipe insulation is a great way to protect the frame. New exhaust crush washers fitted and I could fit the chrome Allspeeds I swapped with Des way back at the beginning of spring; 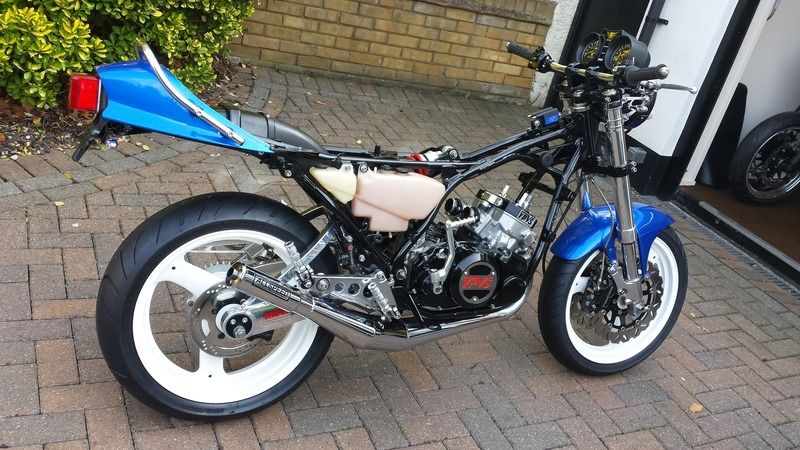 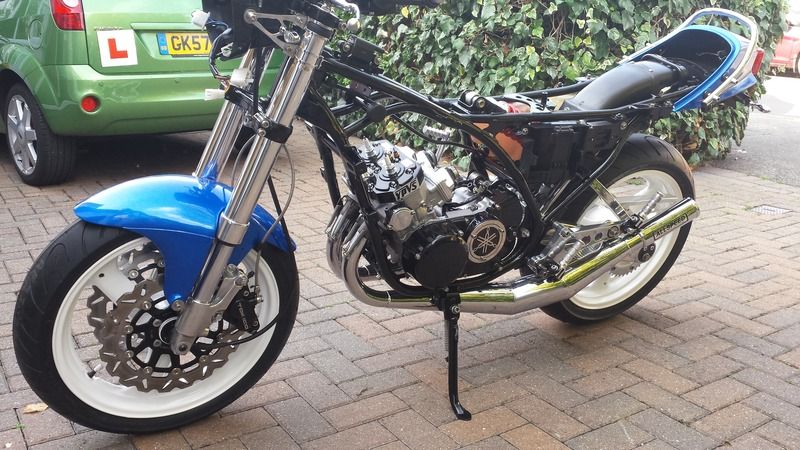 Really like the look of the Coolhead; 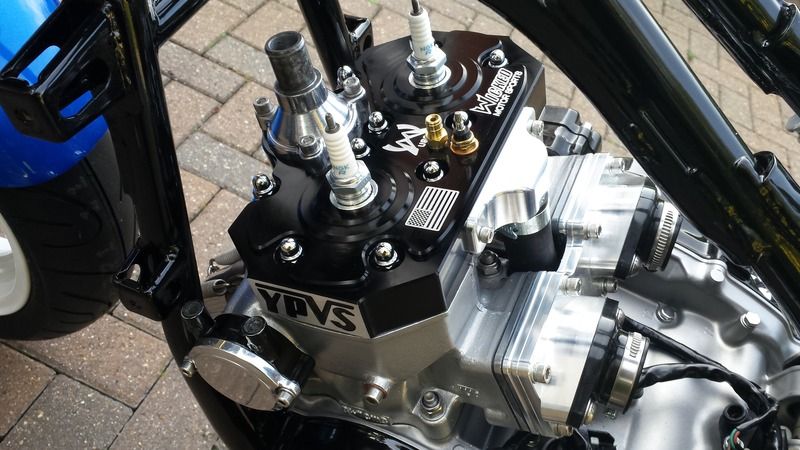 I fitted the Legend kickstart - never had one before, but not sure If I like it or not. Jury is out on that one at the mo !! I will get some black pv cables from Norbo this week and fit the servo, switchgear from the F2 and carbs/filters can go on too. Starting to look a bit more complete now. Dusty |
|
|
|
Post by Yogi on Oct 4, 2015 20:45:59 GMT 1
It's looking mint mate,love the cool head Now I know why you sold the red parts Matt |
|
|
|
Post by stusco on Oct 4, 2015 21:34:18 GMT 1
The head and inlet are very nice where did they come from?
|
|
|
|
Post by gazsellars on Oct 4, 2015 21:39:48 GMT 1
Looking nice now Dusty love the chrome allspeeds! Did they fit ok?
Having a bit of trouble with mine fouling the swinger. But the slip joints have been welded so that maybe the problem
Cheers
Gaz
|
|
|
|
Post by dusty350 on Oct 4, 2015 22:01:21 GMT 1
Hi Stusco The head and inlet came from Martin Brown at MBD -Mad Biker Designs. Top bloke and lots of goodies on his website Gaz, the Allspeeds fit fine. How far did you space your footrests out by ? Think mine are 10mm, which enables the pipes to just clear the swingarm. I did elongate one of the rear mounting holes a bit with the Dremmel to get the bolt through, but no big problem. I love Allspeeds on these bikes, cant wait to hear it run !! Dusty |
|
|
|
Post by gazsellars on Oct 4, 2015 23:11:57 GMT 1
Used 13mm spacers but there's no way they'll fit, having said that I have cut my pipes up and re welded them to get all the dents out so they may not have gone back together exactly the same.
Change of plan now anyway I'm using billet rearsets now and moving the mounting brackets on the pipes to the bottom foot peg mount hopefully it'll work out ok.
Your builds looking great that heads a work of art too!
|
|


 is going into this bike - silly not to really as it is completely rebuilt with zero road miles, plus the servo motor mount was welded in before powdercoating. This engine did have an issue with losing coolant though, and I believe I tracked it down to 2 head studs on the left side which I swapped out for 2 new Yam items. This seemed to solve the issue, but me being me, I have decided to pull the cylinders to check the crank has no signs of corrosion. I was using waterless coolant, so hopefully it will be fine. I bought 2 new Yam base gaskets at immense cost for what they are
  , plus a couple of bling parts that will not only look good but improve a couple of things over standard. Hope to pull the cylinder today and build back up. Once I'm happy, the engine can go in and the chrome Allspeeds can go on. I'm using the foam pods, so I've removed the airbox from the frame. I've also bought new silicon hoses in black to replace the red ones fitted, as the paint scheme on the bike is blue/white, and I will also change the red pv servo cables to black. I am probably going with the F2 loom and switchgear after all - electrics are a weak point for me and by using the F2 parts will save on potential problems. Here is the lump at the mo - a before pic


 and replaces old standard rubbers.


