|
|
Post by dono on May 19, 2015 19:04:25 GMT 1
It looks great and love to forks in silver!
|
|
|
|
Post by dusty350 on May 20, 2015 21:30:34 GMT 1
Thank you  Couple more parts arrived this week. The Yss finally got here; 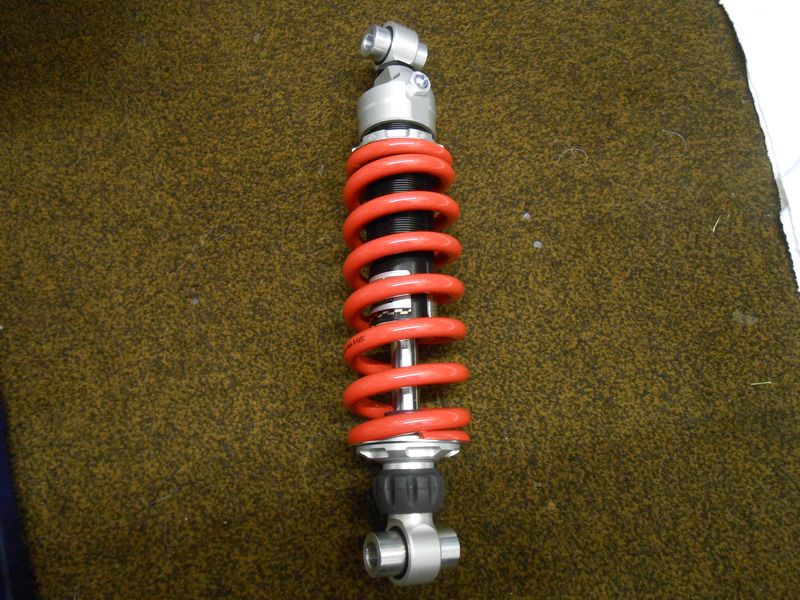 Looks great value for the outlay, so once I mod the chain slipper on the swingarm it can all bolt together. Also my uprated fork springs arrived from The Tuning Shop;  So hopefully the forks will get sorted this weekend, final polish and fit back in. Cheapest part was the indicator mount bought new off ebay for a tad under £9.00 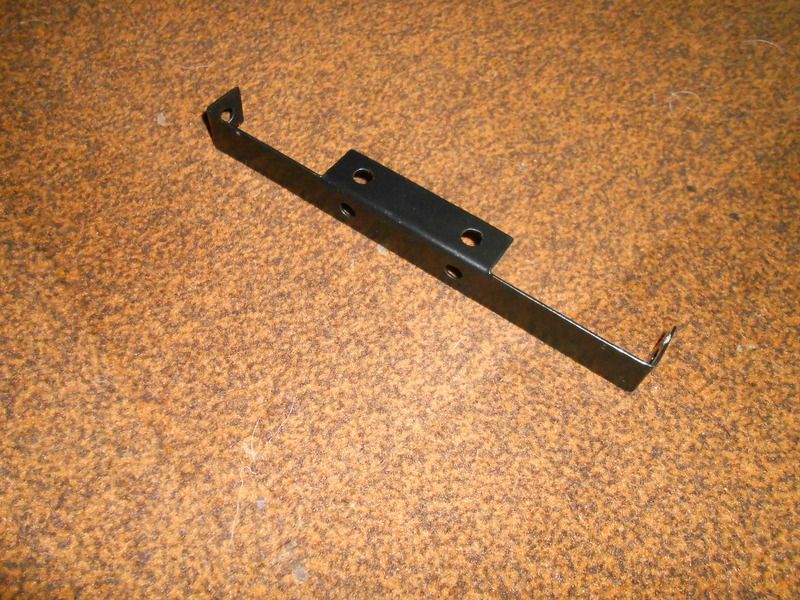 Amazingly, the pre drilled holes line up exactly with the 2 bolts that mount through the number plate mount A quick and easy option if you indicator mounts have been cut off like mine are  Dusty |
|
|
|
Post by stevebgt1 on May 30, 2015 12:21:26 GMT 1
Cant wait to see this……looks superb already !
|
|
|
|
Post by dusty350 on Jun 3, 2015 14:01:08 GMT 1
Hi Slowly coming together now; 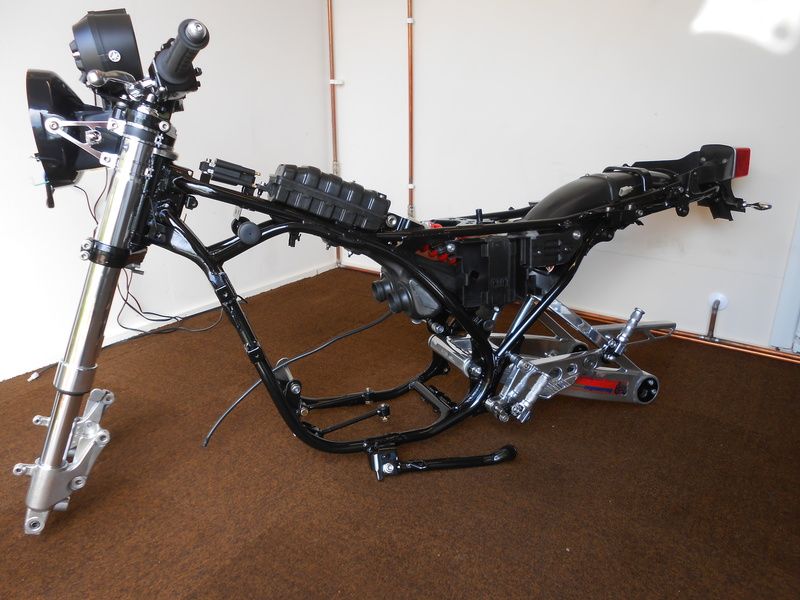 All the plastics cleaned up nicely, were then given a coat of black plastic reviver and refitted. Oil and water expansion tank cleaned out too. Everything is goimg back on with stainless cap heads and nylocs. For the headlight brackets, I used the clamps that came on the Lc, but the original brackets sat the headlihght too far out, so I used my billet brackets from my old F2; 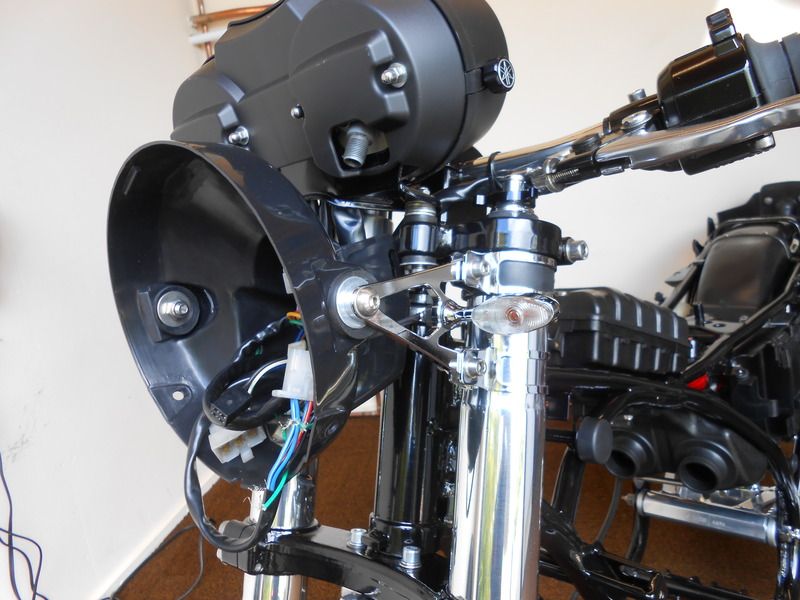 I think it looks more in proportion now. I fitted the clocks after stripping them completely, cleaning the inside of the glass and rebuilding them. They are mounted to the Lc bracket I had reshaped, but not sure if they sit too upright now; 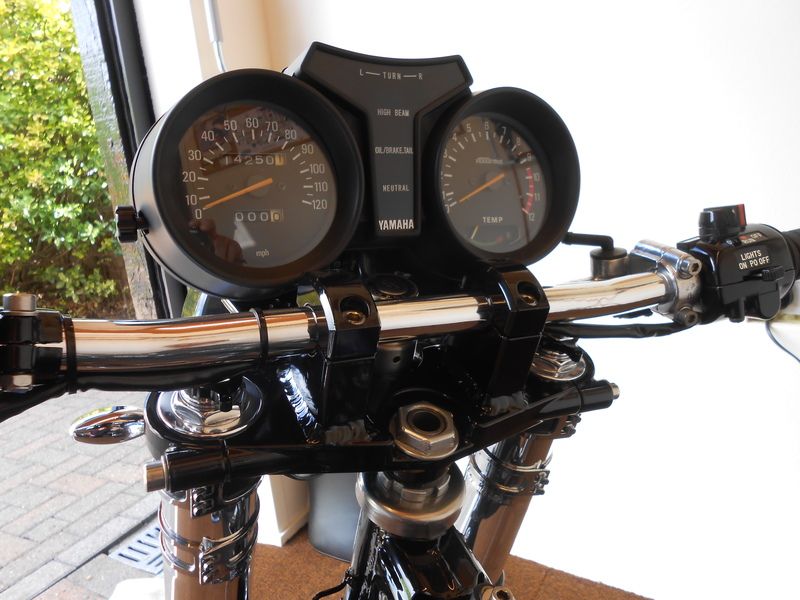 I wont really know until I get the bike on it's wheels. Talking of which, I got the tyres removed this morning and took a trip to Windsor to get them powdercoated gloss white; 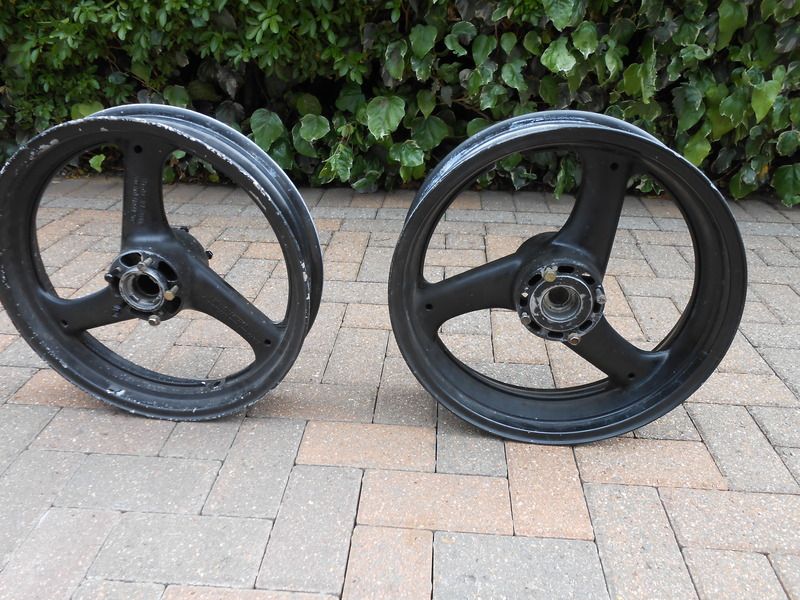 I may have to replace the front Bt090 as it looks past it's best, but the rear is really good so can go back on. The swingarm is in; 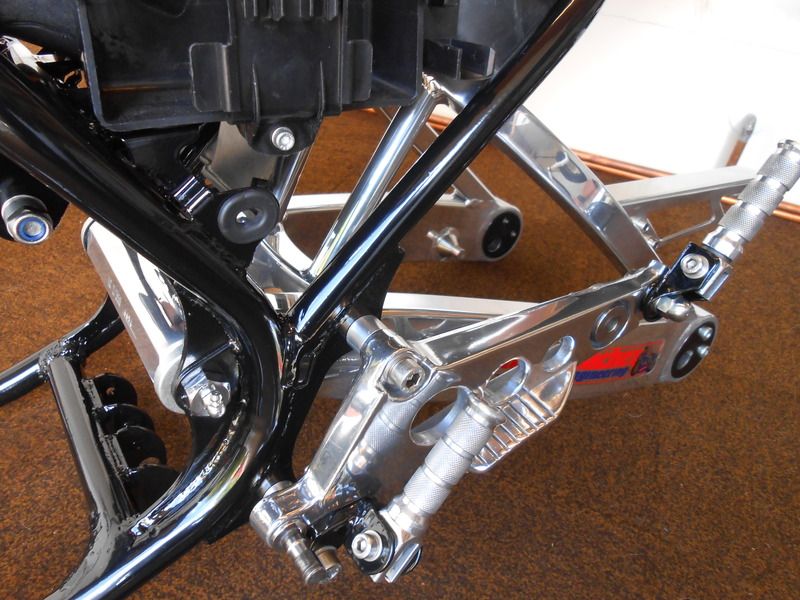 You can see I have spaced the footrests out from the frame to allow the exhausts to clear the wider swingarm. Still need to sort the chain slipper. The YSS slid straight in too; 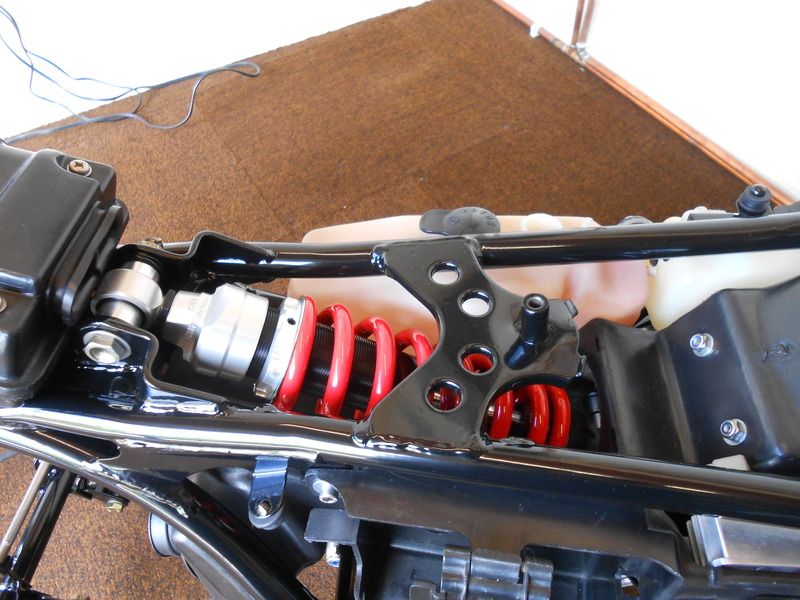 This arrived today to give some nice fat sparks; 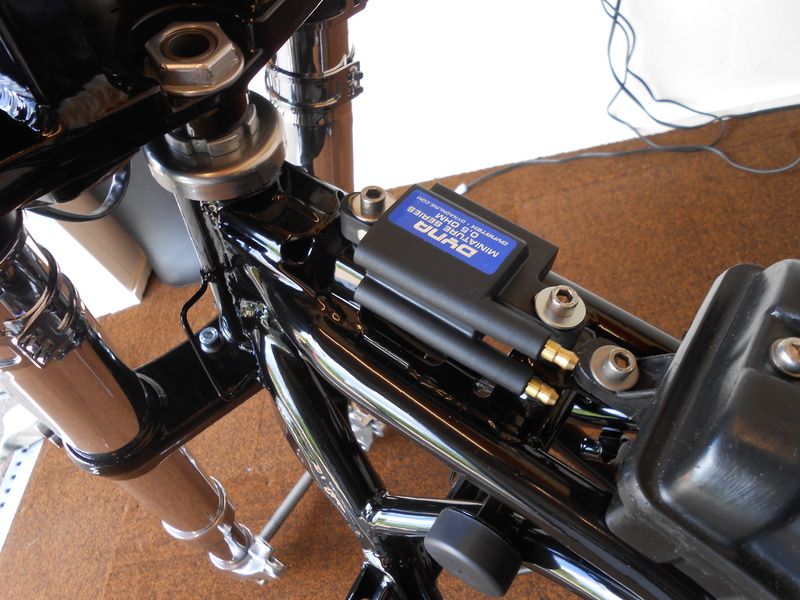 And still undecided whether to go with the Lc engine, or slot this in; 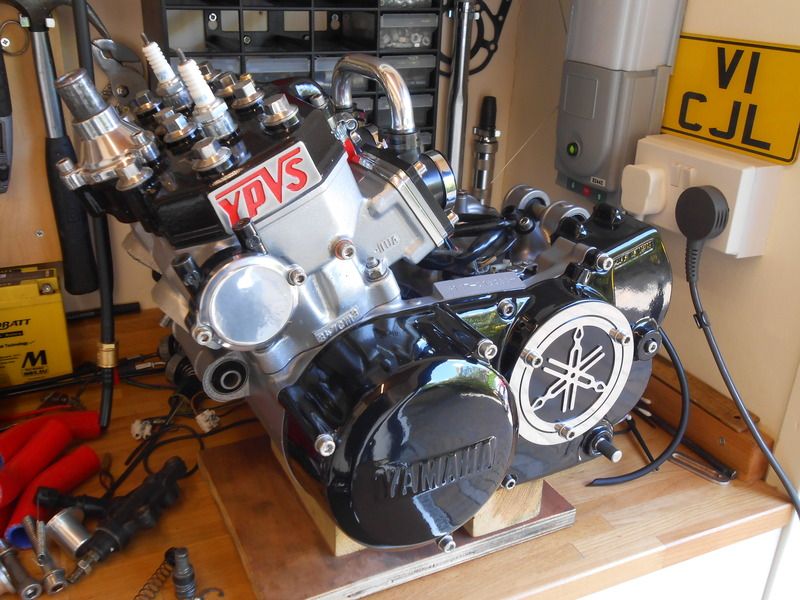 Dusty |
|
|
|
Post by nikfubar on Jun 3, 2015 14:25:15 GMT 1
That's looking great  gonna be a show stopper. Stick the PV engine in it, the front & rear end aren't original so it wont look old school anyway. Have you tried the zip tie method of fitting your tyres, just done this on mine & it eliminates damaging your freshly coated wheel rims. |
|
tezrhc
Drag-strip hero

Posts: 293 
|
Post by tezrhc on Jun 3, 2015 15:22:18 GMT 1
That's looking great gonna be a show stopper. Stick the PV engine in it, the front & rear end aren't original so it wont look old school anyway. Have you tried the zip tie method of fitting your tyres, just done this on mine & it eliminates damaging your freshly coated wheel rims. What's the zip tie method nikfubar? |
|
tezrhc
Drag-strip hero
Posts: 293
|
Post by tezrhc on Jun 3, 2015 15:28:21 GMT 1
If you think the clocks look too upright they probably are,everything looks ace Dusty350,have you got a finish date or will it be done when it's done approach?
|
|
|
|
Post by stusco on Jun 3, 2015 15:29:37 GMT 1
Look it up on utube you'll be impressed
|
|
|
|
Post by twostrokebrit on Jun 3, 2015 19:00:49 GMT 1
whats with all the haters on utube.
|
|
|
|
Post by gazsellars on Jun 3, 2015 21:51:15 GMT 1
Excellent work Dusty looking good!
|
|
|
|
Post by nikfubar on Jun 3, 2015 22:39:05 GMT 1
That's looking great gonna be a show stopper. Stick the PV engine in it, the front & rear end aren't original so it wont look old school anyway. Have you tried the zip tie method of fitting your tyres, just done this on mine & it eliminates damaging your freshly coated wheel rims. What's the zip tie method nikfubar? Here you go I put the tyre on the floor & kneel on it, easier to do up the zip ties, make sure its warm & it goes on easier than the video. Another good tip is to line up the dots printed on the tyre with the valve, it saves on balancing weights or you may not even need them. BTW you will need a compressor like the video which goes up to 60psi min or take it up the garage & use theirs |
|
tezrhc
Drag-strip hero
Posts: 293
|
Post by tezrhc on Jun 4, 2015 7:03:01 GMT 1
What's the zip tie method nikfubar? Here you go I put the tyre on the floor & kneel on it, easier to do up the zip ties, make sure its warm & it goes on easier than the video. Another good tip is to line up the dots printed on the tyre with the valve, it saves on balancing weights or you may not even need them. BTW you will need a compressor like the video which goes up to 60psi min or take it up the garage & use theirs cheers,will try this out. |
|
|
|
Post by stevebgt1 on Jun 4, 2015 12:54:09 GMT 1
Looking sweet this Dusty.... I,m impressed...
|
|
|
|
Post by dusty350 on Jun 16, 2015 22:29:30 GMT 1
Hi Got some more done recently. Wheels were powdercoated white, and I fitted new bearings and rear sprocket and alloy wheel spacers. The repair to the right fork leg was worth the effort, the mudguard now fits as it should and looks much better; 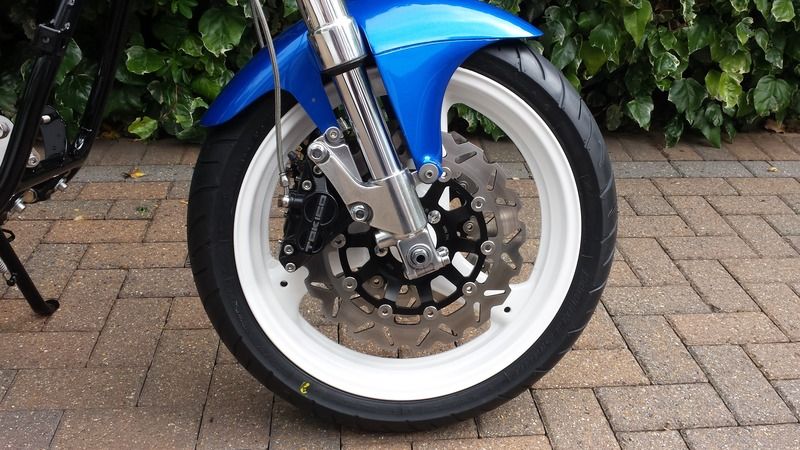 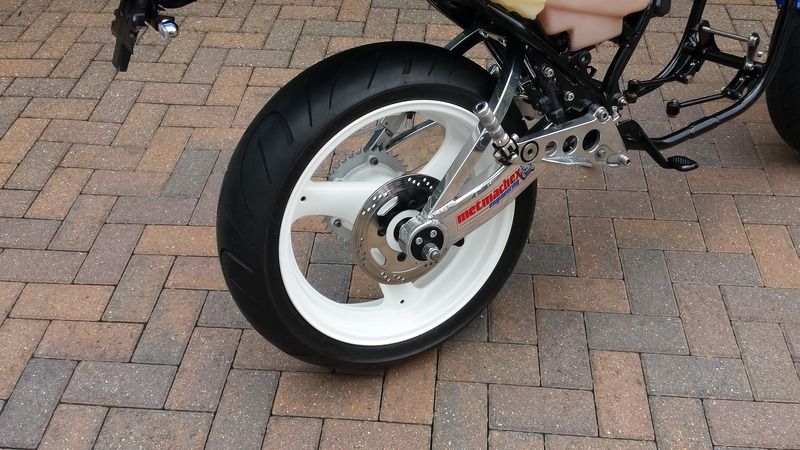 I've got a new wavey disc for the rear but I actually prefer the original, especially as I spent ages getting it looking nice !! I bought some extra long M10 stainless cap heads off ebay as the footrests are spaced 13mm out to clear the swingarm. I also bought a new seal kit for the Rgv front master cylinder; 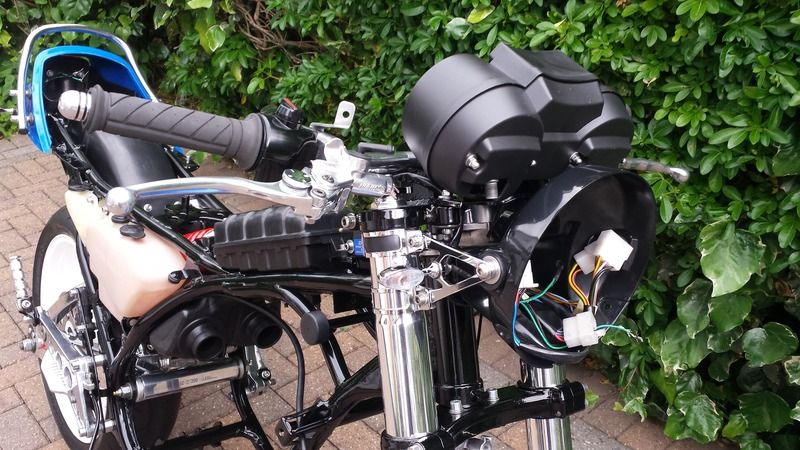 Just need a smaller reservoir and a Goodrich line from the master to the splitter. I also got the clock bracket angle reduced by 5 degrees by my engineering guy. Looks better now, plus he managed not to damage the powdercoat which was a bonus; 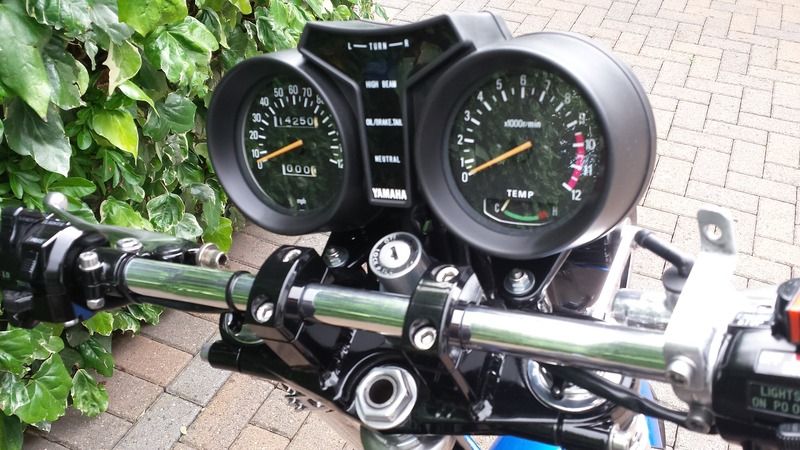 I made some "L" brackets for the ignition coil to sit it upright, as I think it may be easier to route the Ht leads; 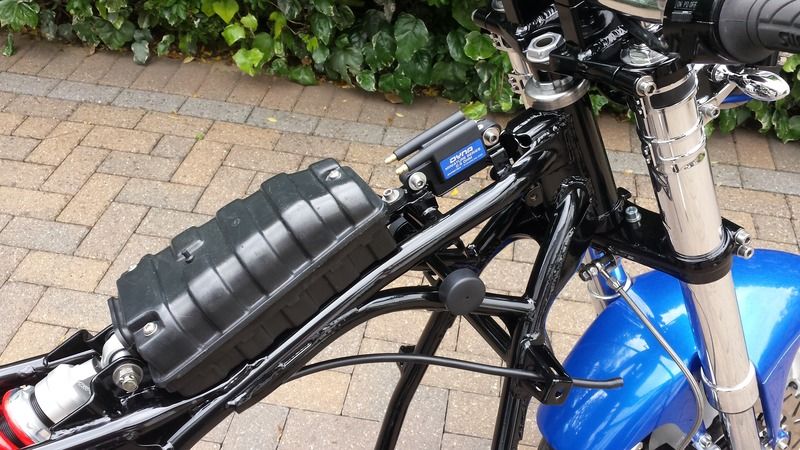 So here's how she sits at the moment; 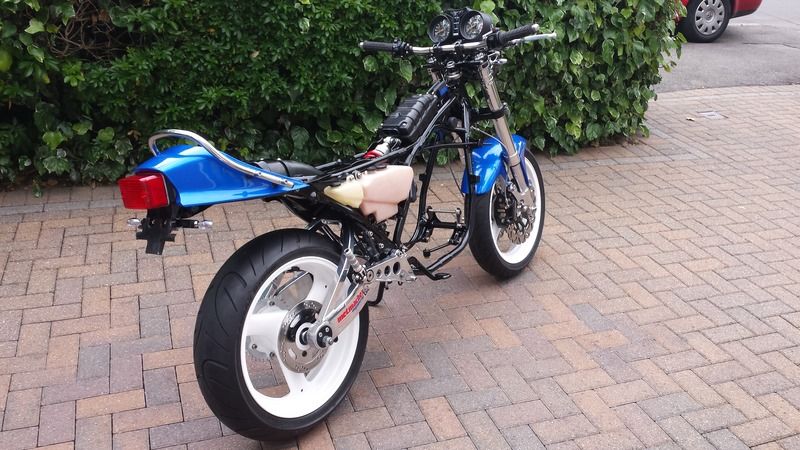 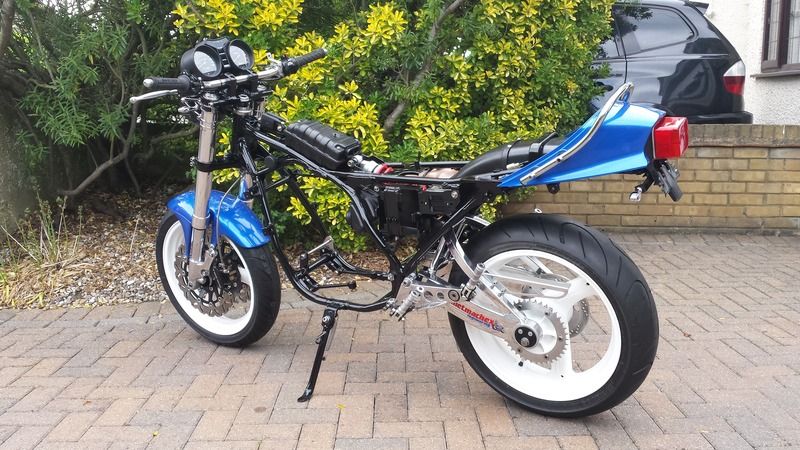 The paintwork is cleaning up nicely. I managed to remove the tank stickers without damaging the paintwork so I have a blank canvas for new decals. The Lc barrels are having 2 exhaust studs drilled out at the mo as they snapped when I tried to remove them  I will start to strip and rebuild the Lc engine next as that is what is going back into the bike. More soon Dusty |
|
|
|
Post by stevebgt1 on Jun 16, 2015 22:39:31 GMT 1
Yeah yeah yeah !! Keep it coming ! Looking damn fine ....
|
|
|
|
Post by iwantalc on Jun 18, 2015 20:59:33 GMT 1
you are such a perfectionist looking really nice..if this build so far is anything to go on the finished article is going to look the nuts.you must have too much money and too much time on your hands to do the rebuilds you do lol all the best dusty ..des
|
|
|
|
Post by yamark on Jun 18, 2015 22:53:14 GMT 1
Dusty I think my airbox makes the bike  , great work, looking splendid , great work, looking splendid |
|
|
|
Post by dusty350 on Jun 19, 2015 7:26:08 GMT 1
Ha The airbox does make all the difference !! Got a nice new wavey rear disc here Mark if you still want one Will start to strip the Lc engine today. The barrels are still with the engineers - they are pretty busy at the mo with other stuff but I am in no rush. The crank has a lot of play on the rods, so I think a rebuild may be in order to be on the safe side. That will mean vapour blasting the cases to clean them up as the bottom case in particular is grotty. Funds are dwindling now, but I've got an F2 lump sat on the bench with lots of new parts that can swap across to the Lc engine should I need to. Dusty |
|
|
|
Post by muttsnuts on Jun 19, 2015 9:16:14 GMT 1
looking good dusty
|
|
|
|
Post by gazsellars on Jun 19, 2015 18:08:15 GMT 1
Hi Dusty
Have you tried your motor in yet to check the chain run? Just fitted my swing arm in same as yours think I may need an offset sprocket with my power valve engine. Just wondered if you have done any measuring for this on yours. Cheers
Gaz
|
|
|
|
Post by yamark on Jun 19, 2015 18:20:20 GMT 1
Ha The airbox does make all the difference !! Got a nice new wavey rear disc here Mark if you still want one Will start to strip the Lc engine today. The barrels are still with the engineers - they are pretty busy at the mo with other stuff but I am in no rush. The crank has a lot of play on the rods, so I think a rebuild may be in order to be on the safe side. That will mean vapour blasting the cases to clean them up as the bottom case in particular is grotty. Funds are dwindling now, but I've got an F2 lump sat on the bench with lots of new parts that can swap across to the Lc engine should I need to. Dusty Cheers Dusty, I'll have the rear disc mate. To return the favour, I've got a new gen Yam head gasket if you need one. Let me know and I'll put it to one side for you
Cheers Mark
|
|
|
|
Post by dusty350 on Jun 19, 2015 18:41:26 GMT 1
Hi Mark Lc head gasket ? If so, sounds like a fair swap Gaz - the Lc engine I removed from the bike had a Talon offset sprocket fitted at the front - not sure what the offset is - I can measure it roughly if you need to know, but this was with the Rgv "P" arm fitted, so the Metmachex may alter things again. As you may know, I had some "issues" with the Metmachex spacers - ended up getting one made myself for the caliper side as the one provided still didn't make it all fit. There was a possibility that wrong wheel bearings had been used in the past, upsetting the dimensions, but I have just fitted new Rgv bearings and the dimensions are exactly the same, so the wheel and bearings are correct. I wont know about chain run until I fit the engine and will have to cross that bridge when I come to it. I hope it all lines up ok with just an offset sprocket maybe. Dusty |
|
|
|
Post by yamark on Jun 19, 2015 18:47:16 GMT 1
Yes Dusty, 4LO head gasket, unopened in bag.
|
|
|
|
Post by gazsellars on Jun 19, 2015 18:51:58 GMT 1
Cheers Dusty
Gonna do some measuring tomorrow and find out what I need to do, looks tight with the frame but I'm hoping an offset sprocket will sort it. May have to have a bit taken off the rear sprocket carrier tho.. Will let you know how I get on.
Cheers
Gaz
|
|
|
|
Post by dusty350 on Jun 19, 2015 19:17:53 GMT 1
Hi Mark
Great - we will have to meet up at some point - I have that Pv frame you are welcome to as well.
Gaz - the original spacer supplied with the arm places the wheel very close to the arm on that side - I felt the chain would foul the bracket that holds the chain guard in place. Plus I only got 1 spacer when you need 2. Dean did supply new spacers but on my set up they still didn't fit properly, so I had my local engineers make me a spacer so it did all fit. Until I had an issue with it, they had supposedly sold 7 arms with no come back so I don't know what others have found.
Dusty
|
|
|
|
Post by Topman350 on Jun 19, 2015 23:09:58 GMT 1
Hi buddy bike is looking really nice immaculate work looking forward to it completed :-)
|
|
|
|
Post by gazsellars on Jun 20, 2015 17:47:22 GMT 1
Hi Dusty
Just done some measuring and it looks like I'm about 9mm out but with the heavy duty chain it will foul the frame. So looks like I need to have 3mm machined off the sprocket carrier and buy a 6mm offset sprocket. Think your set up was 3mm shorter on the brake side so you should be ok with the sprocket carrier I think. Your build looks stunning so far by the way.
Cheers
Gaz
|
|
|
|
Post by dusty350 on Jun 27, 2015 10:54:50 GMT 1
Hi Thanks for the comments Rolling chassis is done for the moment, so I thought I would strip the engine that came out of the bike. It was nice that there were no dramas with this one. I think it has been rebuilt fairly recently - mileage wise - everything came apart easily, rotor came off without tapping the puller, clutch nut and sprocket nut weren't too tight either meaning no heavy handed tactics needed. The crank has been rebuilt - 2 flywheels are non standard. but I am going to get it checked anyway. Barrels are still having the studs removed - they will need drilling out and helicoiling, but the bores are good and the pistons have no blow by past the rings so fairly recent I think. only downside was the gear oil was grey so I think a water seal may be duff. Not all the oil was like it but it deffo wasn't as it should be so I'm glad I can clean all the parts properly. I will get the cases vapour blasted and then start a rebuild; 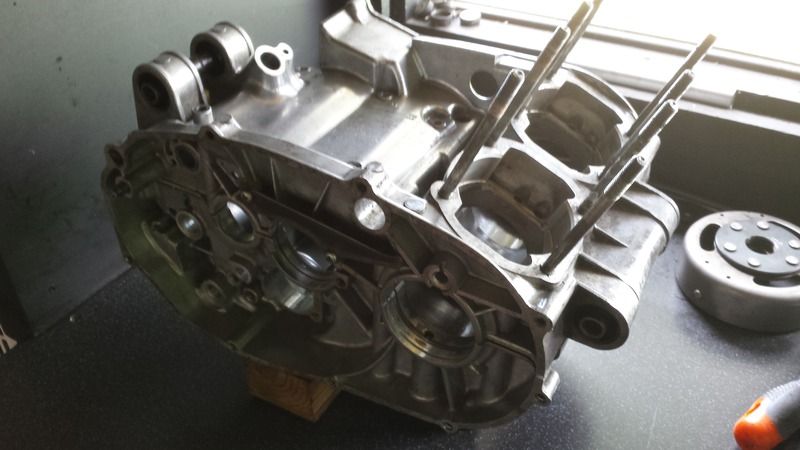 And a box with all the parts in, ready for refurbing/cleaning where needed;  I plan on new Yam gaskets and seals and bearings. Clutch plates look new ish and the clutch drum is groove free so that's good. Once I get the barrels back I plan on getting them polished. Head has no damage and would look nice with stainless bolts. Need to start collecting part numbers now Dusty |
|
|
|
Post by iwantalc on Jun 27, 2015 17:52:35 GMT 1
what did you decide to do with ypvs engine just got back from isle of wight so need to catch up
|
|
|
|
Post by dusty350 on Jun 27, 2015 19:22:35 GMT 1
Hi Des It's still sat on the bench in the garage. I was hoping there was a new Lc engine build out there that matched my Ypvs build - parts and finish wise, that I could have swapped with. There is a rebuilt Lc engine on ebay at the mo but it's got mis matched cases with a 4l1 top and 4l0 bottom ?? Wants £1150.00 !!! So the pv engine will probably get moth balled and I will build the Lc engine up and use that I think. Did make me realise how much time as well as money went into the pv build when I started noting down all the replacement part numbers for the Lc today  Regards Dusty |
|


 gonna be a show stopper. Stick the PV engine in it, the front & rear end aren't original so it wont look old school anyway. Have you tried the zip tie method of fitting your tyres, just done this on mine & it eliminates damaging your freshly coated wheel rims.


 , great work, looking splendid


