|
|
Post by andymoore on Oct 18, 2019 20:29:38 GMT 1
That bike is a work off art imo 👍👍👍
|
|
|
|
Post by donkeychomp on Oct 18, 2019 22:49:59 GMT 1
She is a beauty. Ingenious little job on the clutch Dusty.
Alex
|
|
|
|
Post by dusty350 on Oct 27, 2019 8:41:11 GMT 1
Back onto this now. I got a new loom from Norbo - an F2 Pv loom as everything apart from the Lc clocks and rear tail light are F2 parts. Various components are situated in different places on an F2 loom compared to an Lc, so that makes siting everything quite awkward. I could have used an Lc loom, but I wanted new, and Norbos was a helluva lot cheaper and easier/quicker to source. Plus I'm not at my best with electrickery, and this is a lazy/easy way to sort it !!  I'm following a pattern I did before a few years back with my first Lc/Pv build which proved to work well. This means going back to pod filters, which I sourced from Mutts, and some larger mains. Again, the same set up as before, with 31k carbs so hopefully no dramas with jetting. No airbox means fitting the Pv loom becomes a lot easier, and I made up an ally plate to sit above the engine, and the CDI and fusebox mount to that;  20191026_154702 20191026_154702 by dusty miller, on Flickr Most of the electrics connect together in this area, so plenty of room now. I crimped the coil connections to the Tayler leads and fitted those;  20191026_154753 20191026_154753 by dusty miller, on Flickr Had those in their box for about 2 years, so finally pulled my finger out !! I found the reg/rectifier fits nicely where the Lc fusebox would go;  20191026_154711 20191026_154711 by dusty miller, on Flickr And I was going to fit the Pv controller in the tail piece, but am currently toying with fitting it behind the battery plate where the Lc reg/rec would go - means the wiring plugs straight in with no extensions. Not all the wiring plugs on the new loom match the original Yam plugs, and Norbo has run out of spare plugs, but I've kept a few old looms from past builds and have quite a collection of various connectors now, so have managed to find all the correct ones now. So I need to solder some wires to connect it all up. I need to bypass the F2 side stand switch which is easy, and the biggest job will be working out which Lc instrument wires connect to the F2 instrument wires on the main loom. I have both Lc and F2 A3 colour wiring diagrams, so just a case of working out what does what ! I did borrow the battery from the Café bike, and managed to prove the tail and headlight work so that's good. Annoyingly I used to have some notes from when I did the instrument conversion on my first build, but they have long since disappeared, so some head scratching will be involved !! I've temporarily fitted strip connectors for ease of swapping wires around, and once everything is confirmed and working I will then solder wires together, meaning F2 plugs come from the main loom and wire into Lc instrument plugs for a bodge free fix. Another part I got from Norbs was a stainless engine cover. I pinched the original for the Café bike, so had to replace it ! 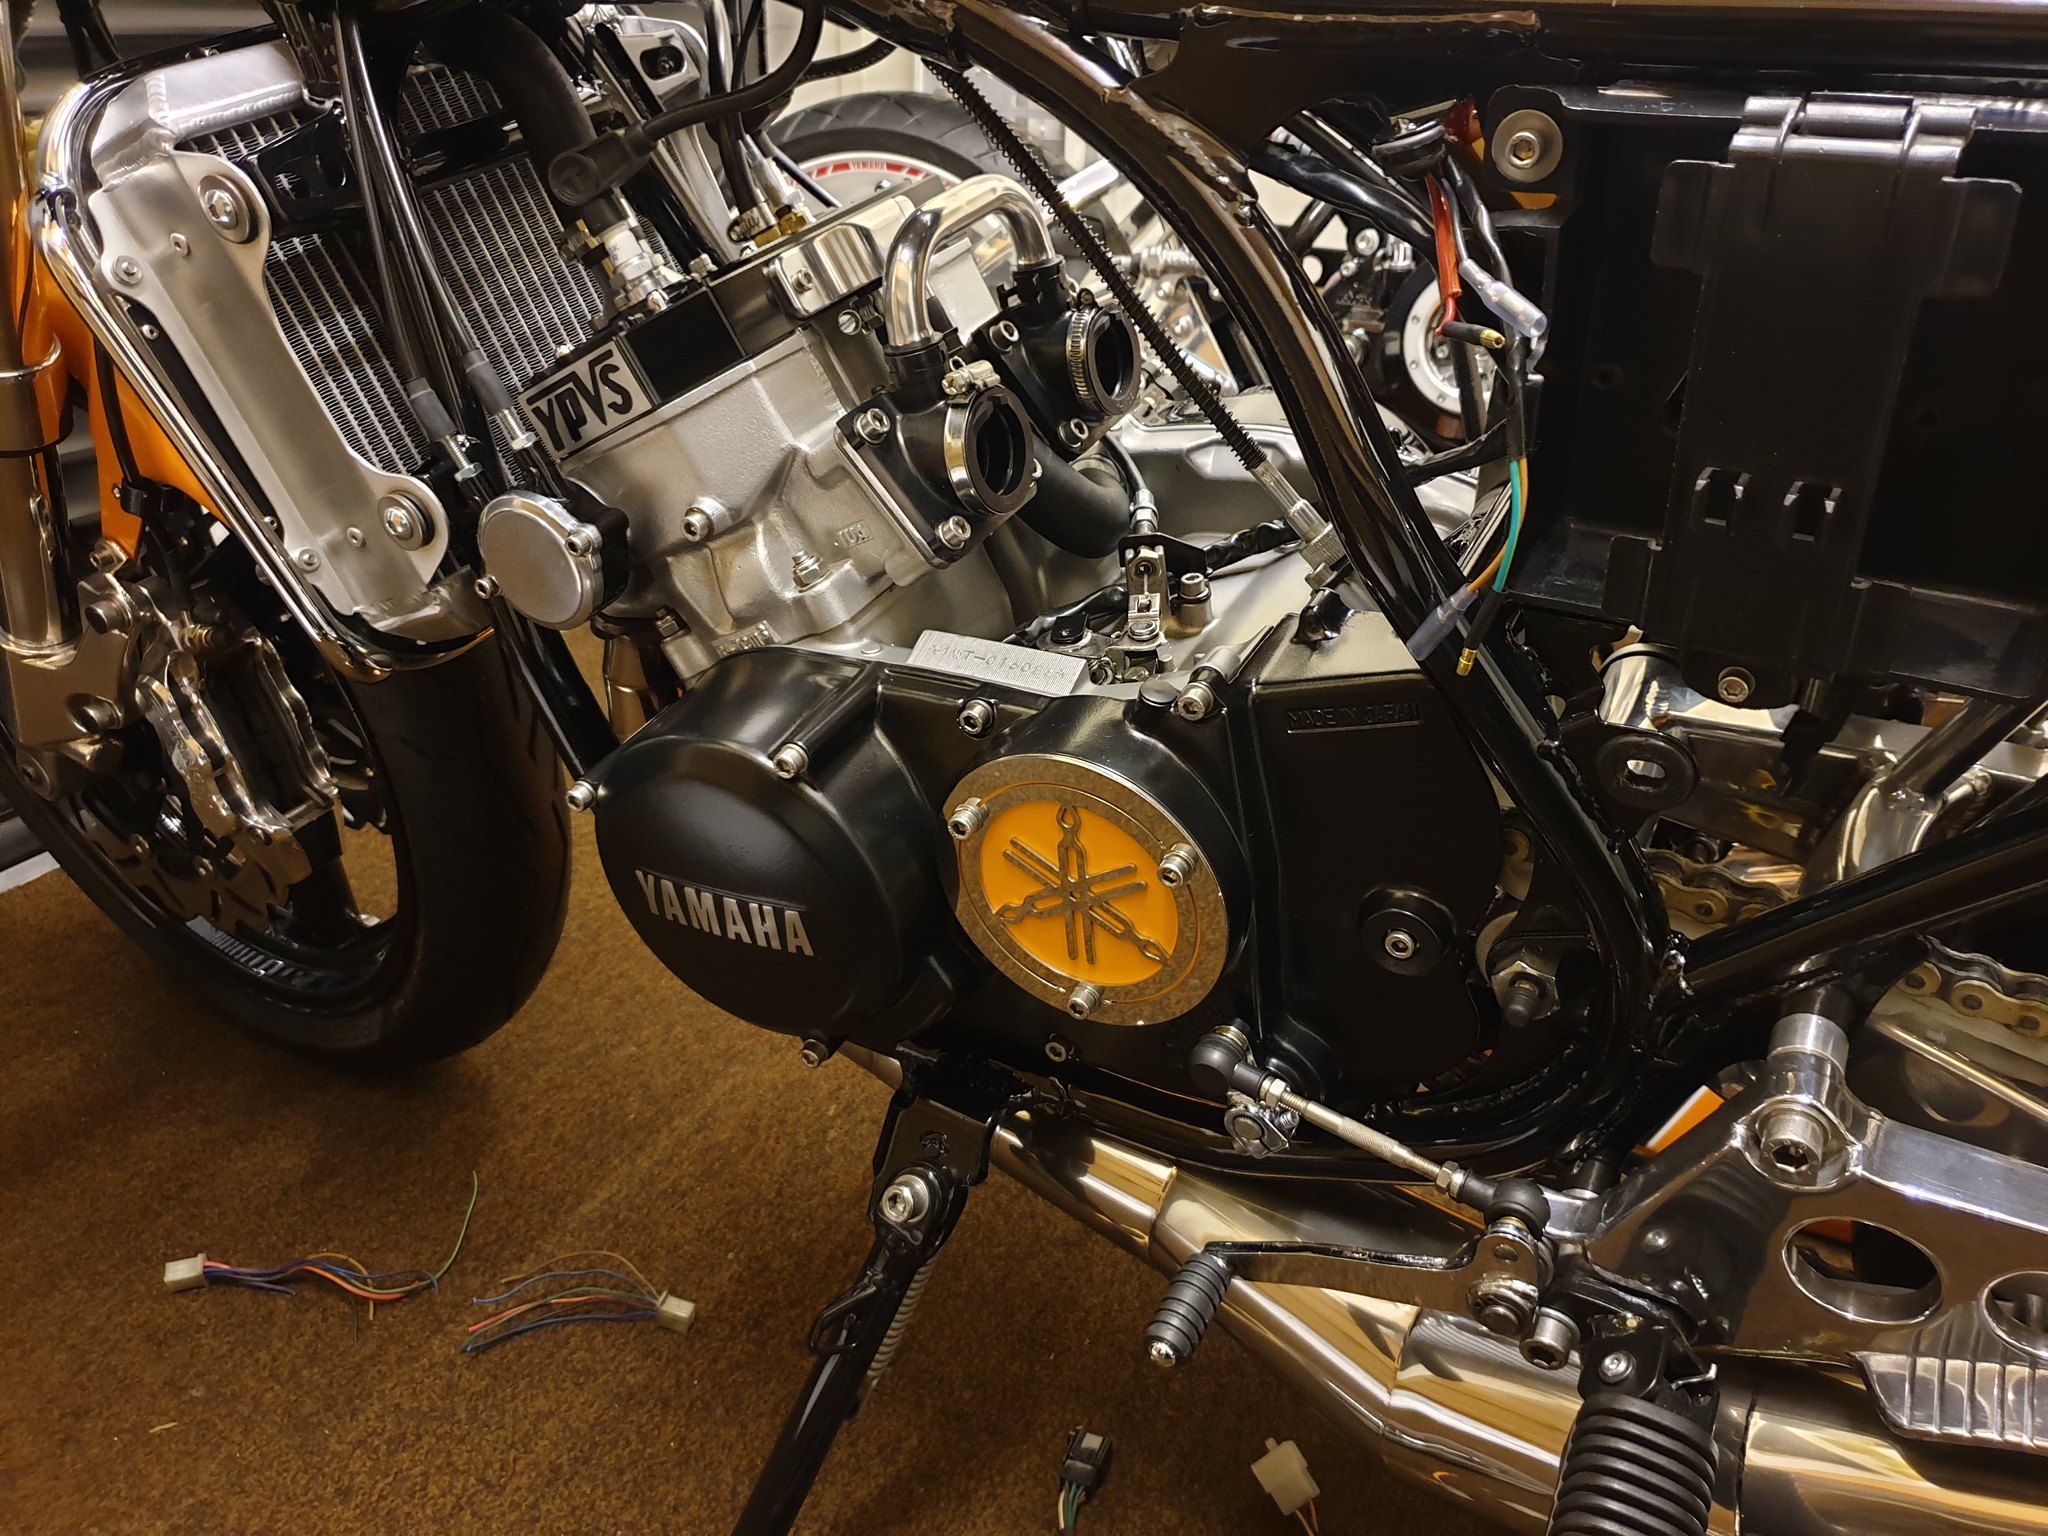 20191026_154739 20191026_154739 by dusty miller, on Flickr I also bought some new rim decals - same design as the Café bike, but in orange, and will fit them when I get the chance. Last part to buy will be a new throttle cable. Norbo hasn't got any of his good pattern ones left, so it may have to be genuine Yam  Dusty  |
|
|
|
Post by donkeychomp on Oct 27, 2019 23:39:31 GMT 1
Never seen leads like that Dusty. Any reason for them as opposed to say, NGK ones? Glad you are finishing this bike though, my fave by a mile.
Alex
|
|
|
|
Post by dusty350 on Oct 28, 2019 8:27:20 GMT 1
Hi Alex The Tayler leads compliment the Dyna coil. That coil has 2 outlet posts that the leads attach to once you have crimped the connectors on the end. The coil doesn't include leads in the kit, so I bought the leads separately. I've used the Tayler leads in the past on a Gsxr build and they are very good, plus they come in a selection of colours if you want to deviate from the norm ! Hope you are well mate Dusty |
|
|
|
Post by yamark on Oct 28, 2019 8:40:35 GMT 1
Great work Dusty. Your choice of components is always spot on
I'm going to start calling you the "master of Electricary" soon 
I know how much you hate electrics  |
|
|
|
Post by dusty350 on Oct 28, 2019 9:01:15 GMT 1
Not sure about that !  The Pv loom is a big cheat to be honest, but I wanted a new loom as opposed to my Lc spare that is getting on for 40 years old ! I have also found a cut wire (black) coming from the taped up wires from the generator, so I will need to repair that and change a couple of plugs over, but should be straightforward. Those Kojaycat wiring diagrams make life so much easier when trying to decipher wiring !! I did manage to fit the Pv control box on the back of the battery box - where the Lc reg/rec would fit to on a standard bike. It fits perfectly and the wiring plugs into the loom at the correct point to save extending the wiring;  20191027_113730 20191027_113730 by dusty miller, on Flickr That means I can leave the rear cowl alone now and keep the tail light recessed. I spaced the F2 reg/rec away from it's mounting points a bit to aid cooling, and it all fits under the side panel with no problems. Dusty |
|
|
|
Post by madmick on Oct 28, 2019 11:06:04 GMT 1
Dusty.... that is one nice bike, defo my favourite as I’ve said before.
Good luck with finishing the rest of it, can’t wait 👌
M.M.
|
|
|
|
Post by dusty350 on Oct 28, 2019 11:33:29 GMT 1
Cheers Mick I've left it too long. I'm seriously considering selling it but thought it wise to get it up and running first. I hate electrics and when it was originally going to get the Lc loom, I avoided dealing with the head scratching that would be involved, but swapping the Pv switchgear onto it, plus the Pv ignition barrel, fitting a pv loom made sense, and so simplified the wiring. Regards the side stand bypass. You remove the little black box from the loom, and tape up the connector block;  20191028_102718 20191028_102718 by dusty miller, on Flickr You then connect these 2 spades together with a simple loop of wire;  20191028_102736 20191028_102736 by dusty miller, on Flickr Dusty |
|
tlmark
Drag-strip hero

Posts: 203
|
Post by tlmark on Oct 28, 2019 12:18:36 GMT 1
Catweazle
|
|
|
|
Post by dusty350 on Oct 28, 2019 20:06:48 GMT 1
Exactly my reaction when I got the indicators working today !! Dusty |
|
|
|
Post by dusty350 on Nov 2, 2019 13:29:01 GMT 1
Gradually working through the electrics on this. Did I mention I hate electrics !! Anyway, lights, stop light, indicators all work but still having issues with the warning light connections in the headlight bowl Trial and error, even with the diagrams. I will get there though. Most importantly, I have a spark With that in mind I fitted the carbs with the new Ramairs I got from Mutts, plus I fitted some 300 mains on Dave's advice, as a start point. Just need that throttle cable now !  20191102_112825 20191102_112825 by dusty miller, on Flickr There is no oil pump on this bike - I pinched it for the Café build, so it will be premix initially. I've plugged the bottom of the oil tank so will fill that up so it can be used as a reservoir for oil and I'll keep a graded syringe in the tail unit. Dusty |
|
|
|
Post by 4l04ever on Nov 2, 2019 15:40:55 GMT 1
|
|
|
|
Post by dusty350 on Nov 2, 2019 19:50:17 GMT 1
Hi Rob, I usually use a bit of oil feed pipe with a plug of silicon in it on the oil feed nipples. It's only temporary any way - if I keep the bike I will get another oil pump for it, and if it goes the new owner can decide which way to go with it. And 300 may be too small but I had to start somewhere, and Dave said start with them. I expect to mess about a bit with the jets now it's running pods. At least it's a doddle getting the carbs on and off !! I also started applying my new wheel rim decals today, to replace the non sticky R&G items;  20191102_151250 20191102_151250 by dusty miller, on Flickr I think they are a better looking decal anyway - same as my other bike. Dusty |
|
|
|
Post by donkeychomp on Nov 3, 2019 0:25:41 GMT 1
What a front end! Rest of the bike ain't too shabby either!
Alex
|
|
|
|
Post by dusty350 on Nov 4, 2019 8:31:31 GMT 1
Trying to sort the throttle cable at the moment. The new pattern cable I bought from Norbo was pinched for the café racer bike as it had the oil pump cable intact. That left me with the cable that was originally fitted to the PWK's. It had been modded where the cable goes into the carb tops, plus it didn't have the oil pump cable, although that didn't matter. Trouble is, where it's been modded for the Pwk's means it wont work with 31k carb tops Spares box turned up a cable with a damaged end at the handlebar end, so I stripped both cables to try and make one good one. You can see the Pwk cables to the left and the cables I need with the steel adjusters on the right;  20191103_153242 20191103_153242 by dusty miller, on Flickr Everything is back together now so tonight I will see if it all works ok. Norbo is out of the good pattern cables he used to do, and a quick look on Fowlers shows Pv throttle cables nla You can still get a genuine Lc cable, but it's £105 plus post now !!  So, giving this a go first !! Other little win was I was after a front brake switch as mine was faulty. I had a master cylinder in the spares box that was a totally different design, but had the switch. Turns out it bolts straight on and works perfectly, so another job ticked off the list. Dusty |
|
|
|
Post by Tobyjugs on Nov 4, 2019 13:02:16 GMT 1
Hi Dusty I couldn't follow your explanation fully.
You might be able to buy some adjusters and end caps from Venhill to extend the length of the cable sheath and bring the cables back into service.
Also once fitted check that the slides lift all the way up into the carb bodies visually.
|
|
|
|
Post by dusty350 on Nov 4, 2019 22:09:22 GMT 1
Hi Tobyjugs The cables on the left were butchered to fit the Pwk's they came fitted to. They wouldn't work on 31k carbs so I found another cable with a damaged end at the handlebar, so I have made 1 good cable out of the 2. I think it should work ok, and will save me a good amount of money if it does - throttle cables from Yamaha are stoopidly expensive, and good patterns are drying up. Fingers crossed Dusty |
|
|
|
Post by donkeychomp on Nov 4, 2019 23:55:11 GMT 1
I have a few throttle cables Dusty. Want to use them? One is from Norbo the others off eBay.
Alex
|
|
|
|
Post by dusty350 on Nov 5, 2019 8:00:33 GMT 1
Hi mate I will try this one today first. If it doesn't work out I will give you a shout Hope you are well mate Dusty |
|
|
|
Post by dusty350 on Nov 8, 2019 8:41:17 GMT 1
I'm gradually working my way through the "snagging" list !The hybrid throttle cable I made up works really well Throttle slides open and close fully and are nicely synce'd - easy to check with pod filters. I had both pipes off yesterday to give them a quick run over the buffing wheel, and then final fitted them with some silicon sealant on the end can flanges;  20191108_065624 20191108_065624 by dusty miller, on Flickr Oil feeds on the carbs have been blanked off, stop light switch at the bars has been wired in with smaller spade terminals so that all works correctly, and I'm getting some new fuel line today. Still got some electrics to sort out - some wires are incorrectly joined ie, the neutral light comes on with the ignition but doesn't go out when you select a gear, so it's obviously connected up wrong. Did I mention I hate electrics !! Dusty |
|
|
|
Post by oldbritguy on Nov 8, 2019 12:13:15 GMT 1
Looking lovely Dusty
Attention to detail as usual is second to none.
Have you tried disconnecting the wire at the neutral switch before attacking the wiring. Might be a simple fix seeing as you are using a new loom. Also possibly switched the oil and neutral connections about as those two bast**ds confused the hell out of me till I got them sussed.
John
|
|
|
|
Post by donkeychomp on Nov 9, 2019 0:18:52 GMT 1
Glad the throttle works Dusty. Not much more to do now...
Alex
|
|
|
|
Post by dusty350 on Nov 9, 2019 9:04:42 GMT 1
Hi Wiring is a case of just matching the correct wires together. It's the Lc clock loom - 2 indicator lights in the Lc binnacle as opposed to 1 in the F2. I've got the headlight shell off to make life easier so it's just a case of sorting through. Horns, indicators, lights, front and rear stop lights, oil level sender all work plus I have a spark so it's just the clocks and idiot lights I have to finalise. The petrol pipes should arrive today, so the last thing to buy is a rear brake line. All brakes need bleeding, need to fit the petrol tap that I've refurbed, and apply the last of the rim decals. I've done loads of little bits that needed doing like a new rubber flap on the inside of the chain case, sorted the slack on the gear change lever with a new washer and circlip, tidied up some cables etc etc. So it is nearly there - only taken me 4 years !! Dusty |
|
|
|
Post by dusty350 on Nov 9, 2019 16:00:52 GMT 1
My petrol pipe arrived from Fowlers today. I couldn't find any locally that didn't have a large external diameter, so I ordered 2 pipes using Lc part numbers. I pipe looked like a short length of the grey oil tank to pump pipe Yam now supply - even had the red tracer running along it's length. The other pipe, which is slightly longer for the right hand carb as standard was 5 foot long !! But it is the correct fuel pipe with a small external diameter, so I just cut 2 pieces out of this long length. Means I've got plenty for the Café racer bike too as I'm changing the red feed pipes to black on that. So, that meant I could hook up the auxiliary tank, and finally fire her up after a 4 year sleep;  20191109_134347 20191109_134347 by dusty miller, on Flickr Sounds really nice with the Tsa's and Mutt's end cans. No fuel leaks anywhere and tickover needed slight adjustment but wasn't far off to start with. I actually built this engine about a year before I bought the bike, so it was about time I fired it up ! Dusty |
|
|
|
Post by oldbritguy on Nov 9, 2019 18:02:59 GMT 1
Sounds nice and crisp Dusty. I imagine a big grin when she first fired up.
Close to starting my own PV so will need to figure out how to post a short vid when I do
Hopefully sounds as nice as this with Mutts pipes and short ally cans
John
|
|
|
|
Post by dusty350 on Nov 10, 2019 8:51:28 GMT 1
Hi John The video is only 50% of the real sound to be honest - my phone hasn't captured the true sound of the pipes - they sound awesome ! And you can upload your vids to Flikr in exactly the same way you do your photos. Always works for me Dusty |
|
|
|
Post by tipfinchy on Nov 10, 2019 11:44:27 GMT 1
looks amazing you sure have the eye for a bike
being a big beringer fan can I ask if the calipers are for a RGV please
mart
|
|
|
|
Post by dusty350 on Nov 10, 2019 21:23:08 GMT 1
Hi Mart Yea, the Beringers are for an Rgv, but also fit others like Hyabusa etc. Were originally anodised red but someone has had it all polished back to bare alloy. They came on another bike I had, and I kept them for this build. Dusty |
|
|
|
Post by mouse on Nov 11, 2019 7:54:36 GMT 1
At last!!
Well done Dusty, looks and sounds amazing, well worth the wait!
Mouse
|
|


 I'm following a pattern I did before a few years back with my first Lc/Pv build which proved to work well. This means going back to pod filters, which I sourced from Mutts, and some larger mains. Again, the same set up as before, with 31k carbs so hopefully no dramas with jetting.


 The Pv loom is a big cheat to be honest, but I wanted a new loom as opposed to my Lc spare that is getting on for 40 years old ! I have also found a cut wire (black) coming from the taped up wires from the generator, so I will need to repair that and change a couple of plugs over, but should be straightforward. Those Kojaycat wiring diagrams make life so much easier when trying to decipher wiring !!


 So, giving this a go first !!


