|
|
Post by JonW on Jun 12, 2014 3:26:29 GMT 1
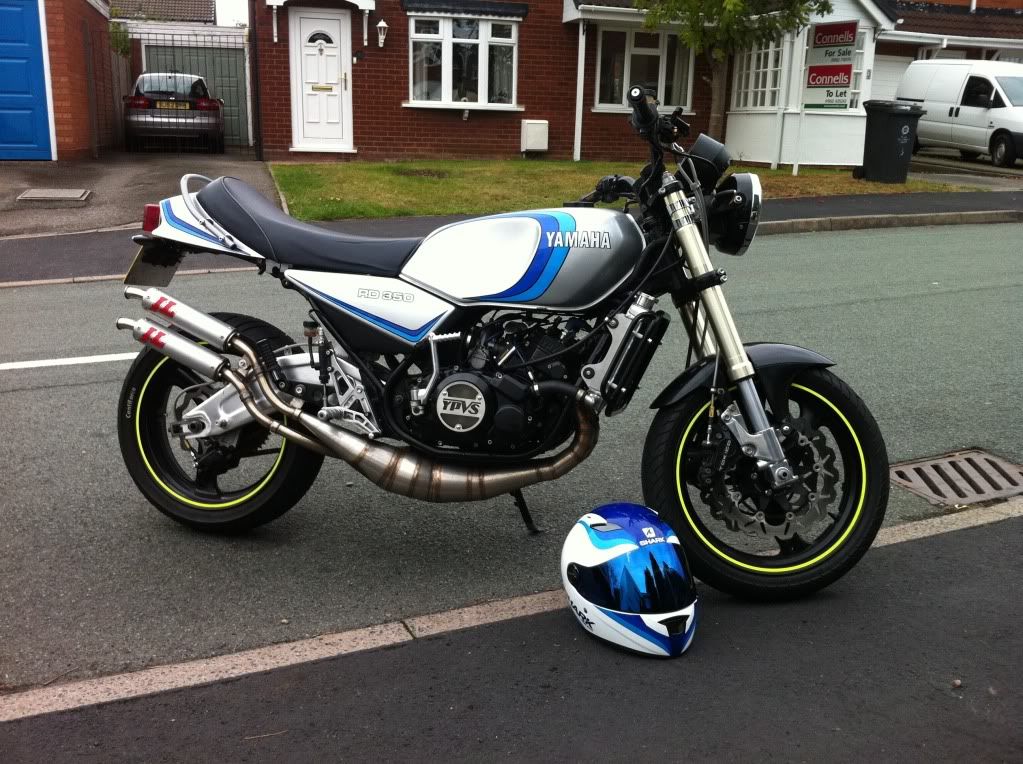
+4 key on and the flywheel went back onto the crank and I whipped out my new tool that uses a spark plug threaded insert to mount a nice new metric dial gauge to check for TDC and then measure back to get a 20deg mark for setting up my new static angle. You could quite easily see from the old and new marks that the +4key was doing its job. Now all I needed was a nice day to shift things around in the garage so i can aim the back end of the LC out of the garage and run it up and set the static angle. Of course it should be 4degrees more than it was before... but its nice to check and do it properly  While I await the next phase of that setup I did a job I was putting off; removing the cross brace on the MX bars. I did a bunch of research online and Renthal themselves say there is no issue with removing the crossbrace on their bars, which is good, and in fact reading their stats; with the brace the 7/8 bars I have are 6% stiffer than their fatbars, with the brace removed they are still 1% stiffer. Interesting stats. And of course the brace is there to cope better with the MX hits, which if you are finding on the road then you have a bigger issue all together I guess LOL! Pretty simple actually to do.... Just undo the Allen headed bolts and the brace comes out, and in doing that the clamps open up and break the seal with the bars, this is said to be a special vibration reducing glue apparently, hence they tell you never to bolt a brace back on as they don't/won't sell you the glue. Getting the clamps off would have been easier if the bars didn't have the rest of the controls on them, but a bit of bending and opening by running a long bolt into them against a bit of bar I got them off and then all the bars needed was a polish. Anyway with the brace removed the key is more accessible and while I'm not 100% sure that I prefer the look of the bike, it seems more 'standard' with unbraced bars, it is more 'road' oriented.  Of course you can see in the pic that the next job on that part of the bike is to fit the smaller reservoir and its bracket, this is the R1 one that came with the master cylinder, the old carbon topped unit is still on the GSXR master, I just left everything like this while I tested the brakes in case I wanted to go back to the GSXR unit. |
|
|
|
Post by JonW on Jun 12, 2014 5:20:23 GMT 1
Pics of the jobs now done: Bars all cleaned up after clamps removed (temp gauge will be removed and replaced with EGT that has water temp in the same unit)  New small reservoir:  |
|
|
|
Post by foxyjohn on Jun 12, 2014 12:19:31 GMT 1
The carbon reservoir top looks good nice work Jon
|
|
|
|
Post by JonW on Jun 12, 2014 13:25:57 GMT 1
Thanks mate, its from Tyga if anyone is looking for one, a bargain at something like $10.
|
|
|
|
Post by JonW on Jun 24, 2014 6:39:40 GMT 1
Bit of fun and games today looking for a mount for the EGT setup. hmm... What I would really like is to mount them above the clocks, but Its not easy as there is no real room there to increase the length of the bolts that hold the clock parts together or i would have done that with a custom bracket. So I reused one of the crossbrace clamps and mounted them to 'float' over the tank, still in my vision, probably better in fact as they will be in my peripheral vision which means I will detect the warnings quicker.  Just got to do the wiring and install the sensors now... only this lot LOL!  |
|
|
|
Post by JonW on Jun 24, 2014 8:55:12 GMT 1
Ok... Ive decided I really dont like this placement and spent an hour removing the clocks so I could mod the lower case tomorrow to take the EGT's bracket. Yeah... I know... LOL!
|
|
|
|
Post by lb on Jun 24, 2014 14:06:36 GMT 1
Dude! Why? The way you had it looked just fine.
|
|
|
|
Post by JonW on Jun 25, 2014 0:21:59 GMT 1
haha, well I am in the pursuit of perfection doncha know... er, I just worried it was a bit too far out of my line of vision when sat on the bike. Its only a few small holes in the clock cover on the bottom and will be easier to read.
One thing I did notice was that the old (cheaper range) koso temp sender was a little different to the new and I struggled to get a good seal for a while with it, I got it in the end tho with a few washers. The connecters on the new unit are all sealed clipped items and much more bike friendly that the cheapo ones. And, if anyone wires one of these up, the back of the unit has P(ower), T(emp) and R(evs) where the wires go in, write the locations down before you bolt it on (or put a bit of tape on the power one) so you cant read those as two have the same connector which is annoying.
|
|
|
|
Post by JonW on Jun 25, 2014 8:33:46 GMT 1
Anyway, I pulled the clocks and the EGT off and set to work. First I fitted the bracket to the back of the clock case. two small holes and a small slot was all it needed, the taped up the Koso wires into looms for each side of the bike:  The threaded the lot back on the bike, with the connectors for half the EGT also living inside the headlight shell to keep things neater. I reckon this is better, its easier to see and follows the line of the LC clocks pretty well I think. I also had the opportunity to drop the clocks with some spacers, this (and the removal of the cross brace) mean that the key is easier to access and ive been meaning to do it for ages.    |
|
|
|
Post by JonW on Jul 10, 2014 6:32:55 GMT 1
While I sourced some great hose clamps from Wurth for my '83 project, I bought some brake hose clamps the other day from ebay as they were easy to buy and delivery was superquick from the USA, plus they looked to be a nice selection for very sensible money (about $8 plus post!). Ok, while they're not super cool or anything I did need them and this will mean I can fit new clamps on my brake reservoir lines and also on the new oil lines when I fit them (I just dont like the OEM clamps much)... So an un-sexy product picture for todays updates.... LOL!  Today I also flushed the old blue (Shell) fluid out of the rear brake and refilled with matching 'piss yellow' fluid to the front. This came about as I was checking the reservoir clips on that run and while they were fine I noticed I was still running the old fluid, so changed it out. More dull work... After all these somewhat dull updates I also did do something kind of sexy and cleaned up and painted my recently bought LC left (flywheel side) engine cover. I originally had a cut down (not by me) RZ case side on there, but I didn't like the cut down look so wanted to go OEM on that cover. I found a half decent one on ebay but even that turned out to be scratched under its 2 layers of paint, but at least not a bad roash rash scuff like most you see these days. Anyway, not an earth shattering event but the right unit is now fitted. One thing that is interesting about these covers is that they are alloy and have an extra shift shaft bearing in them, they even have a seal on that part... which sort of seems overkill, but its a nice touch. So, do anyone know what the bolt hole at the rear part does? doesnt seem to go anywhere or do anything... hmm.... |
|
|
|
Post by fatty on Aug 12, 2015 21:07:55 GMT 1
Just seems like a few months ago !!! Am scrolling thro looking at your build...1st class.... What rearsets you using? I got mine from NK,, Had the original hangers modded so I still got the rear pegs.. They work great, I gotta get another set for bike No2.. I probably shouldnt say as most people dont like them as they look like they were made by a 5yr old, LOL! Im using old 80s Raasks. Not as trick as the modern stuff for sure and they do look like they were sand cast. To be honest whilst i like them i would really like to mod them a bit i i am honest as im not yet sure if i will use the exhaust hangers or even the passenger pegs, so with that in mind maybe i should look for some others, hmm... Raasks are not expensive at less than 100quid for a used set and they do work ok and i like the look of the pedals, they are pure 'period' mod etc. Have a gander back thru the pics in this build, there are some pics of them fitted but here they are:  Edited to add: Ive just seen that Sean has done a natty period type mod with his rearsets, check this out: rdlccrazy.proboards.com/index.cgi?board=hybridchat&action=display&thread=6937&page=4 |
|
|
|
Post by JonW on Aug 13, 2015 2:59:00 GMT 1
Thanks Ash! Glad you liked. I put all those old parts to good use and my mate Jeff still talks bout sending me all the bits after he picked em up from you. |
|
|
|
Post by JonW on Sept 10, 2015 8:33:59 GMT 1
There are a few updates that didnt seem to have made it onto this thread... so I'll paste em in: The main bit of news was this one: Ooooops! This project is about to suffer a bit of a setback.... hmm.... Last week a local lad offered for sale a complete LC in pieces as he was breaking it up. All good so far, and nice for him.... until I realised that he was about 20mins from my house. He was offering most things, including the frame... hmm.... yes, the frame.... In itself thats not a big deal, but it will be for my LC421... The issue Ive got is that while Ive slowly built this bike the values of LCs have gone up in Aus. Thats not in itself an issue, but the problem I have is that the frame I used for this bike also has its original matching numbers motor stored in a box in my garage and it now makes total sense to re-unite those two items and build a restored LC, while at the same time not at all affecting the value of this bike as its very much removed from standard, and a random frame number isn't an issue, it has RZ cases of course. I dropped over to check out the parts this morning and on the seller's (Im not sure he's on this forum) driveway was his Mars Bar LC... fek... I now want to own one of those... Sooo classy. Damn.... And yes you guessed it, I picked up a bunch of parts (some for LB as well) and Paul and I did a deal on his frame and some other bits when he is ready to sell. So... Yes... I did say a couple of things to people over the past few years: 1, I will never build a standard LC, I prefer modified bikes and the LC has spindly forks and thin rubber 2, I would never build a motor on the LC cases with LC cylinders, its old technology 3, If i ever do a standard looking LC I will do it white with blue stripes 4, I wont build any more LC/RZ motors, Ive done enough over the years To all those people I have to admit it looks like I lied... yeah, sucks to be me today... sorry.... So how much of a setback will this be for this LC421? Well not as much as you might think I reckon. The pipes needed to come off for the EGTs to be fitted and the manifold and carbs needed to come off for jetting and oil nipples and the engine clutch side needed to come off for the oil pump... Ok, yes the rest of the bike is fine, but it never hurts to clean up the dust on the hard to reach parts. While moving stuff from one frame to another will be a ton of work, I can only think my bikes win in the end and in fact Im quite looking forward to it! .... I then added a natty clutch lever I had lying around... its amazing what you have and dont know it  Since this project is going to be pulled apart I thought I ought to give it a bit of love... and also steal a part that will work on my 'resto-style' (explanation in the thread when its created I promise) LC that will be built in the future... A while back when I was building the XT I was using a KTM master cylinder so bought a set of ASV Levers for that setup as I got a good deal if I also bought the clutch side as well, I didn't really need it but, I mean... you never know do you... er...  I did buy one with a hot start lever intending to use it as a choke. Great idea, but I never used it on anything and its nice billet kit just sitting in my 'brake spares' box. :/ The 'new LC project' (NLCP? hmm...) didn't have a clutch perch and while the one on this bike wasn't really correct, it would work to get that moving, plus I reckoned I could fit the ASV setup on the LC421 which is so modified that it would fit right in. Apologies for the not so great pic quality...     Pure off road usefulness LOL  (oh and that 'natty' carbon effect sticker disk is there until I sort out the lever range as it currently touches the switches which are new Yamaha, so I dont want to chip them :smt018 ) --- and then I finally found a rad... Remember my LC421? Yeah its been in the back of the garage for a while... and while it still needs to be totally stripped so the resto bike can use its frame, Im still gathering the parts to complete it so that when I have the new frame I can get it built and registered in one fluid movement and finally use it... One thing about spending years working on the radiator for your bike is that you know all sorts of facts and things that will never get you laid... ever! Try this: The RZ rad has a tiny sub 500ml capacity and the LC rad at 750ml, just like a bottle of wine... and is the same size as the high flow RZ rads you can buy now... Useful facts for sure, but ya see what I mean? ...Yeah... Anyway, because of this I decide usually to keep my excitement about radiators to myself, but while at Wicked in LA the other month Roger showed me the Aprilia project he had been working on and in the discussion I picked up a hint about what might be the radiator fix for the 421. As regular readers and visitors to my garage may know, I’ve struggled to find a rad that would work for this bike. Those that have tried have found that cooling is interesting on these bikes, not just cos the 421 is a bit bigger than the original 350, after all it puts out a bit more power, but replacing the spindly LC forks with the RGV USDs and the fat front wheel/tyre and front guard mean that most of the air is punted everywhere except thru the radiator, not at all ideal in Australia where we have quite high summer temps. This means the bike runs warm always, even with a high flow impeller (it just pushes the water wound faster and since its not being cooled...), and in traffic it gets positively hot and so needed a real fix. While I know a few guys with big bores bought high flow radiators from ebay and other sellers, my issues with those units was usually two fold, either they were expensive (although beautifully made) or not wide enough, I say that as Oiler (Brian in Aus) had to invest heavily in a huge alloy scoop to pull enough airflow from around the sides of the front end. Very mad max, but I was hoping not to spend quite that amount of course... This left me with an ongoing (last 3 years!) project with local guy Pete (DOC03), who had an R6/RZ 421 project, to create a wide rad that would fit both my LC and his RZ frame. We designed it, made mock ups from beer boxes and did usable technical drawings, but with his eventual selling of his project that all came to an end and I was left with my 421’s cooling on the back burner indefinitely... For info the rad that Pete and I designed was planned to bring up the capacity of the unit to between 1.1-1.2L, sit 10cm wider than the standard LC unit, be 2 rows and have wider core passages. The plan was that with more coolant and width we would catch air to cool more of the coolant on each pass and as we used thermostats and a backup R6 fan we would hopefully be covered in traffic as well as the open road. We had the option to use high flow impellers or not, depending on if the bike ran cool or not and temp controllers to switch the fans in when stationary. All that fine tuning trickery aside, the biggest problem with designing your own rad is that of getting it built. Shops like PWR will love you and then quote ‘about $800’ to do this work... Ouch! The Chinese, who do some good work (when they want), have no concept of design work, they only copy. Im not joking. We even asked a few of the sellers to literally “make me the LC rad you do now, but with a 10cm wider core” and they replied ‘send me an example and we will copy it’, and no... they didn’t want to use a drawing. Hmm... So, it was fortuitous that when talking to Roger I noticed the rad on the Aprilia, one that he found as he actually had the original machine in the shop at the time he needed a solution so was able to take measurements. I took note of it and did some research when I got home and ordered this:  The units dimensions are bizarrely almost a perfect fit for the base rad that Pete and I designed after a lot of research and discussion. The core, the outside measurements and the capacity are close on what we had in those plans. Amazing. In fact my googling turned up that we werent alone in using this unit, the Kawasaki 2T boys had been using them for a few years. www.kr-1s.co.uk/forum/viewtopic.php?t=8322Ok, so no, it's not perfect. I would prefer the tanks on the top and bottom not the sides, and it still needs a bypass. And... I need to make some brackets, sort out new hoses and probably add a couple of small scoops to it, but it was only $84 shipped. ---- and today I started fitting it before the bike has its spine swap... Well after some time spent fabbing up a bracket and some more time spent adding the R6 fan to the rad and then some downtime I finally got some time today to try the dimensions on the bike... hmm... its not what Id call perfect LOL!   It could really do with being higher to catch more air through the forks, but that brings its own issues with the top hose. Still, I'll work it out. And yes... ideally it would be nice if the rad was deeper, and had the fins all the way to the edge and the tanks on top, but Ive not found a rad like that and this one is close... |
|
|
|
Post by JonW on Oct 28, 2015 12:40:21 GMT 1
Sadly I dont often update this thread these days, I tend to write more on the version of it on the RDRZ500 forum and on my website, but I will share the post below as Im sure a few here will like it. The back ground is that a few guys suggested that my long winded explanations of how/why/what/where/when for every mod was getting a bit old and that that all took away from the enjoyment of just seeing the new addition to the bike completed, ie like others do. So this time round I didnt do any preamble and wont share whats been done etc. the readers can just see it and enjoy it completed That saves time for those who read it etc etc. and for me its a different tack, maybe its a new leaf  -------- Ok, As promised... A finished article! That’s right.... No deliberation. No trying stuff and mocking up. No asking for input. No endless posts telling how I did it / what parts I used / how long it took / how much it cost etc etc . And... No making mistakes along the way... Well, not in plain sight of the public anyway! We can pretend that didn’t happen for the sake of this post So... They said it couldn’t be done. “916 style damper fitment and LCs don’t mix blah blah”. I hate it when people say stuff like that.... So... Now they do    Lock to lock...   I might adjust the clamp a little, but otherwise Im very happy with this. My feeling is that a quality damper is never a bad thing on a bike with firm suspension, a bendy-by-design frame and this much horsepower.... ------ |
|
matt7
Thrash Merchant
 Smell of the 2 stroke & the roar of the crowd
Posts: 445
|
Post by matt7 on Oct 28, 2015 22:15:16 GMT 1
Top quality Jon  I enjoy the build threads that go into tech deliberation & supposition lol, lots of pic's are great too Across the frame damper on an LC is a first for me, had pondered the idea for my Yamagamma ... Cheers Matt |
|
|
|
Post by JonW on Oct 28, 2015 22:54:33 GMT 1
Thanks for the kind words Matt, it wasnt 5 mins of work, but with time and enough thought I reckon anything can be achieved. Im excited to see your solution for this on your bike.
|
|
|
|
Post by JonW on Oct 29, 2015 4:57:33 GMT 1
A couple of other posts this thread has missed... I sorted out the rad into its final position and also added a 500 kicker... --- :smt048 KoMpRoMiZe! :smt048 Sigh... Yeah... I know... No matter how you try to dress it up and make it cool, it still sucks.... Big rads in small bikes... You get me? So, I’ve been working on the bracket for the rad Mk2. There has been a lot of head scratching and deliberation, and I’m unveiling it here for your amusement... LOL For those who want to do something similar, the problems you need to get round with this are: - It needs to sit high up to be above the wheel/guard and catch the air between the forks - The LC is very tight on the frame rails, it narrows more than the YPVS models. - The LC has a bar right where I wanted to put the fan... oh yeah, didn’t I mention Im also fitting an R6 fan, you need to step out the rad for that. - The inlet and outlets need to work for the engine connections to keep the same flow - The steering, forks and brake parts cant hit the rad when turning the bars if its too high/far forwards - The wheel/guard cant hit the rad on compression (and turn) under braking Phew... Just a few :smt048 KoNsTrAiNtZ :smt048 (see what I did there? hmmm).... So I couldn’t put the rad quite as high up as id have liked, but I did get it pretty high up on the frame, this now also looks right in silhouette which means its in the right place, Ive found that if the proportions look good and the location looks right, it often is. Next on the list for the rad is fitting the AMD (its an old IBM in joke for those reading this who’ve worked there) controller and a solution for the bypass. Hmm.... Watch this space... The bracket with the fan fitted:   With the rad bolted on:    Hose alignment isnt bad with OEM and YFZ hoses:   A couple to show that I also deblingled the rad by bush finishing the tanks after polishing them, I always wanted this bike to have a less showy look n feel.   And one of the Tridon lever cap, Im sure people will ask if I don't put one up. The yellow isn't a terrible match to the bodywork actually.  ----- I’ve always wanted one of these 500 kickers... I know its crazy but I reckon they look the best of the aftermarket units and of course we all know they are light, strong and decent quality, which is sadly not always an accusation you can lobby at all of the aftermarket units. But everyone seems to want one and now they command strong money where I am and post always seems to kill the deal from overseas. Last week I was idly perusing ebay and found a local breaker had one in stock, it looked a bit scabby and wasn’t cheap but a couple of emails later and it was mine for a bit better than the ebay price, phew!  First question was how to mod it to fit the 250/350 application... Reading around on the net, it appears that there are three schools of thought; Modify the 500s body to fit the original 250/350 knuckle or modify a 2/350 knuckle to fit the 500 starter arm, or use the original 500 arm and knuckle. Option 1 is pretty easy, you just cut/file down the body of the starter arm. I didn’t want to go this way as being alloy I think you want a bit of strength at this point, its where the cranking occurs and there is quite a bit of force across this areas. And why modify (and potentially ruin) an expensive part if you don’t have to... Option 2, Requires you to extend the 250/350 pivot at the knuckle to accommodate the extra height of the 500 kicker. This can be done in a number of ways, either by welding on the 500 pivot, extending the old pivot or drill and tap the pivot to accept a bolt to hold the 500 arm on. Option 3, In order to keep the original 500 knuckle you need to drill and tap the 250/350 kickstart shaft to accept a bolt. This is close to the OEM fitment for the 500 kicker which uses a big washer and nut to keep the kickstart on the splines, not a clamp like the smaller bikes. But the mods don’t stop there as you also have a small problem in that the 500 unit also turns within its own setup, and needs a dab of weld on the two parts of the knuckle to counter that. In the end I decided to go with a two phase approach based on option 2 and drill, tap and fit a spacer with a bolt in the top of the 250/350 knuckle. The 250/350 part is actually only about 6mm shorter than the top edge of the 500 kicker as in use it sits about 5mm above the 250/350 arm to allow for the OEM washer and clip fixing, this means the majority of the 250/350 pivot arm is in use when fitting the 500 unit, this got me thinking about the mechanical strength of the joint and how much force would be exerted on the fixing for the kicker. I believe the fixing I’ve created will be strong enough, but if it isn’t I will either extend the pivot pin with weld or fit the 500 knuckle, we’ll see, so far Ive only modified a 250/350 part which I had spare anyway.  I used a KTM 620SC OEM alloy exhaust mounting washer, its the perfect size to match the width of the starter arm body as well as the OD of the pivot is the same as the ID of the body, plus it is thick and strong yet light weight. I’ve fitted a lock washer between it and the pivot pin to give some movement and help lock it in place, with a nylon washer between the big washer and the kicker body to allow decent rotating movement. The 500s ball bearing fits the 250/350 knuckle so that part you get for free, tho you do need the 500s lower plate if you don’t modify the divot on the 250/350 knuckle. I didn’t modify that, but could have done, its originally steel to protect the alloy kicker from wear so I kept that feature in my setup. Leaving it out would gain you 2mm of height on the knuckle and mean more of the pivot was inside the the kicker arm, adding strength.  I blasted the grubby and nastily painted/chipped 500 kicker with glass bead after tidying up the casting a little. Serviced the ball bearing parts and blasted/painted the OEM 500 lower spacer plate. Once dry I assembled it on the bike with loctite, while ensuring the action felt smooth yet firm. Looks good and feel strong, lets see what its like in use I guess...  One of the things I really like is how neat the 500 kicker is when not in use, its got a subtle bend in it to keep it closer to the bodywork than the OEM 4L0 or 29L units  --- |
|
matt7
Thrash Merchant
Smell of the 2 stroke & the roar of the crowd
Posts: 445
|
Post by matt7 on Oct 29, 2015 20:51:33 GMT 1
That radiator looks too big in my humble opining , flippin top notch assembly though. I've been running a modded 500 kicker for years, option 1 - shaved kickstart height/width, no problems This is quite a pretty lil thing on Yamagamma  Cheers Matt |
|
|
|
Post by JonW on Oct 30, 2015 0:20:28 GMT 1
Bizarre I replied to this and its disappeared :/ Anyway... Thanks Matt. Interesting, I dont think its too big at all. It may look big in the close up pics, but its shorter than the OEM, but is thicker/wider etc. The size was decided as Im in Aus and temps here hit 45degC, and in summer its in the mid to high 30s a lot etc. I think cooling will be a problem but am prepared to blank off as needed, and id rather start too cold than too hot LOL. So, I have a 55degC stat, high flow impeller and an R6 fan if i need it in traffic... which I have a lot of where I live as im in the city traffic, so it wont always have air running thru it. Im not saying my solution is perfect for everyone, but Ive worked out what I need for my location and bike (forks/motors/aeros etc) and reckon this is about right. But... its as yet untested so we shall see. Is that a 500 kicker or a YZ? I ask as its a different shape to mine? |
|
|
|
Post by yazza54 on Oct 30, 2015 7:26:24 GMT 1
Did you ever dyno this bike Jon?
|
|
|
|
Post by yazza54 on Oct 30, 2015 7:40:11 GMT 1
As a few of you may remember from another thread, ive been searching for a good way to sort out my thermostat and temp sender for my Athena 392/421 kit on my LC. The Athena isnt like the LC or the YPVS heads as it has no thermostat unit bolted on and no provision for the temp sender. So yeah, not ideal... So what were my options...? Welll..... 1, Roger from wicked who sold me the Athena kit suggested I drill and tap the head and fit the sender in there, which would have been a great idea as I could then have used a KTM inline thermostat unit which I have here on my desk... A great solution, except ive already fitted my head and the engine is in the bike, plus I don't have the right tapered tap in my tap box... hmm... I could have used a M10 tap and an insert of course, and I have that stuff... But take the engine out and whip of the head again... No thanks.... 2, I could engineer a plate for the KTM thermostat unit that I could fit a temp sender into... Seems a lot of work by hand and would it even seal? I could get it CNC'd, but that would make it expensive for a one off... I could have 100 made and sell them on... Not likely to be cost effective now is it LOL... Next!!! 3, I could do what the other guys do who fit these top ends, and buy an inline thermostat unit that does already have a hole for the temp sender already drilled and tapped into it... These units range from about $80 to almost $200, and they vary in size, shape, colour, material and also the temp of the thermostat mechanism, the size of the temp sender hole and also the quality... So, since I don't really want to whip my motor out again and drill the head, and I don't want to mess with a KTM thermostat housing, I was left with option 3. I should have just got on with finding one ages ago instead of playing with options 1 and 2 now shouldn't I.... Those other guys went that way for a reason... LOL! I will freely admit I didn't do this lightly. In fact, I spent days trawling the net, looking at car, bike, ATV and Kart units, speaking to suppliers and putting sneaky low bids on ebay items... Yeah, kinda like everyone else does LOL! But... In the end I found the perfect thing for what I want at the best price, and its about 5km from my house! How bizarre is that!? Check this out... sqracing.businesscatalyst.com/CatalogueRetrieve.aspx?CatalogueID=8513&ProductID=655184The unit is not quite the right size, ie it's not really short enough to fit above the head and below the rad inlet partly as I have had my Athena head welded with a 90Deg elbow and extension, but the unit does have very long ends, so I planned to cut a little off the top and bottom to get the fit i wanted.  Other specs that work for this application: it's 19mm OD for the hose's which I have at 19mm ID, and the stainless stat opens fully at 55DegC, just what I wanted. The hole for the temp sender is M10 x 1.00 which is perfect as I have bought a kit of brass pressure fittings (on ebay from NZ for something like $10) that have an various options to fit the tapered thread of the RZ temp sender.... And its only Au$69.95. Nice! Cheapest i could fine on ebay was $80 +post. So I rang up these guys and spoke to a guy called Martin who it turns out is a top bloke, he told me they do all sorts of other parts not yet on their site and they've built their own kart engine. Seems they had trouble with the normal brass (?) stats breaking up after a few hours being run ragged in a kart so they had to look for another solution and in talking to thermostat manufacturers they found this stainless option that was a lot better built. Result is these last in their karts so will last in a road bike. When it landed I stripped it down as I wanted to have a look at this mini stat. Its a chunky and solid looking unit I have to say. No way will it fall apart. I also wanted to check out the body internal sizes as I need to make sure the temp sender doesn't contact the far side of the unit when fitted, plus since I wanted to mod it a little for length I needed it apart (see below). The unit has no seal other than the one round the thermostat itself, just like the YPVS unit of course.  Love this nice engraved arrow! Its the little things LOL Shame its hidden ebhind the rad... oopps.  Here it is pictured with the KTM remote thermostat which I was going to use, these are great as they are also 55DegC and nice and short, but of course no provision for a temp sender.  Temp senders.... I have a bunch of rough looking units here and I wanted to get a new one, so I bought a bunch of those off ebay for a landrover which are the same unit I am told, and only 3quid a pop! The pressure fittings needed work of course. They are designed for oil senders and so have a little hole and needed drilling out for the temp sender to fit through into the water. Simple to do with a drill if you have thin senders but the landrovers are over 8mm which means the thread would die on the fitting... so i had to turn down the senders and found they die at 7ish mm... hmm... in the end i found an LC one with a 6mm end.. i used that. But interesting to know you can thin down a LR part if you ever needed to... LOL So here is a pic with the temp sender fitted instead of the blanking plug and also a few mm cut from each end, and I also dulled the sharp edges off the serrated hose ends as they were really sharp. I did this as I am fitting silicone hoses and they would have been cut by the sharpness of the unit instead of just grabbing nicely which they would do with rubber.   Resurrection of an old post but how does the stat work with no bypass? When closed does it try and draw water out the bottom of the rad but it has no where to go? Then when it opens you get the full lot of cold coolant? Have you found that when the stat opens the temp plummets again? |
|
|
|
Post by JonW on Oct 30, 2015 8:44:54 GMT 1
The stat has a hole (or two) in it but I hear what youre saying, I hadnt noticed the whoosh of cold but its only been heat cycled a few times and not been dynod, ive been very lazy with this sloooow build :/ Its not been run with the new rad at all, its got no carbs on it at the mo... And... its all coming apart soon to swap the frame out of it too |
|
|
|
Post by yazza54 on Oct 30, 2015 9:02:59 GMT 1
At least it has holes to let some warm bleed through and mix with the cold I just always worry about expansion rates.
f**kin ell mate get out there and enjoy the thing
|
|
|
|
Post by JonW on Oct 30, 2015 10:10:16 GMT 1
LOL, Well I will, ive just got a few more bits to do... and I do love tinkering |
|
matt7
Thrash Merchant
Smell of the 2 stroke & the roar of the crowd
Posts: 445
|
Post by matt7 on Oct 30, 2015 20:41:55 GMT 1
Is that a 500 kicker or a YZ? I ask as its a different shape to mine? No, PW80 aftemarket on ypvs knuckle |
|
|
|
Post by JonW on Oct 30, 2015 22:40:47 GMT 1
Ahh I see, when I read what you wrote and saw the pic I thought you were saying its a 500 unit, but I see now what youre saying. I actually have one of those aftermarket PW uints here on my bench...
|
|
|
|
Post by unrealedd on Dec 5, 2015 18:38:30 GMT 1
Hi jon i'm loving your steering damper solution on the LC do you have any diagrams/dimensions for the brackets you used or is this Top Secret. Great work btw really enjoy reading your posts.
|
|
|
|
Post by JonW on Dec 5, 2015 23:11:34 GMT 1
Hi Edd, not top secret, but there arent really any plans or dimensions and it was quite a bit of work to get done. I spent hours and hours looking at bikes parked on the street and then more time looking at listings for kits on ebay and finally bought a bunch of CNC bracket kits off ebay. Then did a lot of measuring and created a design of how they would fit, then borrowed a mates mill to redo the profiles of the mounting surfaces to get them to fit how I wanted as the RGV top triple and the LC frame is not like anything else they have kits for now. I also made and welded two threaded plates to the headstock to mount the 'tower' to the frame. As the Americas say, 'its a neat solution', they mean its cool but I would say 'neat' also as in what the rest of us mean, ie 'its a tight fit'. If you want to do something similar you might want to look at tall towers like the cb400 to clear the tank, thats a key component, but after that it depends on your forks and for me I added parts of the R6 (I think it was R6, anyway it also had to be reemed out to fit the damper and took ages by hand!) damper kit and then a bar mount, but the top mount may depend on your damper and where/how it needs to locate on the tower. I say that as I doubt many will have a spare Arrow lying around to do this, I actually picked that up in a local bike shop's sale last year for $50 brand new... yeah, mental i know... it had an original price on the box of $760! Anyway, absolutely not 5mins of work to do this, but hopefully ive saved you some time with sourcing the parts.
|
|
|
|
Post by unrealedd on Dec 6, 2015 22:17:58 GMT 1
Nice one jon, some great information there. This really does impress upon me the time and dedication you all put into your builds and mods. I will mull over the information you have supplied and see what i can source as your set up really does look neat.
Great work there and looking forward to this beast of yours running down the street.
Keep up the great work and thanks for the in depth reports.
|
|
|
|
Post by JonW on Dec 6, 2015 22:47:06 GMT 1
No worries Edd thanks for the kind words. Ive always found that when doing stuff like this you will spend (more than) a bit of time just holding all the parts in place and trying to see how it will work when the bars are turned etc, my biggest issue was that I wanted the damper to lie at 90 deg when the wheels are straight, but in fact you almost never have the bike straight unless at a bike show, so maybe dont worry about that so much as I did. LOL
I reckon if you get some 8 or 10mm Alloy and have a dremel and taps you could make your own, you would be better with a mill and lathe, but you could do it. start with making a wood or plastic based (I quite like old thick chopping boards) template and go from there once youve worked out a fitment. I started with what I hoped would clear the tank and also put the damper in the right place, and that was cb400 'tower', once you have something like that in place, the rest seems to just follow. Of course as I used a lot of the CNC parts off ebay and once Id chosen the bits that were closest I then modded them, so I saved a bunch of work, but also had a lot of random parts left over and the cost wasnt as low as you might hope but, the outcome for me was that all the CNC created parts are the bits that on show, generally the ends that I modded are hidden as its where the items mount to the bike, that gives the finished install a more CNC look as no matter how good you are on a lathe or mill you are not a CNC.
Anyway, good luck when you decide to do this, its satisfying when its done and you turn the bars and it all runs smoothly and works like a charm, I was surprised no one else had done it really as there is room, tho it is tight as in my view its a billion times better looking that slinging a damper on the side to a fork leg.
|
|


 I did buy one with a hot start lever intending to use it as a choke. Great idea, but I never used it on anything and its nice billet kit just sitting in my 'brake spares' box. :/


