|
|
Post by shaunthe2nd on Jul 27, 2021 22:35:33 GMT 1
Someone was asking about 31k kidney clock repair, and the fact you can't obtain replacement clock covers, so thought I'd put this post up to give people an idea of what is possible. I've been gathering up 31k LC2 clock parts for a while, mostly broken, with missing bits and had km clocks with very tatty facias. This is what I roughly put together to see what I had...  Outer casings broken, one with cracked 'glass' also  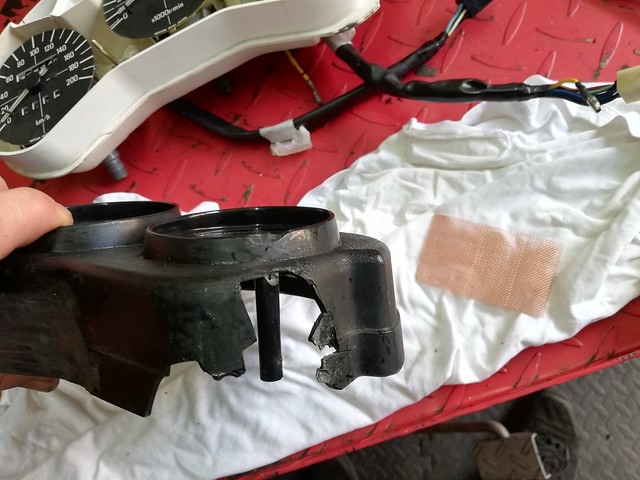 Used some copper mesh and a 2-bond to provide some strength to cracks and repairs..  Bonded in some donor sections using same method... 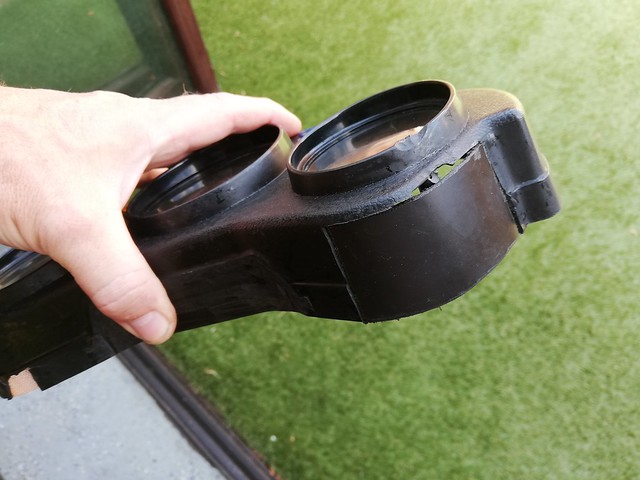  An old 4L0 clock housing donated the parts...  Then plastic welded the outside, and used a dremel t tidy up a bit.  On one of them I had to cut out the broken 'glass' from inside, clean up the area, and insert and fix with silicon a replacement acrylic glass. section. I also fitted the Alan Kelly ignition surrounds. I cut out the remains of the existing and used it as a welding rod! Then similar process with the white inner casing. Cut broken parts to a workable shape.  Then find a donor....   ... and use of copper mesh on inside to give some strength...  Bond in the donor parts and then plastic weld....  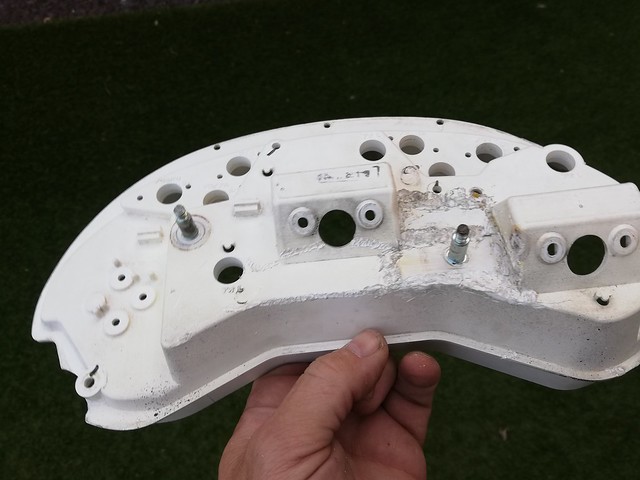 I cleaned the welding up a bit with a dremel but didn't take a picture. Then turned attention to the instruments. Both speedos were km type, so changed the gearing to miles (no pictures), zerod clock, serviced them, and fitted new semi-rigid overlays.   The top one in pic below has the new facias, the bottom one the old ones:  As I only could source one pair of loom connectors, I made up another set from donor sub-looms I had kicking around so could complete both units. 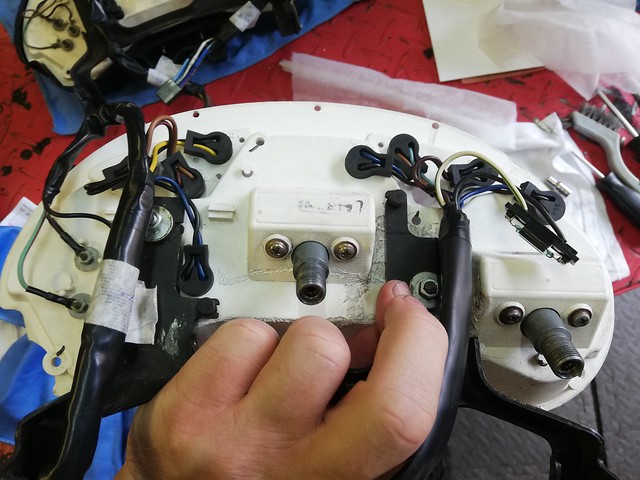 And then final assembly...  I've tested the looms, had a few teething problems but all sorted now. Drill tested the speedos and tachos. All I have left to do is fit them to bike and test/adjust the temp guages. It takes a while, and you need to be patient, both sourcing parts and refurbing, but worth it in the end. |
|
|
|
Post by abar121 on Jul 27, 2021 22:43:08 GMT 1
Looking good. Did you cut the acrylic glass replacement?
I need one for a rev or speedo on my kidney clocks.
|
|
|
|
Post by shaunthe2nd on Jul 27, 2021 22:45:29 GMT 1
|
|
|
|
Post by JonW on Jul 28, 2021 1:07:19 GMT 1
Great work!
I also had to repair the white inner on mine. It seems these take the brunt of any accident as the bracket is bolted to it. Something those not familiar with this setup might not expect. Sometimes you can find better white inners as they seem to be more plentiful than the other parts. The top case being the one thats so very hard to find.
With some careful dremel work and a bit of blasting with the right size media and a repaint Ive found you can replicate the outer finish of these clocks as well, but its a chore and mostly wont be seen of course in use.
|
|
|
|
Post by stirling11 on Jul 28, 2021 3:12:23 GMT 1
Wow, that is just awesome
Great job, shows what time and patience and craftmanship can do
Unfortunately I have the time but not the patience or craftmanship, ah well 1 out of 3 ain't bad lol
|
|
|
|
Post by oldbritguy on Jul 28, 2021 7:21:14 GMT 1
Superb Shaun Thanks for sharing with the forum. I have a set needing some TLC on the top case plus new lenses so this has set me up nicely for a therapy session come winter time. Ill need to bookmark this thread for reference Top man John  |
|
|
|
Post by element137 on Jul 28, 2021 9:19:20 GMT 1
Thanks for sharing - good to learn from - how easy is to swap internals over between clocks ?- I have MPH set ( with damaged external casing ) and KM set with good external casing- is it easy enough to take the internals out of the MPH unit - and put them in the KM unit - straight swap ?- apologies if this is a dumb question.
|
|
|
|
Post by abar121 on Jul 28, 2021 9:53:56 GMT 1
Perfect. Can I ask the diameter? I'm away at the moment and will order one for when I return. |
|
|
|
Post by shaunthe2nd on Jul 28, 2021 10:17:22 GMT 1
Thanks for sharing - good to learn from - how easy is to swap internals over between clocks ?- I have MPH set ( with damaged external casing ) and KM set with good external casing- is it easy enough to take the internals out of the MPH unit - and put them in the KM unit - straight swap ?- apologies if this is a dumb question. Yes its a straight swap if the mechanisms are both in tact. You can also convert a km set to mph but that is a bit more tricky as you have to swap out a pair of internal gears to do it, and also replace the facia, and re-set the needle position. |
|
|
|
Post by shaunthe2nd on Jul 28, 2021 10:21:40 GMT 1
Perfect. Can I ask the diameter? I'm away at the moment and will order one for when I return. I only swapped out the temp guage 'glass' which was 68mm diameter. I didn't need to do the speedo nor tacho, they are bigger, but I didn't measure those unfortunately. I cut out the old glass from underneath so as not to damage the outer housing face. There is an inner rim which i dremelled off. I could then measure the size of the replacement glass. I ordered it and came 2 days later from that link. |
|
ajh
Thrash Merchant

Posts: 415
|
Post by ajh on Jul 28, 2021 16:04:03 GMT 1
did you get a headache or a high from all those plastic welding fumes |
|
|
|
Post by shaunthe2nd on Jul 28, 2021 17:57:52 GMT 1
did you get a headache or a high from all those plastic welding fumes I know what you mean, pretty toxic. I always do my plastic welding whilst sat in the garden, not the garage for that reason. |
|
|
|
Post by brigitte on Jul 28, 2021 18:00:38 GMT 1
did you get a headache or a high from all those plastic welding fumes I think I would just become sick.
Shaun wrothe "serviced them". I understand, the little gears need a a small amount of grease. But what is the right stuff? Maybe silicone oil?
|
|
|
|
Post by shaunthe2nd on Jul 28, 2021 18:13:54 GMT 1
did you get a headache or a high from all those plastic welding fumes I think I would just become sick.
Shaun wrothe "serviced them". I understand, the little gears need a a small amount of grease. But what is the right stuff? Maybe silicone oil?
Once stripped I clean all internals with cotton buds, including the rotating dome and damper etc. Make sure everything correctly aligned and smooth. I use the smallest amount of molybdenum grease on the metal gears and the connectors barrel to cable. I always test with a drill at multiple speeds to ensure everything is running correct before re-sealing. I also speed test them at 4 known speeds to ensure they reading ok. |
|
|
|
Post by shaunthe2nd on Jul 28, 2021 18:19:04 GMT 1
To add to the above comment, the temp guage is actually the hardest to re-set if you remove the needle, which you have to do if changing the facia of the temp guage. I put it back at what I think is the correct position, but then I have to fit the clocks to my bike and test the temp guage by holding the temp sensor into water at different temps. The readings should then be...  |
|
|
|
Post by JonW on Jul 29, 2021 2:04:26 GMT 1
I wear a proper mask and also run a fan across the job when doing plastic welding. You do not want to breathe in that smoke...
|
|
|
|
Post by steve63 on Jul 29, 2021 12:55:44 GMT 1
To add to the above comment, the temp guage is actually the hardest to re-set if you remove the needle, which you have to do if changing the facia of the temp guage. I put it back at what I think is the correct position, but then I have to fit the clocks to my bike and test the temp guage by holding the temp sensor into water at different temps. The readings should then be... Fantastic job. Very impressive. You've saved them cases from the bin. I wonder how many of these would have been skipped back in the day. I repaired a nose cone for a mate that had big chunks missing. The bike was a proddy bike so It didn't need to look nice, just be there. I guess the clocks were in a similar state after the bike had been down the road on many occasions, the guy did seem to enjoy the sound of metal/plastic on tarmac, but the same applied to them. How do you check the 115°C? I suppose by the time it gets that high there's something drastically wrong or you're stuck in a horrendous traffic jam  |
|
|
|
Post by drc on Jul 29, 2021 15:12:02 GMT 1
Great job saving them from the bin. These look fantastic.
|
|
|
|
Post by mattybeckett on Jul 29, 2021 20:14:46 GMT 1
Brilliant work there 👍
|
|
|
|
Post by donkeychomp on Jul 29, 2021 21:19:36 GMT 1
Fantastic job! Makes sense these days not to bin anything, no matter how bad it looks.
Alex
|
|
|
|
Post by reedvalve on Jul 29, 2021 22:24:56 GMT 1
Excellent job, really interesting to see what can be achieved with a bit of patience and skill. The welding on the white inner case looks really good and I'm impressed with how you managed to build up the black outer, what tool do you use for the plastic welding and is there any particular technique you find works best?
Chris
|
|
|
|
Post by JonW on Jul 30, 2021 0:29:36 GMT 1
Search on plastic welding, a few of us have shown how to do it before.
|
|
|
|
Post by shaunthe2nd on Jul 30, 2021 8:21:04 GMT 1
Excellent job, really interesting to see what can be achieved with a bit of patience and skill. The welding on the white inner case looks really good and I'm impressed with how you managed to build up the black outer, what tool do you use for the plastic welding and is there any particular technique you find works best? Chris I use a gas filled soldering iron as can use it outdoors as gives off horrible fumes. I fit the bladed nozzle for welding rather than the pointed nozzle i use for soldering. For cracks, I simply move the iron sideways across the crack whilst running it along the crack to seal he crack, both sides if possible. For infill, you need some donor material of the same type. I cut into small strips first, then using the iron blade melt a bit off at a time and at same time push it into the gap. Don't worry about it looking good at first, just get the fill near where you need it. Once its roughly done you can go back and using the side of the blade melt and blend/smooth the plastic until you are happy. Its hard to get perfect but you can get it functional. Some people use copper wire melted into the weld for stiffness. I usually use copper mesh bonded on inside, and plastic weld on outside as shown in my thread. As said above do a search on here, and also do a similar search on uTube as some good videos on there too. |
|


