|
|
Post by tony1964 on Feb 19, 2018 21:01:59 GMT 1
Hi Tony It's moving on then  I lube the crank with the same oil you intend to use through the pump or premix - makes sense to keep it the same. And genny side oil seal - pretty sure this seal can go either way with no issues but I'm sure when I asked the question before, guys fit it with the wording on it facing out. More important is to remember the other side - castellations face inwards towards the crank. Dry fit the crank and bolt up the cases fully to make sure the crank spins freely, before parting the cases and adding your sealant - saves a lot of mess if you find a tight spot otherwise Dusty  Hi Dusty, Slowly.. Did you use an anti seize paste when using st/bolts joining your case halves together? i know stainless and aluminium have the tendency bind together after a while. Tony |
|
|
|
Post by dusty350 on Feb 19, 2018 22:01:03 GMT 1
Hi mate Yep. I did Dusty |
|
|
|
Post by hudtm60 on Feb 20, 2018 6:31:23 GMT 1
Sorry for the mini hijack of thread but thanks again Dusty for the invaluable advice- and the point about the dry fit is a good one too.
Cheers
Chris
|
|
|
|
Post by hudtm60 on Feb 20, 2018 6:49:41 GMT 1
by the way tony1964...(and apologies if you already know this, I didn't see a reference in your thread but I'm half blind) BUT if you haven't read Dusty's rebuild thread it's a smashing read with tons of pics that has helped me to a lot... rdlccrazy.proboards.com/thread/34544/rd350lc-engine-rebuildhe suggested copaslip for an anti seize paste.  |
|
|
|
Post by yamark on Feb 20, 2018 6:53:24 GMT 1
Here's a question while there's some attention on this stage of the rebuild... 1) Anyone ever use bearing mount like in the pic? and/or 2) When joining the cases together do you put sealant around the outside of the bearings or do we trust the metal to metal to seal?  I used bearing lock on my crankshaft mains and it created tight spots when the crank was rotated. Bearing lock is great for a loose bearing - I've used it on LC water pump bearings before. |
|
|
|
Post by hudtm60 on Feb 20, 2018 6:57:43 GMT 1
Thanks Mark...I may do that....the old bearing literally fell out so it might warrant it in that location...or for bearing without them pips.
|
|
|
|
Post by wallcraft on Feb 20, 2018 10:13:28 GMT 1
Here's a question while there's some attention on this stage of the rebuild... 1) Anyone ever use bearing mount like in the pic? and/or 2) When joining the cases together do you put sealant around the outside of the bearings or do we trust the metal to metal to seal? I used bearing lock on my crankshaft mains and it created tight spots when the crank was rotated. Bearing lock is great for a loose bearing - I've used it on LC water pump bearings before. Hi Yamark, how did you get over the tight spots in the end, just about to loctite one of mine but not done it before!! |
|
|
|
Post by tony1964 on Feb 20, 2018 10:24:02 GMT 1
by the way tony1964...(and apologies if you already know this, I didn't see a reference in your thread but I'm half blind) BUT if you haven't read Dusty's rebuild thread it's a smashing read with tons of pics that has helped me to a lot... rdlccrazy.proboards.com/thread/34544/rd350lc-engine-rebuildhe suggested copaslip for an anti seize paste. Thanks mudtm60 for refreshing my memory, i'm sure it's an age thing.. |
|
|
|
Post by yamark on Feb 20, 2018 18:47:57 GMT 1
Wallcraft- Hi Yamark, how did you get over the tight spots in the end, just about to loctite one of mine but not done it before!!
Hi, I had this on the LC550 triple. My main bearings are not pegged, so I used bearing lock, and the crank had three tight spots from memory. I checked the rotation of my crank in the morning (I assembly it the previous evening), separated the cases and the bearing lock was a solid film- like a very thin piece of plastic. I only put two small drops on each bearing. So I assume the bearing lock squashes and deforms the bearing. After I cleaned the cases up, I reassembled, and still had a slight tight spot. The third time, I altered the tightening sequence of the nuts(I had 12 on the triple), and combined with 2 nuts a fraction under torqued, had no tight spots.
Hope that helps , Mark |
|
|
|
Post by Tobyjugs on Feb 20, 2018 20:02:21 GMT 1
There are different types of bearing fit loctite. You need to use the correct type for the tolerances of the fitted part.
A crankshaft main bearing would have a very small tolerance or an interference fit. You need to then find the correct type, which I think off the top of my head is 603.
If you use the incorrect loctite product, when you close the joint and no air is present it immediately go's hard creating a thick piece of loctite which takes up too much room causing deformation of components.
This term is generally known as shimming.
I do not like to use loctite on the crankshafts for the engines I build. That's not to say I won't use it, I am just very carefull or fussy where I do use it.
Go to the loctite website to check you have the right product for your application.
|
|
|
|
Post by tony1964 on Mar 10, 2018 12:39:59 GMT 1
It's coming together now, slowly but surely. 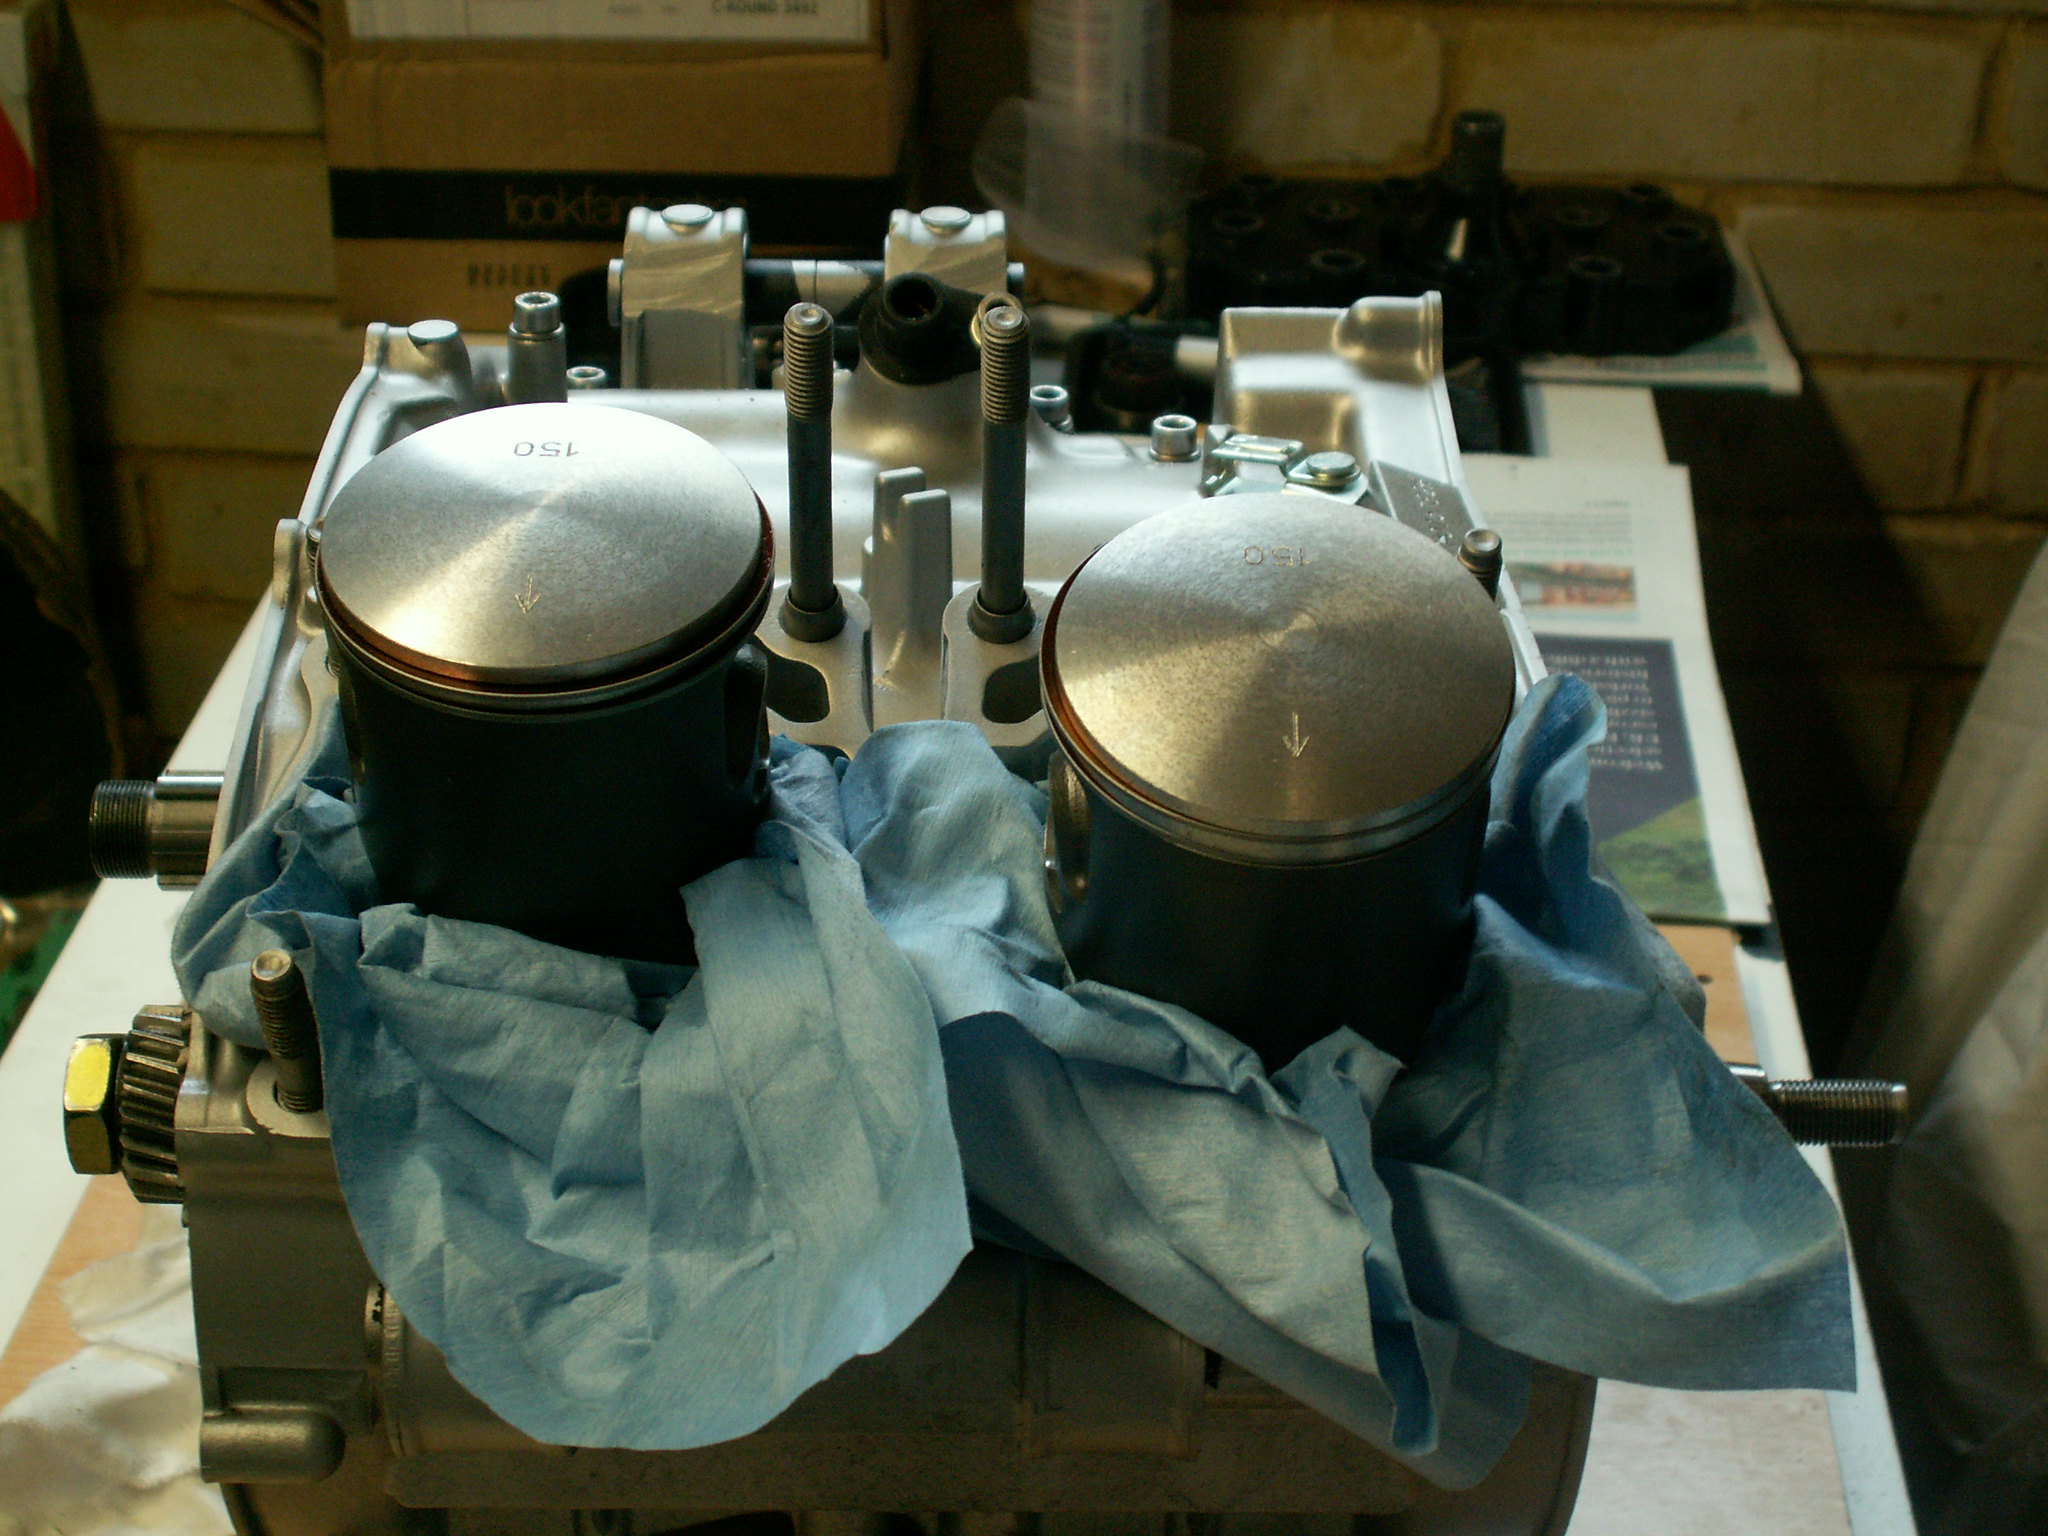 PICT2621 PICT2621 by Anthony Baker, on Flickr New pistons fitted, i don't remember Cir-clips being such a pain to fit.  PICT2613 PICT2613 by Anthony Baker, on Flickr Time to rebuild the power valves, all nice new shiny parts. 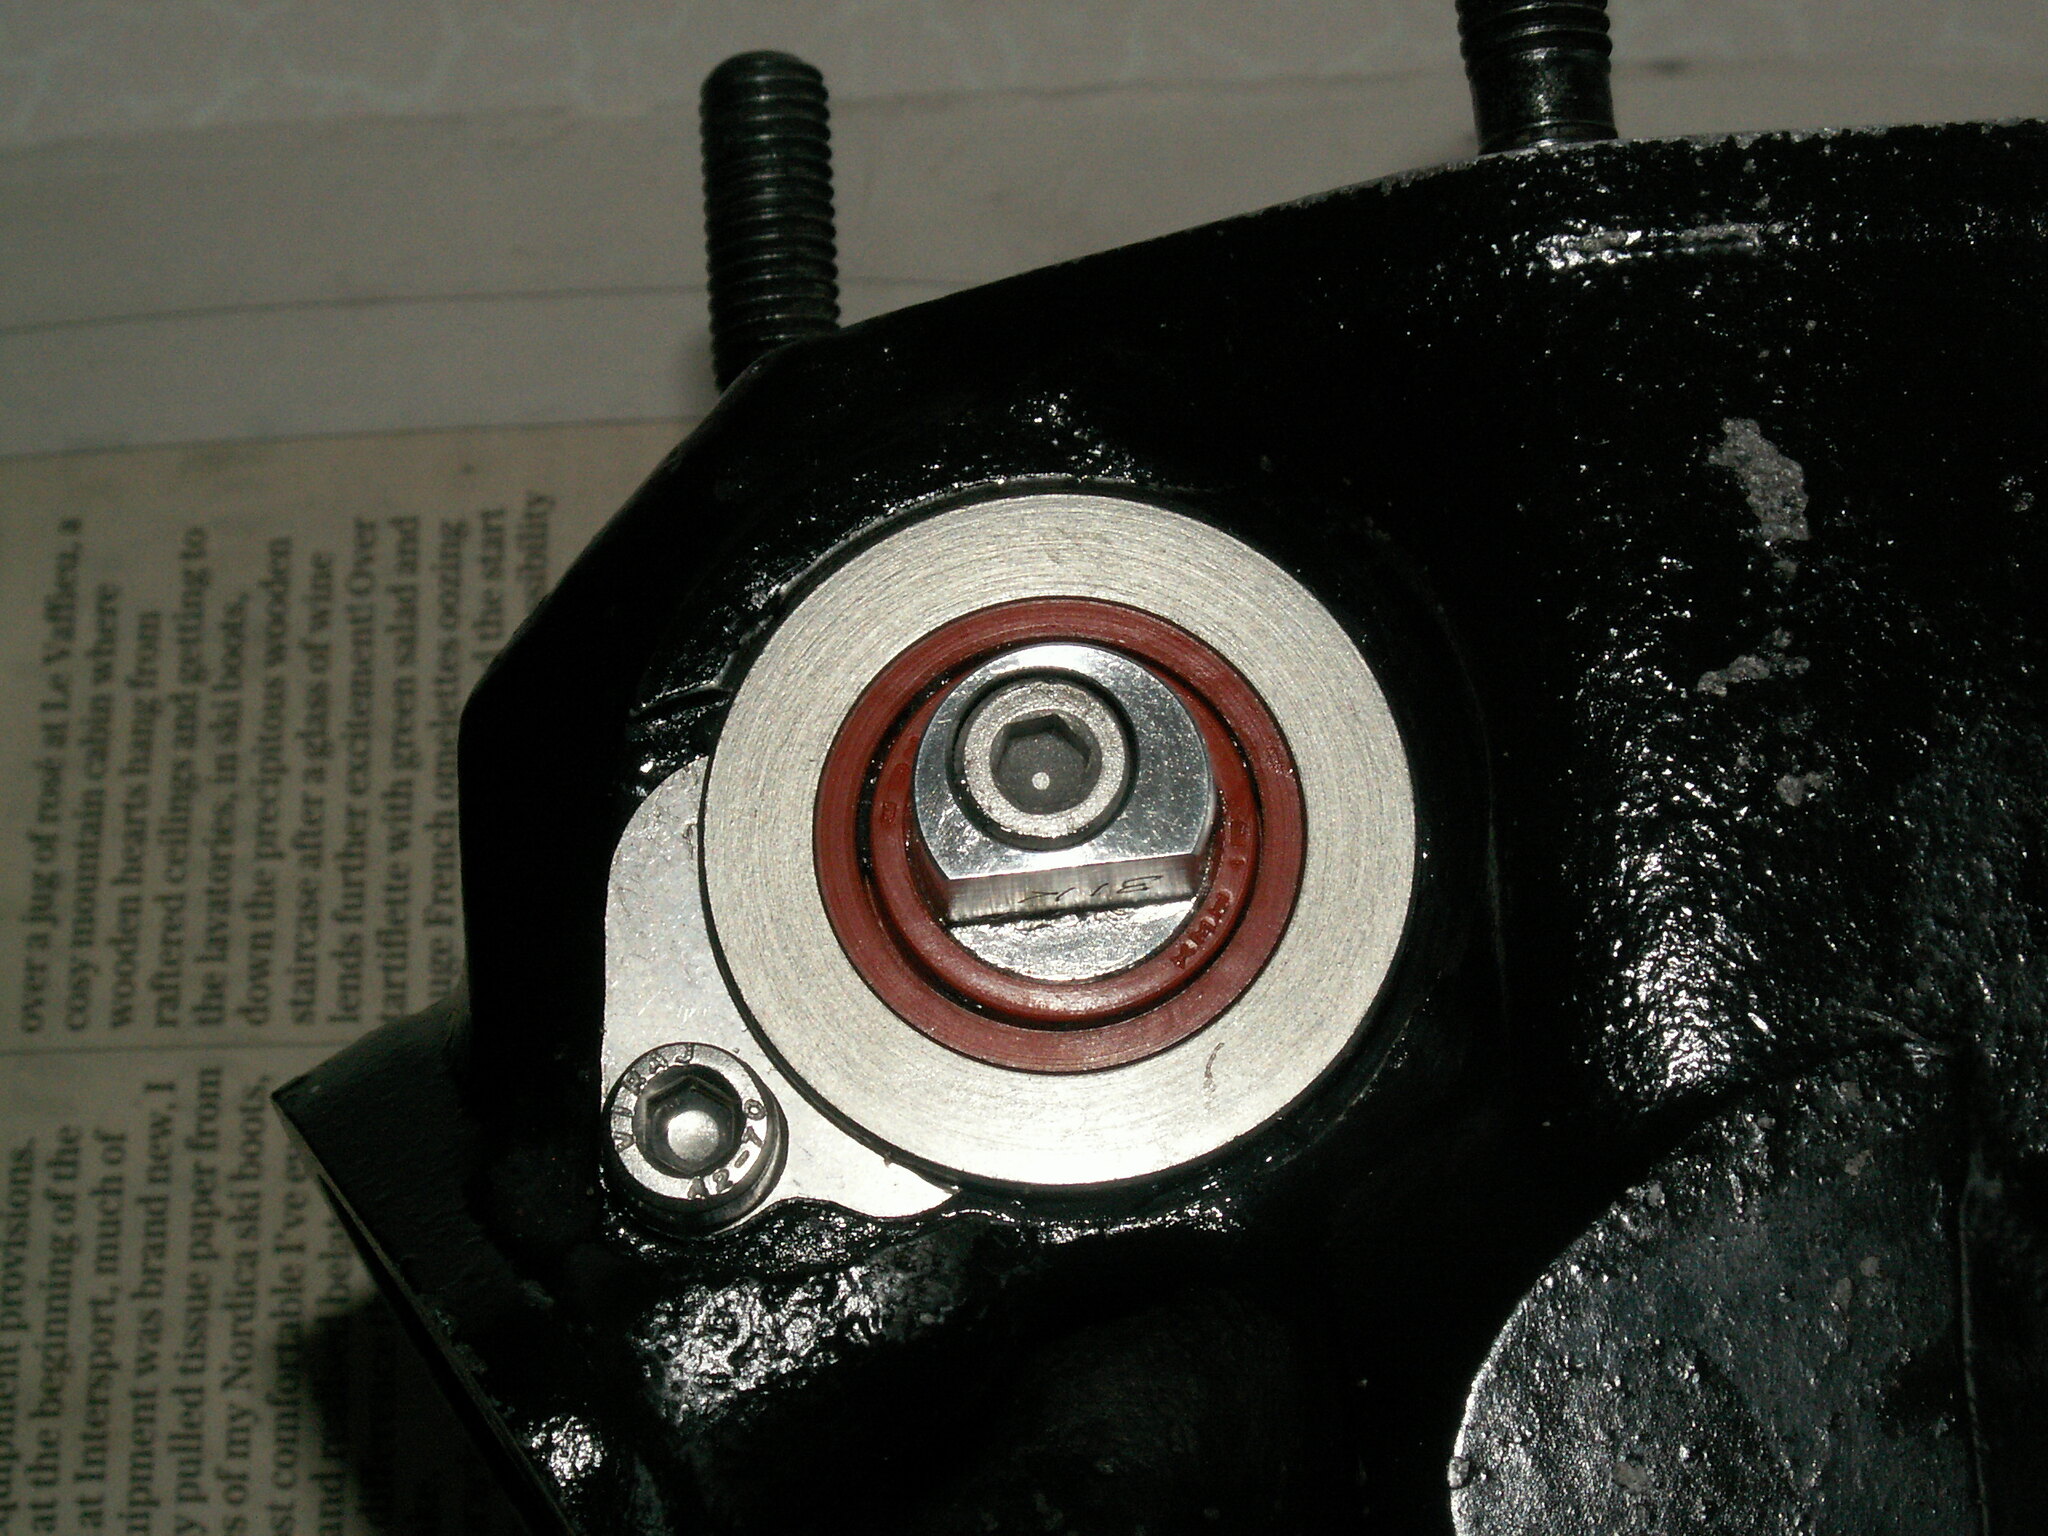 PICT2617 PICT2617 by Anthony Baker, on Flickr Used Norbos thicker Bush holders to help remove the side movement in the Bushes  PICT2619 PICT2619 by Anthony Baker, on Flickr Had to fettle the power valves a little as the clearance wasn't that great, all good now though. |
|
|
|
Post by hudtm60 on Mar 11, 2018 17:58:38 GMT 1
pistons look great...never seen those before....teflon?
|
|
|
|
Post by tony1964 on Mar 29, 2018 12:08:56 GMT 1
Started doing a leak down test, had the normal carb rubber leaks which I've cured, I've got a leak from the Woodruff key (see photo) a have put some sealant around it but as you can see it's still leaking, is it a case of not enough sealant?? 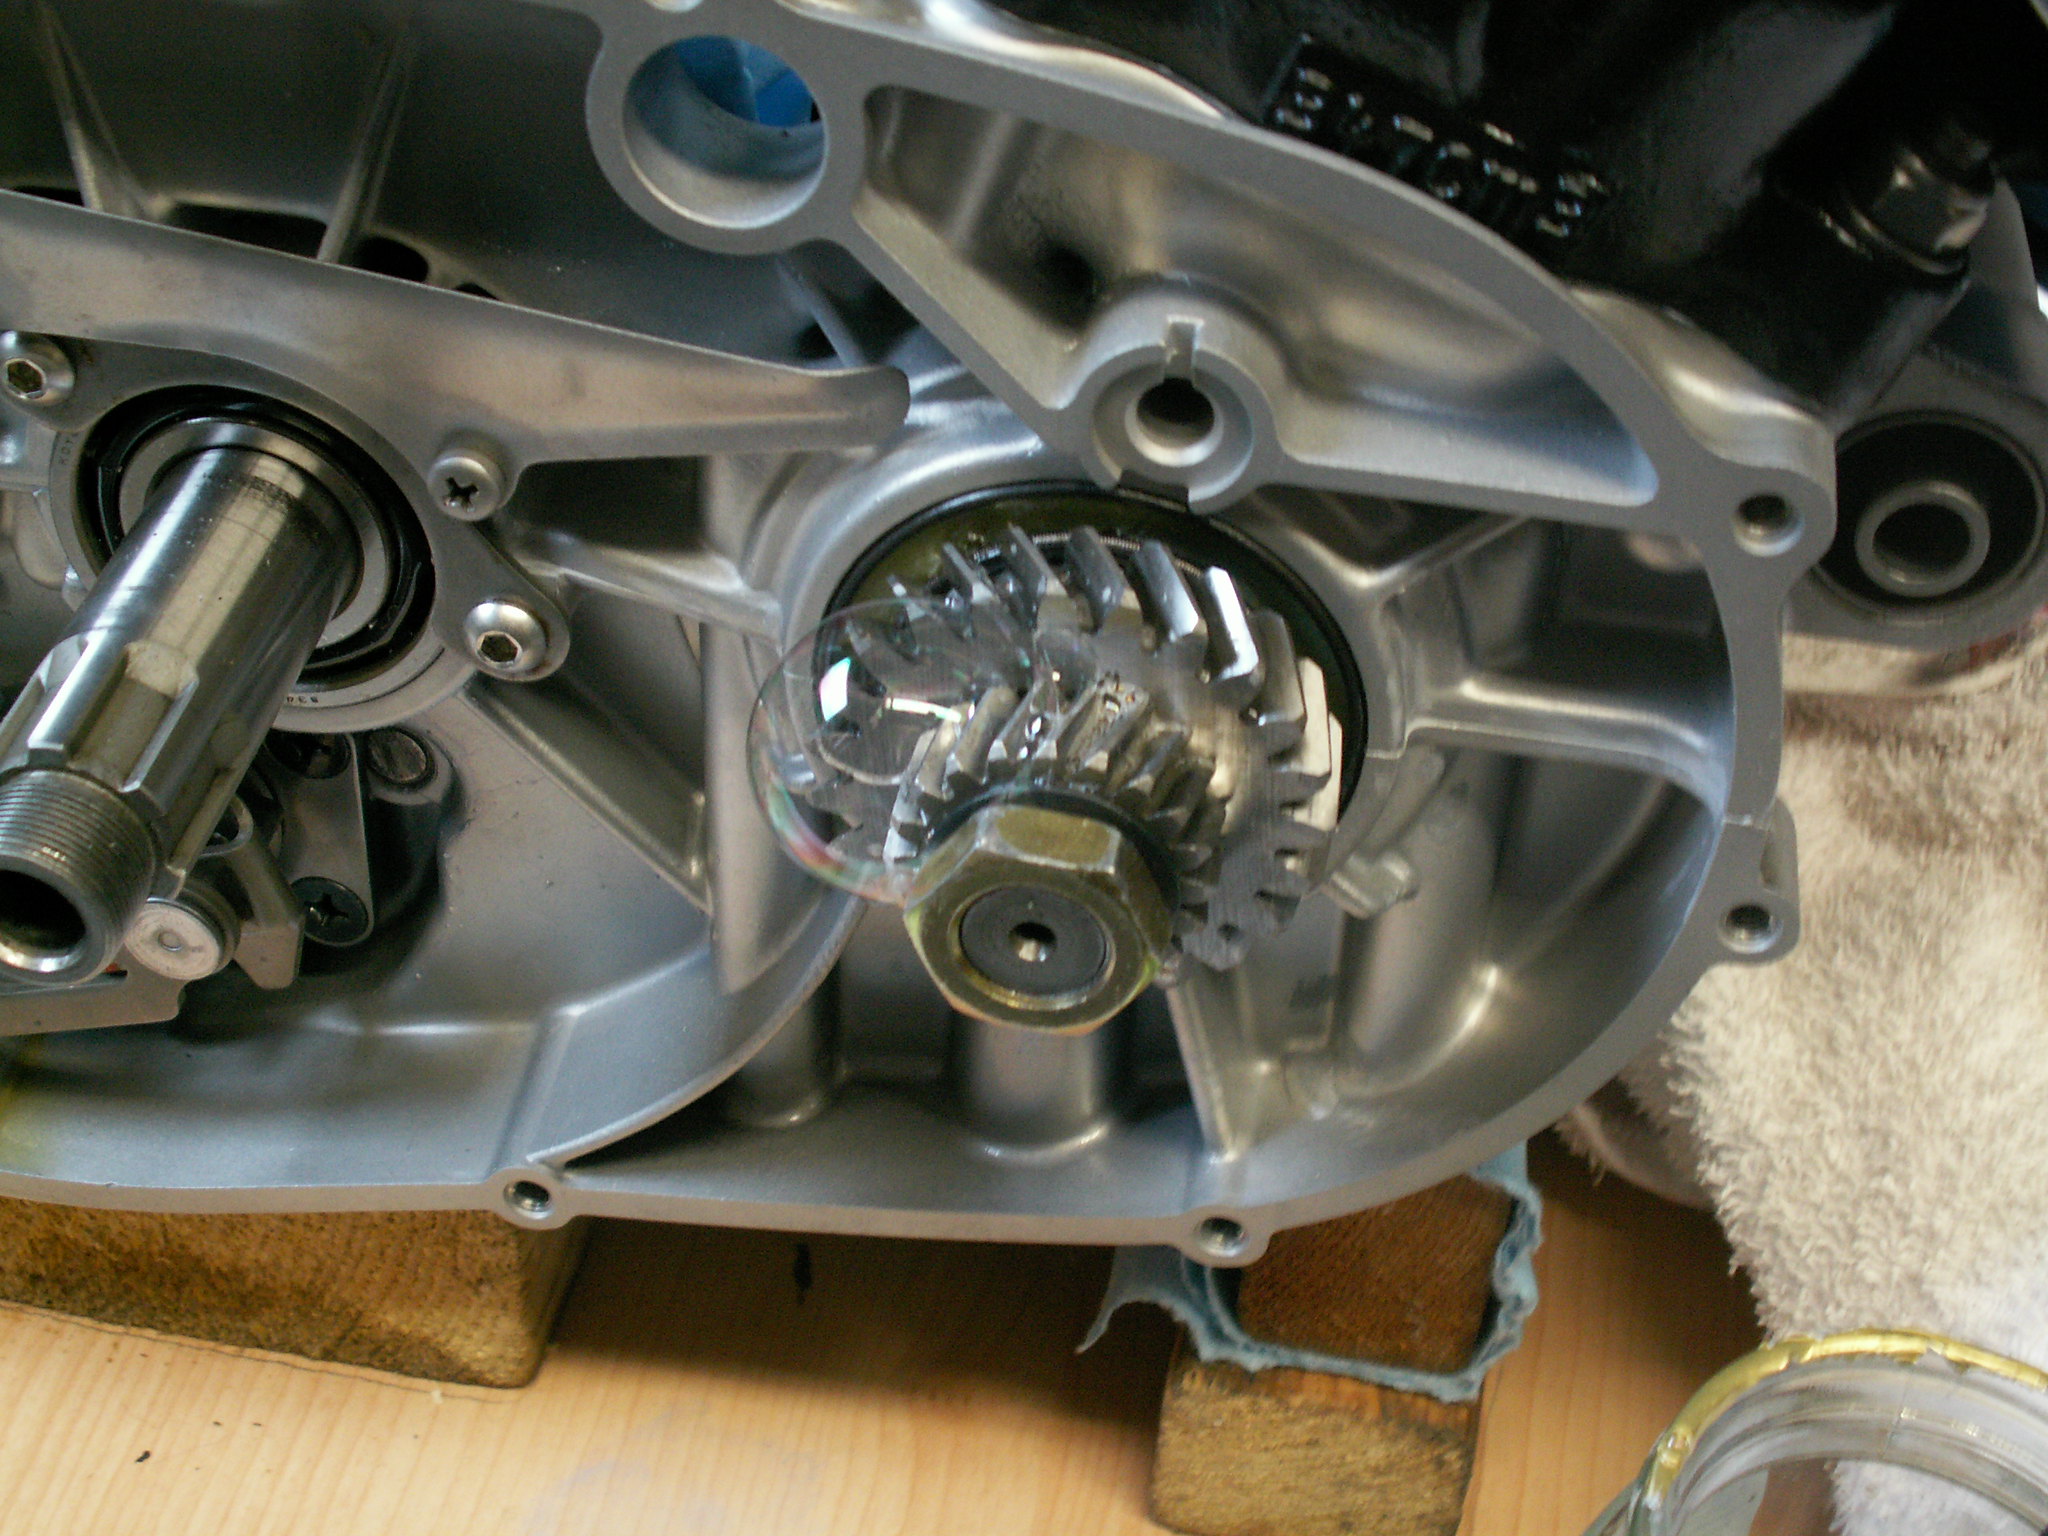 PICT2653 PICT2653 by Anthony Baker, on Flickr 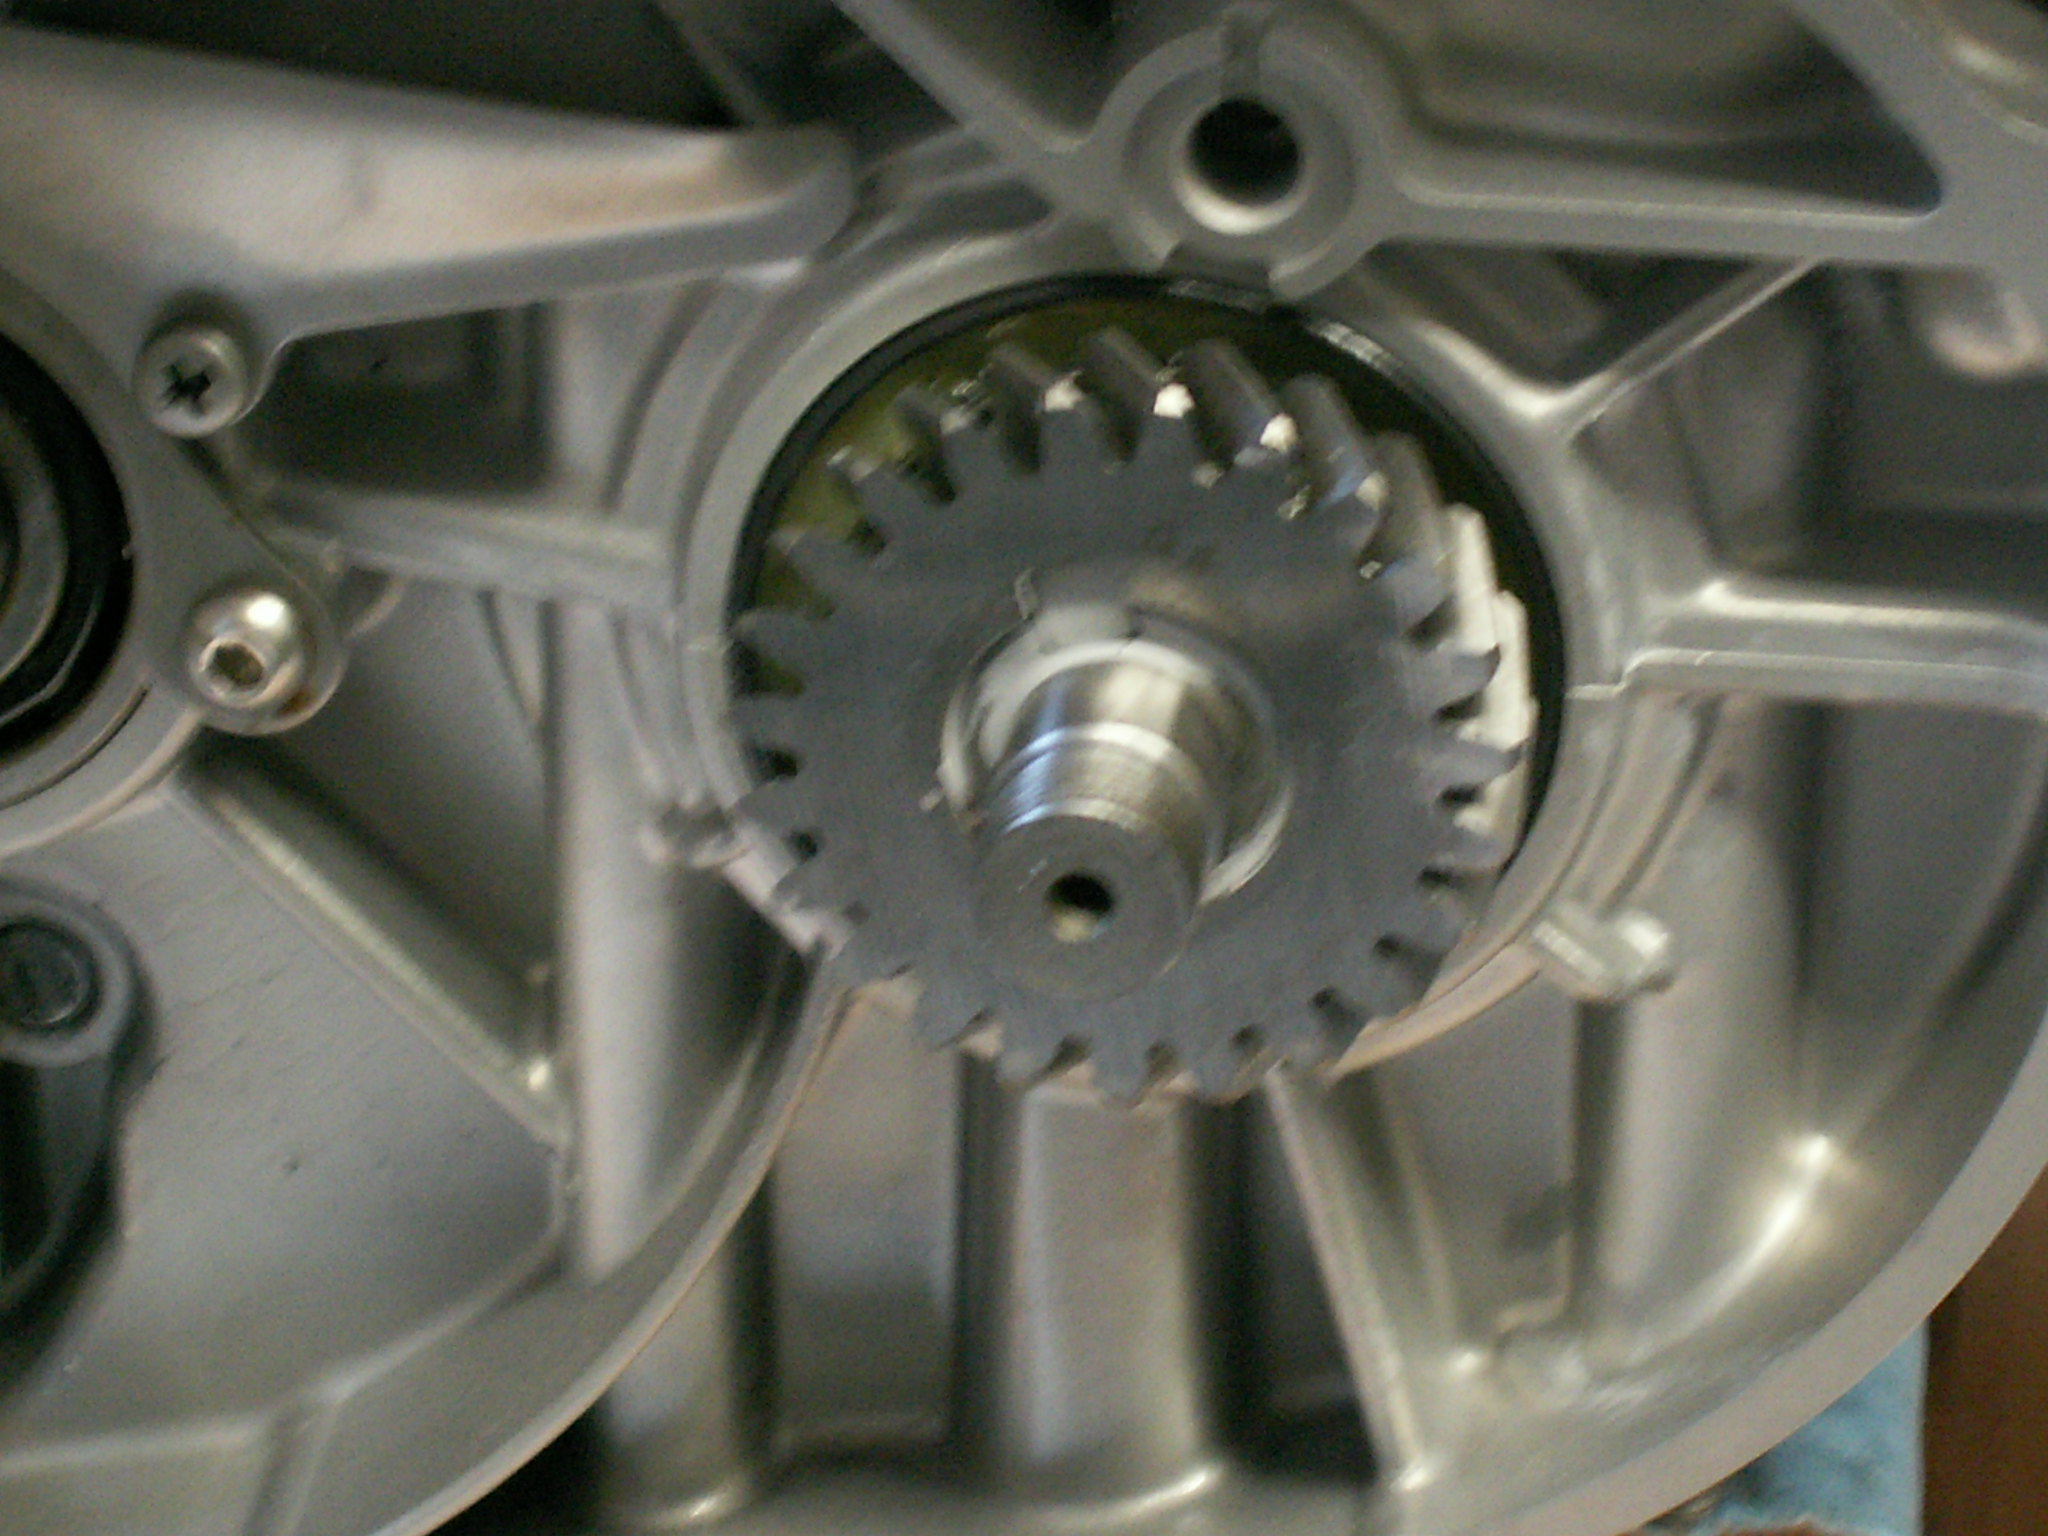 PICT2659 PICT2659 by Anthony Baker, on Flickr Thanks Tony |
|
|
|
Post by Tobyjugs on Mar 29, 2018 16:00:38 GMT 1
Hi Tony looking at the first picture the nut looks loose. If this is the case clean all the parts and tighten the nut up to the correct torque and test again.
|
|
|
|
Post by tony1964 on Mar 29, 2018 17:03:33 GMT 1
Hi Tony looking at the first picture the nut looks loose. If this is the case clean all the parts and tighten the nut up to the correct torque and test again. I've tightened it up as much as i can holding it by hand and i'ts stopped leaking, i wouldn't have thought that would have created a good enough of a seal but is has, now it's not leaking from there and it's holding a little more pressure I've noticed i have a slight leak on the carb bung where the valve comes through it, out with the sealant. Thanks Tobyjugs Tony |
|
|
|
Post by 4l04ever on Mar 29, 2018 17:10:41 GMT 1
I use a 12V impact gun to tighten the crank nut. You can lock the primary gears while you do this with a piece of copper tube squashed flat as per Dusty's top tip. Best to tighten while you can still leak down test, as tightening may move/disturb something, so need to check it in it's final setup.
The impact gun is good for the clutch nut and front sprocket nut too. :-)
Keep up the good work!
|
|
|
|
Post by tony1964 on Mar 29, 2018 17:28:49 GMT 1
I use a 12V impact gun to tighten the crank nut. You can lock the primary gears while you do this with a piece of copper tube squashed flat as per Dusty's top tip. Best to tighten while you can still leak down test, as tightening may move/disturb something, so need to check it in it's final setup. The impact gun is good for the clutch nut and front sprocket nut too. :-) Keep up the good work! Thanks 4l04ever Already got a length of copper tube with the end squashed flat (as per Dusty's top tip) was going to Torque it up when it's back in the bike and the clutch is back on, makes it a little lighter to lift back in and easier to tighten. Tony |
|
|
|
Post by 4l04ever on Mar 29, 2018 17:33:01 GMT 1
Put the engine in the bike, then tighten it all up and leak down test it one last time :-)
Leak down test top tip......put some Yamabond on the inlet gaskets, as they always leak....
|
|
|
|
Post by tony1964 on Mar 30, 2018 10:36:03 GMT 1
Put the engine in the bike, then tighten it all up and leak down test it one last time :-) Leak down test top tip......put some Yamabond on the inlet gaskets, as they always leak.... One step a head of you mate, i was surprised how much it leaked on the inlet gaskets, Leak down test is well worth doing Tony |
|
|
|
Post by dusty350 on Mar 30, 2018 17:10:06 GMT 1
Hi Tony Glad it's going well mate When I rebuilt my Lc engine I used new Yam reed rubbers but didn't fit the cross over tube clips whilst doing the leak down test. The tube was a really tight fit in the new rubbers but it still leaked !! Fitting the clips stopped it. Amazing that those little clips made the difference. Dusty |
|
|
|
Post by tony1964 on Apr 1, 2018 14:18:47 GMT 1
Hi Tony Glad it's going well mate When I rebuilt my Lc engine I used new Yam reed rubbers but didn't fit the cross over tube clips whilst doing the leak down test. The tube was a really tight fit in the new rubbers but it still leaked !! Fitting the clips stopped it. Amazing that those little clips made the difference. Dusty Slowly but surely Dusty, I remember changing the crank cases on my LC back in the early 80s, didn't even consider leak down tests in those days, just a case of chuck it back together and thrash the life out of it. Tony |
|
|
|
Post by tony1964 on Apr 1, 2018 14:22:57 GMT 1
Carried out the leak down test again today, went from 6lb down to 4lb in twenty minutes, couldn't find where it's losing pressure though, is this a pass?
Tony
|
|
|
|
Post by 4l04ever on Apr 1, 2018 14:27:35 GMT 1
That is not too bad. If you can't find the leak, don't worry too much as it is very minor.
It may be worth giving another spray everywhere (including your test equipment and connections)......I found a leak on the connection to my pressure gauge before, so engine was actually fine.
|
|
|
|
Post by tony1964 on Apr 1, 2018 19:40:13 GMT 1
Found out where the small leak is coming from, it's one of the inner power valves seals, doesn't look like there's a lot i can do about it, the seals are new. Engine doesn't look to bad. 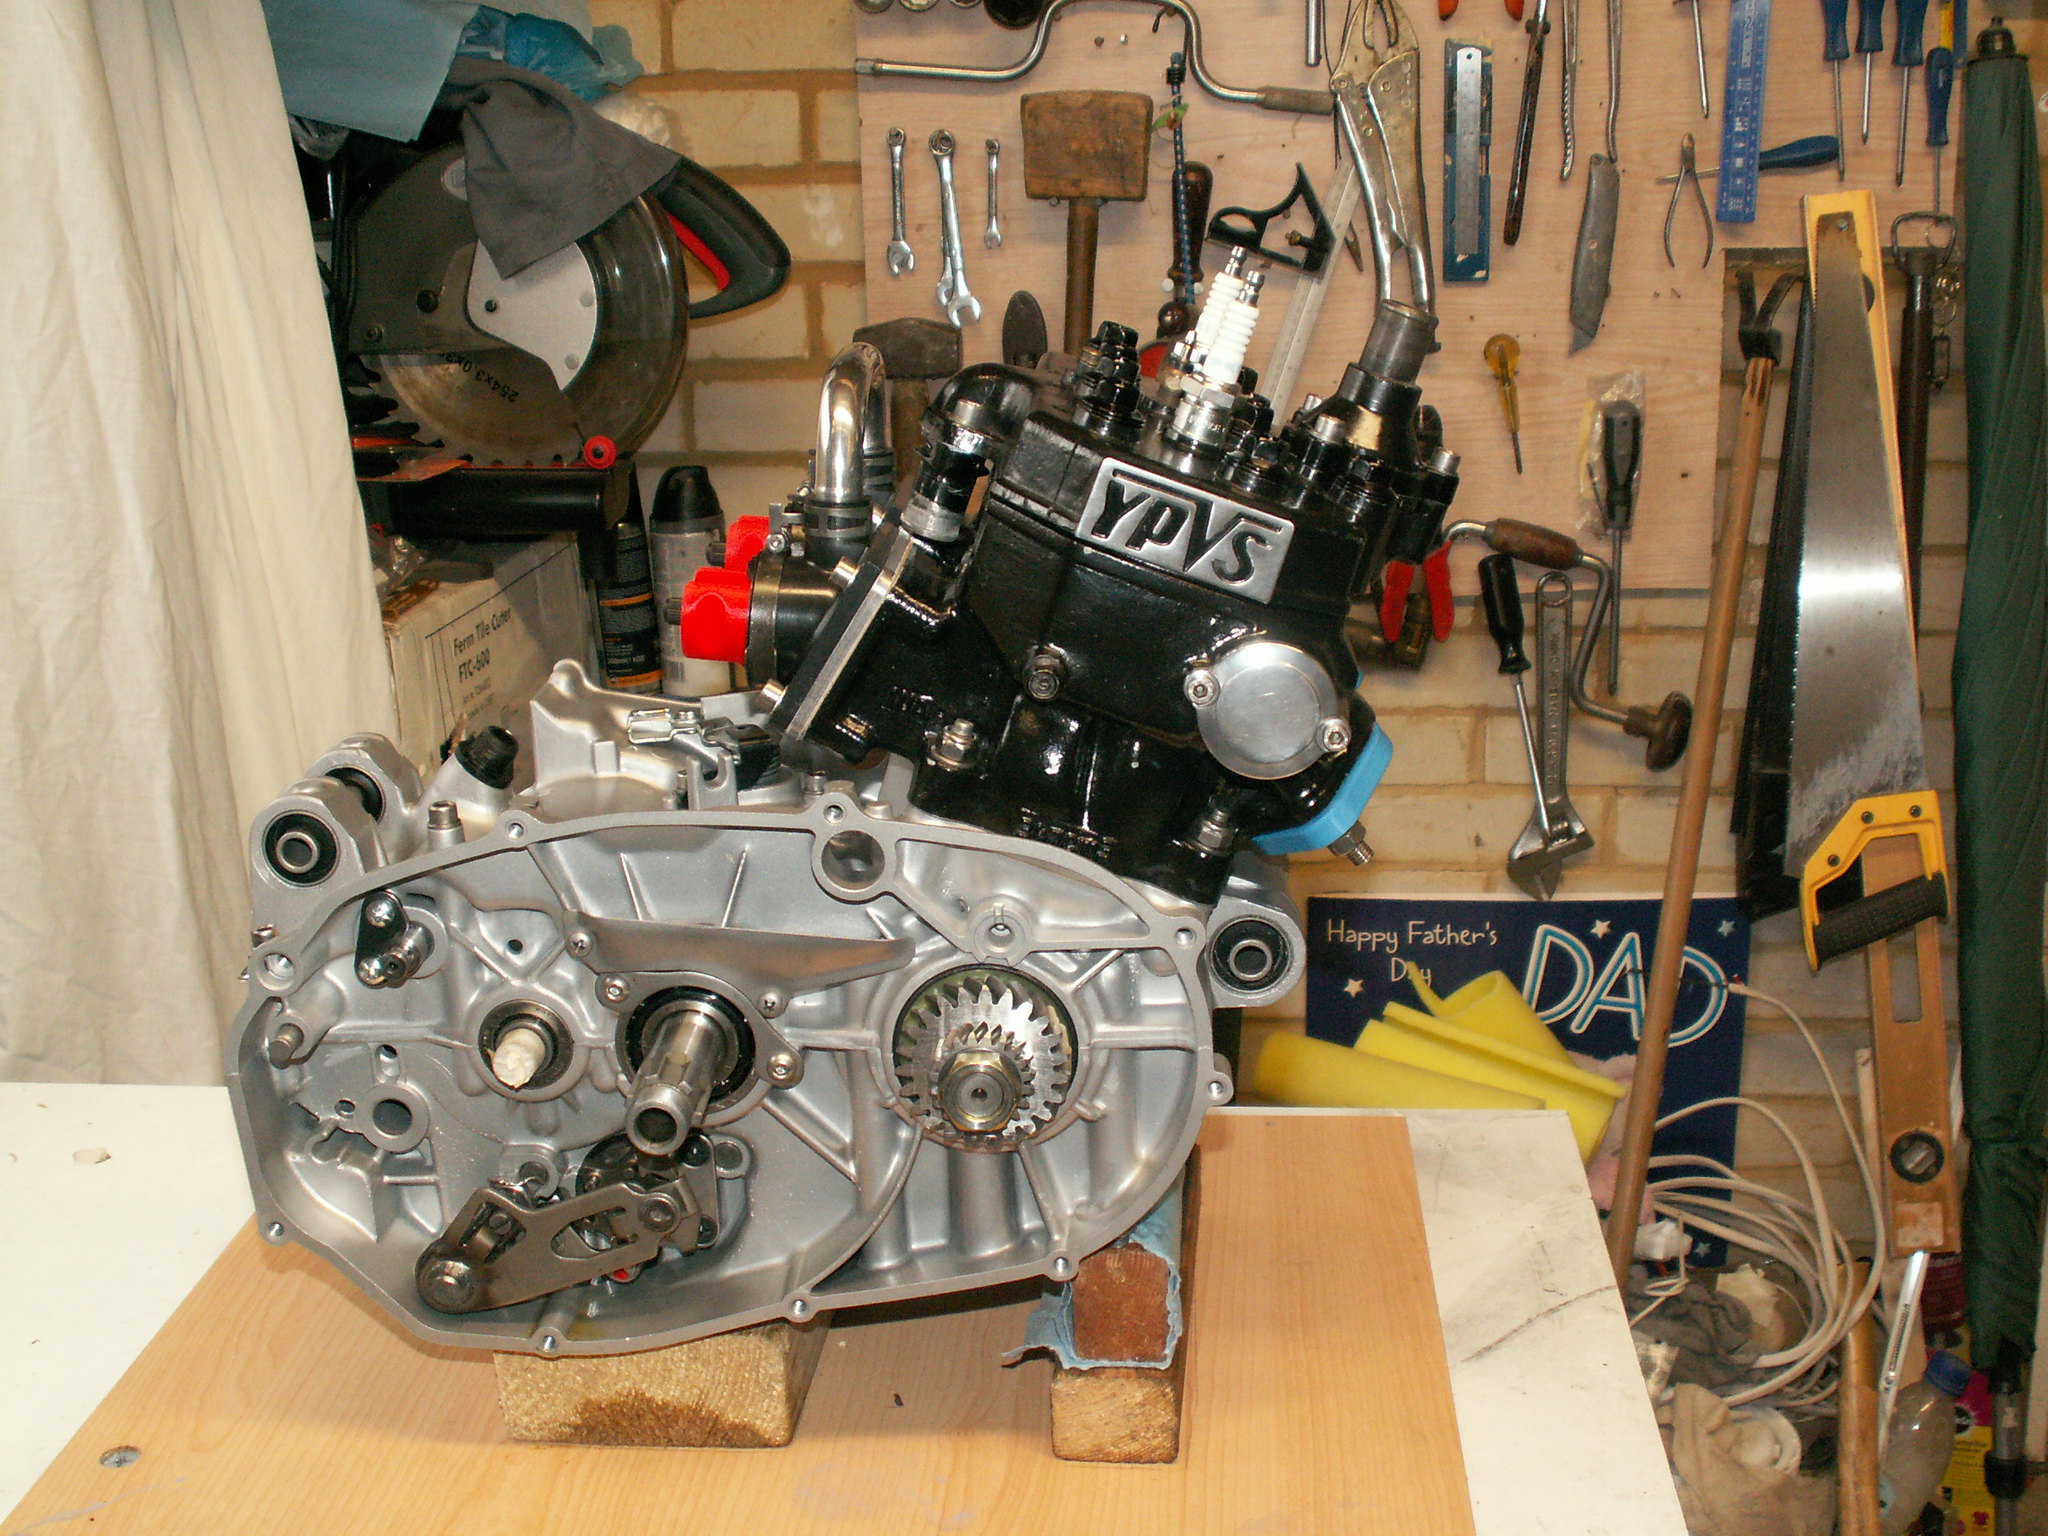 PICT2674 PICT2674 by Anthony Baker, on Flickr 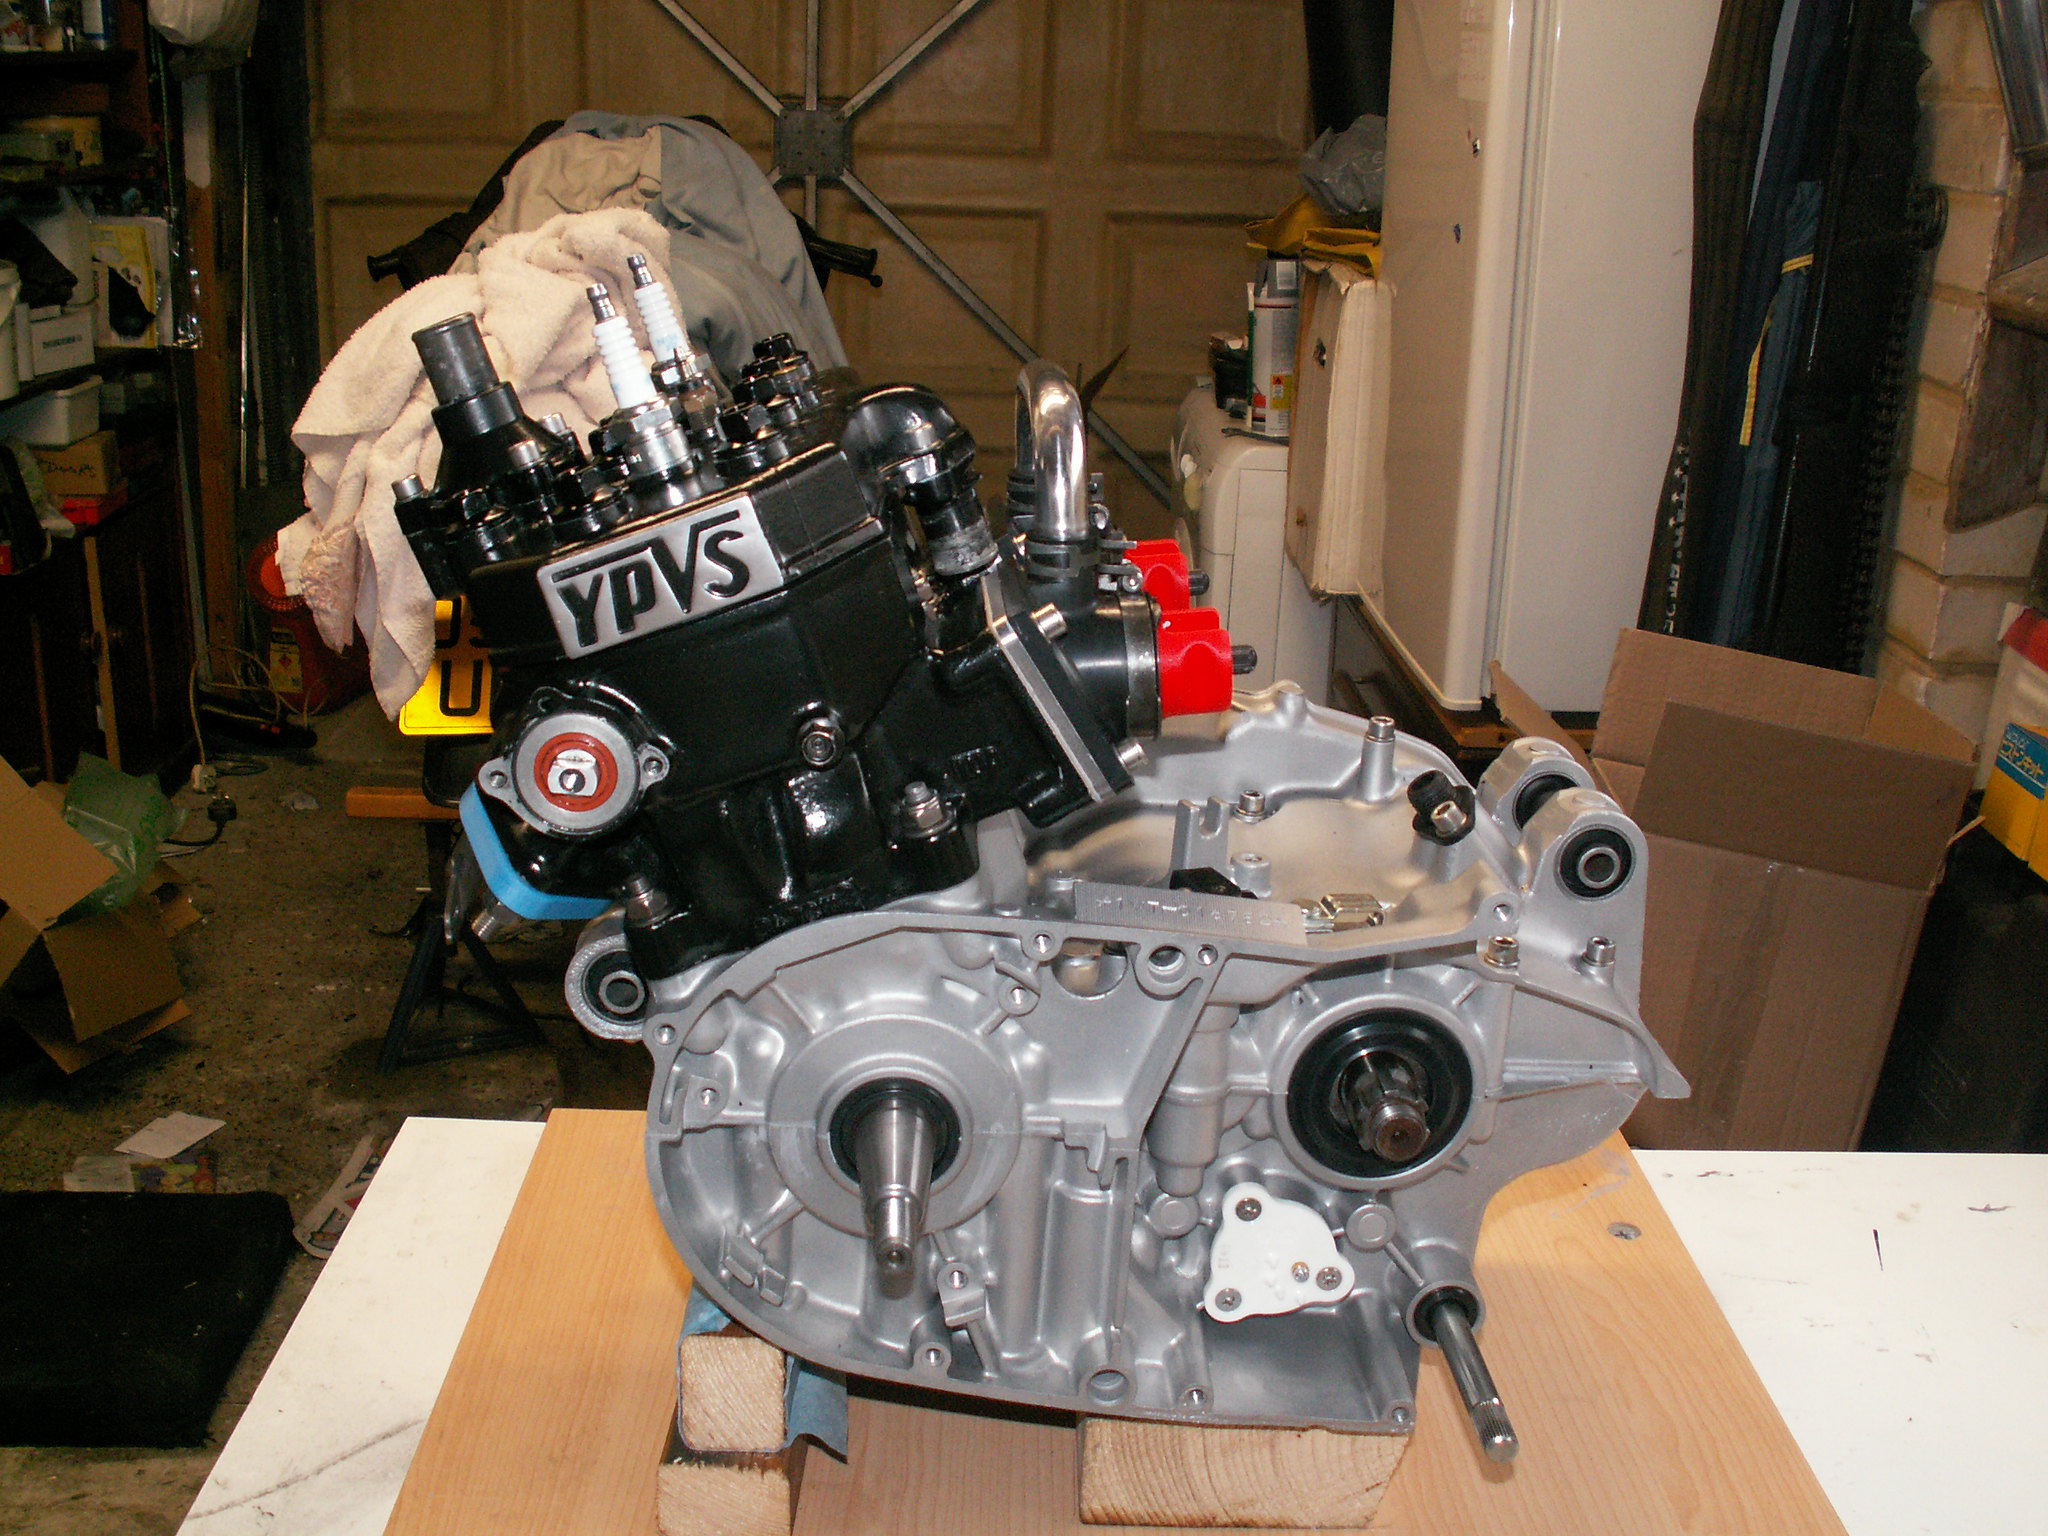 PICT2675 PICT2675 by Anthony Baker, on Flickr Tony |
|
|
|
Post by dusty350 on Apr 1, 2018 19:54:03 GMT 1
Engine looks superb Tony Gotta be happy with that. Well done. Dusty |
|
|
|
Post by jessy03 on Apr 1, 2018 20:00:10 GMT 1
Pukka job, check your pv seals they look the wrong way round.
Jess
|
|
|
|
Post by tony1964 on Apr 1, 2018 21:18:26 GMT 1
Engine looks superb Tony Gotta be happy with that. Well done. Dusty Thanks Dusty. I'm pleased with it, enjoyed doing it. Tony |
|
|
|
Post by tony1964 on Apr 1, 2018 21:56:00 GMT 1
Pukka job, check your pv seals they look the wrong way round. Jess Thanks Jess, not sure why i put that one the wrong way round, probably another of my senior citizens moments  Tony |
|
|
|
Post by tony1964 on Apr 14, 2018 15:36:03 GMT 1
Just want to double check which way round the oil pump and impeller shafts seals go. The oil pump seals number side faces towards the Crank ? and the bevelled edge of the impeller shaft seal goes towards the impeller? Tony 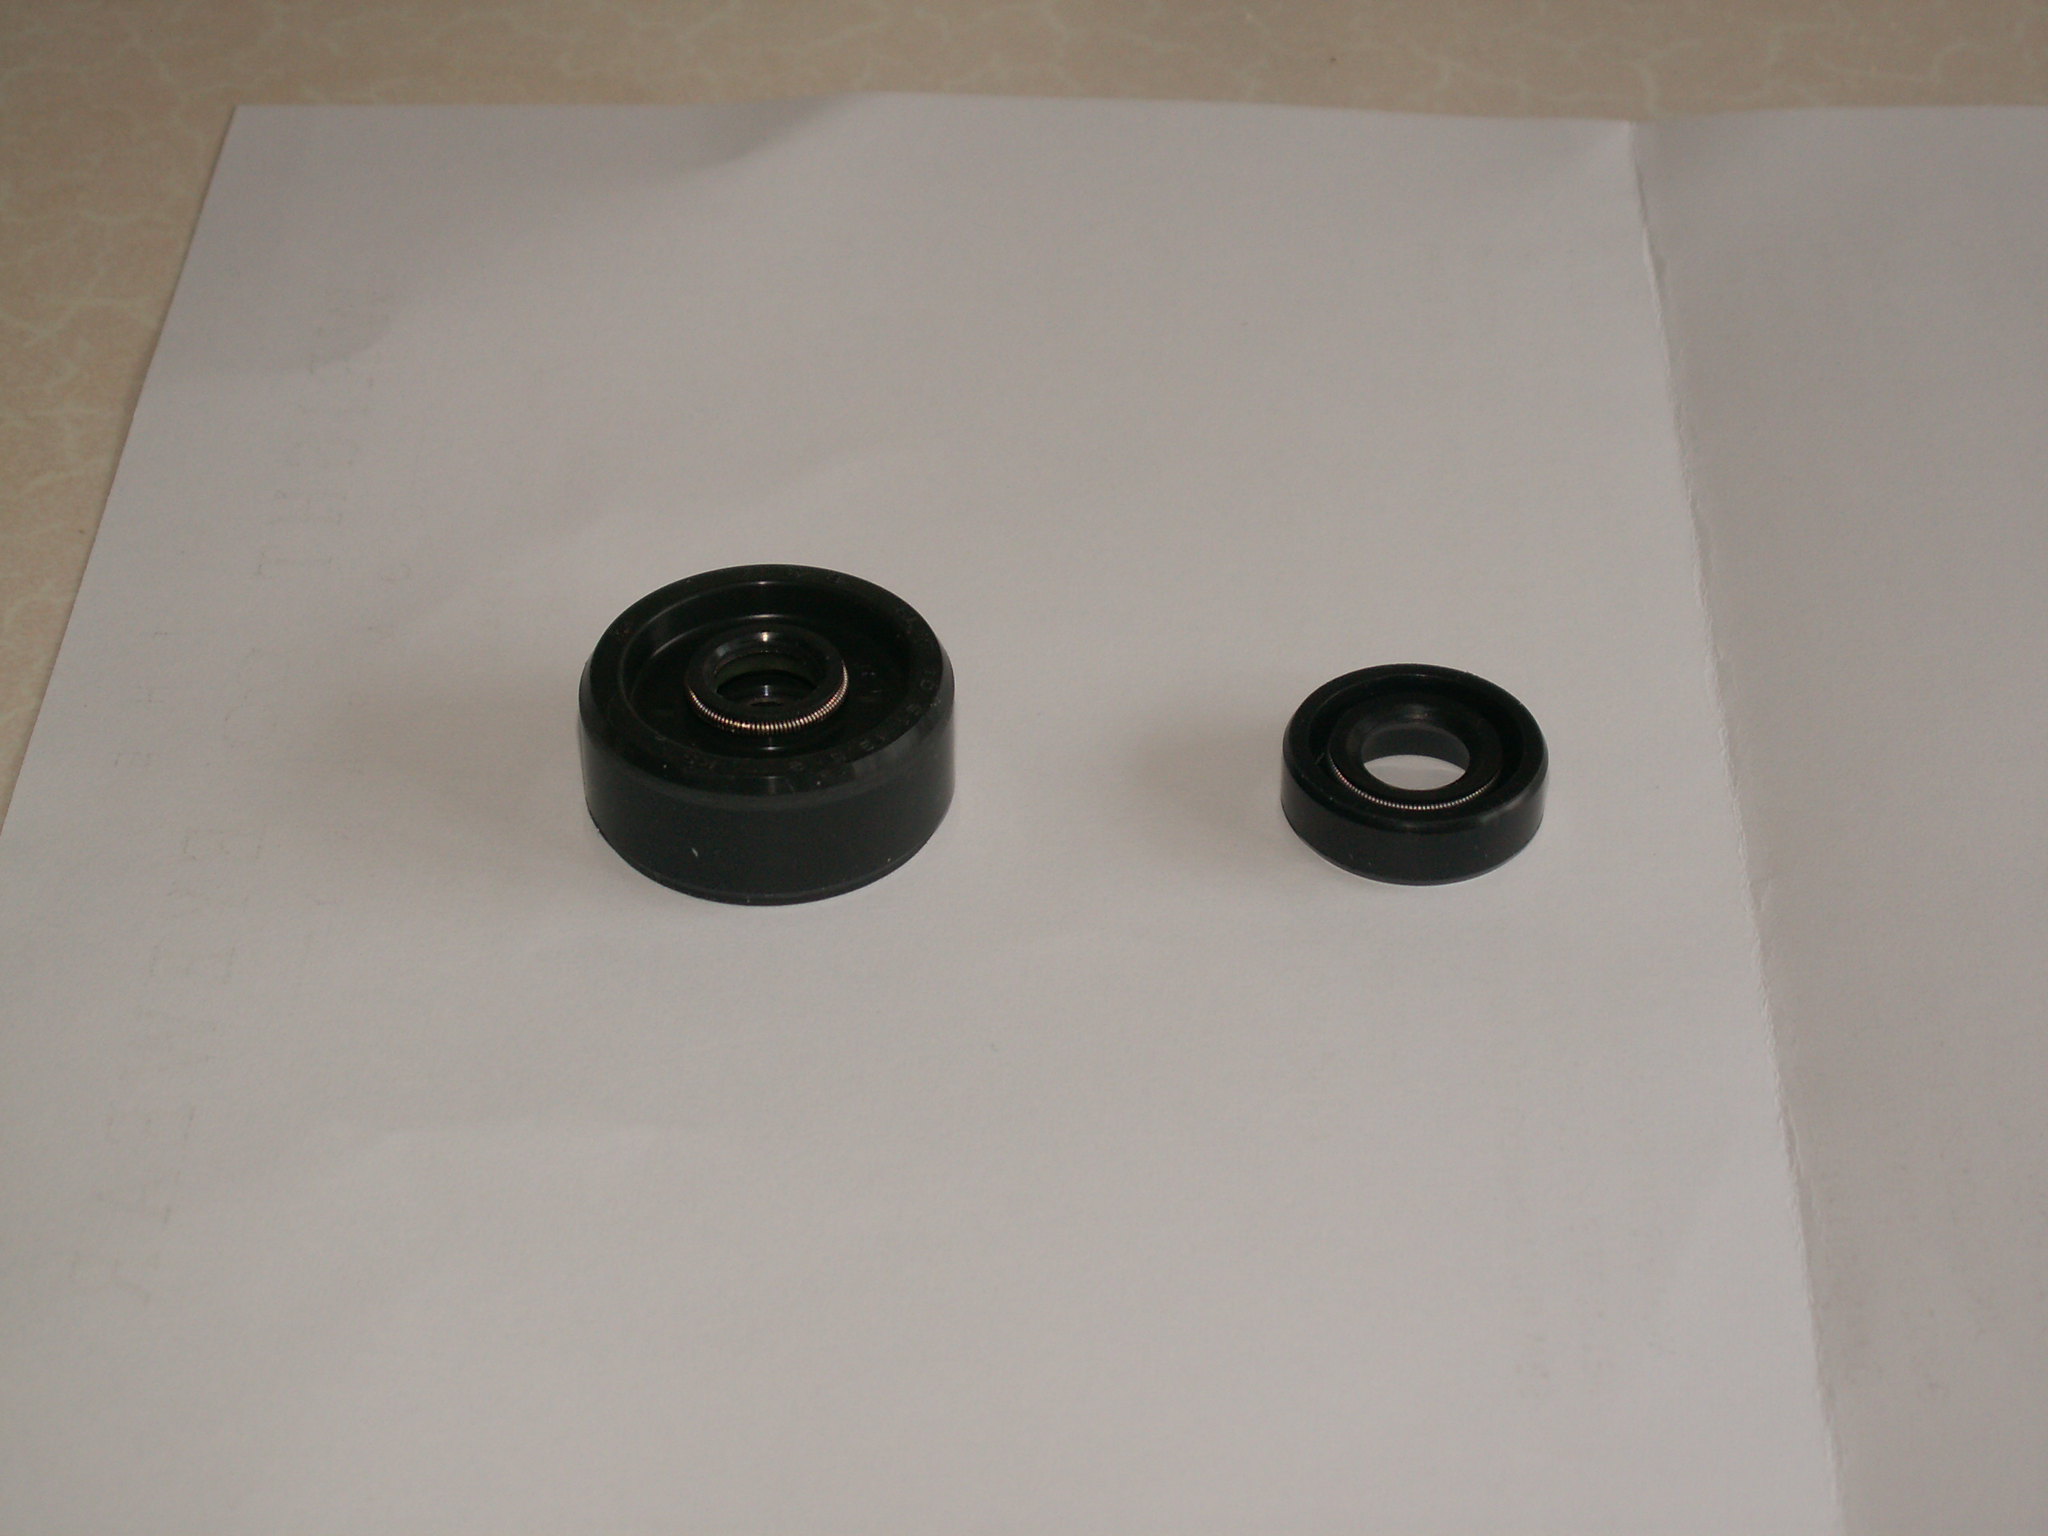 PICT2694 PICT2694 by Anthony Baker, on Flickr |
|
|
|
Post by oldelsieboy on Apr 14, 2018 16:03:23 GMT 1
Just want to double check which way round the oil pump and impeller shafts seals go. The oil pump seals number side faces towards the Crank ? and the bevelled edge of the impeller shaft seal goes towards the impeller? Tony PICT2694 by Anthony Baker, on Flickr The water pump seal is marked "water side" if its OEM. OEB |
|


