tripodtiger
Drag-strip hero
 Australian RD/RZ Owners Register
Posts: 217
|
Post by tripodtiger on Feb 21, 2015 2:11:07 GMT 1
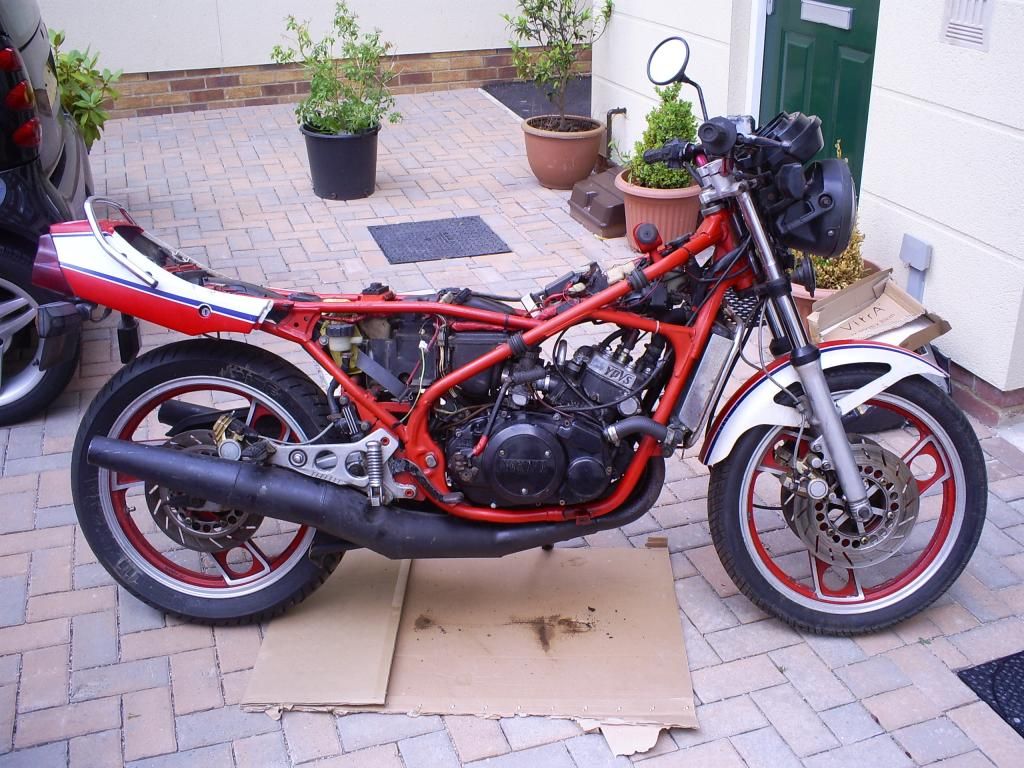
I can't find an 'alternator removal' thread on here.  So now there is.  I am just about to remove the alternator off my LC. I have an alternator puller. I don't have a strap for the flywheel. The gearbox is in 6th. The rear brake is wound fully on so that the rear wheel isn't moving. The crank is still able to move a fair way, maybe 10 or 15 degrees, when I gently rotate the retaining bolt with a socket / bar. I thought it should be stationary, being locked up from the rear wheel with the clutch fully engaged. It's got me a bit worried that I could damage something (like 6th gear). And my manual doesn't tell me if the alternator retaining bolt is left or right thread?  The puller has a right hand thread to screw into the flywheel, is this a different thread to the retaining bolt? I'm going out to have a look at my parts diagram and the other bits I've got to see if I can make some progress. |
|
|
|
Post by raven13 on Feb 21, 2015 2:27:17 GMT 1
ideally you would have an flywheel locking tool or an impact wrench, failing that I tend to smack my rigid socket handle with a bloody big hammer to shock the nut into moving.
the nut is normal thread if I remember correctly
|
|
|
|
Post by bare on Feb 21, 2015 5:01:04 GMT 1
Buy or build a strap to hold the Flywheel.
OR buy / borrow an impact gun. The above Hammer blow might work. Be 100% Sure that the crank can rotate though.
Do Not Use the crankshaft to 'hold' your flywheel It can/will twist. Feeling Lucky?
That's a whole New world of pain if it does twist.. even a degree or 2.
|
|
|
|
Post by steeley on Feb 21, 2015 8:05:39 GMT 1
as bare said use a strap or make a tool to hold the flywheel/rotor.i made a holding tool out of a car bonnet hinge .I drilled a couple off holes in the u section of the hinge to line up with the slots in the rotor then put a couple of bolts in the hinge not poking out to long though you don't want to damage the windings inside just enough to hold the rotor.when you have the crank nut off there should be a spring washer plus a thick washer.once the puller body is wound into the rotor get some pressure on the centre bolt and give it a smack with rubber mallet to shock the rotor off.there was a chap on here or another forum he wound the bolt in and split the end of the crank where the rotor was so tight I had never seen that before.good luck with it.oh like bare said if the crank twists on the centre shaft its engine strip.
|
|
|
|
Post by andfist600 on Feb 21, 2015 11:42:37 GMT 1
I couldn't get mine off and I had the crank jammed up with barrels off. In the end, I borrowed an electric impact gun, it worked first go :-) |
|
tripodtiger
Drag-strip hero
Australian RD/RZ Owners Register
Posts: 217
|
Post by tripodtiger on Feb 21, 2015 13:24:21 GMT 1
The short version is that I got it apart. yah! I took photos whilst doing it, and it really is one of those 'geez I hope I don't bugger this up' things. So the long version, with photos, can wait 'til the morning. I am surprised that I the searches I did here didn't produce any clear result. It's one of those jobs that seems to get spoken of often enough. It's also one of those jobs that seems more fraught than it will most often turn out to be - splitting the end of the crank aside  |
|
tripodtiger
Drag-strip hero
Australian RD/RZ Owners Register
Posts: 217
|
Post by tripodtiger on Feb 22, 2015 1:35:06 GMT 1
For non-mechanics, there are lots of jobs that are anxiety creators. This is one of them. The only reason I got the flywheel off was because of the 'phone a friend' help of my mate, Leigh who lives 1000km away. The replies that some inmates have provided above are exactly as he was telling me. Thanks fellas. The reason for this - well, the bike stopped at Phillip Island, started and ran when I changed the pluggs at home but stopped again before I even left pit exit at Goulburn. Later, whilst rooting around with it at home, I rooted the pickup mount, by being heavy handed.  Jools has sent me a replacement stator, and a back up coil  and I've picked up some bits from a shop in Cairns. Being a race bike, the advice has been to ditch the standard ignition. I was working towards that and the broken stator just brought it forward. In case that doesn't workout as easily as it is supposed to, I can re-fit the standard ignition and go from there.  First task is to remove the flywheel retaining nut. The manual said into 6th & lock the rear brake. That didn't work as there was some clutch slip. The thing that wasn't said was what direction the thread of the nut was. The nut didn't have the normal grooves to indicate left, so I just went right hand. I attempted to use an 18v impact drill, using a tie down made from seatbelt material to hold the flywheel steady. All that did was turn the drill in my hand.  The next option was to take my heart in my mouth and use a hammer.  The first tentative tap didn't do anything. The second was a definite strike, without trying to push the spanner through the floor. Well, look at that. The nut was loose. I'll take another smilie for that. Under the nut there is a spring washer and a thick flat washer.  Take them out so the thread of the puller can go in as far as possible.  Leigh advised that the threads of the puller should be oiled before it is screwed into the flywheel. And the puller / flywheel are left hand thread.  I chose to wind the puller body in with the centre bolt removed, to maximise the thread engagement.  Wind the centre bolt in until it seats. Leigh told me he uses a suitable piece of steel between the crank end and the centre bolt asa washer. I didn't have a suitable piece of steel. |
|
tripodtiger
Drag-strip hero
Australian RD/RZ Owners Register
Posts: 217
|
Post by tripodtiger on Feb 22, 2015 1:58:11 GMT 1
Next is to get your big arse shifter and a ring spanner onto the puller. I used as much force trying to wind the bolt in whilst holding the puller body still as I could. I thought I could feel it move a little, but I reckon I was mistake. Between each attempt on the spanners, I tapped the end of the centre bolt, trying to jarr the metal to metal contact and free it. The tap was around the weight of the hammer falling against the bolt. Not hard just definite.  Even with the assistance of my son, the flywheel didn't come free. It may be that it was retained using locktite. A bit of heat is always a good option for difficult fasteners, and necessary if they've been locktited in. The heat was applied on the flywheel, close to the puller, trying to get as much heat into both the crank & flywheel simultaneously.  It took two goes with the heat, probably at least 5 minutes, no more than 10. We tried again with the spanners, then tapped the end of the centre bolt and the flywheel sprung off. Another smilie   Before I got my son onto the 3 stator bolts, I marked the position of this stator (it is repairable I think) by scratching three alignment marks on the stator and the crank case. If I do use this stator again, I can get the timing ball park correct straight up. Well, that's the theory anyway. The photos will help too. Once the bolts are out, the stator came out by hand, I just had to wriggle it slightly.  Undo the ignition wires under the seat - 3 x white, white/red, red/brown/black - at their connectors. Pull the loom back through the frame. Pop the grommet out and pull the wires and connectors through the hole.  Dont forget the neutral switch wire.      Typical - it's an easy job that some of us convince ourselves is a lot harder, complicated, risky whatever than it really is. Welding the stator is something that is a lot harder,complicated, technical than I am capable of doing. installing the race style ignition - well, we'll have to wait and see.  |
|
|
|
Post by oldelsieboy on Feb 22, 2015 9:25:27 GMT 1
Why is your gearbox sprocket nut fitted back to front?
OEB
|
|
|
|
Post by jon on Feb 22, 2015 22:25:06 GMT 1
Good to take advice about locking the flywheel itself tripodtiger, not worth twisting the crank. I would expect some slack because of the secondary drive having play in the cush drive as standard. Although it worked for you, you'd be better off in future to invest in a flywheel holder. I might have gone over the top in making mine, but it is worth it's weight in gold every time I use it. I welded pins on the other side to hold a 17 tooth sprocket so it is duel purpose. I'd make a small batch of them if there was interest. My guess OEB is that the tripodtiger has fitted a 520 sprocket and YPVS spacer without machining it down 2mm or so? It's a right pain in the arse to do as it is hardened, but worth the effort.  |
|
|
|
Post by JonW on Feb 23, 2015 22:48:53 GMT 1
I use a simple 'loose Y' shaped holding tool from Rex Caunt on ebay, works really well.
|
|
|
|
Post by watchhislegs on Feb 24, 2015 1:01:47 GMT 1
Good write up mate, could have used this a few weeks back!
|
|
tripodtiger
Drag-strip hero
Australian RD/RZ Owners Register
Posts: 217
|
Post by tripodtiger on Feb 24, 2015 7:20:56 GMT 1
Why is your gearbox sprocket nut fitted back to front? OEB Because the first one on it, that I didn't look at and check, bailed ship and dissappeared down a black hole. This one, I looked at, looked at the thread exposed, thought about surface area and figured it should go on that way. That's about the strength of it. I do now have a 520 chain and the 1/8" spacer is on the outside of the sprocket. It is turned down from and 18T sprocket that I just couldn't see myself needing unless I was going to Lake Gairdner. I do hope I never need a flywheel holder again. But wait - it's all got to go together again.  |
|
|
|
Post by stusco on Feb 24, 2015 19:36:28 GMT 1
I got a pick up welded back once worked perfectly only cost a jar of coffee bargin
|
|


 So now there is.


 and I've picked up some bits from a shop in Cairns. Being a race bike, the advice has been to ditch the standard ignition. I was working towards that and the broken stator just brought it forward. In case that doesn't workout as easily as it is supposed to, I can re-fit the standard ignition and go from there.


