|
|
Post by nevets1966 on Feb 29, 2012 21:30:41 GMT 1
I am going to spray the bodywork on my bike with aerosols, I got some decals from norbo last year so they should be ok. I was hoping for advice about the different stages, how many coats of primer and top coat what grade of wet and dry etc. And when it comes to lacquering over it all, would i just flatten the top coat then lacquer over it. I have almost finished taking the gloss off my existing parts, the side panels are new, from the rdlc shop i am hoping to start painting this weekend. any help would be greatly appreciated. cheers steve. ;D
|
|
|
|
Post by tunneruk on Feb 29, 2012 22:50:40 GMT 1
I've just finished my 'restoration' I painted everything myself, including the wheels with Aerosol cans. It is possible to achieve a very, and I mean 'very' decent finish. It's difficult to give an explanation on a forum like this as there's a large amount of technique involved. If I were to sum it up I would say this. Put as many coats of everything on as you can afford, you can always flat it off, be patient and be prepared to spend many hours prepping. I do have a tip, when you've given an item a decent coat of paint / primer and it's looking good, don't be tempted to give it 'one more pass for luck' you'll almost certainly end up with runs! After all, you can always get that 'one more pass' on once the current coat has dried. I used Halfords own brand aerosols which are Acrylic. Filler primer, primer, white, lacquer, satin black and matt black. If you saw my bike in close proximity you'd struggle to tell that it wasn't painted in a pro booth. Just be aware that most aerosol paints aren't petrol resistant. Yet all my paint resists dot 3 brake fluid ....... Who knew!! The finish will never be as tough as a Two Pack paint job. I'm happy to be careful with mine content in the knowledge that I painted it all in my shed with 'rattle cans' There will probably be many people that I meet that won't believe me when I tell them! Here's a link to my photo stream on Flickr. If you hit the slideshow button they're in chronological order.. Enjoy. flic.kr/s/aHsjxjuMKk |
|
|
|
Post by nevets1966 on Feb 29, 2012 23:04:55 GMT 1
thanks for the replies lads. the paint job on that bike is stunning tunneruk you should do it as a living if your not already. i know theres a lot involved but could you tell us if you put the lacquer on straight after you have flattened the top coat which i would assume or would you use a rubbing compound first which i read elsewhere, which i thought odd as the lacquer wouldnt adhere to it properly.also what grade of wet and dry. many thanks steve
|
|
|
|
Post by billyboy on Feb 29, 2012 23:22:31 GMT 1
I have never flatted a colour base coat before clear-coating ,the only flatting you want to do is in the filling and priming stages, and also to get a real sheen on top of your clear ,flat with 1200 wet and dry and cut and polish but make sure your lacquer is fully hardened first. i use 400, 600 and 800 grit grades to flat the filler/ primer and also beware most acrylic clearcoats yellow with time. ATB
|
|
|
|
Post by billyboy on Feb 29, 2012 23:24:40 GMT 1
Forgot to say tunner - great, no, fantastic job, just satin black the lower half of the sidepanels to make complete.
|
|
|
|
Post by nevets1966 on Feb 29, 2012 23:33:23 GMT 1
thanks billyboy really good info. hopefully i can get started saturday cheers.
|
|
|
|
Post by tunneruk on Feb 29, 2012 23:36:10 GMT 1
Here's the prep for the tank ..... (in my case) 1.Paint strip back to metal. 2.Pulled out as much of the dented finish as possible. I soldered M6 bolts to the dents and pulled them out 3. Ran a skim of filler over the required areas 4. Robbed that down to nearly the right shape 5. Applied another really thin skim of filler to the 'nearly there' base and flatted back to perfect shape. (Well as near as my skill level would let me  ) 6 3x generous coats of filler primer, remember, the more you put on, the more you've got to play with, be sure to let each thick coat fully harden off before the next coat, don't worry too mych about rubbing down between coats, just key the surface up with a scotch brite pad. 7. Once the filler primer has really hardened up (I left mine for about a week) 8. Use some matt black aerosol and 'dust' it over the tank, you want the tank to look dirty, this dusting will show you where you have and haven't prepped later on and any low spots that you need to concentrate on. You'll be amazed how many scratches are in the surface of the filler primer from the filler underneath that you'd never see with the naked eye, the black dusting shows them up like you wouldn't believe. 9. Get yourself a bucket of water and a few sheets of 800 grit paper and start rubbing, avoid heavy action alone edges and swage lines, you'll have the black dusting as a gauge to how much you're sanding off. 10. Once you're satisfied that you're ready for paint, clean the prima with either a tac rag or in my case I bought some paint prep wipes which both cleaned the surface and took away any dust. 11. Ensure the area you're about to paint in is dust free, if in doubt, dampen it all down. 12. Apply your base coat of colour, repeat this process until you're satisfied that you have enough paint on there, be sure to let each coat dry and scotch off before the next coat. 13. Out with another clean bucket of water and the 800 grit and start rubbing away at you're colour coat, no black dusting this time though!!! 14. Once you've flatted the paint off (My white panels looked like they were made of paper if that makes sense) it's time to apply your graphics (That's a different thread all together 15. Once your graphics are on and correct, prep the panel like you did for it's first colour coat and apply your coats of lacquer (I applied three), just like the colour coats (Scotching and cleaning in between) 16. Let the lacquer harden for at least two weeks before you do anything more to it, you'll be able to handle the panel easily within about eight hours but the paint won't be fully cured for at least 10 days. 17. 15 days after painting, get your old mate the bucket of water out and start rubbing away at the lacquer, this time with 1200-1500 grit until you have a smooth smooth finish ....... 18. Polish to taste! (I have an automotive 'mop') but even T Cut will be your friend, just be prepared to spend hours going round in tiny circles with a rag if you're doing it by hand. With painting it's vitally important that everything is warm, or at least above ambient temperature,. This applies to both the paint and the panel, be sure to shake all the aerosols to the point of destruction, they've probably sat on a shelf for a number of months in the shop, you need to thoroughly lift the sediment (The paint) from the bottom of the can, if you can't hear the ball rattling then you've not shaken the can enough. One thing I did was to 'flash' dry everything with a heat gun, I'd put the coat of paint on the flash across it to kick start the drying process, not too hot of coarse, just enough to stop the paint attracting dust. The fate of your panels is in your hands! It's enormously satisfying!! Good luck! |
|
|
|
Post by tunneruk on Feb 29, 2012 23:38:27 GMT 1
Forgot to say tunner - great, no, fantastic job, just satin black the lower half of the sidepanels to make complete. Cheers fella, I've already 'satin'd' the lower side panels, I've just this second put one of the images into that photo stream. Here it is ... 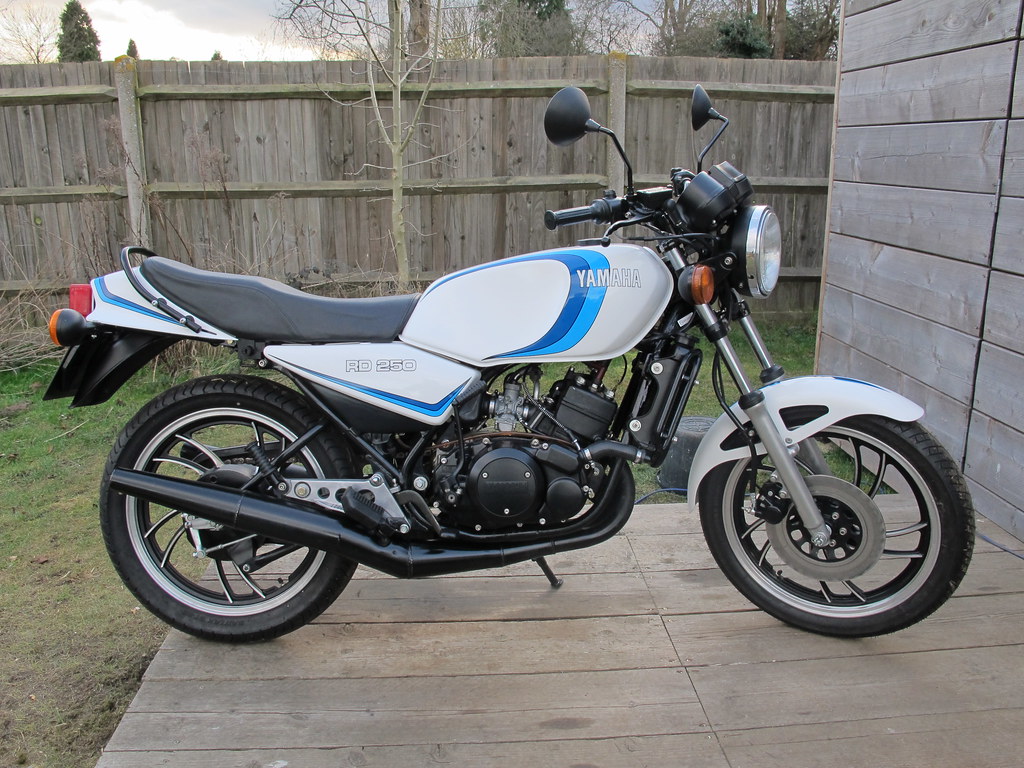 IMG_0202 IMG_0202 by tunneruk, on Flickr |
|
|
|
Post by nevets1966 on Feb 29, 2012 23:49:40 GMT 1
cheers tunneruk appreciate that info think i will give it a go. by the way what a waste of a landrover mat in one of your photos, could do with that in my freelander. many thanks steve.  |
|
davslc
Drag-strip hero

Posts: 242
|
Post by davslc on Mar 1, 2012 7:59:14 GMT 1
excellent write up tunneruk and a good finish , the only difference i had with mine was flatted colour with 1000 wet and dry and flatted clear laquer with 2000 wet and dry but other than that exactly as i did ,but as stated when filling tank take care aerosol paint marks very easy with petrol. also another tip is warm the aerosols in a bucket of hot water before spraying but make sure can is dry before you start to apply paint ,you dont want any water splashing on your wet paint . here is my rattle canned bike straight out the can   all together flatted and polished  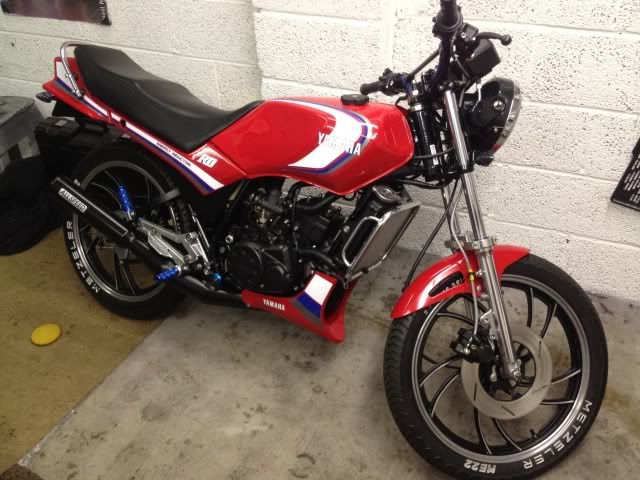 just take your time |
|
|
|
Post by Denzil on Mar 1, 2012 10:36:38 GMT 1
Wow absolutely stunning job you have there, to be honest I am amazed that the paint looks so good, don't think I will be taking mine to the painters as I'm going to have a go myself, cheers.
|
|
|
|
Post by mellow on Mar 1, 2012 18:28:26 GMT 1
They are both stunning jobs.  The only thing with using aerosols is the cost can add up to quite a lot with the amount you use to get the thickness of paint and all the flatting off. If you have the time and patience and dont mind the cost and if it turns out like those two examples id say go ahead  |
|
davslc
Drag-strip hero
Posts: 242
|
Post by davslc on Mar 1, 2012 18:55:49 GMT 1
thanks cost around £120 in paint and £50 for decal kit so all in £170 ,but i do have a halfords trade card so makes paint a little cheaper but not much ,still think its a good saving as most painters would want £350 plus for a job like this with belly pan ect ,just take your time and dont get too giddy when you see the shine and overdo the lacquer a lot of thin coats is better than a few thick ones |
|
|
|
Post by tunneruk on Mar 1, 2012 19:00:39 GMT 1
They are both stunning jobs. The only thing with using aerosols is the cost can add up to quite a lot with the amount you use to get the thickness of paint and all the flatting off. If you have the time and patience and dont mind the cost and if it turns out like those two examples id say go ahead You're right, the cost can add up, I think the paint for my bodywork came to about £175 all in with consumables, this included filler, 800 and 1500 grit paper, masking tape and paint prep wipes. It's a lot of money to spend on a basket of aerosols and bits in Halfords but nothing compared to the cost of 'having' them painted by someone else. |
|
|
|
Post by billyboy on Mar 2, 2012 0:06:18 GMT 1
looks fantastic tunner and also the 125 tank , was this done with halfords clear ? i think they do a fuel resistant one too ,but i dont know how effective it is tho.
|
|
|
|
Post by Fingermaus on Mar 2, 2012 22:36:01 GMT 1
|
|
|
|
Post by mellow on Mar 3, 2012 15:04:07 GMT 1
i can see a second generation R1 ;)Nice sprayjob by the way |
|
|
|
Post by billyboy on Mar 3, 2012 16:21:09 GMT 1
more great work ,davslc was that halfords lacquer on your 125 tank ? looks really deep shine out of the can
|
|
|
|
Post by Fingermaus on Mar 3, 2012 16:55:05 GMT 1
i can see a second generation R1 ;)Nice sprayjob by the way Cheers Mellow Its a 99 bud, just like yours. Very special bike, best I've ever owned. |
|
davslc
Drag-strip hero
Posts: 242
|
Post by davslc on Mar 3, 2012 17:23:40 GMT 1
more great work ,davslc was that halfords lacquer on your 125 tank ? looks really deep shine out of the can yes mate think there was about 8 coats if i remember correctly  plenty to flat back to protect edges of stickers |
|
|
|
Post by twostroker on Mar 3, 2012 18:08:17 GMT 1
theres some good advice here but what i will say is..... aerosols are expensive and are typicly only cellulose .
before you spend any money add up the price of all the aerosols,filler,wet and dry,polish/compound and i bet it comes to £150-£200 plus many hours of labour then you will also need a machine polisher aswell.my advice would be to invest in a 50litre compressor and buy some 2k paint as its a different league in quality to cellulose and the finished job will be far better or alternativly a back street bodyshop would paint a small unfaired bike for £200-£250 if they are quiet especialy if all decals are removed and the tank has been stripped.
a good tip regarding laquer is to use 2k pre-mixed stuff that the shop puts into rattle cans,its expensive but better than any off the shelf aerosol laquer (£12 a can at a guess)
|
|
|
|
Post by billyboy on Mar 4, 2012 0:45:18 GMT 1
i'm having real issues at the moment with hb body rattle can 2k clear not hardening after 6 MONTHS ! i am gutted about this and only put on 2 coats in the height of summer , my advice would be aviod this stuff at all costs.
|
|
|
|
Post by twostroker on Mar 4, 2012 8:06:39 GMT 1
i'm having real issues at the moment with hb body rattle can 2k clear not hardening after 6 MONTHS ! i am gutted about this and only put on 2 coats in the height of summer , my advice would be aviod this stuff at all costs. if it came pre-mixed and just off the shelf in a shop i cant see its atcualy 2k as it would have gone hard a day or so after the paint was put in the can. if its one of them cans that the shop attendant mixs up and puts in a can like they do round here im guessing they made a mistake and forgot to add activator or maybe added just thinners instead. i cant atcualy advise and decent aerosols as there not my thing and the cost/quality doesnt make them worth using to me but im sure some must be ok.  |
|
|
|
Post by lcowner on Mar 4, 2012 10:51:48 GMT 1
they must have forgot to add the hardener!and after 6 months of not drying i wud safely say its never gunna dry.......all i can add to this is i have found a huge difference if u can heat up the thing ur trying to paint makes it less likely to run and if the tank is heated up even with a hairdryer it makes a big difference and my other tip and where i see a lot of people going wrong is trying to put too much paint primer on .i wud say a dusting first then build it up ,but heat is the main thing for me ive found.
im guna be doing a set of rgv wheels next week and will post up piccys ect wish me luck!
|
|
davslc
Drag-strip hero
Posts: 242
|
Post by davslc on Mar 4, 2012 12:43:06 GMT 1
i know a lad that restored a mk1 escort to mint condition then painted it with 2k and didnt buy hardener had to strip it all back to start again  he was used to painting celly so mixed it 50/50 paint thinners no activator ,needless to say was like water runs every were and would never dry , he has since been educated and now loves the 2k stuff  rd nut good luck with wheels mate i hate doing wheels , its not so much the painting but more the prepping |
|
|
|
Post by tunneruk on Mar 4, 2012 13:13:04 GMT 1
Daveslc .... I've just seen your 125 on Ebay ........... Surely not?  |
|
|
|
Post by GoneWithTheWind on Mar 4, 2012 13:21:33 GMT 1
Last year I got some Montana MT 94 graffitti spray(3£ a can) , still waiting to use it. It comes in satin too and satin laquer can be found as well. Dries very very fast but it's water based and it's dry compared to halfords which I find a bit sticky. Whitout laquer seems to come off more easily than halfords spray but again I never used it on a prepared surface and with laquer on top.
Will give it a go and post about it. It's deffo a lot cheaper and it is said to be the best brand of graffitti spray in the world.
|
|
davslc
Drag-strip hero
Posts: 242
|
Post by davslc on Mar 4, 2012 14:05:07 GMT 1
Daveslc .... I've just seen your 125 on Ebay ........... Surely not? i know mate need another project wanting a 350 lc now |
|
|
|
Post by GoneWithTheWind on Mar 4, 2012 15:59:23 GMT 1
I've got two  |
|
davslc
Drag-strip hero
Posts: 242
|
Post by davslc on Mar 4, 2012 16:24:22 GMT 1
I've got two thats just teasing |
|


 )
)


 plenty to flat back to protect edges of stickers