|
|
Post by element137 on Jun 8, 2022 11:19:21 GMT 1
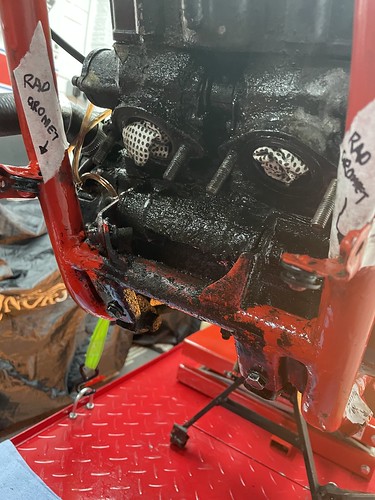
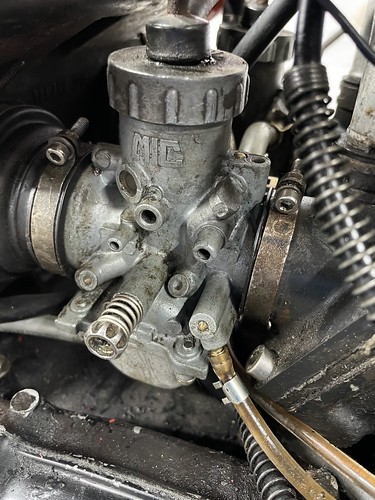
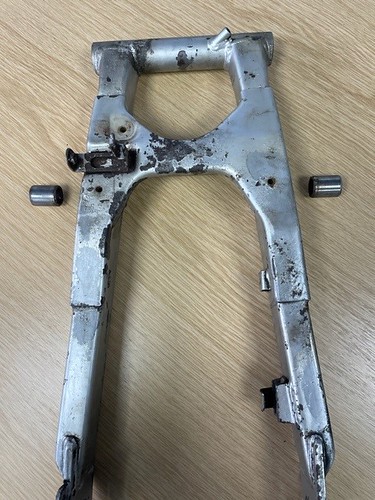
Hi all - though I chuck up some pics of my LC2 project - got it this time last year and working my way through bringing it back to life - so start with couple of pics from day one - and will post up in rough time sequence the work so far - also have to say many thanks to all the advice and help received so far - especially on my battles with bearings/bush removals - its been great fun so far - Mac. 

|
|
|
|
Post by element137 on Jun 8, 2022 11:20:54 GMT 1
State of the wheels to begin with  |
|
|
|
Post by element137 on Jun 8, 2022 11:23:18 GMT 1
hand painted frame, and engine covered in grime  |
|
|
|
Post by element137 on Jun 8, 2022 11:48:57 GMT 1
Started with an initial clean up/vapour blast/rebuild on the carbs to see if it would start - not full balls out clean up - just enough to get it going - 3rd kick and started - carbs come up nice from vapour blasting - see before and after - 
 |
|
|
|
Post by evochris on Jun 8, 2022 15:55:21 GMT 1
Looks like a great project, the carbs come up nice good job and looking forward to seeing more progress. At least the grime on the frame has protected the undercroft areas, I reckon there was a small exhaust leak lol.
|
|
|
|
Post by lcmarky on Jun 8, 2022 17:37:32 GMT 1
Lovely starting point by the looks of the bike.
|
|
|
|
Post by JonW on Jun 9, 2022 1:16:51 GMT 1
hand painted frame, and engine covered in grime  Totally Rad gromets! Carbs look good. Defo do the balls out work, it will pay dividends and save you a job later. |
|
|
|
Post by element137 on Jun 9, 2022 7:12:44 GMT 1
Initial strip down went relatively easy-  |
|
|
|
Post by element137 on Jun 9, 2022 7:19:22 GMT 1
and then the fun started trying to get all bushes out of the swingarm - lots of help on here reference suggestions, was a running battle for a long time - finally managed to extract them all - only then to find that once the swingarm was blasted / cleaned before powder coat - completely rotted through and was scrap - was the first real set back so far - was lucky enough to find a better one on ebay - second pic is the replacement swingarm back from the painter 
 |
|
|
|
Post by element137 on Jun 9, 2022 7:21:46 GMT 1
Looks like a great project, the carbs come up nice good job and looking forward to seeing more progress. At least the grime on the frame has protected the undercroft areas, I reckon there was a small exhaust leak lol. You are right about the protective element of all that gloop - the whole underside of the bike was covered in it front to back - and its preserved a lot of stuff underneath- the bike had stood 8-9 years - |
|
|
|
Post by element137 on Jun 9, 2022 7:24:54 GMT 1
hand painted frame, and engine covered in grime  Totally Rad gromets! Carbs look good. Defo do the balls out work, it will pay dividends and save you a job later. lol- yeah, like totally Rad ! - agree on the balls out clean - carbs are currently with Dave at Muttsnuts (with the engine) so will get a more complete clean/service - I just needed enough to see if it would run - |
|
|
|
Post by element137 on Jun 9, 2022 7:33:54 GMT 1
Then moved onto what was the least enjoyable part so far - wheels - decided to hand polish the wheels - and wrecked my back in the process - spent an entire Sunday hunched over the wheels- rubbing them down with finer grades of paper - and polishing with a Dremel - spent next few weeks in agony with my back - I didn't want to remove the all the milling marks from the original machining- just wanted the rims cleaner/brighter - can honestly say it was not fun - but I though at least that's the hardest part done on the wheels... Pics below before and after - I don't claim to be a polisher- but happy with where they got to - 
 |
|
|
|
Post by element137 on Jun 9, 2022 7:42:26 GMT 1
On the wheels, after a battle to remove the original bearings and replacing with new, which had its moments reference finding the right tool for the job, I thought the polishing was the hard bit - if you ever want to punish someone, with hard labour, in a word .....MASKING before paint - what an utter, kick in the balls, tedious, job- 
|
|
|
|
Post by LC_BOTT on Jun 9, 2022 8:14:28 GMT 1
They are a bit of a pain, but it gets easier the more you do  Are you not painting the inner 'hub' mine usually look a bit worn and tired compared to the newly painted parts, and there's not a lot of paint in there to start with. |
|
|
|
Post by element137 on Jun 9, 2022 8:18:15 GMT 1
|
|
|
|
Post by dusty350 on Jun 9, 2022 8:24:32 GMT 1
They look great🙂
As always, you reap what you sow, so all the prep gives you a mint looking set of wheels🙂
Dusty🙂
|
|
|
|
Post by midlifecrisisrd on Jun 9, 2022 8:41:19 GMT 1
Brilliant work on the wheels 👏
Steve
|
|
|
|
Post by JonW on Jun 9, 2022 8:43:52 GMT 1
I'll echo what the others said. Good work and yes it takes time, but the more you do the better you get at it. I can mask a wheel and have paint on in 20mins now... 6mm line tape helps a lot as does having or making a balancer to spin the wheels when polishing  |
|
|
|
Post by element137 on Jun 9, 2022 9:10:54 GMT 1
They are a bit of a pain, but it gets easier the more you do  Are you not painting the inner 'hub' mine usually look a bit worn and tired compared to the newly painted parts, and there's not a lot of paint in there to start with. I did look at that - after the event - trouble is I only really noticed after I had removed all the masking - once all the discs, sprocket hub etc on was not so noticeable - next time though - I think I would paint the inner part for completeness |
|
|
|
Post by element137 on Jun 9, 2022 9:16:08 GMT 1
I'll echo what the others said. Good work and yes it takes time, but the more you do the better you get at it. I can mask a wheel and have paint on in 20mins now... 6mm line tape helps a lot as does having or making a balancer to spin the wheels when polishing  I used two types of tape - blue was normal 3M masking tape - the green is a flexible vinyl tape - and this was much better for masking into the fine lipped edge between polished edge and black part of the wheel - that lip is something I had never noticed until trying polish, then mask up the wheel - its only when you do a job like this do you see the real detail in the wheel design - I made a lot of mistakes polishing the wheels- not least the rookie mistake of bending over them and lying them flat on a bench - lesson learned though ! |
|
|
|
Post by element137 on Jun 9, 2022 9:24:39 GMT 1
Also had to very reluctantly junk the OEM discs off - they all on/below service limit - couldn't find anything original to use - so decided to go for new - I like them - but I still prefer the original slotted discs - but - didn't want to compromise on safety - the bike wont be for rivet counters anyway - I want to ride it - so I think the right call in the end  |
|
|
|
Post by element137 on Jun 9, 2022 9:33:35 GMT 1
Bit of an in-between job tidy up on the foot rest hangers - vapour blasted and I asked the guy to see if could get a satin/brushed finish - I didn't want to go too bling on these - so happy with these at the moment - but still a bit undecided as to whether to polish them a bit brighter ?  |
|
|
|
Post by element137 on Jun 9, 2022 9:39:31 GMT 1
Also - decide to hand polish the fork lowers - all done with various grade of scotchbrite - compared to doing the wheels - this was enjoyable and quite a nice way to spend a Sunday morning in the man cave - again I didn't want to go too bling - just wanted to get to a clean/satin type finish - I am pleased with these -  |
|
|
|
Post by element137 on Jun 9, 2022 9:46:07 GMT 1
|
|
|
|
Post by evochris on Jun 9, 2022 10:35:57 GMT 1
Forks, wheels and hangers all look great, personal preference on polishing the hangers further, I always go to far and mirror polish, then spend the rest of my life keeping them bright, I need to learn when to stop. Fit them and see if it suits, remember the wheels are not mirror polished so they will go nicely I reckon.
|
|
|
|
Post by element137 on Jun 10, 2022 7:32:32 GMT 1
Frame when it came back from the painters - RAL3020 - much nicer finish than the hand/brush painted original -  |
|
|
|
Post by element137 on Jun 10, 2022 7:35:59 GMT 1
had to junk the main stand that came with it - looked like a one-off fabricated stand - was functional but ugly - found an OEM stand on ebay - was expensive but not stupid money - glad i got it early as the prices of main stands now are just crazy -
|
|
|
|
Post by element137 on Jun 10, 2022 7:40:23 GMT 1
the shock/linkages as they came off - decided to replace the shock rather than try and refurb - dog bone pivot shafts were very badly corroded/worn - -so splashed an some nice billet ones from Norbo  |
|
|
|
Post by element137 on Jun 10, 2022 7:44:33 GMT 1
|
|
|
|
Post by lcmarky on Jun 10, 2022 8:10:44 GMT 1
Looking really good & I agree with the satin finish and upgrading discs & shock, but I'd definitely be upgrading the motor, pipes & ignition.
|
|