|
|
Post by arrdy350 on Feb 16, 2021 7:54:28 GMT 1
Very nice job on the painting and the foot hangers look good. Can't wait to see what it complete 😀👍
|
|
|
|
Post by steve63 on Mar 10, 2021 0:19:42 GMT 1
Hi Shaun, I've just caught up on this build. Looking great so far. Spot on job with the clocks. I remember them being a tad easy to break those big plastic cases. I had a 31K from 1985 until maybe 1990/91 or so. Did a full season and a bit of racing on it then rode it to Spain with the Mrs and camping gear and used it for work for a few years. Solid reliable bike despite being production tuned from new. lovely engine with loads of power everywhere. Looking forward to seeing it in the flesh. Shame your not doing it in red/white with a red frame like mine was  I know you mentined getting some 31K wheels but I would stick with the F2 wheels myself. They're a lot lighter than the 31K wheels and the difference in looks would only be noticeable to anyone who really knows these bikes. As you said it's not going to be an olive green perfect build anyway. Like a performance upgrade. I've been stripping some 4L0 wheels are they are HEAVY. I have a set of F2 wheels and forks/brakes that are going on one of the LC's. The 31K wheels must be a similar weight to the 4L0 although the discs are a lot lighter? Are the dust seals on the forks F2 (flush with the top)? Don't the 31K go over the forks like the LC? |
|
|
|
Post by shaunthe2nd on Mar 11, 2021 22:59:27 GMT 1
Steve,
Thanks for the feedback, sounds like you had great fun with yours back in the day.
The bike came with F2 wheels, but I have sourced some LC2 ones but still need to refurb them. When I did my dry build I left the F2 ones on, but they will be sold off once I've done, as I am going for an original look as far as possible. They are heavy though, as are the 4L0 ones. The F2 only a bit lighter due to the slots instead of O cutouts. In all cases they soak up a lot of time and effort to refurb them, a job I'm not looking forward to.
I'm still planning on going white-blue, and in fact just tonight I started some prep on the body kit before I farm out to a painter.
With regards to the forks, I think you are right. I'm told my forks are the correct LC2 type, but had the wrong dust covers fitted, so I have sourced the correct ones for the final build.
|
|
|
|
Post by shaunthe2nd on Mar 11, 2021 23:40:32 GMT 1
Well I ought to give a bit of an update. I have cracked on with the engine rebuild.  All new original bearings and seals used as well as a long list of replacement components. I used Dusty's engine build thread for guidance (thanks) but also cast my eye through Haynes book of fibs, the parts fiches and even uTube as I wanted to get it right. The downside of all that research is that there are some conflicting info out there!   I was a bit unsure about the gear selections, so found an excuse to blag a free cup of tea and a get a free look over of the gearbox by Muttsnuts (thanks and sorry I forgot the biscuits!).  New clutch assembly fitted. amazingly I picked up a full new NOS assembly with all new plates and steels as well for £50!   I had the barrels rebored to 0.75mm and new Jap Mitaka pistons. They were previously mismatched, one at 0.25mm and the other at 0.5mm so wanted to even it up.They dropped on nicely.   I found out that you can't get a standard torque wrench onto all the lower barrel nuts, especially the middle ones, so I torqued up the ones I could and used the 'feel' I gained for the others. Then on goes the head..  I dry fitted the stator plate, then took it off whilst I lapped the rotor shaft and arm. Then made the schoolboy error of fitting and torquing up the rotor without refitting the stator. Grrr. so then I had the fight to get the rotor off again! Lesson learnt.  Then the dreaded leak down test. I bought a kit for this off eBay specifically for LC/YPVS to save messing about.  Well the good news was no leaks from the new seals, the crankcases nor the carb inlet rubbers. the bad new was that i had a leak on the powervalves. The powervalve bushes and all the seals were fitted new during the rebuild so I was a bit disappointed. I did some research on this and seems this is quite normal on the YPVS. To be sure though I ordered a second set of genuine Yamaha valve seals as I had used some that came with the gasket set I bought. So I stripped the top end again, and rebuilt the valve assemblies with the new Yamaha seals, which were a pig to fit! Then a repeat of the leakdown test to see only marginal improvement as still have a slight leak on the inner valves. I've decided to live for it for now, as its on the exhaust side so unlikley to cause significant combustion problems. Then the water pump, new bearings and seals etc fitted. The casing painted. New seal for oil pump. All back together bar the pump and fitted.  Just about done...   I've been in the process of repainting the LH engine casing, all was looking very nice until I put some lacquer on it and got a horrible paint reaction, so spent a few hours rubbing it all done again, and its ready for repaint again. I can see why people just buy new. The other thing I have realised since assembly is that my engine didn't come with washers under the head bolts so didn't get fitted. I plan to order some from Fowlers and replace one at a time. The other lesson I learnt about the YPVS engine is that you can check the timing but can't adjust it! Next job is to prep and repair the various body panels for painting. Just made a start on that tonight so watch this space. |
|
|
|
Post by steve63 on Mar 12, 2021 0:45:19 GMT 1
Wow, you have been busy!
Is it the plastic engine cover you are painting?
I sold that power valve for £800 and remember saying I'd better sell it while they are worth something. I guess I was wrong. 😁
I've been playing with a few of my wheels. I have a front, painted black right up to the tyre. The tyre is a Michelin race tyre, TF11, I think, from about 1982! I took it off along with a bit of skin off my thumb (it's kind of traditional to lose some skin off at least one finger). Jet washing brought about 25% of the paint off. Industrial paint stripper brought off about 25% more paint. I've brought the wheel and paint stripper into the house tonight. Someone said the paint stripper works better when it's warm. I'll find out tomorrow.
|
|
|
|
Post by shaunthe2nd on Mar 12, 2021 0:55:23 GMT 1
Wow, you have been busy! Is it the plastic engine cover you are painting? I sold that power valve for £800 and remember saying I'd better sell it while they are worth something. I guess I was wrong. 😁 I've been playing with a few of my wheels. I have a front, painted black right up to the tyre. The tyre is a Michelin race tyre, TF11, I think, from about 1982! I took it off along with a bit of skin off my thumb (it's kind of traditional to lose some skin off at least one finger). Jet washing brought about 25% of the paint off. Industrial paint stripper brought off about 25% more paint. I've brought the wheel and paint stripper into the house tonight. Someone said the paint stripper works better when it's warm. I'll find out tomorrow. Yes its the LH hard plastic cover that's a gloss finish. I painted it with the same paint as the engine - Simoniz black engine gloss. I did the same with the RH alloy casing and the plastic oil case and the round clutch cover and all went well. It was only the LH casing that reacted to the lacquer so i'm thinking it was either too cool (larger mass?) or I hadn't let it cure for long enough, orIi put on the first coat of lacquer too thick. Who knows! Plastics can be hit and miss in my experience. Be careful with that tyre, needs binning! Funnily enough i took a 1975 tyre off a 1982 LC a couple of years back. I regularly bring my parts into the house to work on, but not when my gf is around, for harmony reasons! Good luck with the wheel, I have mine to do maybe in a week or 2 hopefully. |
|
Rob123
Thrash Merchant

Posts: 382
|
Post by Rob123 on Mar 12, 2021 7:43:19 GMT 1
Looking good shaun nice to see progress 👍
I'm realy pleased with the simoniz paint I used on my engine since fitting the carbs I have had numerous overflow issues with petrol were its been on the casings for long periods of time even overnight, it has not left a single mark on them brilliant stuff when baked on 😀
|
|
|
|
Post by badger1 on Mar 12, 2021 12:40:34 GMT 1
The leak down tester looks good, did it work ok? that from eBay you say?
|
|
|
|
Post by rsvr1000 on Mar 12, 2021 13:03:37 GMT 1
Looking good, keep the pics coming, mine has slowed up due to work  |
|
|
|
Post by steve63 on Mar 12, 2021 15:04:53 GMT 1
I was just wondering why you were painting the plastic panel. Would it not polish up alright?
My Mrs. is the one saying why don't you stick the radiators in the dishwasher and I'm the one saying I don't want it clogging with the grit and sh@t that will come out of them.
She doesn't know I'm putting some of the new and refurbished bits in the cupboards in the spare bedroom.
|
|
|
|
Post by shaunthe2nd on Mar 12, 2021 15:17:55 GMT 1
I was just wondering why you were painting the plastic panel. Would it not polish up alright? My Mrs. is the one saying why don't you stick the radiators in the dishwasher and I'm the one saying I don't want it clogging with the grit and sh@t that will come out of them. She doesn't know I'm putting some of the new and refurbished bits in the cupboards in the spare bedroom. The side panel had been previously painted and was looking tired, no scuffs luckily, so decided to rub it back and repaint. I've put lots of stuff through my dishwasher before but never thought about doing a radiator. Food for thought! |
|
|
|
Post by shaunthe2nd on Mar 12, 2021 18:54:26 GMT 1
|
|
|
|
Post by badger1 on Mar 12, 2021 19:52:15 GMT 1
Nice to hear something from eBay works as it should, just had a look I might treat myself looks ok. To be honest that kit at that price if it finds a leak like it did for you is cheap compared to how much these cost now to rebuild. Your builds looking good. |
|
|
|
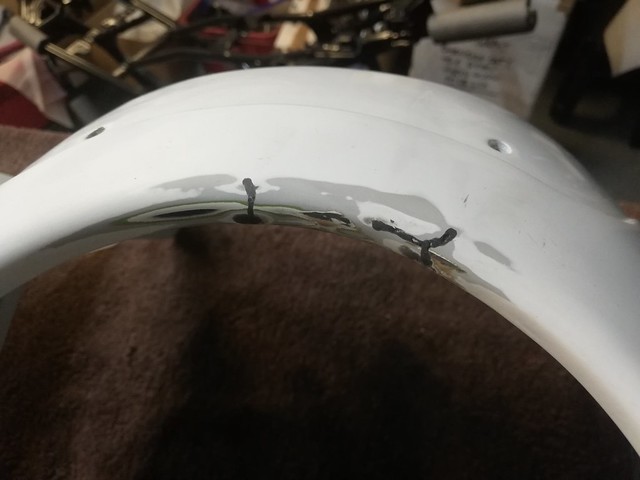
Post by shaunthe2nd on Apr 9, 2021 17:07:31 GMT 1
Time to update I suppose. Thought I'd sort the bodywork out before sending off to the painters as don't know how long they will need. I've gathered a bit of a mix of body parts (can I say that without getting arrested?), most of which need some work.  The muddie was one of the worst, with lots of cracks and broken and missing parts.   So find the end of the cracks, and drill a small hole to prevent further cracking.  Bonded some copper mesh on underside to give some strength to the repair.   Then dremel open the cracks to create something for the Q bond to get hold of. Also made some infill sections from a scrap muddie to fill in the gaps. A bit of rubbing down and starting to take shape. 
All the panels needed some repairs. 
  Then turned my attention to the tank. Its had quite a bit of braze and weld on underside and is hopefully fuel tight. Inside has some surface rust, so thought I'd give it a Deox-C bath.    Wired together some only nuts to put inside the tank so I could shake it up a bit.  Well the good news was that the tank was water tight, for the first 2 or 3 days, and then it started to drip. A few pin holes evolved. Bugga.  On the plus side the Deox-C did its job and nice and clean inside.  So it needed cleaning and drying out. Hairdryer and electric fire...   So decided to use Flowliner to line the tank. Never used this one before, but was told it can be used after the Deox-C stuff, so gave it a go.  Followed the instructions to the letter. had a 90 min work out rolling the tank to get a good even spread as it set. Then left it for 7 days to cure.  Just need to leave it for another couple of days before doing a leak test on it. Fingers crossed. Hopefully the body work is then ready to go to the painters. |
|
|
|
Post by steve63 on Apr 12, 2021 13:04:44 GMT 1
Well done with the mudguard. I looked at it and thought, he's going to have to buy another, I was wrong! I did my RGV tank with DeoxC. It didn't have a lot of rust really, a bit thicker around the tap but it was getting through to the carbs and putting it on to one pot. I left it over night and the majority of the rust was gone the next day. I had the hot air paint stripper out but it was such a warm day (remember them? ) I ended up just leaving it in the sun and it dried in minutes. The tank is black, I say black but a sort of grey from sun bleaching in japan for twenty years, and was almost too hot to touch. I just put it back on the bike and it's been fine. I've not lined it. I've recently bought 2kg of citric acid crystals and been experimenting with that. It seems to work as good as DeoxC and is only £4 for 2kg, maybe £4.50 ish. As a bonus I put a table spoons worth in the kettle and boiled it, all the scale dissolved, like brand new. I suspect that DeoxC is basically citric acid. The dissolved crystals taste like lemon juice. I've not quite managed to pluck up the courage (stupidity?) to taste the DeoxC yet to confirm my theory  |
|
|
|
Post by shaunthe2nd on Apr 12, 2021 17:02:19 GMT 1
Well done with the mudguard. I looked at it and thought, he's going to have to buy another, I was wrong! I did my RGV tank with DeoxC. It didn't have a lot of rust really, a bit thicker around the tap but it was getting through to the carbs and putting it on to one pot. I left it over night and the majority of the rust was gone the next day. I had the hot air paint stripper out but it was such a warm day (remember them? ) I ended up just leaving it in the sun and it dried in minutes. The tank is black, I say black but a sort of grey from sun bleaching in japan for twenty years, and was almost too hot to touch. I just put it back on the bike and it's been fine. I've not lined it. I've recently bought 2kg of citric acid crystals and been experimenting with that. It seems to work as good as DeoxC and is only £4 for 2kg, maybe £4.50 ish. As a bonus I put a table spoons worth in the kettle and boiled it, all the scale dissolved, like brand new. I suspect that DeoxC is basically citric acid. The dissolved crystals taste like lemon juice. I've not quite managed to pluck up the courage (stupidity?) to taste the DeoxC yet to confirm my theory Thanks Steve, I'm quite pleased with the mudguard, hopefully it will paint up ok now. I don't recommend tasting the Deox-C stuff though, does a good job on the rust though. Perhaps too good as my pin holes can vouch for, but i'm glad they showed up now, rather in a few months time after a full repaint. The good news is that the tank is water/fuel tight now and I need to speak to my painter. |
|
|
|
Post by ERic350 on Apr 12, 2021 20:39:29 GMT 1
|
|
|
|
Post by shaunthe2nd on Apr 12, 2021 21:14:29 GMT 1
Thanks for that, wasn't aware of such a tool. |
|
|
|
Post by steve63 on Apr 12, 2021 23:13:21 GMT 1
I spent an hour or so cleaning up my YPVS chain/alternator cover. It came up great with a bit of T cut after removing all the baked on grease. I found though that it has a bit missing. It must have been the same time as the chain snapped and cracked a bit of the crankcase off  I have the bit of crankcase somehwere so a trip to see Shag might be in order but not for a while yet. |
|
|
|
Post by shaunthe2nd on Apr 14, 2021 21:51:45 GMT 1
Well today has been a red letter day for me. I dropped my tank and bodywork at the painters today. He says he needs just 2 weeks so I've booked an appointment at Image Works for the decals to be fitted before final lacquer. If that wasn't exciting enough I also had the tyres fitted to my freshly prepared wheels, so things definitely starting to happen. Well just to bring you up to speed, the wheels that came with the bike were for the later model, F2/N2 i think.  So can't fit these to my build, so sourced some LC2 wheels instead, although both need a lot of work.   Cleaned up ok, but need painting, polishing and new bearings.  New bearings fitted....  ...and started paint stripping...     Masking up takes a while, but quite theraputic.  All ready for painting..   Looking good...  Tyres fitted...  and finally the discs and sprocket/carrier fitted. Now ready to go on the bike.  Another job ticked off. A good day. Next are the exhausts to sort and paint before I then make a start of assembling the bike. Love that bit. |
|
|
|
Post by arrdy350 on Apr 14, 2021 23:09:33 GMT 1
Nice job on the wheels 👍
|
|
|
|
Post by freddie19 on Apr 15, 2021 4:30:06 GMT 1
I'd be interested in the Gold F2 wheels if they're in good condition and you're not going to use them?👍
|
|
|
|
Post by shaunthe2nd on Apr 15, 2021 8:58:21 GMT 1
I'd be interested in the Gold F2 wheels if they're in good condition and you're not going to use them?👍 Yes I will be selling them. I will PM you some better pictures later today if you are interested. Shaun. |
|
|
|
Post by steve63 on Apr 19, 2021 23:26:28 GMT 1
I've been refurbishing my LC wheels. Always looking for the least hard work option I have been blathering the paint stripper on then jet washing them. It works quite well and less graft than wire brushing. I just bought myself a new Triton 140 bar jet wash from Screw Fix. After paint stripping I stick them in the bead blaster. I was thinking of fitting the tyres first, then wheel bearings, then masking and doing the painting last. That way maybe less chance of damaging the paint while fitting the tyres I thought?
|
|
|
|
Post by shaunthe2nd on Apr 20, 2021 8:58:08 GMT 1
The YPVS wheels were slightly easier to strip, mask and paint than the LC type which have more nooks and crannies and difficult curves to mask.
Never thought about using a jet wash after the paint stripper, and unfortunately I don't have a bead blaster, but sounds interesting way of doing it. I guess you have to make sure you keep the beads away from the alloy bits, especially the machine marks if you want to retain those.
Didn't think about painting after fitting tyres, just because they are lighter and easier to handle that way. There was no paint damage to the paintwork during tyre fitting thankfully.
|
|
|
|
Post by steve63 on Apr 20, 2021 9:22:56 GMT 1
The bead in mine is like a really fine sand, like the sand in an egg timer. It leaves a finish like vapour blasting, a dull grey. Even rubbing with your finger end brings the shine back.
I emptied the bead out last night and put some fine crushed glass in it. It's just a bit coarser. I did the brake plate. It leaves a bit rougher finish. Looks similar, just feels a bit rougher. Probably better for painting on.
The cabinet was £105. I wouldn't be without it now. The compressor doesn't keep up with it though.
|
|
|
|
Post by abar121 on Apr 20, 2021 11:33:57 GMT 1
The bead in mine is like a really fine sand, like the sand in an egg timer. It leaves a finish like vapour blasting, a dull grey. Even rubbing with your finger end brings the shine back. I emptied the bead out last night and put some fine crushed glass in it. It's just a bit coarser. I did the brake plate. It leaves a bit rougher finish. Looks similar, just feels a bit rougher. Probably better for painting on. The cabinet was £105. I wouldn't be without it now. The compressor doesn't keep up with it though. Sounds good. What cabinet is that? I was thinking of getting one. I did some soda blasting once, so have all the kit. Looked like a cocaine garden party.. OP, looking great, excellent progress. Echo the comments about citric acid. I bought a 10kg tub for £15 quid or so and it's been stellar! |
|
|
|
Post by steve63 on Apr 20, 2021 13:36:11 GMT 1
The cabinet is one of those orange ones from China. The light quickly broke and the filter to let the air out, what goes in must come out, was no good. After a couple of design changes I have ended up with a fish tank lamp and an old bagless vacuum cleaner piped to it. It's great for small jobs but as with everything it gets pushed to the limit. A wheel just fits in it but takes a while to do mainly down to the limitations with air volume.
|
|
|
|
Post by shaunthe2nd on Apr 20, 2021 21:13:42 GMT 1
Whey hey, finally started building up the bike after months of sorting parts. My favourite bit of any project. We now have a rolling chasis....  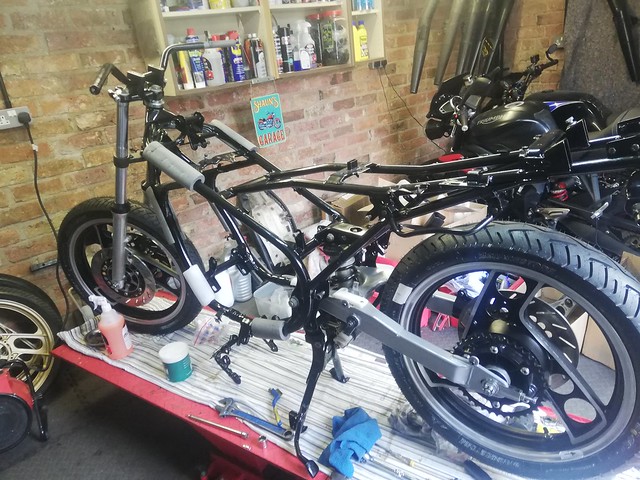 Starting to enjoy this. |
|
|
|
Post by shaunthe2nd on Apr 28, 2021 22:10:04 GMT 1
Definitely enjoying this phase, although only managing to grab a couple hours fun every now and then. In one session I fitted a few of the plastics and the brakes, although still dry.  Then its the engine into the frame.  In she goes.  Today I started fitted the loom and the electrics. Luckily I had already repaired the loom and had it all labelled up, so I'm hoping that bit should be ok. Whether everything works is a matter for another day!  Not finished the wiring, need a few more hours on that. Tomorrow I pick up the paintwork hopefully as have an appointment at Image Works on Friday for decals to be fitted, before taking it all back to painter for final lacquer. Its all happening now! |
|


