2taol
Thrash Merchant

Posts: 378
|
Post by 2taol on Jul 4, 2020 21:05:27 GMT 1
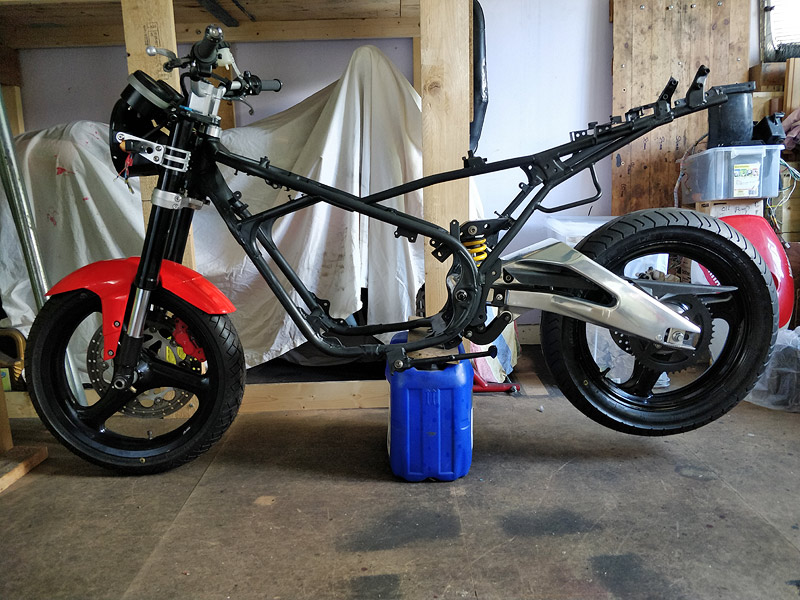
So I have been on this forum for many years mostly lurking and fully enjoying all the rebuilds. This project has been simmering for about 7 years with fits and starts as funds dictate and this is the final build. There are still lots of jobs to do, cleaning, coating etc. I have accumulated parts over the years and only a few odds and ends to get. I am on a lot of forums but there are 2 which I really like, here and 2strokeforum.net as they are pretty much focussed on A/C RD's. This is what can be classed as a completely weird build! F2 frame, RD250B engine, aprilia RS125 front end, YZF-R125 rear end, RD250LC small can Microns. A bit about myself, im not 18 but at the half tonne. back in the day I had only 2 strokes starting with a Suzuki TS100 and lastly a TZR125 3ma. About 8 years ago I restored a '99 aprilia RS125 which I still have. I dont have a timeline for this but hopefully I can finish by the end of August... So here is a group shot of the parts ready for off (or actually on!)  |
|
|
|
Post by dusty350 on Jul 4, 2020 21:20:45 GMT 1
Looks a great project  And nice to see something a bit different in a hybrid  One of the members here built a lovely Pv hybrid with an aircooled 350 engine fitted - I think the chunky aircooled lump looks great in the Pv chassis. Look forward to your progress Dusty |
|
|
|
Post by donkeychomp on Jul 4, 2020 22:09:23 GMT 1
This is going to be very different! I like that. Good luck, keep the pics coming.
Alex
|
|
|
|
Post by veg on Jul 4, 2020 22:46:46 GMT 1
As said different is v good we like different
|
|
|
|
Post by JonW on Jul 6, 2020 13:40:03 GMT 1
yep im with the others, different for sure. Interested to see how it comes out!
|
|
|
|
Post by midlifecrisisrd on Jul 6, 2020 13:47:12 GMT 1
Come on, get on with it!
We want progress pics 😁
Steve
|
|
2taol
Thrash Merchant
Posts: 378
|
Post by 2taol on Jul 7, 2020 13:06:21 GMT 1
lol I forgot to mention that this started out as a "budget" build. The naive budget 7 years ago has been blown big time but I'm still trying to keep it as cheap as possible. So I spent about 5 hours on sunday removing unwanted fairing and radiator tabs, sanding the frame and about 2 hours last night prepping the frame with Oxirite rust converter ahead of the rattle can paint, starting tonight hopefully, any tips on spray painting other than patience?   |
|
|
|
Post by st66 on Jul 7, 2020 20:08:26 GMT 1
Cool, look forwards to seeing the bits go together, the trick with painting is don't slap it on don't get to close with the can first a light coat let it sit for 5to 1o mins and second coat and so on same with clearcoat, don't paint in cold or damp conditions just light coats and biukd it up long stokes at a distance of say at half arms length ,, it builds up and runs if you get to close so nice and steady good luck mate
|
|
2taol
Thrash Merchant
Posts: 378
|
Post by 2taol on Jul 7, 2020 21:59:02 GMT 1
thanks st66, im in the middle of the process atm. im building the layers every 20 mins and being careful not to get runs in the paint.
I dont have any clear coat, with the 2K paint it seems it isnt necessary. I might if I can pick up 2 cans and give it a once over, not sure.
Im planning on getting about 6 coats of paint on, im at 4 now.....
|
|
fabiostar
Thrash Merchant
the older i get the faster i was.
Posts: 395
|
Post by fabiostar on Jul 8, 2020 8:53:34 GMT 1
nice build and as others said its a change from the norm.
|
|
2taol
Thrash Merchant
Posts: 378
|
Post by 2taol on Jul 8, 2020 19:29:48 GMT 1
going to finish off the frame tonight, its raining here at the moment, quite damp really so i have the heating on in the garage to help the curing process, will get a few more coats on and leave it at that.
Im also doing the side stand, shock linkages and taillight bracket.
|
|
2taol
Thrash Merchant
Posts: 378
|
Post by 2taol on Jul 8, 2020 22:15:30 GMT 1
... and frame painting is finished, 7 to 8 coats of 2K Signal Black RAL9004 Satin, very happy with the result, no paint runs!  |
|
2taol
Thrash Merchant
Posts: 378
|
Post by 2taol on Jul 10, 2020 20:30:19 GMT 1
Before painting the frame I reassembled the bike to a rolling chassis state to check that the welding i had commissioned was good and I also had some swingarm and rear wheel spacers made up. Just wanted to check. So I need to decide whether to strip and polish the swinger or repaint it gloss black RAL9005 to contrast against the Signal black satin RAL9004 of the frame? Bearing in mind the engine casings bar the crank cases have been vapour blasted and will be left bare, the pipes will be matt black and the front forks and wheels are gloss black. Dont know about the body work yet. Just trying to paint a picture (pun intended)  |
|
|
|
Post by dusty350 on Jul 10, 2020 21:24:43 GMT 1
Looking good Polished swingarm for me Dusty |
|
2taol
Thrash Merchant
Posts: 378
|
Post by 2taol on Jul 13, 2020 23:10:13 GMT 1
ok so thats a definitive polish..... This swingarm was never intended to be polished, the finish is very uneven, Yamaha decided it would be best to have a "Matt" finish as a cost saving approach. After approximately 8 hours over 2 days I have it ready for polishing. I started with a 3M scotch disc followed by 60, 80, 120, 240, 360 grit sanding discs, then 400 and 800 grit wet sand paper, (i have some 1200 wet and dry paper, I might give it the once over with that too)   |
|
|
|
Post by dusty350 on Jul 14, 2020 7:01:36 GMT 1
Looking good The effort will show in the end product, and the fact it took a LOT of work means you wont see too many other polished arms of that type. In the past, I've spent hours getting through an anodised finish on forks just so I could start the polishing process (before I knew about OvenPride !!) Now I just take them to Jamie who vapour blasts them for me, and then polishing is a doddle This is gonna look great Dusty |
|
|
|
Post by Topman350 on Jul 14, 2020 9:49:37 GMT 1
lol I forgot to mention that this started out as a "budget" build. The naive budget 7 years ago has been blown big time but I'm still trying to keep it as cheap as possible. So I spent about 5 hours on sunday removing unwanted fairing and radiator tabs, sanding the frame and about 2 hours last night prepping the frame with Oxirite rust converter ahead of the rattle can paint, starting tonight hopefully, any tips on spray painting other than patience? Looks a great built will be really nice when done with regards the painting any metal parts no undercoat needed other than powerder coating I would recommend hammerite aerosol smooth black plus it's comes in all colours it's the best drys really tough, you apply a light dust coat 1st leave for 10/15 mins between coats and then apply a further 4/6 even coats it will take around 7/10days to cure but its worth the wait the finish is a deap gloss shine, good luck with the build I'm sure it will be awesome. Topman350 😀 |
|
|
|
Post by Topman350 on Jul 14, 2020 9:53:31 GMT 1
ok so thats a definitive polish..... This swingarm was never intended to be polished, the finish is very uneven, Yamaha decided it would be best to have a "Matt" finish as a cost saving approach. After approximately 8 hours over 2 days I have it ready for polishing. I started with a 3M scotch disc followed by 60, 80, 120, 240, 360 grit sanding discs, then 400 and 800 grit wet sand paper, (i have some 1200 wet and dry paper, I might give it the once over with that too) I would take the V shape off its not needed and in the way of polishing! if it was me 😀 👍 |
|
2taol
Thrash Merchant
Posts: 378
|
Post by 2taol on Jul 17, 2020 0:19:29 GMT 1
quick update on the polishing..,..
nearly ready for a final polish.
What i have fone so far:
Scotch bright disc to remove paint
P80 disc
P120 disc
P240 disc
P320 disc
400 wet
800 wet
1200 wet
Brown bar polish
Blue bar polish, this really shows the blemishes
P320
600 wet
800 wet
1000 wet
2000 wet
|
|
|
|
|
|
Post by dusty350 on Jul 19, 2020 21:33:56 GMT 1
Great work I never go too far with polishing to be honest. The upkeep on bike parts with a highly polished finish can be a nightmare, so if you regard mirror finish as 100%, I normally go 75% max. It's virtually impossible to keep a really shiny swingarm or forks looking mint  I made the mistake with a Gsxr1100H frame years ago. I had it pro polished and it looked fantastic - a real mirror finish. First time I needed to buff it up, very minor scratches appeared in the metal and spoilt the look, and it didn't get any better with subsequent polishing, so I vowed never to go too shiny again. And Japanese castings are notoriously poor, and can take forever to get to a decent finish - again, a pair of 400 side cases years ago taught me that lesson ! But, as always, each to their own, so go with what you want I'm sure it will look lovely with the amount of time you are spending, and polished alloy does look trick Dusty |
|
2taol
Thrash Merchant
Posts: 378
|
Post by 2taol on Jul 20, 2020 7:30:43 GMT 1
ok so thats a definitive polish..... This swingarm was never intended to be polished, the finish is very uneven, Yamaha decided it would be best to have a "Matt" finish as a cost saving approach. After approximately 8 hours over 2 days I have it ready for polishing. I started with a 3M scotch disc followed by 60, 80, 120, 240, 360 grit sanding discs, then 400 and 800 grit wet sand paper, (i have some 1200 wet and dry paper, I might give it the once over with that too) I would take the V shape off its not needed and in the way of polishing! if it was me 😀 👍 Topman apologies I forgot to say thanks for the tip on the "V". |
|
2taol
Thrash Merchant
Posts: 378
|
Post by 2taol on Jul 20, 2020 7:37:17 GMT 1
Great work I never go too far with polishing to be honest. The upkeep on bike parts with a highly polished finish can be a nightmare, so if you regard mirror finish as 100%, I normally go 75% max. It's virtually impossible to keep a really shiny swingarm or forks looking mint I made the mistake with a Gsxr1100H frame years ago. I had it pro polished and it looked fantastic - a real mirror finish. First time I needed to buff it up, very minor scratches appeared in the metal and spoilt the look, and it didn't get any better with subsequent polishing, so I vowed never to go too shiny again. And Japanese castings are notoriously poor, and can take forever to get to a decent finish - again, a pair of 400 side cases years ago taught me that lesson ! But, as always, each to their own, so go with what you want I'm sure it will look lovely with the amount of time you are spending, and polished alloy does look trick Dusty I agree, I dont know why I have been obsessed with getting this to a high mirror finish, I know the disadvantages with that. The last polishing spree I did was the RS125 frame and swinger but not to a really high mirror finish and I really liked the finish.  so next task is to paint a few parts before the marrying of the frame and swingarm. |
|
2taol
Thrash Merchant
Posts: 378
|
Post by 2taol on Jul 26, 2020 23:49:48 GMT 1
For the last few days I have been prepping parts for painting, Satin Black is the finish, It goes better than gloss than my painting skills. I have a week off work so I expect to get quite a bit done this week . . . Parts painted: Engine mount brackets Taillight bracket Seat Latches Kickstart Rear Master Cylinder Brake pedal Rear Caliper Carrier Swing arm spindle [ends] Gear Change Rod   |
|
2taol
Thrash Merchant
Posts: 378
|
Post by 2taol on Jul 27, 2020 22:18:58 GMT 1
After having to make 2 Aluminium spacers for the lower rear shock mount, parts were cleaned and greased and fitted to the frame. I have some round Aluminium bar which I have been making spacers from with basic hand tools. First I mark the desired width with a pipe cutter and with a junior hack saw I cut a little at a time along the score mark rotating all the time to get a straight cut.    |
|
|
|
Post by sidney81 on Jul 28, 2020 10:28:34 GMT 1
Hi ,I'm enjoying this , looking great I'm building a air cooled hybrid ( mash up) as my misses calls it 🤣,so good to see another 👍😊
|
|
2taol
Thrash Merchant
Posts: 378
|
Post by 2taol on Jul 28, 2020 19:18:22 GMT 1
great! well this is a right mashup! This is what can be classed as a completely weird build! F2 frame, RD250B engine, aprilia RS125 front end, YZF-R125 rear end, RD250LC small can Microns. and a Honda XL Varadero 125 rear wheel! |
|
2taol
Thrash Merchant
Posts: 378
|
Post by 2taol on Jul 29, 2020 23:45:19 GMT 1
Spent about 5 hours in the garage today, Didnt feel like it though and certainly didnt get as much done as I hoped. Got the rear wheel fitted and the clearance between the brake disc bolts and carrier/swingarm is very tight, about 3 to 4mm.
Also got more done on the front end, fitted the clocks, headlight shell, Bars and controls. I made the headlight brackets myself from 4mm Aluminium plate and bought some fork brackets from ebay and sprayed the
chrome "silver". I also cut a small spacer from some tubing to hide the threads of the stainless bolts and used dome head nuts again to cover the threads.
|
|
2taol
Thrash Merchant
Posts: 378
|
Post by 2taol on Jul 29, 2020 23:54:09 GMT 1
Another task today was to repair the oil tank, the outlet nozzle was cracked where it joined the main body of the tank. Whoever repaired it before used a kind of resin which was leaking, I removed the resin, cleaned the area with brake fluid
and "welded" some plastic into the area to seal it. I used a sliver of plastic from a coolant overflow tank, which obviously
wont be using and melted that with a soldering iron! While welding the area I left a screwdriver stuck in the nozzle so that the area would retain its normal shape and not deform with the heat. The job is perfect, I tested it for a water leak over a few hours and it aint leaking!
|
|
2taol
Thrash Merchant
Posts: 378
|
Post by 2taol on Aug 2, 2020 0:10:35 GMT 1
Got a lot of work done over the last few days.
rear pedal properly commissioned, this included a bit of messing, had to cut the head of the lower footrest hanger to increase clearance, fit an oddball return spring, I made up a braided hose and spent quite a bit of time bleeding the master cylinder/caliper.
I chopped the hangers, I dont like the pillion ends and wont be carrying pilions either.
I was also missing a R/H footrest so I cut the spring from one of the pillion footrests and reconfigured it to work as a regractable one for the kickstart. It just took a lot of time.
Also fitted airbox and oil tank after cleaning.
pics to follow....
|
|


 And nice to see something a bit different in a hybrid