|
|
Post by nokturnal on Mar 6, 2020 3:14:23 GMT 1
Just bought a new output collar. Was around 13$ from the dealer.
|
|
|
|
Post by JonW on Mar 6, 2020 4:17:04 GMT 1
Just bought a new output collar. Was around 13$ from the dealer. yes me too, and then i found one... meh! |
|
|
|
Post by donkeychomp on Mar 7, 2020 0:01:05 GMT 1
Jon wtf kind of paint are you using? Can you get Hycote over there?
Alex
|
|
|
|
Post by JonW on Mar 7, 2020 0:38:31 GMT 1
Jon wtf kind of paint are you using? Can you get Hycote over there? Alex This is some stuff i have from White Knight. It was a mistake to buy it, but its done now... its nice enough when its dry, but it just takes a long time to be sandable. ahh well, i only have the ducktail to do now... almost done.  Anyway its not like all Aussie paint is shit, its just that this one is.... I repaired, painted and decaled my garage art projects in a few weeks without issue with simple el cheapo paint and its looking fine after 50+ deg summer dangling from the rafters of my garage etc. I just think this stuff I used on this bike is a special (n a bad way) case lol |
|
|
|
Post by JonW on Mar 7, 2020 0:44:00 GMT 1
Good news (not for this project) is that Howard (hblair) has found me a gearbox for my 'final engine', so that's great news and also some other bits that im missing. Phew.
FWIW and for completeness, I realise now that I also dont have the output shaft from an LC engine either I gave that to a mate of mine as his LC had a chipped idler lock land on his so he had that one. Not that its an issue now, but its good for my notes lol
|
|
Deleted
Deleted Member
Posts: 0
|
Post by Deleted on Mar 7, 2020 4:31:23 GMT 1
Is the output shaft the one with the chain sprocket on it
If yes i have one, but you'll nee to do your vinegar trick with it
Let me know the box isn't packed yet
|
|
Deleted
Deleted Member
Posts: 0
|
Post by Deleted on Mar 7, 2020 8:35:01 GMT 1
Hold on to that thought Jon, I may have mistaken a YPVS one that is manky
|
|
Deleted
Deleted Member
Posts: 0
|
Post by Deleted on Mar 7, 2020 8:49:22 GMT 1
regarding your paint, I use Spray Max 2 Pac instead of the Acrylic type, it's a German product
it goes on real easy and gives a very good finish, I get a much much better result than with the acrylic cans which tend to go very dull after drying
This stuff takes about 3 hours to dry
There are places in Concorde & Revesby that sell it
You need to get all your parts ready for painting before you use it as you have only got about 8 hours once the hardener is mixed to use up the whole can
I've done my stator and clutch covers, top of crank case and both wheels with it, plus other small bits as well
You do need good ventilation, there is quite a bit of over spray so I'd advise taking bikes and cars out of the garage before spraying, or cocoon your self in a make shift spray booth, wearing a mask
|
|
|
|
Post by JonW on Mar 7, 2020 12:37:44 GMT 1
Good info Howard, Ive been warned off using canned 2 pack due to other health issues, dying isnt in my itinerary at the mo lol worry not about output shafts, that cluster has the burnt gears so its just dead now anyway. I was just adding infor for completeness for when i want to look it up later lol
|
|
|
|
Post by JonW on Mar 30, 2020 6:16:46 GMT 1
I used this post ( www.rzrd500.com/phpBB3/viewtopic.php?f=21&t=11964&p=165412#p165412 ) today to repair my 83/84 (US85) units that were both dead when plugged in and ignition switched on. FWIW The later versions do not have these B834/D880 Transistor sets so I assume are not repairable, certainly not as easily. These are large parts with big solid steel feet and even a pretty incompetent circuit board repairer (like me, im good with wires but little components on a board scare me) can do these I reckon. I did buy a digitally heat adjustable soldering iron from ebay - a chinese cheapie - and some 0.5mm solder and already had a solder-sucker. Those things are all you need really other than the transistors which you can buy cheaply on ebay. ok, I worked on the two dead units I had here: 1, On one, changing these out solved the issue and when keyed on the servo spins over and back like a new one. Fast and seems dependable. Perfect! 2, I wasnt so lucky with the second controller tho. I swapped these transistors out and it was still dead, but wobbling some wires got it spinning the servo. The problem is that it spins the servo what looks like a full revolution at medium speed, and then pauses for about the same number of seconds and then spins it the same way again the same amount. Defo not useful on a bike, that would rip the cables to pieces. Ive no idea what is wrong with the 2nd unit (any ideas?). I did wonder if it is the PU4310 mentioned in this thread: www.rzrd500.com/phpBB3/viewtopic.php?f=3&t=6462&p=54414&hilit=transistor#p54414I do sort of doubt that tho as that PU4310 unit is like another set of power supplier transistors from what I can glean from that theead. The fault I have seems more like I have the power, but its not being controlled right. Like its logic is gone or what it receives back from the servo isnt getting through. hmm.. Anyway, I am very thankful to this thread that I have at least been able to save one of these units. Anyone who has one they dont want to repair, and would only stick in the trash, feel free to send it to me (I'll cover the costs of course) and I'll try and fix it to replace my dead one, but really if youve the time and the kit I suggest you have a go at doing this. Oh... And before you ask, no I dont want to get into repairing these for people. its a bit of a faff peeling back the gloop on the board, unsoldering and re soldering the transistors (which took ages to source from china) and then when its all done finding out there is some other issue and its all been for nought etc. If we could be certain these were the fault everytime it would be different i guess, I'd buy a bunch of the transistors in and open up shop lol. So, now this bike has the correct 83/84 PV controller back in it. Until now its been 'using' (tho has no engine lol) a later version with a plug swap so its good to claim that back, my F2 will need it when its built. |
|
|
|
Post by donkeychomp on Mar 30, 2020 22:52:31 GMT 1
Can you still not post pics Jon?
Alex
|
|
|
|
Post by JonW on Mar 30, 2020 23:21:37 GMT 1
nope sorry Alex, I cant. I either need to now engage some other provider for pics or I just dont bother. Im favouring the latter at the mo as I dont want to go round the loops Ive been round with imageshack and photof**ket as in the end all the guys screw us. sigh.
|
|
|
|
Post by nokturnal on Mar 31, 2020 2:27:47 GMT 1
flickr has worked well for me. after photo bucket shit the bed...
|
|
|
|
Post by JonW on Sept 17, 2020 5:43:55 GMT 1
Ive not posted about this bike as Ive been gutted about the picture thing and Ive been playing with other things, but not having the ability to post pics was annoying so lets try imgur...
working in the wheels...
(pic deleted as was massive - see below)
|
|
|
|
Post by JonW on Sept 17, 2020 5:44:15 GMT 1
hmm, massive pic...
|
|
|
|
Post by stusco on Sept 17, 2020 9:52:02 GMT 1
If you post few pics that size i can make a cup of teaa while they load up😁
|
|
|
|
Post by JonW on Sept 17, 2020 14:03:51 GMT 1
lol. well thats imgur for you i guess, obvs doesnt size pics. Live n learn. I have a resizer... lets try that...  |
|
|
|
Post by JonW on Nov 6, 2020 23:14:31 GMT 1
Bought a set of BT46 for this bike and also my F1. I fitted new Nachi bearings and then cleaned and painted the best from my stack of brake disks, then fitted them with re-zinc'd bolts and put the wheels on the bike. As usual I reckon they look great considering the horrible wheels I started with. Not dramatic progress as such as I had wheels on it before (my F1s wheels with its old rotted Dunlop GT501s that have also now gone lol) to roll it around, but its nice that they dont need to come off again any time soon.  |
|
|
|
Post by donkeychomp on Nov 6, 2020 23:56:46 GMT 1
Looking good Jon...
Alex
|
|
|
|
Post by shaunthe2nd on Nov 10, 2020 9:21:21 GMT 1
Much better with the pics.
Some great progress.
|
|
|
|
Post by midlifecrisisrd on Nov 10, 2020 9:43:00 GMT 1
Looking good 😉
Steve
|
|
|
|
Post by JonW on Nov 10, 2020 13:30:10 GMT 1
Thanks Guys!
|
|
|
|
Post by JonW on Nov 12, 2020 1:10:04 GMT 1
Fitted the rest of the cables (tacho, PVs, clutch etc) after I gave them a lube with my new Motion Pro cable oiler and their fancy (if pretty exy!) spray lube.
Background is that I had an old clamp style cable oiler I bought in about 1992 at Artdeans in Swindon, yes remember them? Good old Fran on the parts counter begrudgingly giving discount if you begged enough... yes, before it became Fowlers and the later switched back when the brothers bought it back. Anyway, that unit served me well but most of the spray (usually WD40 and then some kind of spray oil) was now going up my arm or across the bike due to wear (I used it a lot!) so it was time for a new one.
I could have just bought another like I had, ebay is awash with them, but where is the fun of that?! I hoped to find something that circa 30 years of advancement had come up with, after all if you went back 30 years prior to my 1992 purchase people used plasticine to make a well or taped a plastic bag round the cable, hung it up and then poured oil in the well/bag and let it run down using gravity. The move to pressurised oil delivered through the cable with a clamped device meant you could lube a cable in seconds instead of overnight. I was hoping for another step change... but found there was not much in the way of options out there.
I was looking around some of the MX sites as I often find they offer good stuff for those of us doing 2Ts and of course they usually do their own maintenance as there is lots of it and I found this Motion Pro V3 'luber' (how American lol). I was intrigued after googling and finding this video, so bought one.
I also ordered the special Motion Pro juice as well. Ok, so my order went from minimal money on ebay to something much more wallet lightening... but I had high hopes and... well... short story; Its been great!
Usually stuff like this can be very hit or miss, but it seems to me that Motion Pro have thought this through and come up with a good product.
The only downside (other than price lol) is that its fiddly to work the scroll-cut seal onto the cable and you get oily doing that if doing multiple cables as the seal gets liberally lubed and then so do your fingers, however in use as a cable oiler the lube goes where it should and not anywhere else, thats what I wanted when I set out on this quest. The ability to remove the spray nozzle and then push the plunger (that pops under the pressure of the injected lube) to force lube down the cable (hydraulically?) is pretty clever. This unit will sit on most cables as well, including the fat tacho/speedo etc.
Im also impressed with MPs lube product, its thick and makes the cables very smooth in use. Like er, KY for cables... or something lol.
Verdict: not cheap, but worth it.
|
|
|
|
Post by JonW on Nov 13, 2020 3:20:50 GMT 1
No love for the cable luber then... Doesnt anyone else use one? Anyway... Progress... I started to add the decals to the panels for this bike. Its not been great news. On the same day I did side panels for 3 bikes, I always tend to do the same job to multiple bikes, it just saves time over all. Why a bunch of side panels? well they are only a slight faff to do our your own without the extra pair of hands, so thats why they got done. Im trying to get panels out of the spare room (its my 'paint drying room' at the mo, and also use up some decals as well that Ive had a while. Yeah, Ive had the decals for these bikes a while... Yeah I know, I know... not good. Painters always ask how old your decals are when you bring them in to have paintwork done. And it would appear that is for good reason. These are 6 years old (and subject to our heat here and very little cold, tho they were stored flat) and... well, you can see why painters hate old decals. (point of note tho, Same day I fitted some 9 year old decals to my F1 and they had no issues at all, different supplier... I wont say who supplied what here as older decals is not really a test anyone would do as such, life just got away from me is all - I also fitted 3 year old LC decals with no hassles FWIW) Anyway, this is what happened. With the decal applied the paper backing tape came off in chunks, leaving the glue on the surface of the decal. not good at all. Excuse the water still on them, Im trying to 'melt' the paper to get to the glue itself.   It would come off with a lot of scraping with the silicone squidgee but it was really slow going. In the end i found and used some 'Di-solvit' or some much product i bought about 15 years ago from a local hardware store, it is orange oil i think, stinks but works. Of course if anyone does something similar you should check it wont take the colour off the decal first. So this is what i have now, just need to do a little black touch up that got forgotten when these were painted a while back.  Just the rest of the panels to do. Lets hope I dont have more of this glue issue, but I fear its a forgone conclusion.  --- For those who wanted to see the LC and F1 side panels, here you go... As they were not 'gluey' it was much quicker to apply the F1 decals even tho the were huge (the white was printed as part of the decal, unlike the LC2) so bubbles was a problem... and fitting the decal around the fuel tap hole wasnt something Id want to do again in a hurry lol. (Oh and before people say these are not right some how, I did spend a lot of time pouring over pics looking at the variations in production for these and the angles you see them at are different to how they are on the bike, I reckon they are fine tho YMMV of course )   |
|
|
|
Post by midlifecrisisrd on Nov 13, 2020 22:32:27 GMT 1
I've never used a cable oiler
Pity those decals went a bit off
I bought a genuine set of lc2 side and tail decals and they are about as sticky as a bloody stick ☹
I love the F1 decals, always been tempted to do a bike in that scheme 🤔
Steve
|
|
|
|
Post by donkeychomp on Nov 13, 2020 22:33:12 GMT 1
The LC ones look spot on to me. I have to admit applying decals (especially to a tank) is a right royal pain in the arse!
Alex
|
|
|
|
Post by JonW on Nov 13, 2020 23:26:02 GMT 1
I've never used a cable oiler Pity those decals went a bit off I bought a genuine set of lc2 side and tail decals and they are about as sticky as a bloody stick ☹ I love the F1 decals, always been tempted to do a bike in that scheme 🤔 Steve Wow, I thought we all oiled even new cables prior to use. interesting. Yeah, its been a while but wow they are funny things when you have the glue to get off. At least with this scheme there is not much in the way of decals lol Yes the Aussie speedblock F1 is a thing of beauty, like a mini 500 I reckon. There are a hell of a lot of decals on it tho, ie the side panels are pretty much all decal, as are the mids. Yet the fairing is just a simple blue stripe. |
|
|
|
Post by JonW on Nov 13, 2020 23:27:03 GMT 1
The LC ones look spot on to me. I have to admit applying decals (especially to a tank) is a right royal pain in the arse! Alex Yeah, I hate doing it, a methodical approach seems to be the way. Its not rocket science but there is a 'science' to it. |
|
|
|
Post by JonW on Feb 15, 2021 4:08:56 GMT 1
Ok, I admit it... It’s been a while and yes, I lost interest in this project. You might recall that this is my least fave model of the YPVS range and my plan was to sell it when it was complete. I was going well on this plan, but then Corona Virus came along and instead of capitalising on the ‘covid tax’ hike in prices, instead I walked away from the build and worked on the cars and other bikes instead. I guess no one can accuse me of ‘profiteering’, it’s plainly not in my nature. Hmm... That’s a good thing really but not for my bank balance I guess. As many know, I really don’t like working on other people’s projects and as I had already decided that this project would be sold it feels like this bike is not ‘mine’ and that i’m doing the work for someone else. Yeah, all that NOS i’ve found and quality parts fitted plus all the hard work in places that no one will ever see (and i’m sure that plenty of other so called ‘restorers’ don’t bother with) have been done just like this is a keeper for me means that I’m defo not doing this for making money; The parts bill alone has been horrendous. Hmmm. Anyway, someone will get a nice bike out of this, not me tho. Not crying about it, just a fact, but its also part of the reason I’m probably less fussed about finishing it as until then its still ‘mine’ lol. Ok, that said, I do need to finish it and think about it leaving my garage as I need the space and that isn’t going to happen until the engine is done... (and it gets a 2nd repaint... What? I hear you cry, yeah I’ll talk about why another time, but lets just say I striving for ‘better than average’ here and the paint/decals I was using were not good enough in my view as I hinted about before, but there was a ‘final straw moment’ a few months back, suffice to say). My psychological issues of restoring a bike to sell aside, the main reason this build stalled is that while I had bought a ‘good’ crank from a mate, I wasn’t loving the idea of fitting it to the engine without sending it to my crank guy. He’s not local, instead he’s about 1000km away from me and while the crank actually ‘felt’ fine to my fingers when lifting, pressing and wobbling the rods, well... I just didn’t feel right about using it without sending it through him and having it looked at. Cranks are one of the few things I don’t do myself and they are the key to a good engine so need to be ‘right’. Of course there is a cost associated with having them looked at (not least the postage back and forth at Auspost’s crazy rates!) and I didn’t want to bother him with a crank that was fine, but the risk for all the other good engine work including expensively sourced 350 cylinders with good condition head along with having rebore and new pistons etc was too much to bear I guess and every time I looked at getting the crank into the cases that have been sat on my bench with the clusters etc all fitted for ages, well, I just couldn’t bring myself to fit it – Deep down I just couldn’t risk it, even though it ‘felt fine’... Im sure plenty of you would feel the same. Regular readers of my threads may recall that a few months back I bought a JDM imported engine locally and stripped it for my JDM F2 build and when doing that acquired yet another ‘ok feeling crank with unknown history’. I stripped that engine before Christmas and posted about it on the build thread and set to work cleaning up the cases and other parts. Like any of us, I do get swayed by ‘new’ projects lol. But that was about as far as I got with that and a few weeks back I finally got sick of looking at these two cranks on my benches and figured I should box them up and send them off. If they were bad, I needed to know and source something else. If they were good, then I’d be golden. Either way I could move on. I heard back this weekend and the good news is that my fingers didn’t lie, both cranks were good enough to go for a good few miles yet and the only advice was that the one I had earmarked for this engine could do with new thrust washers and mains. Result...! And the fact this crank actually needed something also worked for me, it meant that it was worth my worry and sending off for an expert to cast his eye over it. So all good and they will come back in a week or two. So, i’m sorted and can get on... No rush, but progress... The news gave me a lift as I was dreading the cost of bad news. Then also this weekend my wife bought a new foot stool for under the desk where she works at home and asked me what I wanted to do with the box she had previously been using... Er, what box? Turns out it was a box with a previously rebuilt crank in it! What the...?! Yep, I’m now worried i’m getting on and must be losing it. I’d totally forgotten about that one! So I did have a ‘ready to go’ crank that my guy had already looked at and redone for me just waiting to be used. Oopps. Best I think about getting this engine done then... No more excuses! lol Since there are no photos of any of the above crank stuff (why would there be? lol) I will give you something... how about this?  |
|
|
|
Post by JonW on Feb 17, 2021 0:41:08 GMT 1
Ok... Yeah... Of course I should be building the engine... But I’ve a bit of a quandary with cylinders for this one. Looking at my notes and my boxes of engine parts it seems that due to Corona Virus I’ve got cylinders all over the world at the mo, either at my folks place or still at the vendor’s house. Oppps. This means my choices for this one are not quite what I had in mind, so maybe a little more thought needs to be given to the top end. I could still build the bottom end up of course and store it. At least it’d be off my bench. Hmm... We’ll see... Anyway, rather than think about (and get on with) what I should be doing I decided to try out a new product on some plastics that I’d already done my best on. Nothing like reworking stuff you’ve already done, sigh... lol. Backstory is that I was at my mates workshop the other month and his son (also a mechanic there) was telling me about a product for car bumpers. In fact ‘telling’ is too weak a word; ‘extolling its virtues’ would be more accurate. He has been amazed at what he’d managed with the product on a car bumper and knew that I’d be interested to hear about it. He was right. The product in question isn’t one I expect you can easily get outside of Australia, but I’m sure there must be someone selling them on ebay or something. Its rather worryingly (for the snowflake generation) called Mr Black and made by a local company called Bowden’s Own. I should say that I’m not schilling this, I didn’t get a free one and it’s not cheap, circa £50 for the box with applicators and cloth, cleaner solution and the black ‘juice’. But like Josh-the-mechanic I was pretty blown away by the stuff so wanted to share. 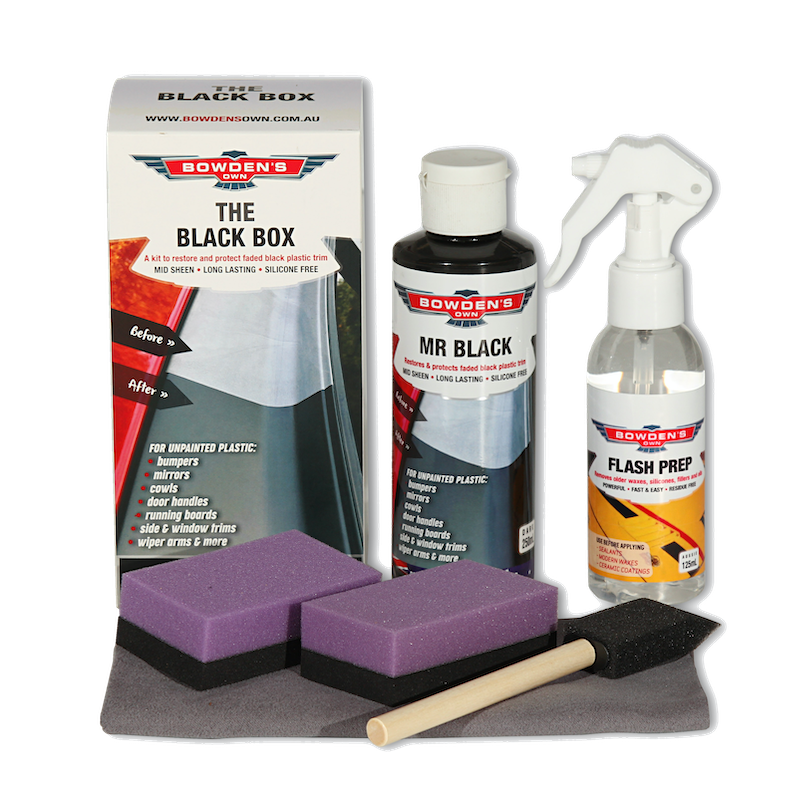 Firstly I didn’t want to mess this up as its a dye so I followed the instructions and used it on the ‘under wiper panel’ of my Evo after I’d removed it from the car. It made the panel look like new. No joke. Now that panel has a pimply surface like old VW bumpers from the 80s and ‘holds’ the colour in place when you wipe it on and so doesn’t show any wipe marks. I knew the bigger test would be to use it on the bike panels that are very flat and a little shiny and would be bound to show wipe marks, also questioning if it would it even stay on the panel to soak in etc. I looked round my garage and the LC2 is still on the lift so I pulled the already cleaned up and polished (with Autoglym Vinyl and Rubber solution) chain guard and set to work cleaning any old polish and silicones off with the supplied cleaner in the Black Box set and then when dry, coating it with the product. It needed about 3 coats to get the colour nice and dark and remove any wipe marks from the firm sponge applicator, but wow it looks good. Sadly I didn’t do a ‘before’ pic, tho it wasn’t awful before it was blotchy and faded in places as the Autoglym can only do so much for a faded panel. I’m not sure if I heated this one either before the autoglym, but I expect so as that often helps. Anyway, it was 100% better with this new stuff.  I’ve set about doing the Radiator cowl next. If you do get some of this (they also sell just the Mr Black on its own and that is cheaper than the box set, just use some wax n grease remover to ensure the panel doesn’t have old products on it) make sure you wear gloves, the dye will defo stain your hands and take some time to wear off. I wore the gloves but Josh didn’t, his fingers were pretty funny to look at. This is the companies own video about using it for those interested. And yes they picked the best example to show it off, that van bumper is well trashed. I don’t own anything quite that bad lol Anyway, apologies if you cant get this in your location, I only mention it as I was pretty impressed with it. For me the main thing is that it’s nothing like the old ‘back to black’ products of the old days, it really works and seems to last for a long while unlike those. Certainly we needed something like this in Aus where all plastic is faded in mere minutes but our nasty sun... I just need something now to recolour the velour trim in the Evo back to black, maybe I should email Bowdens about using this on that, hmmm.... |
|


