|
|
Post by sidney81 on Aug 2, 2020 15:52:29 GMT 1
The undertray looks great Chris  And thank goodness someone invented the Lithium battery ! Makes creating a special all the more easier when you don't have to contend with housing a bulky lead acid house brick battery "somewhere else" !! I couldn't decide whether to polish or powdercoat black my ally undertray, but in the end I went with polished. There is quite a lot of black on mine, plus I thought muck and stone chips would soon spoil the finish of paint, so I decided a polished finish would be easier to maintain. Looking like you are nearly ready for final strip ?? Dusty  Hi dusty ,thank you I'm happy if I have your approval 😊, I have to re make the bracket's that hold the fuse box / rectifier,as I chopped them off in the beginning 🙄 thinking I won't need them but things have changed and now I do ha has oh well ! But not to far away now 😃 |
|
|
|
Post by sidney81 on Aug 4, 2020 21:23:03 GMT 1
Hi 👋, little update ,I made new brackets and welded them on to hold the fuse box / rectifier plate as I cut the originals off because I thought I didn't need them but things changed and i did in the end oopppsss 😂,I also shortened the two lugs that hold the fuse box so it now sits closer to the plate . The wiring is looking ok everything lines up and works ,do have to find a place for the flasher unit !!! Next job make a bracket to hold the new coils 👍Chris 🙂  IMG_20200804_192926 IMG_20200804_192926 by Chris, on Flickr  00100dPORTRAIT_00100_BURST20200804195635500_COVER 00100dPORTRAIT_00100_BURST20200804195635500_COVER by Chris, on Flickr  IMG_20200804_205941 IMG_20200804_205941 by Chris, on Flickr |
|
|
|
Post by sidney81 on Aug 9, 2020 15:58:54 GMT 1
Hi , little update on the under tray ,I made some alloy clips up and brought a rubber battery strap to hold the battery in place , folded some alloy side brackets up welded them on so the battery can't move side to side ,once powder coated I will stick some sticky back foam on to cushion the battery it all works really well and Im Really happy with it ,few pictures 😊Chris  IMG_20200806_141916 IMG_20200806_141916 by Chris, on Flickr 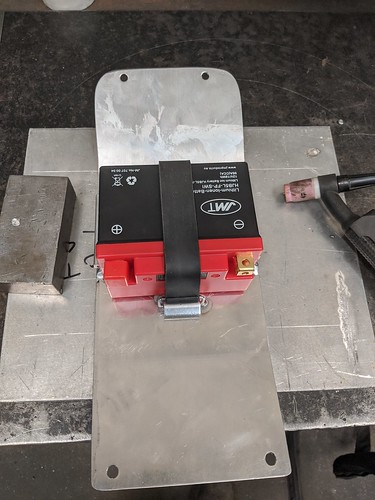 IMG_20200806_142626 IMG_20200806_142626 by Chris, on Flickr  IMG_20200806_173159 IMG_20200806_173159 by Chris, on Flickr  IMG_20200806_173208 IMG_20200806_173208 by Chris, on Flickr  00100dPORTRAIT_00100_BURST20200806173233767_COVER 00100dPORTRAIT_00100_BURST20200806173233767_COVER by Chris, on Flickr  00100dPORTRAIT_00100_BURST20200806173245652_COVER 00100dPORTRAIT_00100_BURST20200806173245652_COVER by Chris, on Flickr |
|
|
|
Post by flames on Aug 9, 2020 16:39:22 GMT 1
Excellent. Loving this build and the skills you are putting into it.
|
|
|
|
Post by sidney81 on Aug 9, 2020 16:47:42 GMT 1
Excellent. Loving this build and the skills you are putting into it. thanks bud I'm trying !! It's my first hybrid build to , really appreciate your comments 👍👍 |
|
|
|
Post by veg on Aug 9, 2020 18:24:12 GMT 1
Your fab skills are great as are your welding skills. Looks a real treat. Can’t wait to see it finished.
|
|
|
|
Post by sidney81 on Aug 9, 2020 19:52:41 GMT 1
Your fab skills are great as are your welding skills. Looks a real treat. Can’t wait to see it finished. thanks veg 👍👍 |
|
|
|
Post by tacky1 on Aug 9, 2020 20:23:29 GMT 1
Gotta say, This is turning out really nice, Loving that battery tray and the little strap mounts, Class...
|
|
|
|
Post by dusty350 on Aug 9, 2020 21:17:18 GMT 1
Looking good Chris Great work as always Dusty |
|
|
|
Post by sidney81 on Aug 9, 2020 22:35:32 GMT 1
Gotta say, This is turning out really nice, Loving that battery tray and the little strap mounts, Class... thank you 👍 |
|
|
|
Post by sidney81 on Aug 9, 2020 22:35:51 GMT 1
Looking good Chris Great work as always Dusty thanks dusty 🙂 |
|
2taol
Thrash Merchant

Posts: 378
|
Post by 2taol on Aug 10, 2020 0:01:36 GMT 1
yup, nice update
|
|
|
|
Post by sidney81 on Aug 13, 2020 22:19:20 GMT 1
Hi ,just a small update 🙂 received my blue spot calliper and fuse box lid today from my ol' mate Andy tempest from Webb's of Lincoln , helpful guy with a Aladdin's cave full of bits n pieces,blue Spot in great condition and will bolt straight on as I'm using tzr forks , I have one on my Tzr ,great improvement , Chris 🙂 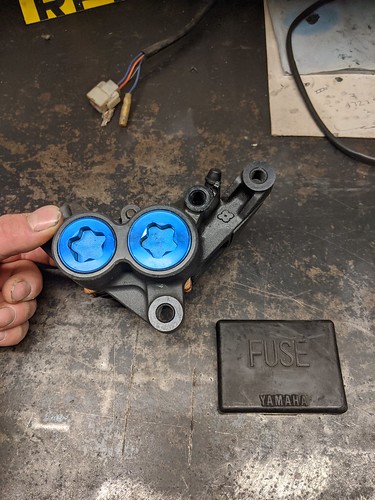 IMG_20200813_202424 IMG_20200813_202424 by Chris, on Flickr |
|
|
|
Post by sidney81 on Aug 15, 2020 14:40:54 GMT 1
Hi everyone , i took my wider 3.5 inch belgrada rear wheel and an old 140/70/17 rear tyre to my local bike shop this morning and got them to stick it on the rim for me, as this will be the size tyre I'll be running so wanted to double check chain run etc and gap in the swing arm ,it all fits up nice ,I need a offset front sprocket but I knew that. I'm chuffed because just that wider rim and tyre transforms the rear end I think it's cool 😎 Chris  IMG_20200815_104624 IMG_20200815_104624 by Chris, on Flickr  IMG_20200815_111850 IMG_20200815_111850 by Chris, on Flickr  IMG_20200815_111904 IMG_20200815_111904 by Chris, on Flickr |
|
|
|
Post by jon on Aug 15, 2020 16:02:03 GMT 1
sidney81That doesn’t look like a Belgarda rear rim to me. Looks more like a 4HW or similar? What the wheel code, R what? Jon
|
|
|
|
Post by flames on Aug 15, 2020 16:31:50 GMT 1
Looks great bud. Did you take a full on side view pic with wheels fitted?
|
|
|
|
Post by sidney81 on Aug 15, 2020 18:14:27 GMT 1
sidney81That doesn’t look like a Belgarda rear rim to me. Looks more like a 4HW or similar? What the wheel code, R what? Jon hi Jon you may be correct the code is R-57  |
|
|
|
Post by dusty350 on Aug 15, 2020 18:15:21 GMT 1
The wider tyre does look so much better in the Rd frame I've got a 140 on my Café bike, but I parked it next to the 400 project the other day - that has a 150 fitted, and that looks huge ! Do you know what offset you need yet ? Haven't measured mine yet, but I think it will be pretty big. Need to mess with the sprocket spacer as I have an Lc and a Pv spacer in the shed, I think. That may help reduce the offset on the sprocket Dusty |
|
|
|
Post by sidney81 on Aug 15, 2020 18:15:46 GMT 1
Looks great bud. Did you take a full on side view pic with wheels fitted? hi bud no I didn't was a mission to get it out ,I will tommrow 👍 |
|
|
|
Post by sidney81 on Aug 15, 2020 18:18:30 GMT 1
The wider tyre does look so much better in the Rd frame I've got a 140 on my Café bike, but I parked it next to the 400 project the other day - that has a 150 fitted, and that looks huge ! Do you know what offset you need yet ? Haven't measured mine yet, but I think it will be pretty big. Need to mess with the sprocket spacer as I have an Lc and a Pv spacer in the shed, I think. That may help reduce the offset on the sprocket Dusty hi dusty that's good to know about the spacer's!! I've not measured propley with a straight edge yes but I reckon 10 mm at least ! ,Chris |
|
|
|
Post by dusty350 on Aug 15, 2020 18:23:59 GMT 1
Off the top of my head, I cant remember the difference between Lc and Pv sprocket spacer, but I think it's 5 or 6mm ?? Sure someone will confirm. I will have a dig in the shed tomorrow and if I've got both I will measure them Dusty |
|
|
|
Post by dusty350 on Aug 15, 2020 18:24:30 GMT 1
Off the top of my head, I cant remember the difference between Lc and Pv sprocket spacer, but I think it's 5 or 6mm ?? Sure someone will confirm. I will have a dig in the shed tomorrow and if I've got both I will measure them Dusty |
|
|
|
Post by Tobyjugs on Aug 15, 2020 19:36:50 GMT 1
The spacers are 14.25 mm and 19.5 mm wide.
|
|
|
|
Post by sidney81 on Aug 15, 2020 19:59:58 GMT 1
The spacers are 14.25 mm and 19.5 mm wide. hi wahat is the bigger one please 19.5 from pv ? |
|
|
|
Post by flames on Aug 15, 2020 20:04:12 GMT 1
I have read somewhere that PV spacer is 5mm wider. On one of the threads about fitting 140/150 wheels. Think they needed to make up 10 mm for chain run and advice was 5mm off carrier and PV sprocket spacer.
|
|
|
|
Post by Tobyjugs on Aug 15, 2020 20:10:15 GMT 1
The spacers are 14.25 mm and 19.5 mm wide. hi wahat is the bigger one please 19.5 from pv ? 19.5 mm for the YPVS spacer. |
|
|
|
Post by sidney81 on Aug 18, 2020 21:05:44 GMT 1
Hi ,been messing around with the front sprocket. As mentioned the ypvs sprocket spacer is wider so I slackened the sprocket nut off, wound it back so it's still on the thread. I then have about 5 mm of play!! so with a ypvs spacer or I make one up I can gain around 5 mm ,I also have the option to take a few mm off the rear sprocket carrier to if needed 😊 Chris  IMG_20200817_184311 IMG_20200817_184311 by Chris, on Flickr  VID_20200817_184322_LS VID_20200817_184322_LS by Chris, on Flickr |
|
|
|
Post by dusty350 on Aug 18, 2020 21:19:12 GMT 1
Hi Chris, I double checked part numbers. The aircooled sprocket spacer is the same as the Lc, so 14.25. I have a Pv spacer in the shed, and that is indeed 19.5mm, so that will help. I've got a 3mm or 5mm, cant remember which, offset front sprocket, so will try that with the Pv spacer when I get time. Pv sprocket spacer is still available, albeit it on backorder, from Yamaha, but it's expensive for what it is. I'm sure you could knock one up easily enough, and save a few quid too Hth Dusty |
|
|
|
Post by sidney81 on Aug 18, 2020 21:26:30 GMT 1
Hi Chris, I double checked part numbers. The aircooled sprocket spacer is the same as the Lc, so 14.25. I have a Pv spacer in the shed, and that is indeed 19.5mm, so that will help. I've got a 3mm or 5mm, cant remember which, offset front sprocket, so will try that with the Pv spacer when I get time. Pv sprocket spacer is still available, albeit it on backorder, from Yamaha, but it's expensive for what it is. I'm sure you could knock one up easily enough, and save a few quid too Hth Dusty hi dusty ,thank you 👍 that was some good info ,I'll make a 20 mm spacer up and try it see how it works etc , like you say save a few quid is allways good to 👍👍 |
|
|
|
Post by Tobyjugs on Aug 19, 2020 15:39:55 GMT 1
If you use the YPVS distance bush do you still have the ability to lock your nut using a lock tab? Don't forget the outside part of the bush is also the running surface for your seal.
|
|


