|
|
Post by oldbritguy on Sept 19, 2021 21:00:31 GMT 1
Lovely bit of welding there. Proper skill.
Find someone with a lathe big enough to take a wheel Mark.
Will make a much truer job of taking those welds back.
John
|
|
|
|
Post by mouse on Sept 19, 2021 22:02:40 GMT 1
Nice to see you back Sir!
All the best
Mouse
|
|
|
|
Post by dusty350 on Sept 20, 2021 6:57:44 GMT 1
Did you speak to Steve, Mark ? I bet he has the machinery to take the welds back  Dusty  |
|
|
|
RD700LC
Sept 20, 2021 15:00:50 GMT 1
via mobile
yamark likes this
Post by sidney81 on Sept 20, 2021 15:00:50 GMT 1
Nice work 👌
|
|
|
|
RD700LC
Sept 20, 2021 20:11:44 GMT 1
Post by yamark on Sept 20, 2021 20:11:44 GMT 1
Thanks John, and thanks for your suggestion. I'll check with Steve Dusty (Steve is Dusty's engineer that specializes in machining) Thanks Mouse and Sidney81 I've got to make balance pipes and extend the choke for number 3 and 4 cylinders next |
|
|
|
RD700LC
Sept 21, 2021 20:21:07 GMT 1
via mobile
yamark likes this
Post by Slabsideian on Sept 21, 2021 20:21:07 GMT 1
Welcome back Mark 👊🏻
|
|
|
|
RD700LC
Sept 26, 2021 16:05:44 GMT 1
Post by yamark on Sept 26, 2021 16:05:44 GMT 1
Cheers mate |
|
|
|
Post by yamark on Sept 26, 2021 16:23:29 GMT 1
Balance pipes The plan is to make 2 balance pipes, and link the two with another flexible pipe. I'm making it all out of copper plumbing fittings, 8,10, and 12mm tube and fittings will be used. I'm aiming for a fairly seamless. I first have to cut the tube and make some internal liners  SDC11998 SDC11998 I then cut more pipe for the smaller top tube  SDC12000 SDC12000The left balance pipe assembled, ready for soldering  SDC12001 SDC12001 And the right after soldering  SDC12003 SDC12003 Both pipes soldered and fitted, I used copper washers to act as depth stops  SDC12005 SDC12005 And finally with the flexible tube connected.  SDC12004 SDC12004 I'll polish the pipes up, and they can go in the pile for bright zinc plating Cheers, Mark |
|
|
|
Post by abar121 on Sept 26, 2021 17:22:53 GMT 1
Love it! Great work there
|
|
|
|
Post by dusty350 on Sept 26, 2021 19:28:38 GMT 1
Great work on the cross over tubes Mark You must know a good plumber !!  |
|
|
|
Post by JonW on Sept 27, 2021 2:42:43 GMT 1
Very clean, lovely work as ever Mark.
|
|
|
|
Post by yamark on Sept 27, 2021 17:55:19 GMT 1
Cheers, abar121, and Jon I know a couple Dusty - Cheers mate |
|
|
|
Post by Yogi on Sept 28, 2021 16:53:54 GMT 1
I didn’t realise that’s what they meant by plumbing it in 😂
Looking good mate,glad you are back at it 👍
|
|
|
|
Post by yamark on Oct 3, 2021 15:13:57 GMT 1
I didn’t realise that’s what they meant by plumbing it in 😂 Looking good mate,glad you are back at it 👍 Cheers Matt, wait until you see the coolant pipe plumbing |
|
|
|
Post by Yogi on Oct 3, 2021 15:16:37 GMT 1
I didn’t realise that’s what they meant by plumbing it in 😂 Looking good mate,glad you are back at it 👍 Cheers Matt, wait until you see the coolant pipe plumbing Popcorns ready 👍😂😂 |
|
|
|
Post by yamark on Oct 3, 2021 15:35:08 GMT 1
Choke I struggled with the choke a bit. The choke knob for cylinders 3 and 4 will be really hard to get to if not impossible, so I set about extending the choke control. I kicked around a couple of ideas- one was a cable (using a 350R type lever), but I wanted to keep the original look. I decided on a tube and rod linkage made from stainless steel So I cut some SS tube, plates for the brackets and a rod of Silver steel  SDC12006 SDC12006 Next, I bent the brackets- they will mount under the intake rubber bolts  SDC12007 SDC12007 And the brackets and tube in place.  SDC12008 SDC12008 The 2 choke knobs will be stacked, next to each other Cheers, Mark |
|
|
|
Post by andy748 on Oct 3, 2021 18:12:42 GMT 1
Nice neat solution Mark, it's coming along nicely. Andy.
|
|
|
|
Post by donkeychomp on Oct 3, 2021 21:20:19 GMT 1
Genius.
Alex
|
|
|
|
Post by mouse on Oct 4, 2021 11:53:04 GMT 1
What a neat solution!
Mouse
|
|
|
|
RD700LC
Oct 10, 2021 19:02:35 GMT 1
Post by yamark on Oct 10, 2021 19:02:35 GMT 1
What a neat solution! Mouse Thanks Mouse |
|
|
|
Post by yamark on Oct 10, 2021 19:21:56 GMT 1
Choke part 2 I'm using a tube and rod system for the inboard choke. I knew straight away that the rod would vibrate and rattle around in the tube. So I set about making a pair of nylon bushes. First rough pass on the lathe - there will be some of wastage of material  SDC12009 SDC12009 Turning down to the final size  SDC12010 SDC12010  SDC12011 SDC12011 And in position. The bushes will stop any noise and wear, and give a bit of resistance when the choke is applied 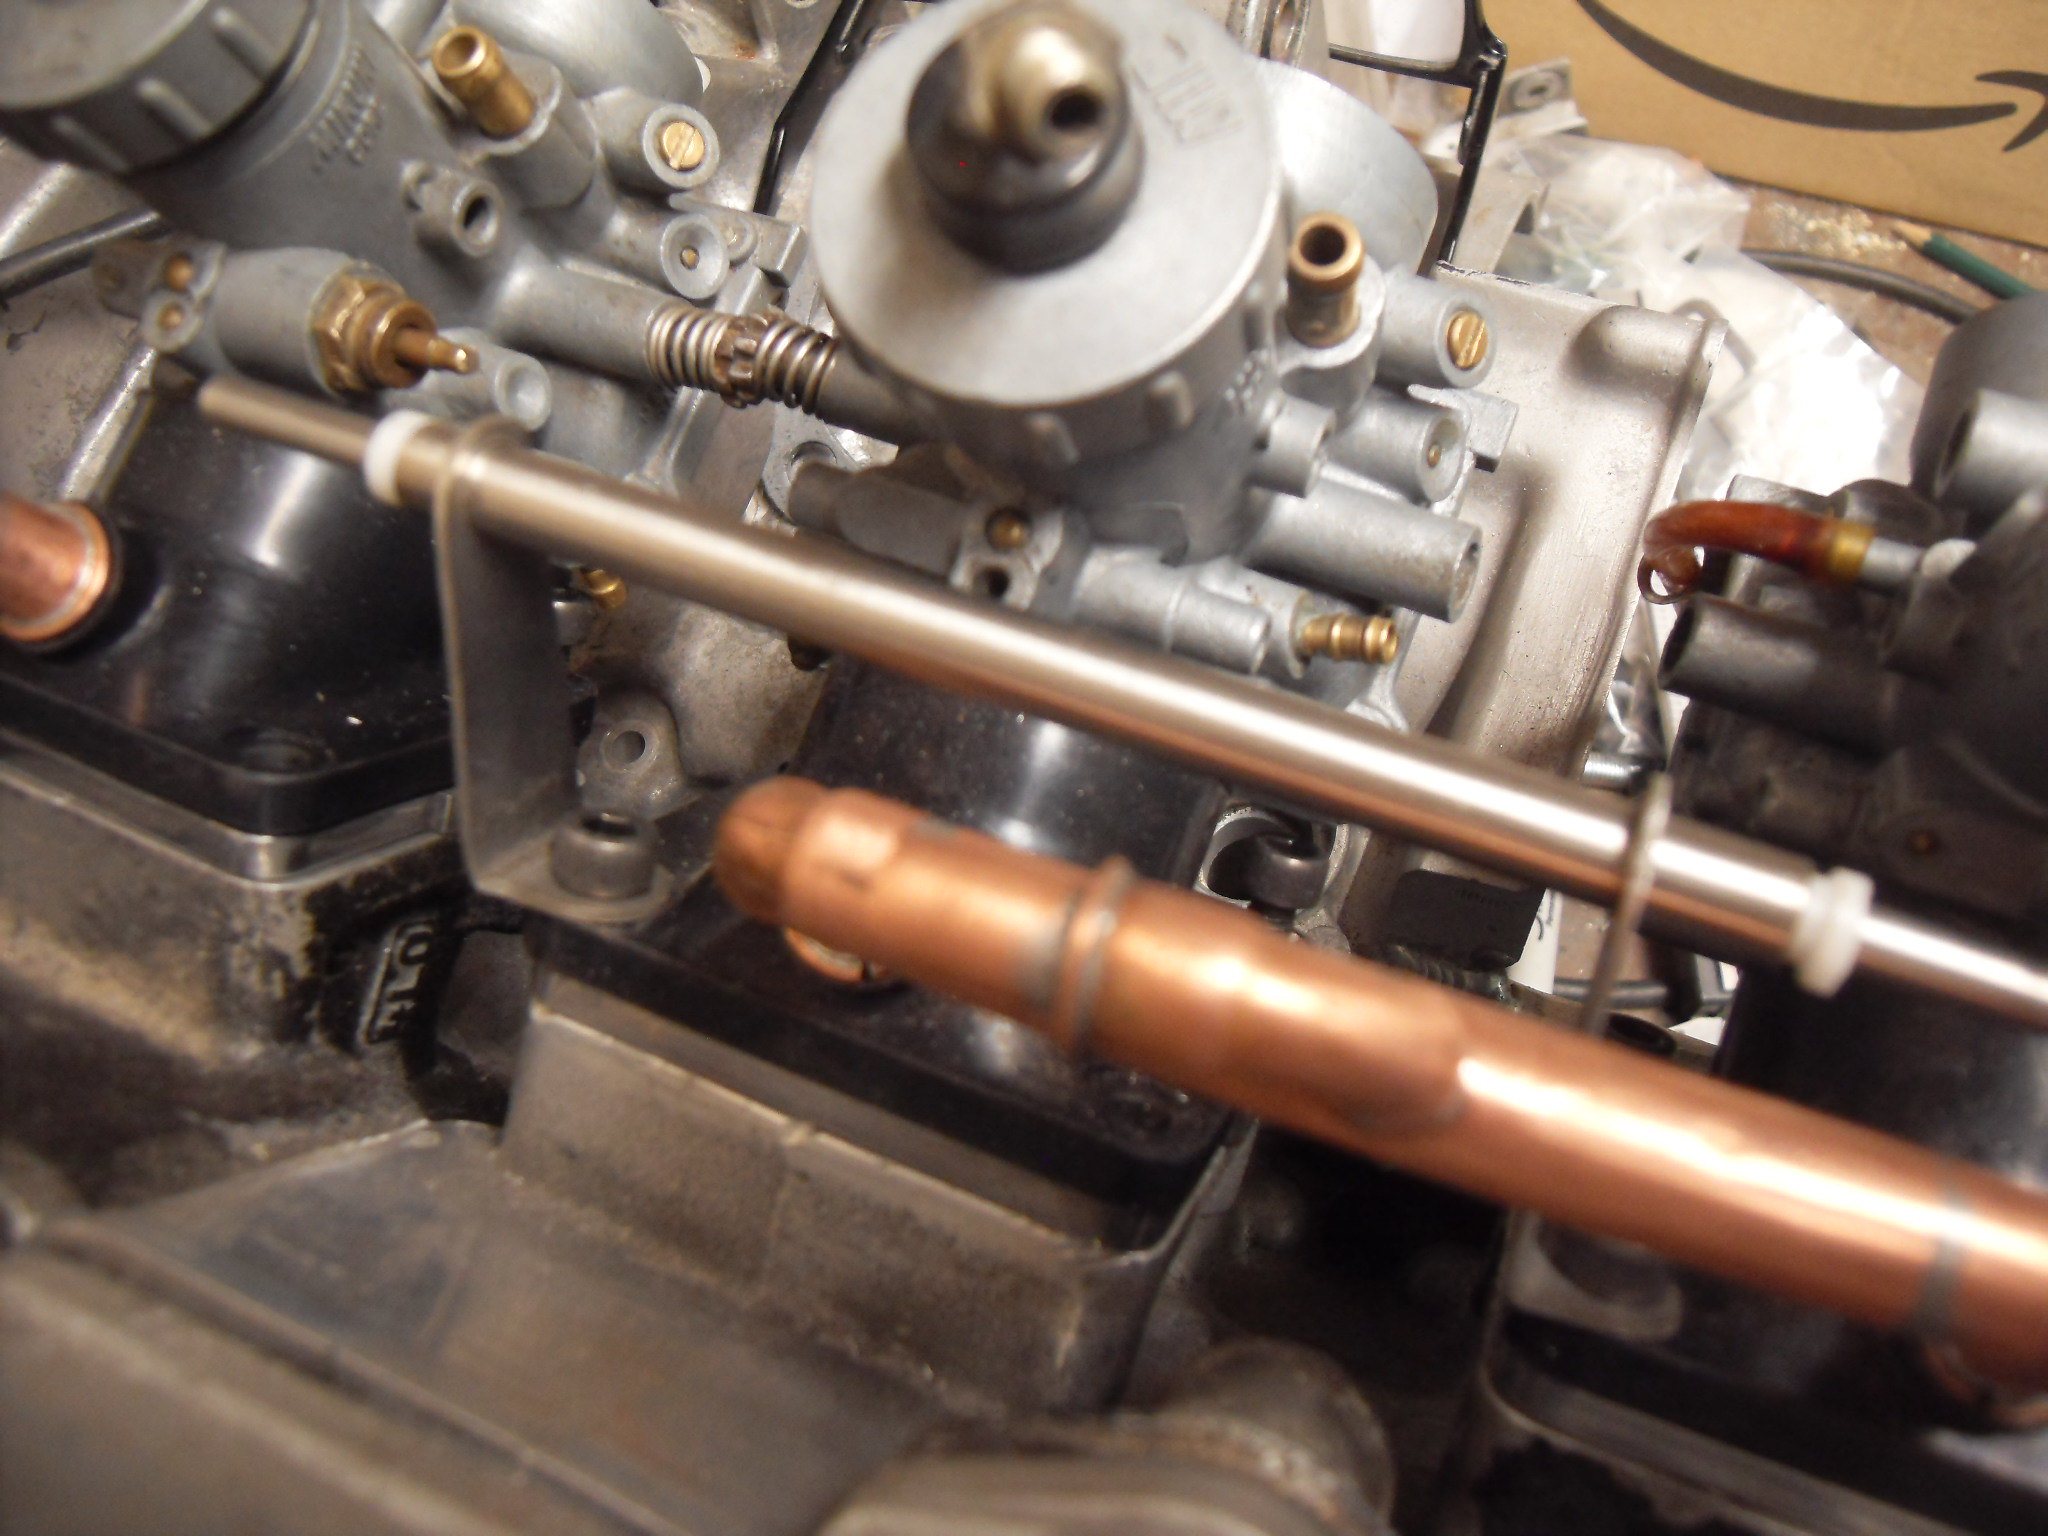 SDC12012 SDC12012 Just the knob to attach and make a linkage to the choke mechanism Cheers, Mark |
|
|
|
Post by shaunthe2nd on Oct 10, 2021 20:28:17 GMT 1
Some interesting stuff. Glad to see you posting again, thanks.
|
|
|
|
Post by yamark on Oct 17, 2021 16:27:57 GMT 1
Thanks Shaun Choke part 3 I cut a deep groove in a very nice choke knob  . I then made a link plate to slot into the knob. I then threaded the end of the operating rod. Next a stainless steel washer was silver soldered to the rod, this was to clamp the link plate between the washer and a nut on the threaded rod. The support brackets were then silver soldered onto the tube. So this is the extended choke finished 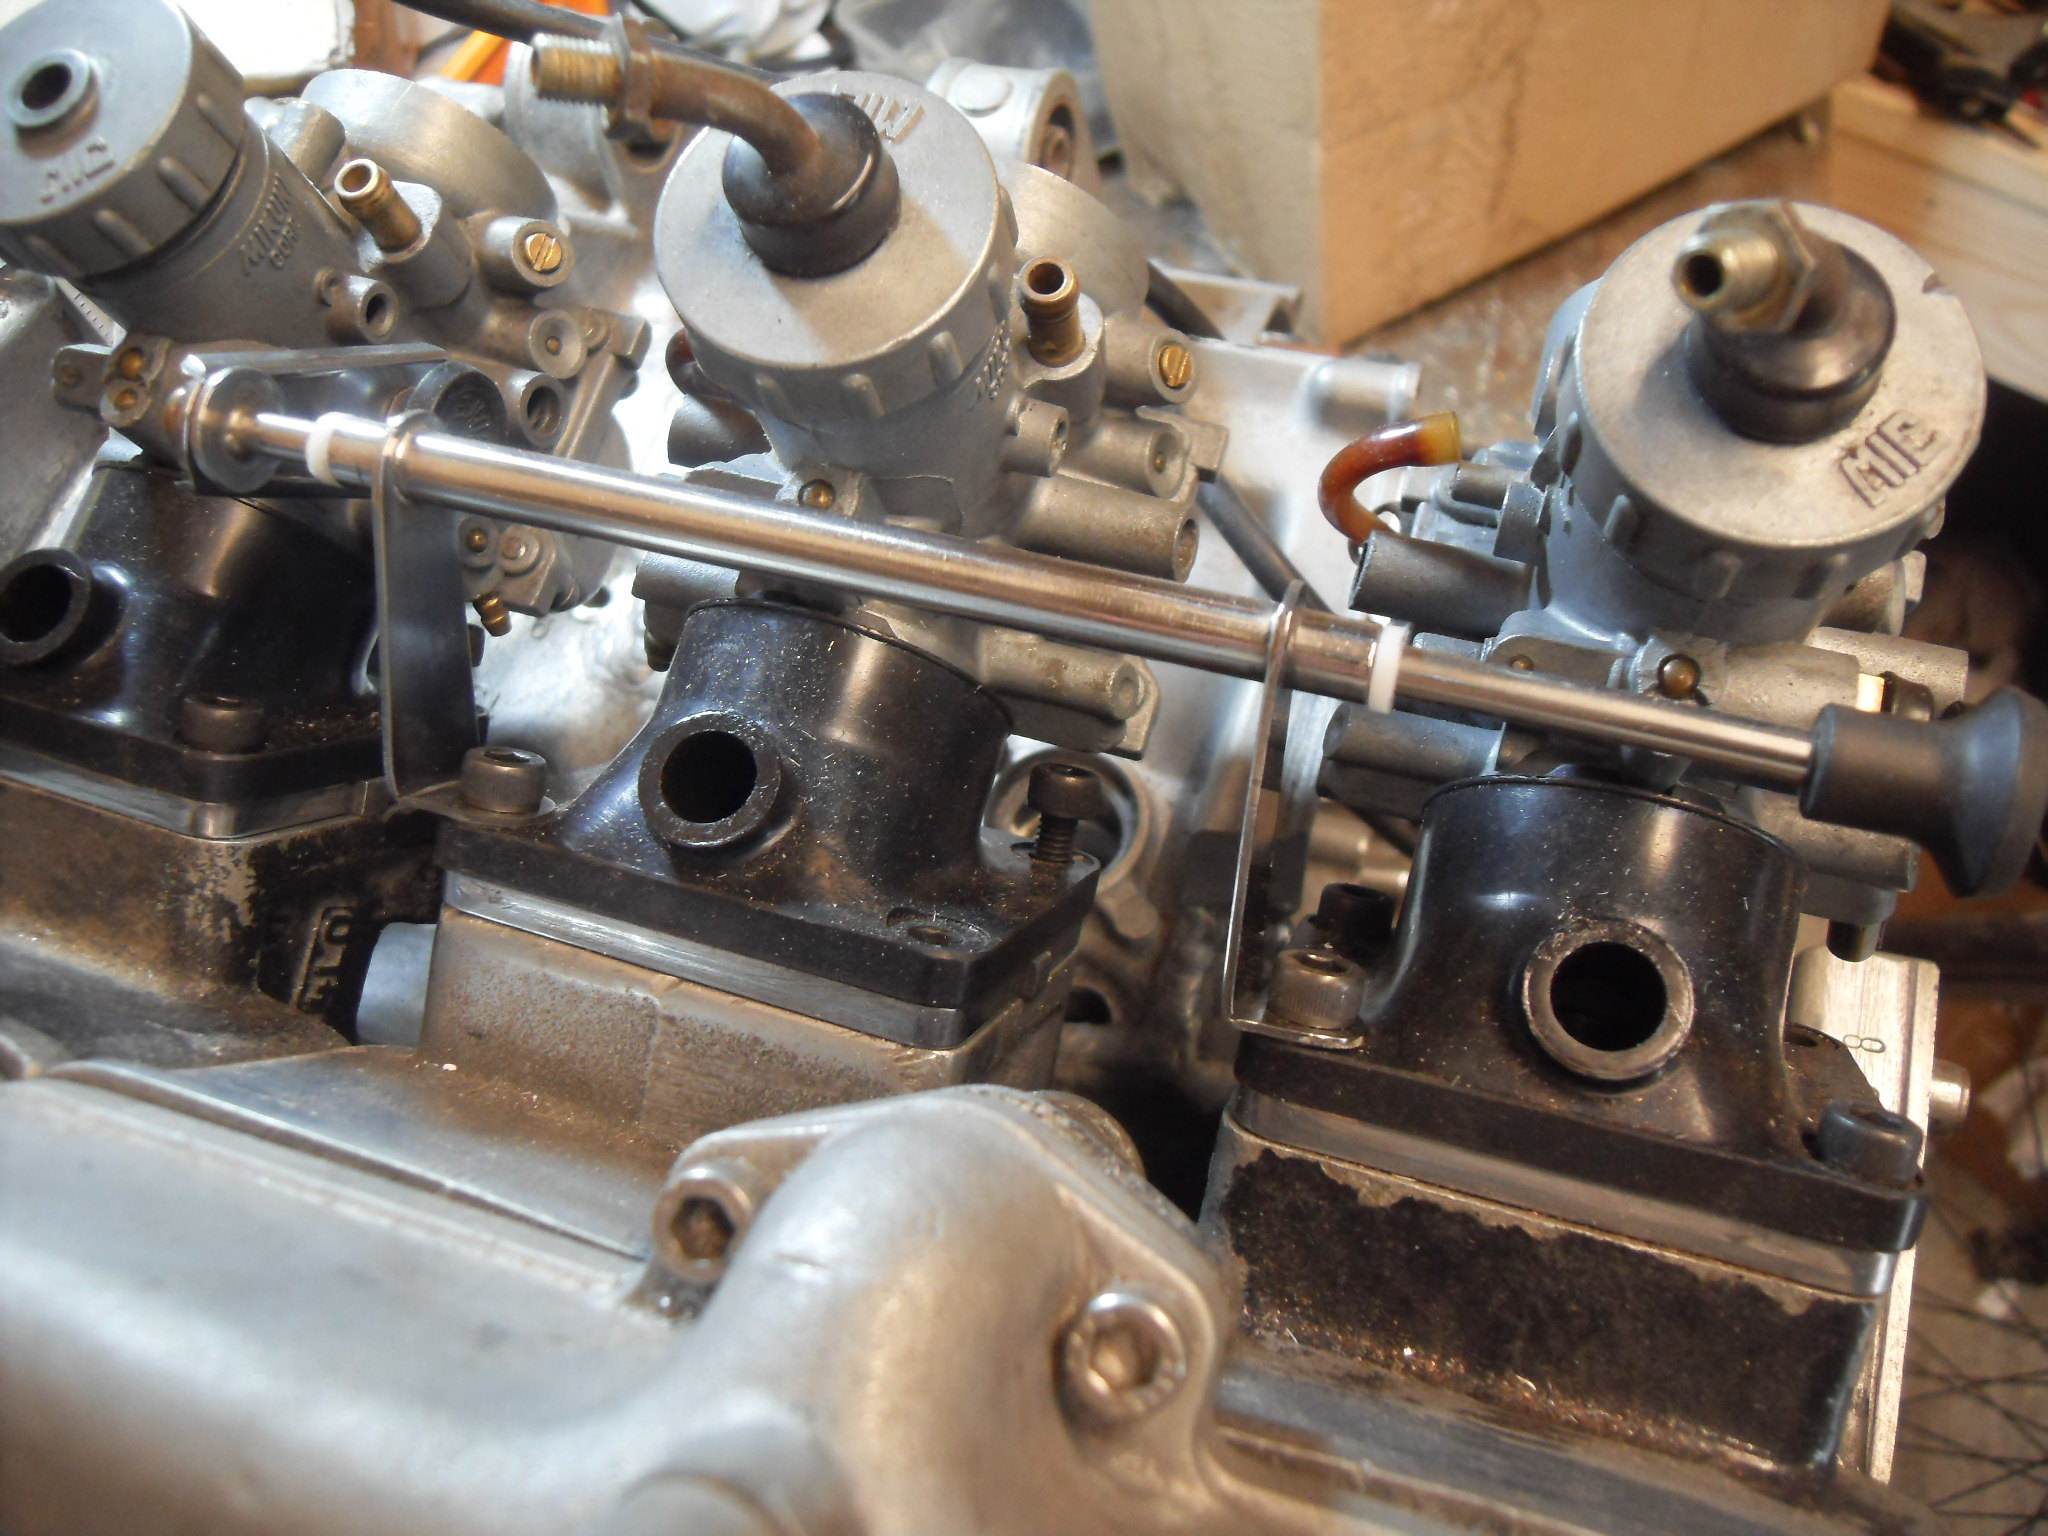 SDC12021 SDC12021  SDC12022 SDC12022 That is pretty much the end of fabrication for now, apart from the generator guide wire. It has to be made, as it is in a new position and a different shape to original. Once the wire guide is made, I can get all the parts to the platers, there are loads of parts to be bright zinc plated So I made a wire guide  SDC12032 SDC12032 I took some pictures of how I made the guide- let me know if any of you guys are interested in how it was made Cheers, Mark |
|
|
|
Post by sbscnor on Oct 17, 2021 18:52:41 GMT 1
Mark, the wire guide is NLA so make some more and I will have one pls, excellent work always an interesting read and good to see your back on it.
|
|
|
|
Post by Tobyjugs on Oct 17, 2021 20:00:51 GMT 1
Hi Mark i couldn't really follow you choke plan until i saw the last picture, then the muddy waters cleared. I think it look visually very imposing. Luv it  |
|
|
|
Post by sidney81 on Oct 17, 2021 20:34:29 GMT 1
Cool 😎😎😎
|
|
|
|
Post by Yogi on Oct 18, 2021 15:48:38 GMT 1
Easy solutions to hard problems, you make me sick you know it all 😤😂😂😂
|
|
|
|
Post by tonyd123 on Oct 19, 2021 10:34:42 GMT 1
I love seeing these solutions to engineering problems, well done |
|
|
|
Post by yamark on Oct 24, 2021 16:07:41 GMT 1
Cheers, sbscnor, Tobyjugs, Sydney 81, Yogi, tonyd123 You have no idea how much your comments drive me forward- it is so appreciated as I still struggle to comprehend what has happened in my private life. scscnor, they are easy to make the wire guides- I'm about to do a guide! Tobyjugs- the look I was after, cheers pal Cheers Chris Yogi - thanks mate, I think it's a compliment tonyd123- thanks mate, appreciated |
|
|
|
Post by yamark on Oct 24, 2021 16:29:02 GMT 1
Wire guide, Guide! I made a few wire guides as they can be in with the zinc plating. This is how I made them I first cut a strip of 1.5mm thick steel the same width as the standard wire guides  SDC12023 SDC12023 I then grind two parallel slots to fold over the wire 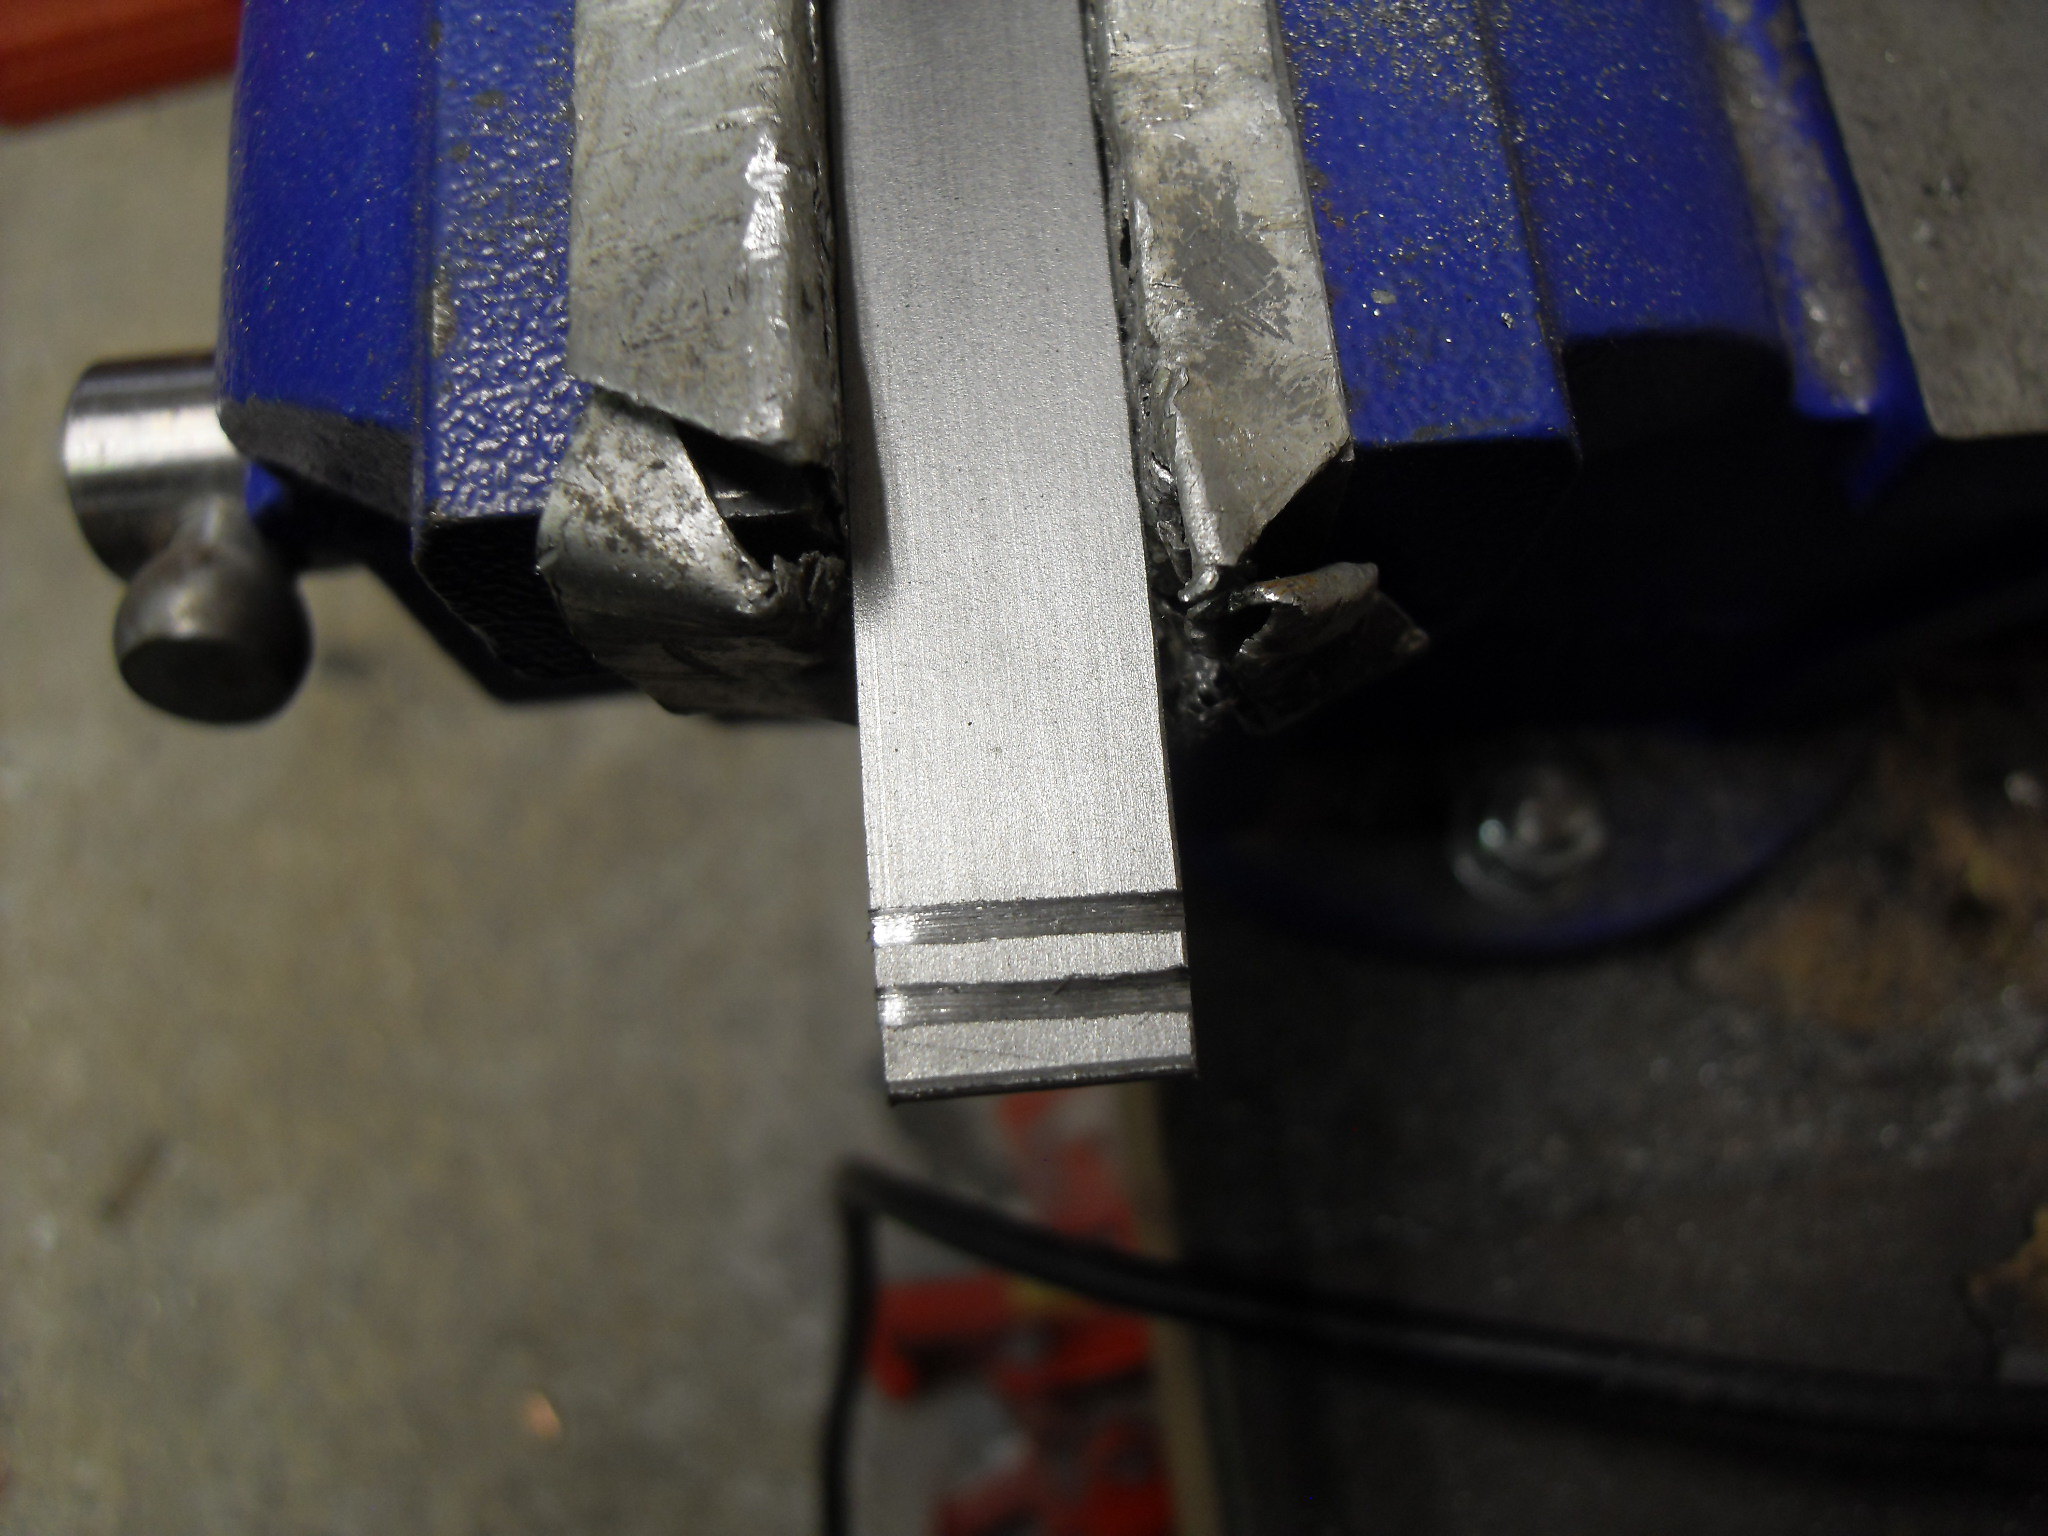 SDC12024 SDC12024 I then fold the inner grove in a vice to 90 degrees 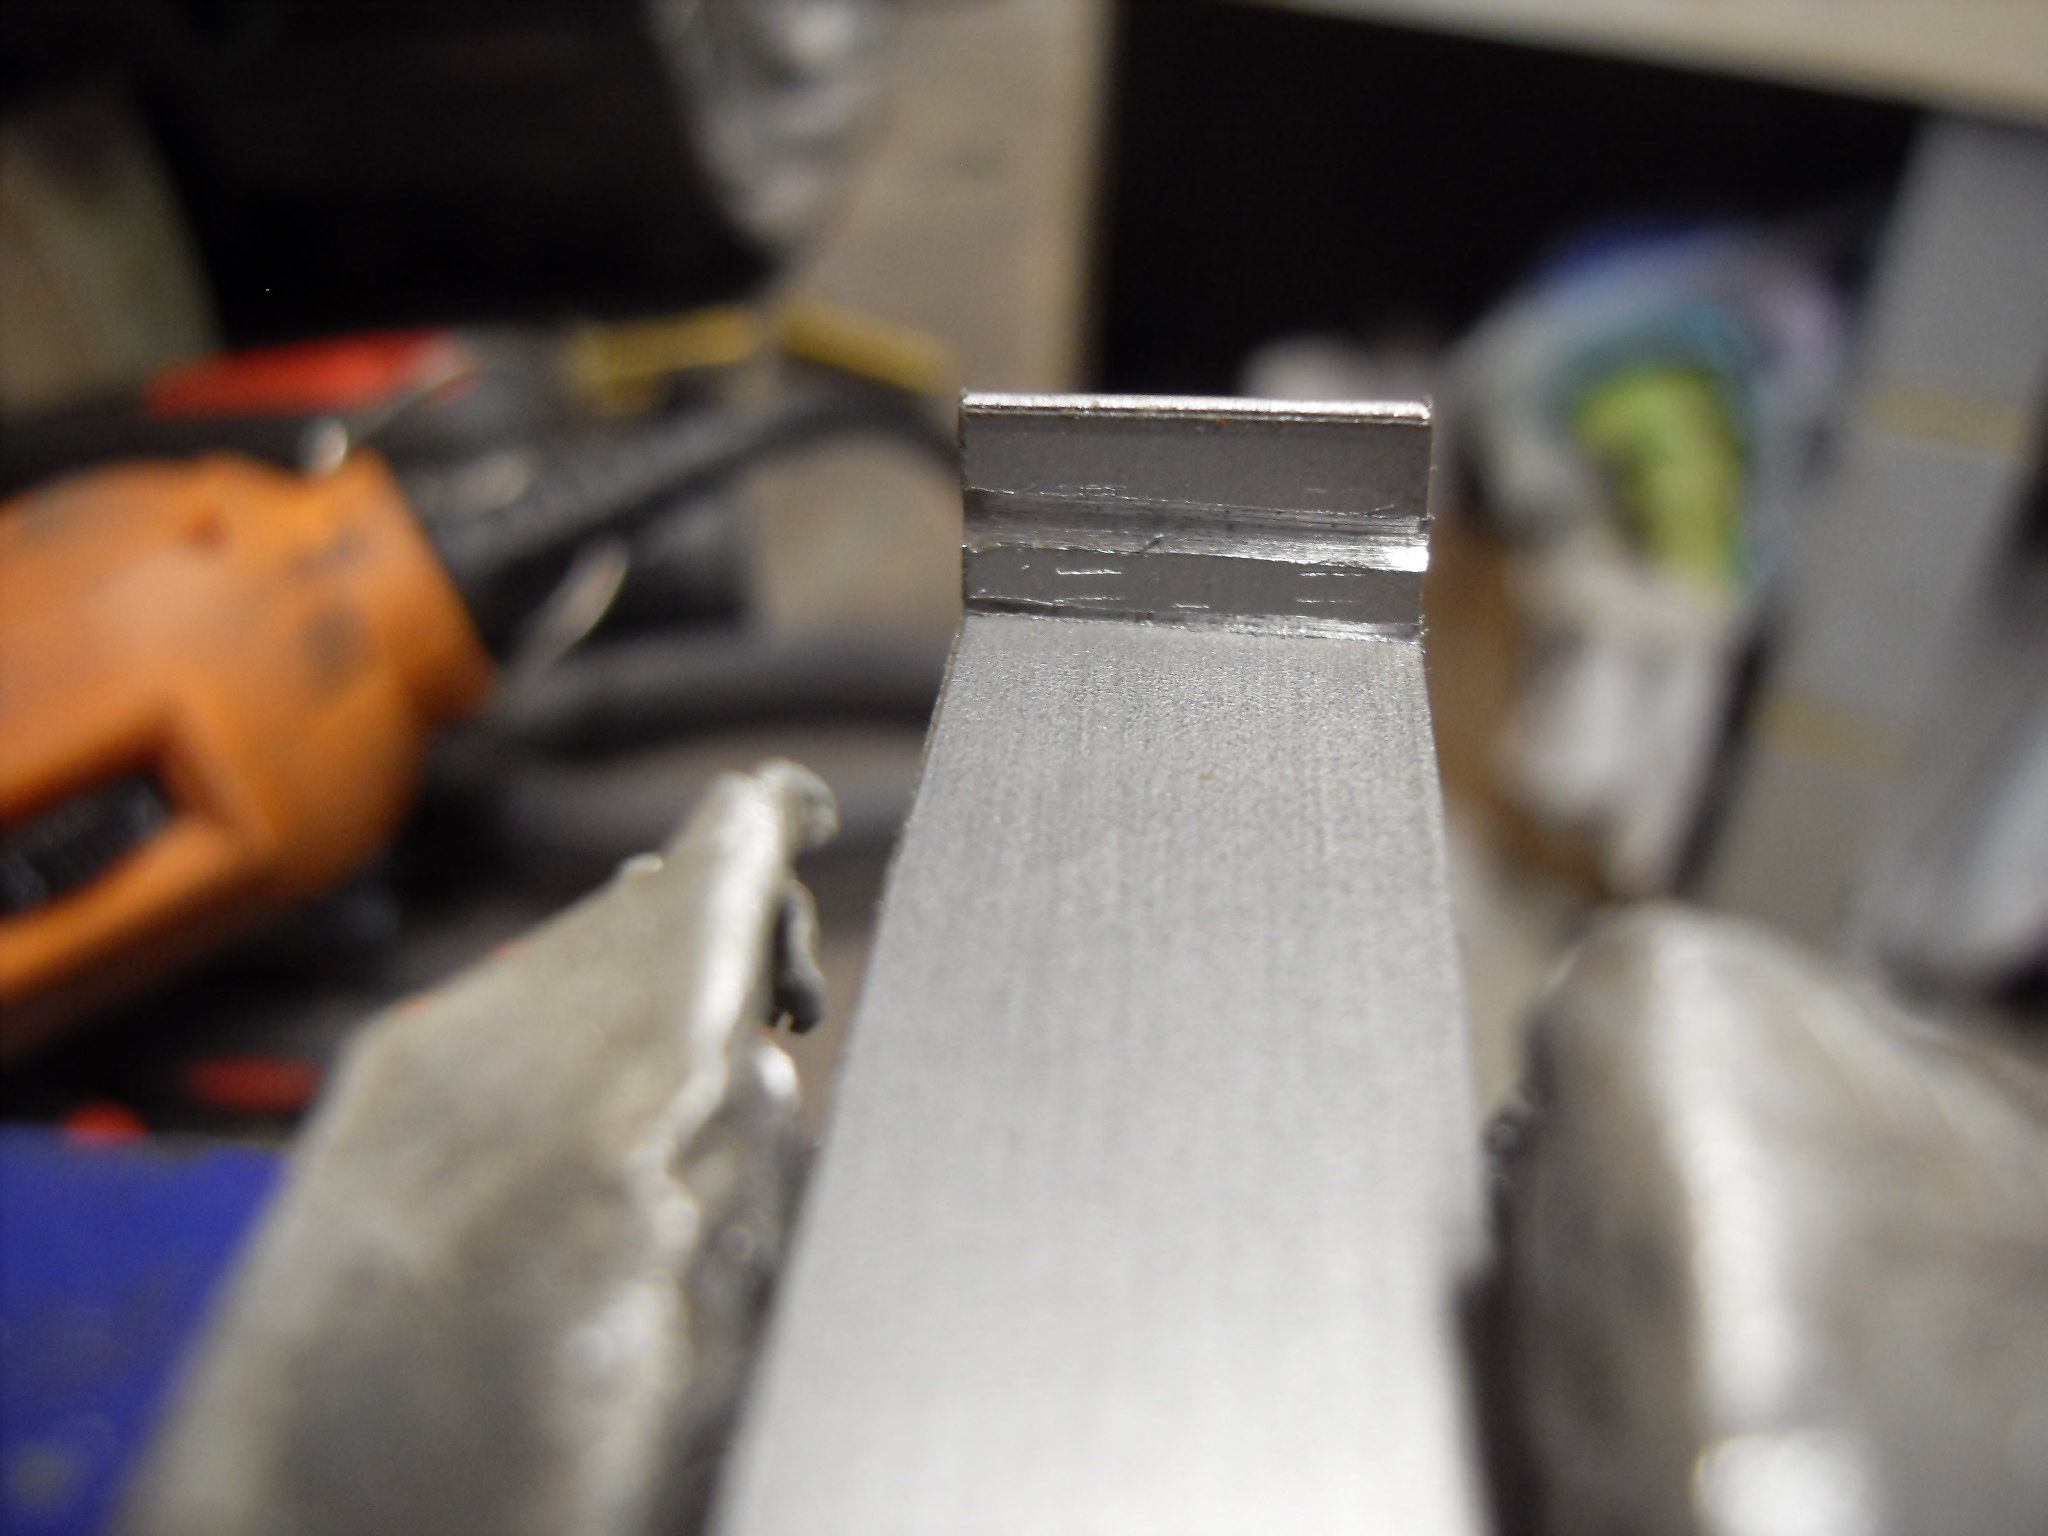 SDC12025 SDC12025 Next a length of wire coat hanger is clamped by the second fold and soldered  SDC12026 SDC12026 Another light score groove is then ground on the outside  SDC12027 SDC12027 And then a fold is made the other way, ready for the plate to be drilled and shaped.  SDC12028 SDC12028 Once the plate is drilled and shaped, you just have to bend the wire to the shape you want - simples Cheers, Mark (and thanks lads for all the "push forwards") |
|


 .
.


