|
|
Post by marrcel on Sept 3, 2018 22:02:12 GMT 1
Good job👍
Searching for bench grinder now😜
|
|
|
|
Post by donkeychomp on Sept 3, 2018 22:45:21 GMT 1
Going to be a cracker for sure.
Not an xmas one...
Alex
|
|
|
|
Post by dusty350 on Sept 4, 2018 6:50:15 GMT 1
Marcel - Amazon were listing a polishing machine which may be a better bet than modding a bench grinder - especially if you only want it for polishing. Some bench grinders have a lowish wattage, and not really up to serious polishing jobs. The Higher the wattage the better. My grinder is approx. 550w I think and struggles a bit on deep scratches, and if I wanted to mirror polish parts I think I would be there a long time !! It's good enough for most of the parts I do but I will invest in a dedicated machine one day, just to make it a bit easier  Dusty  |
|
|
|
Post by marrcel on Sept 4, 2018 20:17:43 GMT 1
Mmm i have an angle grinder. Is this useable?
|
|
|
|
Post by marrcel on Sept 4, 2018 20:18:52 GMT 1
I mean rpm wise ?
|
|
|
|
Post by dusty350 on Sept 4, 2018 20:31:10 GMT 1
Never tried it so cant comment. I think you would want a bench mounted machine to get the best finish to be honest, and the way the mops are designed means a hand held tool probably wont suit what you want. You can buy orbital polishers but they tend to be for car paintwork and not suitable for what we need. Dusty |
|
|
|
Post by midlifecrisisrd on Sept 4, 2018 20:37:20 GMT 1
I have tried it. They are way too fast, the vibration is terrible Think polishing is 2 - 3000 rpm Angle grinder is more like 10000rpm Steve |
|
|
|
Post by marrcel on Sept 5, 2018 19:52:43 GMT 1
Thx to you for advice. Not longer hacking this beautiful topic👍😉
|
|
|
|
Post by dusty350 on Sept 6, 2018 19:19:27 GMT 1
Been bolting a few more parts on. For some reason, a previous owner had removed the front bracket that the coil mounted to  They were good enough to drill and tap a hole a bit further forward, so having pinched the Banshee coils that were destined for the café racer bike, I made a small bracket so I could mount the coils properly; 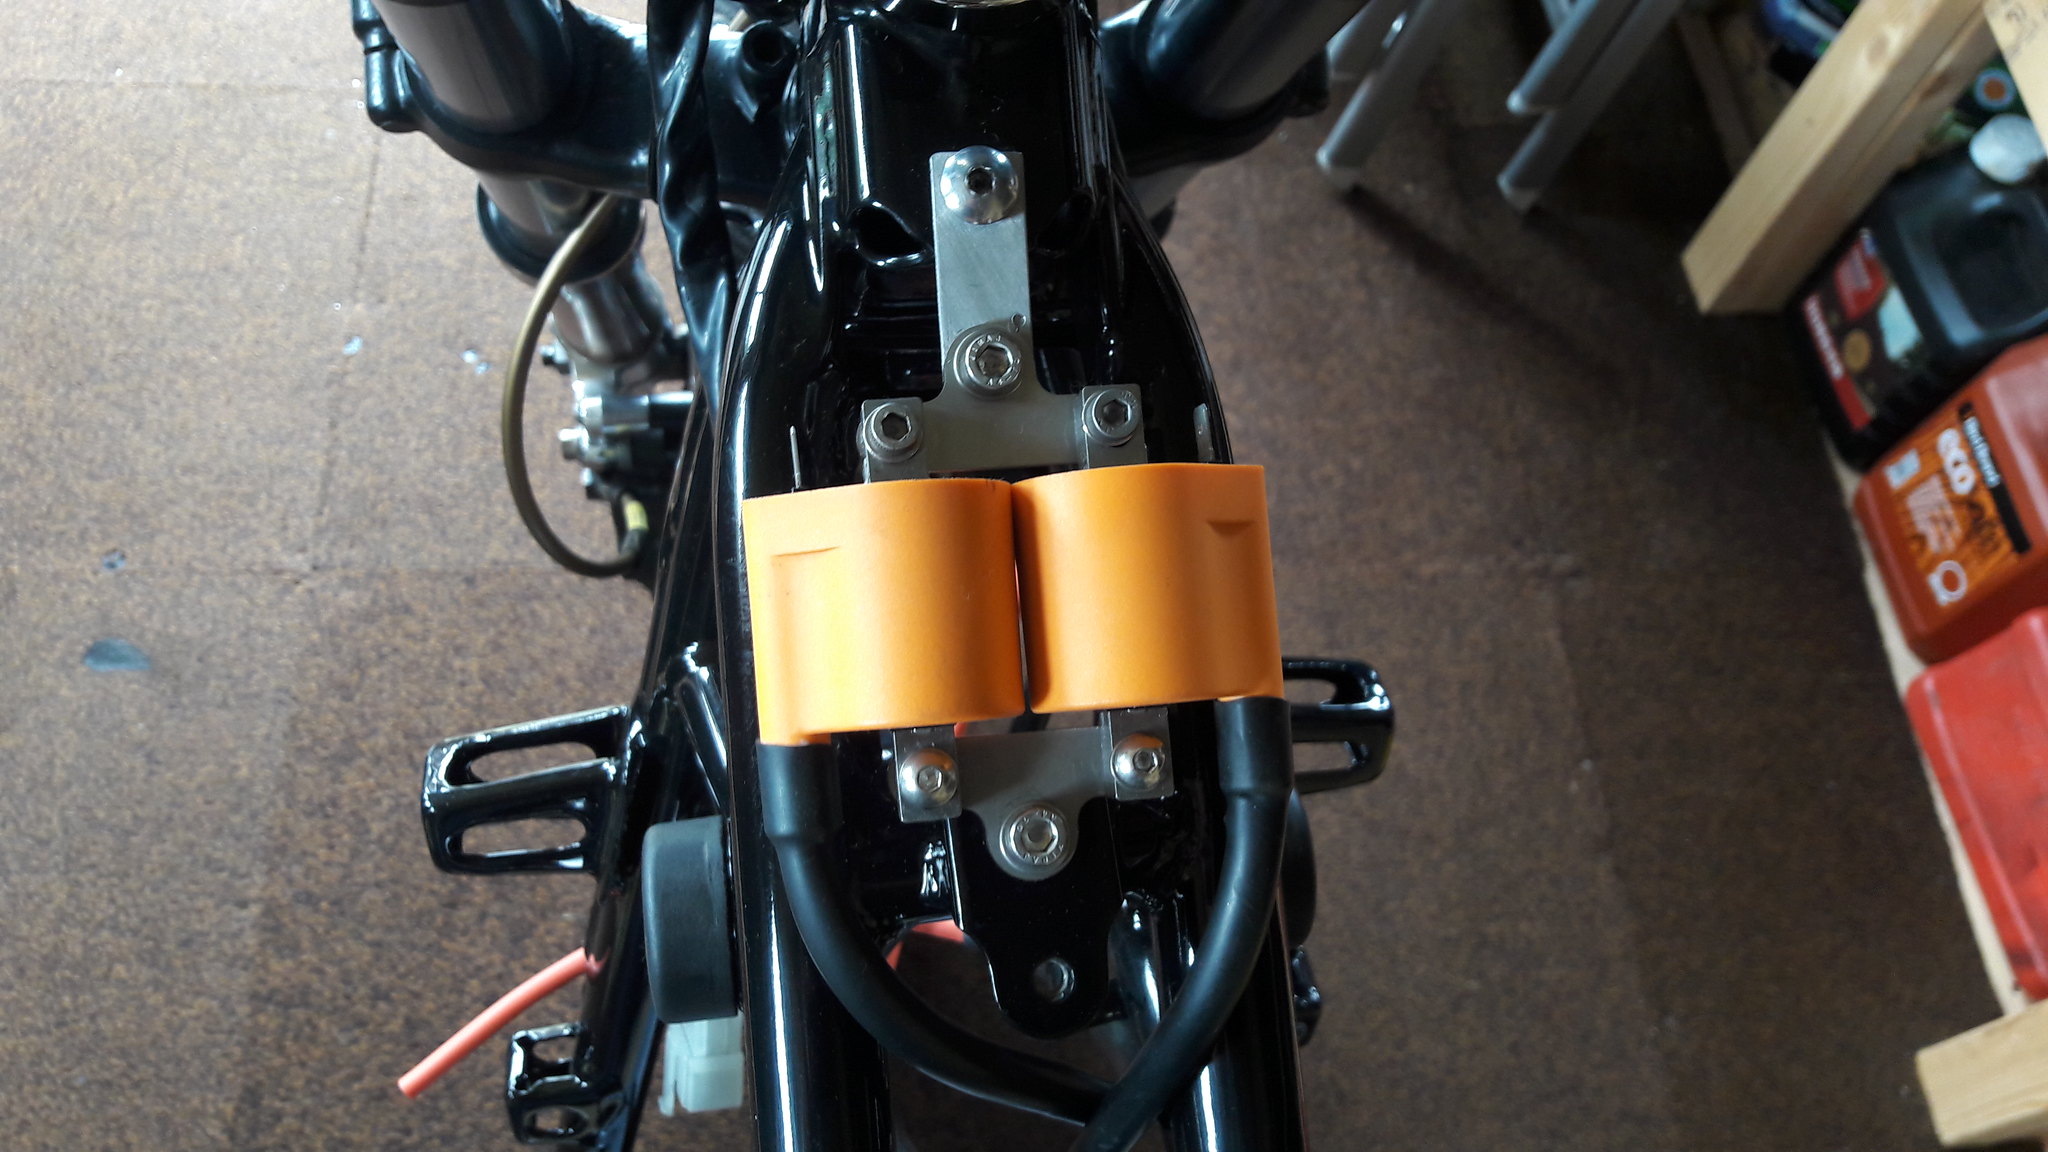 20180906_145441 20180906_145441 by David Miller, on Flickr I've resisted the temptation to recess the rear light at the moment, but I did cut down the number plate bracket a bit more - it had already been cut - to fit my 7x5 number plate that arrived yesterday. This bike originally came with the yellow bodywork, but I am using the 2 stripe red set that was spare;  20180906_145428 20180906_145428 by David Miller, on Flickr 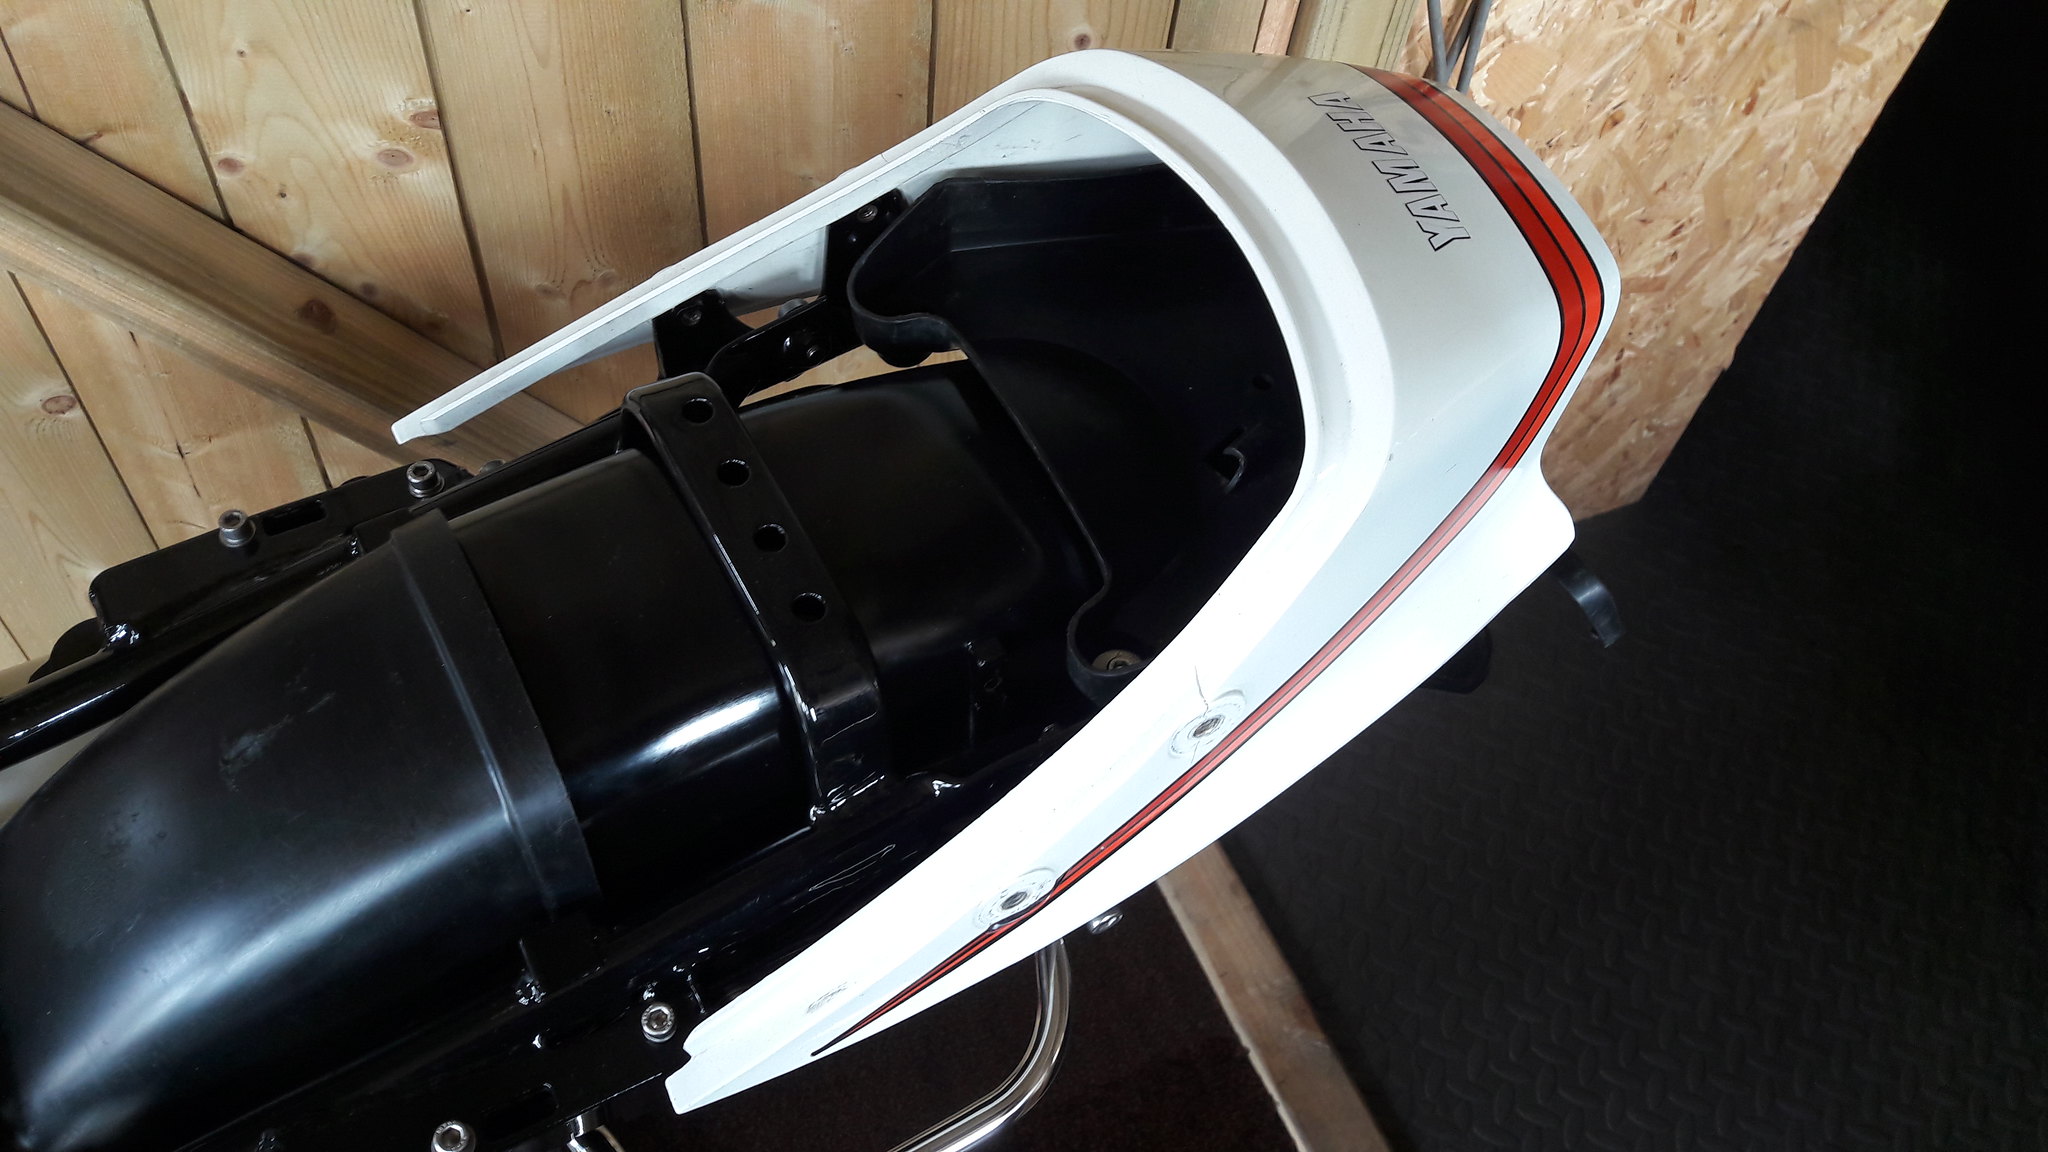 20180906_145456 20180906_145456 by David Miller, on Flickr Starting to look a bit more like an Lc now; 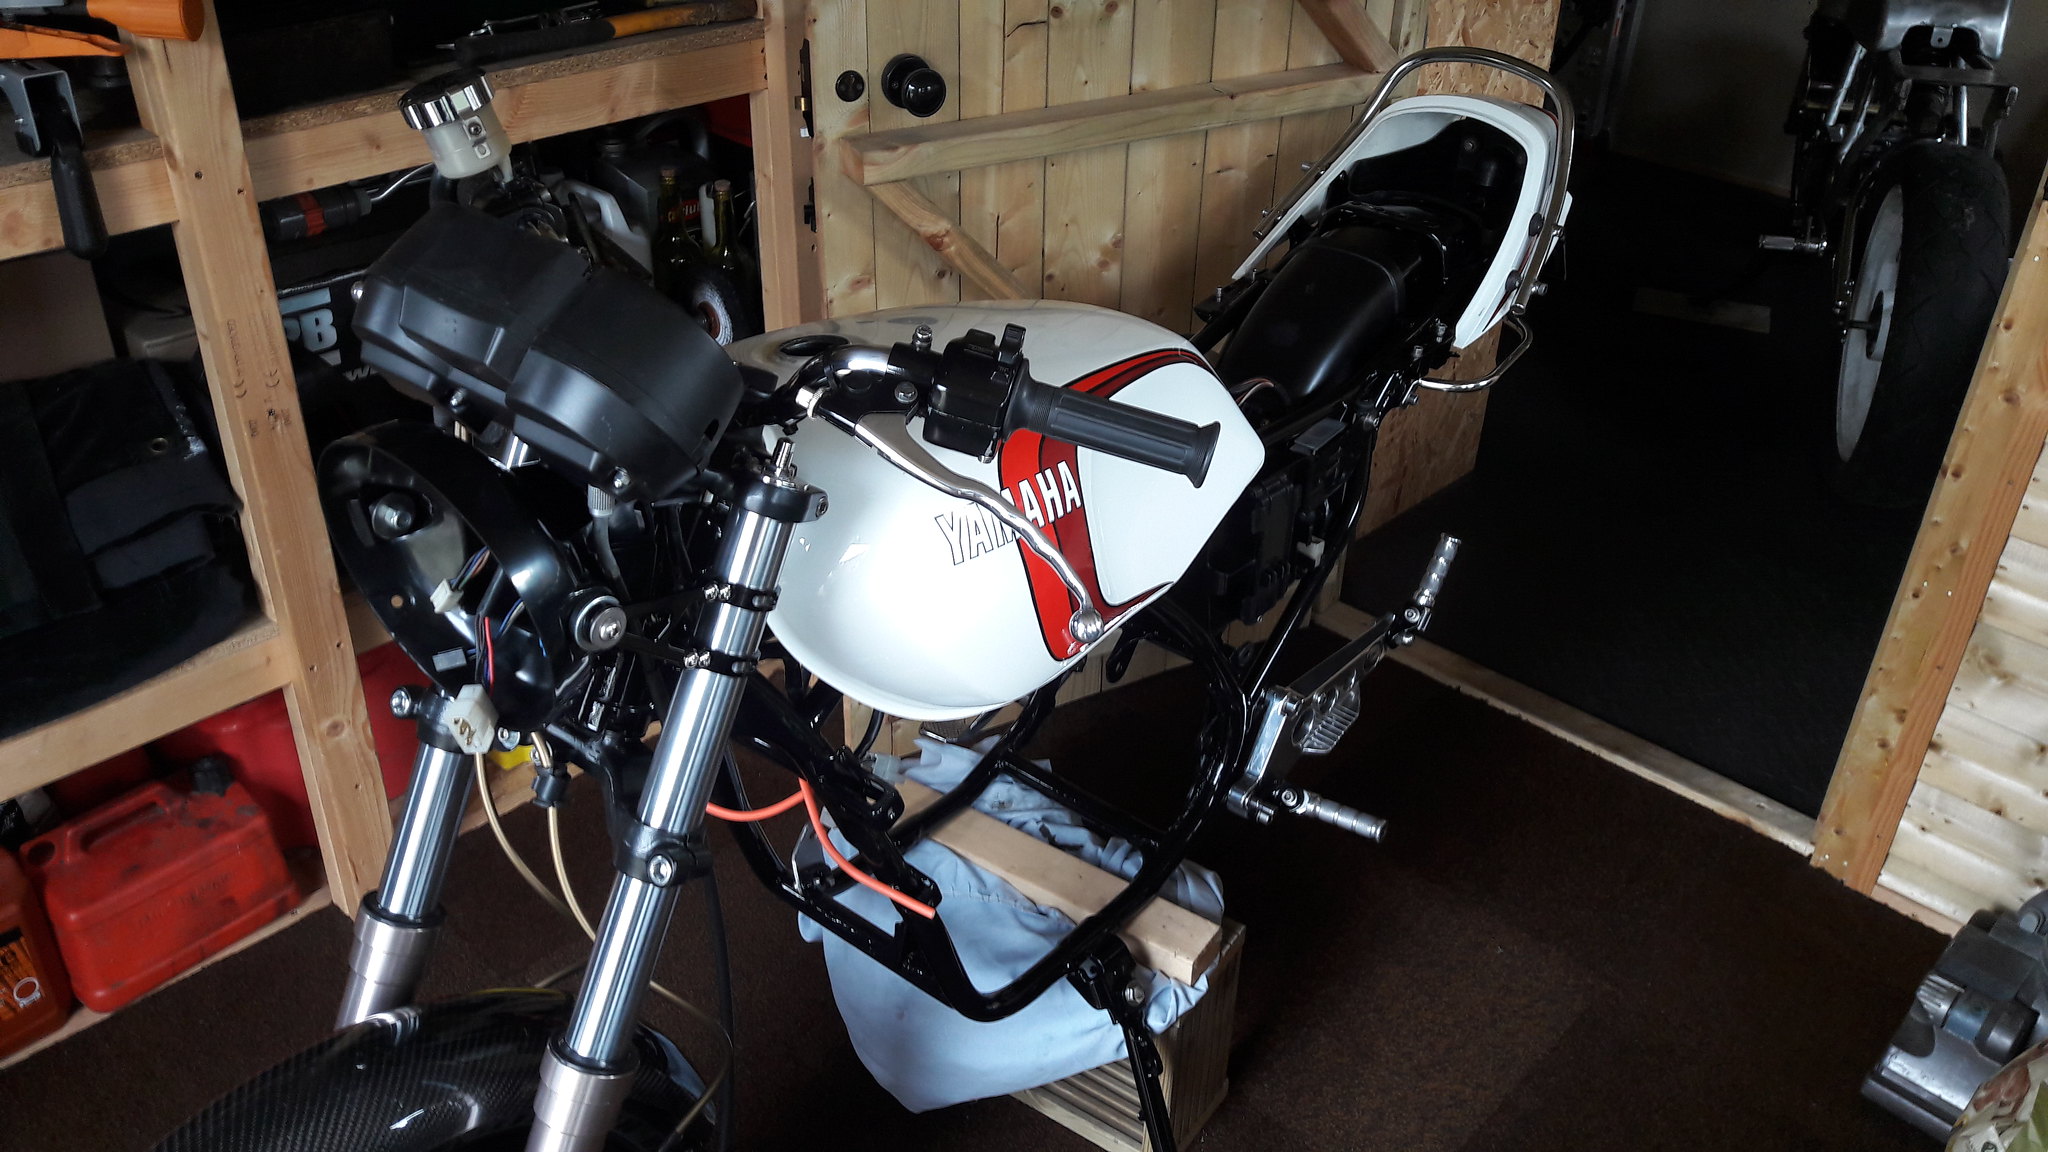 20180906_161048 20180906_161048 by David Miller, on Flickr Dusty |
|
|
|
Post by mouse on Sept 7, 2018 8:42:31 GMT 1
Lovely build as ever Dusty, she is at an exciting stage, think she will look great with that front end.
Mouse
|
|
|
|
Post by dusty350 on Sept 13, 2018 7:56:27 GMT 1
Busy week, so haven't done loads, but did refurb the rad. It was in pretty good nic anyway, but I gave it a good wash inside and out after giving the paint a key with some fine sanding blocks. Resprayed it in gloss black, found some better rad guard spacers, polished up the rad guard, and fitted the 2 polished side plates that came in a box of spares; 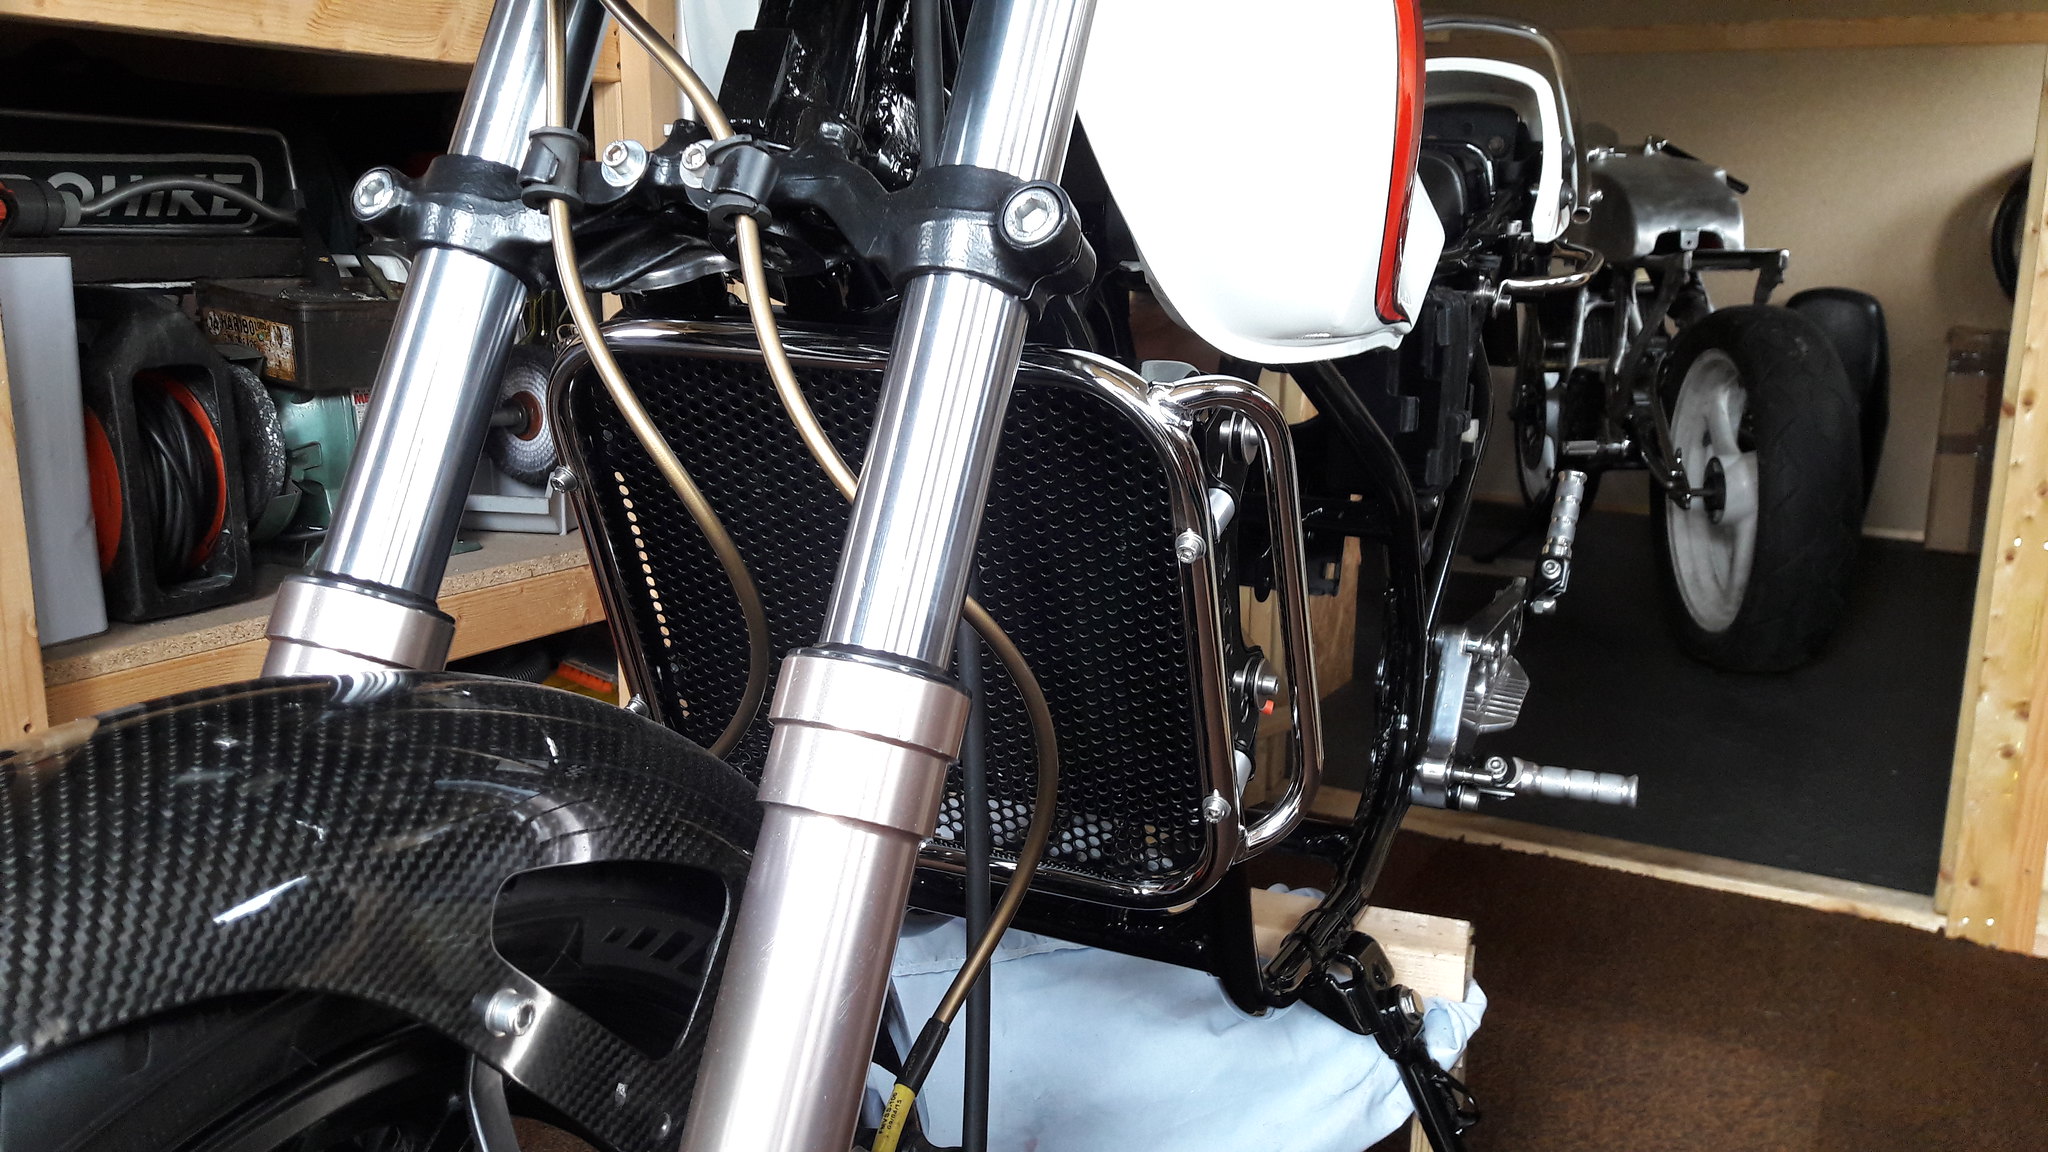 20180912_161110 20180912_161110 by David Miller, on Flickr  20180912_161021 20180912_161021 by David Miller, on Flickr 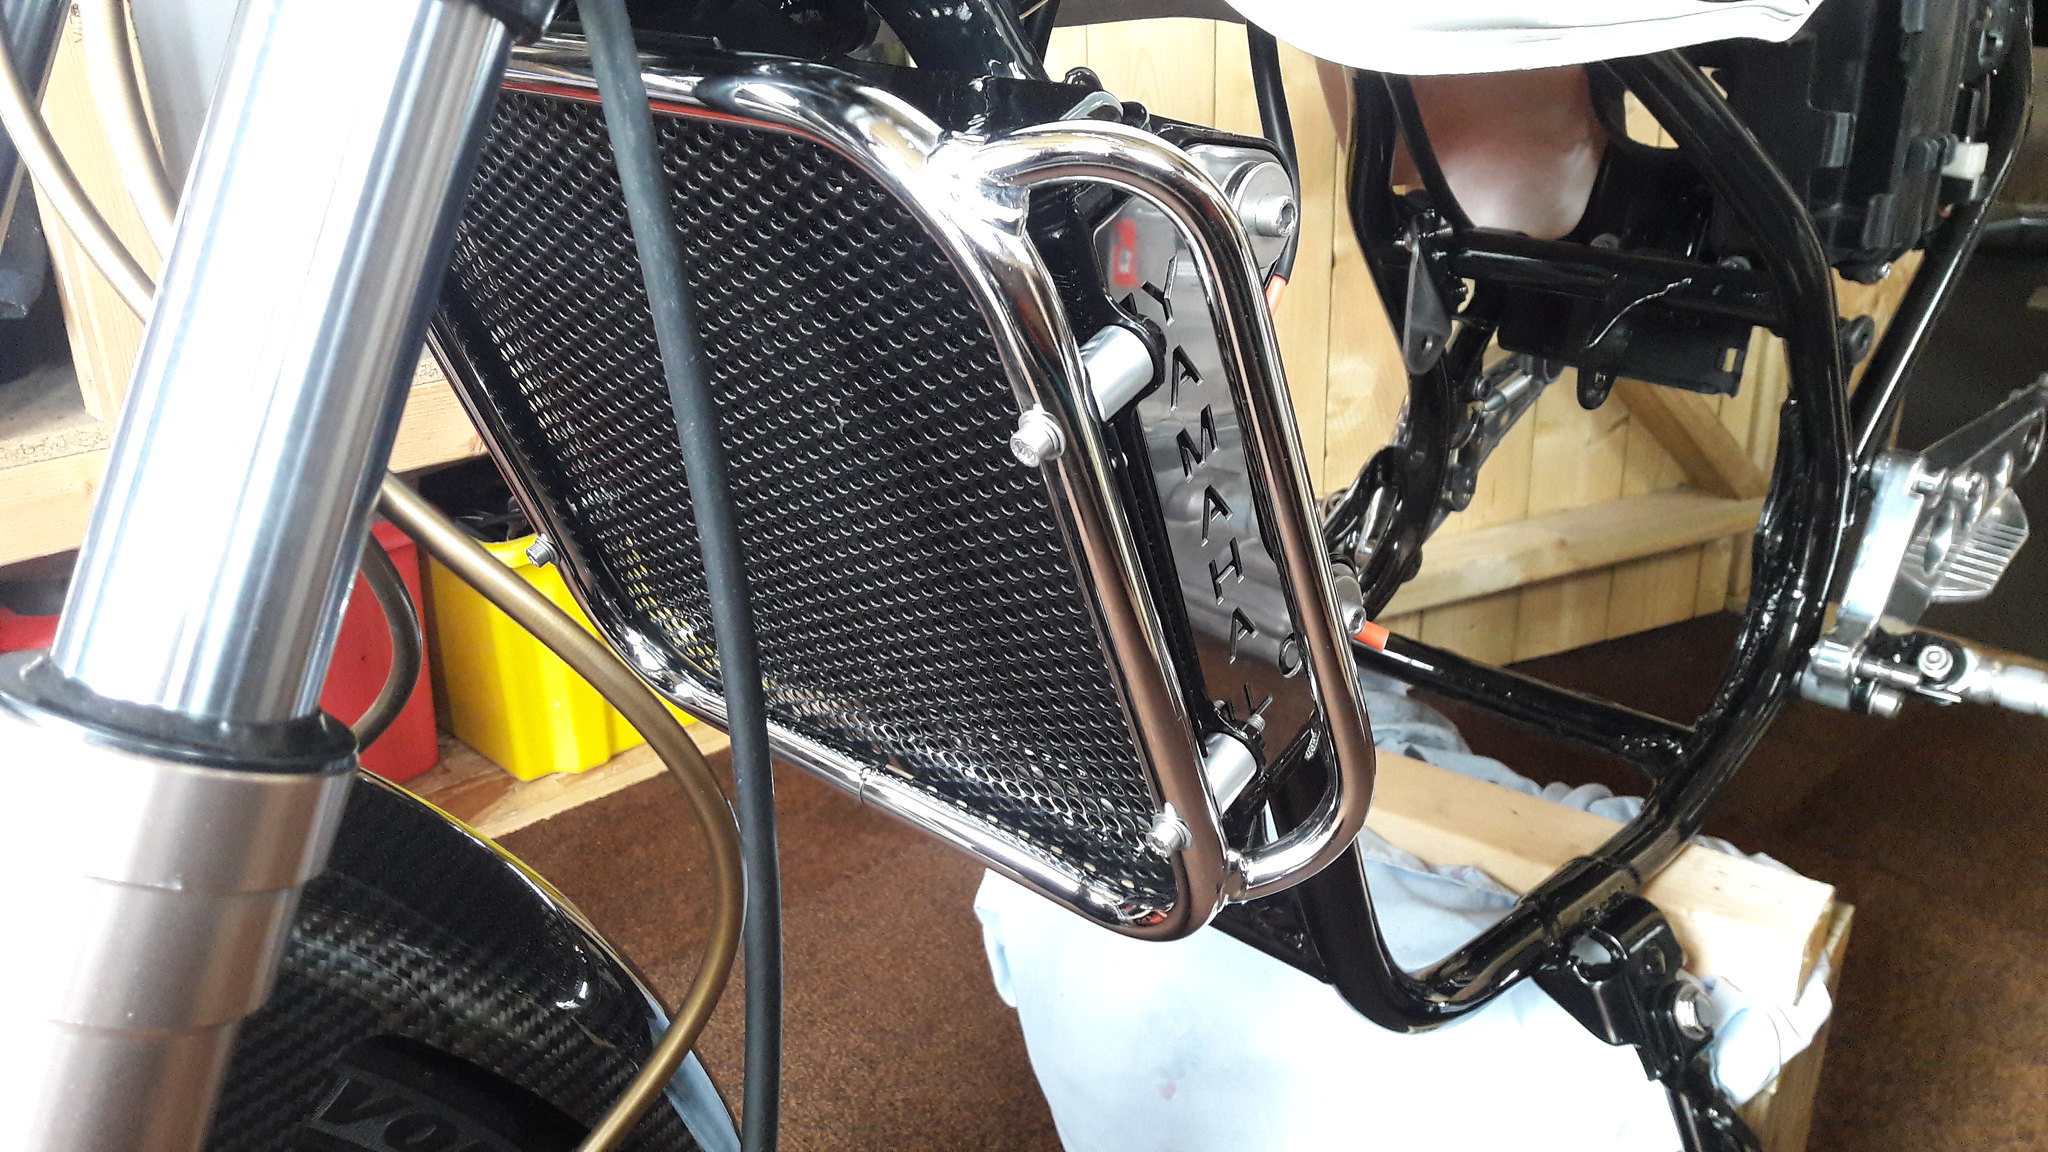 20180912_161008 20180912_161008 by David Miller, on Flickr Wouldn't normally fit something like those plates but I think they look ok. Next job is to make a plate to mount some horns to. Dusty |
|
|
|
Post by Dangerous on Sept 13, 2018 13:11:30 GMT 1
Looking great that dusty. Great job
|
|
|
|
Post by dusty350 on Sept 13, 2018 19:02:14 GMT 1
Thanks Knocked up a horn bracket this morning. Annoyingly, I couldn't find the card template for the bracket I made before, so had to take the dimensions from a drawing, and transfer that to a new template. Drew round it on some ally sheet I had and cut it out with my jigsaw/metal blade. Popped into my engineering guy this afternoon and he put the 23 degree bend into it for me whilst I was there chatting May need to tweek it slightly once I get some horns. I wanted it to look a bit like an Lc bracket, but it had to work with the Fzr lower yoke; 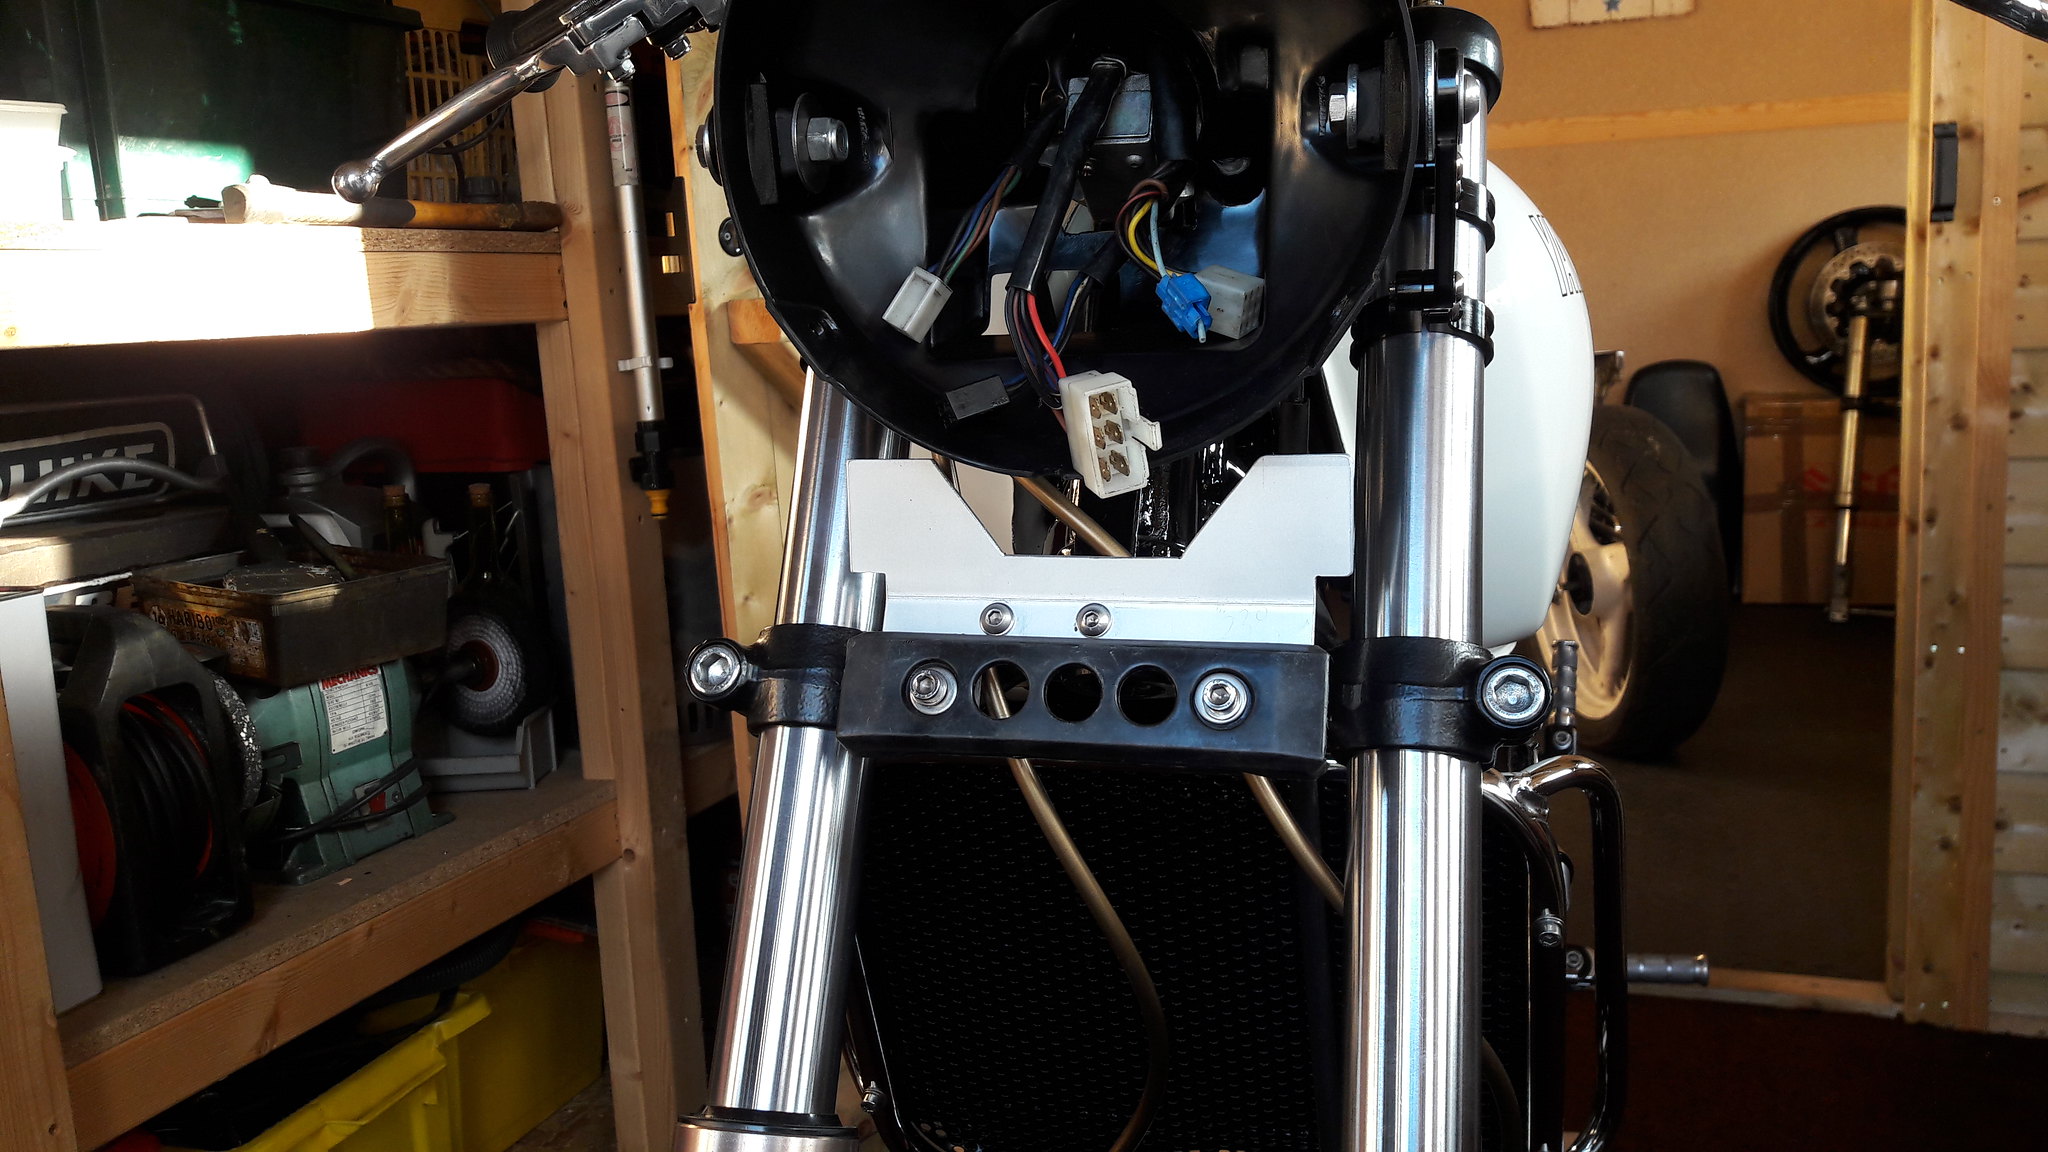 20180913_175044 20180913_175044 by David Miller, on Flickr It will fill the gap underneath the headlight nicely. Dusty |
|
|
|
Post by tony1964 on Sept 13, 2018 19:45:00 GMT 1
Looking good Dusty, i do like the look of that front end
|
|
|
|
Post by dusty350 on Sept 15, 2018 21:56:20 GMT 1
Today, I had some time (missus and daughter off doing a 12 mile run !!  ) so dining room table got requisitioned for my Lc clocks rebuild ! I thought the clocks on this bike looked pretty good, apart from a faded red line on the tacho and a missing trip knob. I was going to buy 2 new dials, but the speedo dial was good, and I had a spare tacho, albeit without a temp gauge fitted ?? So, a clock strip to clean, and swap the tacho dial over - shouldn't take long 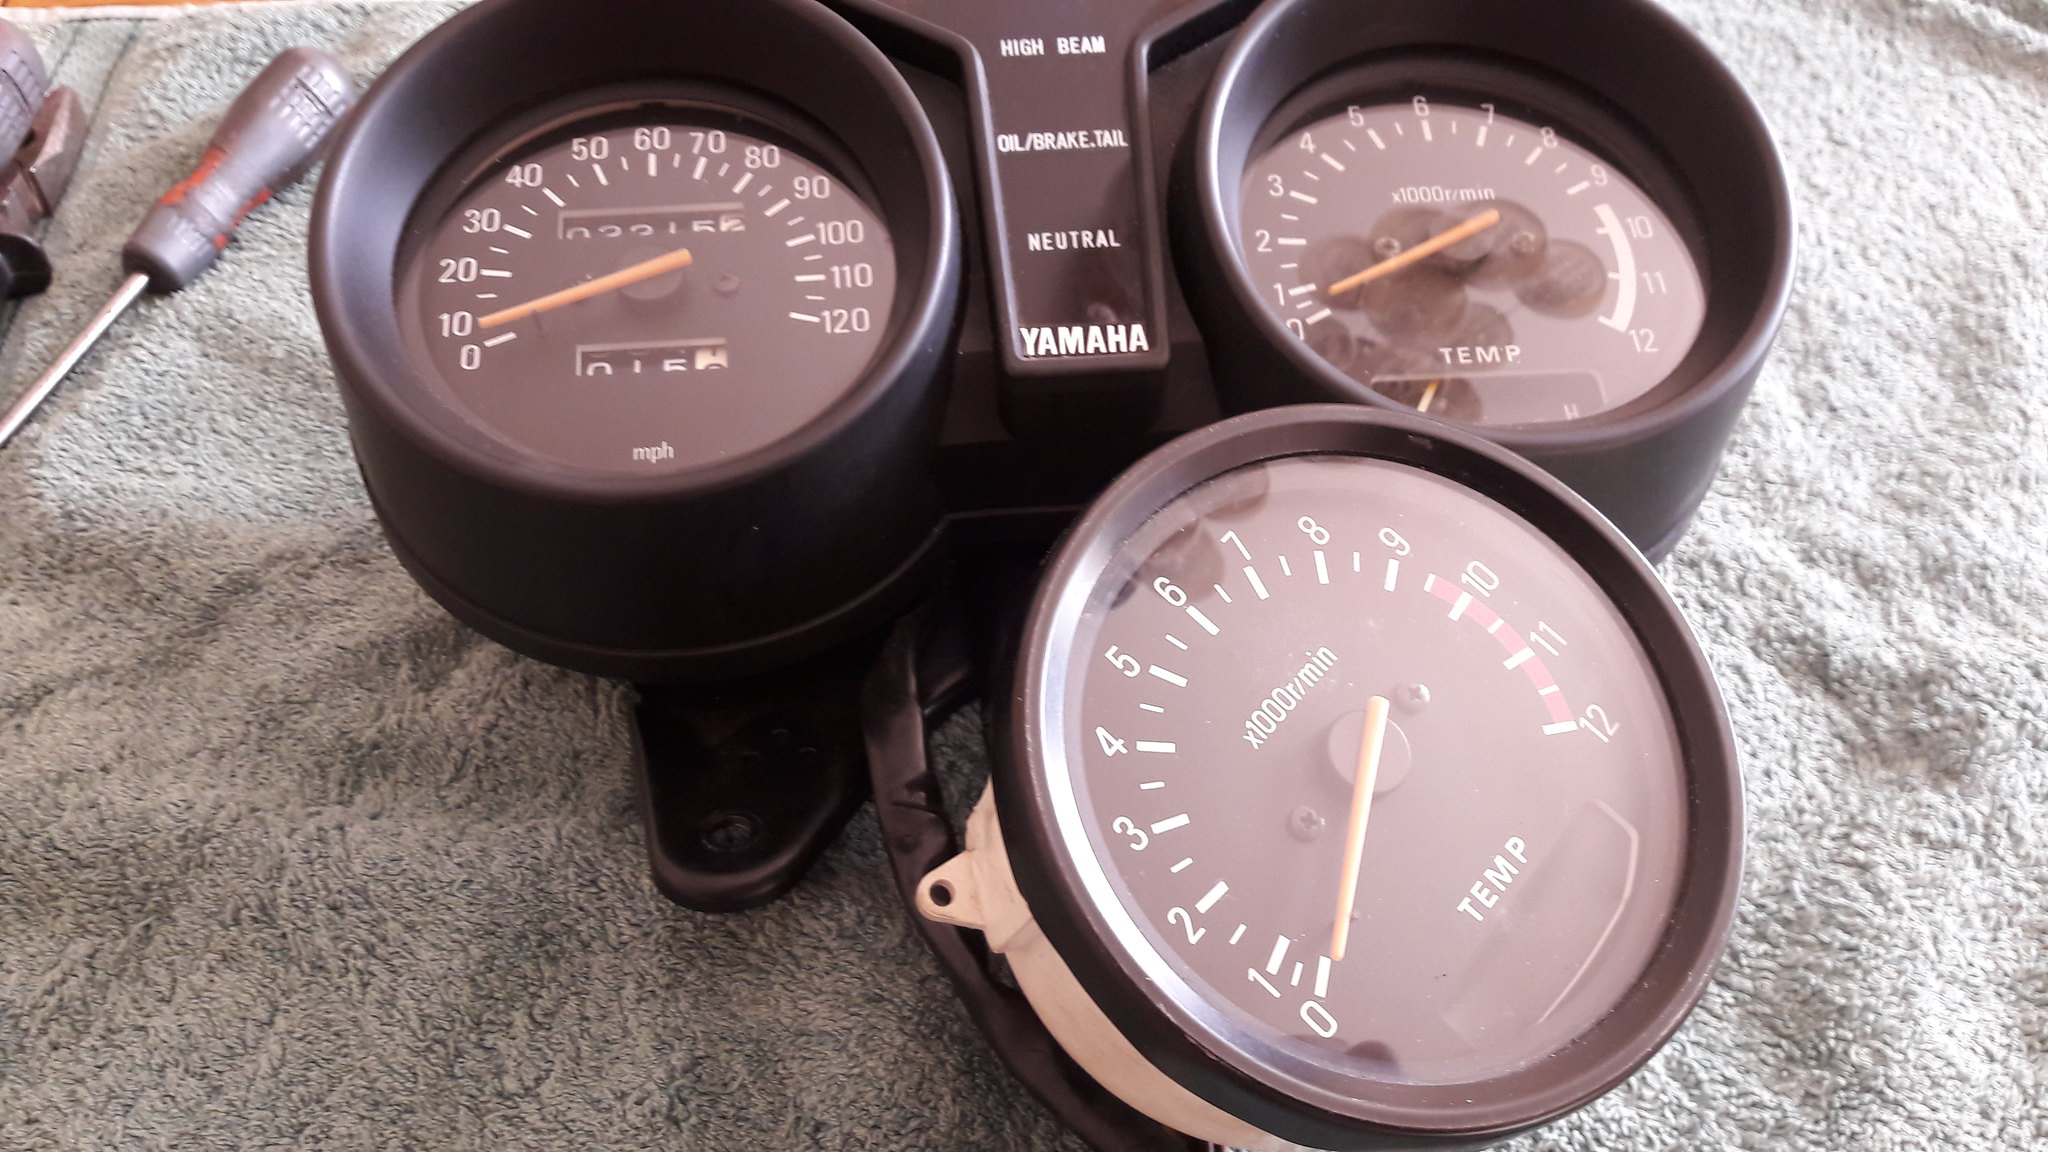 20180915_110750 20180915_110750 by David Miller, on Flickr Remove the 8mm dome nuts on the back;  20180915_110844 20180915_110844 by David Miller, on Flickr Remove the plastic back case and the clock mount reveals; 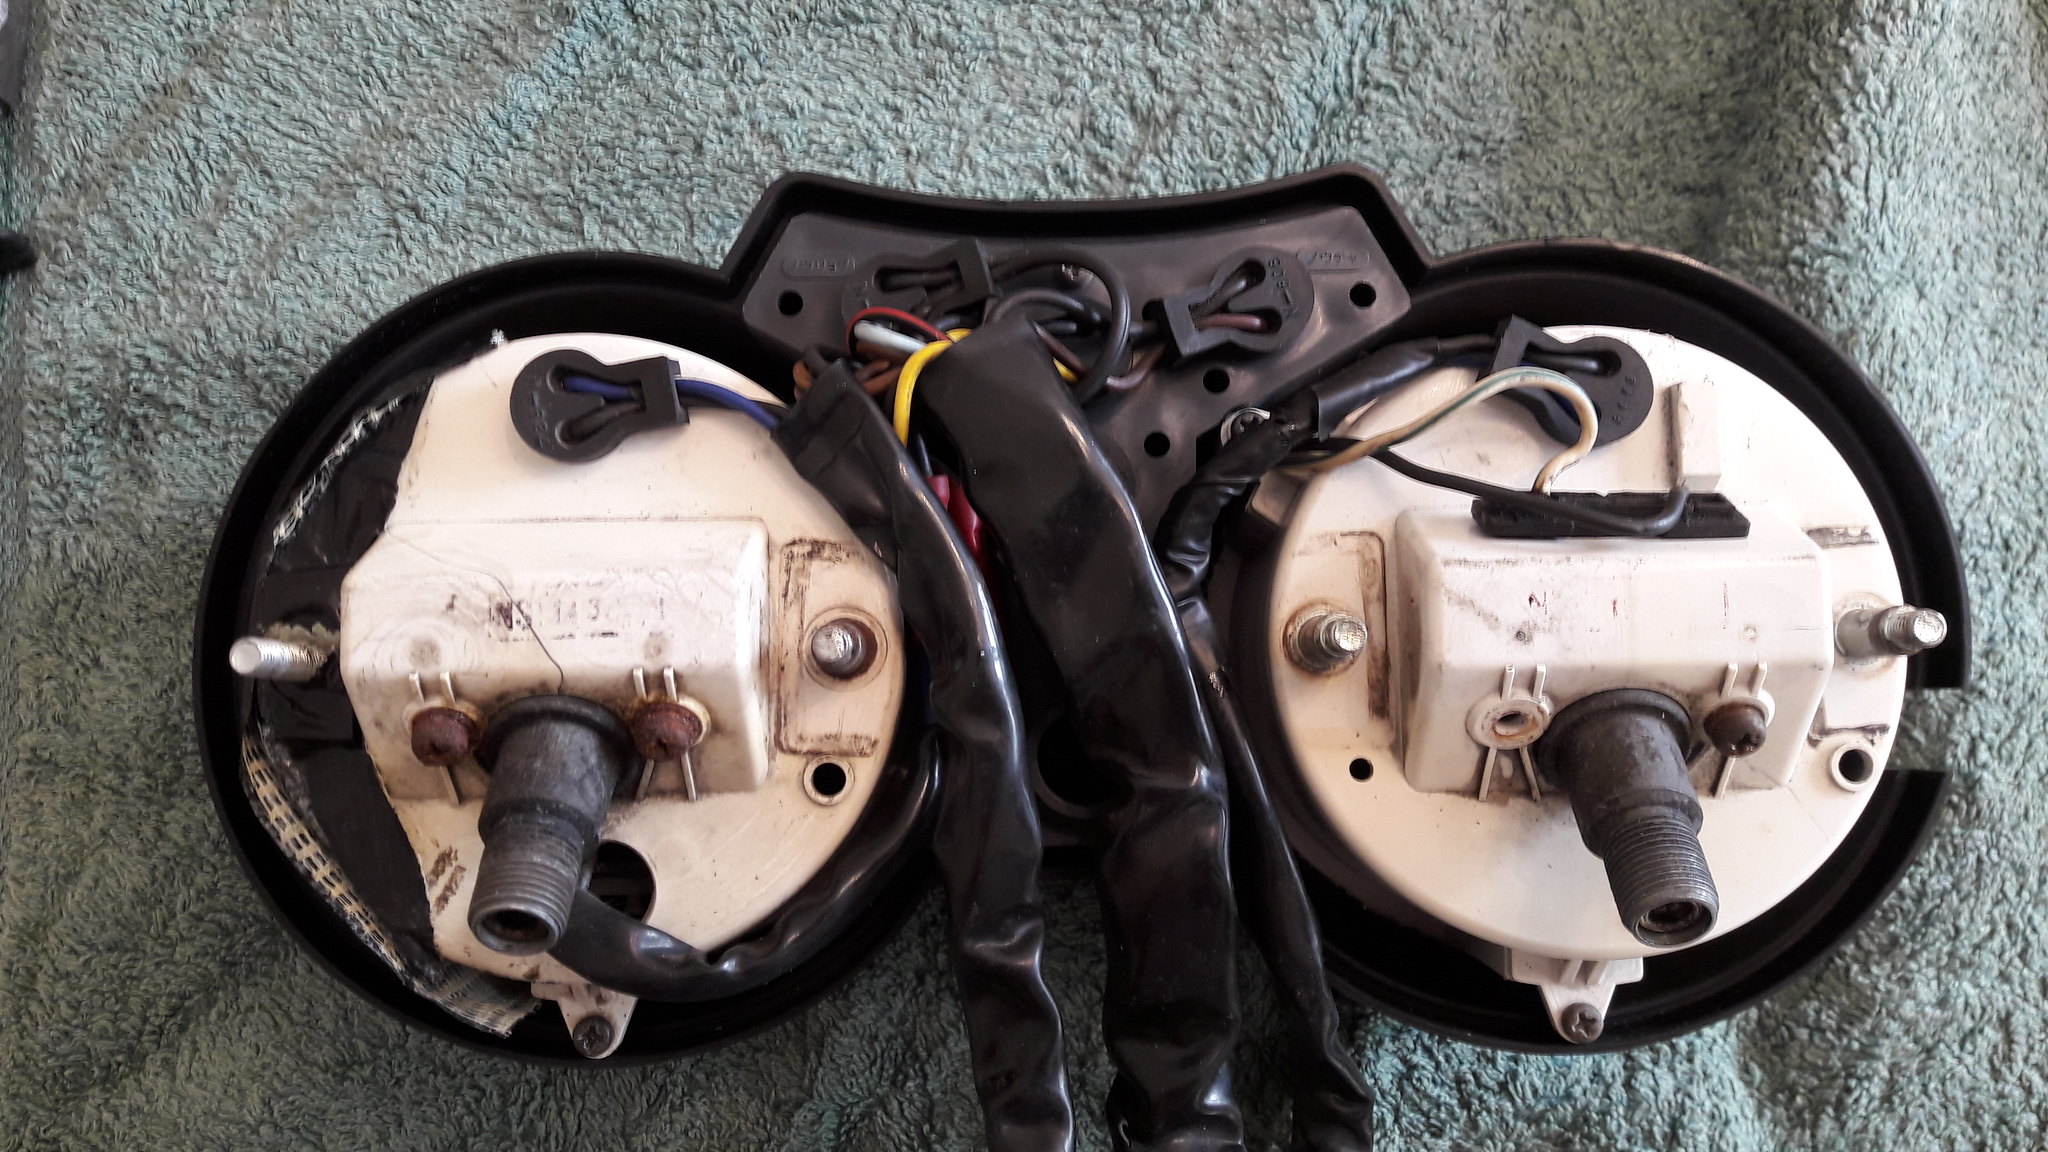 20180915_112410 20180915_112410 by David Miller, on Flickr Now I know there is a bit of tape covering the hole where the trip knob goes on the speedo, but what's that tape on the tacho (left side instrument) ?; 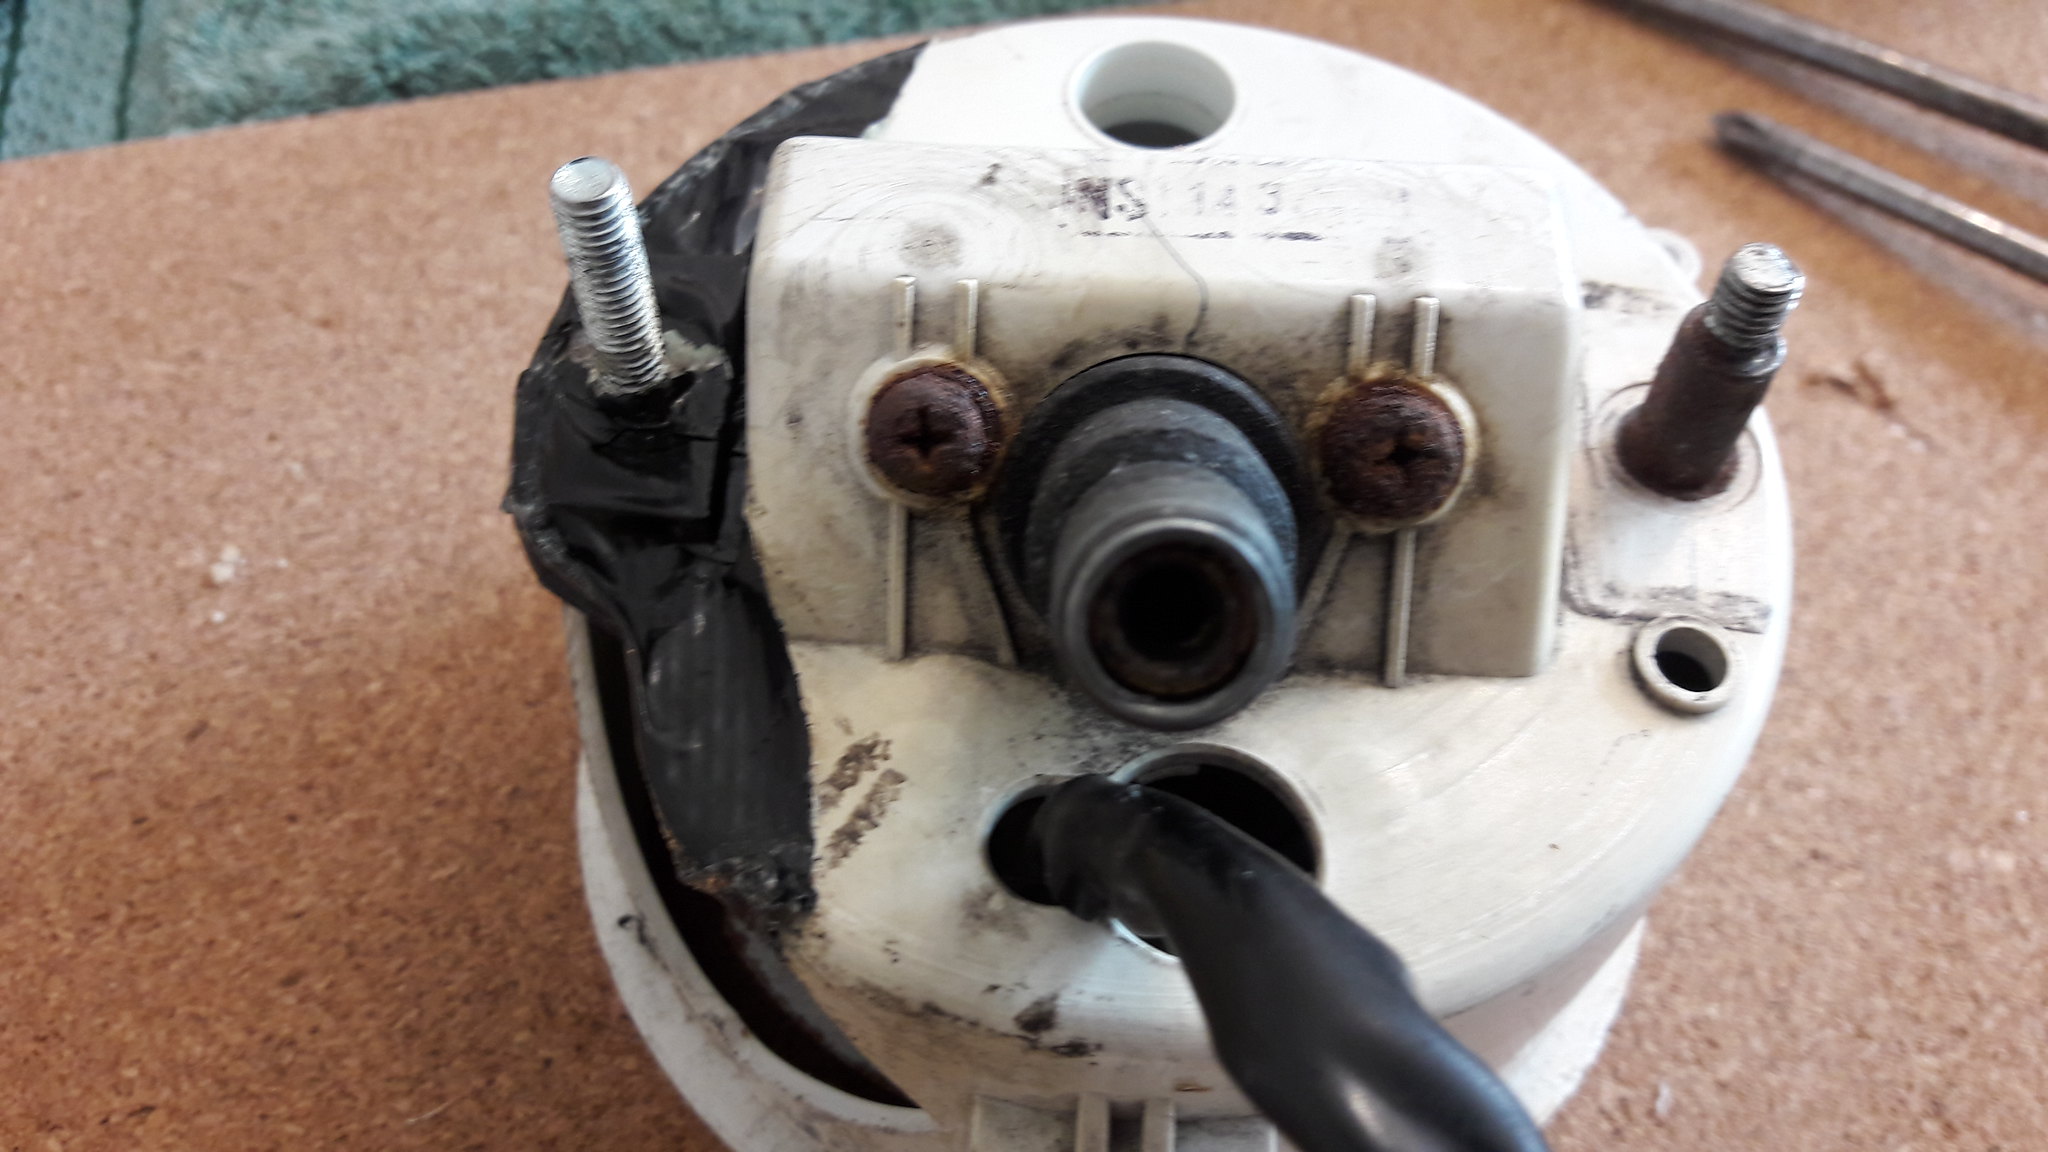 20180915_114611 20180915_114611 by David Miller, on Flickr This looks ominous, and it was ; 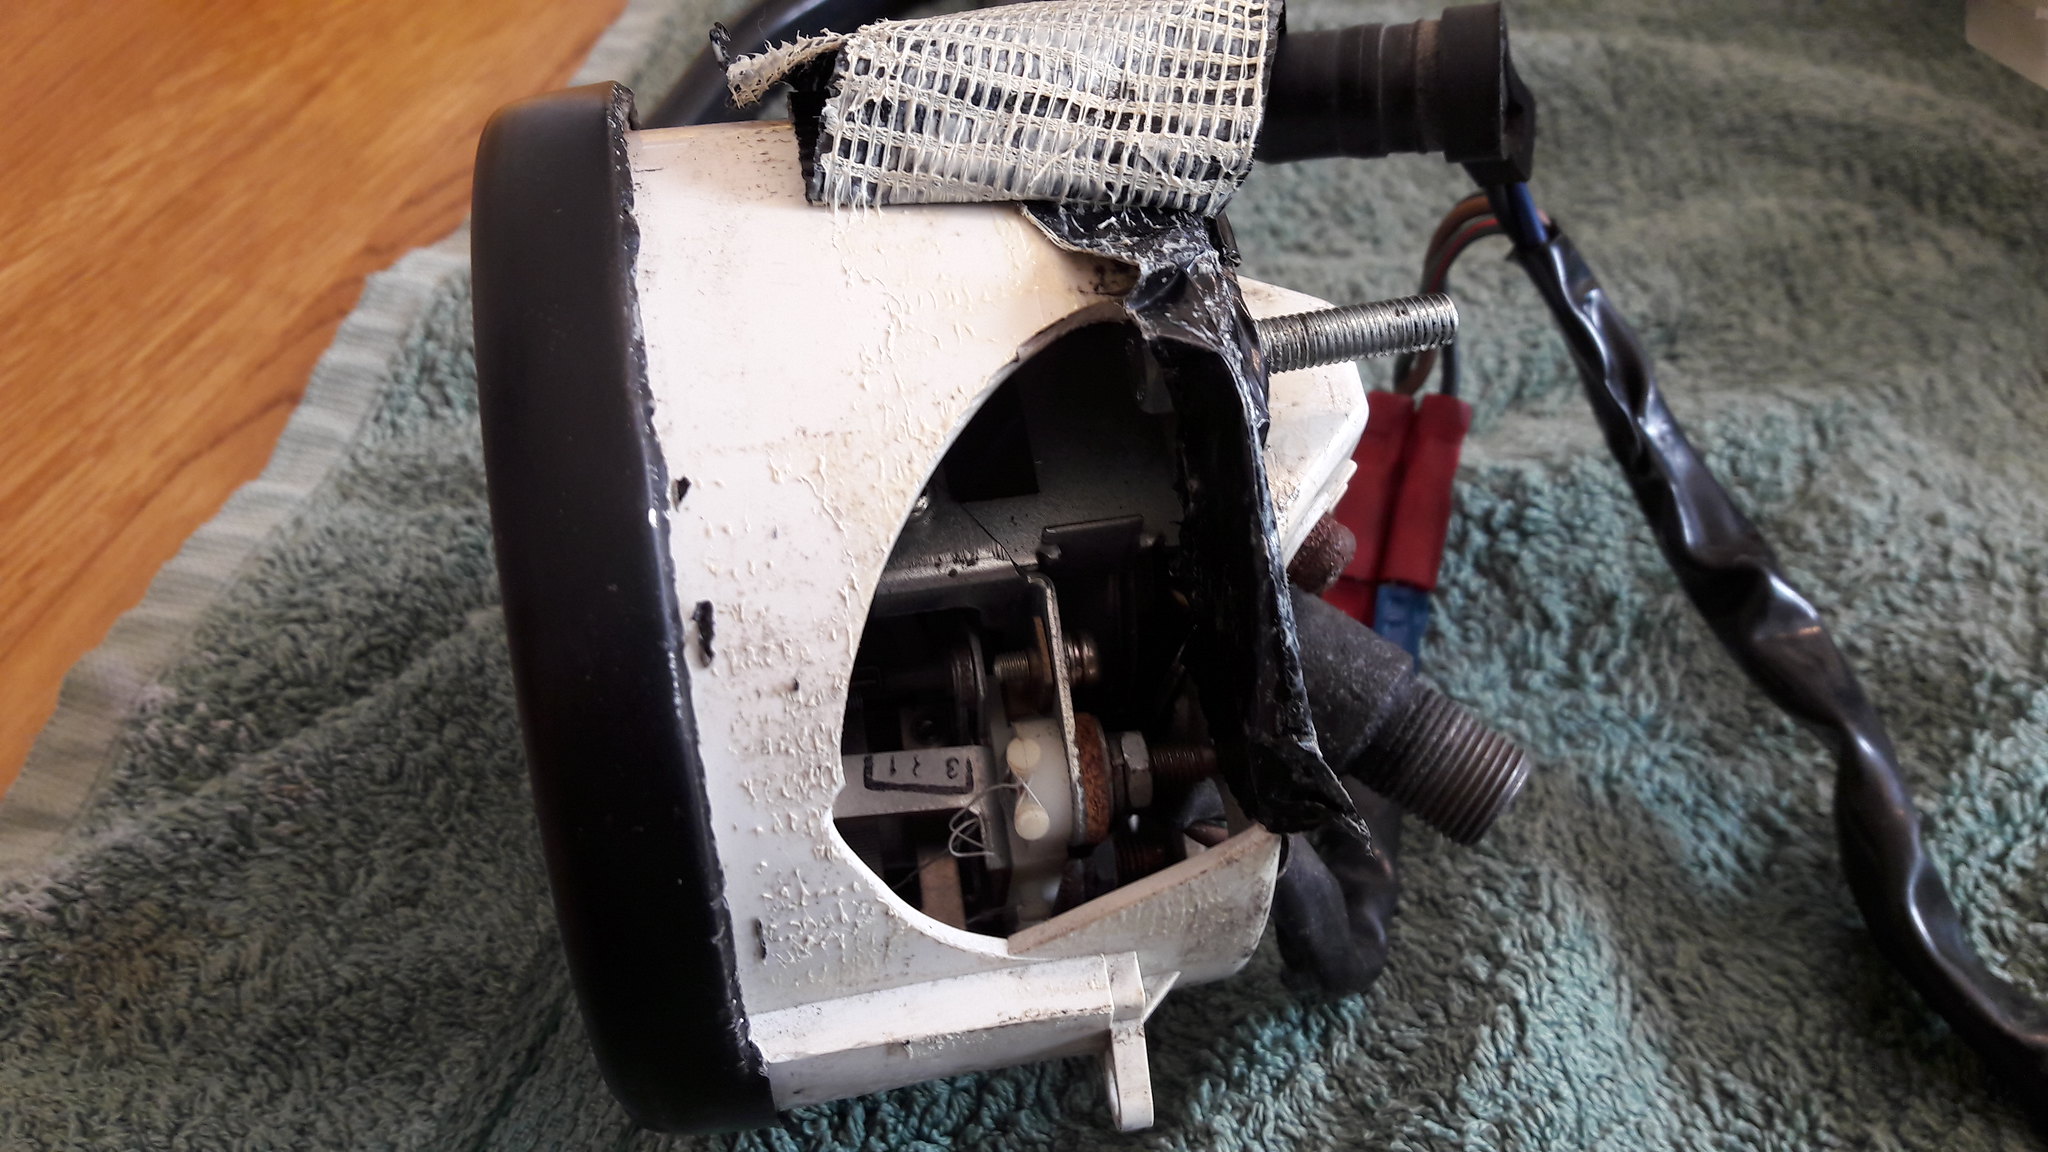 20180915_112755 20180915_112755 by David Miller, on Flickr Ouch ! Looks like I will be using more of the spare tacho than I thought. Anyway, here is the strip down process. Using a thin bladed screwdriver, prise back the crimped edge of the bezel - really small increments as it has a springy feel to it; 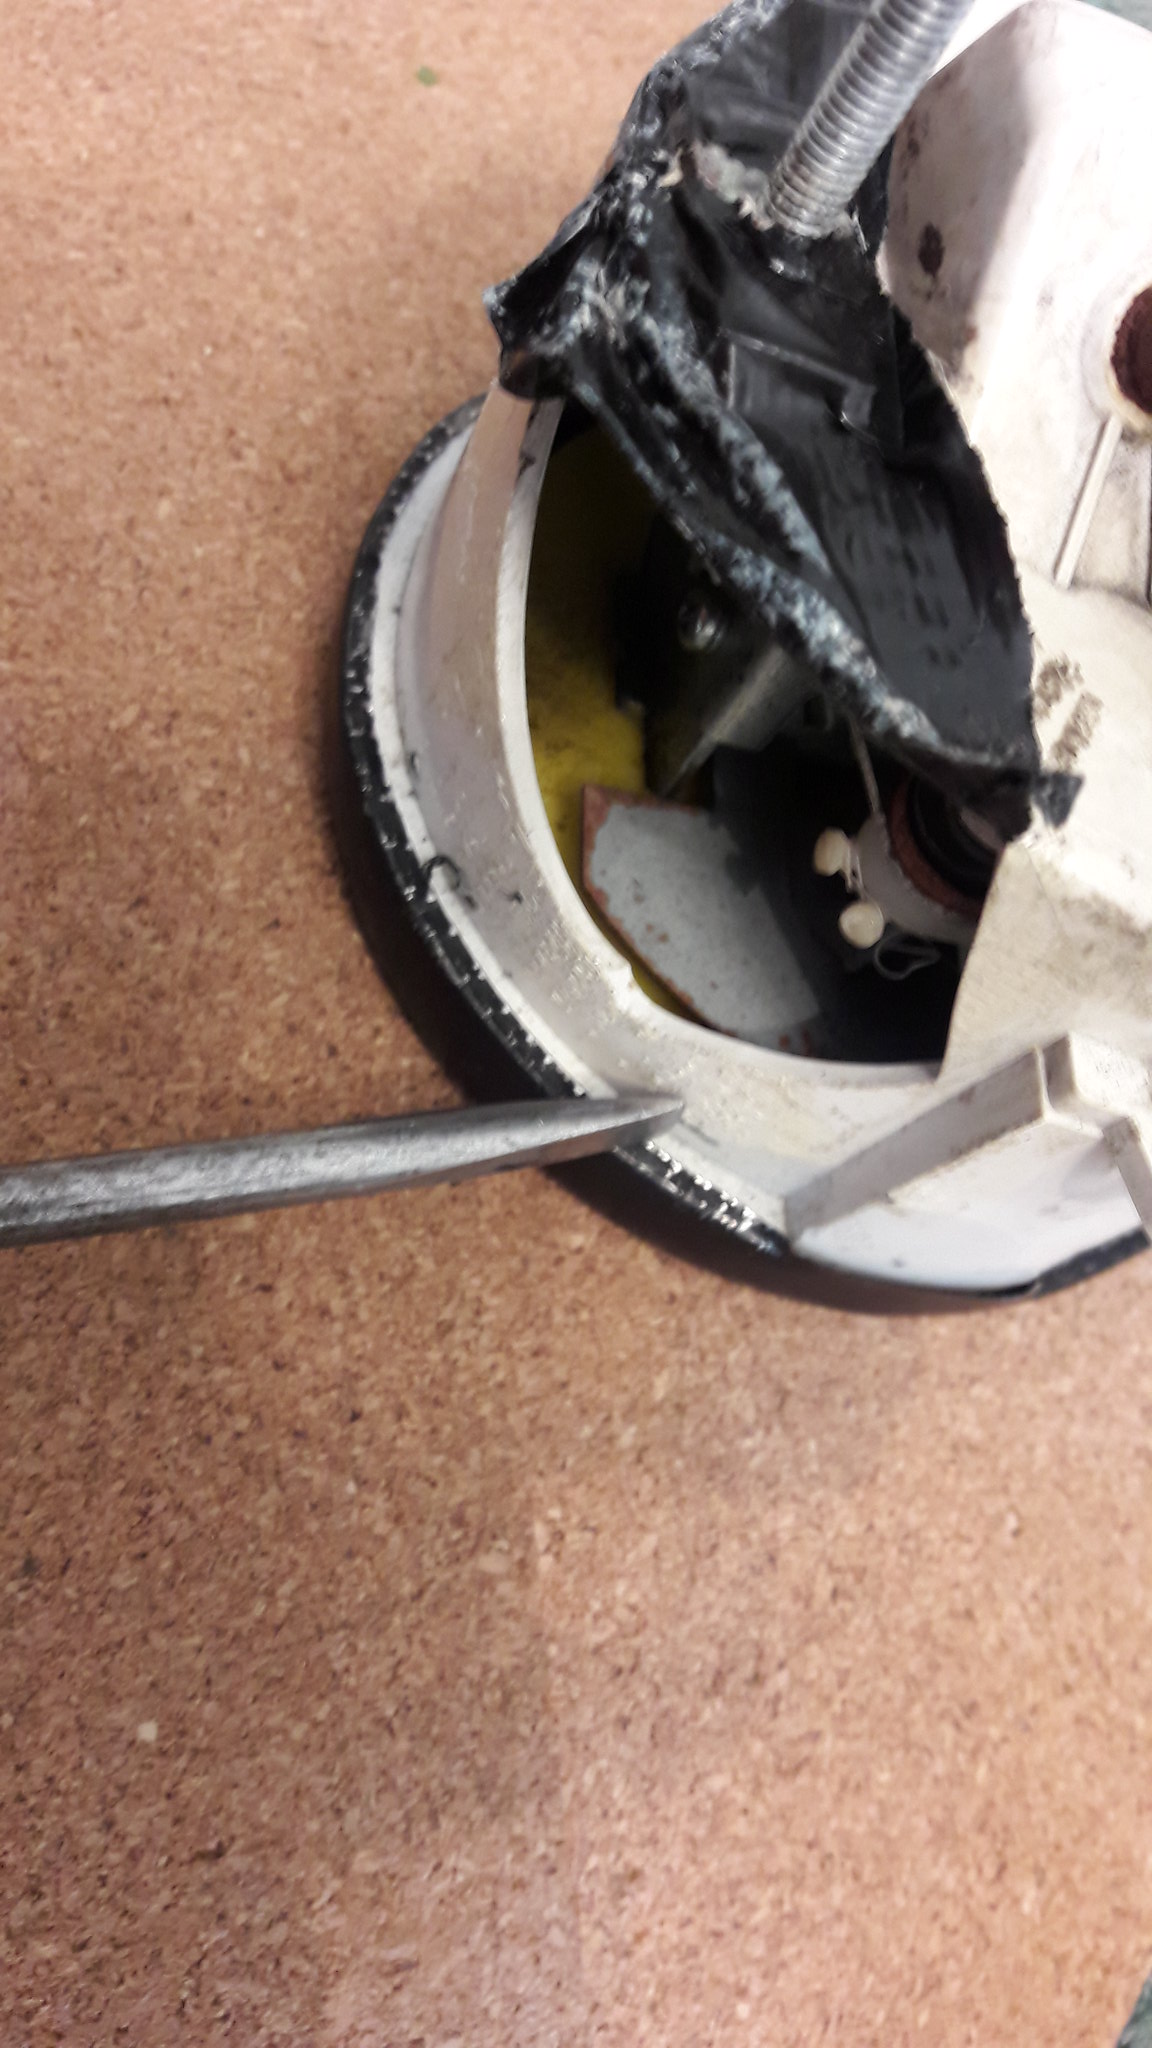 20180915_112855 20180915_112855 by David Miller, on Flickr  20180915_113120 20180915_113120 by David Miller, on Flickr Before removing the bezel, make a pencil mark on the rim and on the case so you line it up afterwards. Once the crimped edge is peeled back, you can pop the bezel off; 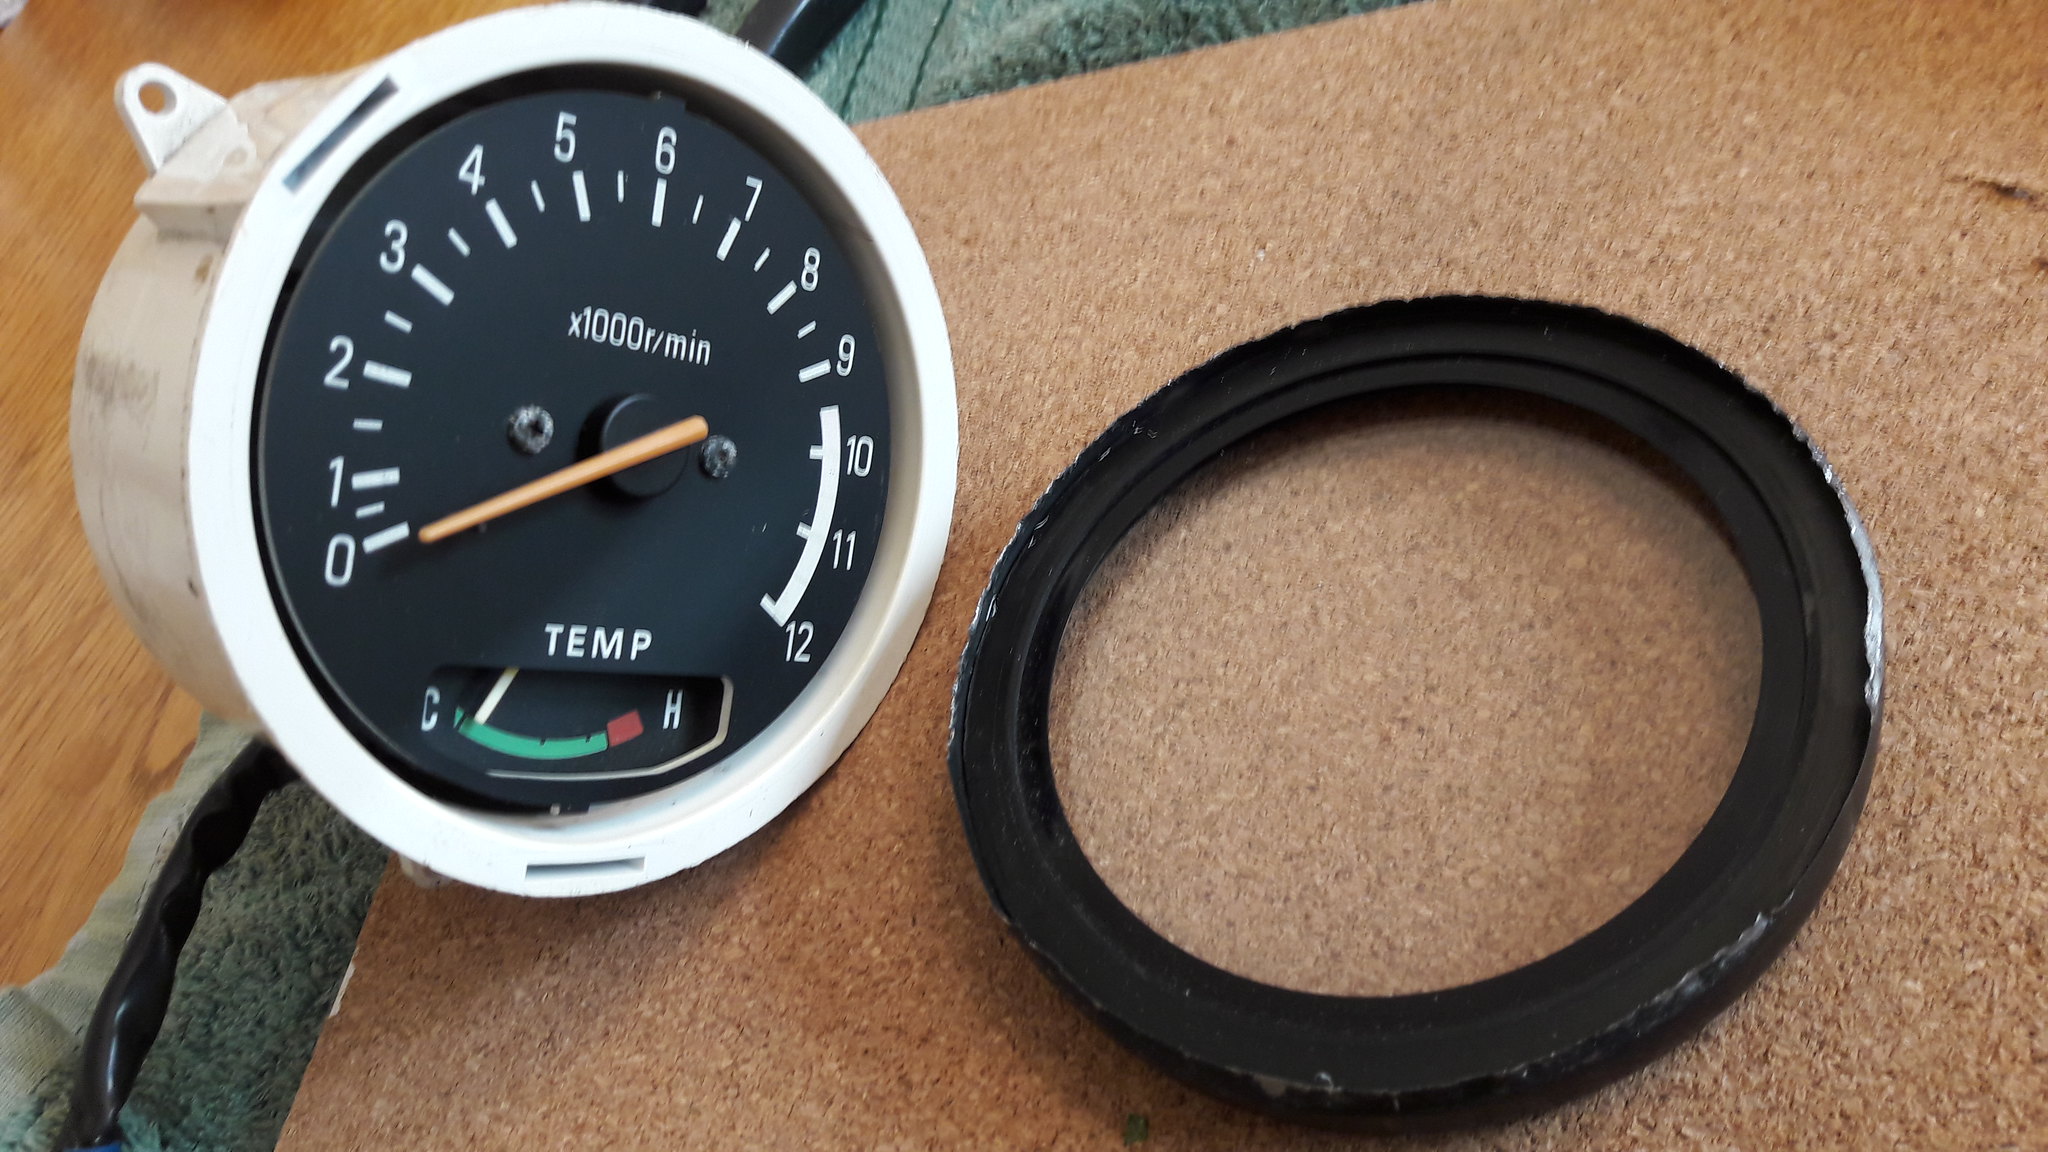 20180915_113523 20180915_113523 by David Miller, on Flickr The parts of the bezel, from the right, is rubber seal, plastic shroud, the glass itself with another rubber seal and the metal rim;  20180915_113607 20180915_113607 by David Miller, on Flickr Now is a good time to fold back the crimped part on the rim as it will be easier to fit back on afterwards For the speedo and tacho, the needles are under tension, and if you plan on removing them, you need to ease, carefully, the needle over it's stop, and then mark a line as to where it settles. This will mean that when you refit the needle, you put it back in the right place before easing it back over the stop. You can see 2 pencil lines - top one is where needle sits on the stop, and bottom is where it settles; 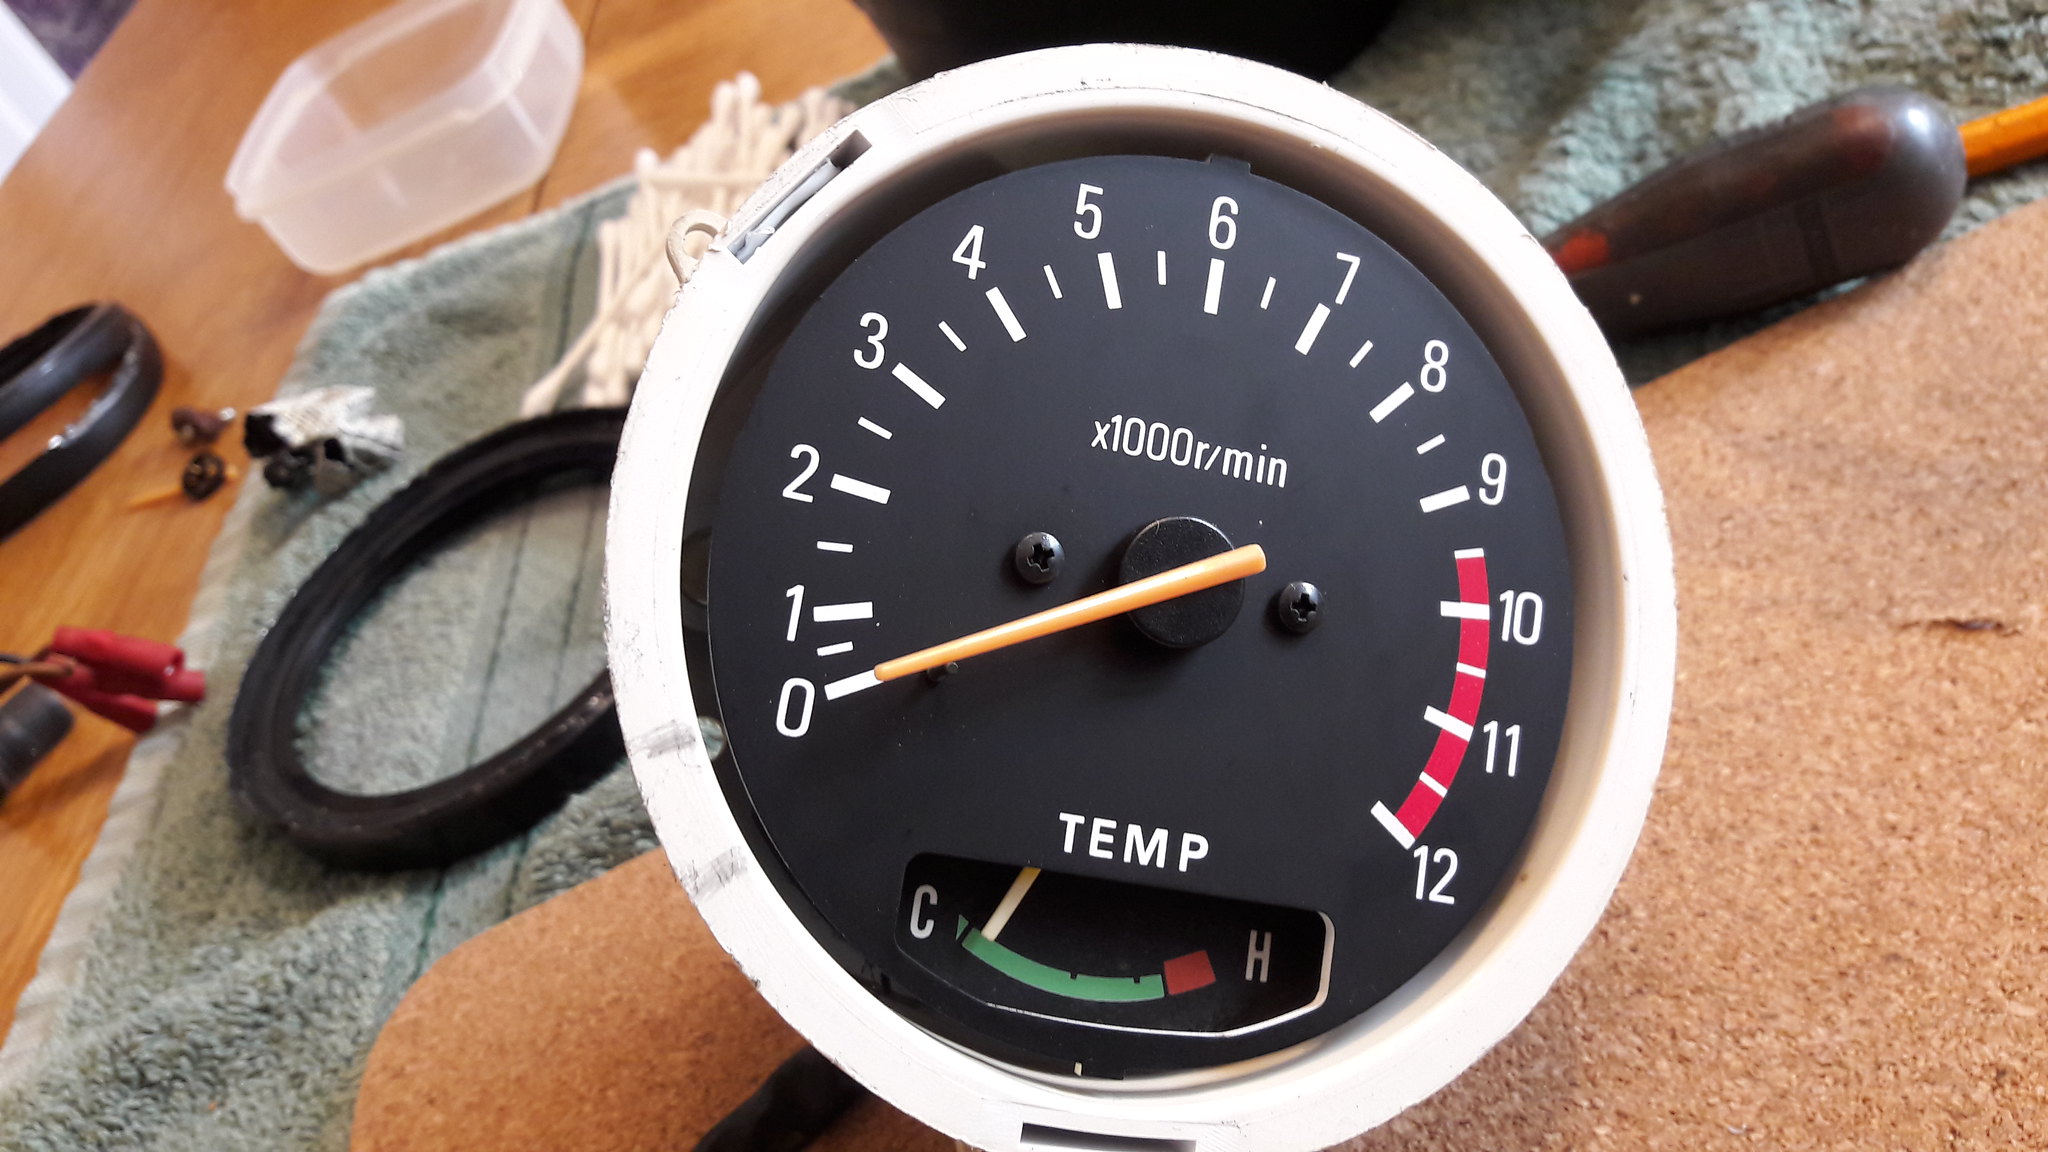 20180915_122207 20180915_122207 by David Miller, on Flickr The pics I'm adding are of both tachos being stripped together, so the pics show both. Getting the needles off is tricky - they are fragile. I gently lever mine with a fork as you can get 2 prongs underneath it, but be mindfull they will ping off across the room. Placing them in a plastic bag as you do it means it cant fly off and snap on landing ! Then the 2 small screws on the face, and you can remove the dial; 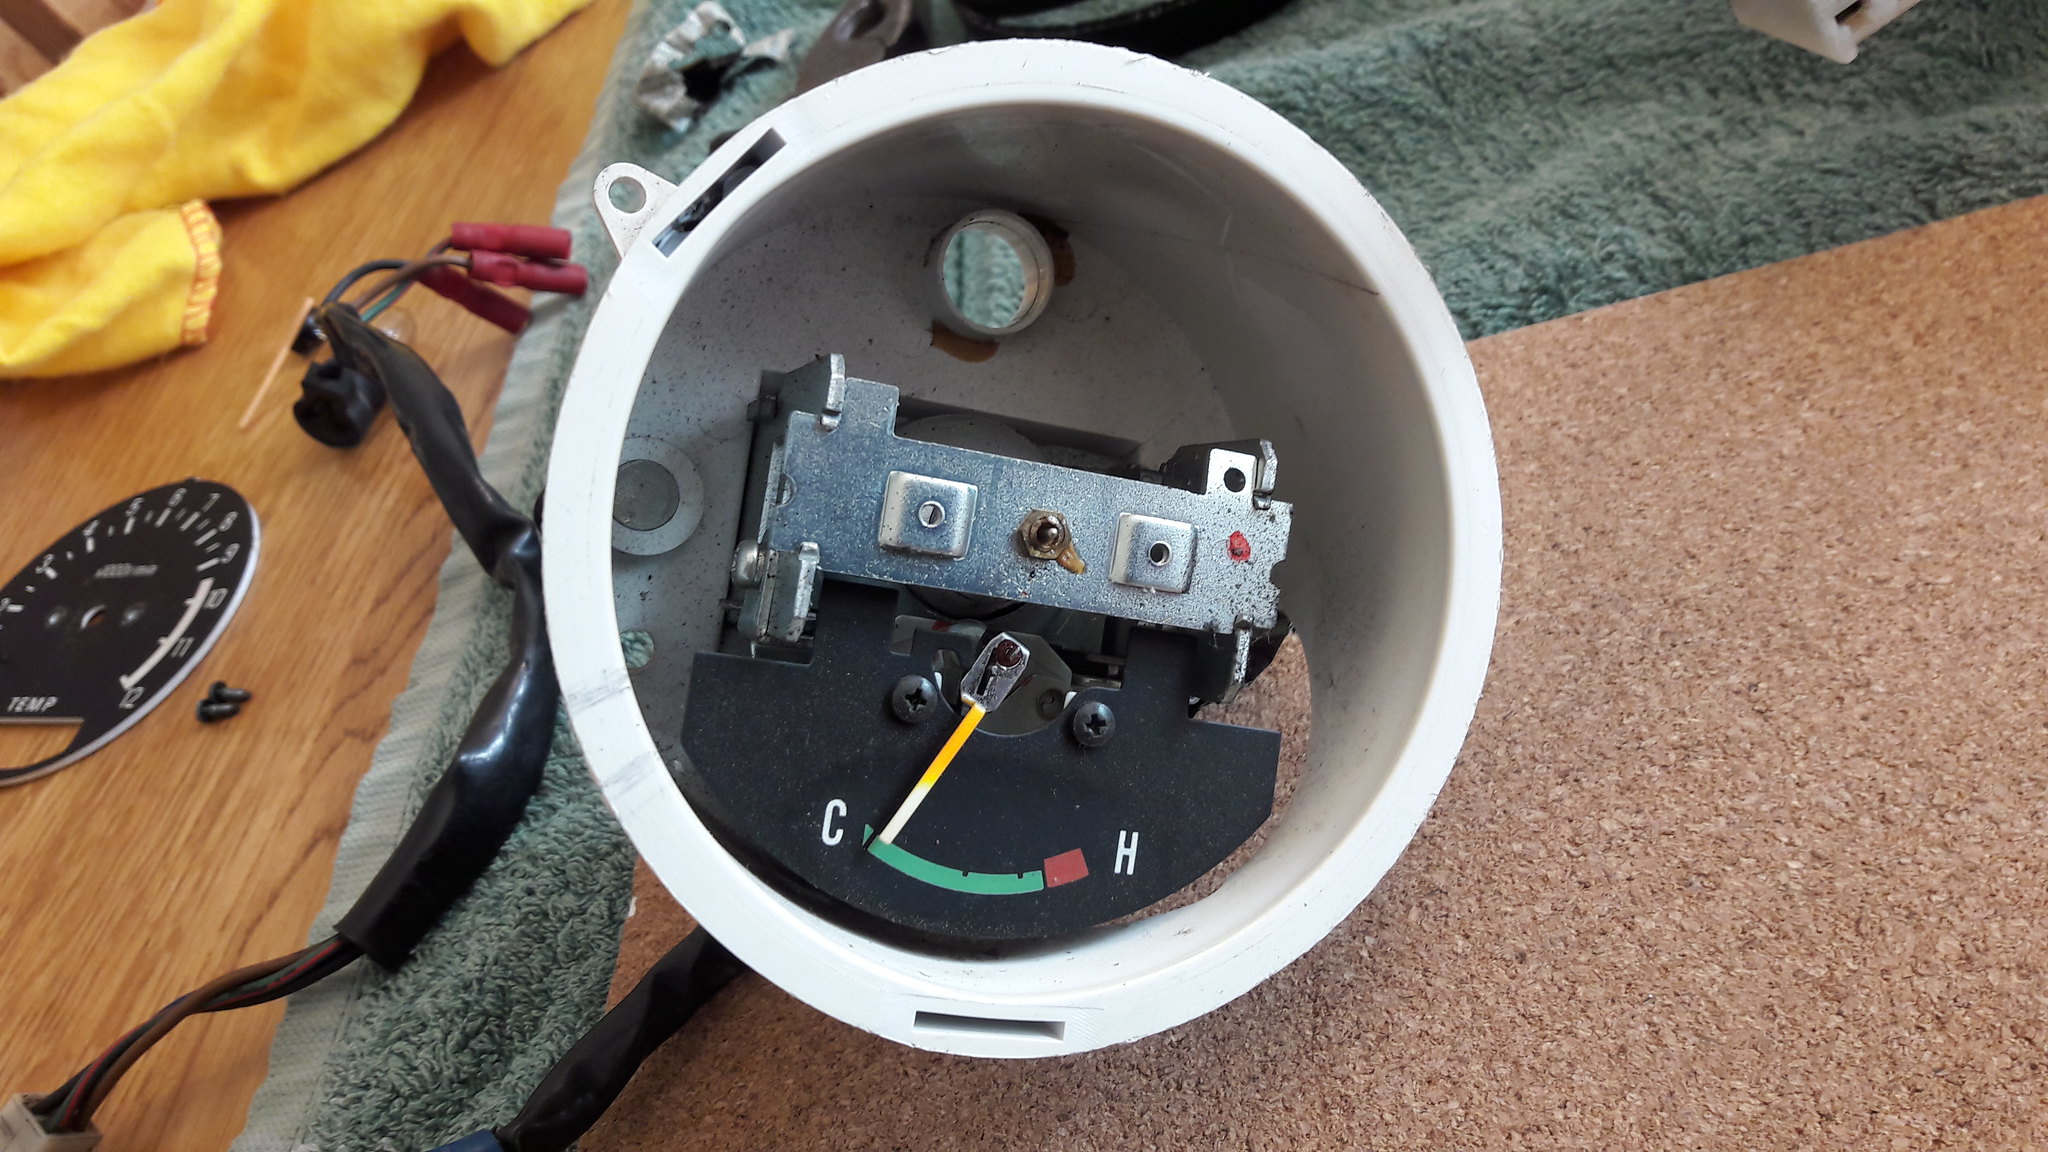 20180915_114604 20180915_114604 by David Miller, on Flickr 2 screws on the back of the case hold the mechanism in, so undo tyhose and; 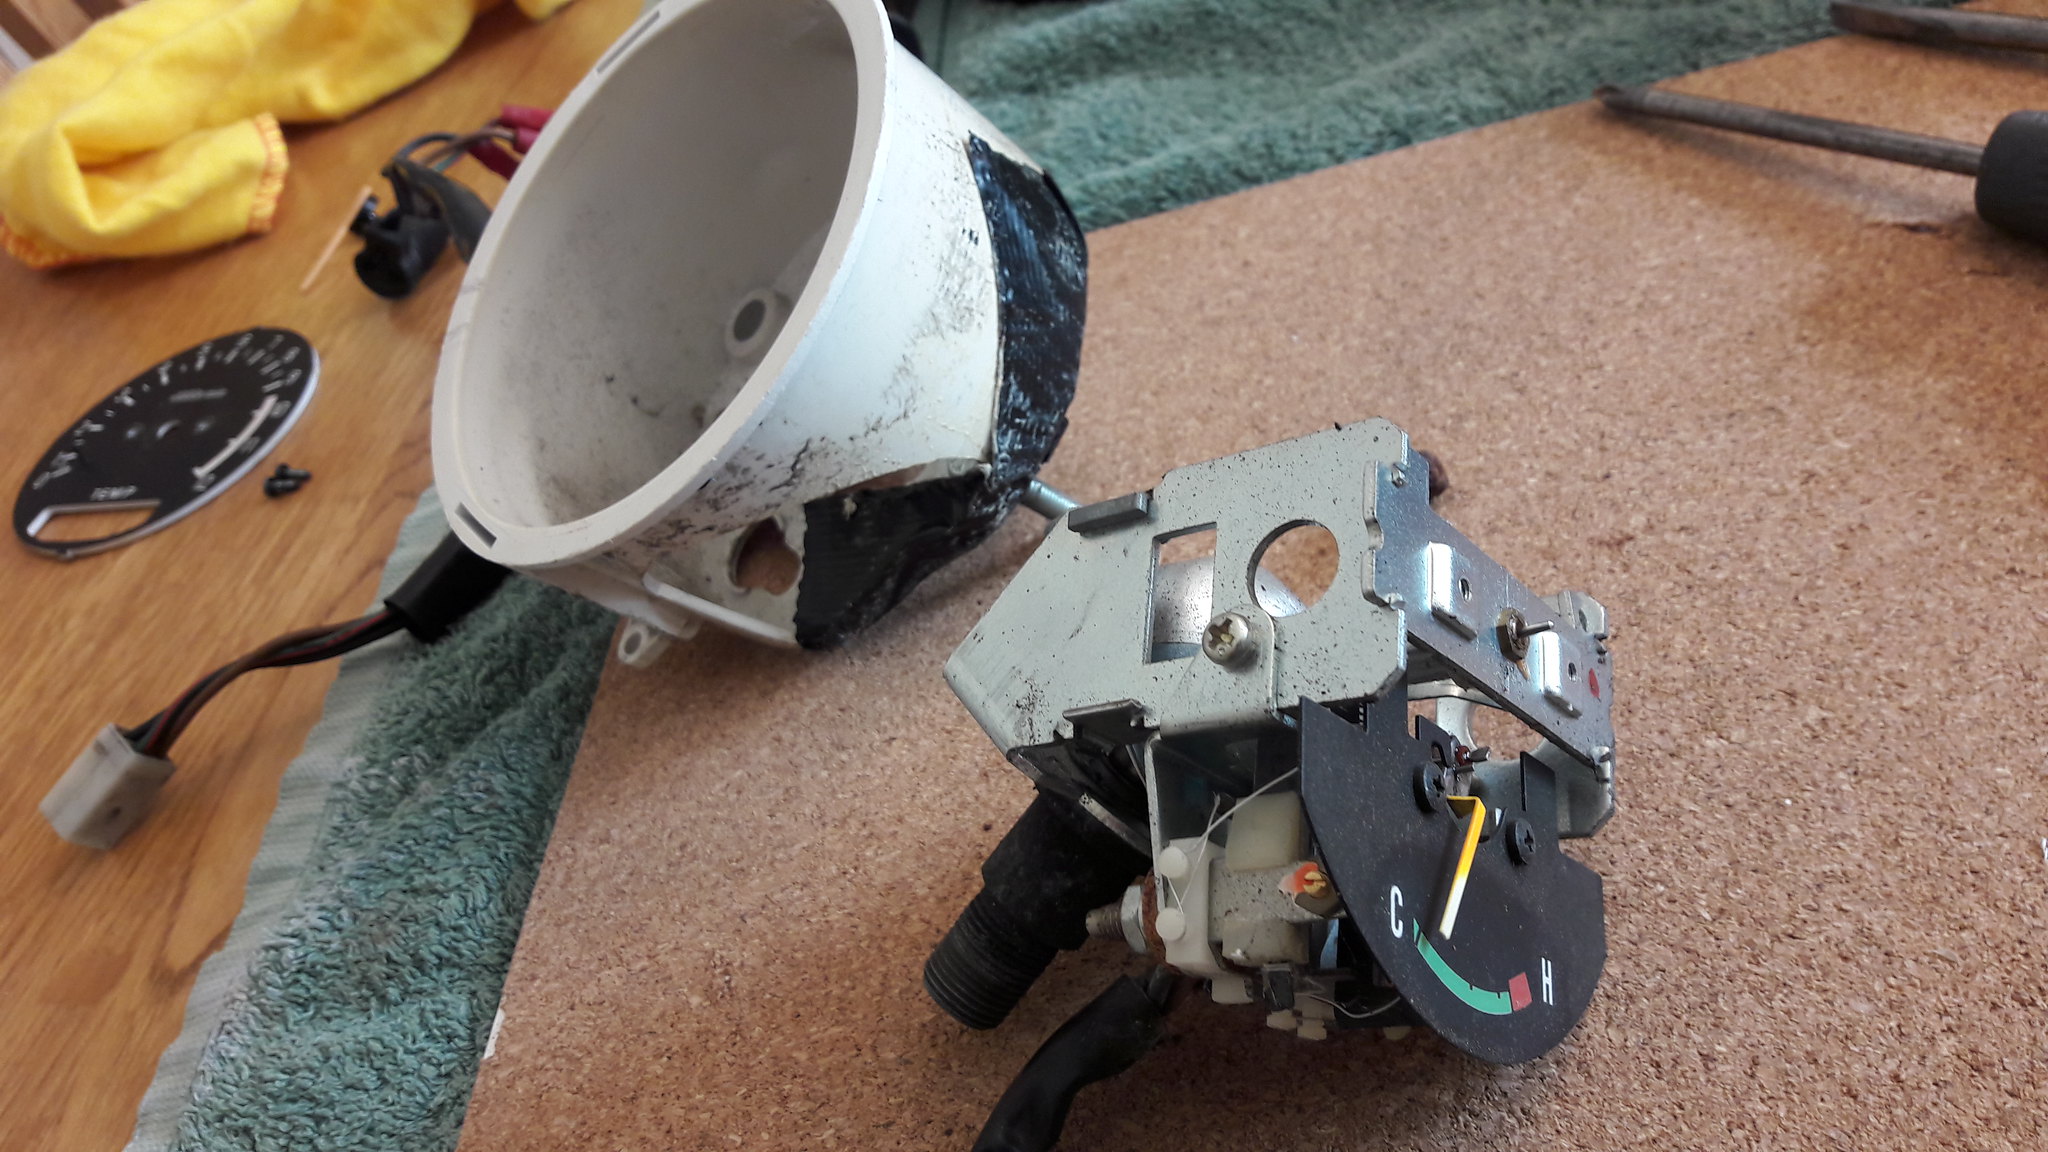 20180915_114737 20180915_114737 by David Miller, on Flickr My spare tach had a good case and dial, but no temp mechanism fitted' so I decided the best thing to do was fit the temp gauge from the broken case to my spare tach; 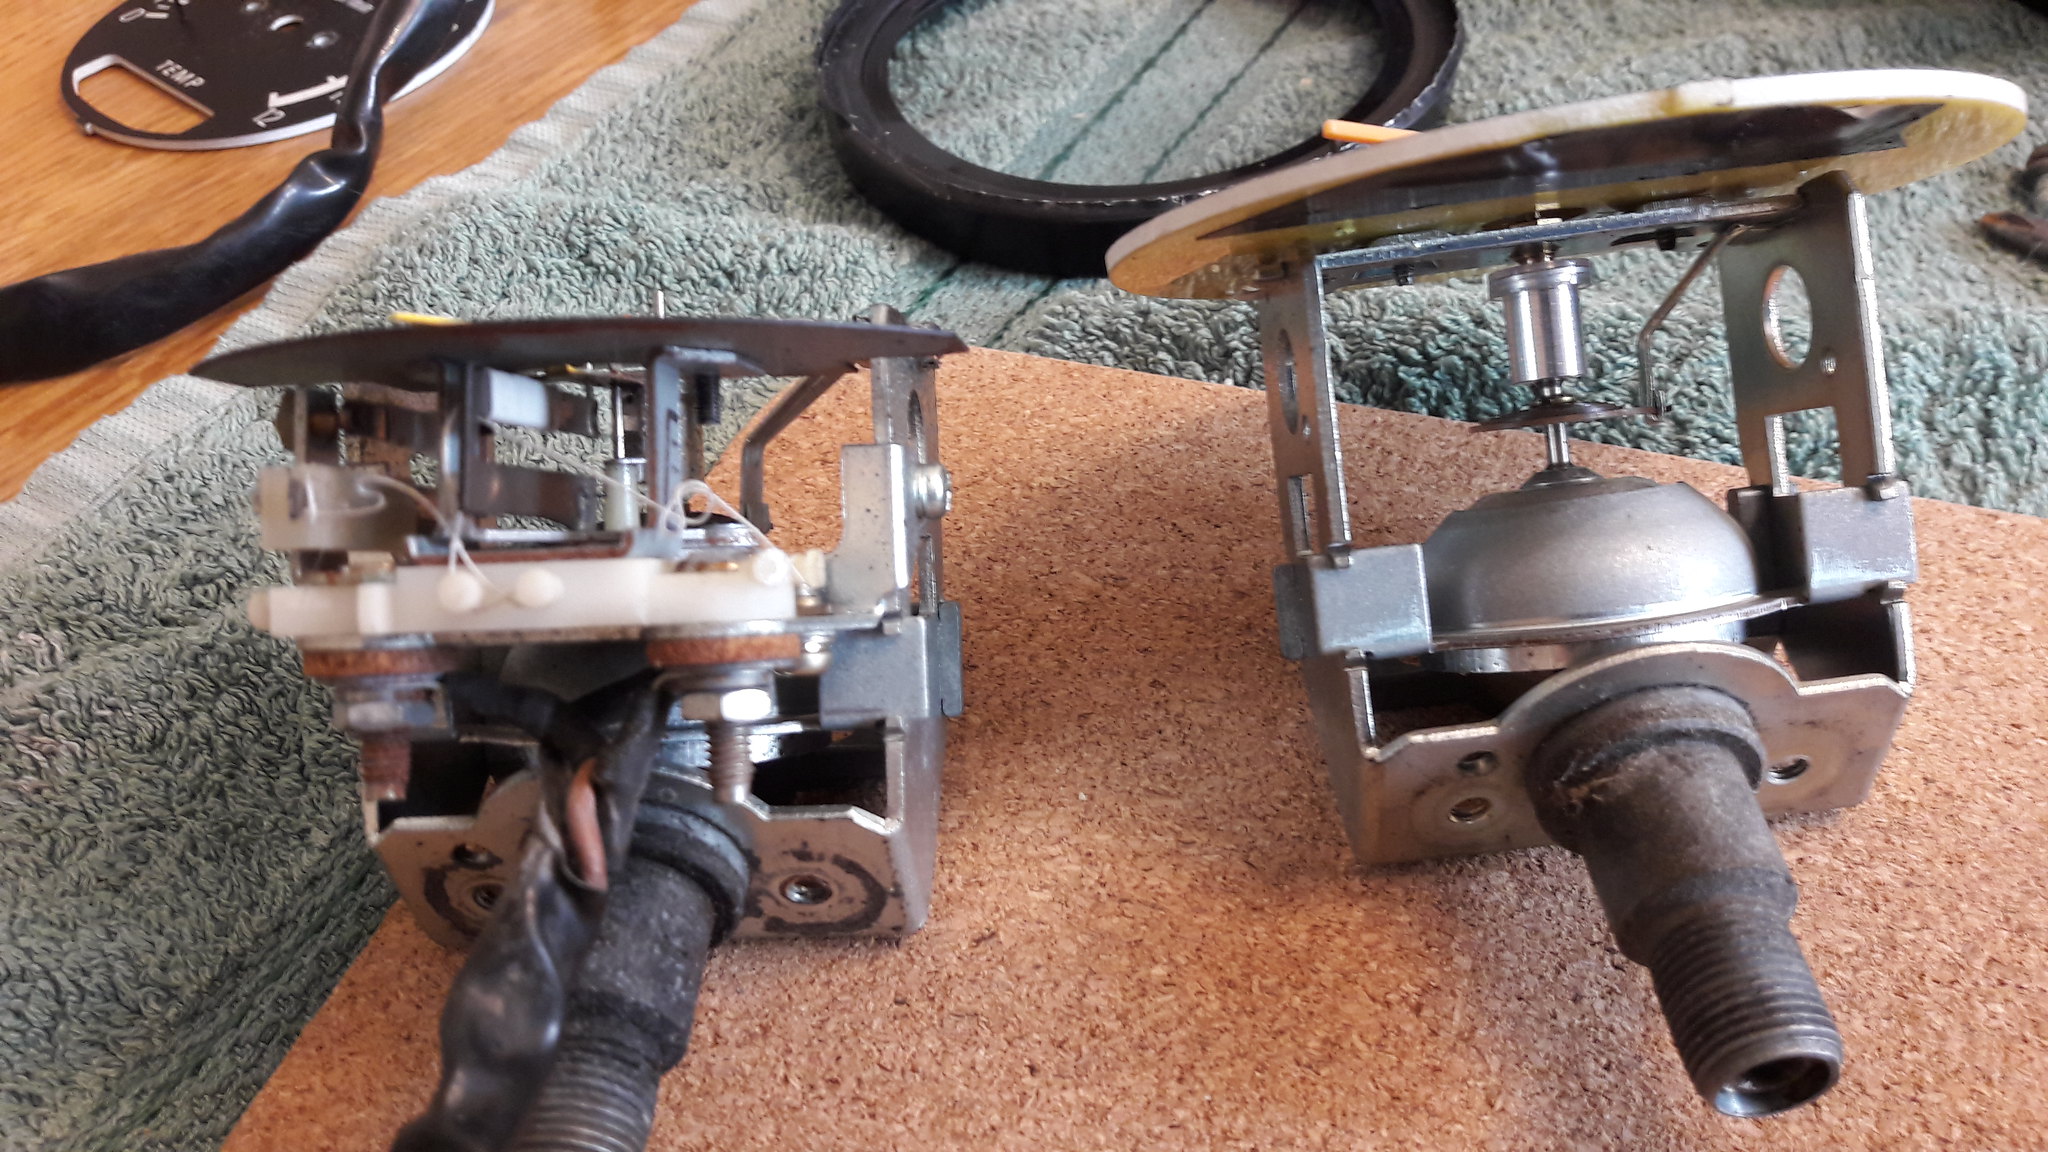 20180915_121530 20180915_121530 by David Miller, on Flickr 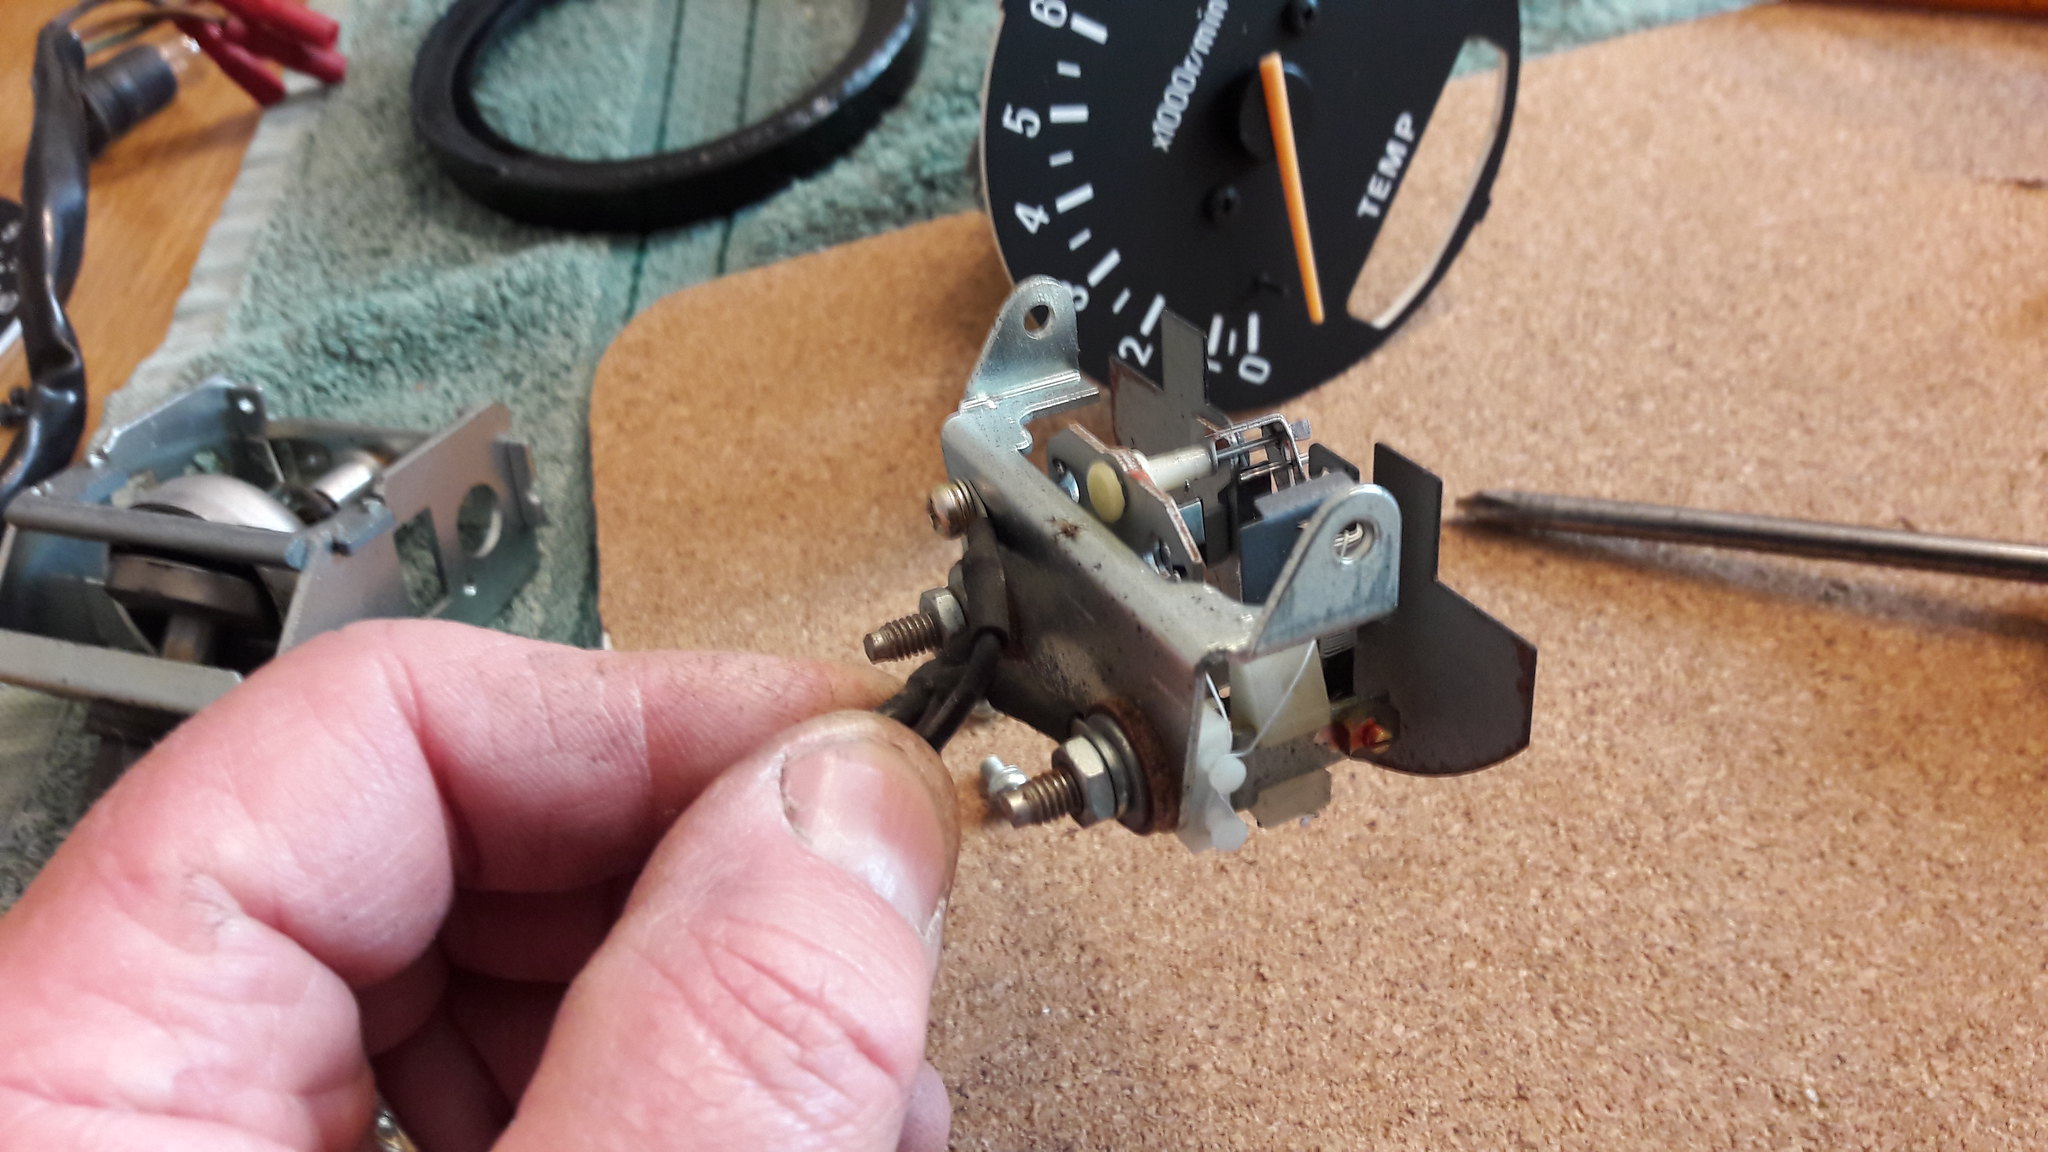 20180915_121642 20180915_121642 by David Miller, on Flickr This had the advantage of not having to remove the needle from the tacho - I just undid the screws on the back of the case, removed the whole assembly, fitted the temp mechanism, and bolted it back in, after cleaning the dials with cotton buds and water - pretty grubby they were too. Glass gets a good clean in and out, then reassemble. To crimp the bezel back on, I use some pliers with tape on one face, to protect the bezel, and then "crimp" the edge back to the casing; 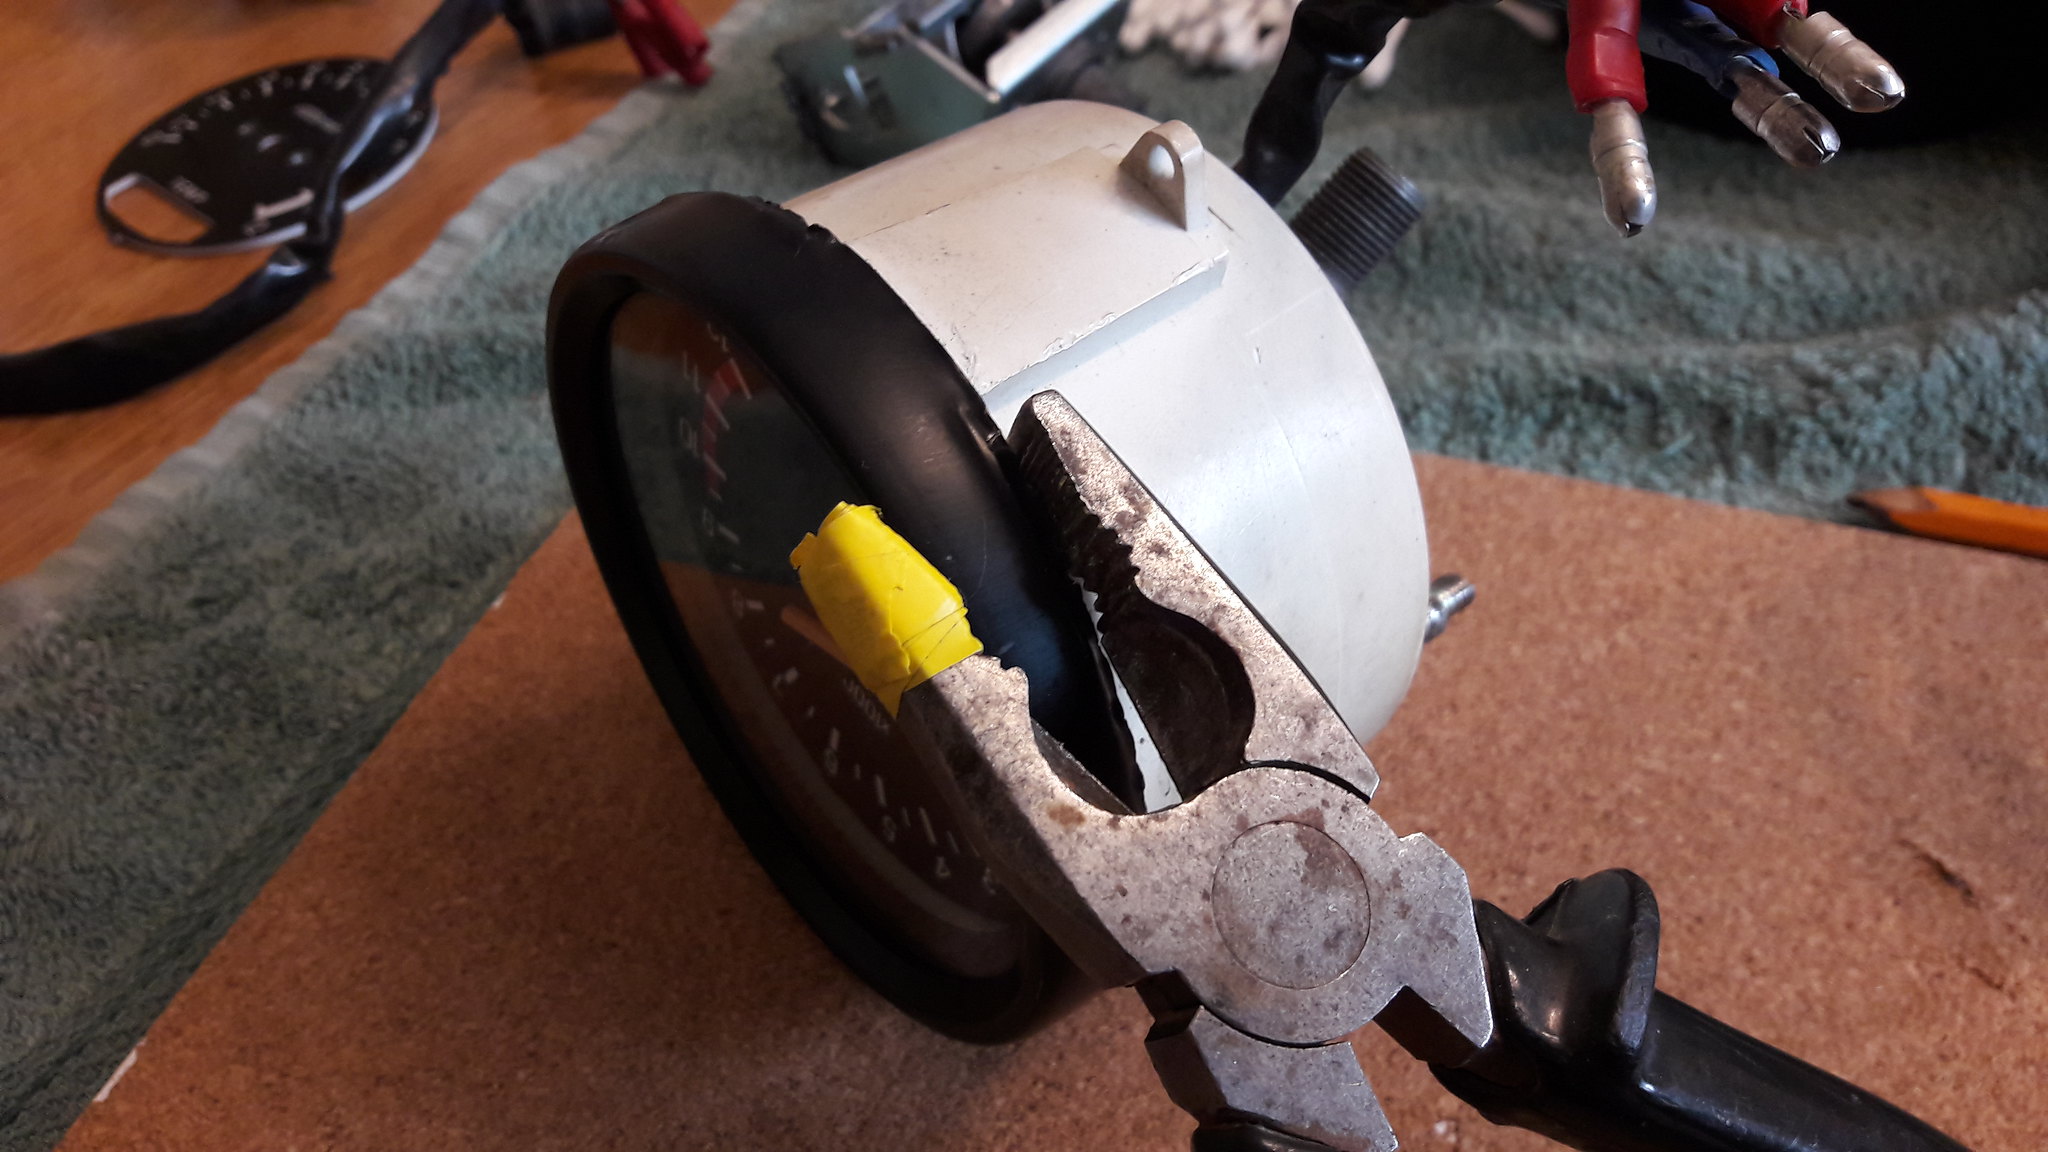 20180915_123344 20180915_123344 by David Miller, on Flickr The speedo just needed cleaning. Same process to remove the bezel, although this one was pretty bashed about; 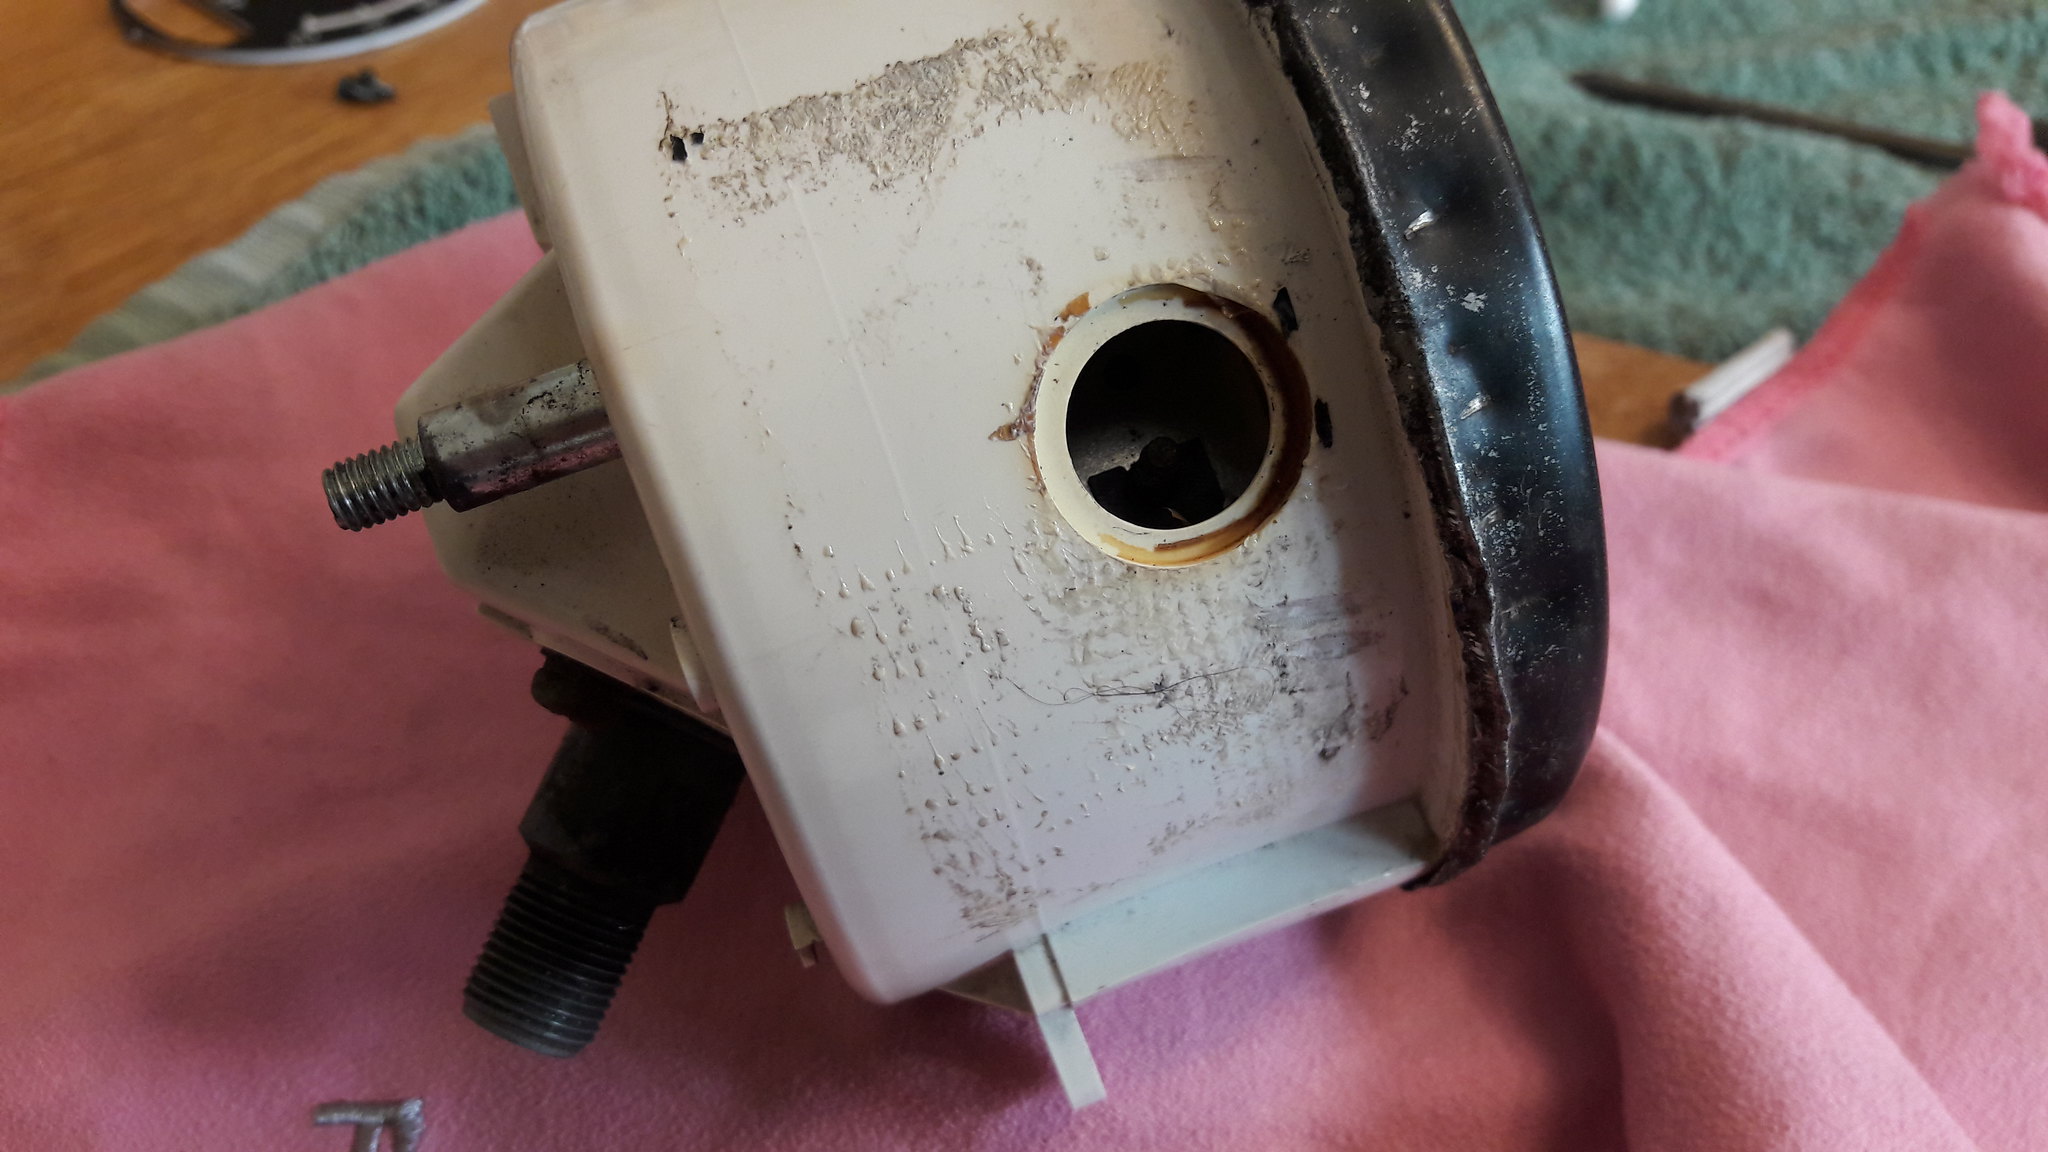 20180915_125807 20180915_125807 by David Miller, on Flickr Obviously been apart before, and you can see where the tape was covering the trip knob hole. There should be a rubber grommet in there too. So, once apart, I cleaned the glass but fitted it back into the now spare bezel from the tacho which was in better condition. Also found a grommet from an Autojumble - I always buy some as spares, that fitted nicely; 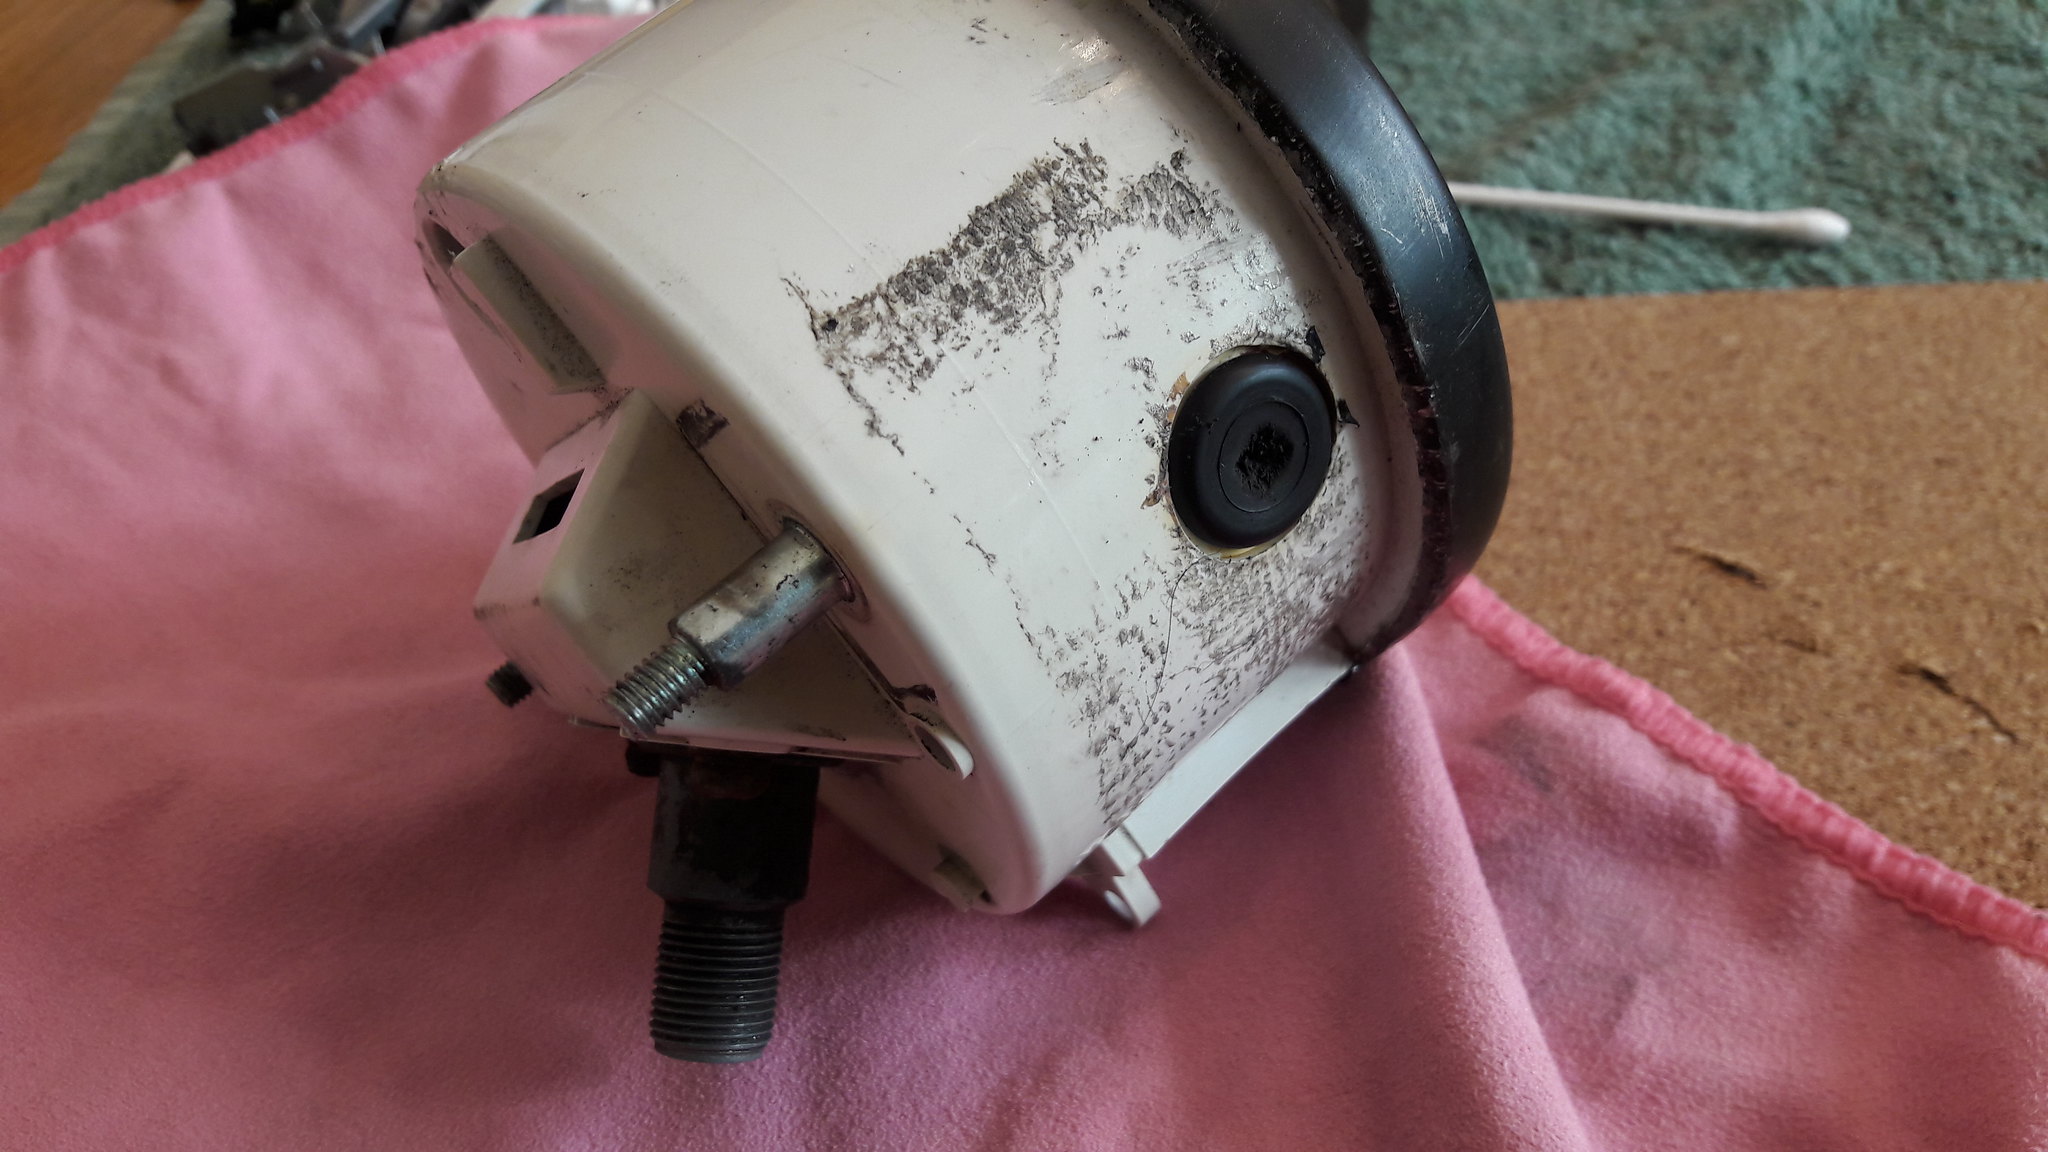 20180915_132628 20180915_132628 by David Miller, on Flickr Made a hole in the middle for a trip knob, which I now have thanks to Alex dropping off a spare. So all cleaned up, and put back together, hopefully a better functioning clock set; 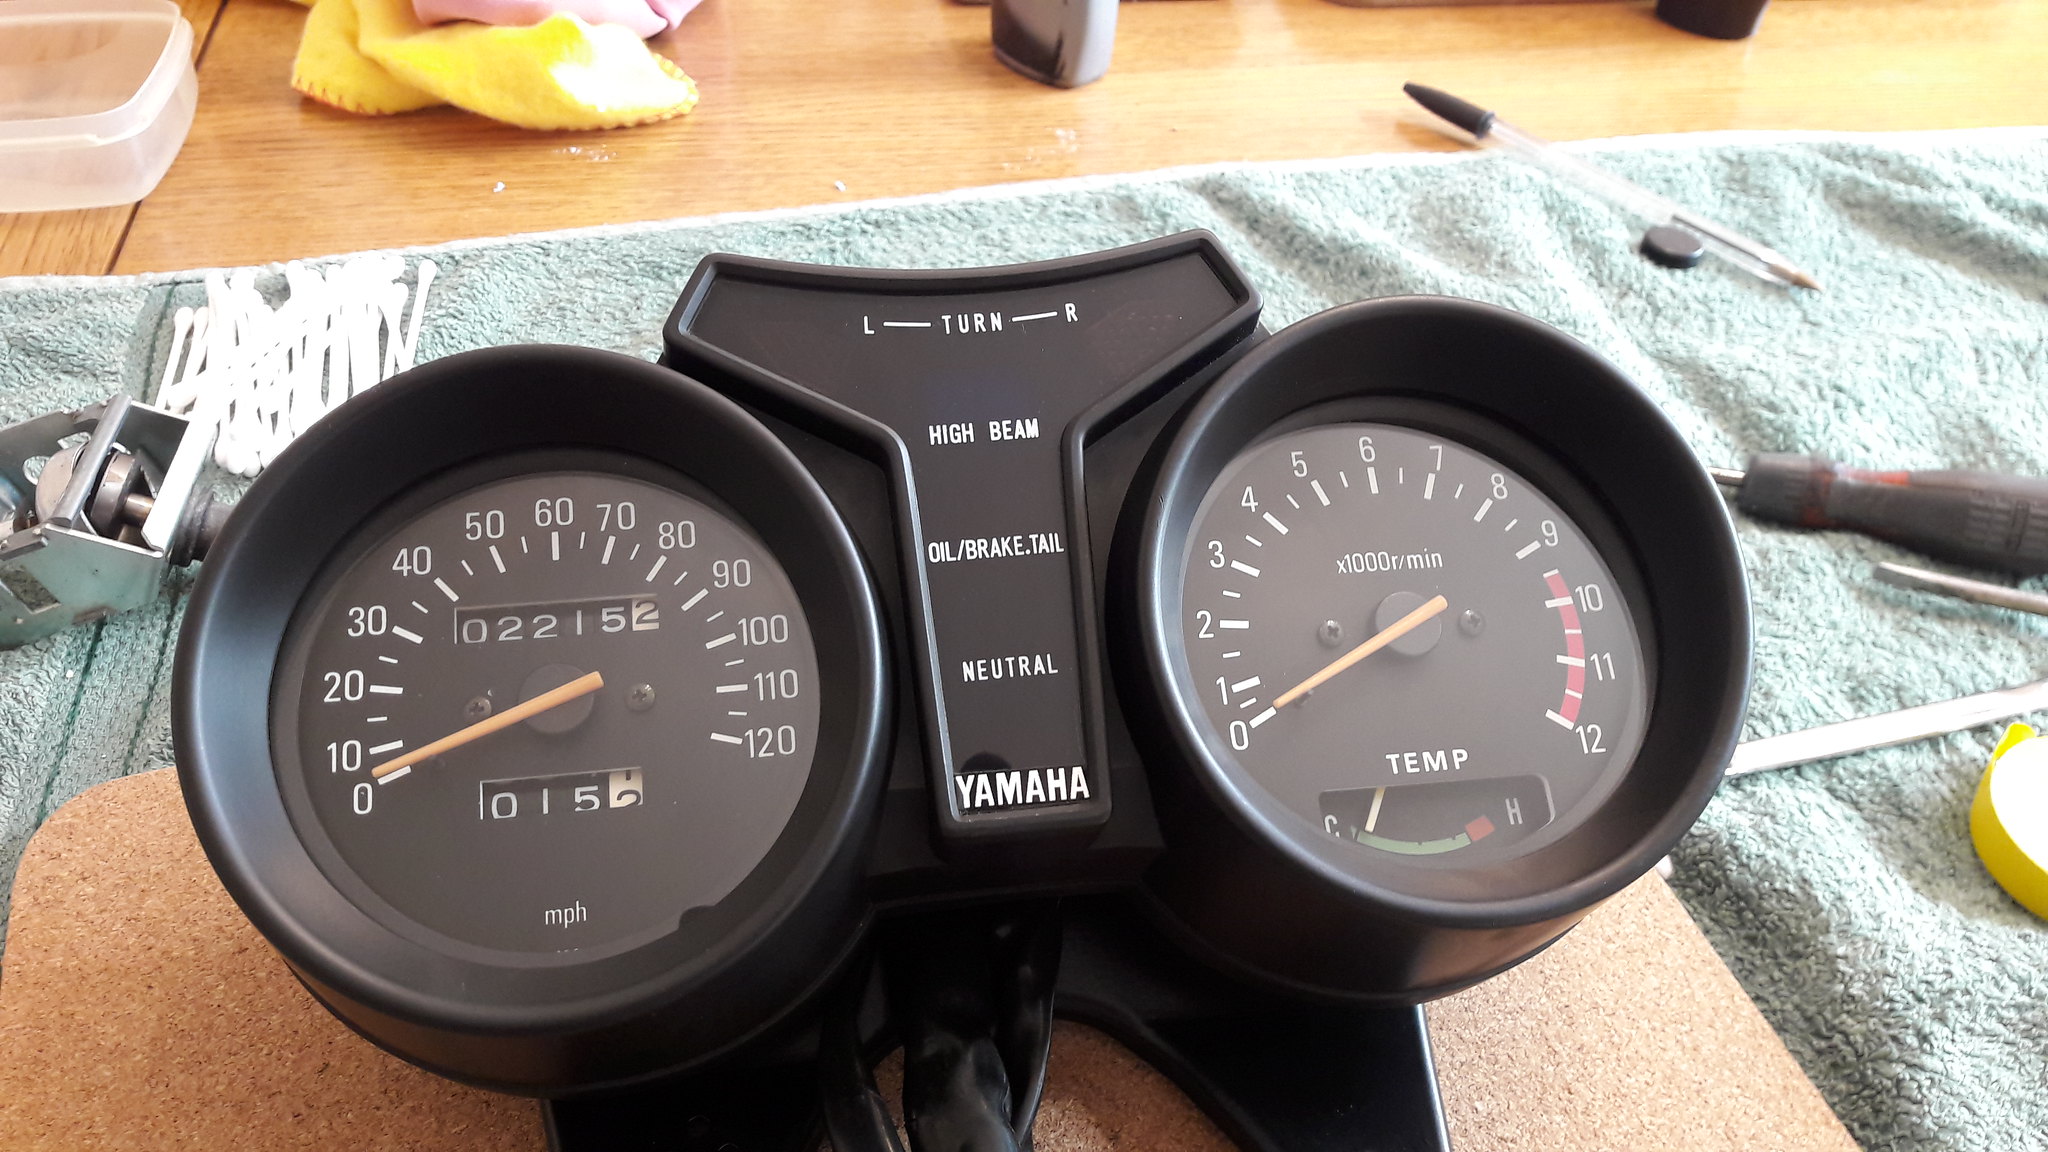 20180915_134425 20180915_134425 by David Miller, on Flickr Forgot to add, check all your bulbs are ok if they are untested whilst the cases are apart. I also gave the cases a polish up with some liquid black polish - easier to do without the clocks fitted. Hope that helps anyone looking to overhaul their speedo and tacho. Just take your time and it's a fairly easy job. Dusty |
|
|
|
Post by donkeychomp on Sept 15, 2018 22:09:51 GMT 1
Glad that old speedo helped. And I have your template Dusty. I will copy it and bring it back over!
Alex
|
|
|
|
Post by dusty350 on Sept 15, 2018 22:41:45 GMT 1
Cheers for the speedo. Cant seem to get the trip knob out though so may have to dismantle it so I can grip the trip knob shaft with some long nose pliers. It may be easier just to buy one off Norbo as it seems a shame to pull that speedo apart. Do you know what bike it's off ? And don't worry about the template - I have a drawing so can knock one up anytime Dusty |
|
|
|
Post by donkeychomp on Sept 15, 2018 23:59:03 GMT 1
Mate just rip it apart. Was from my old ZXR400 H1. I have another one as well both are not needed. I think it's held on by a tiny phillips grub screw but could be wrong (usually am lol).
Alex
|
|
|
|
Post by mouse on Sept 16, 2018 8:47:22 GMT 1
Beautiful job on the clocks Dusty
Mouse
|
|
|
|
Post by dusty350 on Sept 17, 2018 19:24:06 GMT 1
Thanks mate. It was worth the effort as they look a lot better now. I just need to get a trip knob from Norbo to finish them. Alex kindly gave me a kwak speedo but the trip knob wont fit unfortunately. No problem as I can fit a Yam one easily enough. Just waiting on the swingarm now and then I can move the rolling chassis up to the garage for easier winter fettling. Next job is to clean and fit the loom Dusty |
|
|
|
Post by donkeychomp on Sept 17, 2018 22:57:05 GMT 1
I have other speedos. Have you ordered the knob yet?
Alex
|
|
|
|
Post by dusty350 on Sept 21, 2018 19:54:42 GMT 1
Fitted the 2 new horns to the bracket I made; 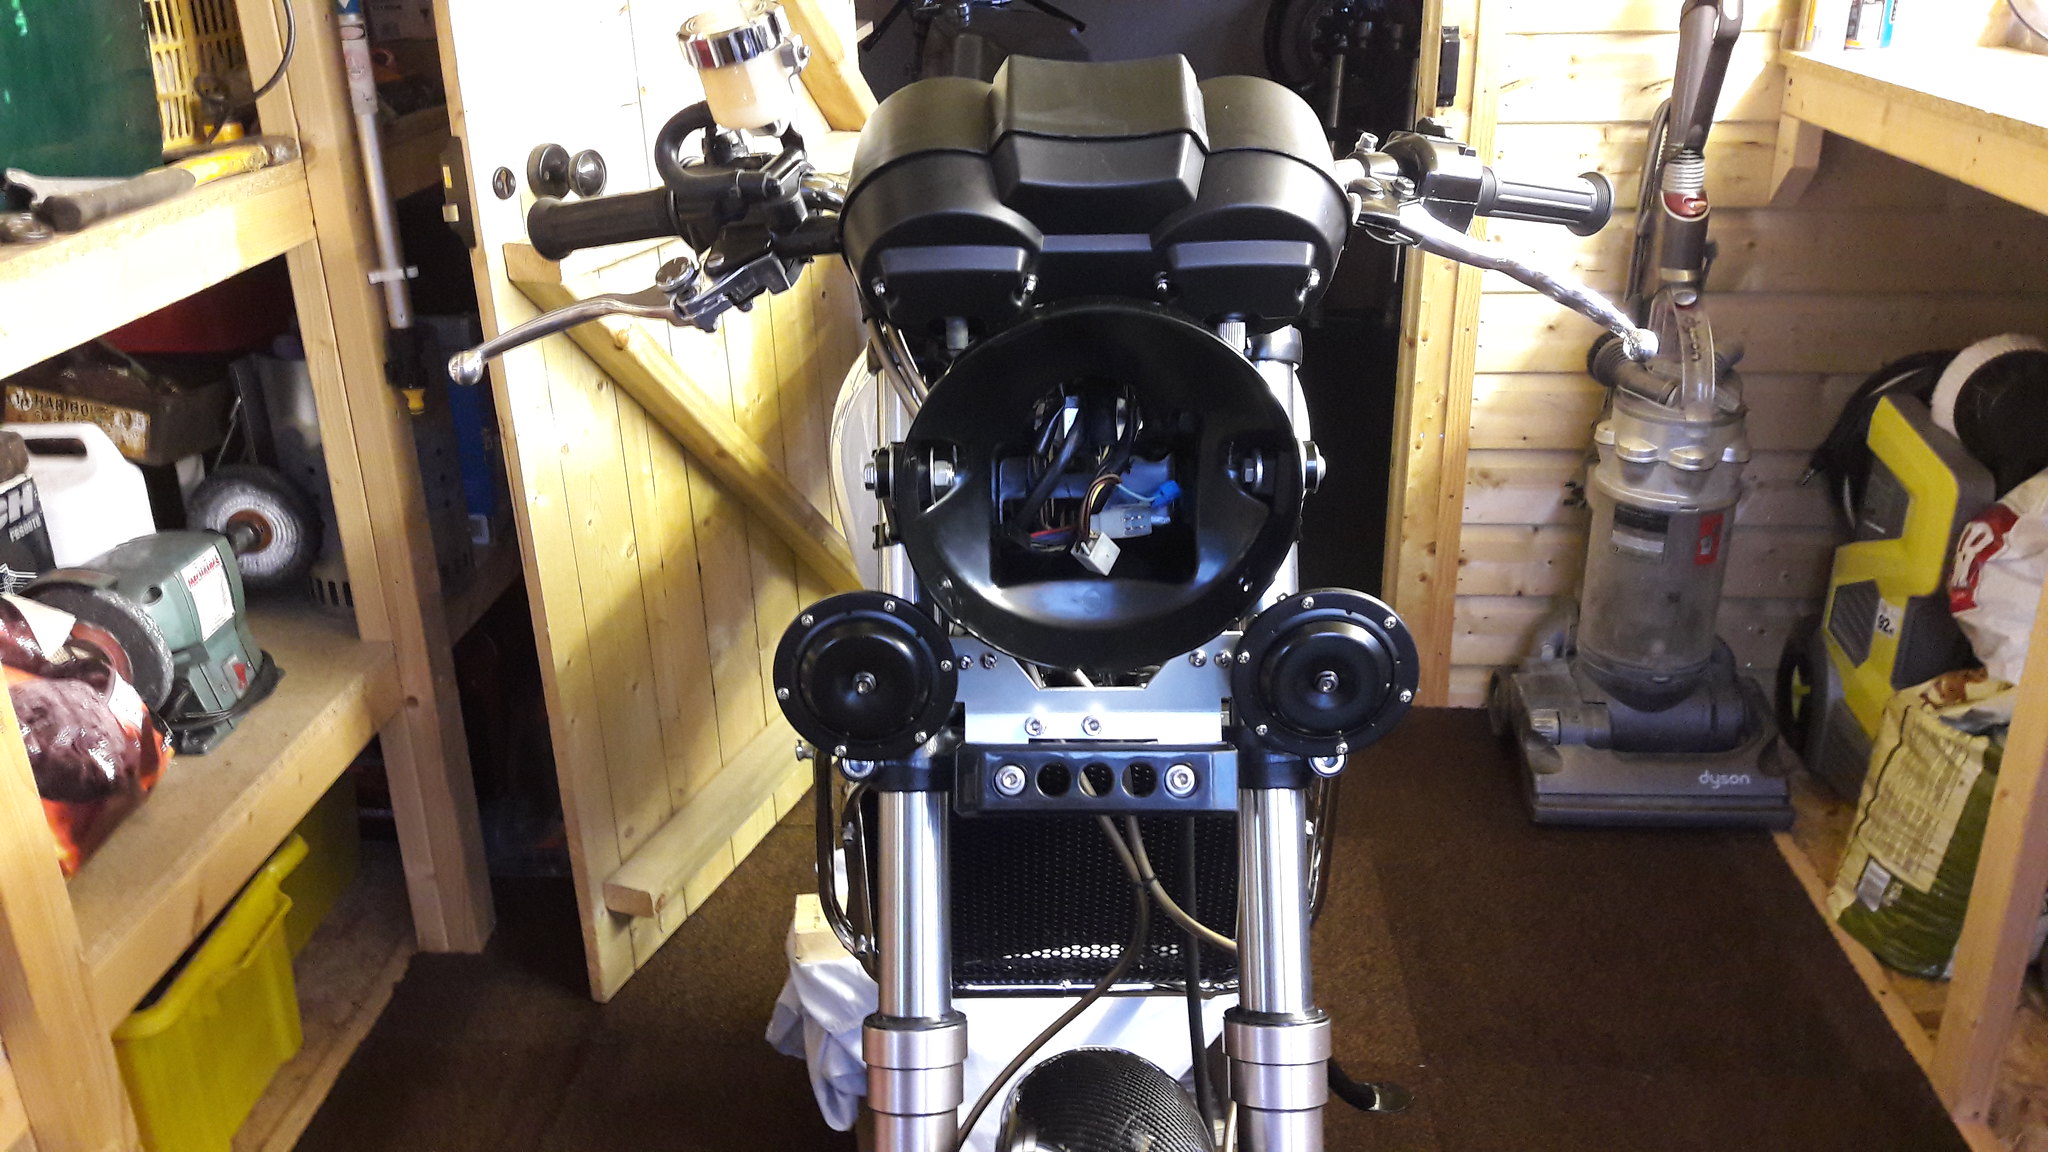 20180919_185628 20180919_185628 by David Miller, on Flickr Bought a new cover too; 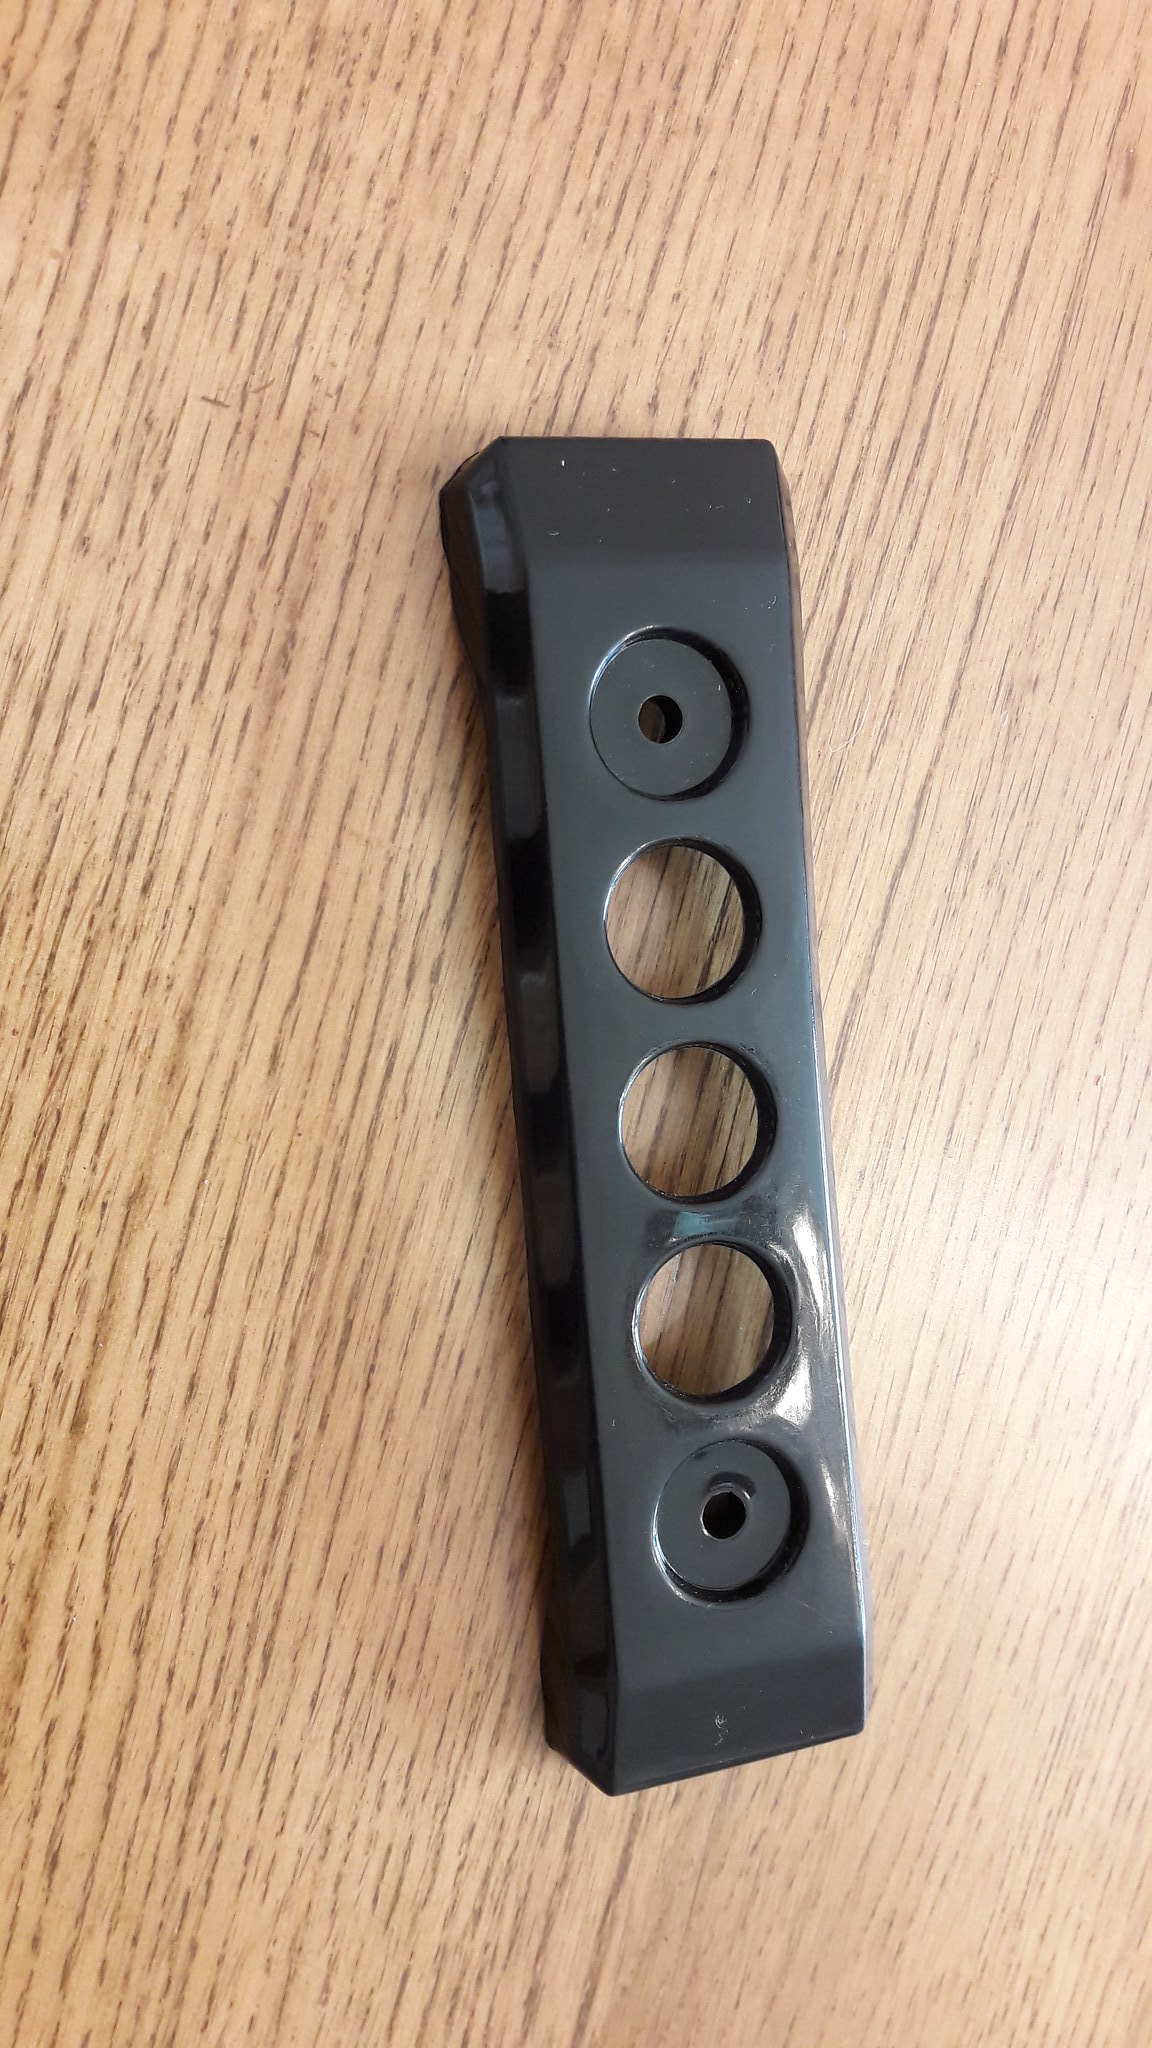 20180915_134805 20180915_134805 by David Miller, on Flickr Not sure whether to polish the bracket or paint it ? I have also cleaned up the loom this week - cleaned all the connectors and re taped it all so it looks good now. Ready to fit ! Dusty |
|
|
|
Post by donkeychomp on Sept 21, 2018 22:03:53 GMT 1
I'd paint it black and use the ally dome Allens. That's me...you'll end up polishing it, I know you will!  Looking very smart Dusty! Alex |
|
|
|
Post by dusty350 on Sept 22, 2018 8:50:30 GMT 1
Hi mate I actually think it may be better painted, but there is a lot of black around it, so maybe polish to break it up a bit ? Will mull it over a bit longer !! Dusty |
|
|
|
Post by dusty350 on Oct 9, 2018 20:26:01 GMT 1
Been quiet on this recently, waiting on the next big part of the jigsaw to arrive. Today was the day - the Metmachex arm turned up at 9 am;  20181009_090501 20181009_090501 by David Miller, on Flickr Tis a thing of beauty !! This afternoon I got down the shed to fit it. I'm keen to move the bike from the shed up to the garage for the winter as it will be much easier to work on, so this arrived at a good time. Fitted in really easily, along with the YSS shock I bought from Mutts a few weeks back; 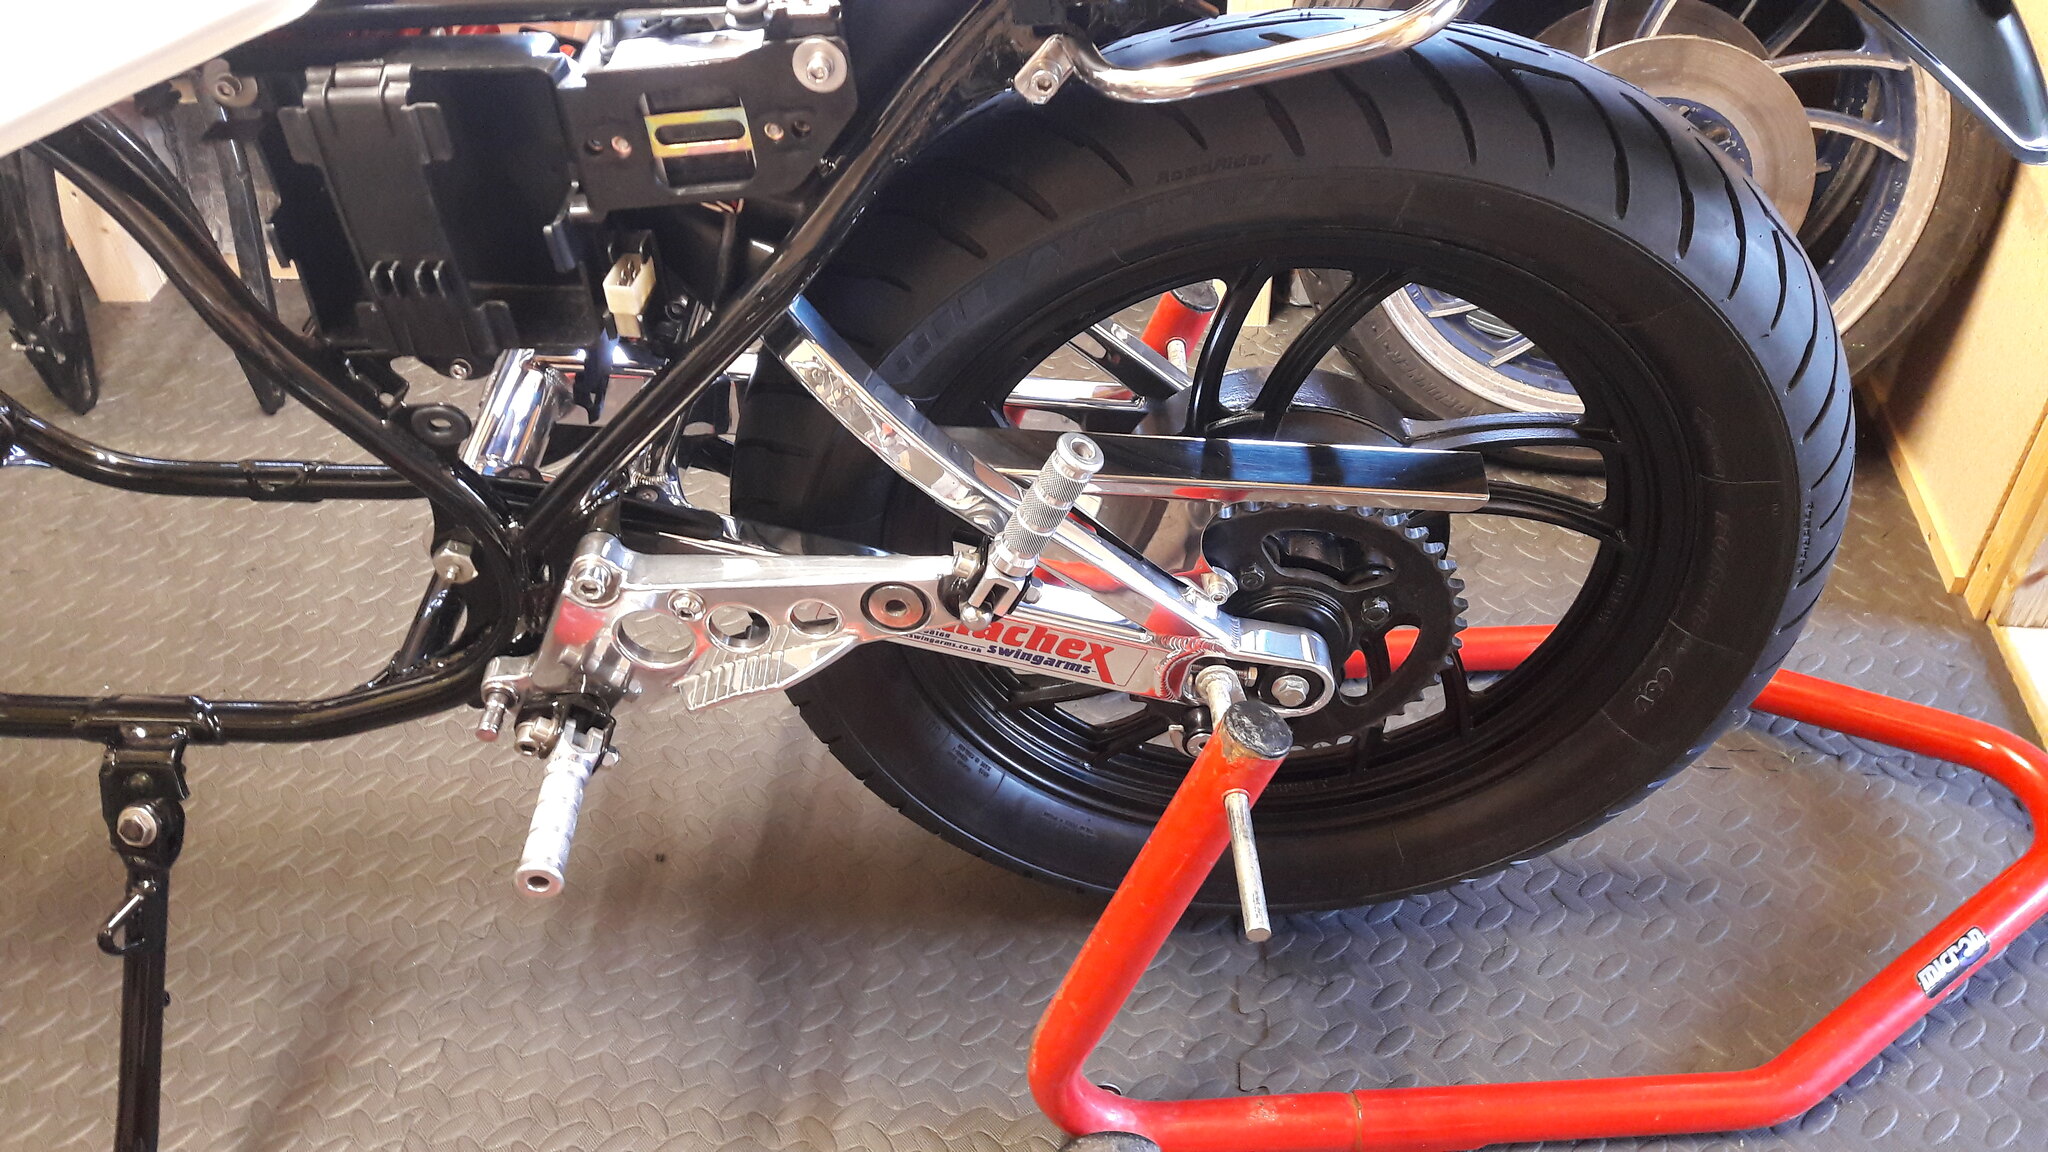 20181009_173345 20181009_173345 by David Miller, on Flickr 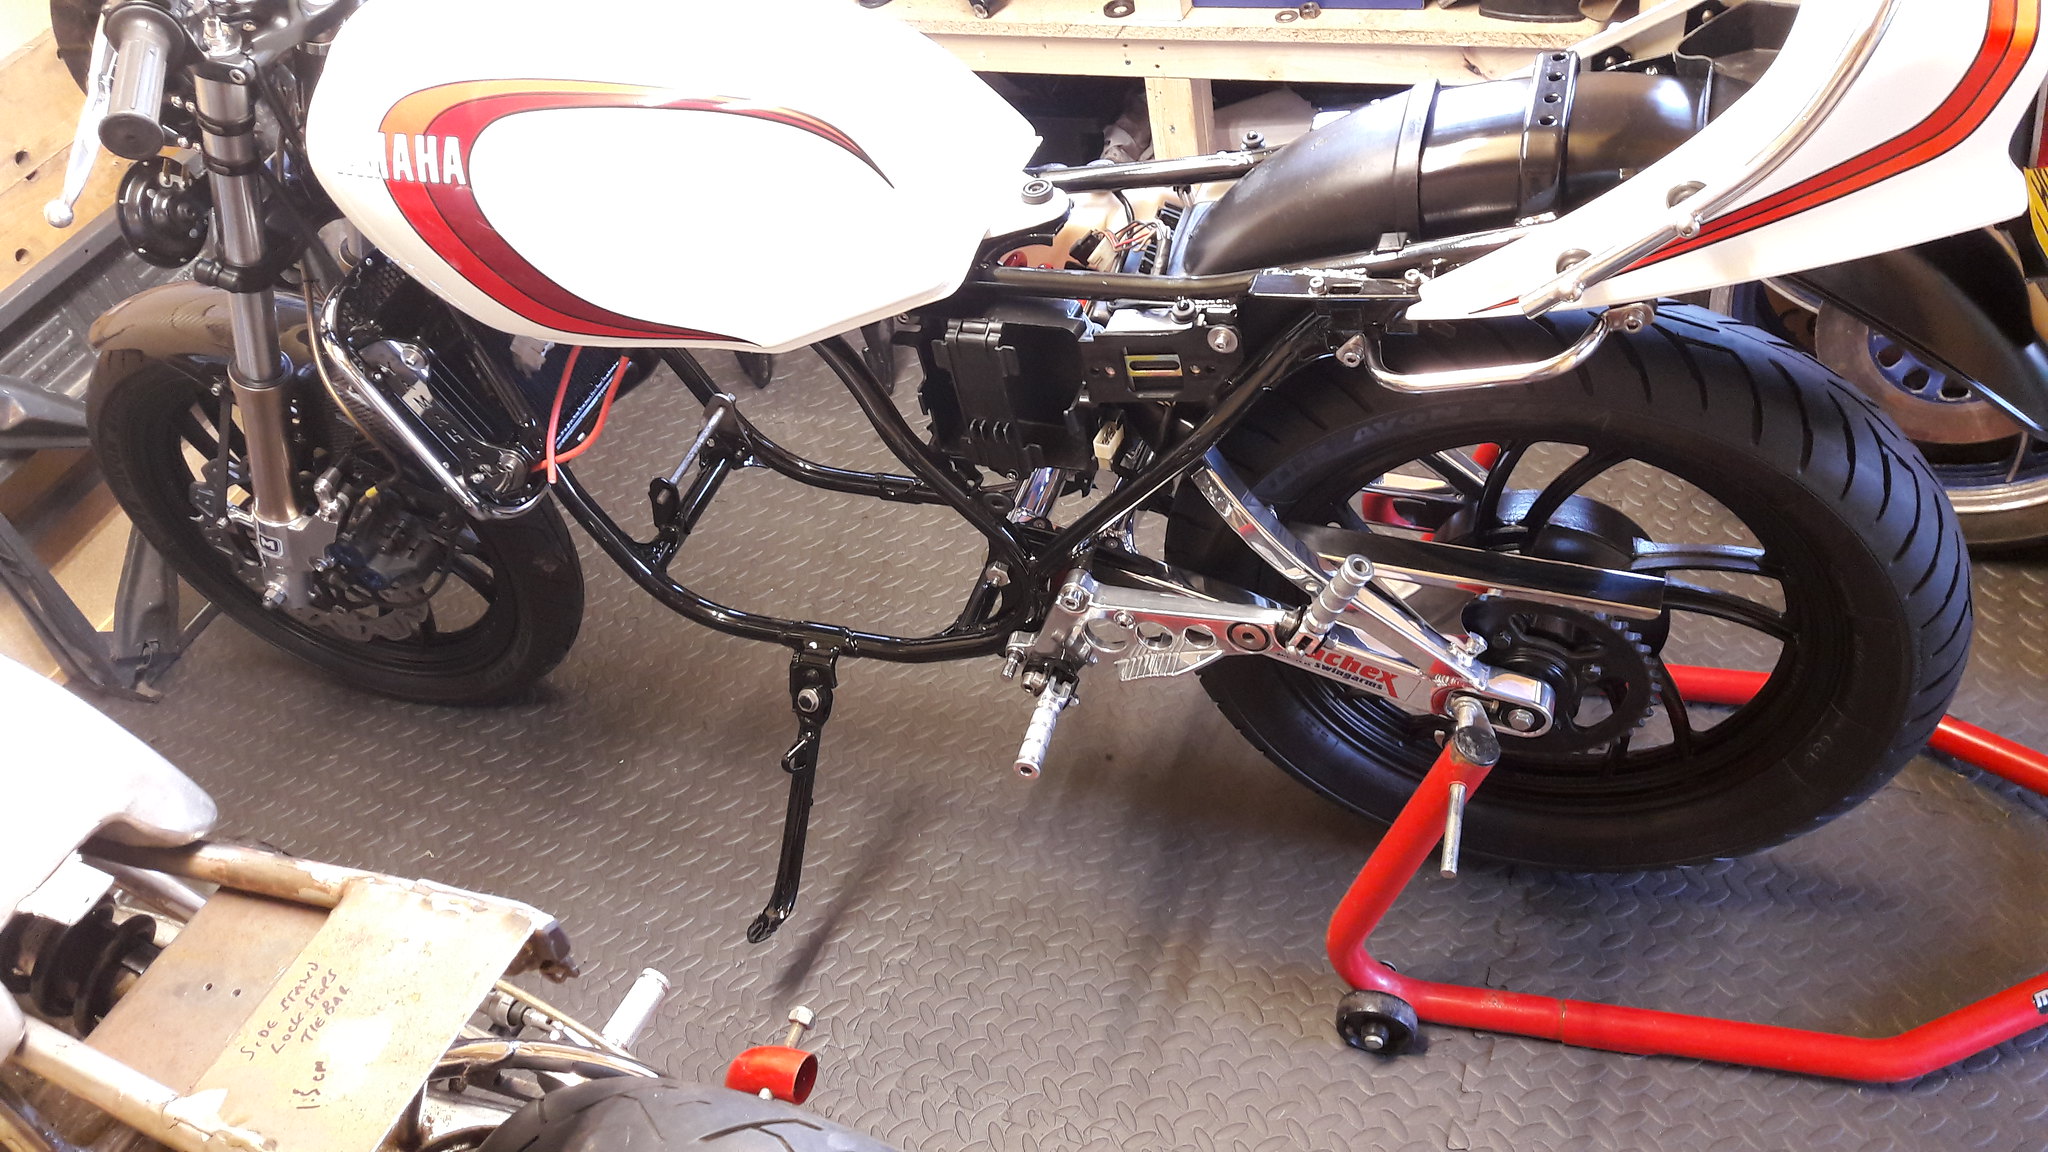 20181009_173356 20181009_173356 by David Miller, on Flickr New rear tyre already fitted, and the wheel has been powdercoated by a previous owner and then not used by the look of it - same as the front. I want to get a nicer torque arm from Norbo and find a nicer bolt for the torque arm to bolt at the front of the swingarm. May need to add some preload to the shock too. Loom is all clean and I've re taped it so that's ready to go on and I need a couple of bits for the airbox then that can be fitted too. Then it's engine rebuild time, and as before, I will list part numbers and do as many pics as possible as I go Dusty |
|
|
|
Post by midlifecrisisrd on Oct 9, 2018 20:42:59 GMT 1
The arm looks brill
You made a good job of the clocks, exact same thing happened to me.
Thought the clocks weren't bad but both smashed to pieces inside
Steve
|
|
|
|
Post by dusty350 on Oct 9, 2018 20:59:45 GMT 1
Yea, it was a nasty surprise as I thought they were ok. A real stroke of luck that the spare I had was the tacho, which I needed Swingarm looks awesome. I've got a couple of bits to finish the rolling chassis, but basically it's done. I'm building it as a daily rider so trying not to be too fussy with it but I cant help improving all the little bits that look a little tired. I'm now thinking of changing the seat for a Gully copy, but at £275 it's not a cheap option !  I'm going to start clearing the bench in the garage for the engine rebuild. That's got to be my next, main job. Dusty |
|
|
|
Post by donkeychomp on Oct 9, 2018 23:40:50 GMT 1
Looks totally fantastic mate. I'd keep the seat myself never been a fan of the gully ones but of course that is all down to preference.
Alex
|
|
|
|
Post by mouse on Oct 10, 2018 7:06:49 GMT 1
Really love the swingarm Dusty, much prefer the chain adjusters too, bike is looking fab!
Mouse
|
|
|
|
Post by dusty350 on Oct 11, 2018 15:16:30 GMT 1
Cheers mate Fitted the rear brake switch and found the correct bolt for the front torque arm mount. Also fitted the brake rod. Bike moved from shed to garage now for the winter ( a lot warmer in the garage !!)  20181010_161415 20181010_161415 by David Miller, on Flickr Dusty |
|


 They were good enough to drill and tap a hole a bit further forward, so having pinched the Banshee coils that were destined for the café racer bike, I made a small bracket so I could mount the coils properly;


 ) so dining room table got requisitioned for my Lc clocks rebuild !
 I'm going to start clearing the bench in the garage for the engine rebuild. That's got to be my next, main job.