|
|
Post by andy748 on Nov 22, 2020 13:43:05 GMT 1
|
|
|
|
Post by markrd250lc on Nov 22, 2020 18:21:39 GMT 1
Went for my first ride on the 250LC to Boxhill (Surrey) , well pleased with it.
Mark
|
|
|
|
Post by Chewie01 on Nov 22, 2020 19:06:14 GMT 1
Were there many bikes down the hill today? I thought about taking my YPVS out for a spin down there today, but after the last time I went there my bike was covered in mud from the roads I could have grown potatoes on it.
|
|
|
|
Post by markrd250lc on Nov 22, 2020 19:21:33 GMT 1
Were there many bikes down the hill today? I thought about taking my YPVS out for a spin down there today, but after the last time I went there my bike was covered in mud from the roads I could have grown potatoes on it. Yes loads , got there about 10am and there was a Jap car meet leaving then about 50 plus old school fords showed up, about 7 or 8 RD air cooled and about 60 plus mixed bikes etc. |
|
|
|
Post by donkeychomp on Nov 22, 2020 23:42:25 GMT 1
Dammit I keep on forgetting to go to Boxhill. When I do you'll recognise me. Mito and a Simpson Bandit lol.
Alex
|
|
|
|
Post by JonW on Nov 24, 2020 2:36:23 GMT 1
Gradually getting there with my F1 project which ive been building on and off for 10 years now. The decals for these models are huge! Even the white between the colours is part of the decal. To be honest its been a nightmare to get these on, but on they are. I did some LC decals after and was wondering why i ever fussed about doing em as they are so small and thin haha. Anyway, finally added all the fixings so these mid panels got new OEM grommets in with new OEM collars... and mostly new OEM screws... and new OEM nut plates (replated to OEM green). Of course, I never had any of those parts with my panels. The cost to do these is stupid of course, but worth it when you see the finished result. The solo tail has a new cruzinimage pad (they were a US$12 bargain) and I reused the grommets that came with it, of course there are no part numbers for those as I couldnt find any part numbers for the tail at all. The standard ducktail had new grommets as well, mine were long gone. Just got to fit the rear edge trims to the two tails and they can be put away for now I guess until the F1 gets onto the lift. Ive still got to paint the tank and redo the red on the mudguard and top fairing.  |
|
|
|
Post by 29davyt on Nov 24, 2020 16:55:09 GMT 1
Took the chain guard off and scraped ( with my nail ) the few remains bits of black paint off it, gave it a good rub with some paint restorer and refitted,, now then !! To have or not to have a tyre pressure decal on it  🤔🤔🤔🤔😂 |
|
avb
Thrash Merchant
 andys vapour blasting
Posts: 387
|
Post by avb on Nov 29, 2020 17:10:10 GMT 1
had the spondon440 top yoke anodised by acorn
|
|
stotty
L plate rider.

Posts: 32
|
Post by stotty on Dec 6, 2020 18:36:35 GMT 1
New headset bearings, stripped out fork tube stantions as bolloxed. Refitted rear shock with new Clevis pin and pin bushes..
|
|
|
|
Post by hudtm60 on Dec 8, 2020 17:55:51 GMT 1
5C but at least it’s dry.  |
|
|
|
Post by geoffb on Dec 11, 2020 20:48:43 GMT 1
Today I glued and stapled a new standard seat cover on my 1981 350LC (with new foam). I was really pleased with the result and was also glad that I researched electric staple guns and the right size staples (6mm) before I started.  |
|
cnkxu1
Thrash Merchant
Posts: 392
|
Post by cnkxu1 on Dec 11, 2020 23:32:35 GMT 1
Today I glued and stapled a new standard seat cover on my 1981 350LC (with new foam). I was really pleased with the result and was also glad that I researched electric staple guns and the right size staples (6mm) before I started. I have been having trouble with staples bending. Tried different guns mechanical and electric. Tried different staples. What brand and dimensions did you use? The original ones that came out were quite thin. The ones I have been trying are thicker. |
|
Gord
Drag-strip hero
Posts: 233
|
Post by Gord on Dec 12, 2020 14:22:27 GMT 1
Today I glued and stapled a new standard seat cover on my 1981 350LC (with new foam). I was really pleased with the result and was also glad that I researched electric staple guns and the right size staples (6mm) before I started. I have been having trouble with staples bending. Tried different guns mechanical and electric. Tried different staples. What brand and dimensions did you use? The original ones that came out were quite thin. The ones I have been trying are thicker. I used 6mm staples when I did mine but bought stainless steel staples, I think they are a little stronger. I used an air powered staple gun, if you look round you can find they fairly cheap. |
|
|
|
Post by kernow on Dec 12, 2020 21:39:47 GMT 1
5C but at least it’s dry. 5c a little chipper but at least dry roads. I,ve been looking forward to a run but our roads are either filthy with road salt or lashing with rain. Glad you had a run out, |
|
|
|
Post by geoffb on Dec 12, 2020 21:52:05 GMT 1
Today I glued and stapled a new standard seat cover on my 1981 350LC (with new foam). I was really pleased with the result and was also glad that I researched electric staple guns and the right size staples (6mm) before I started. I have been having trouble with staples bending. Tried different guns mechanical and electric. Tried different staples. What brand and dimensions did you use? The original ones that came out were quite thin. The ones I have been trying are thicker. I find that the staples still bend unless you apply pressure to the top of the stapler when firing and you are square on to the surface. I got the STANLEY Electric Staple Nail Gun Nailer 0-TRE550 from Amazon for £40.00 and a pack of 6mm G staples. 👍 |
|
|
|
Post by 1966baz on Dec 13, 2020 8:04:52 GMT 1
Got my standard F2 and my 3xv out, ran them round the block and up to temperature.
|
|
|
|
|
|
Post by pdxjim on Dec 18, 2020 7:57:40 GMT 1
5C but at least it’s dry. Looking good sir. Not many of us with proper LC's over here. |
|
|
|
|
|
Post by jessy03 on Dec 19, 2020 14:54:11 GMT 1
Fitted some new bars  |
|
|
|
Post by liffy16 on Dec 19, 2020 17:15:18 GMT 1
Went for a ride on my 250lc while the roads were dry,until it rained again !
|
|
|
|
Post by andy748 on Dec 19, 2020 21:16:19 GMT 1
Got my bottom end complete, after discovering the steels in the clutch were blued and cream crackered! Clutch casing isn't prettty but it'll be behind the fairing and i'm a 8 out of 10 kinda resto guy as it'll be used and abused regularly. Mocked up them Niche barrels and the chinky V-Force reed blocks, good news is i have a pair of pistons and rings which are fine, so a tune and ports chamfered and they are done. Andy.  IMG_4054 IMG_4054 by Andrew Jolly, on Flickr  IMG_4055 IMG_4055 by Andrew Jolly, on Flickr 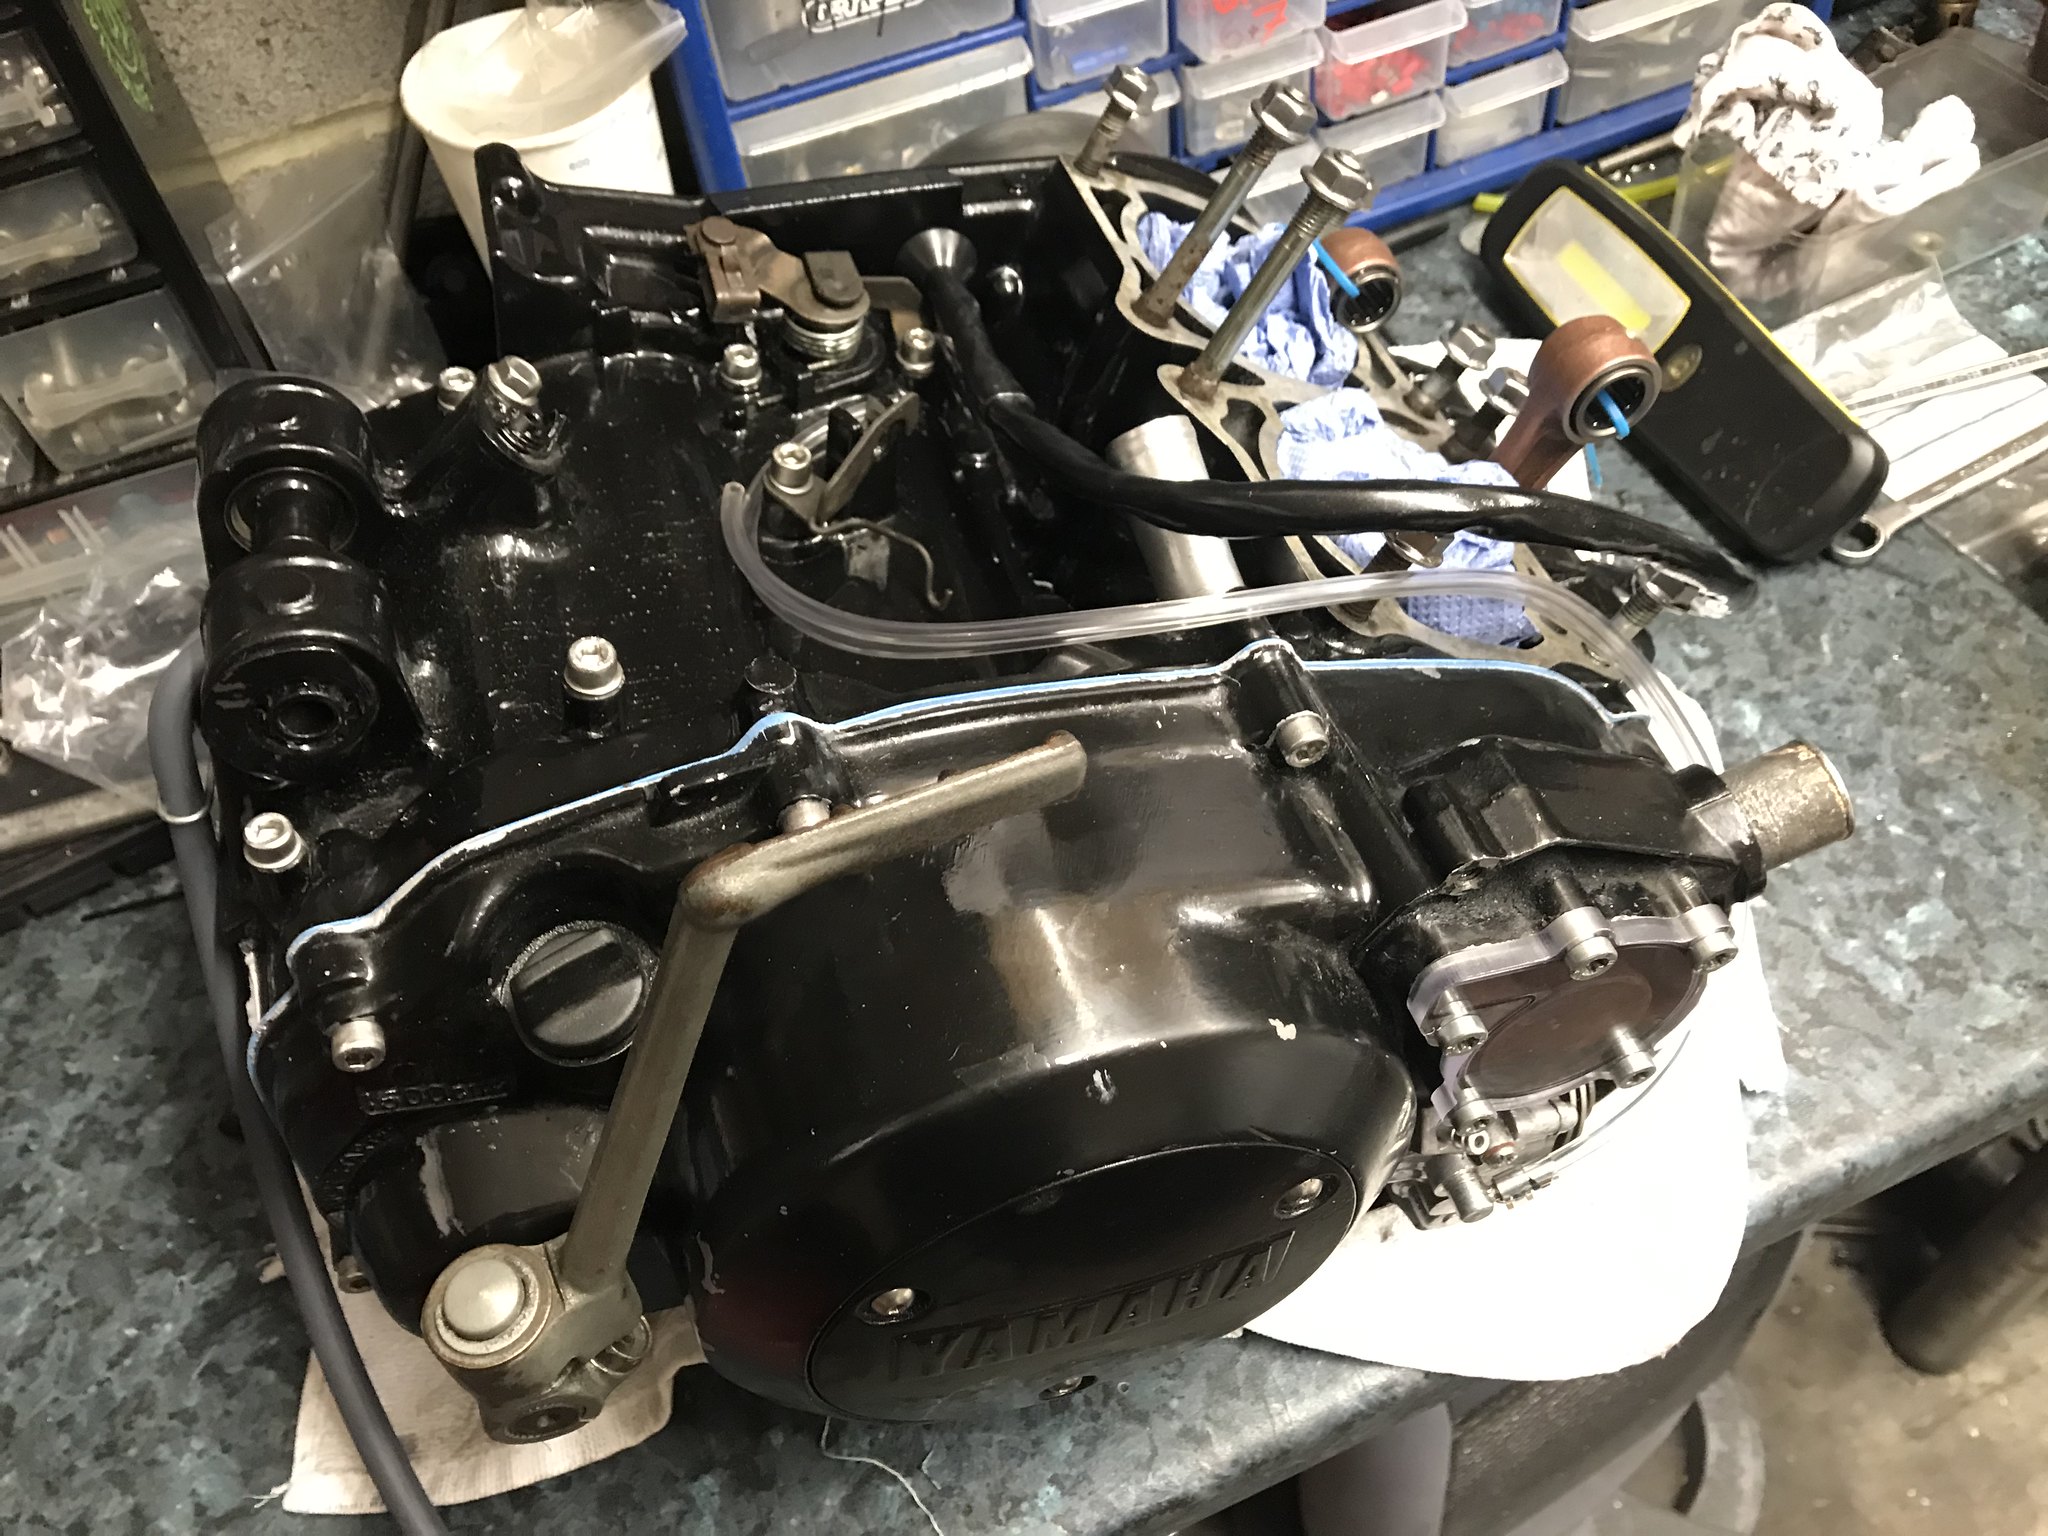 IMG_4056 IMG_4056 by Andrew Jolly, on Flickr  IMG_4057 IMG_4057 by Andrew Jolly, on Flickr  IMG_4058 IMG_4058 by Andrew Jolly, on Flickr  IMG_4060 IMG_4060 by Andrew Jolly, on Flickr |
|
|
|
avb
Thrash Merchant
andys vapour blasting
Posts: 387
|
Post by avb on Dec 23, 2020 23:59:12 GMT 1
Cut the front muddy down  |
|
|
|
Post by JonW on Dec 24, 2020 0:43:45 GMT 1
Looks much better!
|
|
|
|
Post by midlifecrisisrd on Dec 24, 2020 11:28:33 GMT 1
Totally agree 👍
Steve
|
|
|
|
Post by tipfinchy on Dec 24, 2020 13:05:30 GMT 1
Got a do it yourself stator cover off Norbo , should keep me busy for a while 🤔😂 Mart  |
|
|
|
Post by geoffb on Dec 24, 2020 16:51:31 GMT 1
|
|
|
|
Post by hudtm60 on Dec 25, 2020 21:54:43 GMT 1
Santa has ensured that I will be sporting further evidence of my affection/affliction/addiction to these bikes....even if there are very few people within a 4,000mile radius of where I live that actually have a clue what RDLC means....to me...to us....I will wear it and drink out of it with pride. MFC everybody.  |
|
|
|
Post by dougw on Dec 26, 2020 16:48:48 GMT 1
Made some blanking plates to seal the exhaust ports ready for a leak down test tomorrow when the sealant has cured.
Fingers crossed!
|
|


 🤔🤔🤔🤔😂
🤔🤔🤔🤔😂


