|
|
Post by jon on Aug 27, 2013 19:06:25 GMT 1
Just asked for a half decent chain from my local bike shop?
Have since changed the rear sprocket for an aluminium talon (39T) to keep it original gearing).
This build was never going to be for ultimate performance, so left the engine fairly standard, (wait for my YPVS next year!)
|
|
|
|
Post by copper99 on Aug 27, 2013 21:17:47 GMT 1
Beautiful build mate, look forward to seeing this when its all complete...
|
|
|
|
Post by jon on Aug 29, 2013 19:43:35 GMT 1
flames you are thinking a year forward! My YPVS will have rearsets made from conrods (not too far back from standard). This is not what they are for this time. Maybe the extra bits (shown below) will make it easier to guess. 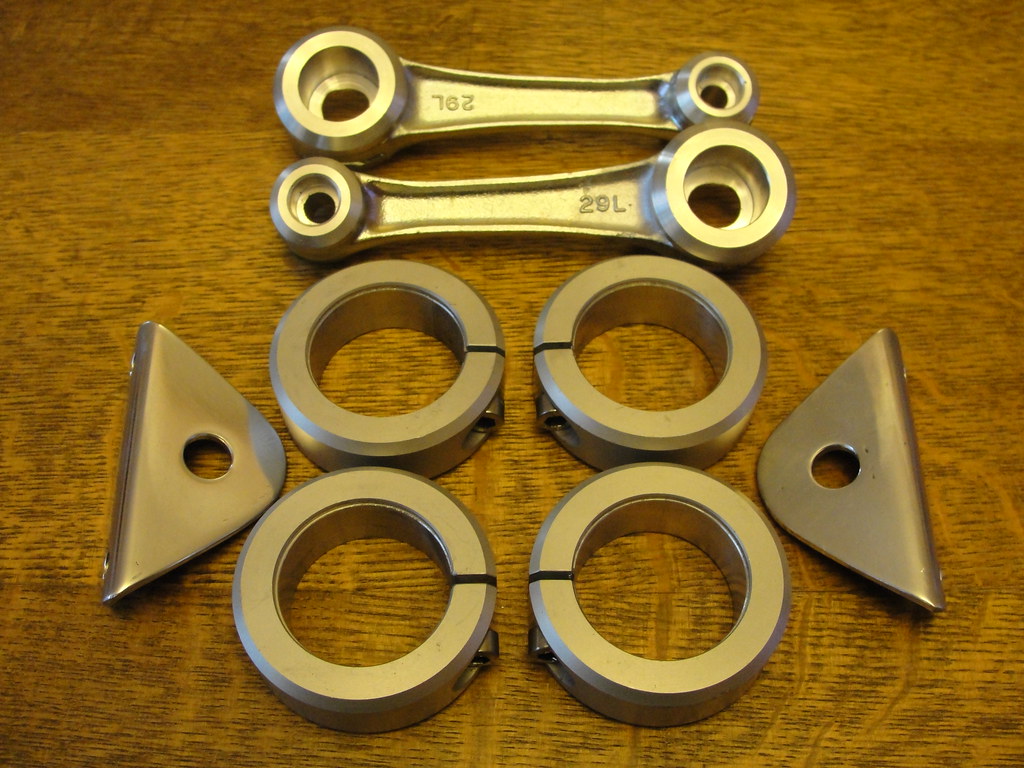 |
|
|
|
Post by winnerevo1 on Aug 29, 2013 20:02:44 GMT 1
Headlamp brackets.......?
|
|
|
|
Post by jon on Aug 29, 2013 20:38:05 GMT 1
winnerevo1 - you are the winner with the correct answer, though you did have extra clues than some  I will post some pictures of them fitted next week when my headlamp rim comes back from powder coating. |
|
|
|
Post by winnerevo1 on Aug 29, 2013 21:15:21 GMT 1
What's my prize?  |
|
|
|
Post by Yogi on Aug 29, 2013 21:46:18 GMT 1
What's my prize? Your in the quiz team |
|
|
|
Post by jon on Sept 1, 2013 19:32:48 GMT 1
Last bit of custom fabrication (I hope) done this weekend was a clock bracket. The rest is all standard parts from here on in, so I hope it will all go together quite quickly.  Early visit to powder coaters in the hope they haven't coated the bits yet I gave them last week, so I can include this. |
|
|
|
Post by zx9landie on Sept 22, 2013 22:35:04 GMT 1
love the fork brace/front mud guard mounting !!
|
|
|
|
Post by jon on Sept 22, 2013 22:50:09 GMT 1
Been quite busy doing lots of small bits to finish off the bike. The bit that's taken most time recently is mounting the clocks and headlight. Finally got it how I want: 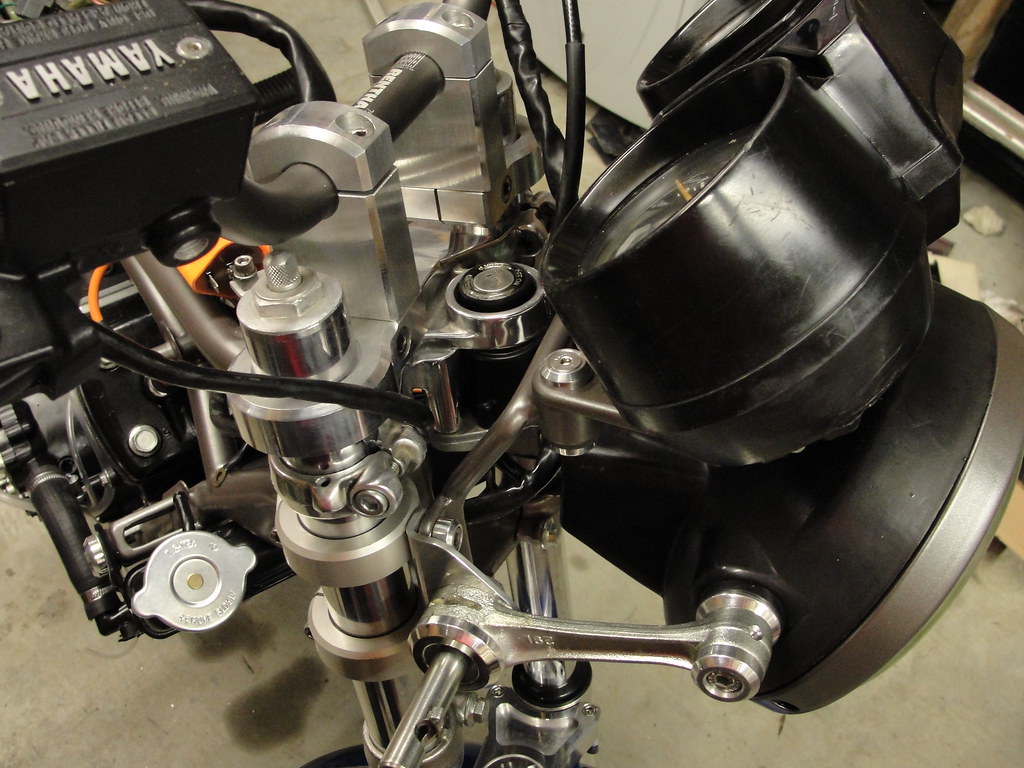 Old Coil was a bit tired looking: 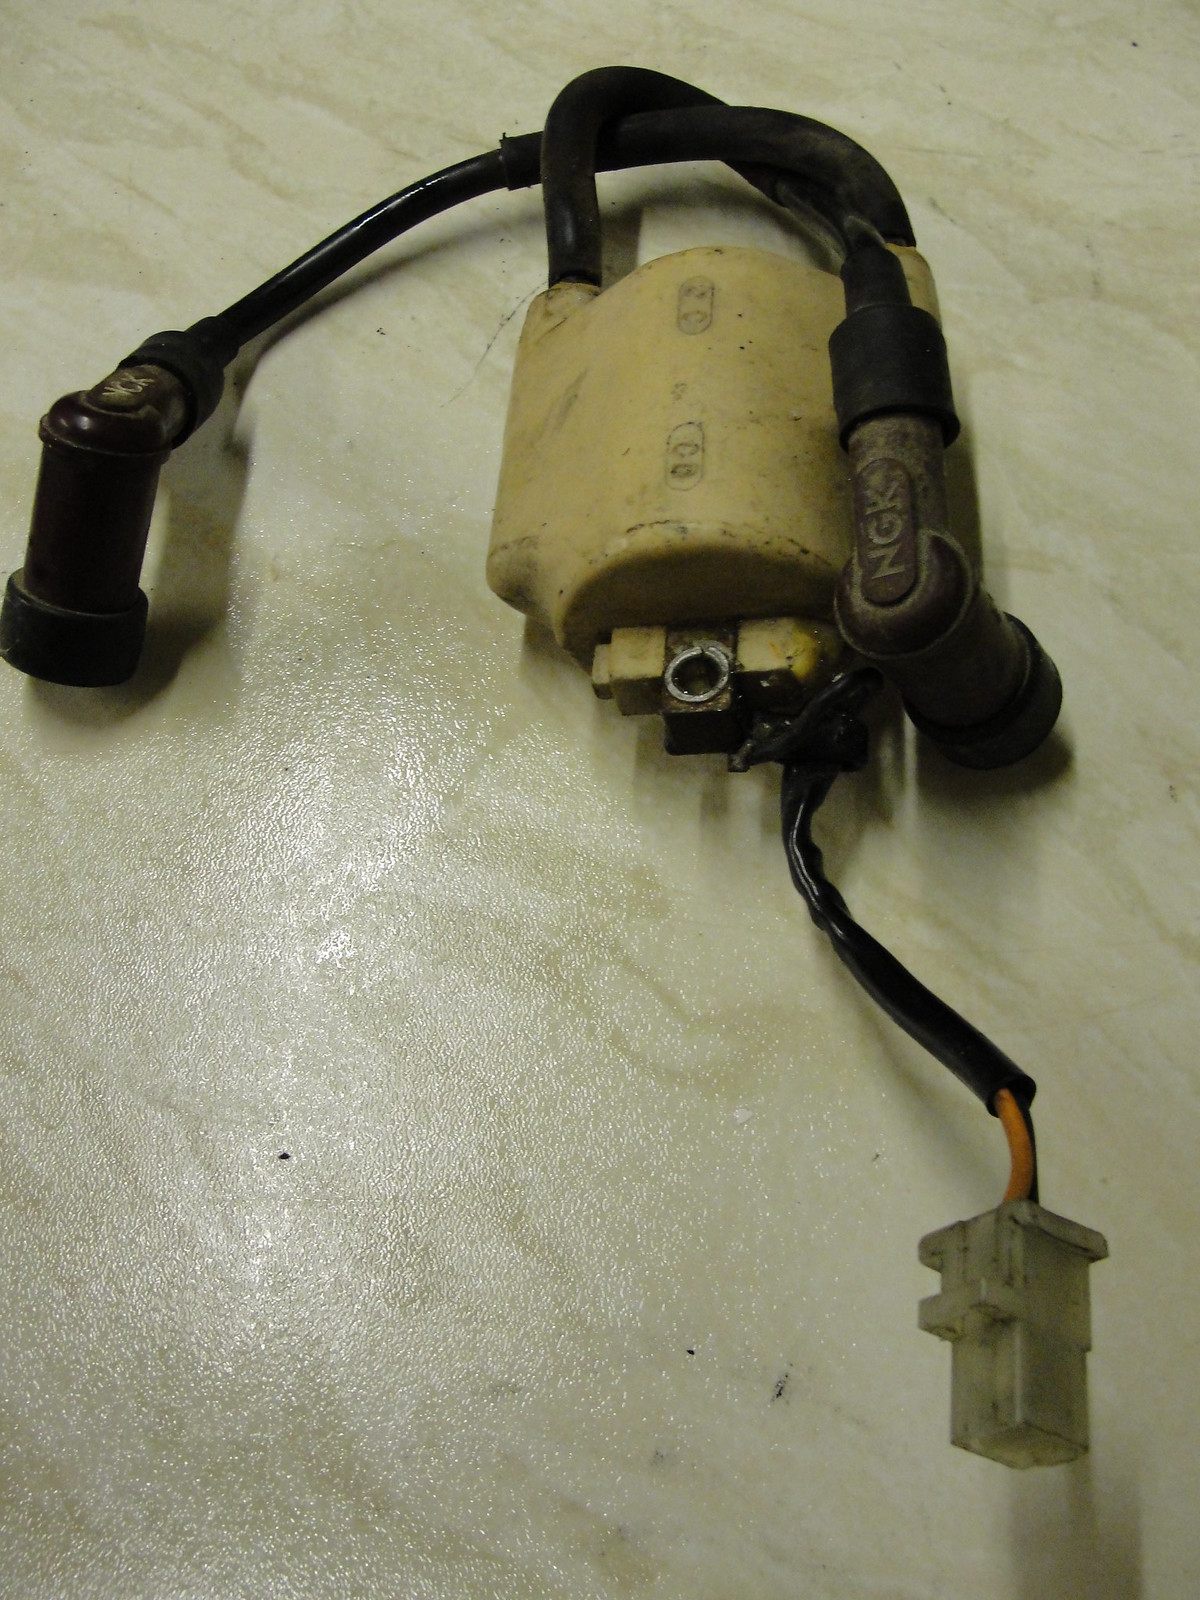 Made a new part loom out of the connector off the old coil to keep it plug and play: 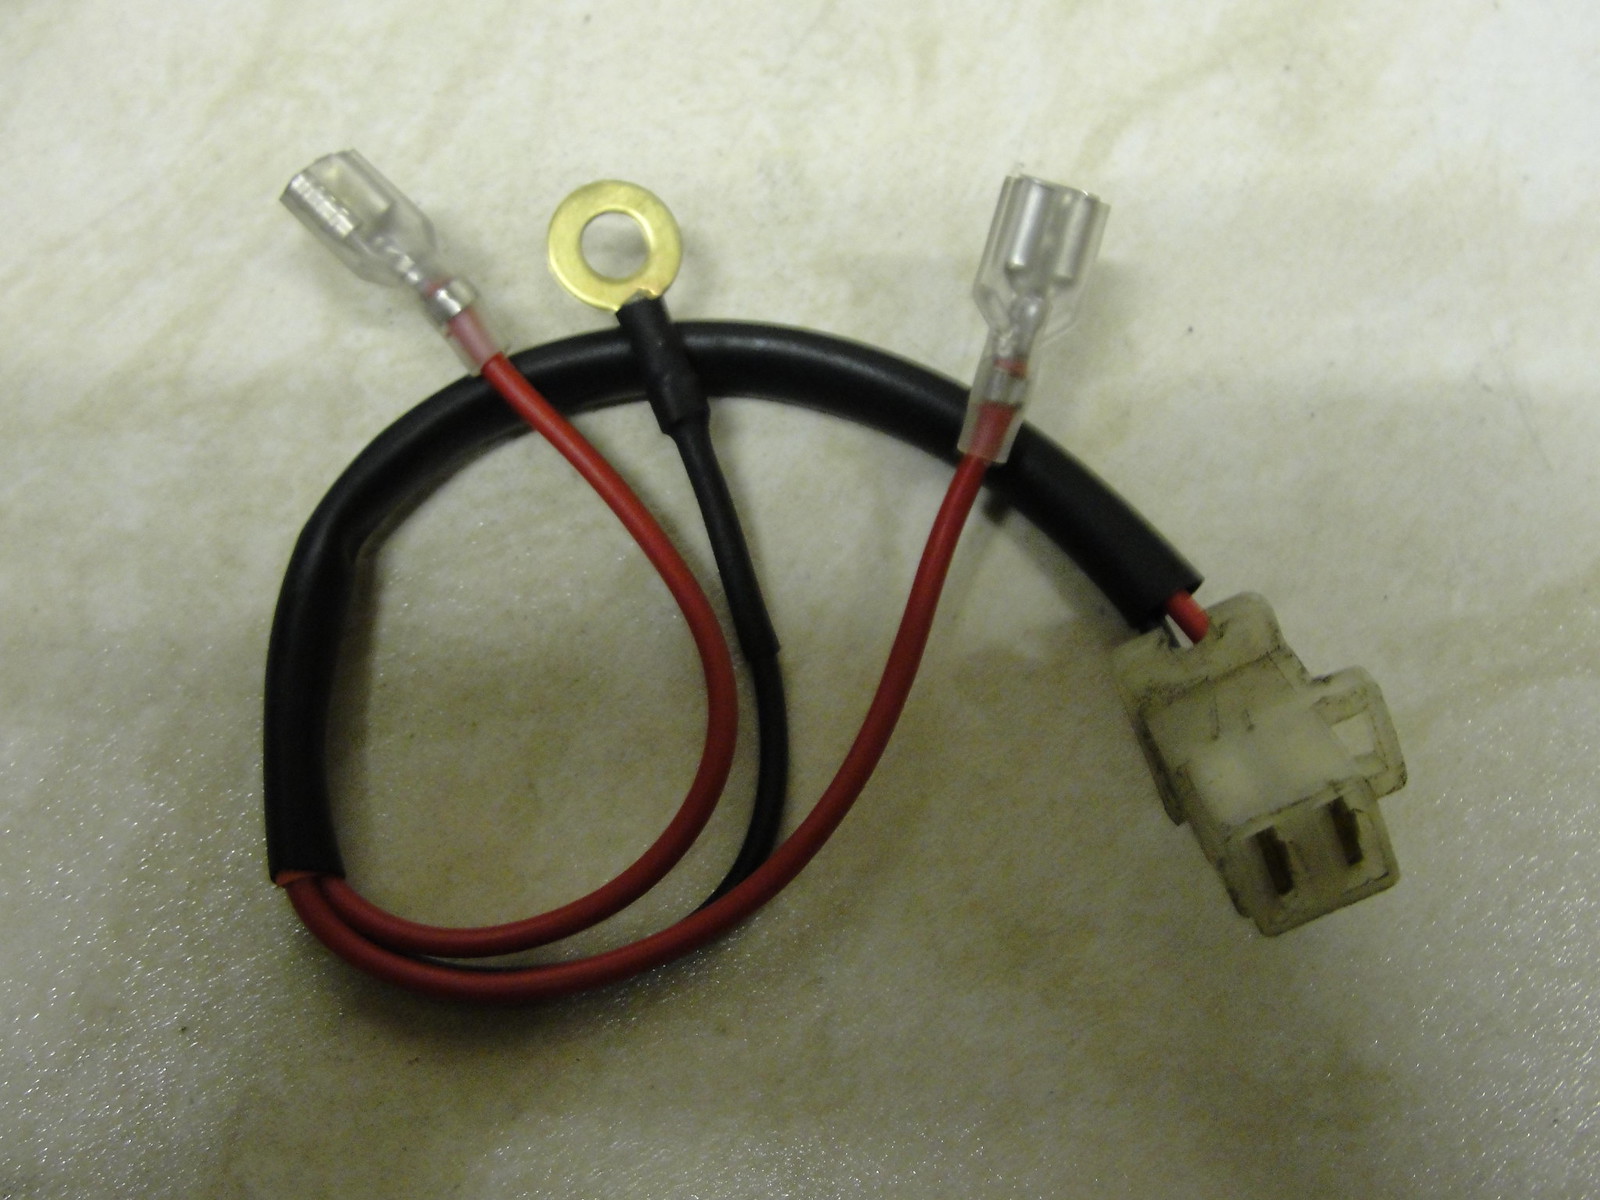 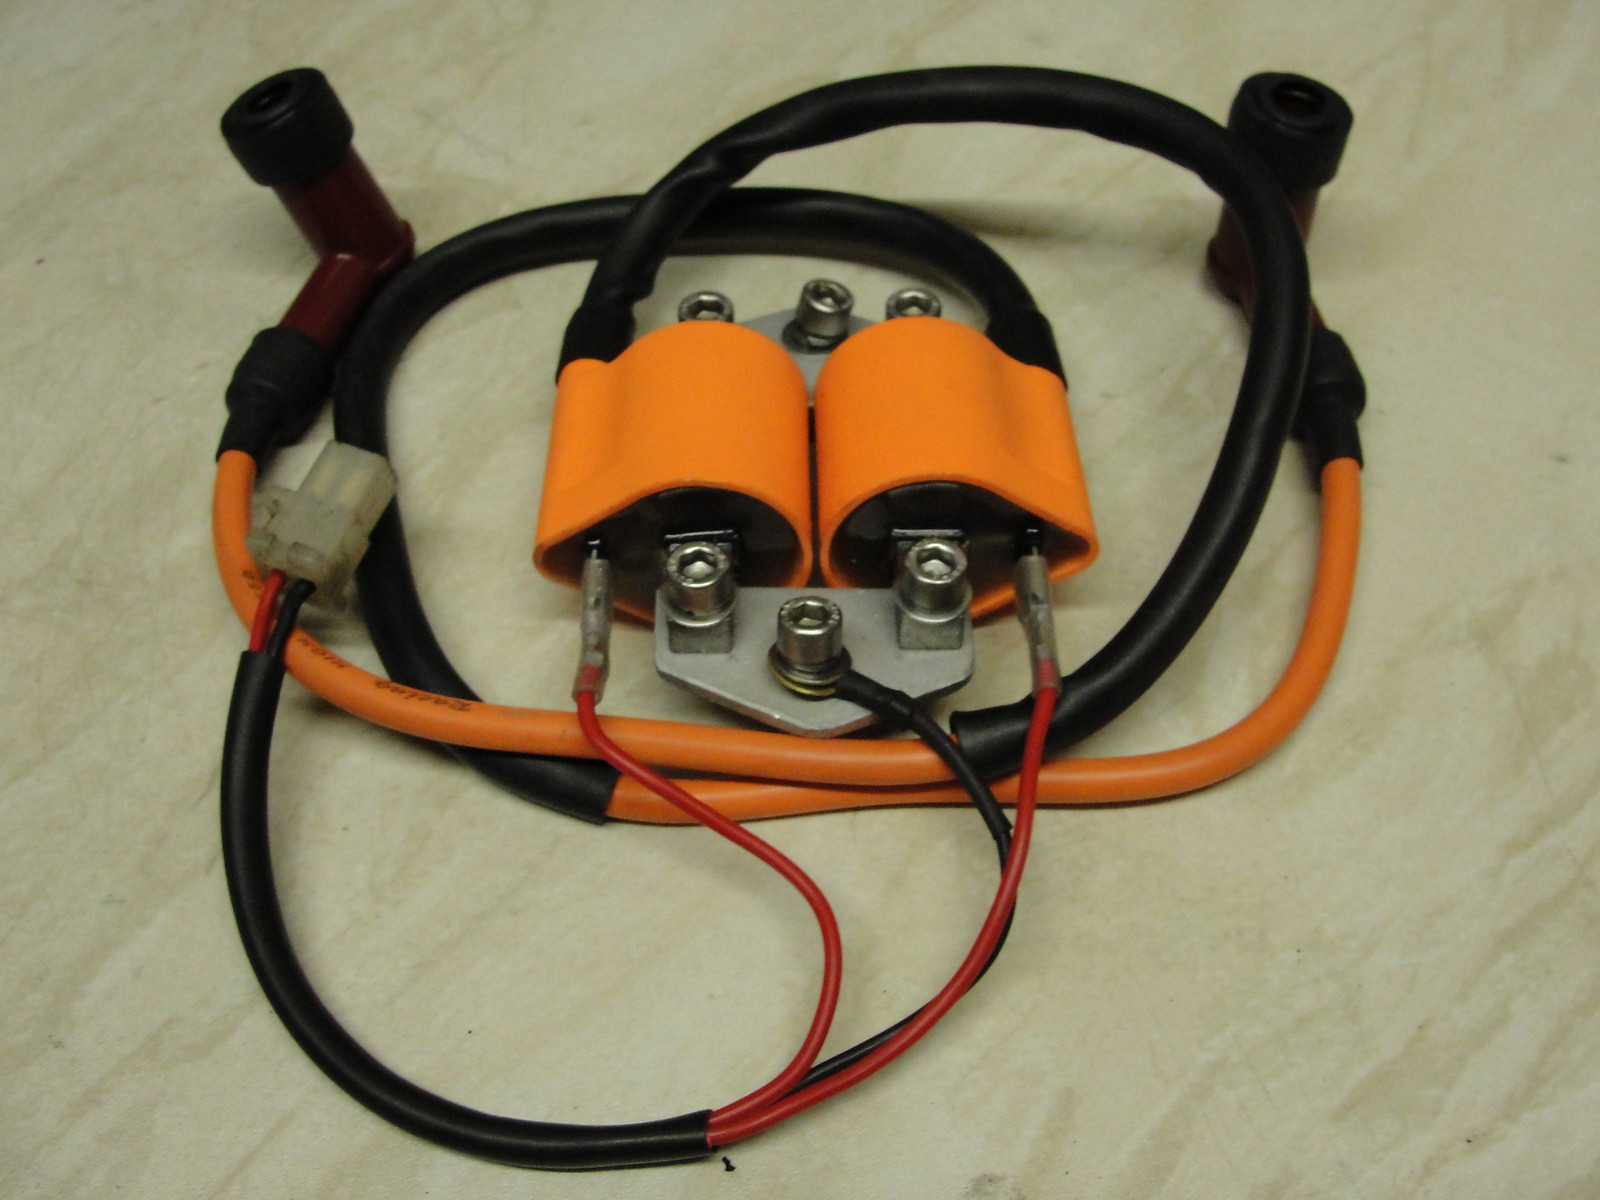 |
|
|
|
Post by jon on Sept 24, 2013 18:45:15 GMT 1
I've run into my first problem.
Can anyone advise me on what tacho and speedo cable to use, as they both are around 6" too short with the higher clocks?
|
|
|
|
Post by ulsta on Sept 25, 2013 1:11:50 GMT 1
Google or serch ebay for a "SPEEDOMETER CABLE EXTENDER"
I used one to extend the speedo cable on my VFR when I moved the drive from the front wheel to the gearbox sprocket.
|
|
|
|
Post by jon on Sept 25, 2013 7:45:13 GMT 1
Thanks ulsta, but I've seen these.
Most mention an m10 thread but I measure M12 x 1.0.
There was one extender from America for M12, but mentioned no pitch so I didn't really want to take the risk.
Also I'd prefer a single cable if possible.
Anyone used one off a different bike?
|
|
|
|
Post by jon on Oct 6, 2013 20:34:43 GMT 1
I admitted defeat and got some speedo cable extenders from Custom Fasteners. Had some real setbacks recently with one thing or another. When I converted the TZR steering stem to fit, I measured the fork tube clearance against the tank. The welded steering stops to match. This weekend when I fitted the tank the new clock brackets hit it! I took the whole front end off again, and altered the steering stops. The steering lock bracket on the frame then didn't fit!! Ground it down a bit (while swearing a lot). Anyway all good now, but not much progress  I did manage to finish off my horn bracket though, which was good  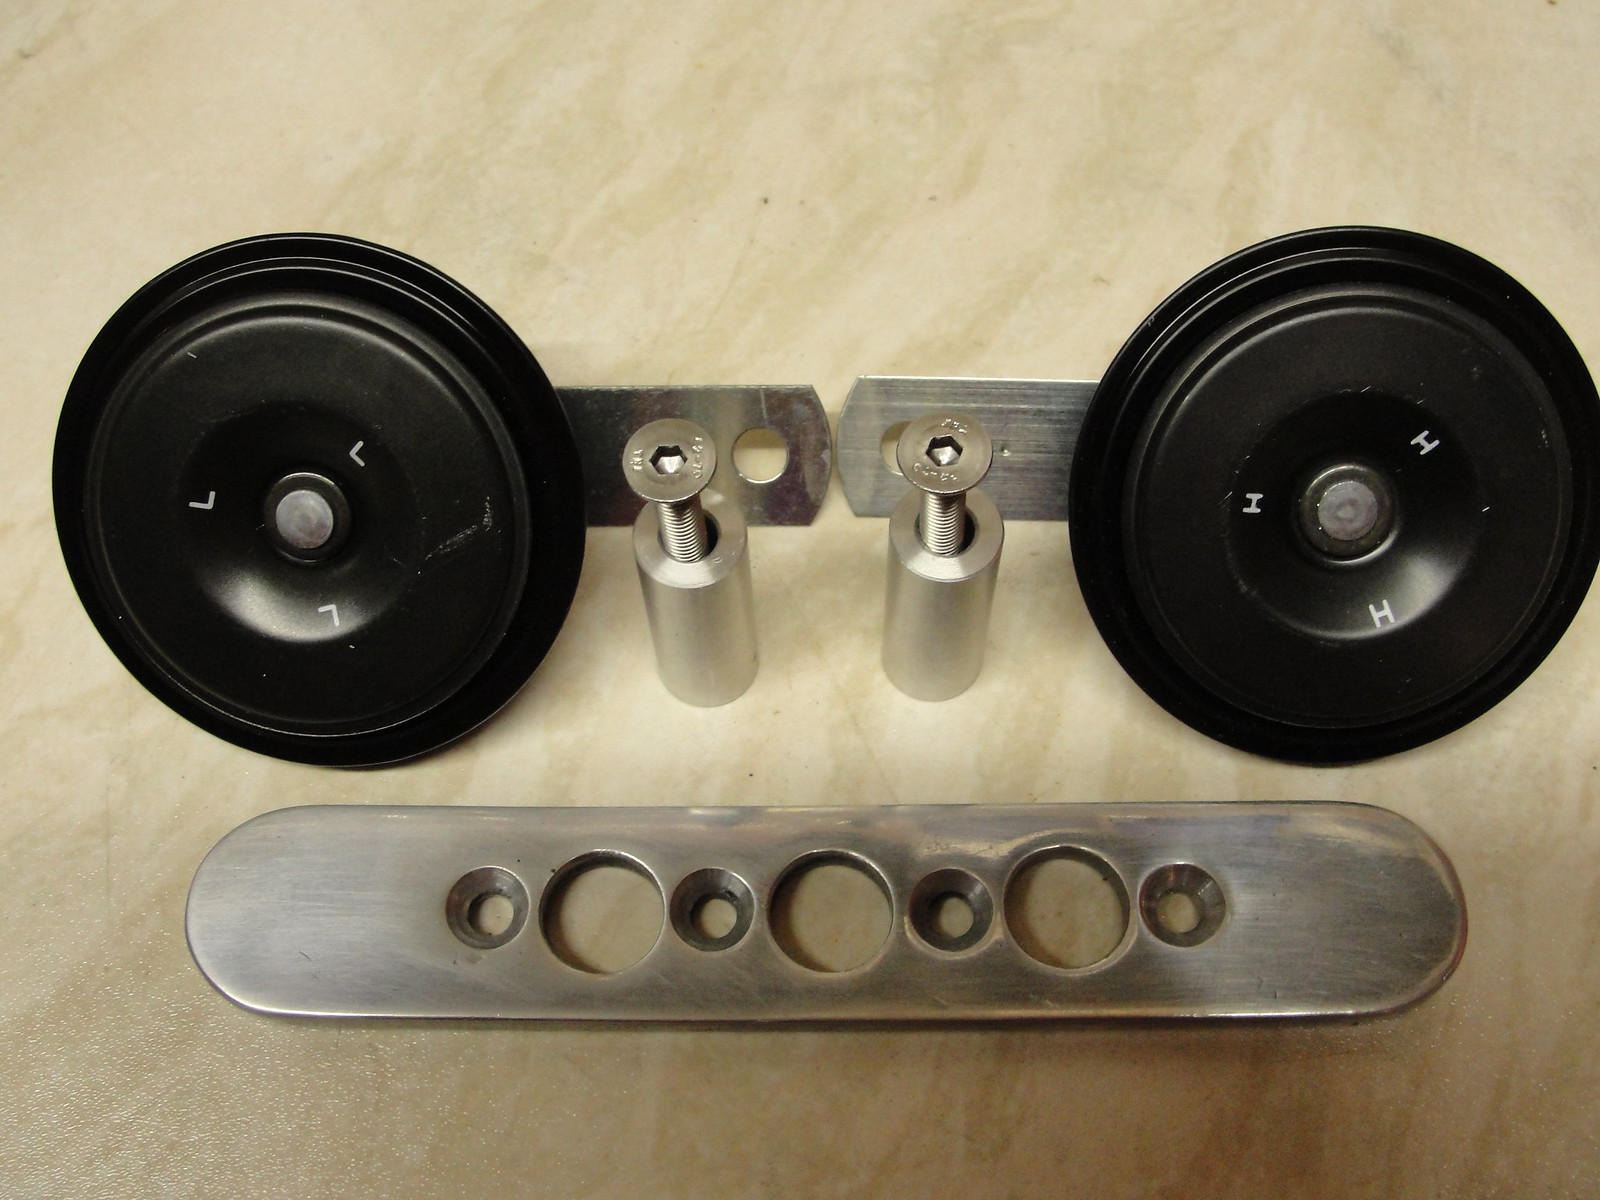 I could not resist attaching panelwork to it after making some tank rubber spacers out of ally to take up the slack of the tank wobbling about on the rubbers at the front. |
|
|
|
Post by leaky on Oct 6, 2013 23:56:06 GMT 1
Looking good there! Loving the paintwork too - works well with the hybrid chassis..
|
|
|
|
Post by jon on Nov 10, 2013 21:14:55 GMT 1
IT LIVES! The sound and smell brings up so many locked up memories in us all. My PC has blown up recently  , making sending photos difficult. Anyway here goes the update : Horn fitted: 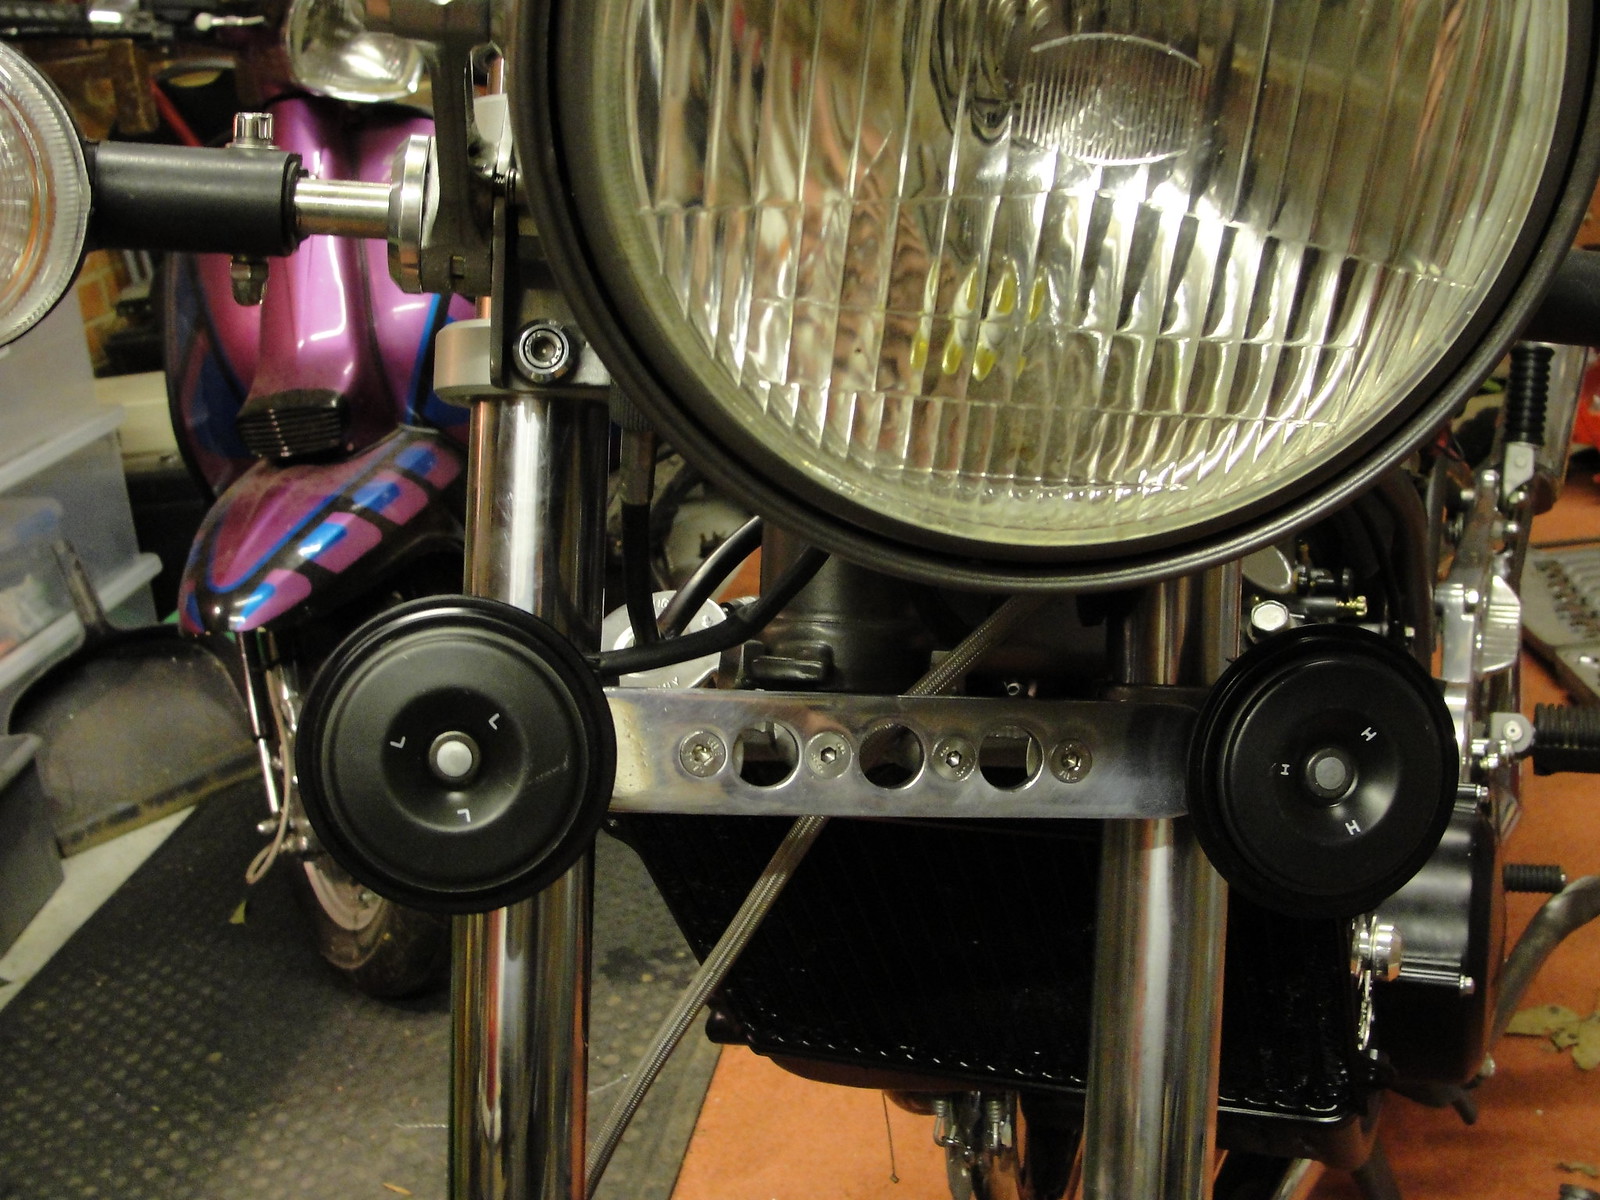 Kickstart was slacker than ... I machined down the knuckle, and ground out the lever (it it very hard steel - think it is drop forged?), then made a brass bush. It feels silky smooth and very tight - reminds me of ... 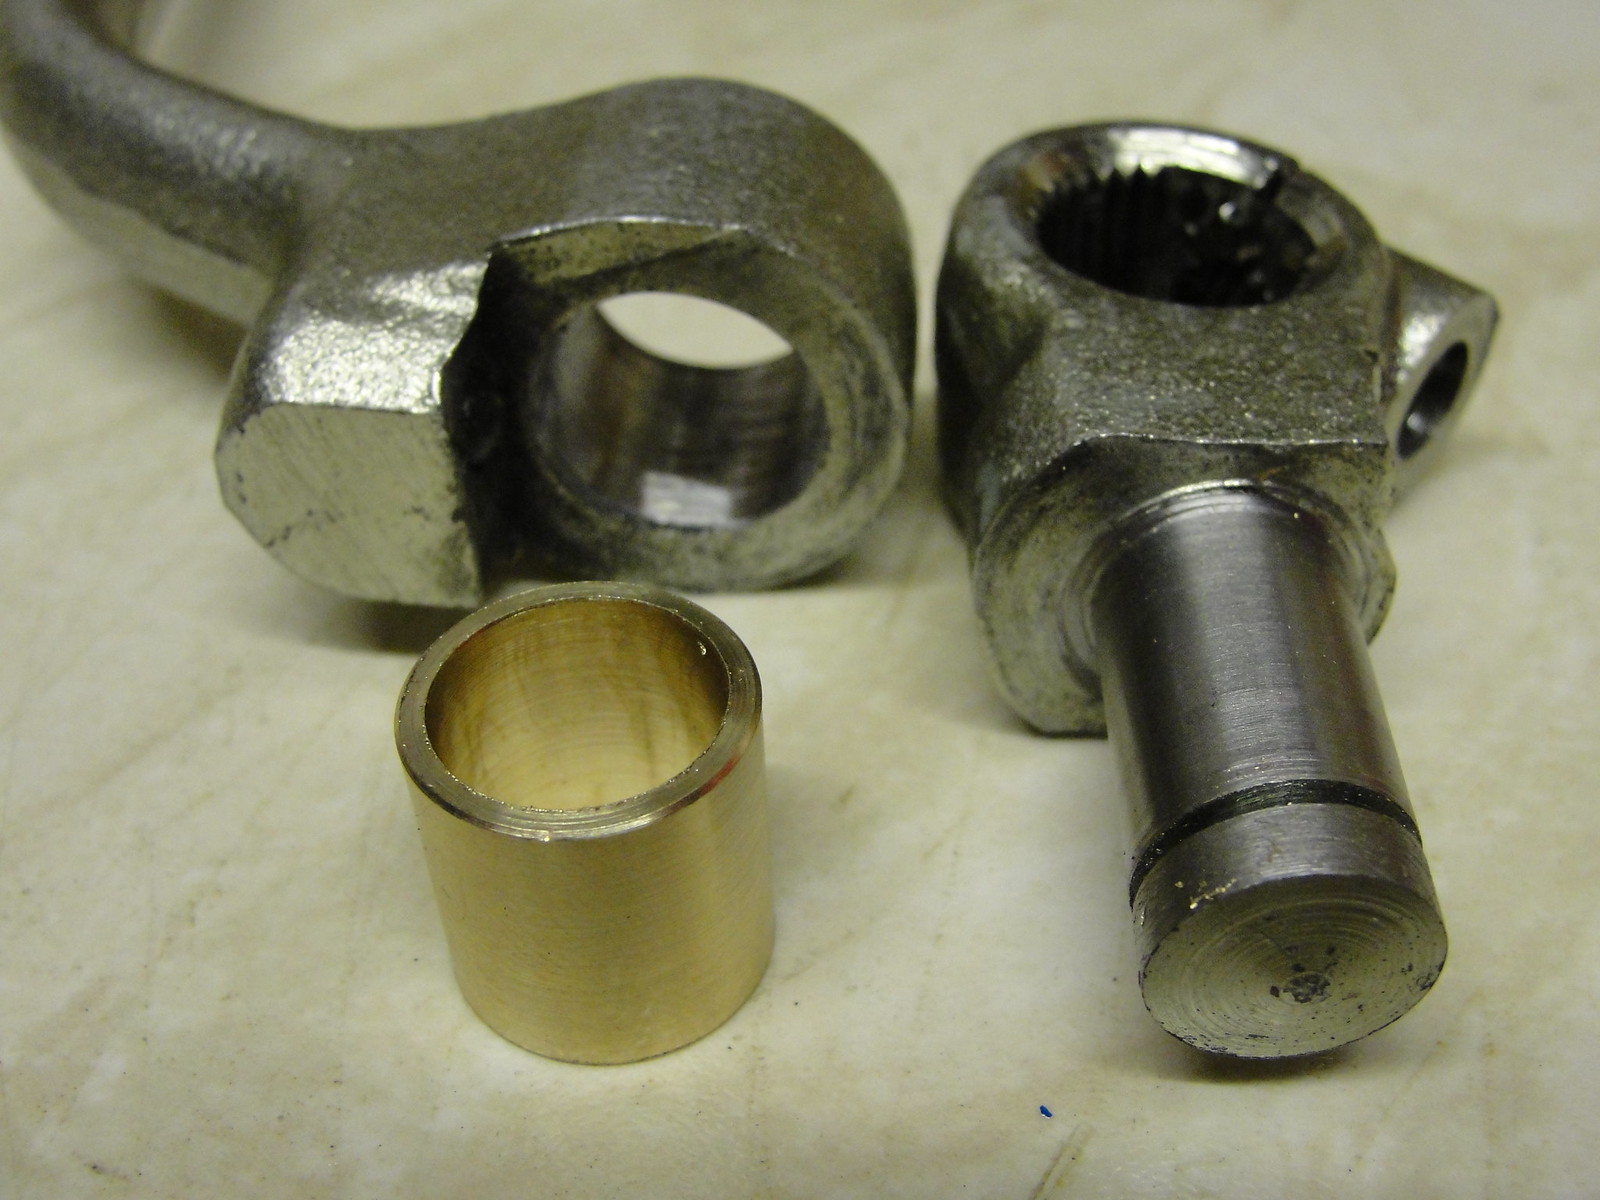 I bought some rad grill spacers off Norbo, but couldn't help feeling I could make something nicer. I made the following to go with his cool grill: 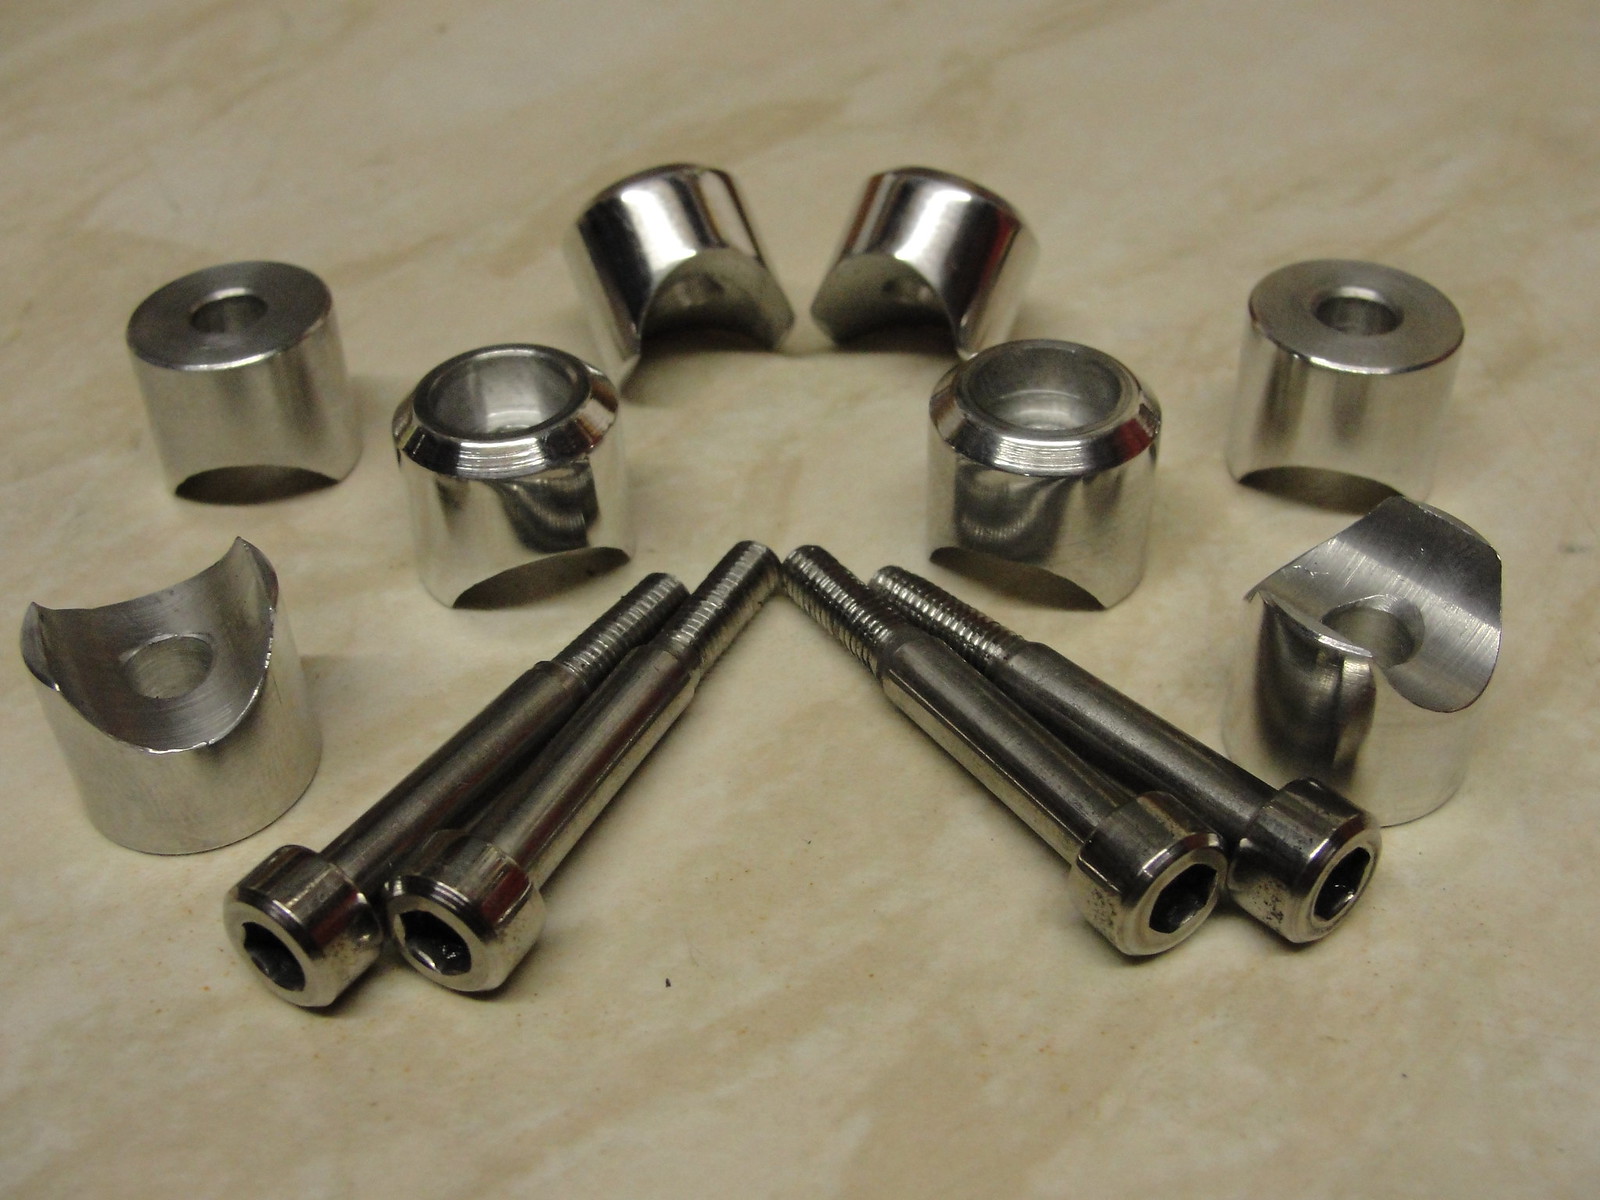 |
|
|
|
Post by marsbar350 on Nov 10, 2013 21:25:29 GMT 1
excellent jonny boy quality is top notch  |
|
|
|
Post by copper99 on Nov 11, 2013 22:06:36 GMT 1
Stunning work mate..
|
|
|
|
Post by jon on Nov 16, 2013 21:45:21 GMT 1
Bled front brake today, and I can't wait to try it as I think its going to really work well. Yesterday I made a centre stand bracket to stop it hitting the chain. 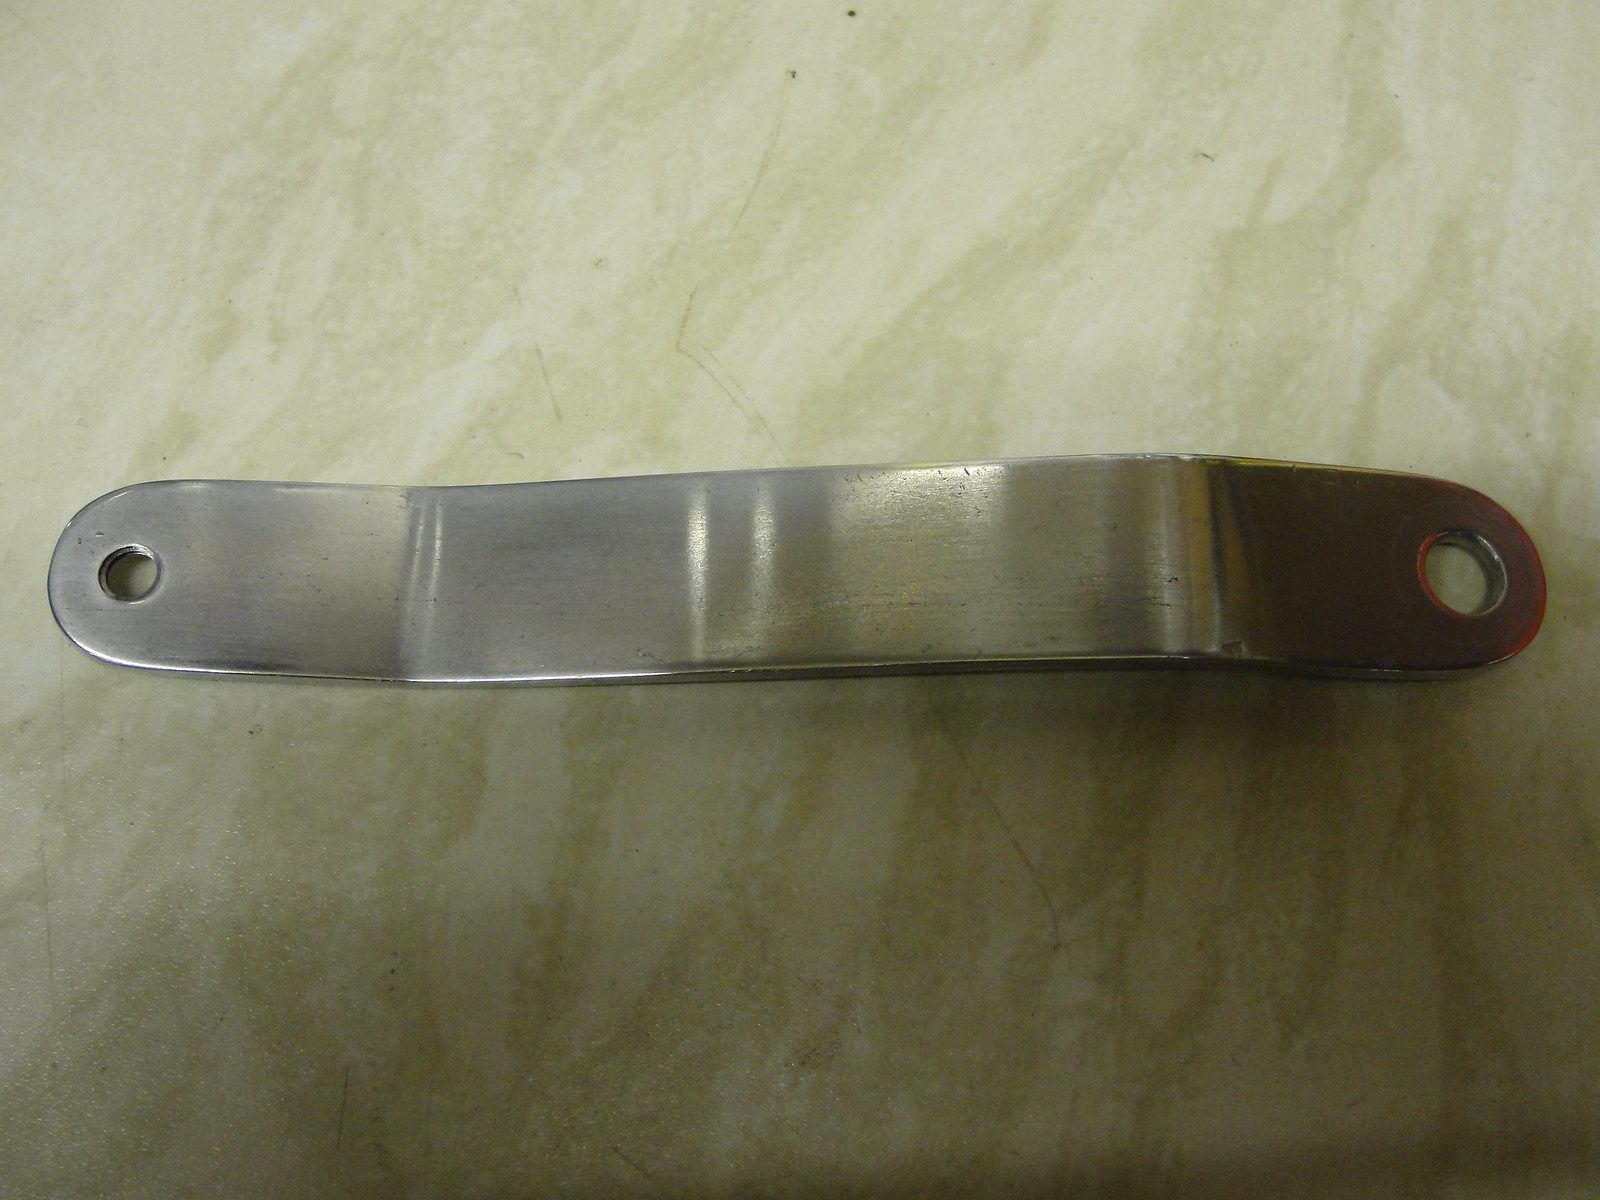 Today I tried my black anodising kit for the first time. Really it's for my next build which will be race look rather than bling. Turned out really well! 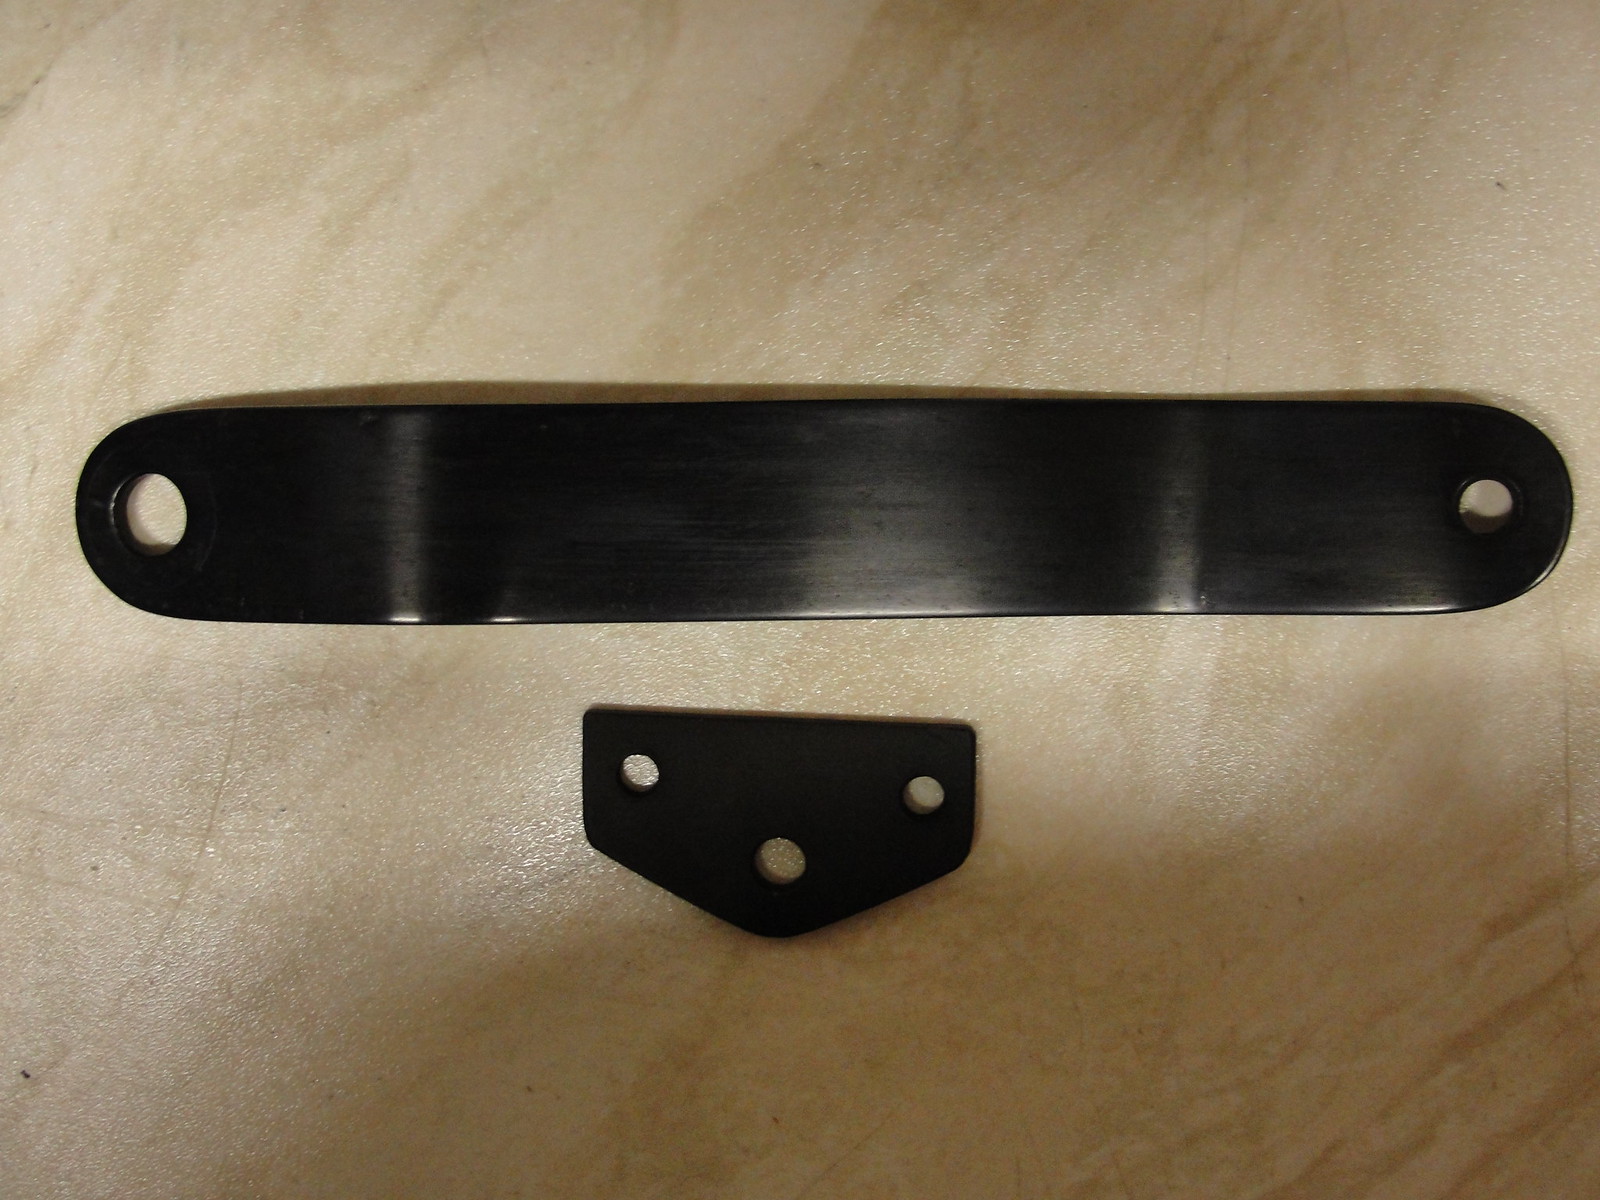 And fitted:  |
|
matt7
Thrash Merchant
 Smell of the 2 stroke & the roar of the crowd
Posts: 445
|
Post by matt7 on Nov 17, 2013 11:52:53 GMT 1
Excellent fabrication skills Why do you leave centre stand fitted ? legal requirement, or personal choice ? seems most builds down your way (and surprising number around globe) have centre stands fitted ? Certainly not because you're a one for originality of Yamaha's design |
|
|
|
Post by jon on Nov 17, 2013 21:41:05 GMT 1
matt7, I really like the practability of a centre stand. Not getting knocked over easily, chain lubing etc. I know some modern bikes don't have them, but a LC has the capability of one, so why not? I've never really liked the idea of the strain of a sidestand on an LC (or some other bikes for that matter). I've seen a few snapped off. Must have damaged the bike? Anyway that's why I went to great lengths to fabricate an LC looking centre stand for my LC. With the TZR running gear (and my height) the bike sits a little higher than normal. With a standard LC centre stand the rear wheel would have not been raised off the ground, and therefore the bike not as stable. I took measurements off an LC stand, and used a pipe bender the make a similar looking stand; but with twin tubing going into one. Took a lot of effort, but to be honest the sort of price an LC stand is going for it was worth it for the £20 or so outlay it cost me in materials. To buy one a modify it would have cost a lot more. 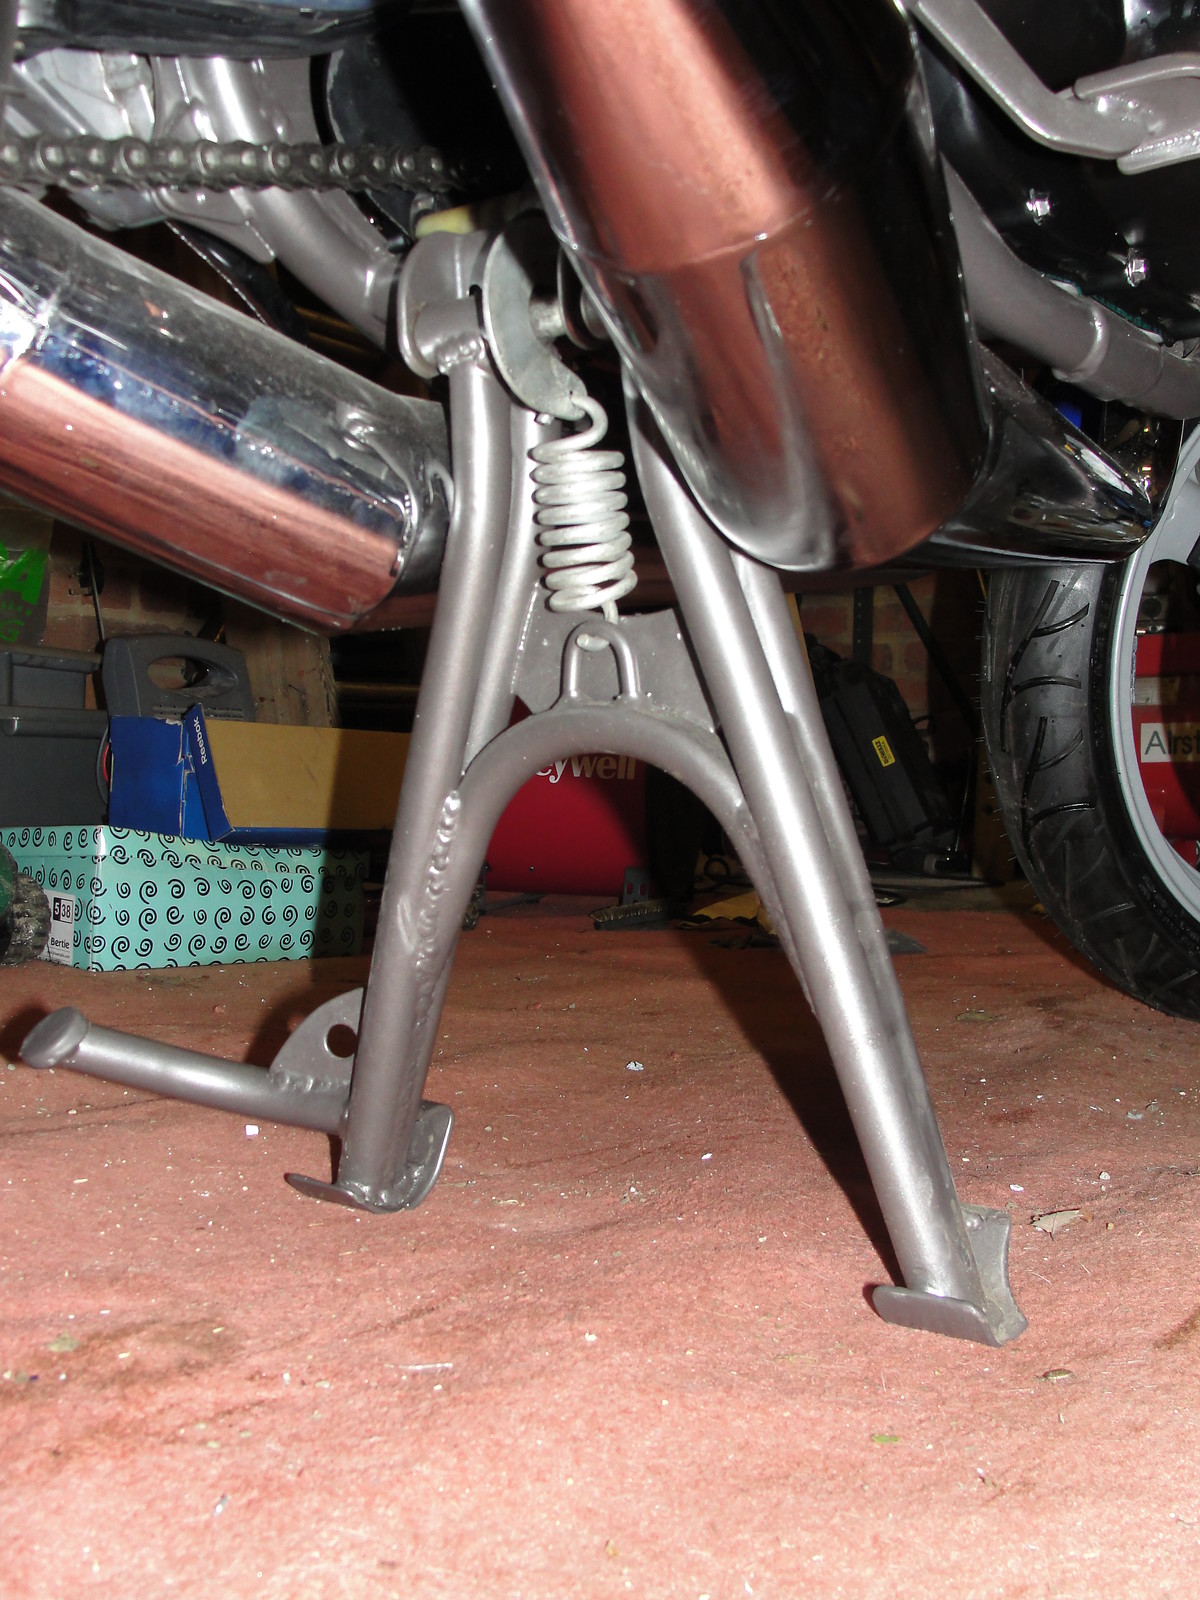 |
|
|
|
Post by jon on Nov 23, 2013 21:14:27 GMT 1
It's almost finished. Got to sort out a fuel starvation problem, then (hopefully) MOT next weekend. Dragged it out today for a photo in the daylight: 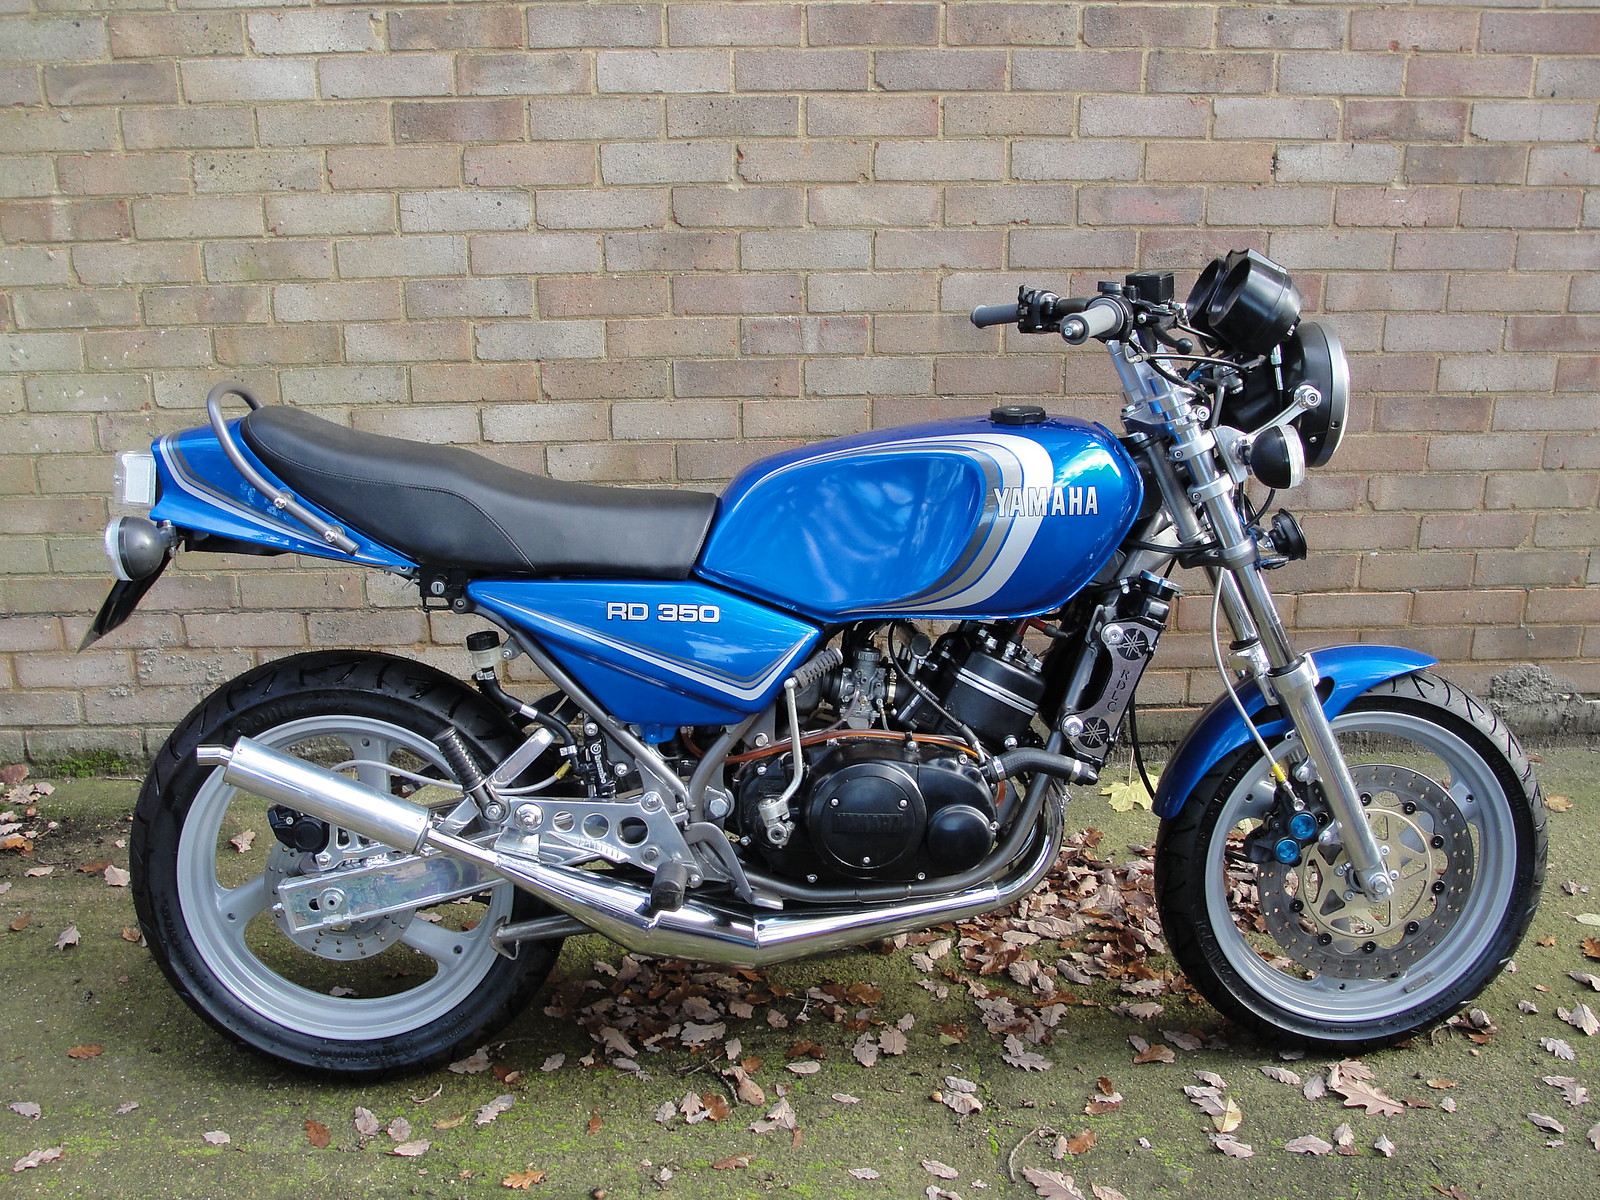 |
|
|
|
Post by archloafer on Nov 24, 2013 0:31:01 GMT 1
Really lovely work - I've enjoyed reading this thread very much, and learned a thing or two. Fantastic result, a really great looking bike. Hat duly tipped...
~ David
|
|
|
|
Post by northernmonkey on Nov 24, 2013 10:48:48 GMT 1
Nice build,good skills looks a bit tall at the front for me and side panels need to be black at the lower half
|
|
|
|
Post by johnlc on Nov 24, 2013 11:33:55 GMT 1
Think it's just the headlight that's a bit high everything else looks fine
|
|
|
|
Post by jon on Nov 24, 2013 12:37:35 GMT 1
Thanks for the comments guys.
The headlight and clocks can be moved up and down together. I agree seeing it side on they do look a bit high.
I think I will lower it, for aesthetic reasons.
The bars will stay for know, until I've driven it. I wanted a comfortable riding position. I have got a set of chrome drag bars as a backup if I think it feels too high.
On a practical note, does anyone know the normal flow of an LC tap with little petrol in the tame (litres - or part litre per minute) ?
|
|
|
|
Post by copper99 on Nov 24, 2013 16:01:45 GMT 1
Thats a beauty mate...id be very proud of that.
|
|
|
|
Post by foxyjohn on Nov 24, 2013 17:54:10 GMT 1
Quality build |
|
|
|
Post by yamman1066 on Nov 24, 2013 18:04:52 GMT 1
hi like the candy blue , nice
|
|
|
|
Post by 1966baz on Nov 24, 2013 18:34:52 GMT 1
Yeah love the candy blue - really suits the whole bike. Well done mate.
|
|


 , making sending photos difficult.


