|
|
Post by dusty350 on Apr 23, 2019 7:35:43 GMT 1
Great work so far mate  Engine build looks awesome  I always change the clutch basket when I do mine. You'll know it's good forever now Dusty |
|
|
|
Post by andy748 on Apr 23, 2019 9:28:54 GMT 1
Looks great, methodical build, check you bronze bush for play as well, slip it on the shaft should be next to no play, MBD sells them if it’s worn (just done mine).Andy.
|
|
|
|
Post by oldbritguy on Apr 23, 2019 20:42:55 GMT 1
Great work so far mate Engine build looks awesome I always change the clutch basket when I do mine. You'll know it's good forever now Dusty Cheers Dusty, small steps but at least going in the right direction. Got the billet basket idea from your own engine build so cheers for that Going to look into getting the other primary gear hardchromed and reground down to correct size but that will wait until this one is built (eventually ha!) hopefully some more updates to follow soon J |
|
|
|
Post by oldbritguy on Apr 23, 2019 20:46:24 GMT 1
Looks great, methodical build, check you bronze bush for play as well, slip it on the shaft should be next to no play, MBD sells them if it’s worn (just done mine).Andy. Thanks Andy Been following some top builds on this forum so in good company for a steer in the right direction Bronze bush is good with no slop or play so it is going back in as is. Hoping to get more on the motor this week Cheers John |
|
|
|
Post by donkeychomp on Apr 23, 2019 22:12:06 GMT 1
Looking great! Those gen Yam parts get a bit pricey!
Alex
|
|
|
|
Post by oldbritguy on Apr 26, 2019 12:51:36 GMT 1
You are spot on there Alex, I have stopped counting now lol. A couple of parts back from plating today, happy with that  Just noticed a blur on the image. Must have been a small spot of oil from the engine rebuild pics which I will put up later today hopefully |
|
|
|
Post by midlifecrisisrd on Apr 26, 2019 15:13:38 GMT 1
You are spot on there Alex, I have stopped counting now lol. A couple of parts back from plating today, happy with that Just noticed a blur on the image. Must have been a small spot of oil from the engine rebuild pics which I will put up later today hopefully Is that why my parts are not ready You've been keeping MY plater busy 😂😂😂 Steve |
|
|
|
Post by oldbritguy on Apr 26, 2019 15:18:27 GMT 1
A while back I discovered a hole rotted in the frame so off the the welder it went. Not the tidiest weld job I have seen but solid with an extra brace put in for strength. Time for the angle grinder.  Once buffed down a bit it is time for paint. I am not a great fan of powdercoated frames as I find them difficult to tidy up when they get scraped or scuffed so 1st coat of primer  Flatten with wet and dry and another coat of primer before paint. Thought I would try some PJ1 gloss as the usual rattle can stuff has disappointed in the past  After a couple of coats its time to start sticking bits back on   Now to find some more parts to bolt back on |
|
|
|
Post by oldbritguy on Apr 26, 2019 15:23:01 GMT 1
You are spot on there Alex, I have stopped counting now lol. A couple of parts back from plating today, happy with that Just noticed a blur on the image. Must have been a small spot of oil from the engine rebuild pics which I will put up later today hopefully Is that why my parts are not ready You've been keeping MY plater busy 😂😂😂 Steve Sorry Steve I thought if I just gave them a couple of parts they would sneak them in with yours lol. Anyhow they are free now so you should get your parts soon John |
|
|
|
Post by oldbritguy on Apr 26, 2019 23:38:37 GMT 1
|
|
|
|
Post by Yogi on Apr 27, 2019 6:30:44 GMT 1
They look 👀really good now mate,,Top job
Amazing how good elbow grease works 👍
|
|
|
|
Post by donkeychomp on Apr 27, 2019 22:29:22 GMT 1
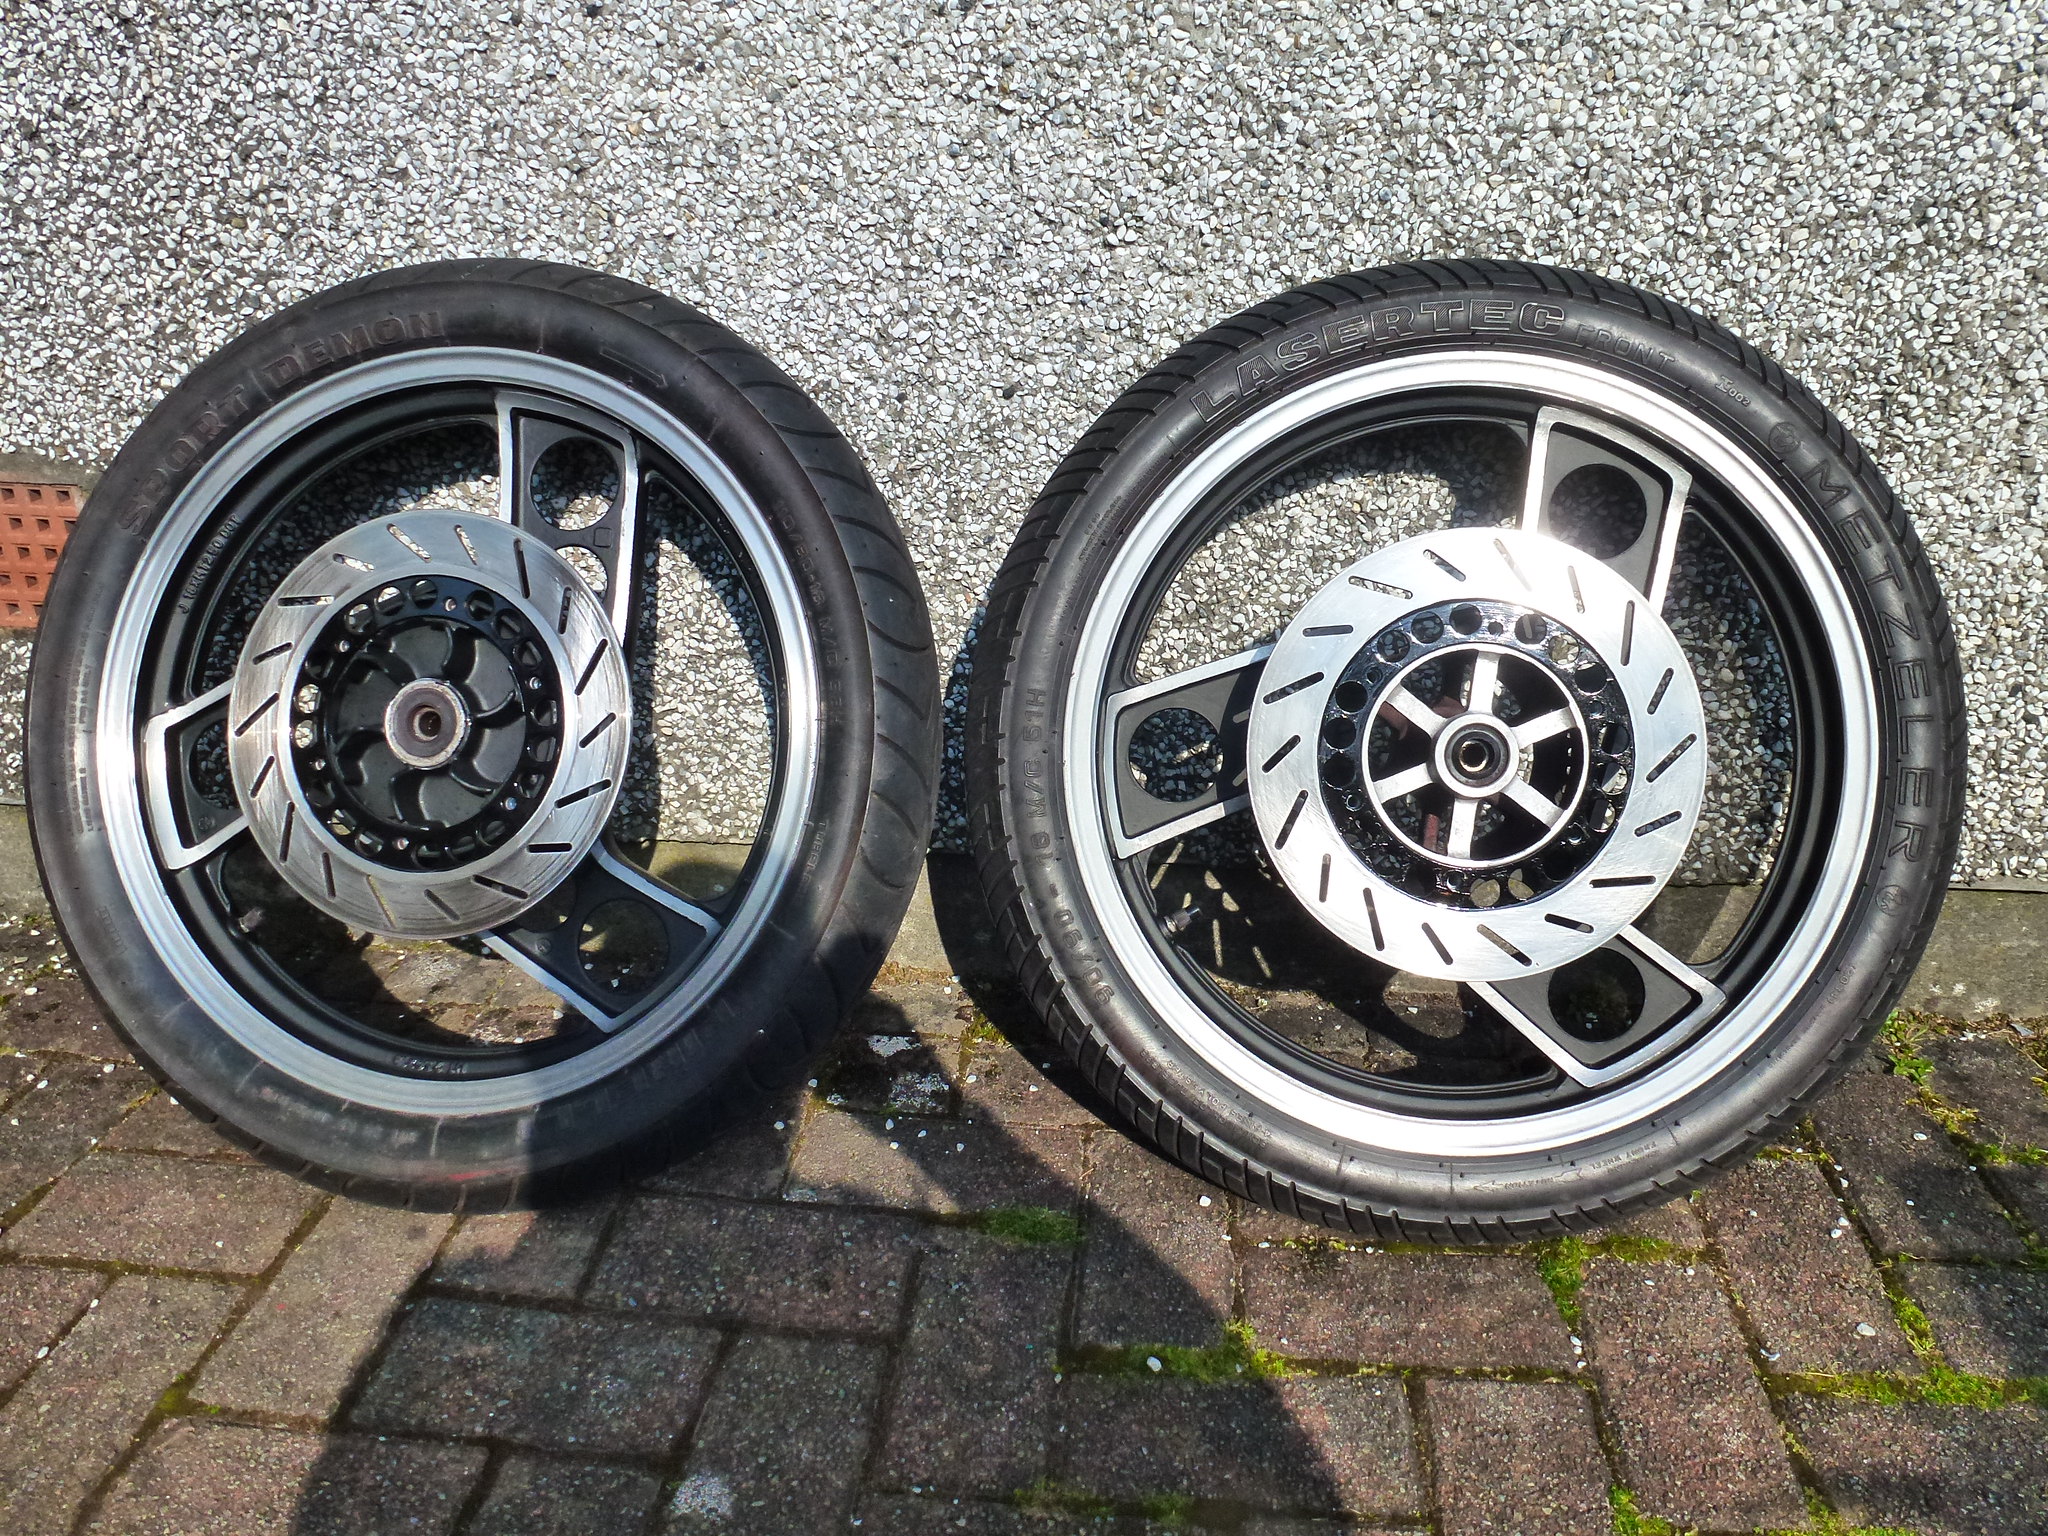
I'm very impressed with the frame. And the wheels! Good work there.
Alex
|
|
|
|
Post by oldbritguy on Apr 28, 2019 0:49:51 GMT 1
I'm very impressed with the frame. And the wheels! Good work there. Alex Cheers Alex I am also happy with how the frame turned out as I have never used that paint before so we will see how it stands up to my clumsy spanner work. Wheels were a bit of an effort but also turned out nice. Two more jobs off the list John |
|
|
|
Post by oldbritguy on Apr 28, 2019 1:25:54 GMT 1
Todays job, get the power valves back in. I got the cylinders rebored earlier this year courtesy of Dave Mutts so had to double check clearances in the bores between the valves and pistons. Dont want any contact when I go to start the thing. A little bit of cleaning up with some fine files and wet and dry was required but now we are good to go. 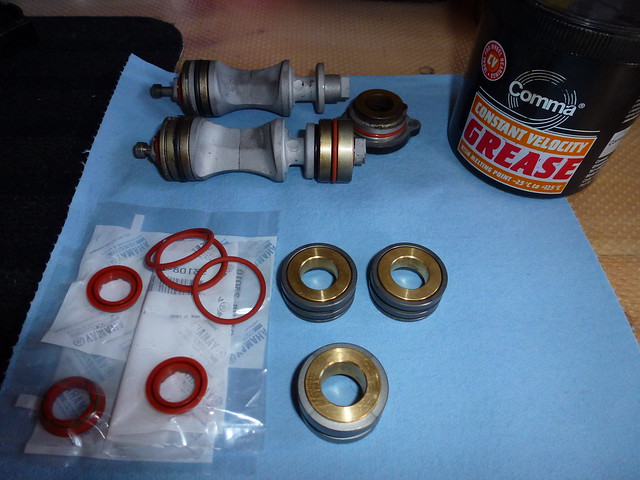 Seeing as I was fitting new bushes as well as the o-rings and castle seals, the old ones were just binned. Manual says to lube everything with molybdenum disulphide grease (messy black stuff you put in CV joints) so on with the o-rings and we are ready for reassembly. As a note, I never replaced the end valve bush as they are no longer available (the one in the end cap) but it was still a good fit with no play so I was happy with that.  O-rings fitted and everything suitably greased the valves are back in and everything moving nice and smooth  As a word of caution, that grease is particularly messy stuff so don't go overboard with it if you are doing your seals or bushes in the future John |
|
|
|
Post by oldbritguy on Apr 30, 2019 0:53:45 GMT 1
|
|
|
|
Post by oldbritguy on Jul 29, 2019 14:04:37 GMT 1
After a long break the build is back on. I must confess I wish I had finished the engine before going off on an extended holiday as I have lost my flow on things so I will try and get some sort of order into things once I also find where I stored all of my parts Haha! I painted the clutch cover a while back so it was time to get it ready for refitting New water pump seal and bearing and a new seal for the oil pump worm drive 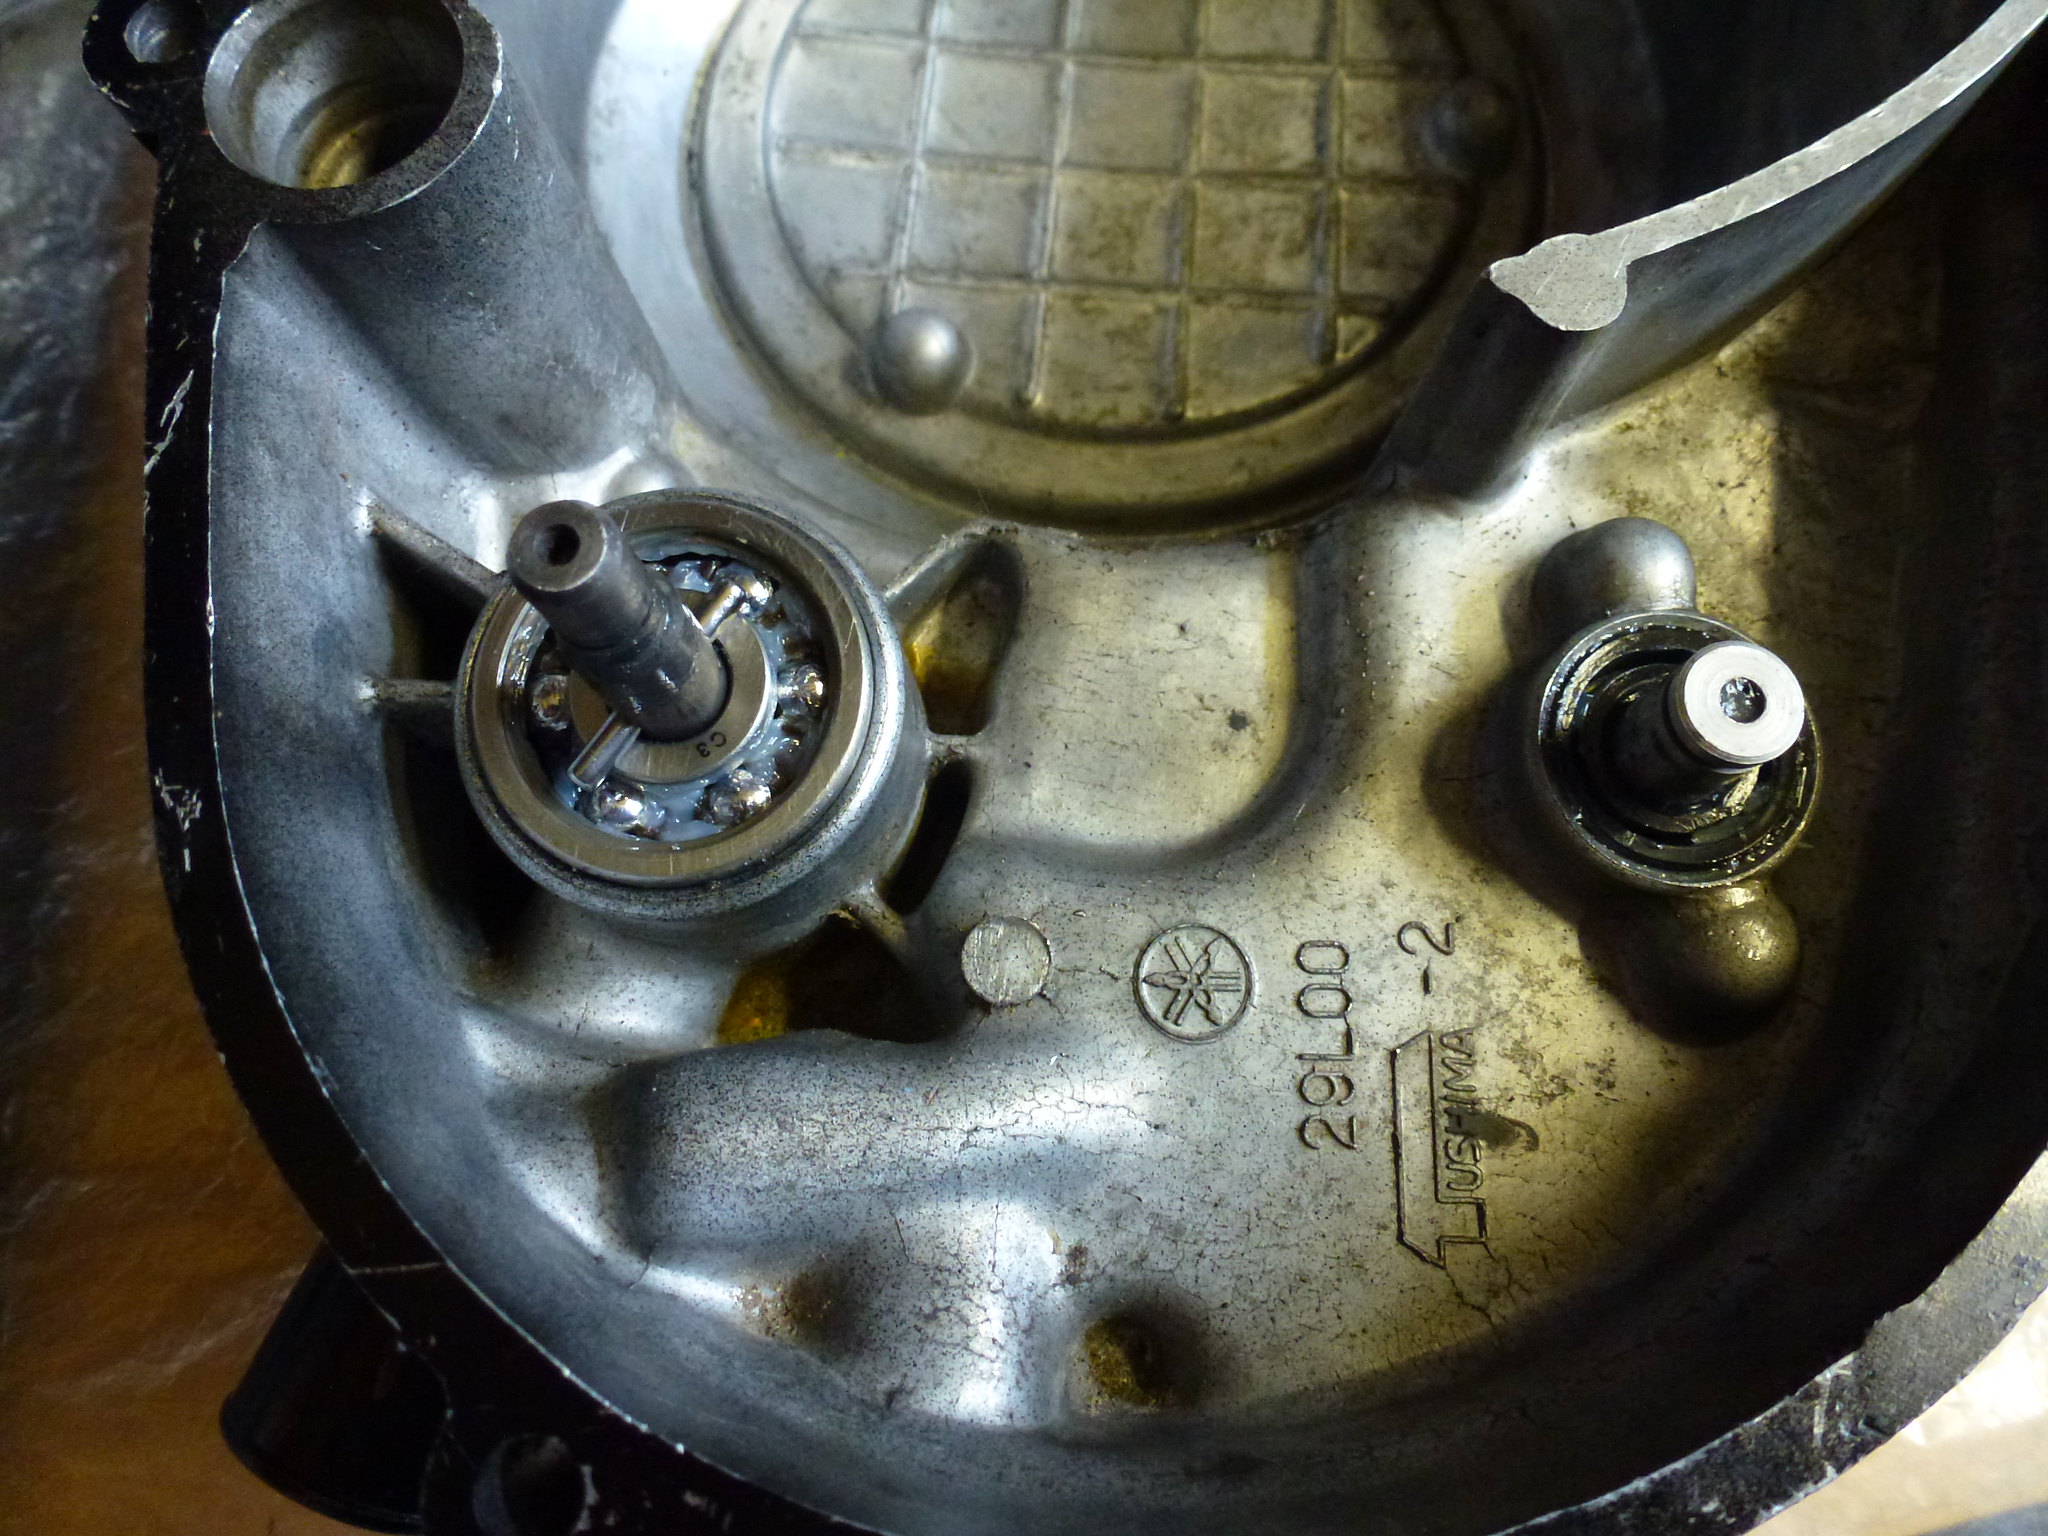 Plastic gears and circlips refitted  Then the newly plated water pump cover and gasket and we are done for now  Its good to get the spanners back out |
|
tlmark
Drag-strip hero

Posts: 203
|
Post by tlmark on Jul 29, 2019 15:10:26 GMT 1
Looks good
|
|
|
|
Post by oldbritguy on Aug 4, 2019 0:36:16 GMT 1
Now that the Flickr issue is sorted I can get some progress pics up. Still working on the bottom end, it was time for the primary drive and clutch. Having read quite a few engine rebuild threads on here I figured it was straightforward enough. Starting with the clutch going back on the mainshaft it was thick thrust washer first  then the clutch basket/hub with centre bush  Then second thick thrust washer (both the same size)  then slide on the clutch centre hub and fit a new tab washer and nut. So far so good  It was at this point I realised that I would be unable to fit the primary gear and oil pump gear as there is not enough clearance to get past the clutch basket. At least I hadn't tightened the clutch centre nut beyond finger tight so it was everything back off and get the primary gear on.  A bit of threebond on the woodruff key and fit everything together with lots of grease on the crank seal. Then torque up.   Now that I think I know what I am doing I'll get to the clutch tomorrow John |
|
|
|
Post by mouse on Aug 4, 2019 8:13:45 GMT 1
Really lovely job there Sir, well done!
Mouse
|
|
|
|
Post by dusty350 on Aug 4, 2019 9:16:41 GMT 1
Hi John Great work so far mate - it's gonna look awesome How did you lock the crankshaft when torqueing the primary gear ? The pics suggest you slid a bar through the little end eye of the rods ? Word of caution. That puts a lot of strain on that part of the conrod and is not recommended as a way of locking the crank. I did it on my very first aircooled build years ago, and was bollocked by the old Yamaha mechanic at my local bike shop when I mentioned it ! I've seen a pic of a tool - think it was Yamaha , that was a locking tool that is a piece of steel with a slit cut into it, imagine a very large reed petal design, that slides over the crankcase mouth and either side of the rod arm - 1 for each side. It supports the conrod below the circular little end housing, at a stronger part of the rod. I've googled that tool and cant find a pic anywhere ? And I've never seen it used in any of the rebuild threads ? The weakest part of the rod is the little end housing, so it will be those that are locking the crank to allow you to put 47ft/lbs through the crankshaft nut. You are best off fitting primary, clutch and rotor and then locking those combined to save any one component from taking a lot of strain. It will also prevent the risk of twisting the crank. These cranks are only pressed together and not splined like the earlier aircooled cranks. I've learnt a lot from others building them over the years, and I do certain things very differently now as to how I used to do them ! Dusty |
|
|
|
Post by oldbritguy on Aug 4, 2019 10:07:37 GMT 1
Cheers Dusty, we are getting there slowly. Yeah I used a 1/2 socket bar supported on two wooden blocks to hold the crank at the small end with a piece of hard plastic sleeving to protect the internal surface of the small end bearing face. I think this was the method suggested in the Haynes manual too hence going for it.
I have used this method with every Brit engine I have built over the years without any probs but as you say they are solid and quite hefty bits of metal. I did think of other ways to lock up the crank but struggled to come up with anything else. I was real careful while doing this did check the small end after with the digital vernier when finished just to make sure everything was still in shape.
I totally agree that this looks the weakest part of the crank set up and I never considered the crank twisting either due to it's pressed up construction but hey, it is done now and I don't really want to pull the thing apart and fit another new crank. I'll keep my fingers crossed.
What I will do though is once I fit the cylinders, I will get the timing disc fitted to the crank and using a dial gauge I can check the position of both sides at TDC relative to each other and crank position and hopefully nothing has moved.
Ahhh, the seeds of doubt are now firmly planted
John
|
|
|
|
Post by dusty350 on Aug 4, 2019 10:39:23 GMT 1
Didn't want to worry you mate !
The 400 I did years ago is still running now with no issues if that helps😉
We got away with loads of things back then, but if there is a safer way of doing it then that's gotta be better. Get a rotor holding tool if you dont already have one, they are cheap and perfect for the job. If you can balance the forces each side when tightening the nuts it will be safer😉
Dusty👍
|
|
|
|
Post by oldbritguy on Aug 4, 2019 23:39:01 GMT 1
Cheers again Dusty for sharing your wisdom and yes I have a rotor locking tool. In fact it is the very one you suggested a while back when I was gathering tools for stripping my LC motor (Which is still to happen lol). I am actually a bit further on with the build so feeding the photos in now Flickr is back up in and some sort of sequence, but still a long way to go yet. So back to the bottom end. Clutch basket and centre back on thrust washers, lock tab, new nut and all torqued up  New clip and seal for the water pipe and in it goes with plenty of rubber grease   Next in with a new pushrod and ball bearing    Then it was time for the clutch. EBC HD plates and 3 std springs with 3 TZ ones. Hopefully not too heavy to operate and no slipping either 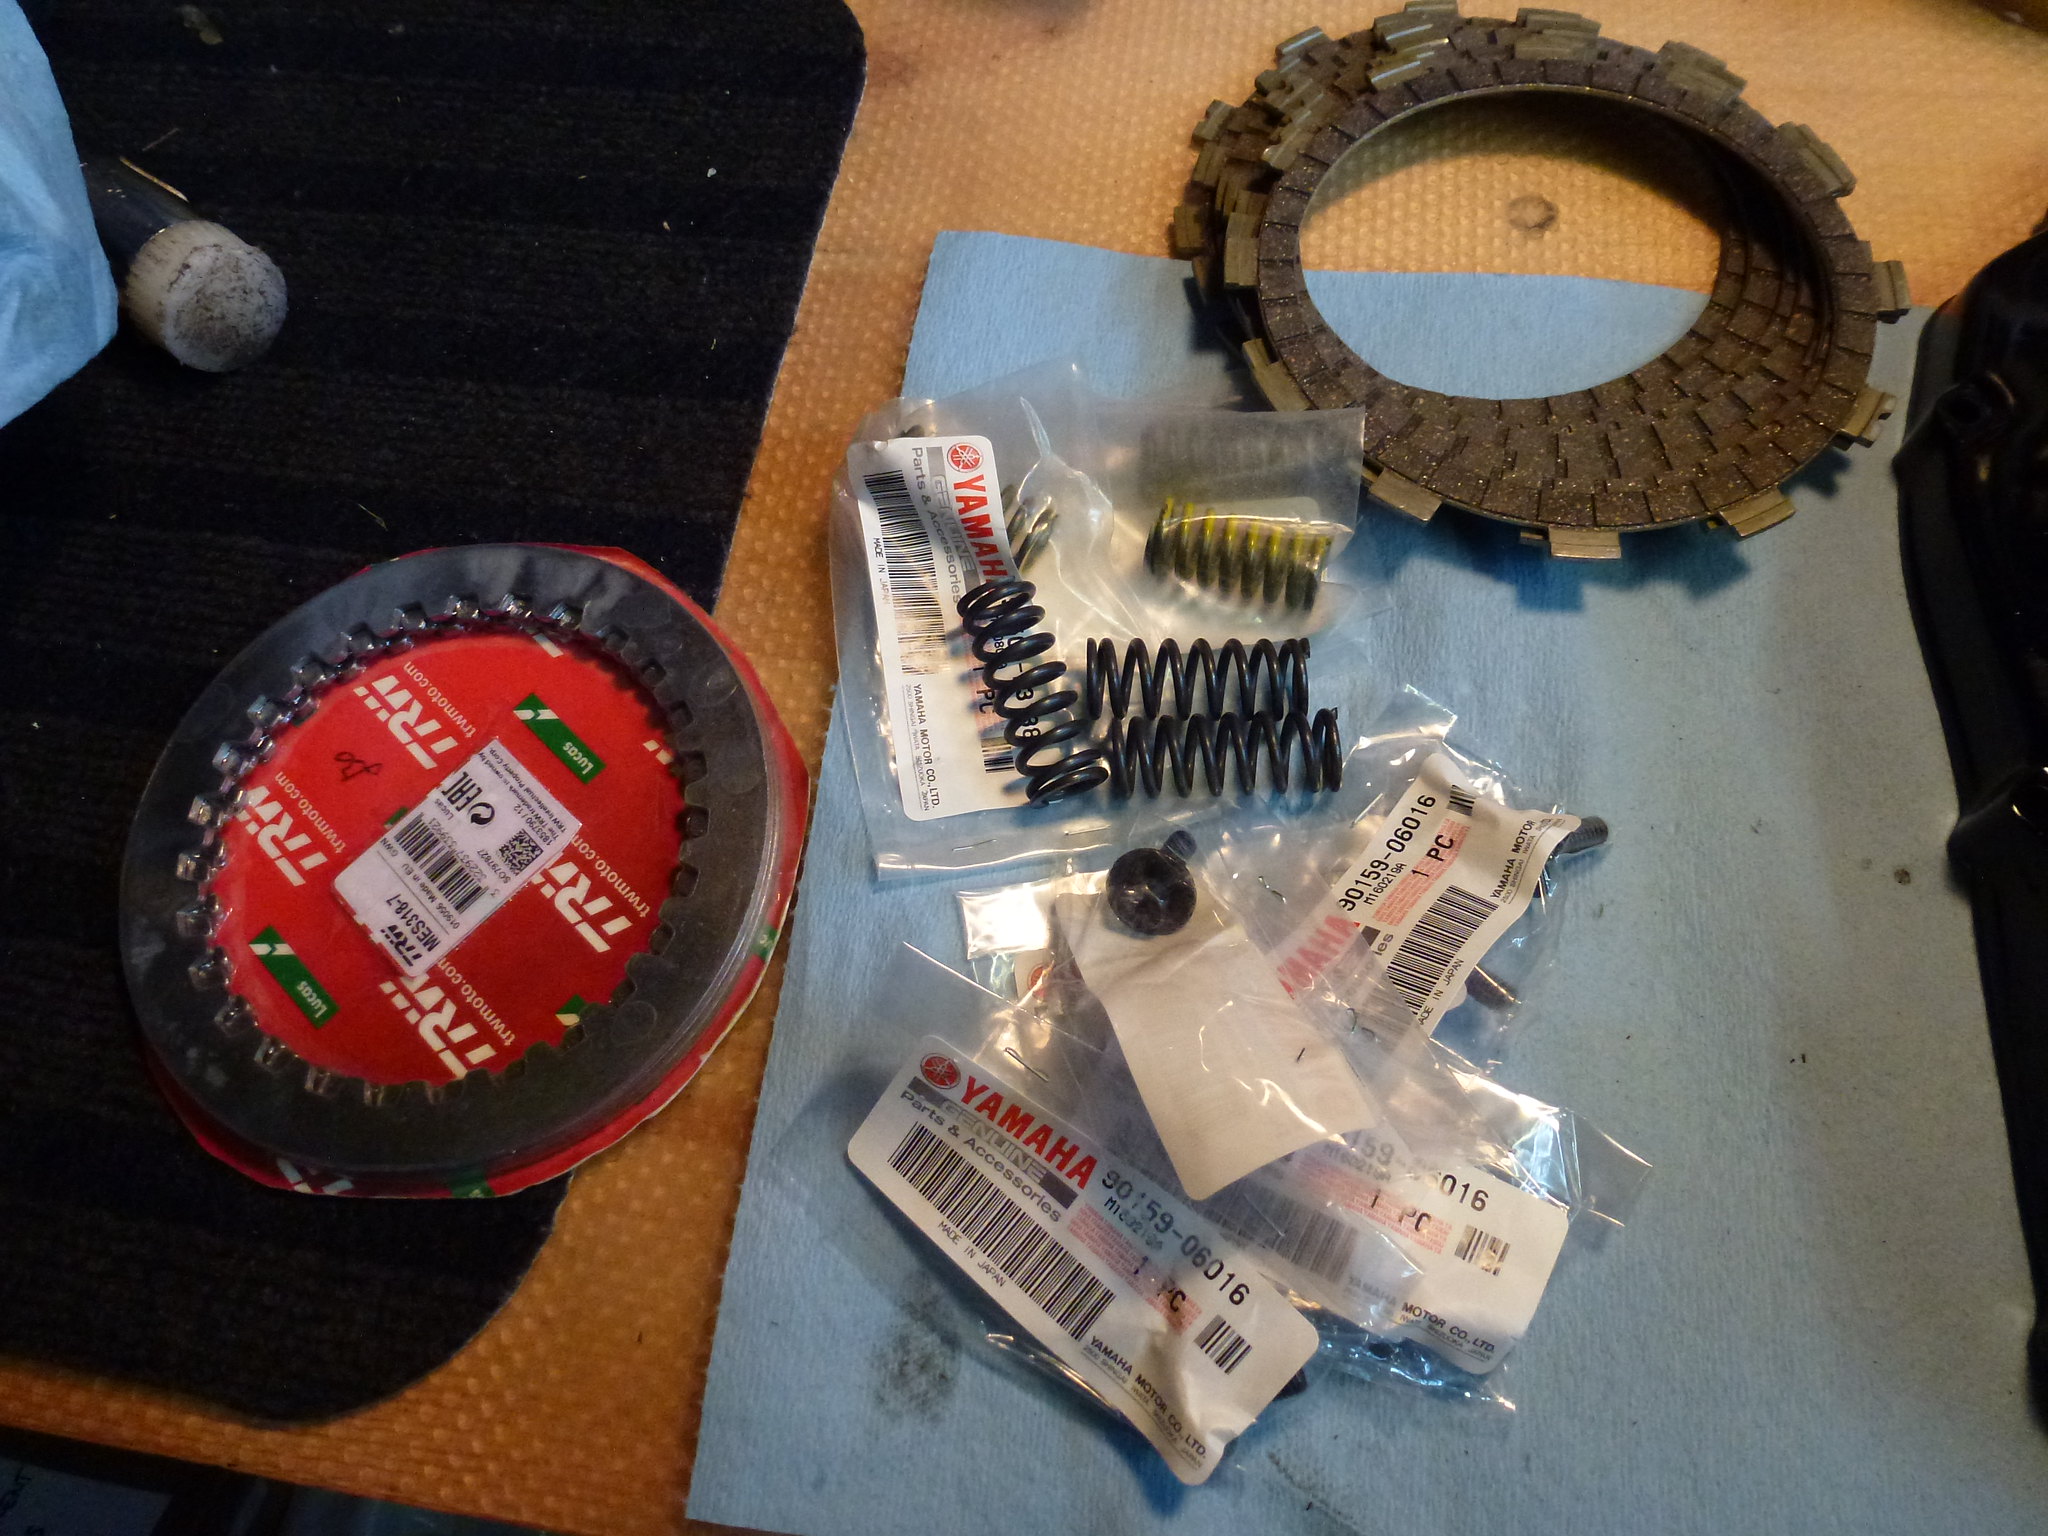 Picked this lot up from Norbo but decided to dispense with the o-rings as I have a mix and match of non OEM parts plus there are mixed reviews on their effectiveness by the good lads on the forum. If the clutch is rattling then I will get a set and stick them in. Soaked the plates for a couple of hours in oil then in they went. 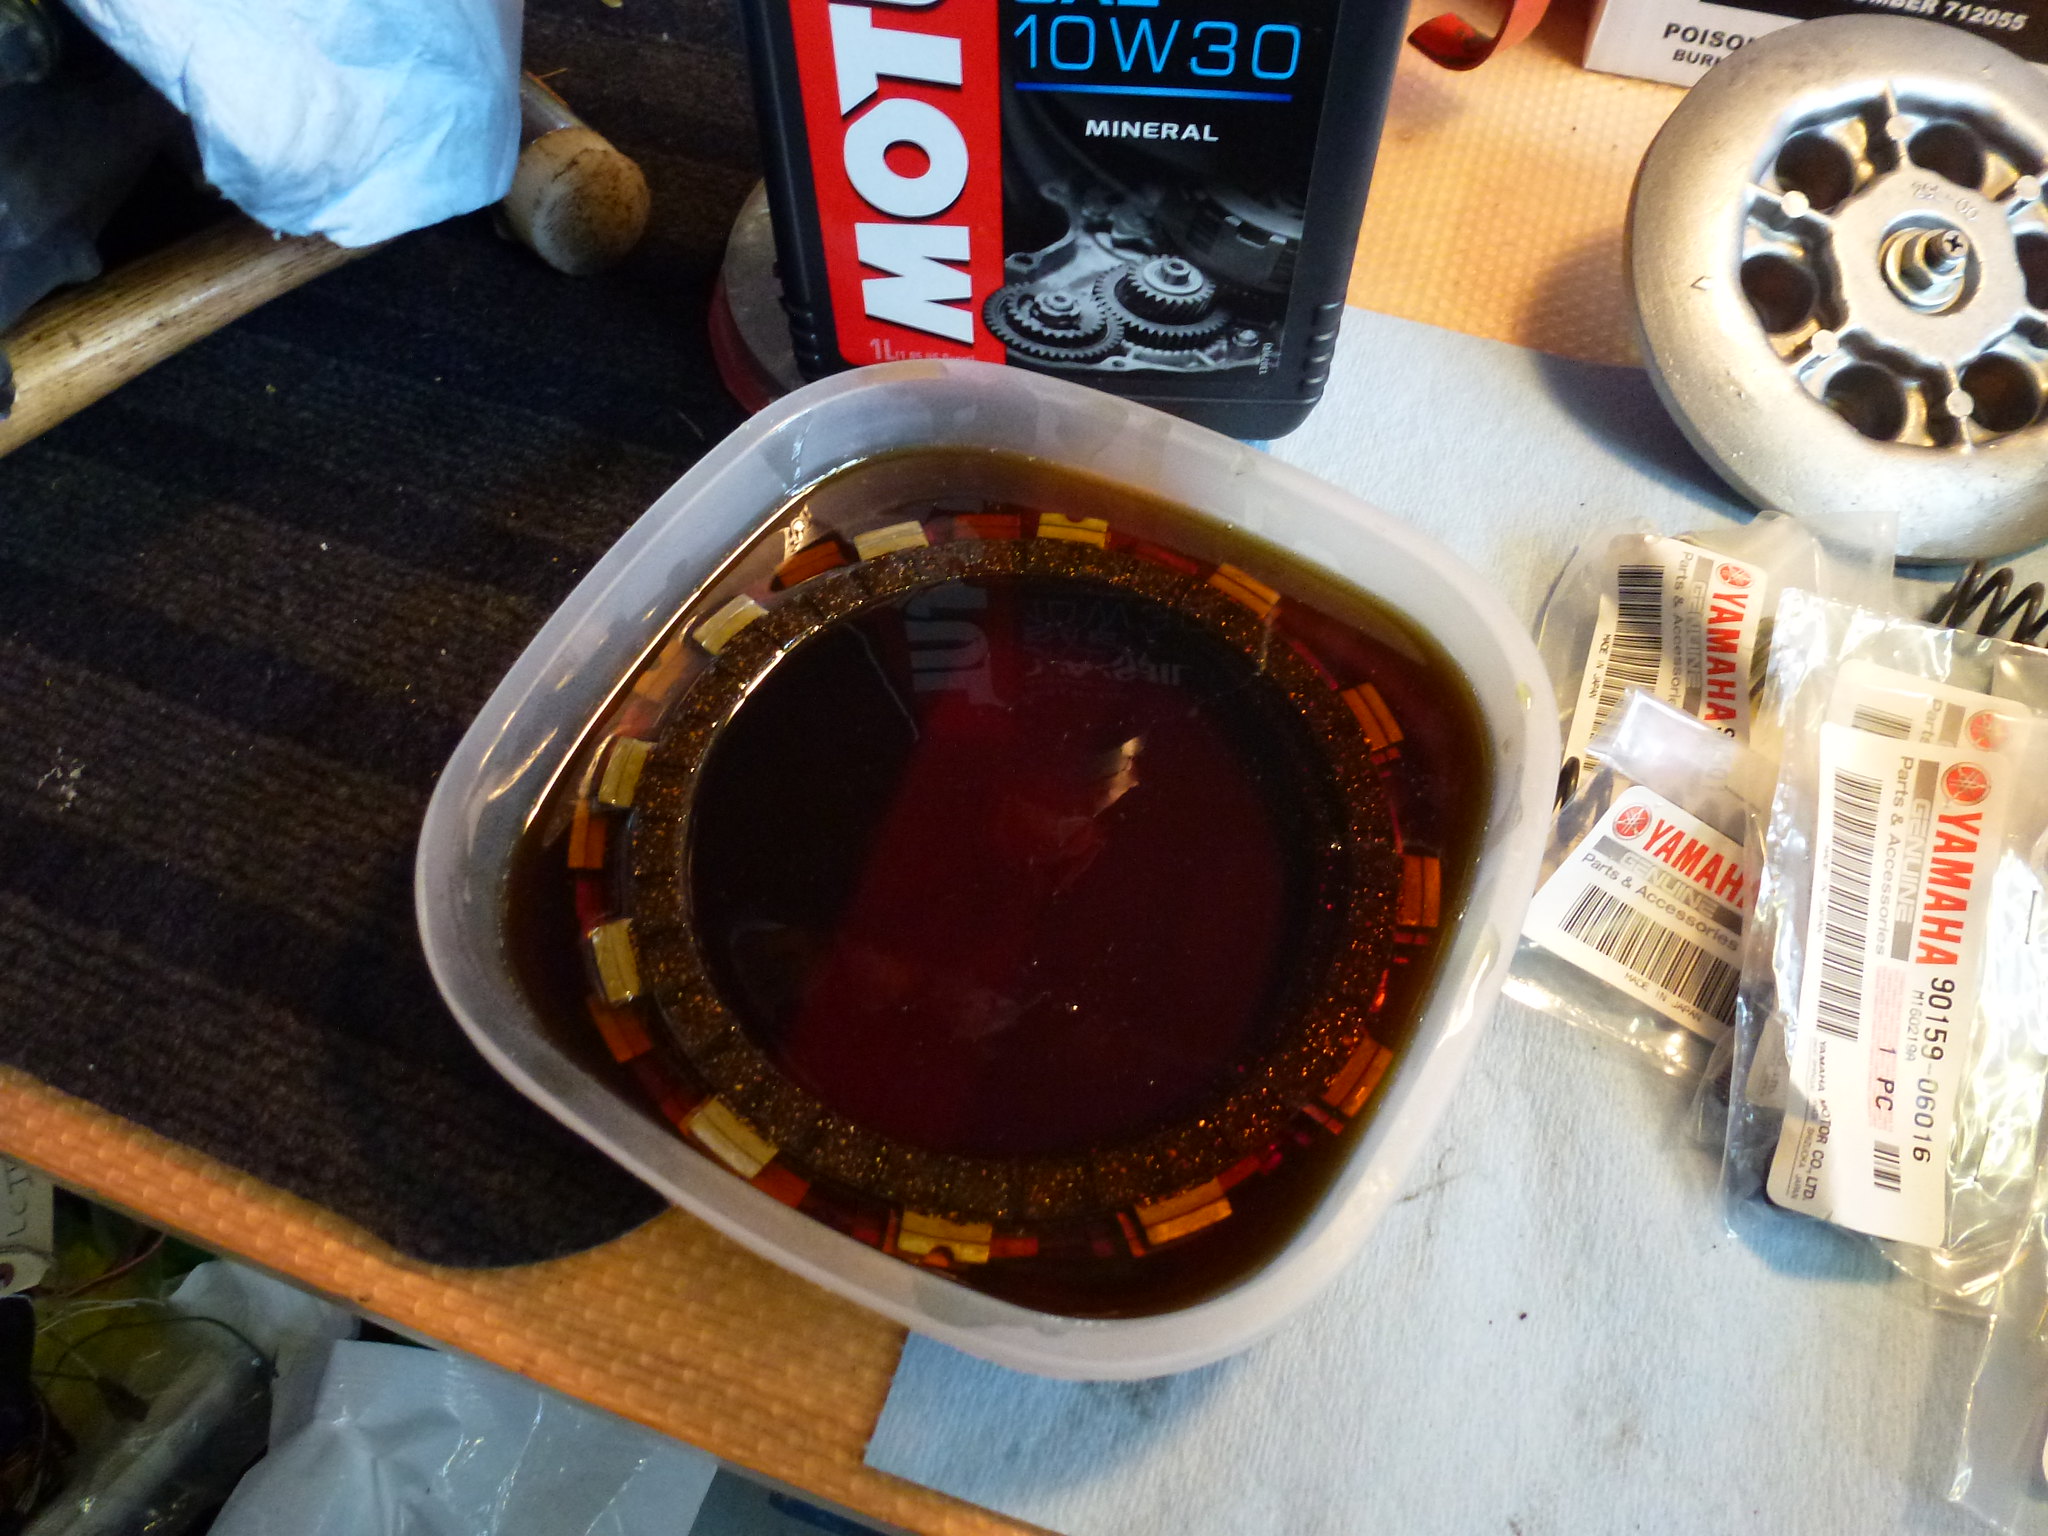 Pressure plate on then new springs and bolts   Yes, I did fully tighten them all in but took this pic to show the alternate spacing of the std (yellow painted)and TZ springs Last thing to do here before fitting the clutch cover was fit a new seal for the kickstart  Greased up and ready to fit. Rotor side next John |
|
|
|
Post by veg on Aug 4, 2019 23:52:26 GMT 1
Coming together really nicely before you know it, it’ll be on the road
|
|
|
|
Post by Tobyjugs on Aug 5, 2019 0:22:27 GMT 1
Hi John I like the pictures of the clutch springs. I have a few of the yellow springs and thanks to you I know which ones are standard.
Cheers for that.
Not so long ago I fitted a stealth lock up clutch to Kees's bike. I wanted to fit standard springs. I ended up measuring the Lenght of the springs under compression and free. I used the weakest springs I could find. The yellow springs were slightly stiffer but all had the same measurement. OEM quality.
|
|
|
|
Post by dusty350 on Aug 5, 2019 6:55:03 GMT 1
Looking good mate On the home strait now Dusty |
|
|
|
Post by yamark on Aug 5, 2019 7:27:55 GMT 1
Nice work John
I like the use of new parts, it's something I always try to do.
Great build mate |
|
|
|
Post by oldbritguy on Aug 5, 2019 17:54:42 GMT 1
Hi John I like the pictures of the clutch springs. I have a few of the yellow springs and thanks to you I know which ones are standard. Cheers for that. Not so long ago I fitted a stealth lock up clutch to Kees's bike. I wanted to fit standard springs. I ended up measuring the Lenght of the springs under compression and free. I used the weakest springs I could find. The yellow springs were slightly stiffer but all had the same measurement. OEM quality. I was surprised myself by the difference in the spring lengths and happy to go with 3 and 3 as it appears to be a common improvement by many of the forum members I just wish I made a note of the different lengths before I fitted them though I am sure the sizes will be available somewhere Glad the picture was of help John |
|
|
|
Post by oldbritguy on Aug 5, 2019 17:58:16 GMT 1
Looking good mate On the home strait now Dusty Cheers Dusty but I did smile at the "home strait" as I have still to put the rest of the bike together once the motor is done. I do feel as though things are going in the right direction at least. More to follow John |
|
|
|
Post by oldbritguy on Aug 5, 2019 18:06:33 GMT 1
Nice work John
I like the use of new parts, it's something I always try to do.
Great build mate Thanks Mark. Using genuine parts is good but I had little option also as I started with an empty set of crankcases. The big bits were easy to get second hand (gearbox, barrels, head etc) but it is all the small fiddly bits that had to be OEM or Norbo At least I can get bits off the shelf unlike your own build which is all bespoke and special fabrication to which I doff my cap Sir Cheers again and enjoy your holiday John |
|


 I always change the clutch basket when I do mine. You'll know it's good forever now