|
|
Post by oldbritguy on Mar 14, 2019 0:11:55 GMT 1
Well it has been a quiet month with not much to show for my efforts but we are getting there........... slowly! As expected, the list of missing parts needed to complete a running bike has grown much bigger than first anticipated so with thanks to some very helpful forum members for their advice and offers, we are moving in the right direction now. Took delivery of a new crank, rebored cylinders, gearbox bearings and gaskets from Dave Muttsnuts, and loads of other yam bits from Fowlers and Norbo's emporium, and a good set of crankcases from Dejan and we are ready to start getting the motor together.  Just need to open up Dusty's engine rebuild thread and we are off  |
|
|
|
Post by philmill on Mar 14, 2019 7:46:44 GMT 1
Enjoy the engine rebuild, I find it very therapeutic, its a very satisfying task, as it comes together its a thing of beauty.... seriously though, I do like to see the whole thing complete, clean and shiny at last.
Phil
|
|
|
|
Post by dusty350 on Mar 14, 2019 8:17:35 GMT 1
Exciting moment - getting all the parts together Enjoy the engine build. It's a straightforward/easy engine to do and should give many miles of reliable service Look forward to seeing your progress. Good luck Dusty |
|
|
|
Post by mouse on Mar 14, 2019 8:18:06 GMT 1
Wow!
That is some project, great. I'm sure with all the help on here you will end up with a great bike
ATB
Mouse
|
|
|
|
Post by dusty350 on Mar 14, 2019 8:57:50 GMT 1
I have got a load of Pv engine build pics if you need them, but to be honest, the architecture between the Lc and the Pv is virtually identical, so if you follow the lc build you'll be fine. Just be sure to get the old clutch arm bearing out of the top Pv case before you build it up if you haven't done so already. I got one out with an M10 rawl bolt using a drift from underneath in the past (in the absence of a bearing puller) ! Apart from that, it's easy peasy  Dusty |
|
|
|
Post by oldbritguy on Mar 14, 2019 9:23:14 GMT 1
I have got a load of Pv engine build pics if you need them, but to be honest, the architecture between the Lc and the Pv is virtually identical, so if you follow the lc build you'll be fine. Just be sure to get the old clutch arm bearing out of the top Pv case before you build it up if you haven't done so already. I got one out with an M10 rawl bolt using a drift from underneath in the past (in the absence of a bearing puller) ! Apart from that, it's easy peasy Dusty Cheers Dusty Looking forward to getting this together at last. Brilliant idea of using the Rawlbolt to remove the clutch arm bearing which I remember you mentioning in someone else's rebuild, Panzermatt I think, so will be having a go later today and hopefully as you say "easy peasy" ha! A few other jobs on the bike running simultaneously just now so more pics will appear later also John |
|
|
|
Post by dusty350 on Mar 14, 2019 9:58:54 GMT 1
The rawl bolt was a desperate measure as I didn't have a bearing puller. It's not ideal but does work. Try heating the case up a bit first too. Good luck Dusty |
|
|
|
Post by Mr Kipling on Mar 14, 2019 16:48:08 GMT 1
Someones been busy buying parts !!! Atb with the engine build......
|
|
|
|
Post by Yogi on Mar 14, 2019 17:44:10 GMT 1
|
|
|
|
Post by oldbritguy on Mar 15, 2019 10:56:38 GMT 1
Cheers Matt, another great reference point for the build.
Thats what I love about this forum, advice and help from loads of likeminded folk who have all been there themselves. Brilliant!
John
|
|
|
|
Post by oldbritguy on Mar 24, 2019 21:25:43 GMT 1
Well, I thought I was on a roll and about to crack on with things however the gremlins have once again stuck their fingers in and set us back a bit this week. Frame was really badly hand painted with what looked like tyre paint so started rubbing down in prep for a decent job and found this..... 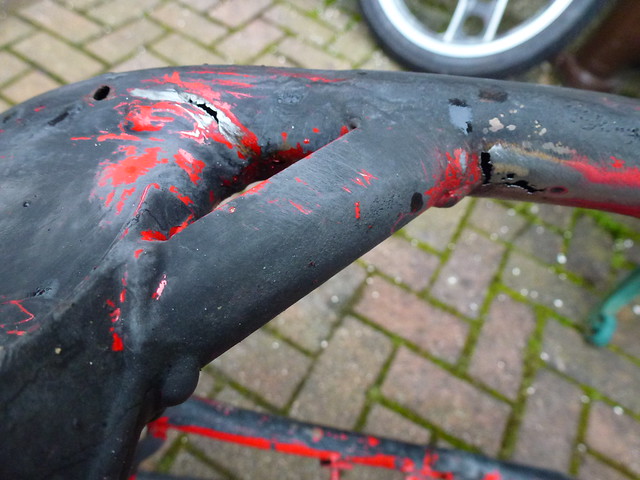 Ah well, off to the welder then and find something else to get on with. Seeing as I now have all the bits to rebuild the motor I started going through it and found some deep pitting in the first gear pinion on the main input shaft. Bugger! I had a gear tooth break off years ago, locked the gearbox up and me and my old Triumph ended up in a ditch.  After a few enquiries, Steve Midlifecrisisrd steered me in the direction of a replacement so a big thanks to Steve and we are now waiting on the post. On a positive, I dont have the major headaches of some of the forum members are experiencing at the moment so I will just keep chipping away. Today got a bit of satin black on a couple of parts ready for the return of the frame and gearbox bits.  'Appy days |
|
|
|
Post by midlifecrisisrd on Mar 24, 2019 21:33:02 GMT 1
Nice painting 😎
Bummer on the frame. Had an n1 like that, had to get a donor frame section welded in
All sortable anyway
Steve
|
|
|
|
Post by jon on Mar 26, 2019 8:16:24 GMT 1
The trouble is some of these frames are getting on for 40 years old, and being steel are going to rot out; especially if it’s been left outside in the U.K.
We’re all precious about them now chained up in a dry garage, but back in the day they were just left in the front garden.
Have a good look all over it, as the rot is probably from the inside; so could be just about to break through elsewhere.
The good thing is it should be an easy enough repair. Good luck with it.
Jon
|
|
|
|
Post by oldbritguy on Mar 26, 2019 11:01:45 GMT 1
Yes Jon, old bikes plus neglect means many headaches for the rebuilder. This is a 1984 and most definitely has not been the best cared for example out there.
When I dropped the frame off at the welder I asked him to have a good look over it, particularly around the brace welds and repair anything else he finds though on the face of it, that appeared to be the only visible rotten part.
Should be getting it back today so we will see how things are later
John
|
|
|
|
Post by midlifecrisisrd on Mar 26, 2019 16:53:28 GMT 1
Inside the tubing is frightening
When I cut open the n1 frame the tube was full of crud, no hollow in the middle
There is a breather hole on the upper section that either let's water in or blocks and stops moisture drying out
There is one in the lower rail at the centre stand
When I cut the n1 section out I went right into the lower cross member and it was full of crud too
Steve
|
|
|
|
Post by oldbritguy on Apr 11, 2019 0:26:45 GMT 1
I've neglected this thread for a while as been busy with other much less important stuff but back on it again Getting the cases ready for building up I had a go at fitting the new clutch arm bearing. Using the old drawbolt with a couple of heavy washers and it went in no bother    Sat the old bearing casing next to the new one for the pic as it was a swine to get out. Tried every suggested method by the team on the forum but ended up going down my local engineer shop and getting it with a proper puller. Need to get one of those even though I don't need one at the moment (sound familiar?) Motivated with the drawbolt method, had a go at the gearshaft bush   Happy with that! Cases now ready for the heavy bits inside, game on  |
|
|
|
Post by dusty350 on Apr 11, 2019 7:15:42 GMT 1
Great job so far John A bearing puller kit is on my list of tools to buy too. Some of these old bearings are a real pig to get out. Still, hardest bits done now ;)Plain sailing for you now Dusty |
|
|
|
Post by veg on Apr 11, 2019 9:30:38 GMT 1
Great build and brilliant to see another on the way back. 👍
|
|
|
|
Post by shaunthe2nd on Apr 11, 2019 9:59:33 GMT 1
Nice thread. Keep the pics coming and good luck with it.
|
|
|
|
Post by philmill on Apr 11, 2019 16:16:54 GMT 1
Looking good John, the cases look really good. The rebuild is fun, and treat as that, its not difficult, just slow and steady mate.
Phil
|
|
|
|
Post by Yogi on Apr 11, 2019 16:57:18 GMT 1
Chugging along nicely mate.did you get the frame back yet?
Atb Matt
|
|
|
|
Post by oldbritguy on Apr 11, 2019 17:15:42 GMT 1
Thanks guys, I have been using all of your tips working my way through this and hopefully it will pay off in the end. Taking advantage of the sunshine, I sat out in the garden and got to work on the gearbox. I managed to source a replacement main input shaft (thanks again to Steve Midlifecrisisrd) so stripped both gear clusters to give them both a right good inspection, and fit the replacement shaft  One cluster stripped as this is the shaft that is destined for the bin. Pulled the other apart, cleaning everything with some degreaser getting ready for reassembly. Realised at this point I had a lot of gearbox bits lying in the one pile mmmmm!  Used the air impact wrench to get the screw out of the end of the selector drum. Came spinning out nicely, no chewed head. (Three cheers for cheap Aldi air tools!!!!)  Into the big box of new bits and dig out the circlips, bearings, collars, tab washer and nuts  Then put it all back together  Just need to get this lot into the crankcases now and start buttoning it up. Going to do a bit on the frame next |
|
|
|
Post by panzermatt on Apr 11, 2019 18:04:23 GMT 1
this is great to watch. more pictures!
|
|
|
|
Post by marrcel on Apr 11, 2019 18:54:01 GMT 1
Can you show a pic from the parts that were bad?
Gives me a clue to look out for when i am opened it.
|
|
|
|
Post by oldbritguy on Apr 11, 2019 21:01:08 GMT 1
Chugging along nicely mate.did you get the frame back yet? Atb Matt Cheers Matt Yes, I got the frame back a while ago which has been sat in the shed for a bit. Going to put a couple of pics up soon as I have now started work on it and the swingarm too. Watch this space |
|
|
|
Post by oldbritguy on Apr 11, 2019 21:09:04 GMT 1
Looking good John, the cases look really good. The rebuild is fun, and treat as that, its not difficult, just slow and steady mate. Phil Thanks Phil Gave the cases a good clean with Aldi's cheap fairy type liquid then blasted them with the wee Karcher. Came up nice. A rub down with some wet and dry then a coat of etch primer. After an hour sitting on top of the kitchen radiator to get them nice and warm, gave the top case a couple of coats of PJ1 satin engine paint. Some mixed reviews on this particular paint but I have given it a go to see how it turns out. Left the paint for a couple of weeks to cure next to the heating boiler (yes still got the heating on up here in Jockland) before pressing the bearing in the other day. I am happy so far so we shall see how it fares as the rebuild continues More to follow |
|
|
|
Post by oldbritguy on Apr 11, 2019 21:41:59 GMT 1
Can you show a pic from the parts that were bad? Gives me a clue to look out for when i am opened it. Hi Marrcel The only bad part really that I found here was the pinion on the input shaft, which was replaced. There is a picture of it earlier in the thread (24th March) where I discovered some bad pitting in the teeth of the fixed gear on the shaft. This was a result of the gearshafts (out of the engine) sitting in a damp shed for too long before they came into my ownership. The rest of the gearbox was pretty good. With regarding inspecting the components as you go through the gearbox, it is a straightforward process. A visual check of all the gear teeth looking for chipping of the teeth, pitting or heavy rusting (this should only be a problem for gearboxes which have been stripped and stored exposed in damp conditions) and check the condition of the threads on the end of the shafts where the big nuts screw on. Feel all of the pinions and gears for any slop or lateral movement on the shafts or if you can rock them side to side. Also check end float where the gears etc sit against thrust washers and circlips. Replace anything which is worn out. Feel rotational movement of all of the bearings for roughness. As a matter of course, I replaced the bearings anyway even though the existing ones were ok. If you take the gears apart to inspect the bushings in the fitted gears, replace the circlips you take off as good practice. Take a good look at the selector forks and the tracks they sit in on the gears and the selector drum for signs of wear or roughness. Check the shafts themselves for signs of damage such as a scoring from a spinning bearing, damage to the splines where the gears move back and forth, or evidence of overheating/discolouration/blueing/yellow etc. Finally take lots of pictures as you go and work with the workshop manual to make sure everything goes back together properly. Gears and shafts are no longer available from Yamaha but good used parts are readily available. Bearings, circlips, shims, nuts and tab washers are all available new from both Norbo and Yamaha dealers. Hope this helps but you have already figured out, there is plenty of help here on the forum should you find yourself stuck. John |
|
|
|
Post by oldbritguy on Apr 13, 2019 17:15:17 GMT 1
Out in the sunshine again and got another job out of the way. Picked up some bushes and seals a while back from Norbo for the swing arm dog bone links and decided it was time to get them fitted.  Using the drawbolt method with some threaded rod and a couple of big washers pulled them in no problem. I also used a bit of silicone grease to help them slide into place.  I had to use the smaller socket to pull the bush into the arm to allow enough room for the seal to fit at the end. No problems with the inside of the arm as there is enough room once the bush is fully fitted.  Finally fitted the seal and job done. Starting to enjoy this! 
|
|
|
|
Post by oldbritguy on Apr 17, 2019 10:38:50 GMT 1
Just arrived from Arrow  Not ready for fitting it yet so I will just enjoy looking at it for a bit. |
|
|
|
Post by oldbritguy on Apr 22, 2019 23:29:33 GMT 1
Moving in super slow mo here  Not having any luck in sourcing a decent 94 primary gear, so I have decided to just go with my not so good 96 crank gear and ropey 60 clutch gear and fix the thing up. Clutch basket was poor with heavy wear marks where the plates have been giving it a hard time  I thought about having a go at dressing the fingers with a file but there was also a fair bit of movement in the cush rubbers inside the unit itself. I marked the drum and gear with a sharpie pen to show just how much movement there was   So, another assault on the wallet and a visit to Norbo's emporium and this arrived in the post with a few other choice parts as well of course.  Out with the drill and get those old rivets off. Centre punch first and start with a small 3mm bit to get a pilot hole going.  6mm bit then a sharp chisel to get the rivet heads off and the thing is apart.   New bits fitted and a bit of loctite on the threads and we are good to go 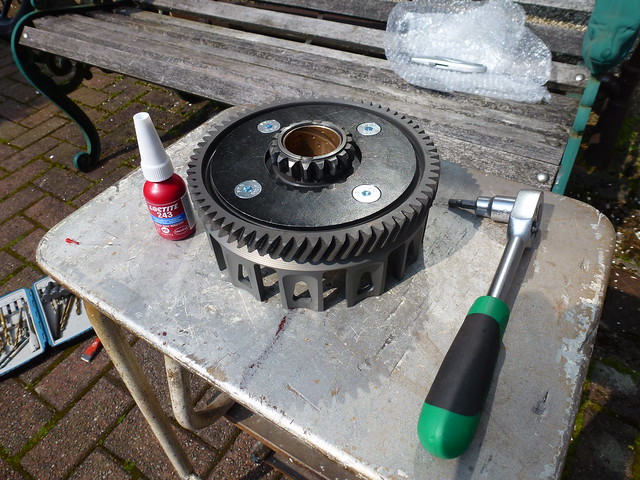 Will be a bit more of a burst of activity this week hopefully |
|


