|
|
Post by madmick on Sept 7, 2019 10:46:45 GMT 1
Hi Alex, Yea, I was looking at that last night too. He has done a really nice job of that build - really tidy with the frame mods. I do fancy an aircooled build again. 7k seems pricey, but there is a lot of work and thought gone into it and I really like it. Only thing I would change is the crinkle paint finish, but each to their own  Dusty  I agree with you dusty... that crinkle paint is off putting 🥴 M.M. |
|
|
|
Post by donkeychomp on Sept 7, 2019 11:22:46 GMT 1
True, that is a bit odd! But a nicely done bike. The Bandit forks are interesting and you could have adjustable clip ons mounted like he's done for a bit of comfort!
Alex
|
|
|
|
Post by dusty350 on Sept 8, 2019 14:48:07 GMT 1
Today I swapped the switchgear over from the Lc hybrid. The reason for this being the Lc throttle cable fits and works better with an Lc throttle. I could have tried a spare throttle tube I have, but I also prefer the look of the Lc switchgear, and the parts on the orange bike were brand new and unused in standard black finish, which I thought might look better too;  20190908_132924 20190908_132924 by dusty miller, on Flickr But that meant changing levers over too for a bit of contrast;  20190908_132935 20190908_132935 by dusty miller, on Flickr The other benefit is the orange bike will now use Pv switchgear, and I will change the Lc ignition barrel for a Pv one, and then use a Pv loom which will make wiring that bike up a lot more straightforward. The only mods needed then will be getting the Lc clocks wired into the Pv loom, but I've worked it out before so shouldn't be a problem. Dusty |
|
|
|
Post by wallcraft on Sept 8, 2019 22:16:12 GMT 1
Nice levers Dusty, were they from?
Mark.
|
|
|
|
Post by donkeychomp on Sept 8, 2019 22:18:22 GMT 1
That little c**kpit. Clean, uncluttered, focused. Love it matey.
Alex
|
|
|
|
Post by dusty350 on Sept 9, 2019 7:37:12 GMT 1
Hi Mark. Levers were a firm called Mcspeed on ebay. I did read someone else had ordered some afterwards and had trouble with them - levers didn't turn up, and messages weren't answered. Not sure if that was a blip or whether they are now defunct. Cheers Alex. The idea was to keep it as uncluttered as possible. All the warning lights are built into the tacho face so the c**kpit area is finished now. I prefer the Lc switchgear for looks, plus being black suits it better too I think. And more importantly the Lc throttle cable seems happier in the Lc switchgear Dusty |
|
|
|
Post by Yogi on Sept 9, 2019 9:50:58 GMT 1
Nice one Dusty I actually prefer the Lc switch gear 👌
Adds a bit of contrast as you said 👍
Not happy about you pinching bits off my Lc though 🥴
Matt 🐻
|
|
|
|
Post by dusty350 on Sept 9, 2019 14:07:40 GMT 1
I'm adding Pv parts Matt so it appeals to you more  Dusty |
|
|
|
Post by Yogi on Sept 10, 2019 19:01:16 GMT 1
I'm adding Pv parts Matt so it appeals to you more Dusty You don’t need to do that mate 😉 I already love it 😍 My stables crying out for it 😭 Matt 🐻 |
|
|
|
Post by dusty350 on Sept 26, 2019 8:30:10 GMT 1
I was away last week so didn't touch the bike, but before I went I ordered some Uni filters from the US, and they were waiting for me when I got home I wanted the Uni's as they have an angled outlet which would allow the filter to tilt away from the frame tubes. The combination of the billet inlets and different carbs, plus the frame tube position would have meant straight exit filters would have been compressed up against the tubes on either side - obviously not ideal. The Uni's are a dual filter - a removable, coarse outer foam, and a more conventional inner foam bonded to the rubber mounting ring. There is an inner coil of wire that helps the filter keep it's shape too;  20190926_073243 20190926_073243 by dusty miller, on Flickr The only issue is the filters I wanted come in either 1 3/4 or 2 inch mounting diameters (id). I felt the 1 3/4, or 44.5mm, would be a real stretch for the Pwk28's which have a 50mm od at the rear, so I bought the 2 inch id versions, knowing they would be a bit "baggy". Once fitted, the clamp held the filters on fine, but I preferred to make the filter a tight fit before clamping, so I needed something to take up the slack. I had 2 old airbox to carb rubbers for an Lc, so I trimmed them up with a sharp knife and stretched them over the Pwk's; 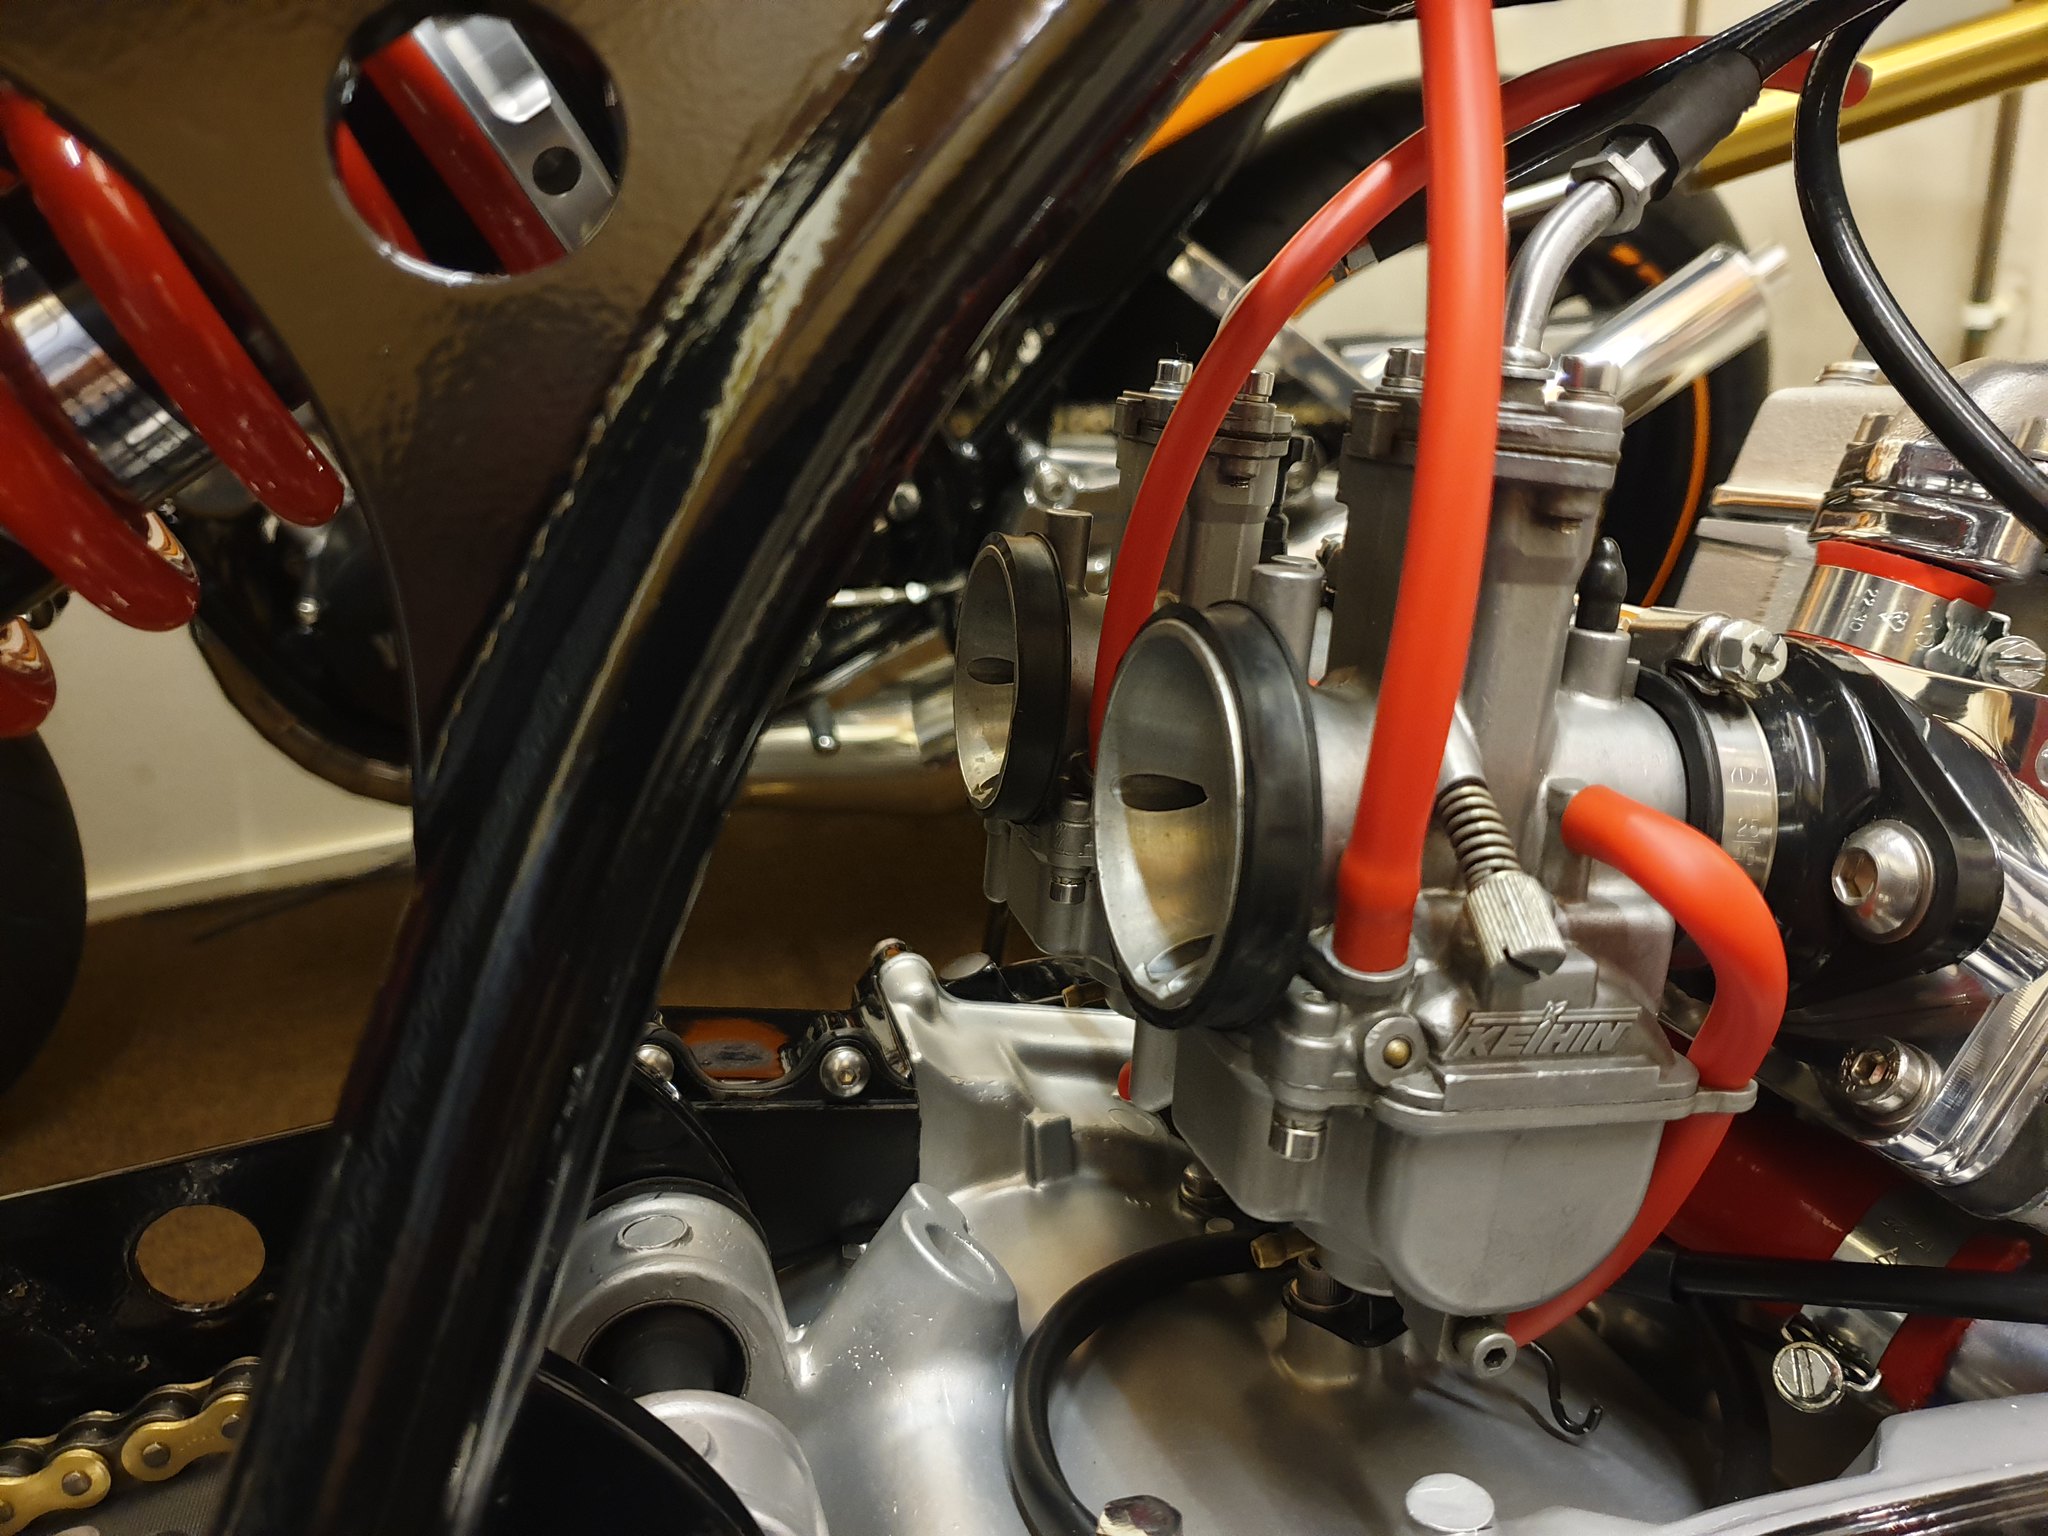 20190925_082453 20190925_082453 by dusty miller, on Flickr Now the Uni filter is a tight fit on the carb mouth before applying the clamp; 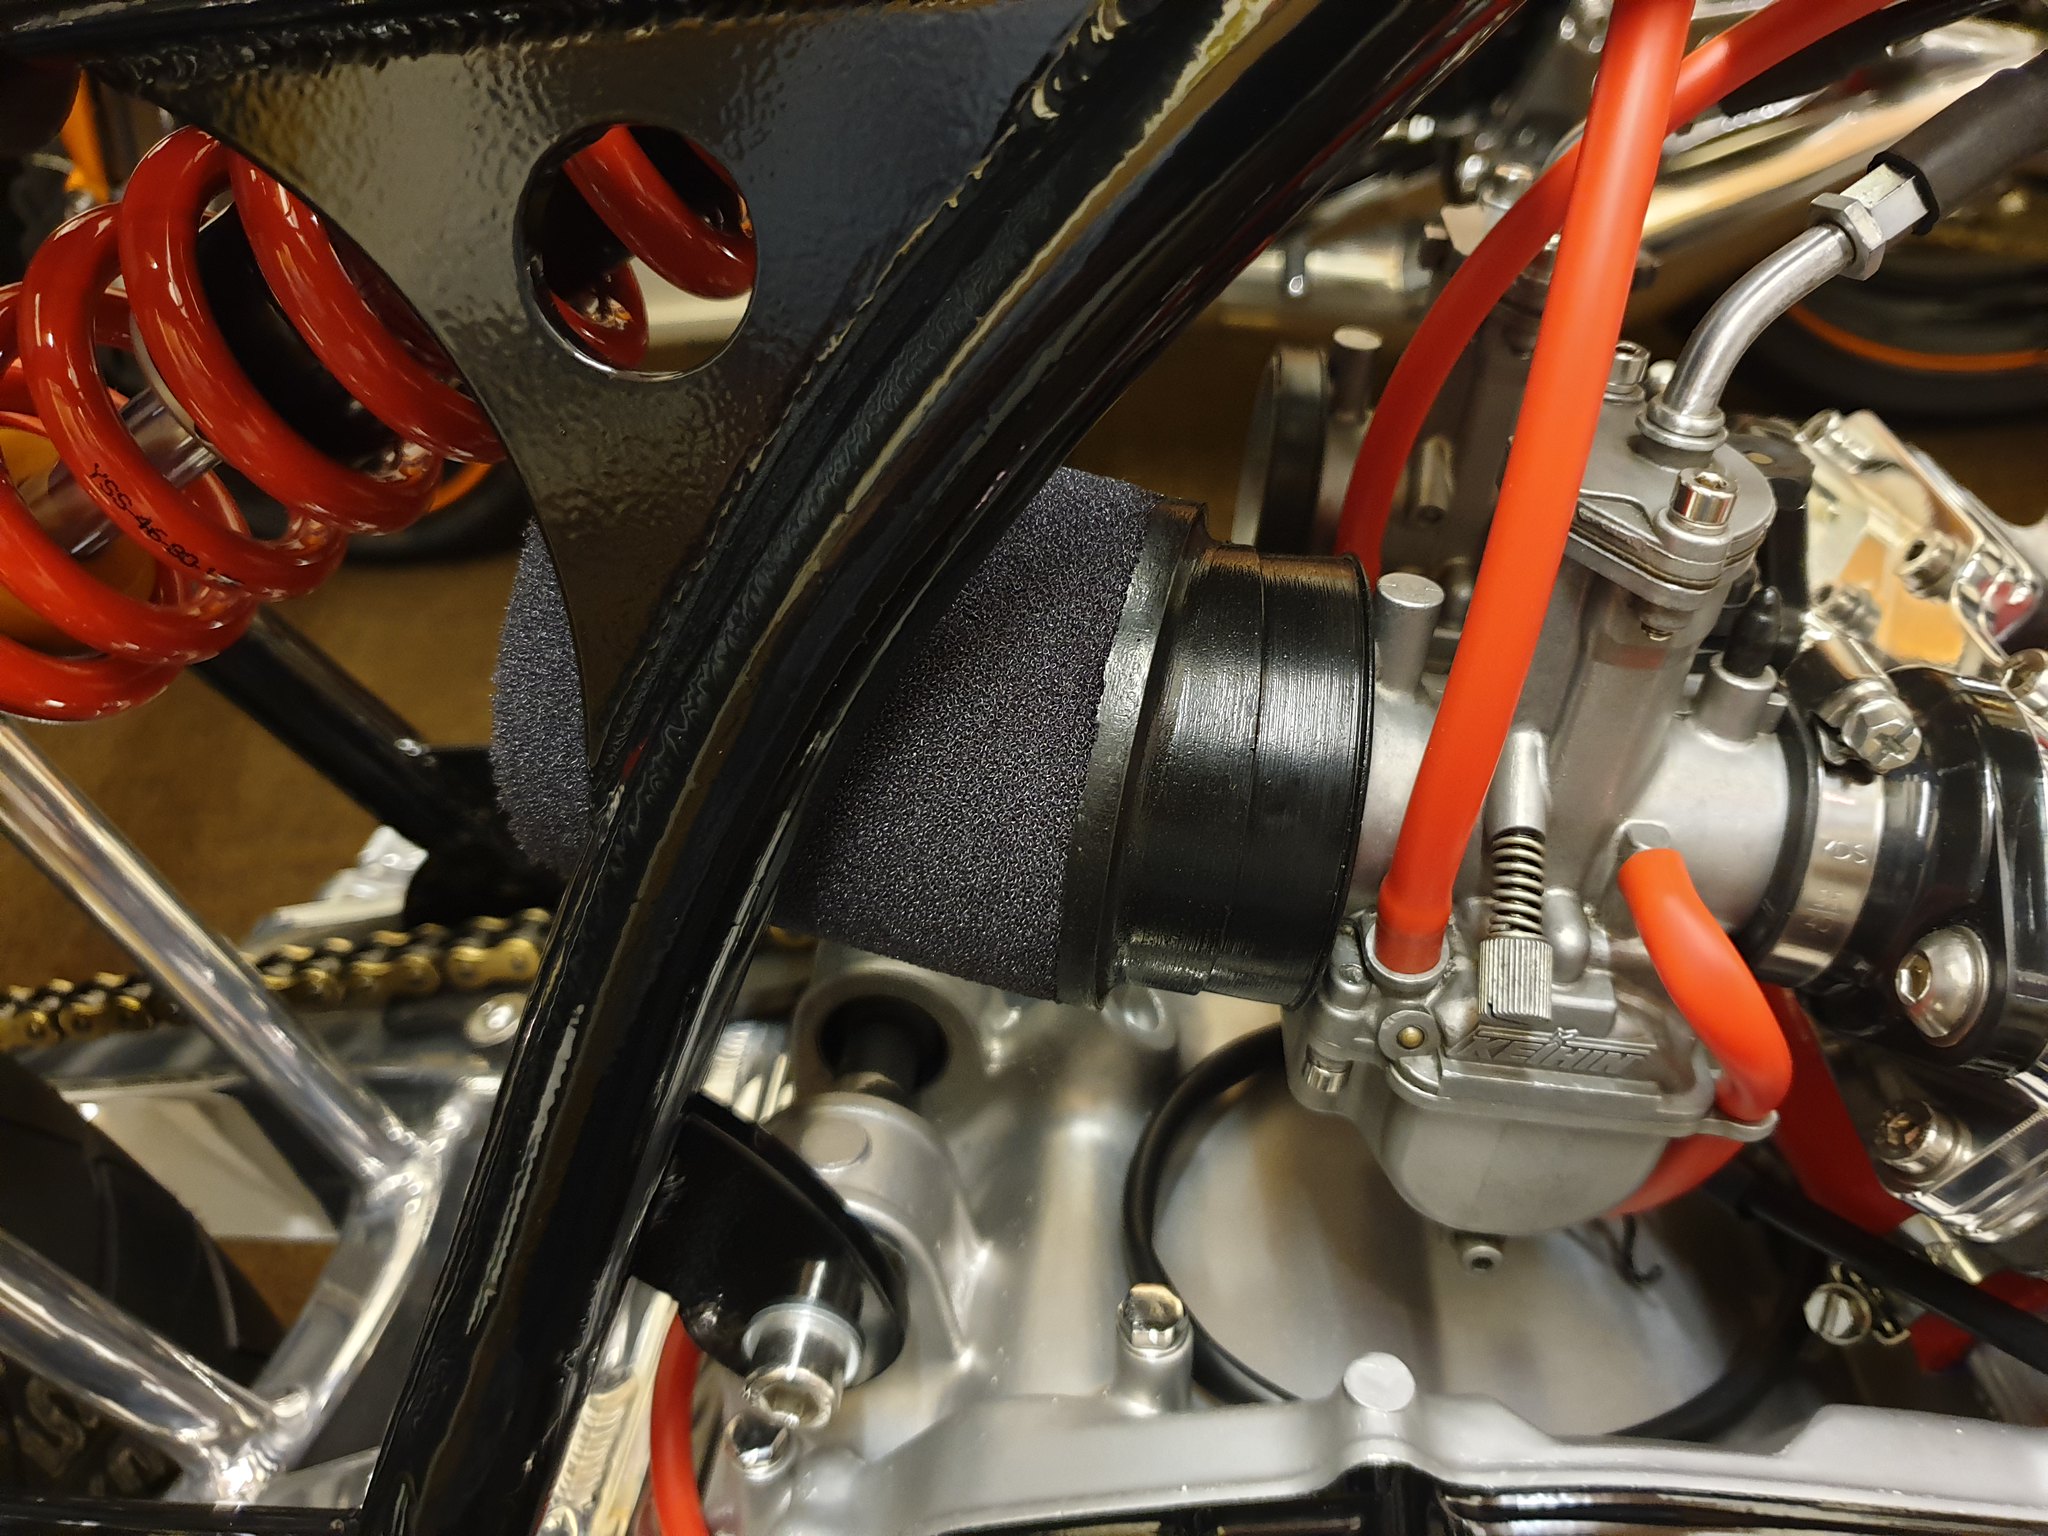 20190925_082527 20190925_082527 by dusty miller, on Flickr And you can see how the filter is angled away from the frame tube; 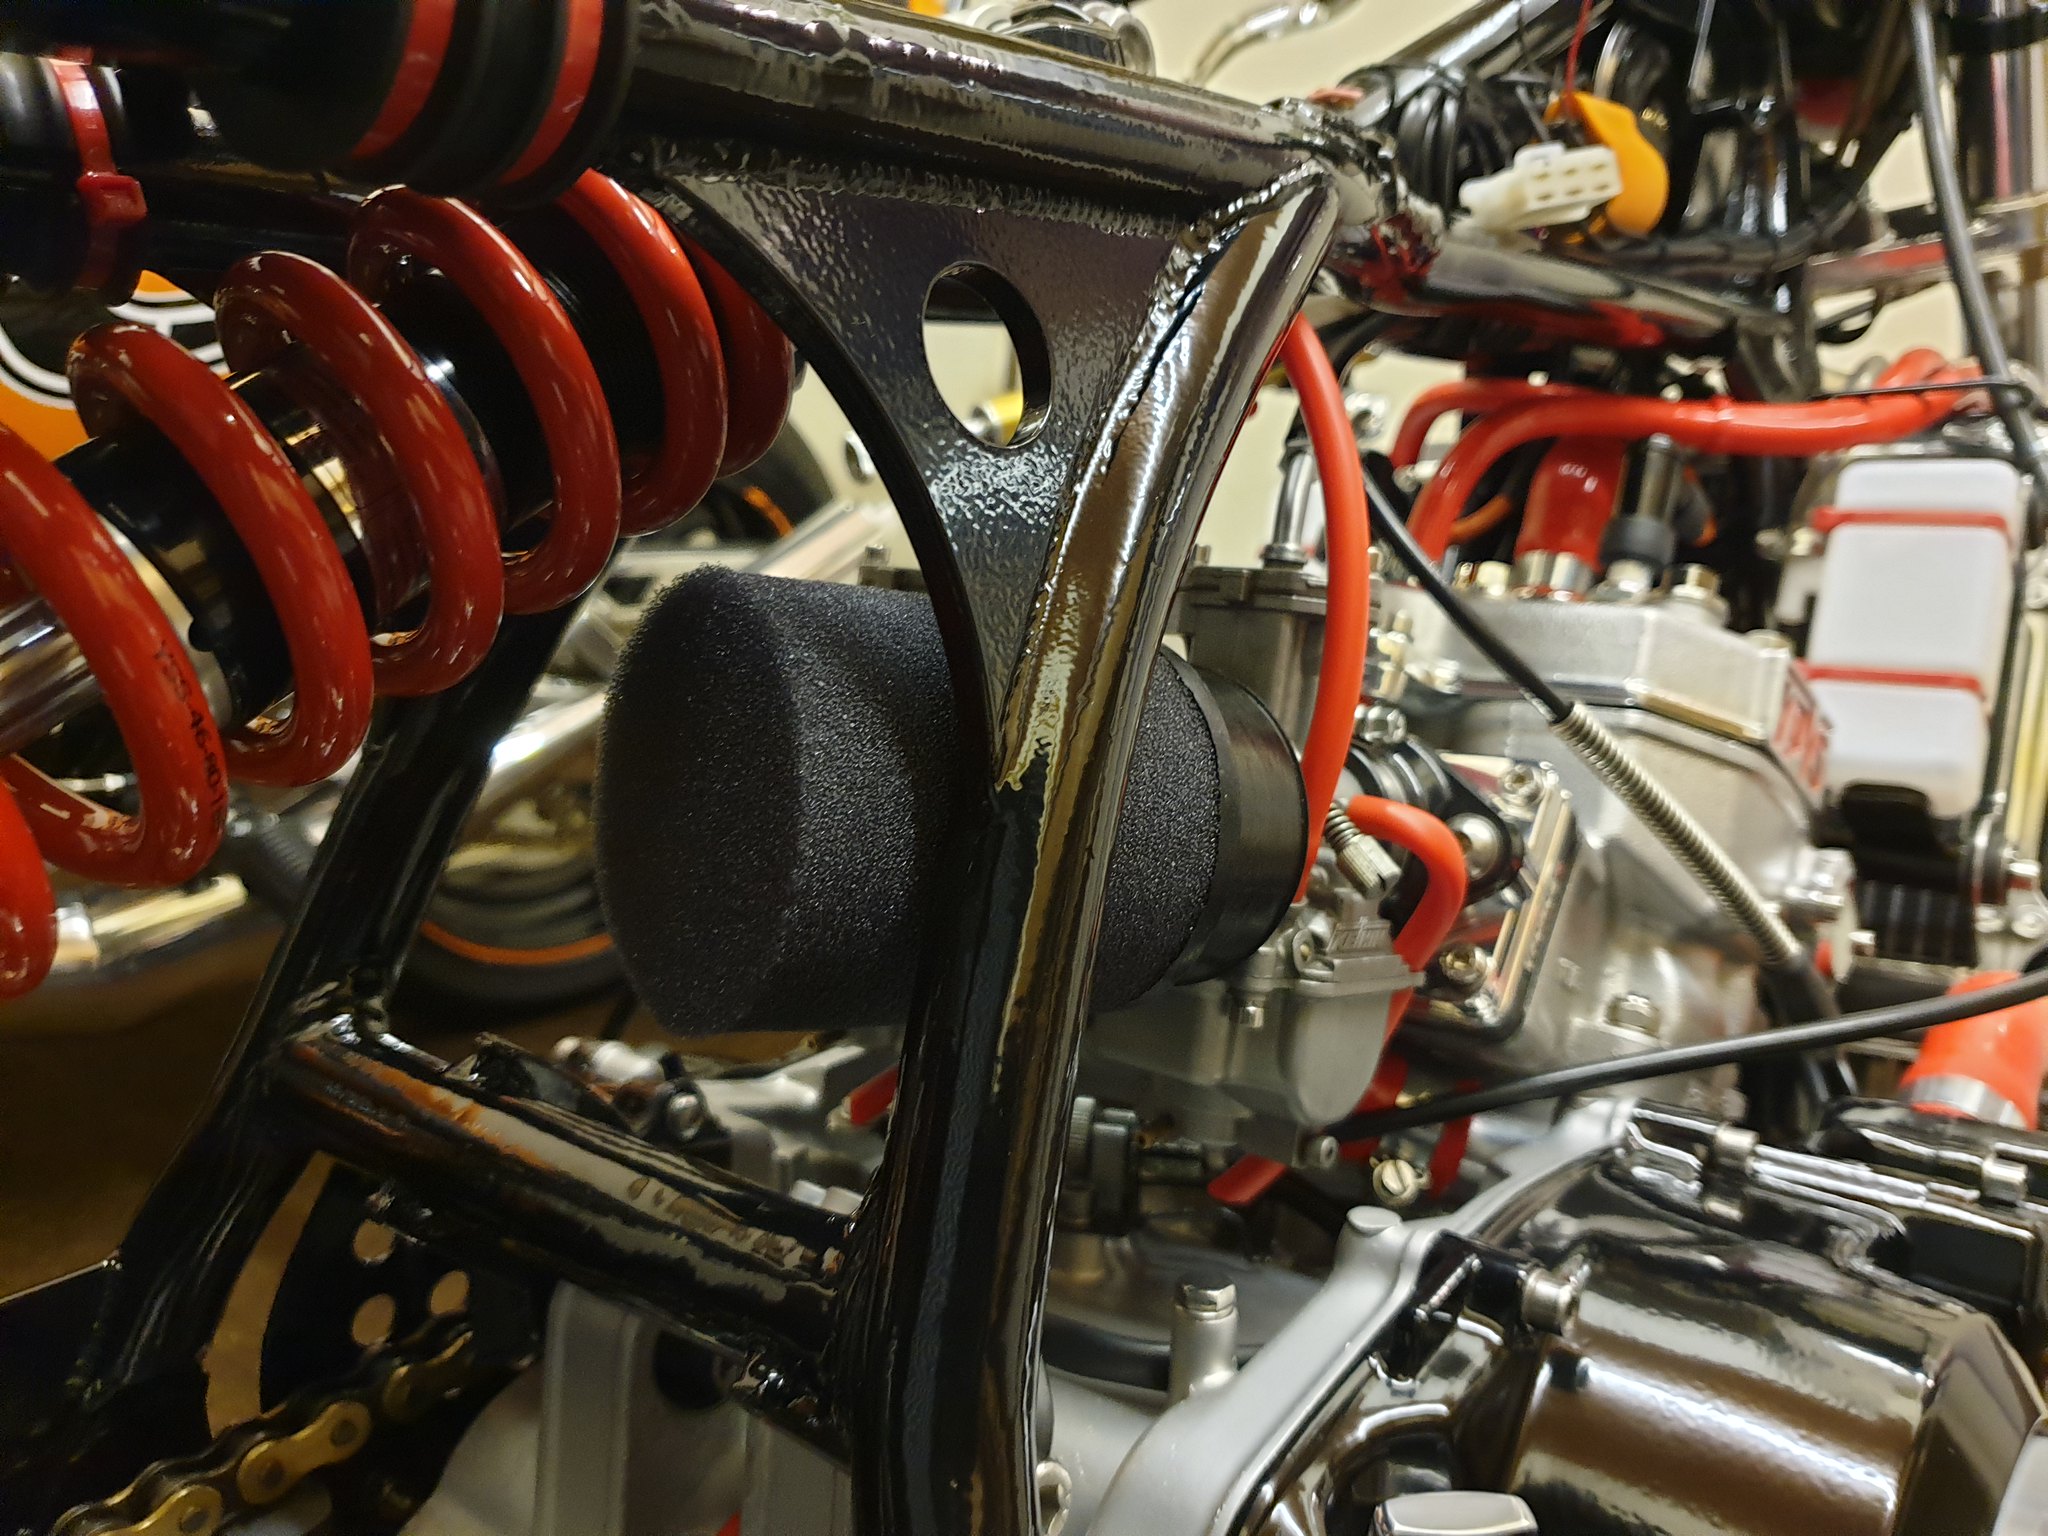 20190925_082805 20190925_082805 by dusty miller, on Flickr I went for the 4 inch long filters after considering getting the 6" versions. Reason being, after some measuring, the 6" would have compressed against each other as they would be angled towards a central point. With the 4" you have an acceptable "coming together" of the filters, but the 6" would be too compressed. It's another compromise of course. The red, outer filter makes them quite bulky, and I've still got to do a final fit to see how that will look. The filters can be used without the red part if necessary. Dusty |
|
|
|
Post by veg on Sept 26, 2019 9:05:46 GMT 1
I really like those filters funny how the little things make all the difference.
|
|
|
|
Post by JonW on Sept 26, 2019 9:28:28 GMT 1
Loving this build, great work as ever mate.
The KOSO temp is the same one I cut up and put in my LC tacho, probably not something most people would do lol. Anyway, theyre a nice unit.
|
|
|
|
Post by oldbritguy on Sept 26, 2019 10:40:24 GMT 1
Nice bit of work on the filters Dusty, they look really good.
I am very impressed and a little jealous that all of your home fabricated parts actually look factory. Well done mate.
John
|
|
|
|
Post by dusty350 on Sept 26, 2019 10:59:21 GMT 1
Thanks guys And I agree, it's little details that add up to the final product. 4" straight filters would have looked awful squashed up against the frame tubes, and possibly affected the air flow through the filters. It cost roughly double to get these from the States compared to buying some filters like Ramair's over here  , but it was important to make the filters look right, and fit around the frame tubes as best as possible. Hi Jon, the Koso unit looks great for the money, and you were very brave modding it !! I'm looking forward to having it up and running Another job I have nearly completed is the gear change lever. Again, compromise saw the footrest plates spaced away from the frame by 25mm. This was to clear the swingarm, and allow the pipes a bit of room around the arm once fitted, as they will pick up a rear mounting point on the rearset plates. Brake side isn't an issue, but the gearchange side meant the rod from the gear lever to a standard gear change shaft arm was at quite an extreme angle. I looked at various "kinked" arms for the gear change shaft, but in the end I modded what I already had. Biggest win was OEB very kindly donated a rod with M8 rod eyes which was exactly the right length for what I needed - thanks Nigel, you are a star With the rod, I could work out a spacer at the engine end also the foot control end;  20190925_083504 20190925_083504 by dusty miller, on Flickr  20190925_083353 20190925_083353 by dusty miller, on Flickr Keen to keep the rod as straight as possible, I moved the rod to the inside edge of the gear change lever at the peg;  20190925_083450 20190925_083450 by dusty miller, on Flickr Rod nice and straight now but cant work properly as the cap head bolt that fits the top of the footrest plate to the frame fouls it  . So, off to my fasteners place and I buy an M8 countersunk bolt with recessed hex drive;  20190926_073105 20190926_073105 by dusty miller, on Flickr I don't posses the tool for countersinking the footrest plate, so I made the top mounting hole a bit bigger with the largest drill bit I have - just a couple of mm deep, and then carefully ground out a seat for the countersink bolt to sit into. Could go a fraction more, but the rod now clears the bolt head, and keeps a fairly straight run the to gear shaft arm;  20190926_073124 20190926_073124 by dusty miller, on Flickr Just need to reduce the height of the button head bolt at the footrest end and it's done. Gear change action seems very slick and precise which was the intended result, so pleased with that Another smallitem done is a rear reflector. There was room above the number plate, so ebay turned up a nicely sized one;  20190925_083641 20190925_083641 by dusty miller, on Flickr That will be stuck on once I have done the rear light (and know I am happy with it !) Dusty |
|
|
|
Post by donkeychomp on Sept 26, 2019 23:18:12 GMT 1
Nice work Dusty. A snug fit but it fits and that's what matters.
Alex
|
|
|
|
Post by dusty350 on Sept 27, 2019 7:42:32 GMT 1
Yea, it's snug, but as straight a line as possible will aid gear changes Fitted both filters now, with the outer sleeves ;  20190926_115153 20190926_115153 by dusty miller, on Flickr  20190926_115258 20190926_115258 by dusty miller, on Flickr Pretty happy with them. Next job will be finalise the gear change set up, with a final polish of the footrest back plate, and maybe drill some exhaust mount holes now for ease of pipe fitting by the fabricators. I need to get some better fuel line for the carbs, and a stick on magnet for the speedo pick up. Oil pump is ready for Arrow at some point, and the brakes can be bled. Couple of other jobs but essentially I've got as far as I can. She needs to visit the Malton Wizard for the final parts to complete Dusty |
|
|
|
Post by donkeychomp on Sept 27, 2019 23:47:55 GMT 1
Do you want that red fuel line I have? Not used it yet still in the bag!
Alex
|
|
|
|
Post by dusty350 on Sept 28, 2019 8:15:49 GMT 1
Forgot you had it Alex I ordered some yesterday ! Keep hold of it - you could use it on one of yours I'm sure Cheers Dusty |
|
Deleted
Deleted Member
Posts: 0
|
Post by Deleted on Oct 4, 2019 10:47:46 GMT 1
Mate that's magnificent.
Do you think who ever ends up with it once you sell it would actually ride it at all?
A fella I know built a beautiful race bike. Did one lap of a track then hung it up on the wall.
I think he's to scared to damage it.
|
|
|
|
Post by dusty350 on Oct 4, 2019 18:43:37 GMT 1
Hi Ken All the completed bikes I've sold have been ridden by the new owners as far as I know. I've sold a few unfinished projects too over the years - a couple of those have been finished and ridden too. This café racer is being built to ride on the road, or could be paraded I spose. It will be Mot'd when it's finished. Would certainly suit someone more supple than me though . I always say I will never sell this one or that when I start a build, but I really do think I will keep hold of this one ! There is more time and effort in this than I usually do as this is more "bespoke" than my regular hybrid builds. I can sit and look at it for hours !! Plus it's the bike I have been wanting to build for 30 years or more, so I feel more "invested" in this than any of the others. My attempts at Café racers in the past have never quite been as right as this one, and this has turned out even better than my long held vision. I love all the bikes I build - you have to if you are going to make a good job of it, but I love this one just that little bit more I do think someone like Mouse, who is smaller and more "bendy" than me could wring it's neck around Brands on a few parade laps - that would be good to see Dusty |
|
|
|
Post by donkeychomp on Oct 4, 2019 23:08:21 GMT 1
I. for one, am glad to hear that Dusty!
Alex
|
|
|
|
Post by dusty350 on Oct 17, 2019 19:31:50 GMT 1
Not much done recently, but one essential part did get bolted back on today. Arrow worked his magic on the oil pump in less than a week - cheers mate - and it's like brand new;  20191017_142123 20191017_142123 by dusty miller, on Flickr Fantastic workmanship as always . I'm getting some clear pump to carb oil lines from Norbo, and I've got some new clips already, so I will be able to test out the oil tank set up. I will fill it up with a graded syringe so I will know exactly how much the tank holds. Dusty |
|
Deleted
Deleted Member
Posts: 0
|
Post by Deleted on Oct 18, 2019 9:17:52 GMT 1
Thanks for setting the bar so high ya old poof.
|
|
|
|
Post by veg on Oct 29, 2019 17:21:31 GMT 1
Dusty that is fabulous looking, funny how when you really invest time in a bike you grow emotionally attached. I have owned well over 50 plus bikes in my 50 years, my tz/lc is a keeper. Like you i keep looking at all the little brackets and bits and bobs i built, it took me nearly 3 years to get where it is today, it still isn't finished as i have even more ideas for it, its a work in progress and its unique very much like your build. It really is a bloody credit to you. Is the red theme to remind you of the job running around in your trumpton truck as we used to call them. |
|
|
|
Post by dusty350 on Oct 29, 2019 18:22:37 GMT 1
Thanks Veg The red/white scheme is a nod to the Td/Tz silhouette of the bike - no fire engine influence  I love all the bikes I build - you have to to do them right I think, but I'm comfortable with selling them on to enable me to do the next one. If money was no object and I had the space, there are some that would never have been sold though. This Café bike really has ticked some boxes that other builds haven't been able to though, hence the feeling that it may last longer than the rest. My engineering guys regularly talk of retirement which means the ability to build another would be drastically reduced - I don't know of another small, friendly engineering firm locally that would be happy to do the sort of work I would need, so whereas I find building Lc hybrids relatively easy, doing something like this again would be a lot harder without them up the road. I've got a lot of ideas bouncing around for the next project, and it will be along the lines of a Café racer style bike again, but different to this one, and a bit more extreme in some respects, but for now, I'm looking forward to the day it can go for pipes and loom, and set up on Dave's dyno Dusty |
|
|
|
Post by dusty350 on Feb 18, 2020 17:18:59 GMT 1
Did a small job today that I've been putting off for ages, in case I mucked it up - the tiny tail light that I want to fit into the fin of the seat unit. I plan to take my 400 crank and barrels up to PJME on Thursday, and thought it would be a good opportunity to take the seat and front muddie over to Mark Cordwell in Derby, so he can paint them to match my tank. So the Dremel was pressed into action for some careful cutting;  20200218_151304 20200218_151304 by dusty miller, on Flickr The seat will have a red stripe running down it's centre line to match the tank stripe, and this light should sit central within that stripe, so will be hidden at first glance;  20200218_151357 20200218_151357 by dusty miller, on Flickr Not quite sure how I am going to fix it in place but I'm thinking of using the expanding foam you get from the builders merchants, behind the light and inside the fin. The fact it's LED means I will hopefully never have to change the unit. Mark could then mask the lens, fill the edges and spray the stripe over it for a good finish. The front muddie will be plain red, like a Tz. Dusty |
|
|
|
Post by midlifecrisisrd on Feb 18, 2020 17:43:00 GMT 1
Nice job
I'd just use clear silicone to hold it in. Expanding foam is a bit messy
Steve
|
|
|
|
Post by mouse on Feb 18, 2020 18:25:09 GMT 1
At last!!
Good job, nice steady hand, looks great!!
Mouse
|
|
|
|
Post by veg on Feb 18, 2020 18:34:04 GMT 1
Agree with Steve having used expanding foam recently on part of my extension it is almost uncontrollable you have to do it at an upwards angle and until it sets it can move. Silicon would be what I used or is the fin deep enough to put some small self tapers in and use a small alloy plate to hold it in situ?
|
|
|
|
Post by dusty350 on Feb 18, 2020 20:09:48 GMT 1
No way of doing an ally plate unfortunately. It's actually really awkward inside the fin - the fibreglass is really thick and uneven on the inside. I did consider clear silicon - I've got tubes of it in the shed, , but that can be messy to apply properly, and would be a nightmare if I ever did have to extract the light. With a small amount of foam, I feel it would expand around the light and hold it in place well. I have used it for DIY jobs before, and know you only need a really small amount to fill a gap ! I've rigged up some tape to hold the light in place - slightly protruding by a mm looks best I think. It's job for tomorrow so more news then Dusty |
|


 , but it was important to make the filters look right, and fit around the frame tubes as best as possible.
 . So, off to my fasteners place and I buy an M8 countersunk bolt with recessed hex drive;


