neil
Thrash Merchant
 my 125
Posts: 385
|
Post by neil on Aug 25, 2019 11:03:34 GMT 1
Looking great, attention to detail is something else! Neil
|
|
|
|
Post by Mr Kipling on Aug 25, 2019 20:14:07 GMT 1
Looking awesome already Dusty cant wait for final build....
|
|
|
|
Post by Yogi on Aug 25, 2019 22:10:11 GMT 1
A stunner is on its way for sure 👍
|
|
|
|
Post by dusty350 on Aug 29, 2019 21:49:19 GMT 1
Couple of little jobs this week. I fitted the sender for the digital speedo pick up to the bracket on the forks. Tried to keep the cable as neat as possible;  20190829_194138 20190829_194138 by dusty miller, on Flickr The other part sorted out was the oil tank. I'm using a plastic Honda overflow tank, as it's cheap and simple. I bought some genuine Yam oil hose that feeds from a spigot on the bottom of the tank (usually at the top but it's upside down). There is a spigot on the side of the tank and I've connected a clear hose to that which then runs up inside the hollow steering stem, and through a hole in the top yoke nut;  20190829_194154 20190829_194154 by dusty miller, on Flickr  20190829_194116 20190829_194116 by dusty miller, on Flickr I can remove the end stop from this end and fill the tank via this hose with 2 stroke oil from a large syringe quite easily. Not sure what the oil capacity of the tank and hoses will be but that will be easily measured once I fill it up - certainly enough for a good few miles I think. Throttle cable fitment is the next job - I have a new cable that I need to swap over the Pwk slides to - this new cable will have the oil pump cable intact - it had been removed on the cable that came with the carbs originally, and I also need to send the oil pump off to Arrow for a refurb. Still plenty to do ! Dusty  |
|
|
|
Post by oldbritguy on Aug 29, 2019 23:18:53 GMT 1
Lovely job there Dusty, always look forward to your updates. Everything nice and tidy and nothing looking out of place. Proper pro job mate 👍 Really neat job on the speedo pick up and cable tidy too. I don't know if I missed this earlier but does the pick up operate from the pulsing from the disc rivets? Looks a really neat design. Giving me some great ideas here too  John |
|
Deleted
Deleted Member
Posts: 0
|
Post by Deleted on Aug 30, 2019 0:34:31 GMT 1
Have to admit Dusty it's eye popping. Normally close ups like that show up every little spec of dust or grease etc.
How the hell do you keep them that clean once your finished?
My bikes get covered in a layer of dust every week. Pretty dry here at the moment though.
|
|
|
|
Post by mouse on Aug 30, 2019 7:14:08 GMT 1
Beautiful and neat solution Dusty!
I have seen this bike in the flesh and it really is as good as it looks!
Mouse
|
|
|
|
Post by marrcel on Aug 30, 2019 8:58:54 GMT 1
If you fill the oil with a syringe through the breather hose, how does the oilbottle breath?
|
|
|
|
Post by dusty350 on Aug 30, 2019 19:06:43 GMT 1
Hi John The pick up gets a reading from a magnet, preferably 2 or 3 that either glue or bolt through the bobbins. The supplied magnet is too loose in the bobbin hole, so I tried a bolt version and the head is too proud - it would hit the caliper, so I need to get a stick on magnet(s) next to try. More than one fitted makes the speedo more accurate. Ken - I normally sell them when they are finished to start the next one, but they are pretty clean when they leave my garage !! Cheers Mouse, great to catch up the other day Marcel, there is a 3mm hole drilled through the centre on the bung at the top of the pipe to allow oil to flow out the bottom. I was originally going to keep the pipe short, but I had a long piece of hose and there was already a hole in the top yoke nut, so I just enlarged it on the pillar drill so the hose could pass through. I will obviously check flow when I'm ready to fill it up, but don't envisage any problems. I do have the option of a small hole on the top of the bottle if needed - the bottle will never be completely filled with oil. Dusty |
|
|
|
Post by dusty350 on Sept 1, 2019 21:06:10 GMT 1
Yesterday I fitted the tank to make sure there was clearance for the clutch cable at the front edge of the tank. It's the first time I've fitted the bodywork to the powdercoated frame. I love the look of this bike sooo much;  20190831_093607 20190831_093607 by dusty miller, on Flickr  20190831_093145 20190831_093145 by dusty miller, on Flickr One thing I will need to source is a kinked gear lever arm - the part that fits onto the splined gearshaft that exits through the left side casing. Where I have spaced the rearset plates away from the frame, the angle the rod from the gear change lever has to follow is a bit stressed, so a splined part that doglegs outwards would be a benefit. Anyone know of a part that would fit the bill ? Don't want to bend the gearchange rod itself as I may lose some of the leverage. Dusty |
|
|
|
Post by veg on Sept 1, 2019 21:15:39 GMT 1
That looks absolutely amazing dusty a real beautiful bike.
|
|
|
|
Post by oldbritguy on Sept 1, 2019 21:30:10 GMT 1
Hi Dusty The dog's bo***cks or what? That is the biz!!!!!!! I know it is not what you are immediately looking for but I have used some rearset parts from this company before on my Triton and also the Laverda. Good kit. Might be worth thinking about if you are stuck www.discovolantemoto.co.uk/tarozzi-spare-parts-78-c.aspJohn |
|
|
|
Post by donkeychomp on Sept 1, 2019 22:05:33 GMT 1
Gobsmacked.
Alex
|
|
|
|
Post by dave1963 on Sept 1, 2019 22:07:26 GMT 1
Hi dusty i used a yamaha fj gear shifter on my hybrid its off set quite abit can't remember what cc one it was
|
|
|
|
Post by shandyboy on Sept 1, 2019 23:02:31 GMT 1
Mint Buddy
|
|
|
|
Post by mouse on Sept 2, 2019 7:21:22 GMT 1
Well that looks a mess!
No, looks as fantastic as i thought it would, cannot wait to see it with pipes, well done Dusty.
Mouse
|
|
|
|
Post by philmill on Sept 2, 2019 10:58:28 GMT 1
Awesome, I love it.
Phil
|
|
tlmark
Drag-strip hero
Posts: 203
|
Post by tlmark on Sept 2, 2019 11:20:53 GMT 1
Holy shit that is gorgeous
|
|
|
|
Post by Yogi on Sept 2, 2019 17:57:02 GMT 1
All credit to you Dusty boy 👌
Who said you can’t make a silk purse out of a sows ear 👍
|
|
|
|
Post by veg on Sept 2, 2019 17:59:24 GMT 1
As opposed to a sows ear out of a silk purse
🥁my names veg and I’m here all night thank you very much
|
|
|
|
Post by Tobyjugs on Sept 2, 2019 19:56:39 GMT 1
Looking very nice Dusty. You didn't mention how much offset you need. There are two type of spherical rod ends available one has more of an offset. With one pointing out and one pointing in, on opposite ends of the rod it creates a good offset and it might suit the raw style of the beastie. Just trying to offer an alternative suggestion.  I like Dave 1963's suggestion best. If you are going to bend an ally lever i always heat the ally up and rub a bit of soap (something like imperial leather) on the ally and when it leaves a black mark its hot and soft enough to bend without melting. Looking at the length of the lever on the brake pedal. Pivot point to master cylinder rod, it makes me think it could be just a bit too long meaning you really have to push down on the pedal to get the required force in the calliper. (just me being critical?) |
|
|
|
Post by midlifecrisisrd on Sept 2, 2019 20:13:15 GMT 1
Hi dusty i used a yamaha fj gear shifter on my hybrid its off set quite abit can't remember what cc one it was Think it's fj1200 mate Steve |
|
|
|
Post by midlifecrisisrd on Sept 2, 2019 20:15:32 GMT 1
Hi dusty i used a yamaha fj gear shifter on my hybrid its off set quite abit can't remember what cc one it was Think it's fj1200 mate Steve Oh dear, just found an offset 600 one now 🤔 Steve |
|
|
|
Post by dave1963 on Sept 2, 2019 20:42:41 GMT 1
Can't find info on mine but fj1200 on ebay looks the same as steve said
|
|
|
|
Post by dusty350 on Sept 2, 2019 21:56:46 GMT 1
Thanks for the info fellas , I appreciate it. Cant believe what some people ask for a small part on ebay ! Should be used to it by now, but it still amazes me. I have found something that may work in a spares box tonight, plus I do have some spare rearset parts that I may be able to mod when I have a bit of time. Will measure the offset tomorrow. It's not a huge amount but enough to stop smooth gear changes I think. It will be an easy fix I think. Thanks again for the input Dusty |
|
|
|
Post by reggieperrin on Sept 4, 2019 17:07:06 GMT 1
Nope... Changed my mind Dusty... I want it back now.... Reg.. |
|
|
|
Post by headcoats on Sept 5, 2019 19:34:03 GMT 1
|
|
|
|
Post by dusty350 on Sept 6, 2019 15:00:43 GMT 1
Today I fitted a new Lc throttle cable to the Pwk's. The carbs came from another project bike, and had a tired cable that didn't have an oil pump cable - it had been removed from the splitter. After some careful measuring of the original set up, I cut 10 mm off the hex adjusters near the carb tops which allowed me the same amount of cable as the original; 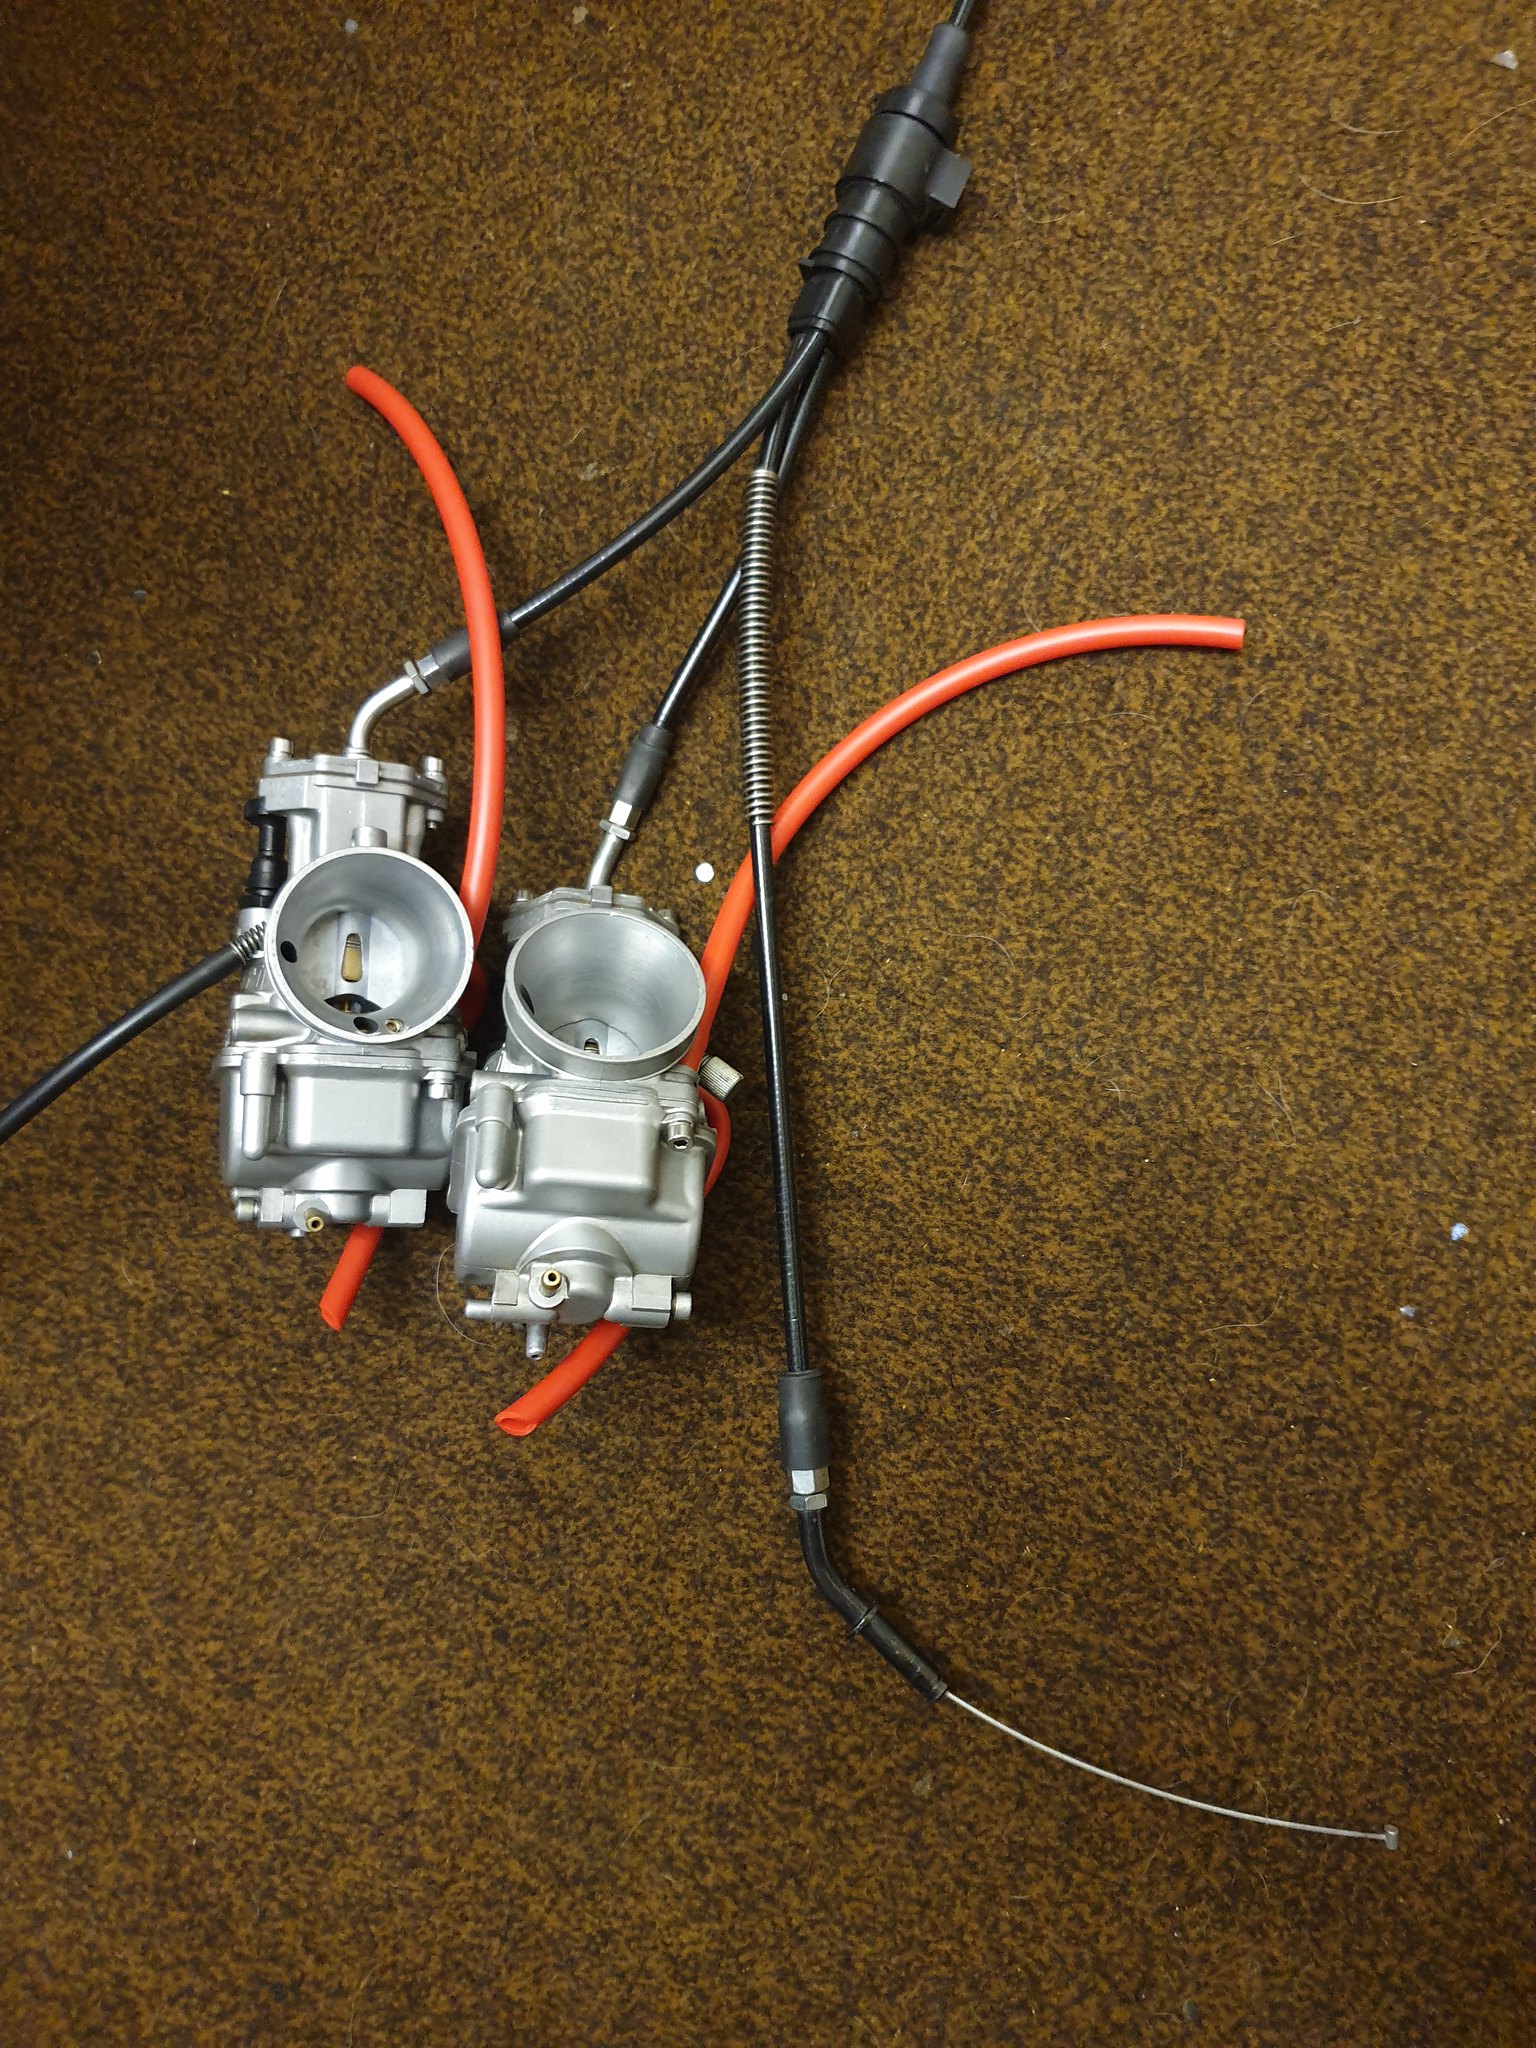 20190906_134421 20190906_134421 by dusty miller, on Flickr I also checked which needles and jets are fitted. These carbs were reputedly fitted to a Pv before I got them, so not sure what the base set up is, but needles are N68 on middle groove, and mains are marked 165 AB. Bolted them on, and got a fairly easy run to the headstock. I also renewed all the old screws for some stainless cap heads;  20190906_143823 20190906_143823 by dusty miller, on Flickr I will need to find some angled filters though. The Ramairs get squashed against the frame tubes which isn't ideal, so I will try and source the Uni filters with the 15mm exit angle - that should direct them away from the frame. Also fitted the temp gauge to the bracket I made ages ago; 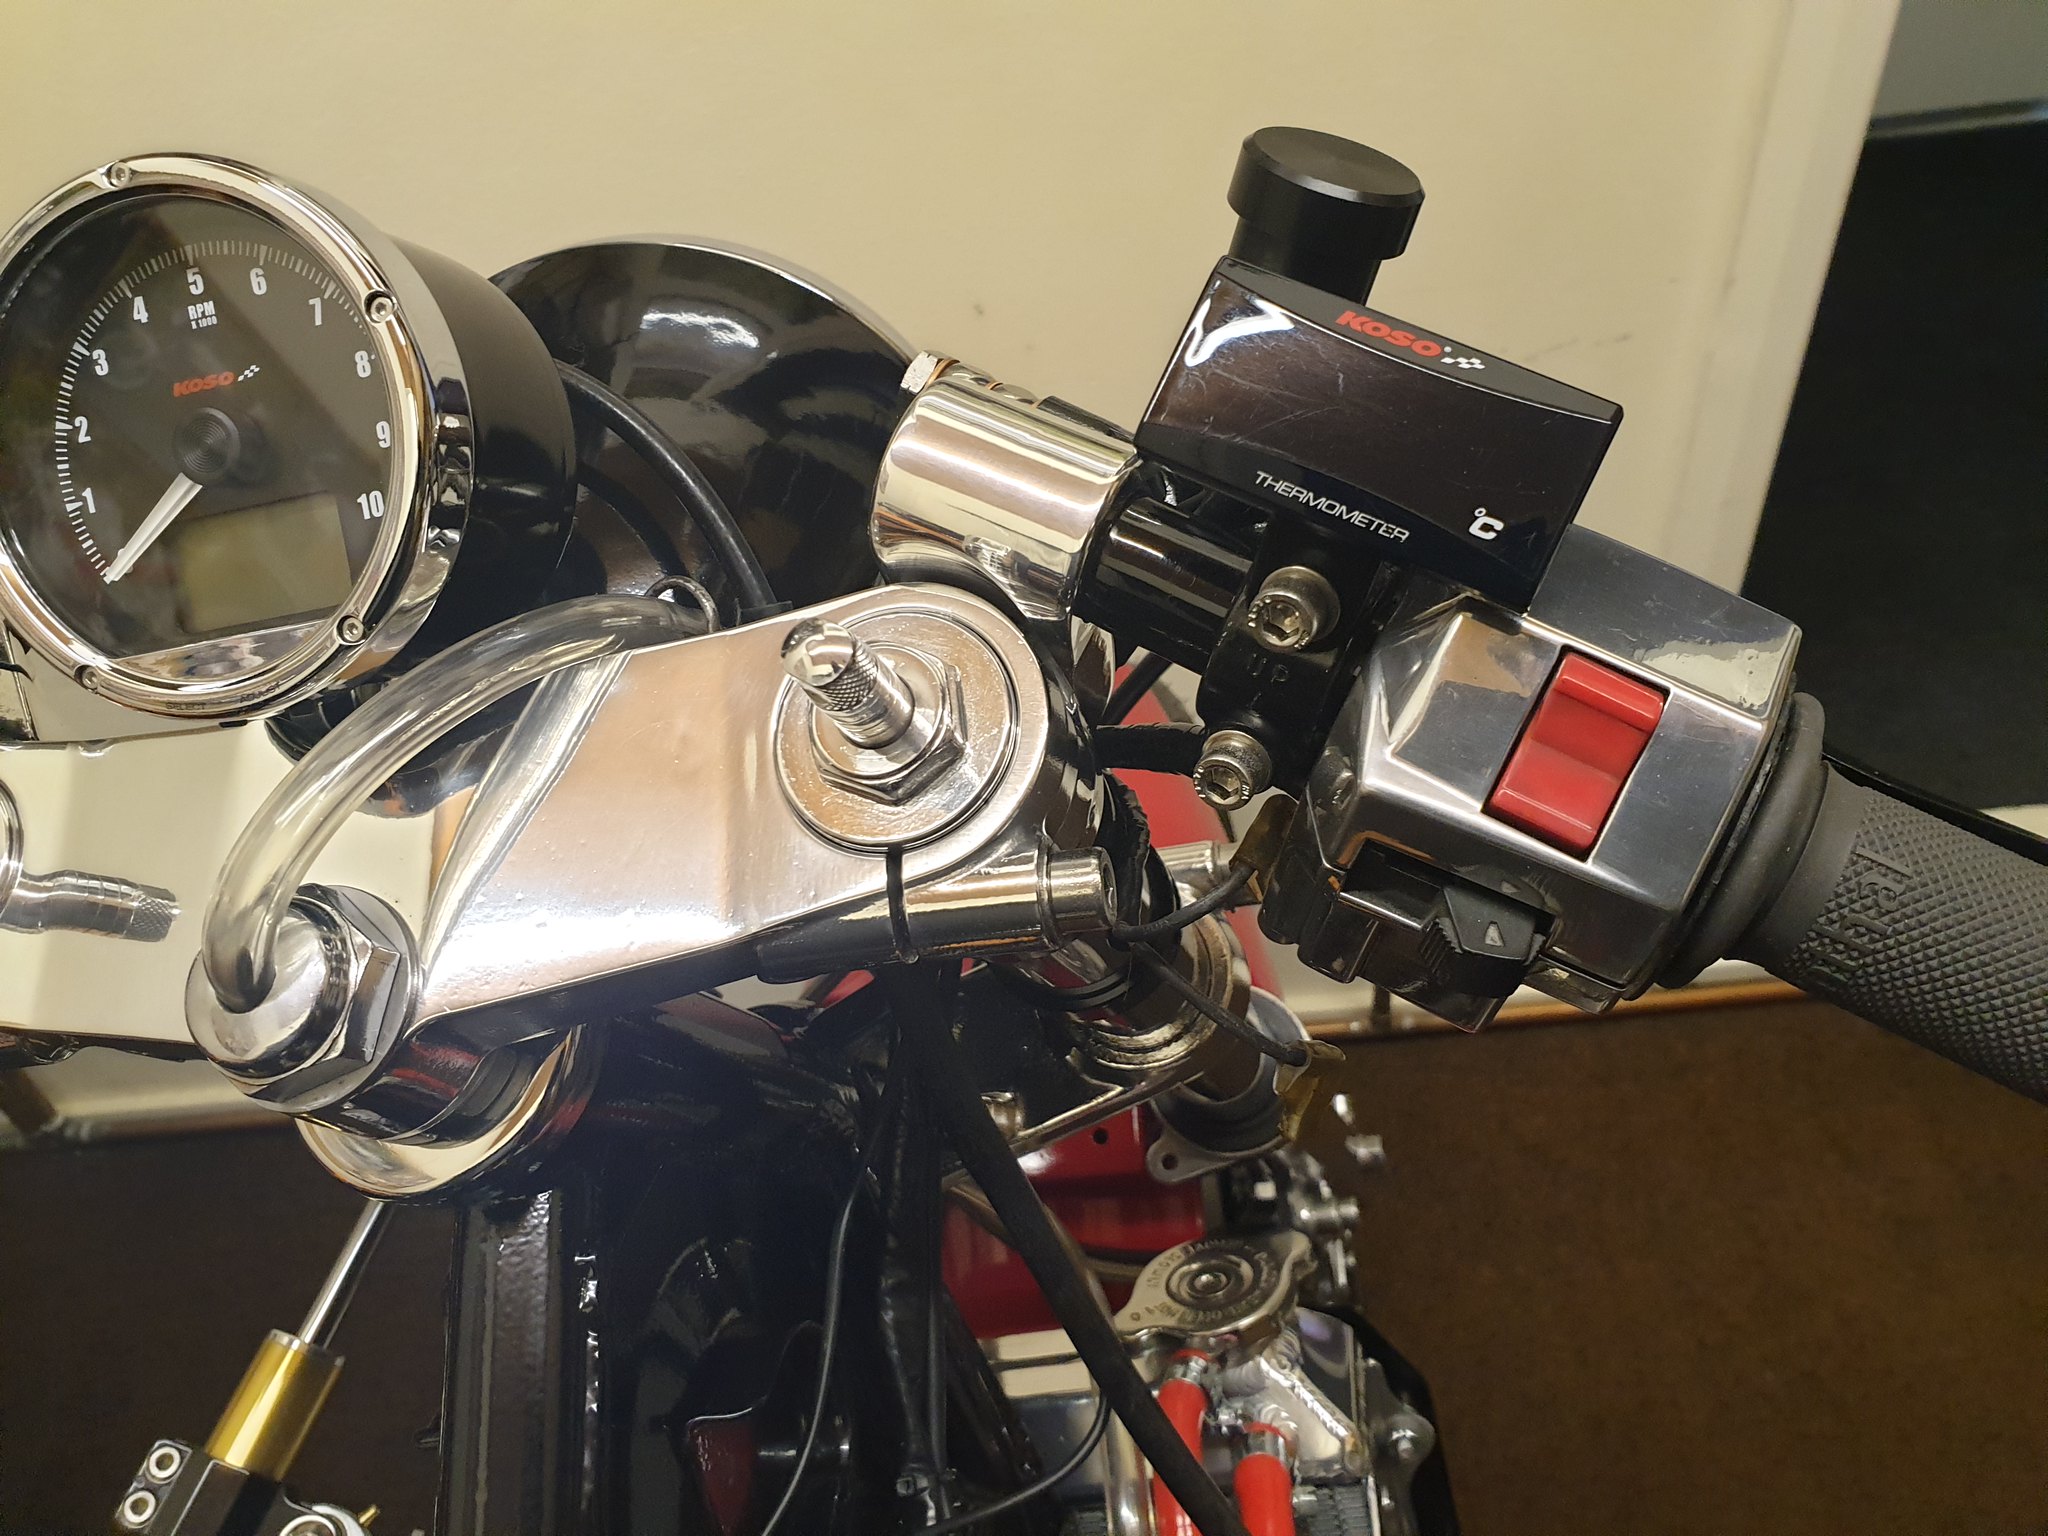 20190906_143807 20190906_143807 by dusty miller, on Flickr I deliberately wanted to keep it away from the centre instrument, but still very visible, so it ended up here. Looks pretty good when lit up ! Dusty |
|
|
|
Post by donkeychomp on Sept 7, 2019 0:06:22 GMT 1
|
|
|
|
Post by dusty350 on Sept 7, 2019 7:10:09 GMT 1
Hi Alex, Yea, I was looking at that last night too. He has done a really nice job of that build - really tidy with the frame mods. I do fancy an aircooled build again. 7k seems pricey, but there is a lot of work and thought gone into it and I really like it. Only thing I would change is the crinkle paint finish, but each to their own Dusty |
|


