|
|
Post by mouse on Mar 13, 2017 9:07:19 GMT 1
Hi Andrew, Looking awesome mate. The engine looks gorgeous. Martin has done a fantastic job - you need to sort that pv end cap though !!   Frame repairs look good too. You are using the right people so always going to get the right job done. So, paint or powder on the frame ?? Dusty  Cheers Dusty, well spotted on the pv end cap, it's on the list of things to do! Going for paint, hoping to drop it off this weekend...maybe! Mouse |
|
|
|
Post by mouse on Mar 13, 2017 9:11:02 GMT 1
Brilliant Andrew, you moving at a great pace. I like all your choices so far. Keep up the good work
Mark Many thanks Yamark, yes she is gathering momentum now, i couldn't attempt your build as i am too Impatient! I'm really happy with it all, the only potential fly in the ointment is my choice of white wheels, hope it's going to look ok! Mouse |
|
|
|
Post by mouse on Mar 15, 2017 8:35:07 GMT 1
Right, painters sorted!
Off on Saturday to deliver frame, swingerarm etc
They reckon a couple of weeks
Can't wait
Mouse
|
|
|
|
Post by dusty350 on Mar 15, 2017 8:53:05 GMT 1
And I bet you still finish it before I finish any of mine !! Glad it's moving on now, and warmer in the garage now too so it will be built in no time. Catch up soon mate Dusty |
|
|
|
Post by mouse on Mar 19, 2017 18:09:12 GMT 1
|
|
|
|
Post by dusty350 on Mar 19, 2017 21:23:31 GMT 1
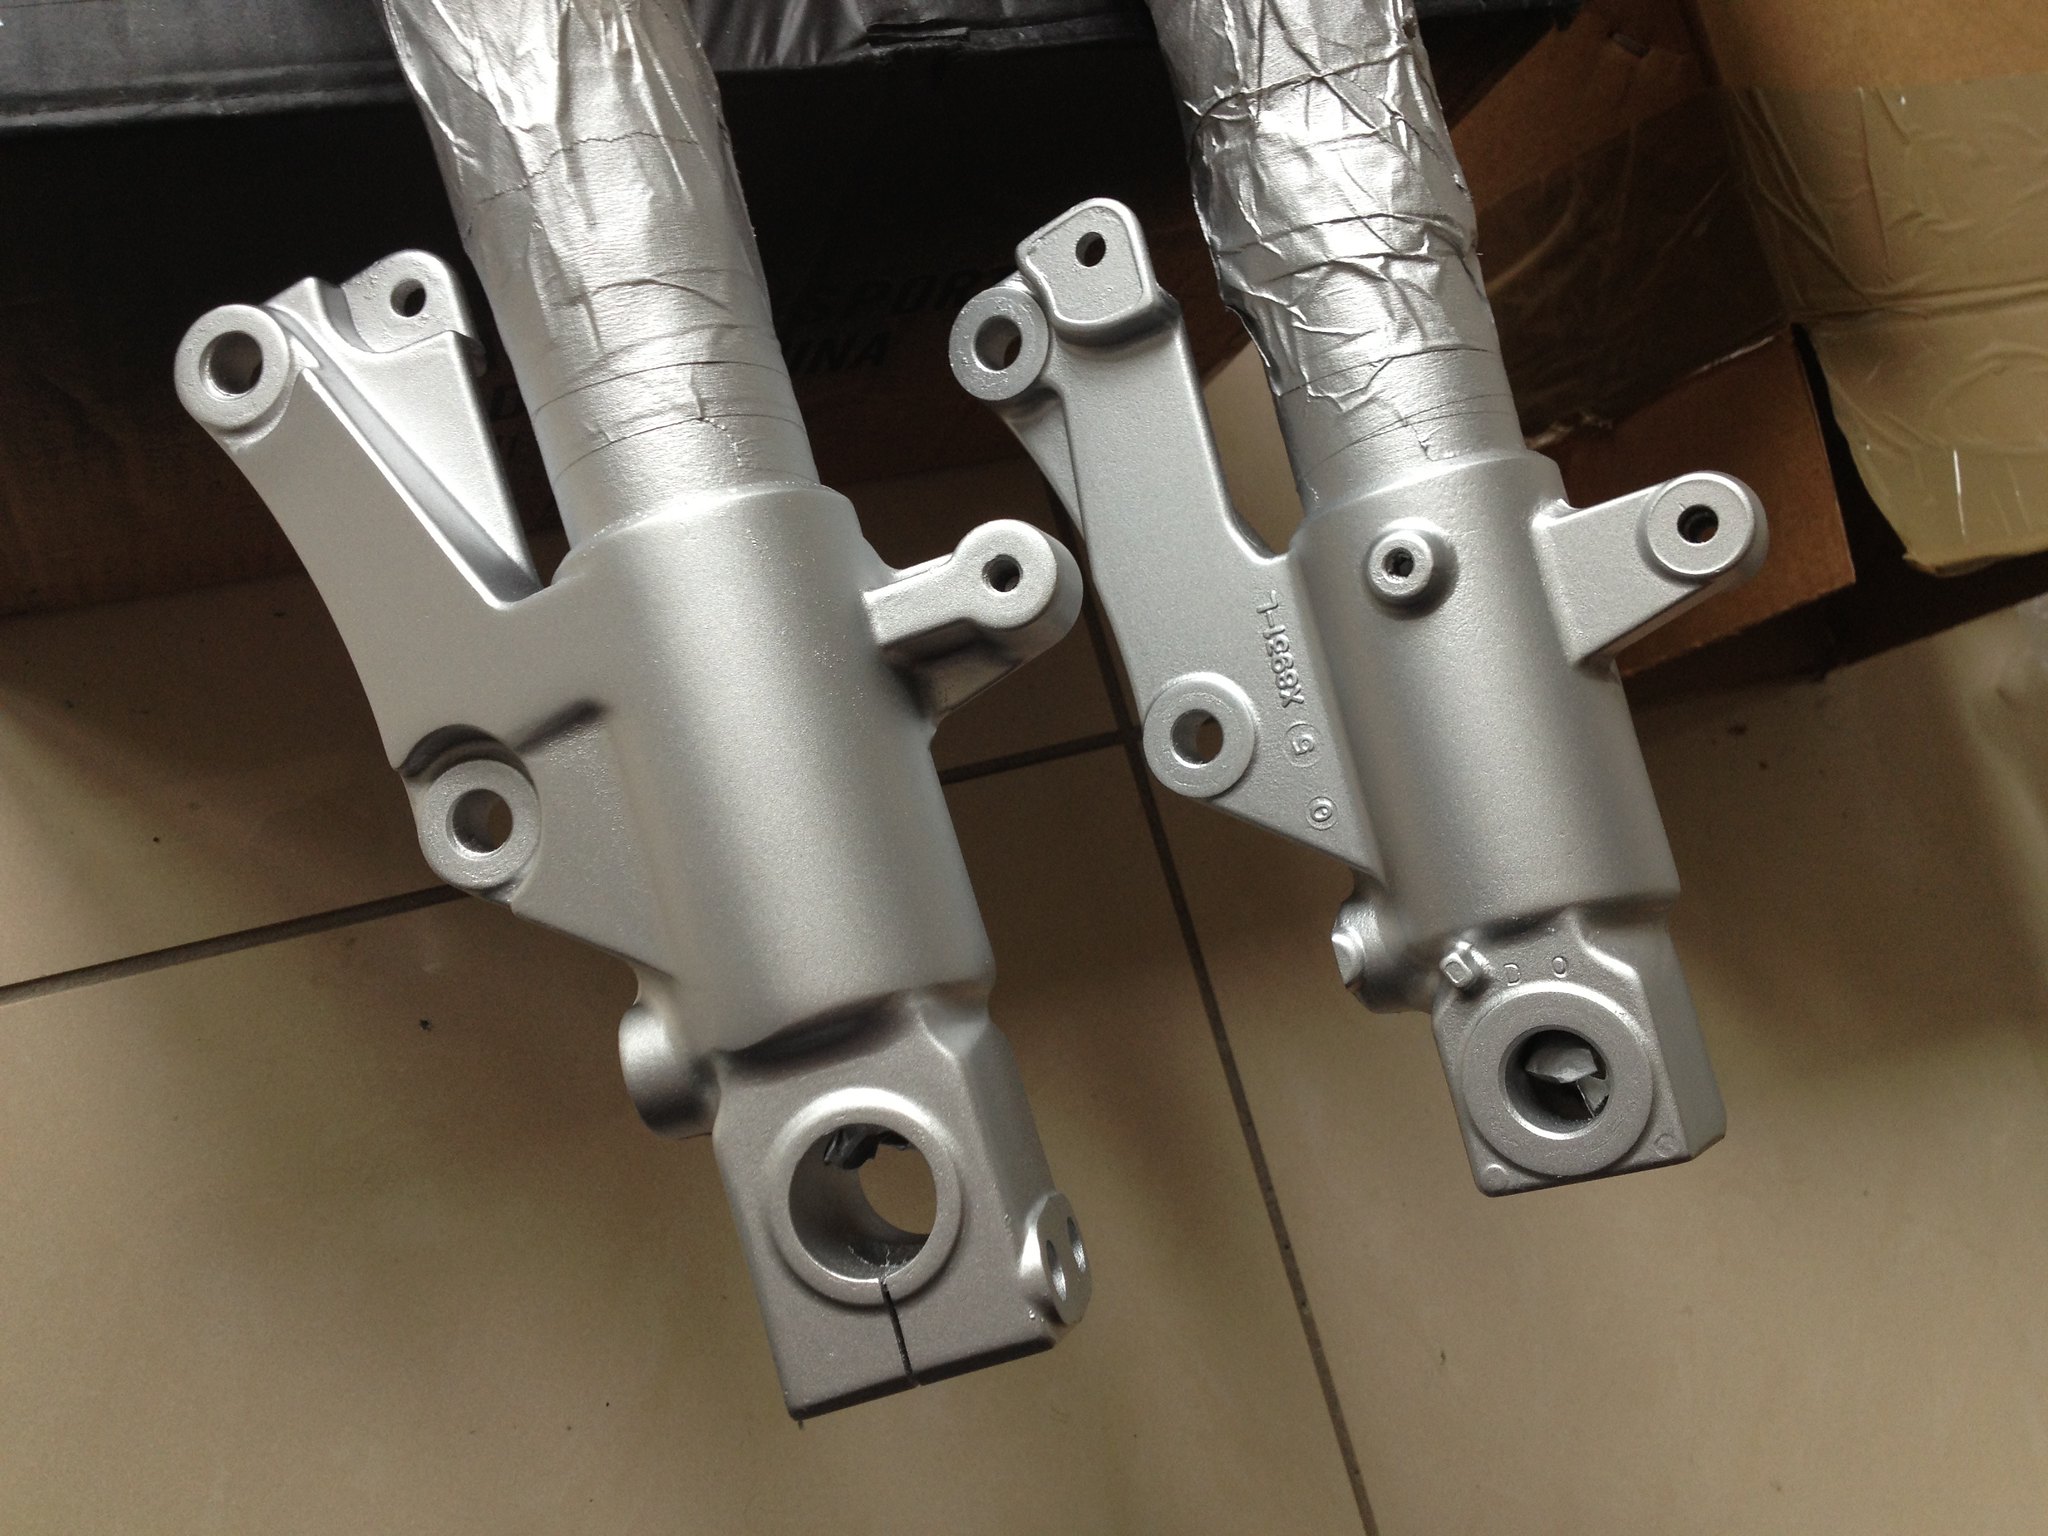
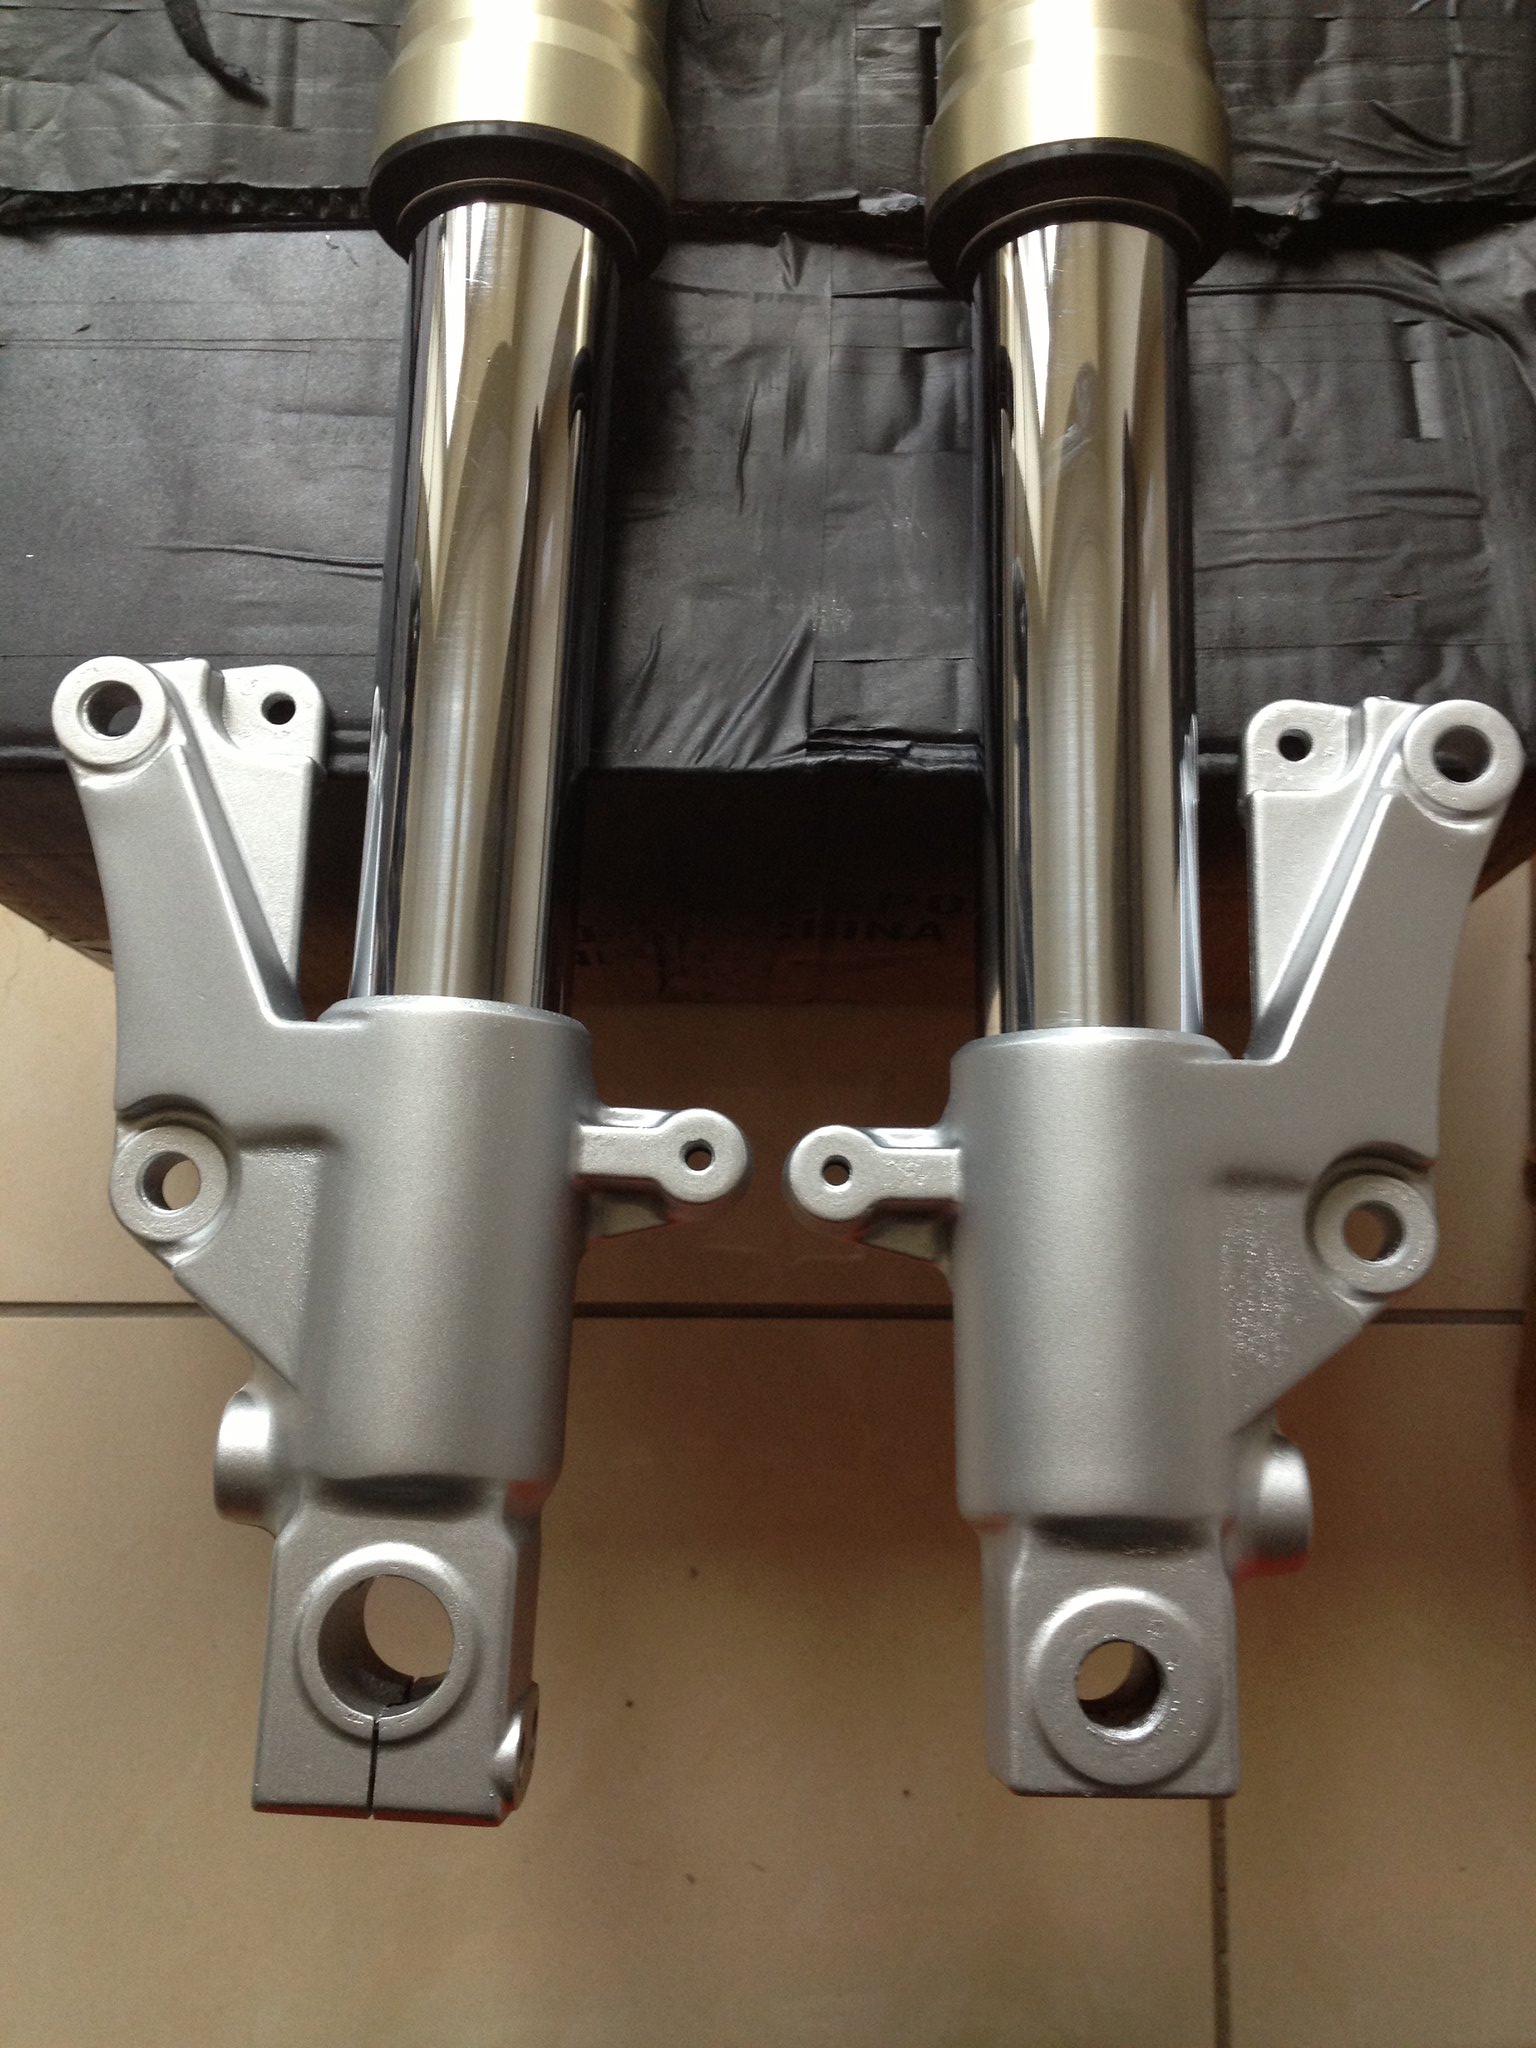
Looking good Andrew, the bottom of the forks look brand new ! Well done mate Regards Dusty |
|
rz350k
L plate rider.

Posts: 15 
|
Post by rz350k on Mar 23, 2017 3:18:24 GMT 1
Great bike luv the Lc2's
|
|
|
|
Post by mouse on Mar 23, 2017 8:35:43 GMT 1
Looking good Andrew, the bottom of the forks look brand new ! Well done mate Regards Dusty Cheers Dusty they have come up quite well, not mint but.... Used Simoniz wheel paint, the fastest drying paint i have ever known, literally is touch dry within seconds!! Supposed to be quite tough though Mouse |
|
|
|
Post by dusty350 on Mar 23, 2017 9:07:50 GMT 1
They look really good Those fork bottoms are not the easiest parts to prep - I know when I polished mine they were a pig to get even - the shape doesn't make it easy to get into with a mop. Worth the effort though, your eye will always be drawn to the part that didn't get the prep that the rest got !! Should have brought mine over to you !! Dusty |
|
|
|
Post by Yogi on Mar 23, 2017 9:11:16 GMT 1
I'm looking forward to seeing this go back together
Nice work on the front end,keep the pics coming
Atb Matt
|
|
|
|
Post by mouse on Mar 26, 2017 17:55:35 GMT 1
|
|
|
|
Post by ibby4585 on Mar 26, 2017 18:03:11 GMT 1
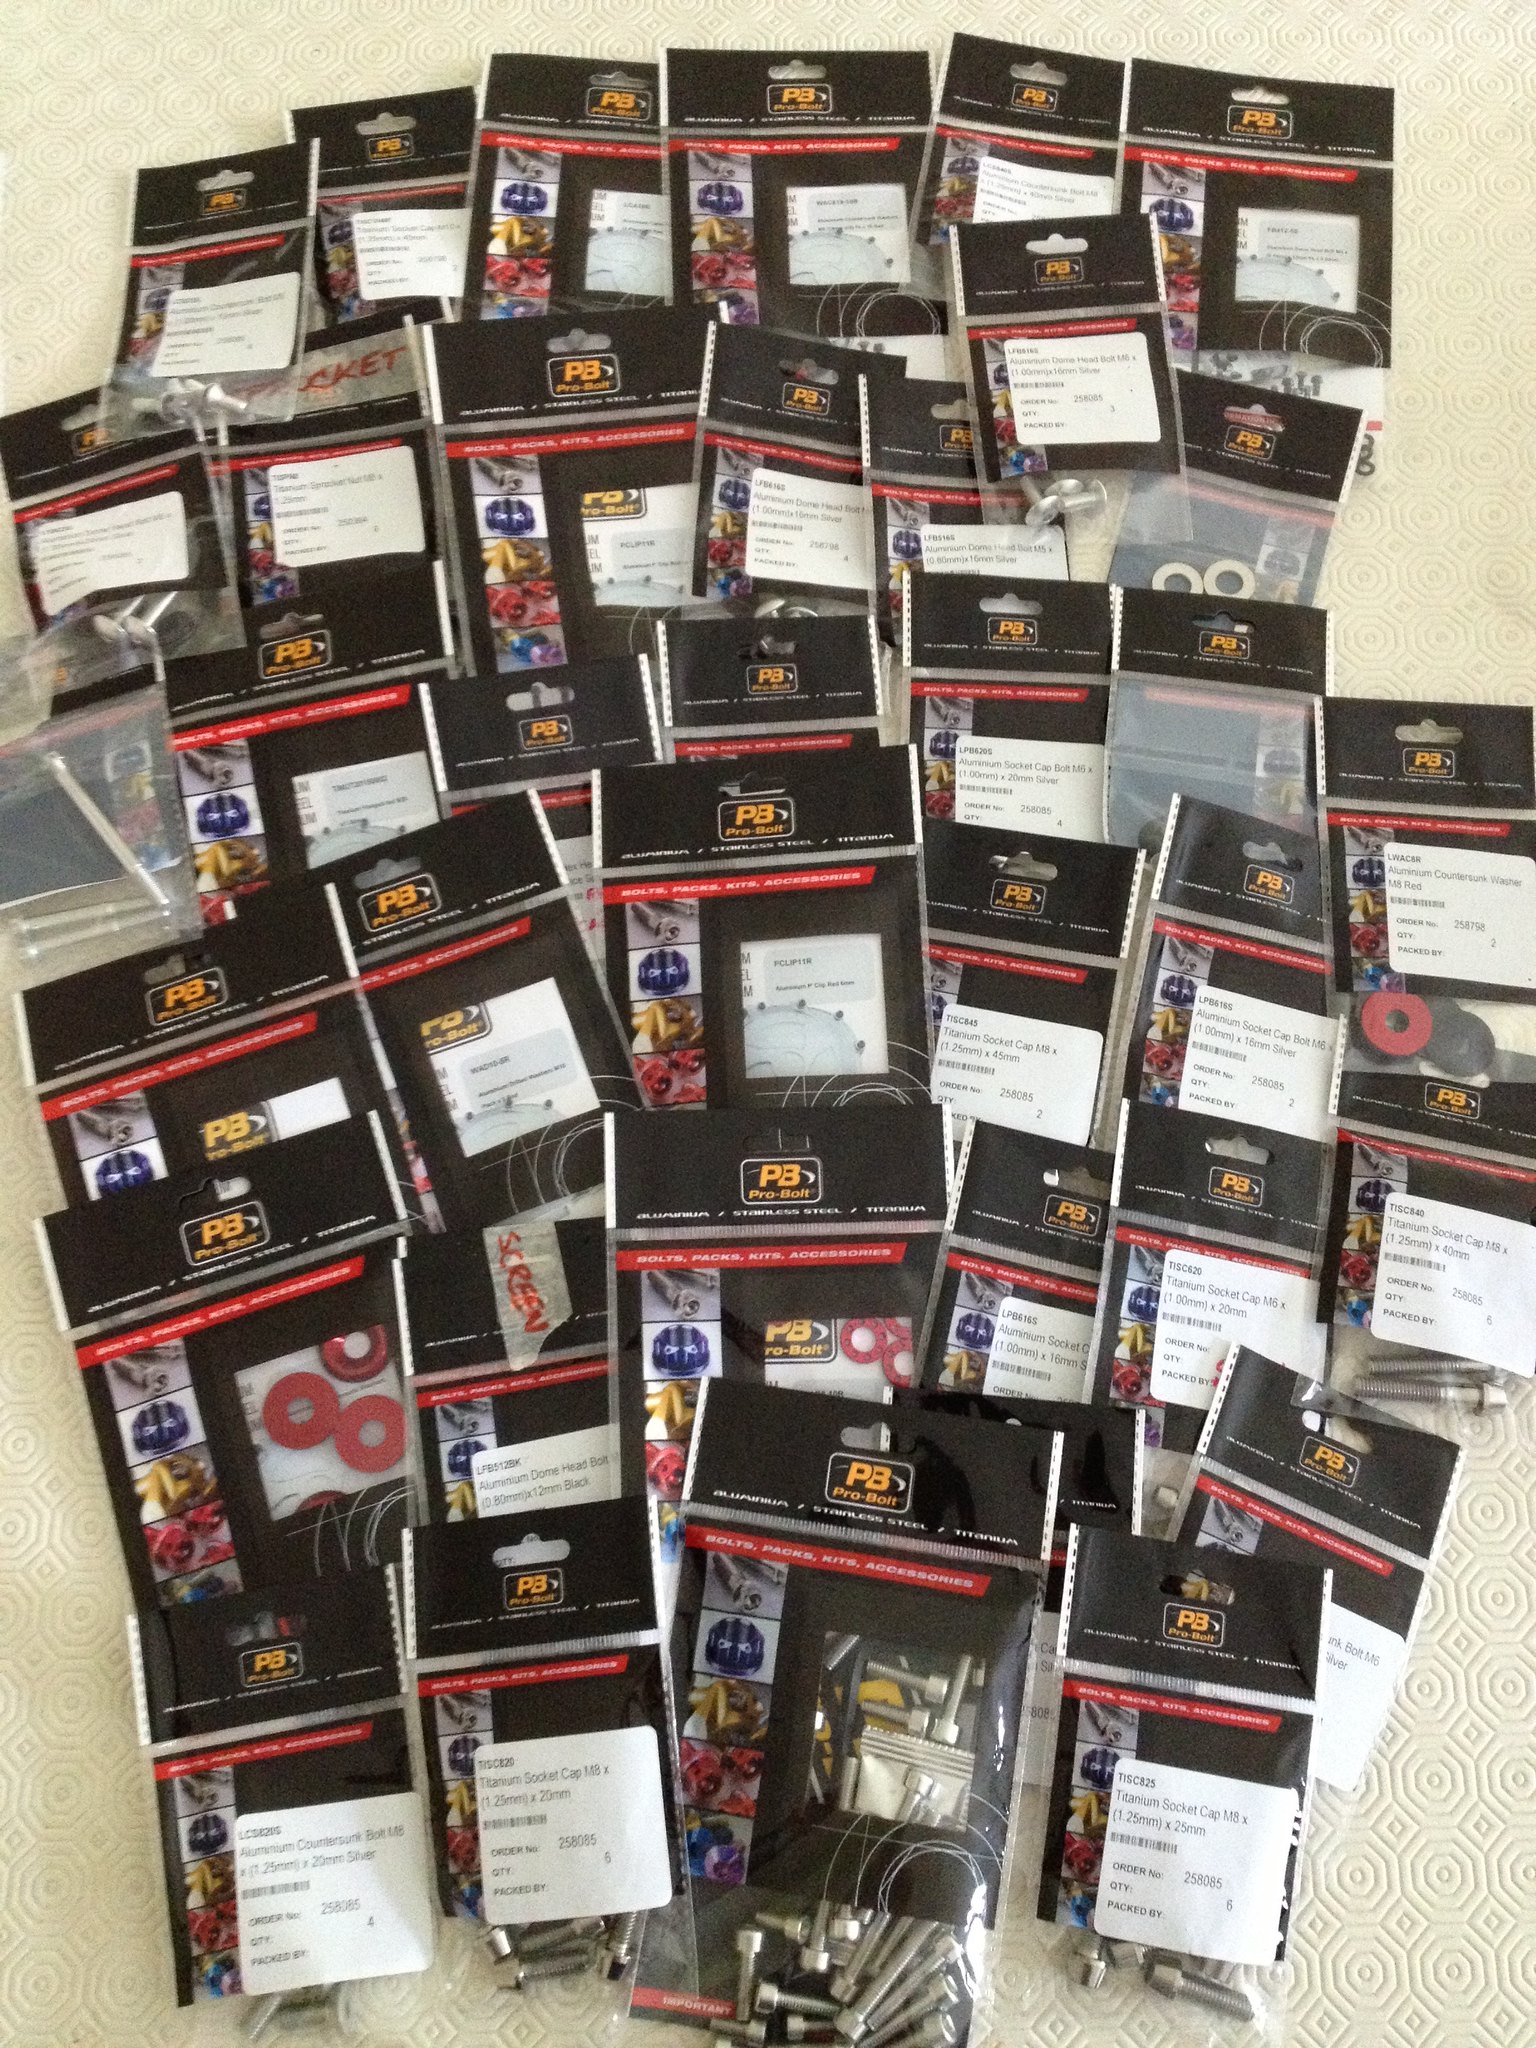
Thats about £1000 worth of bolts lol!!
|
|
|
|
Post by yamark on Mar 26, 2017 18:14:06 GMT 1
I sense Pro bolt are already looking forward to their Christmas party 
The forks look great Mouse |
|
|
|
Post by mouse on Mar 29, 2017 12:58:35 GMT 1
Thats about £1000 worth of bolts lol!! I try not to think about the cost!! Mouse |
|
|
|
Post by mouse on Apr 2, 2017 18:59:39 GMT 1
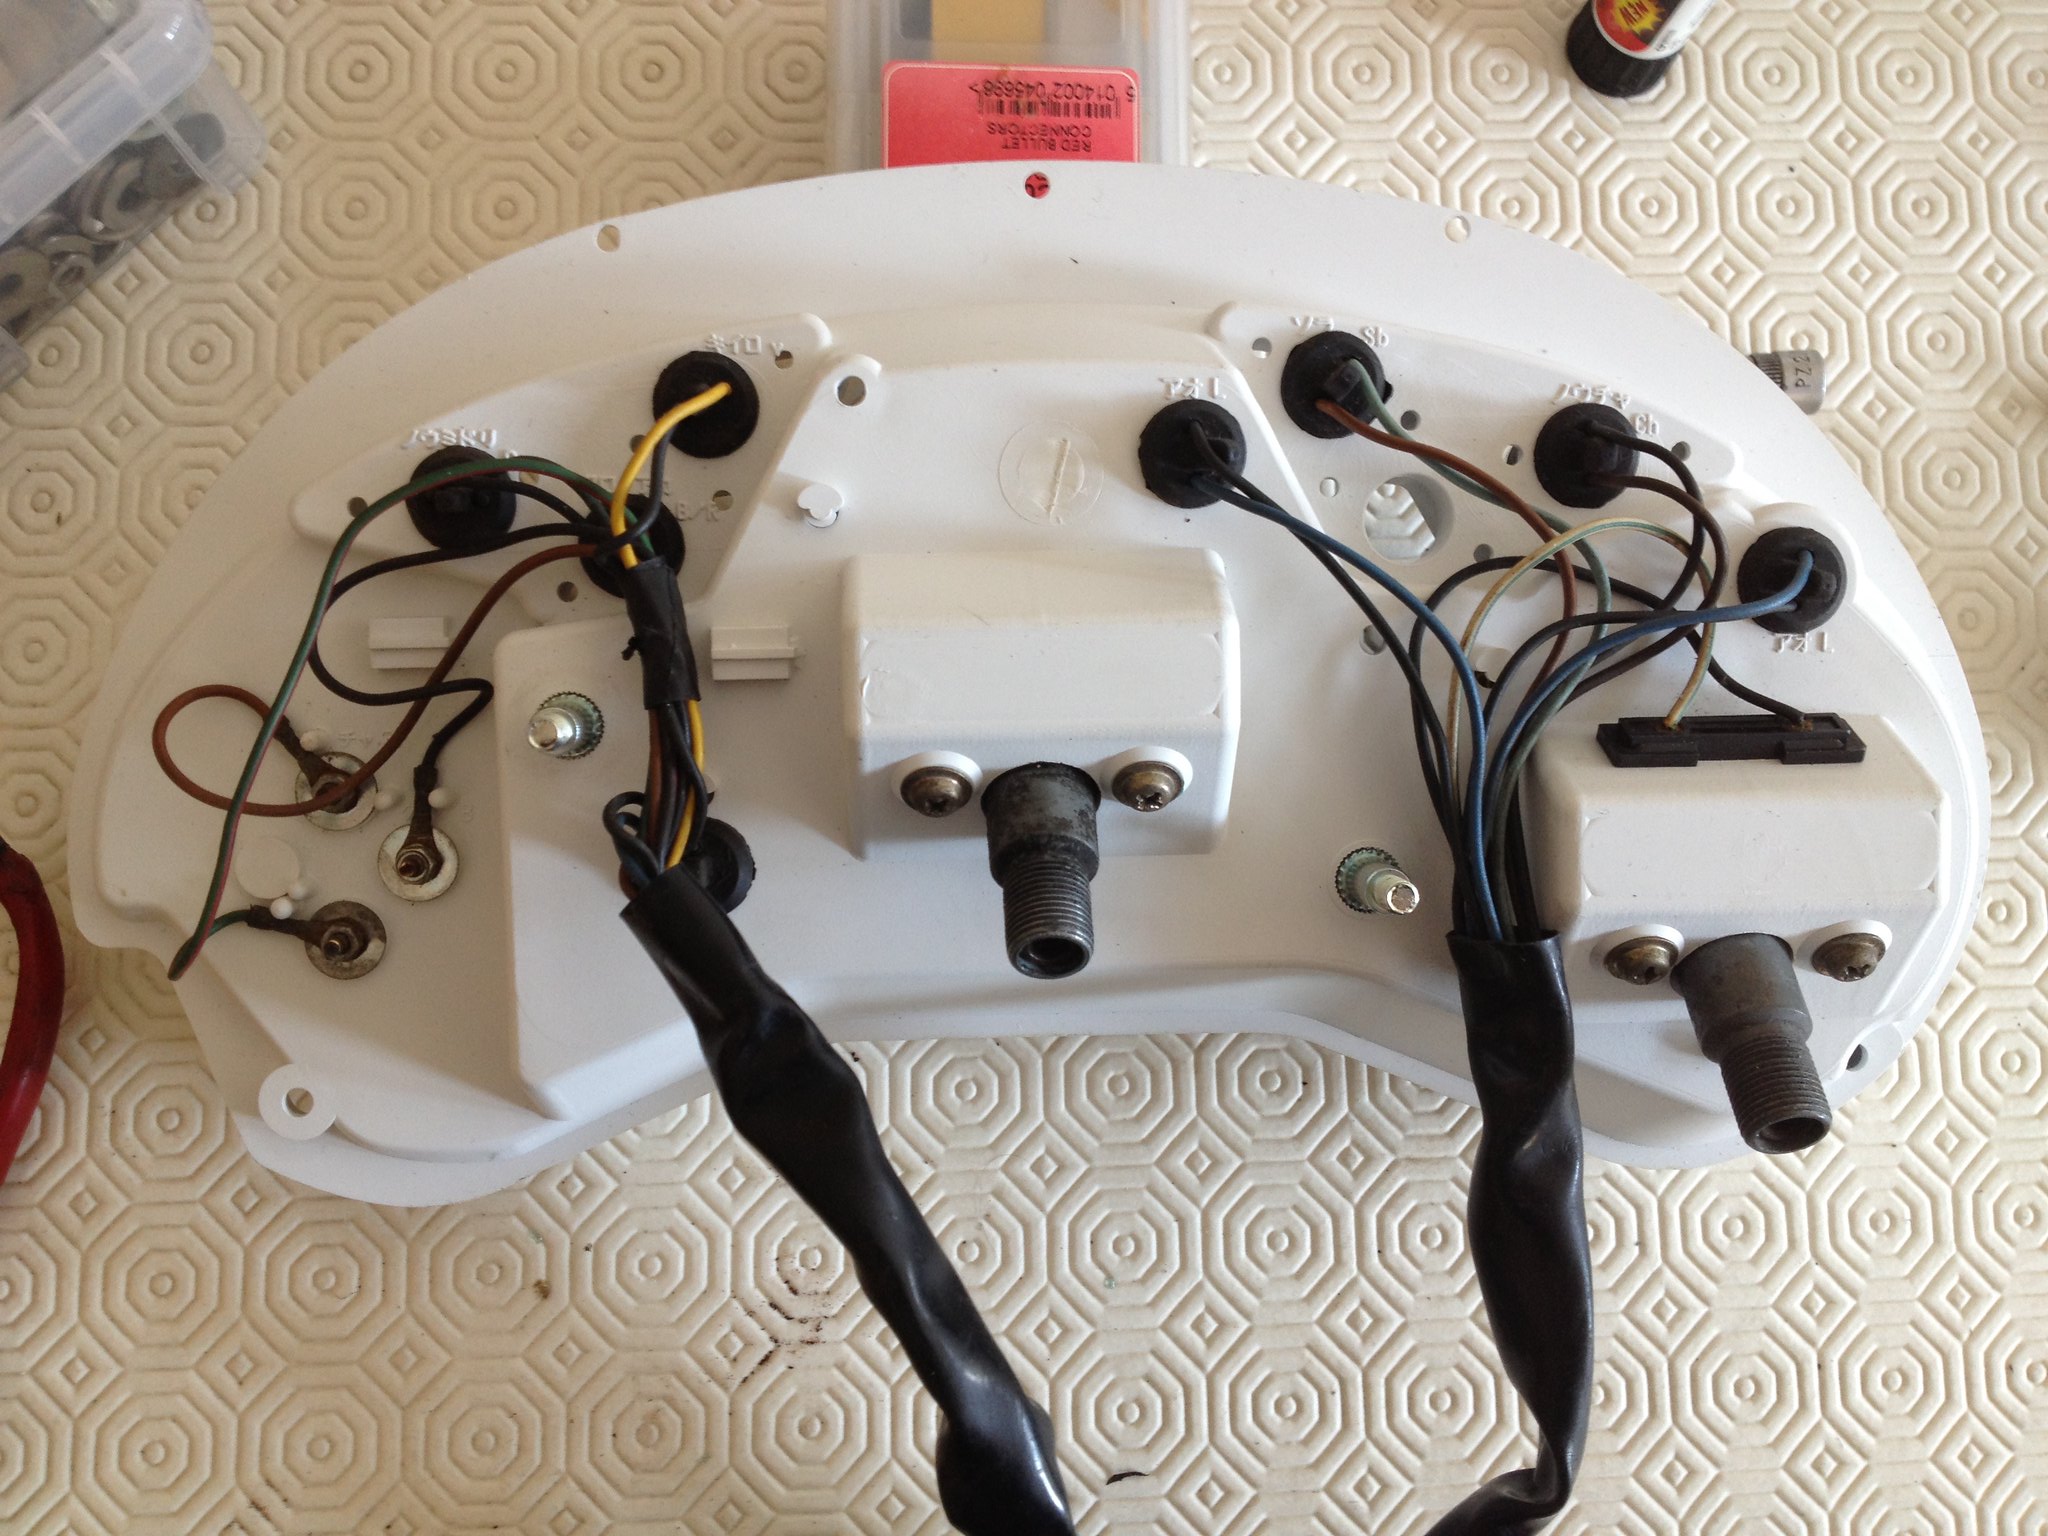
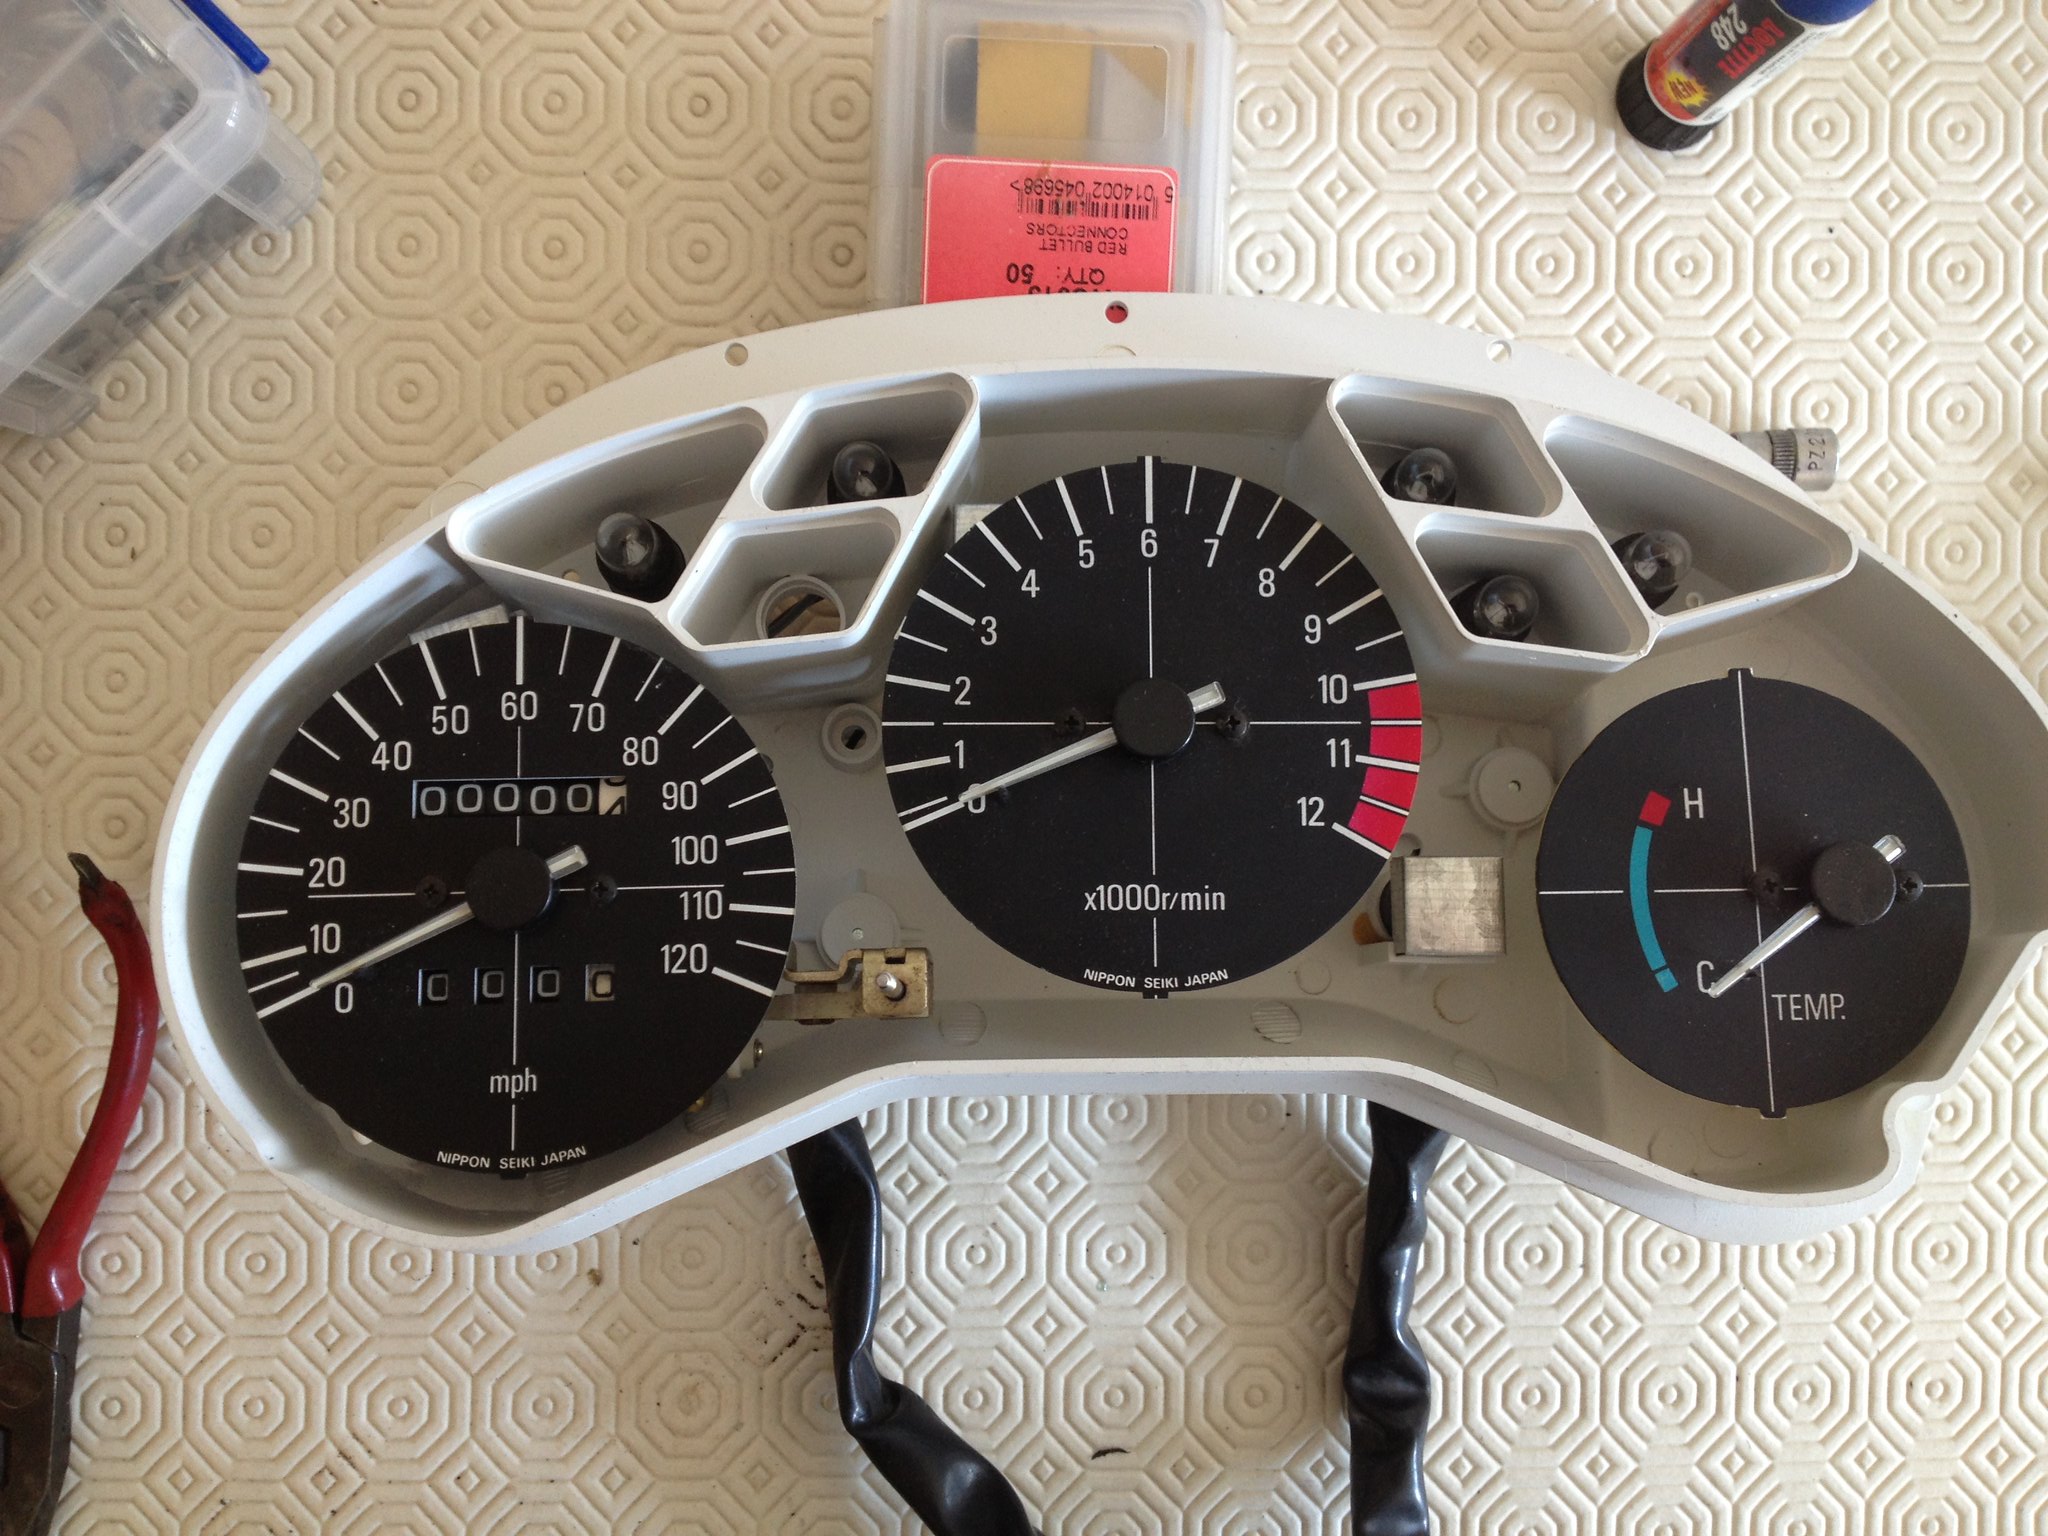
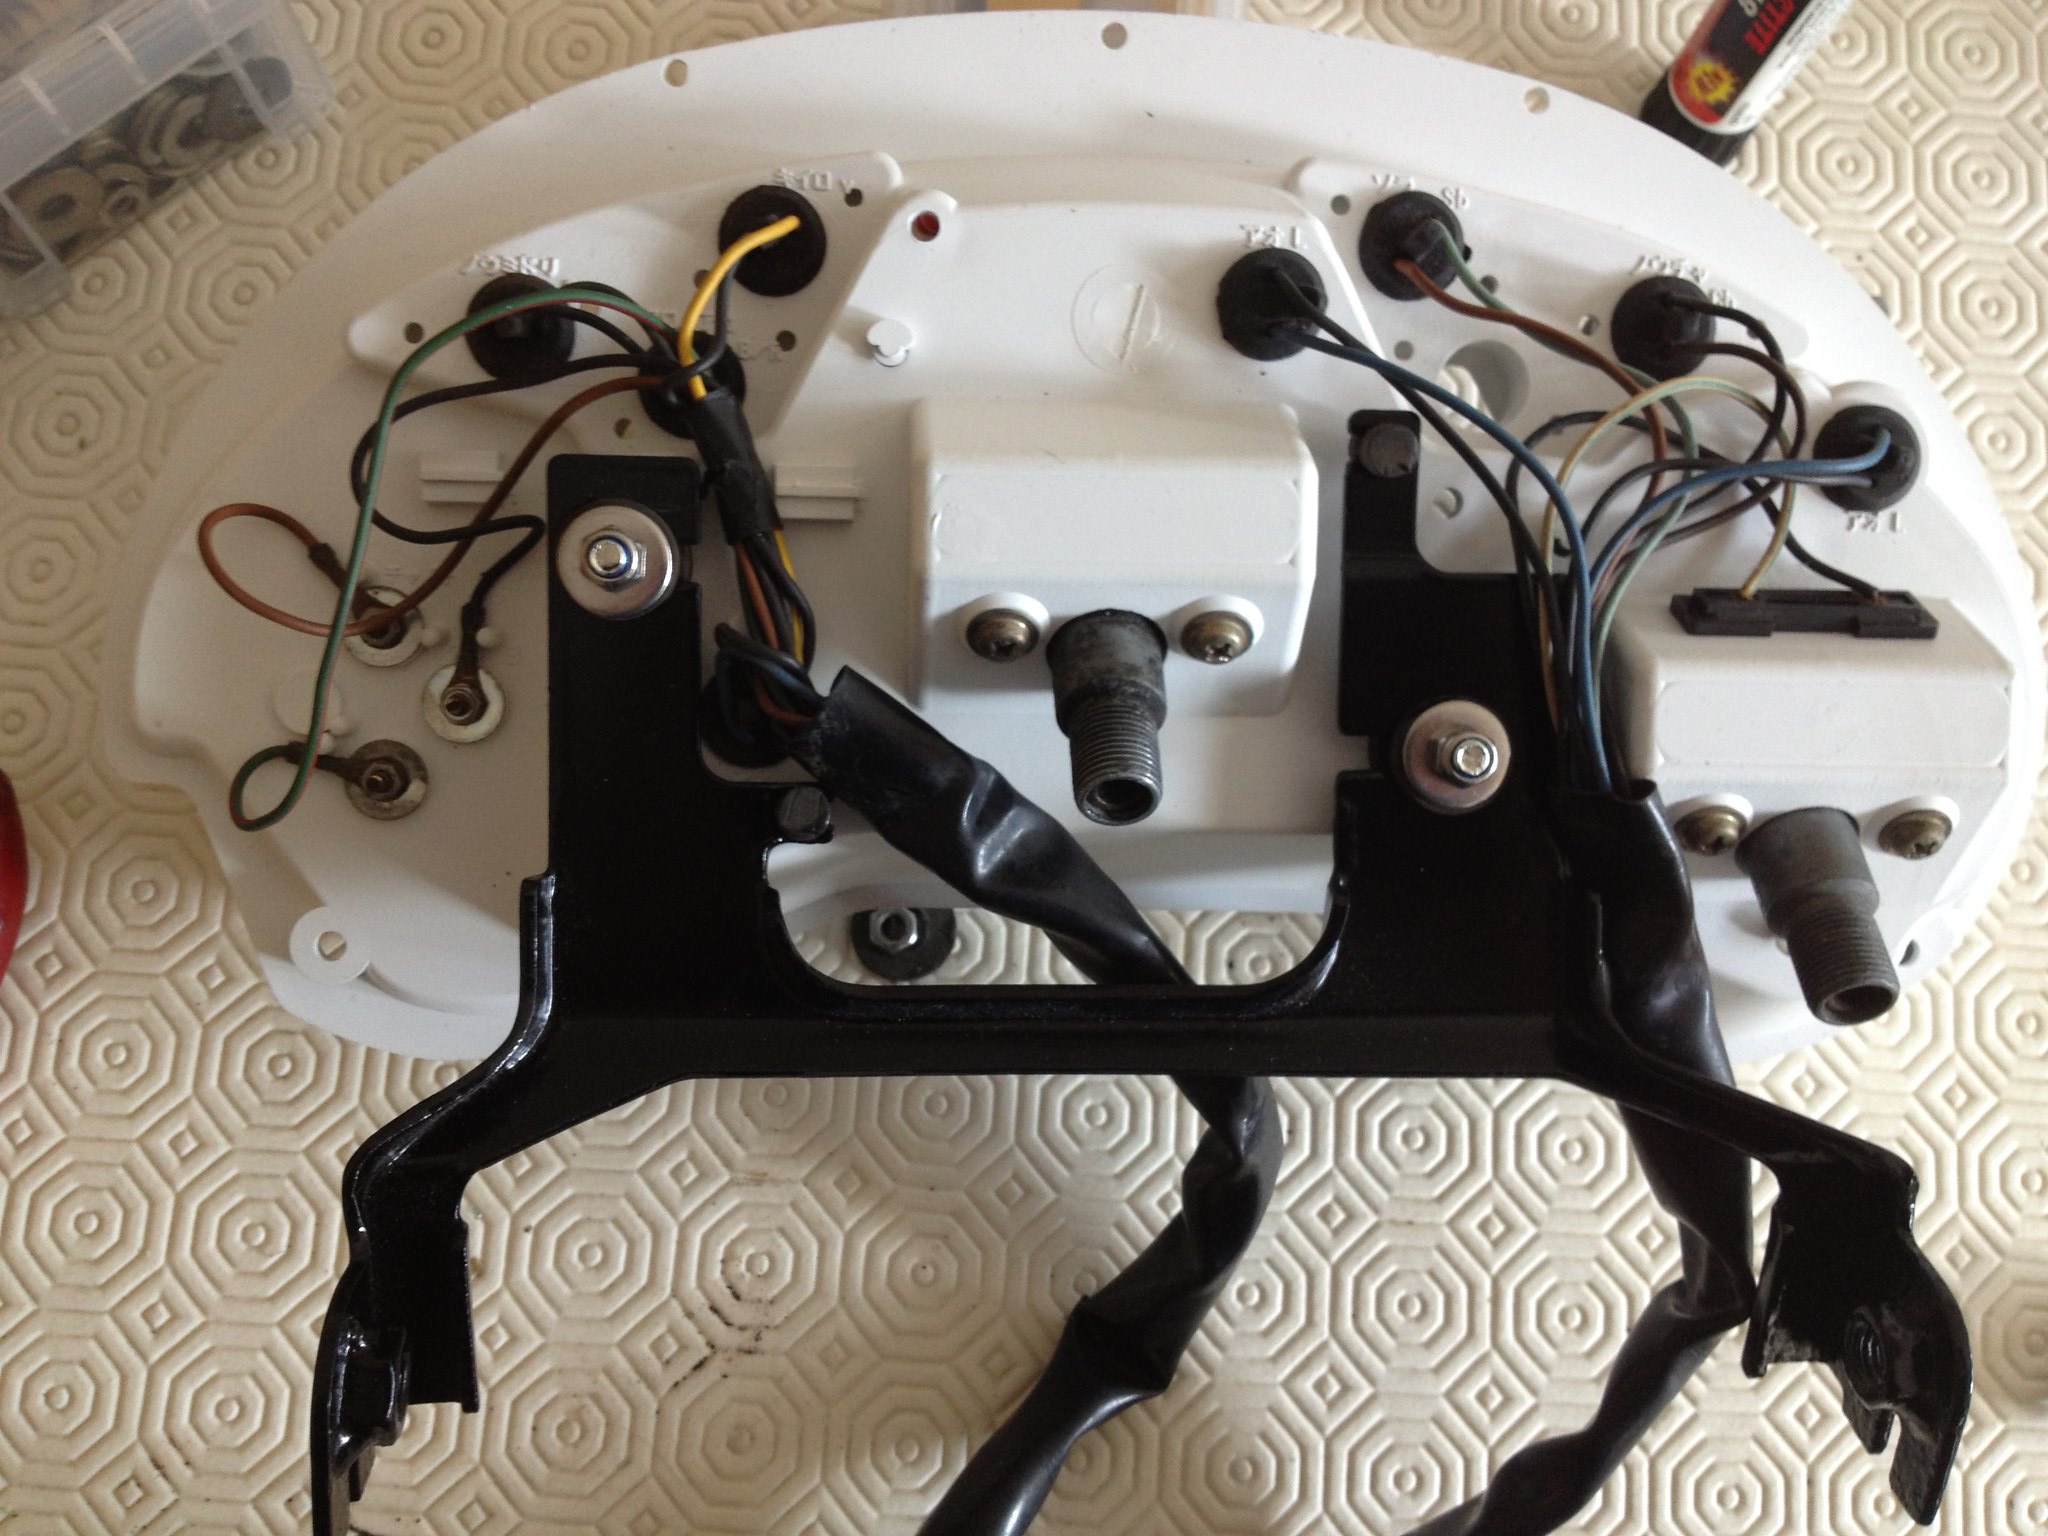
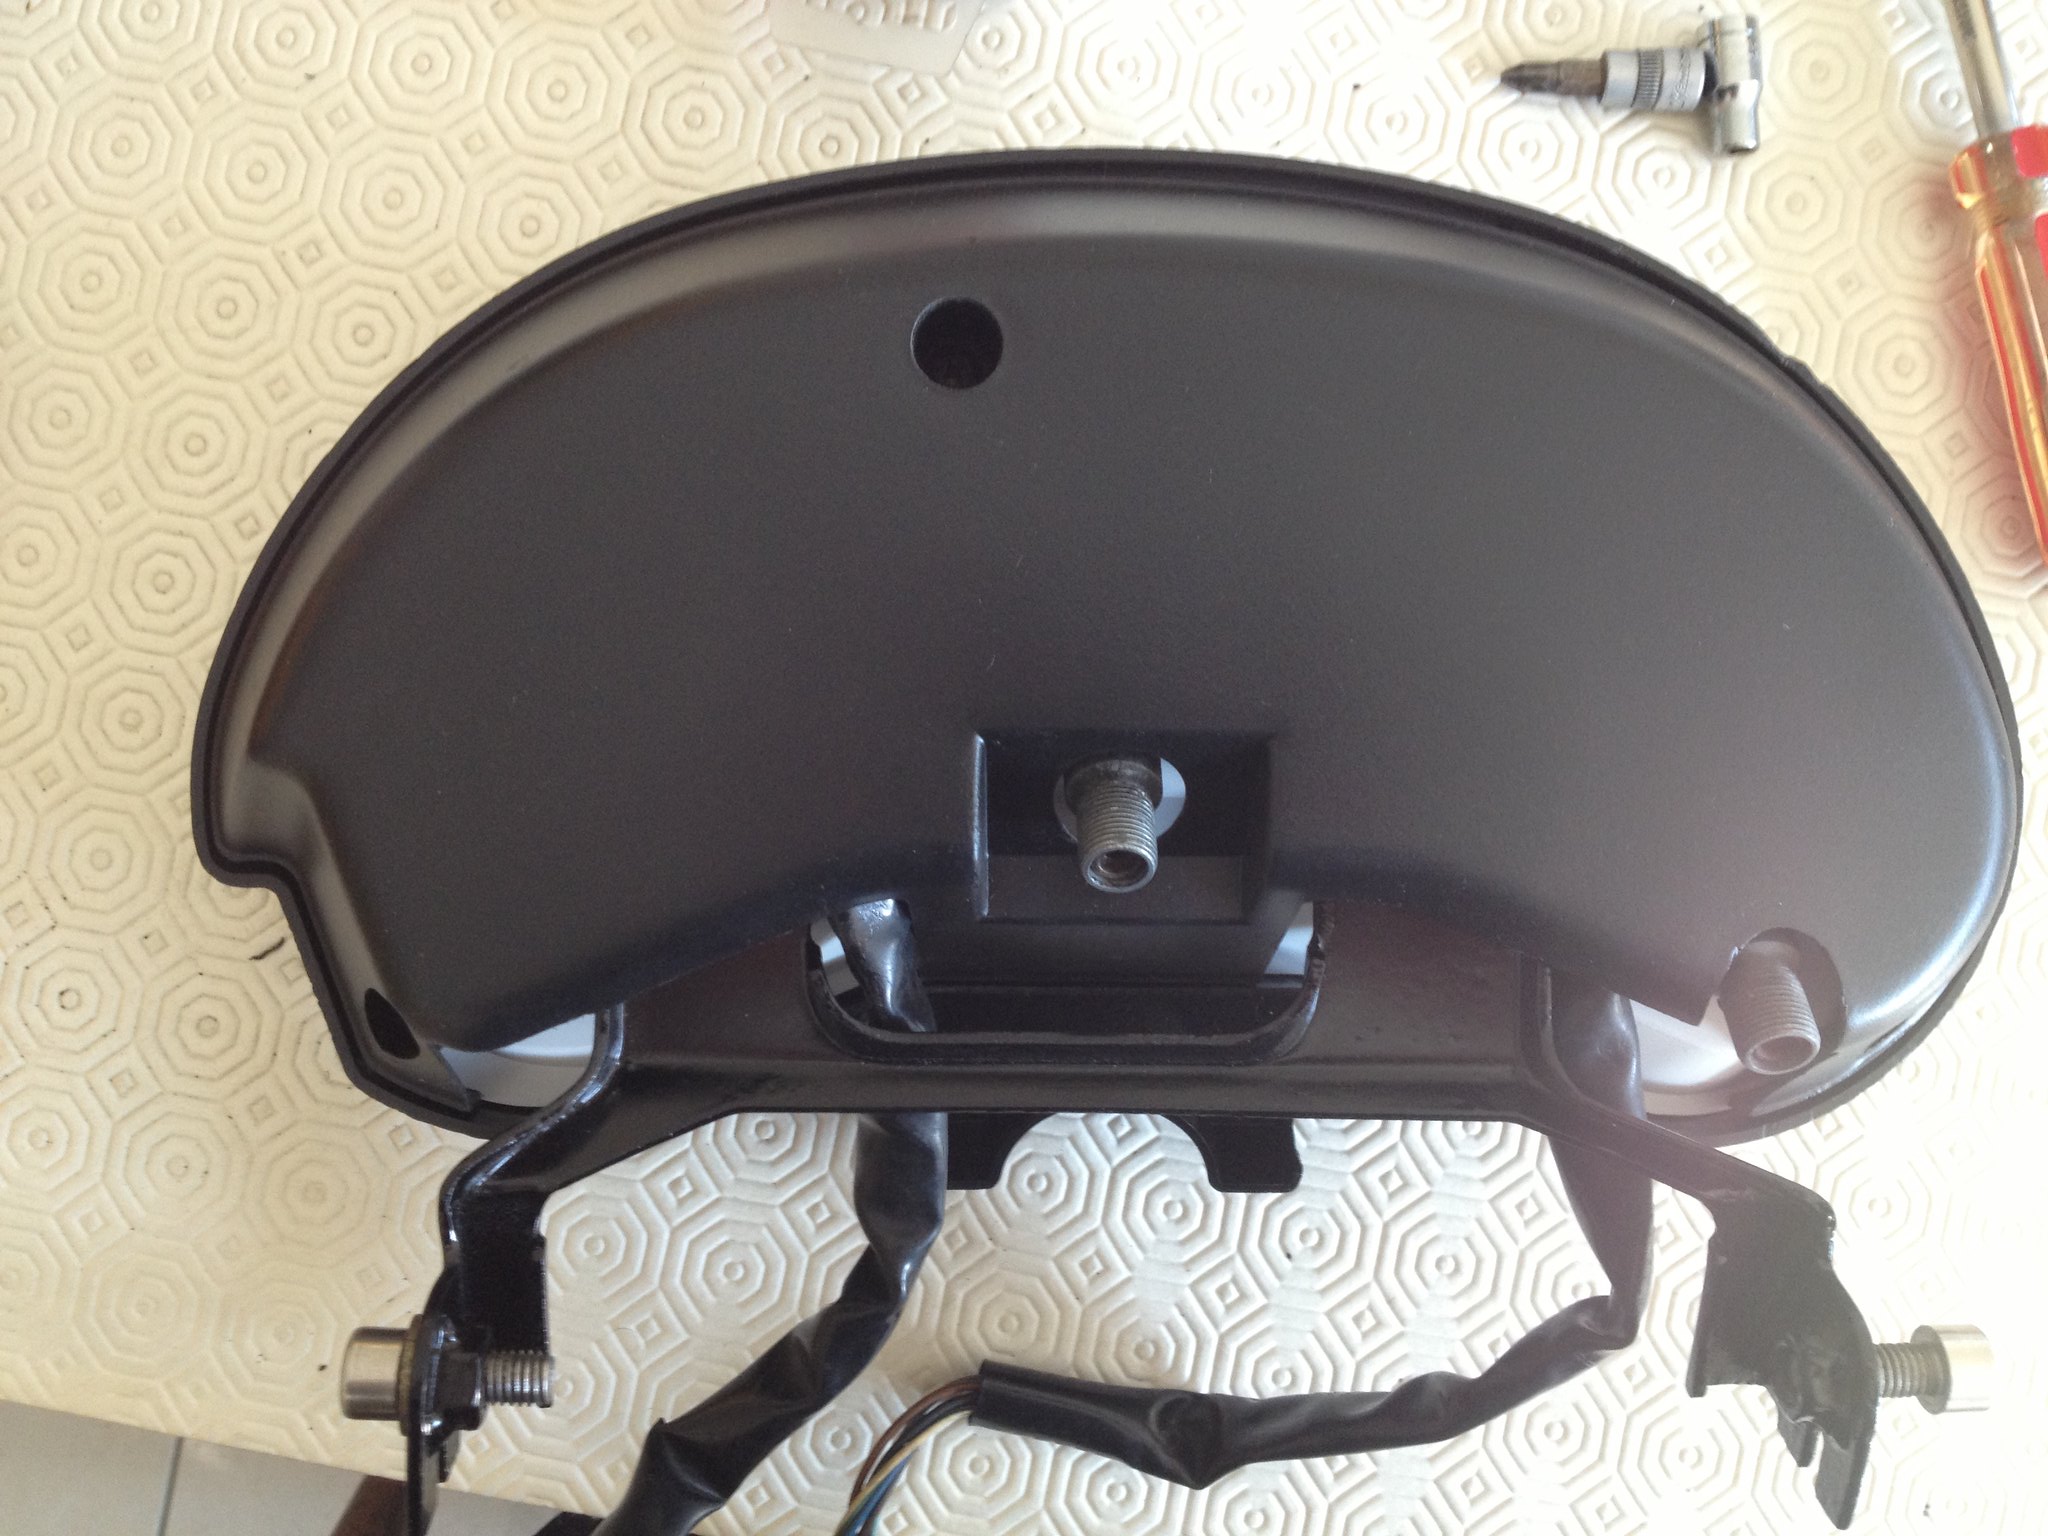
Got a few more jobs done today. Clocks, Jeez why did Yamaha change the original lovely LC clocks to the fiddly delicate b*****d things on the 31k?? Here is a pic of the ones i have from the inside back 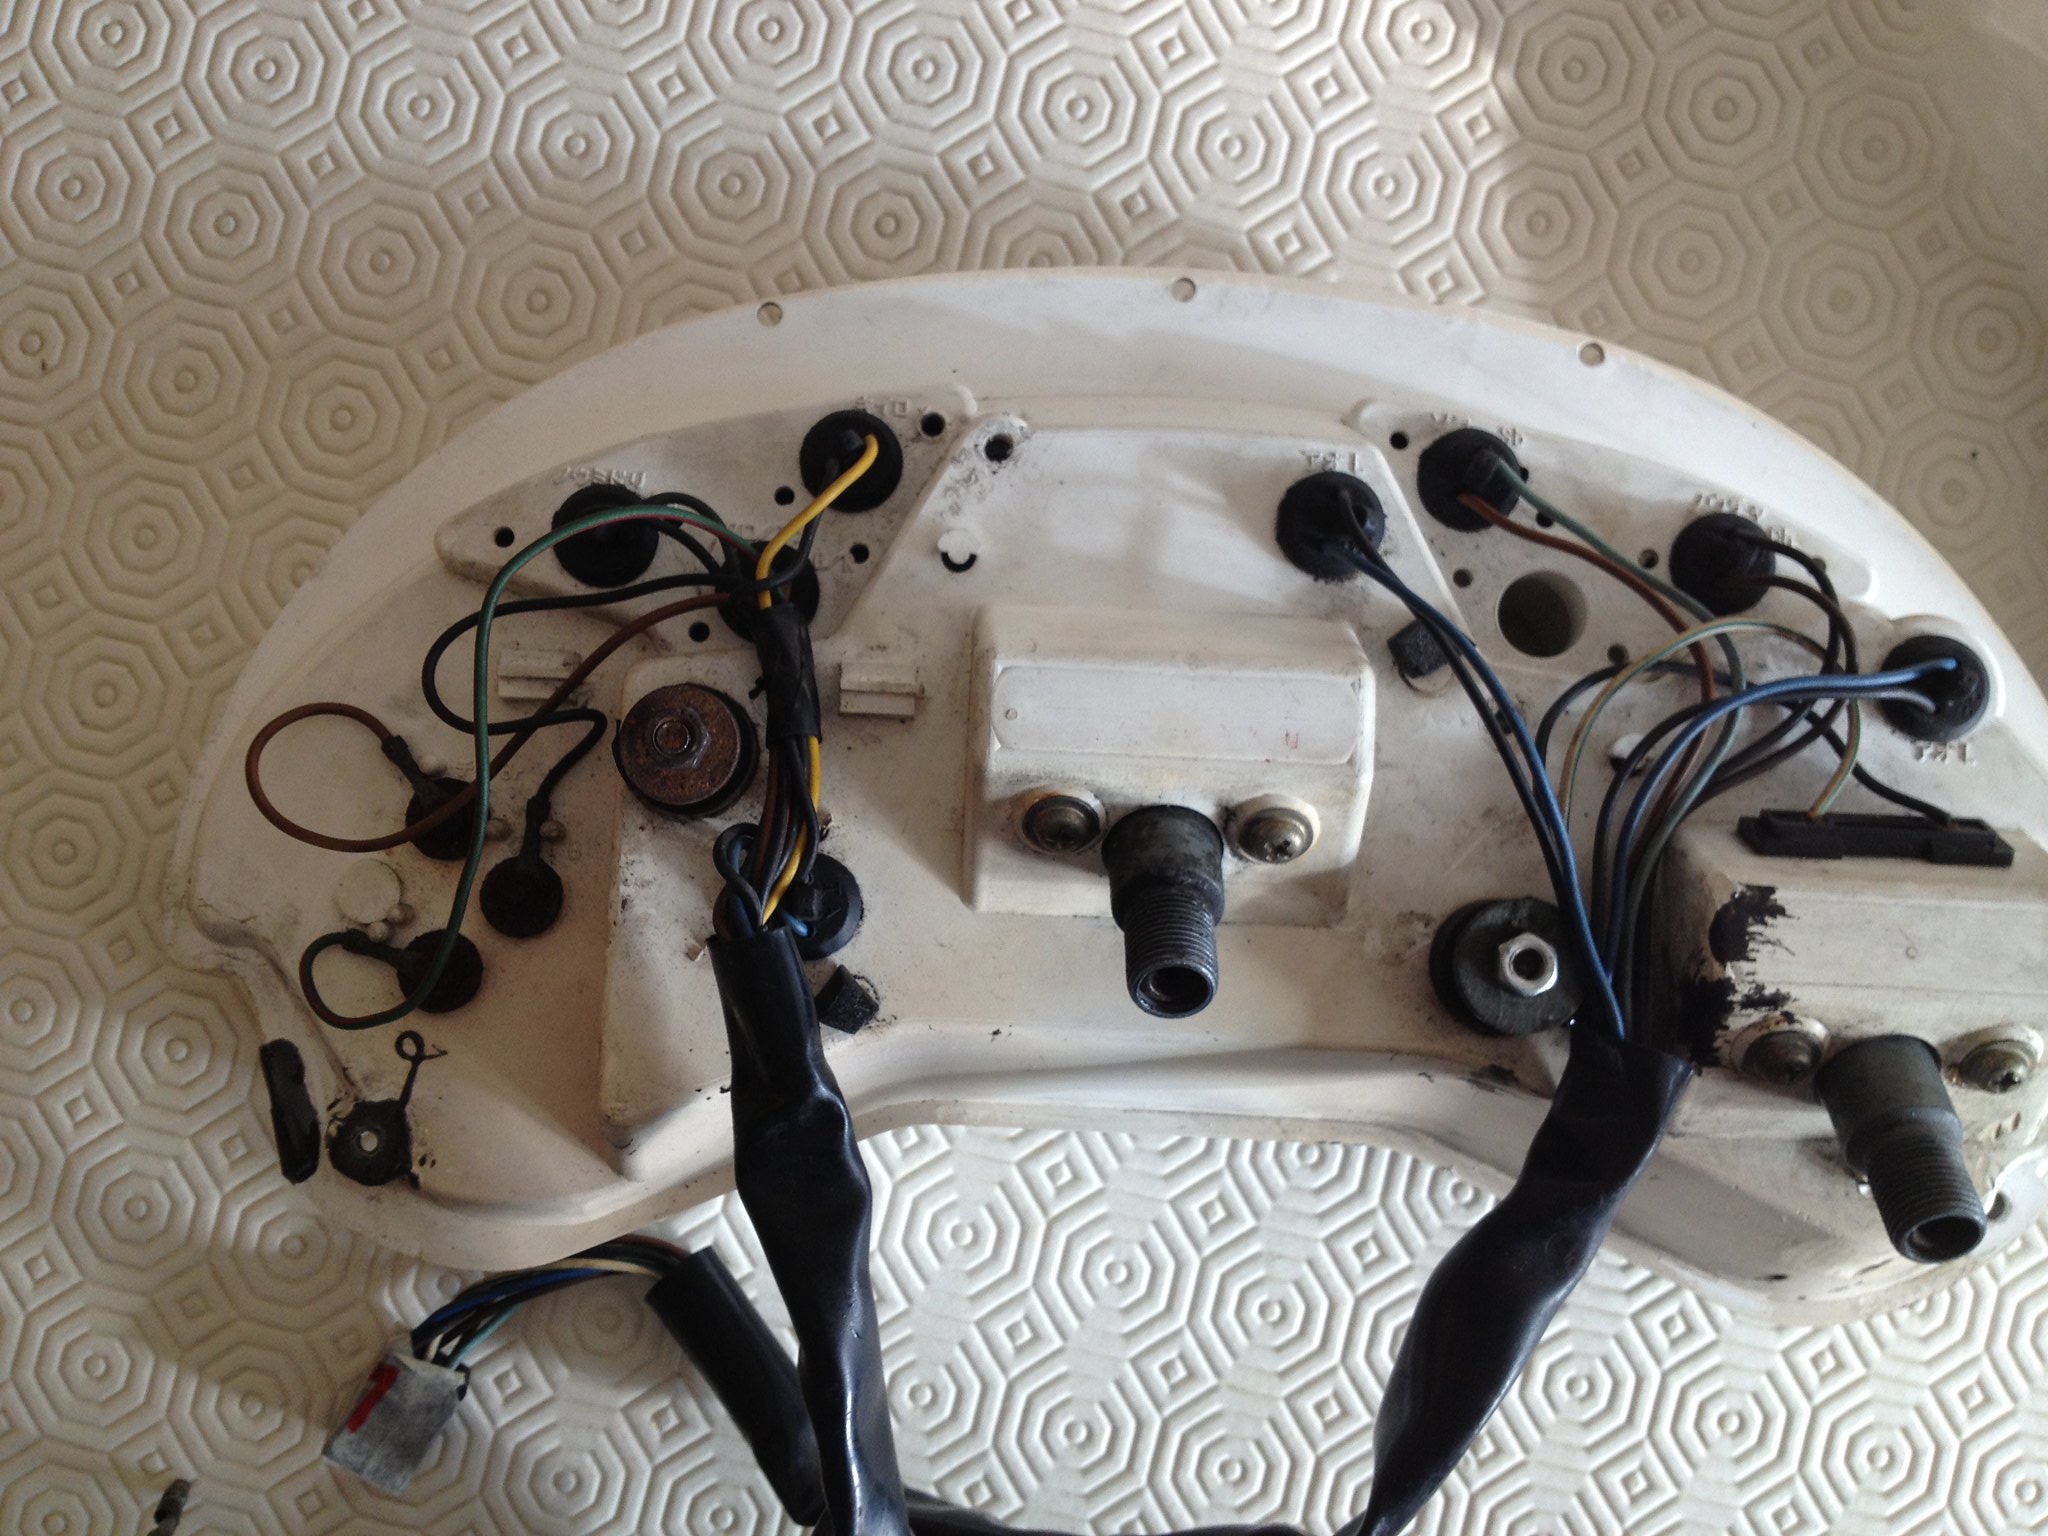
Not too bad, however what i didn't realise is that of the two fixed bolts that are fixed to the inner clock piece and attach the clocks to the mounting bracket, one had been snapped at some point and had about 2mm of thread, which has to go through said bracket and then have a washer and nut attached, some hope!
So after searching on Fleabay i managed to get a NOS inner clock piece and swopped over my wiring and clocks. I have tried to make the best set of clocks i can from several bits, including swopping over the little screws that hold the faces on.
and with my freshly painted mounting bracket attached
Managed to zero my speedo. It is a KPH speedo with an MPH face, I don't even know if it works yet, i hope so, but if any has a MPH speedo with working odometer and trip PLEASE let me know!!
So here are the finished clocks from the front, i can't take the credit for the front cover, i bought that from Midlifecrsisrd and a lovely job he did too
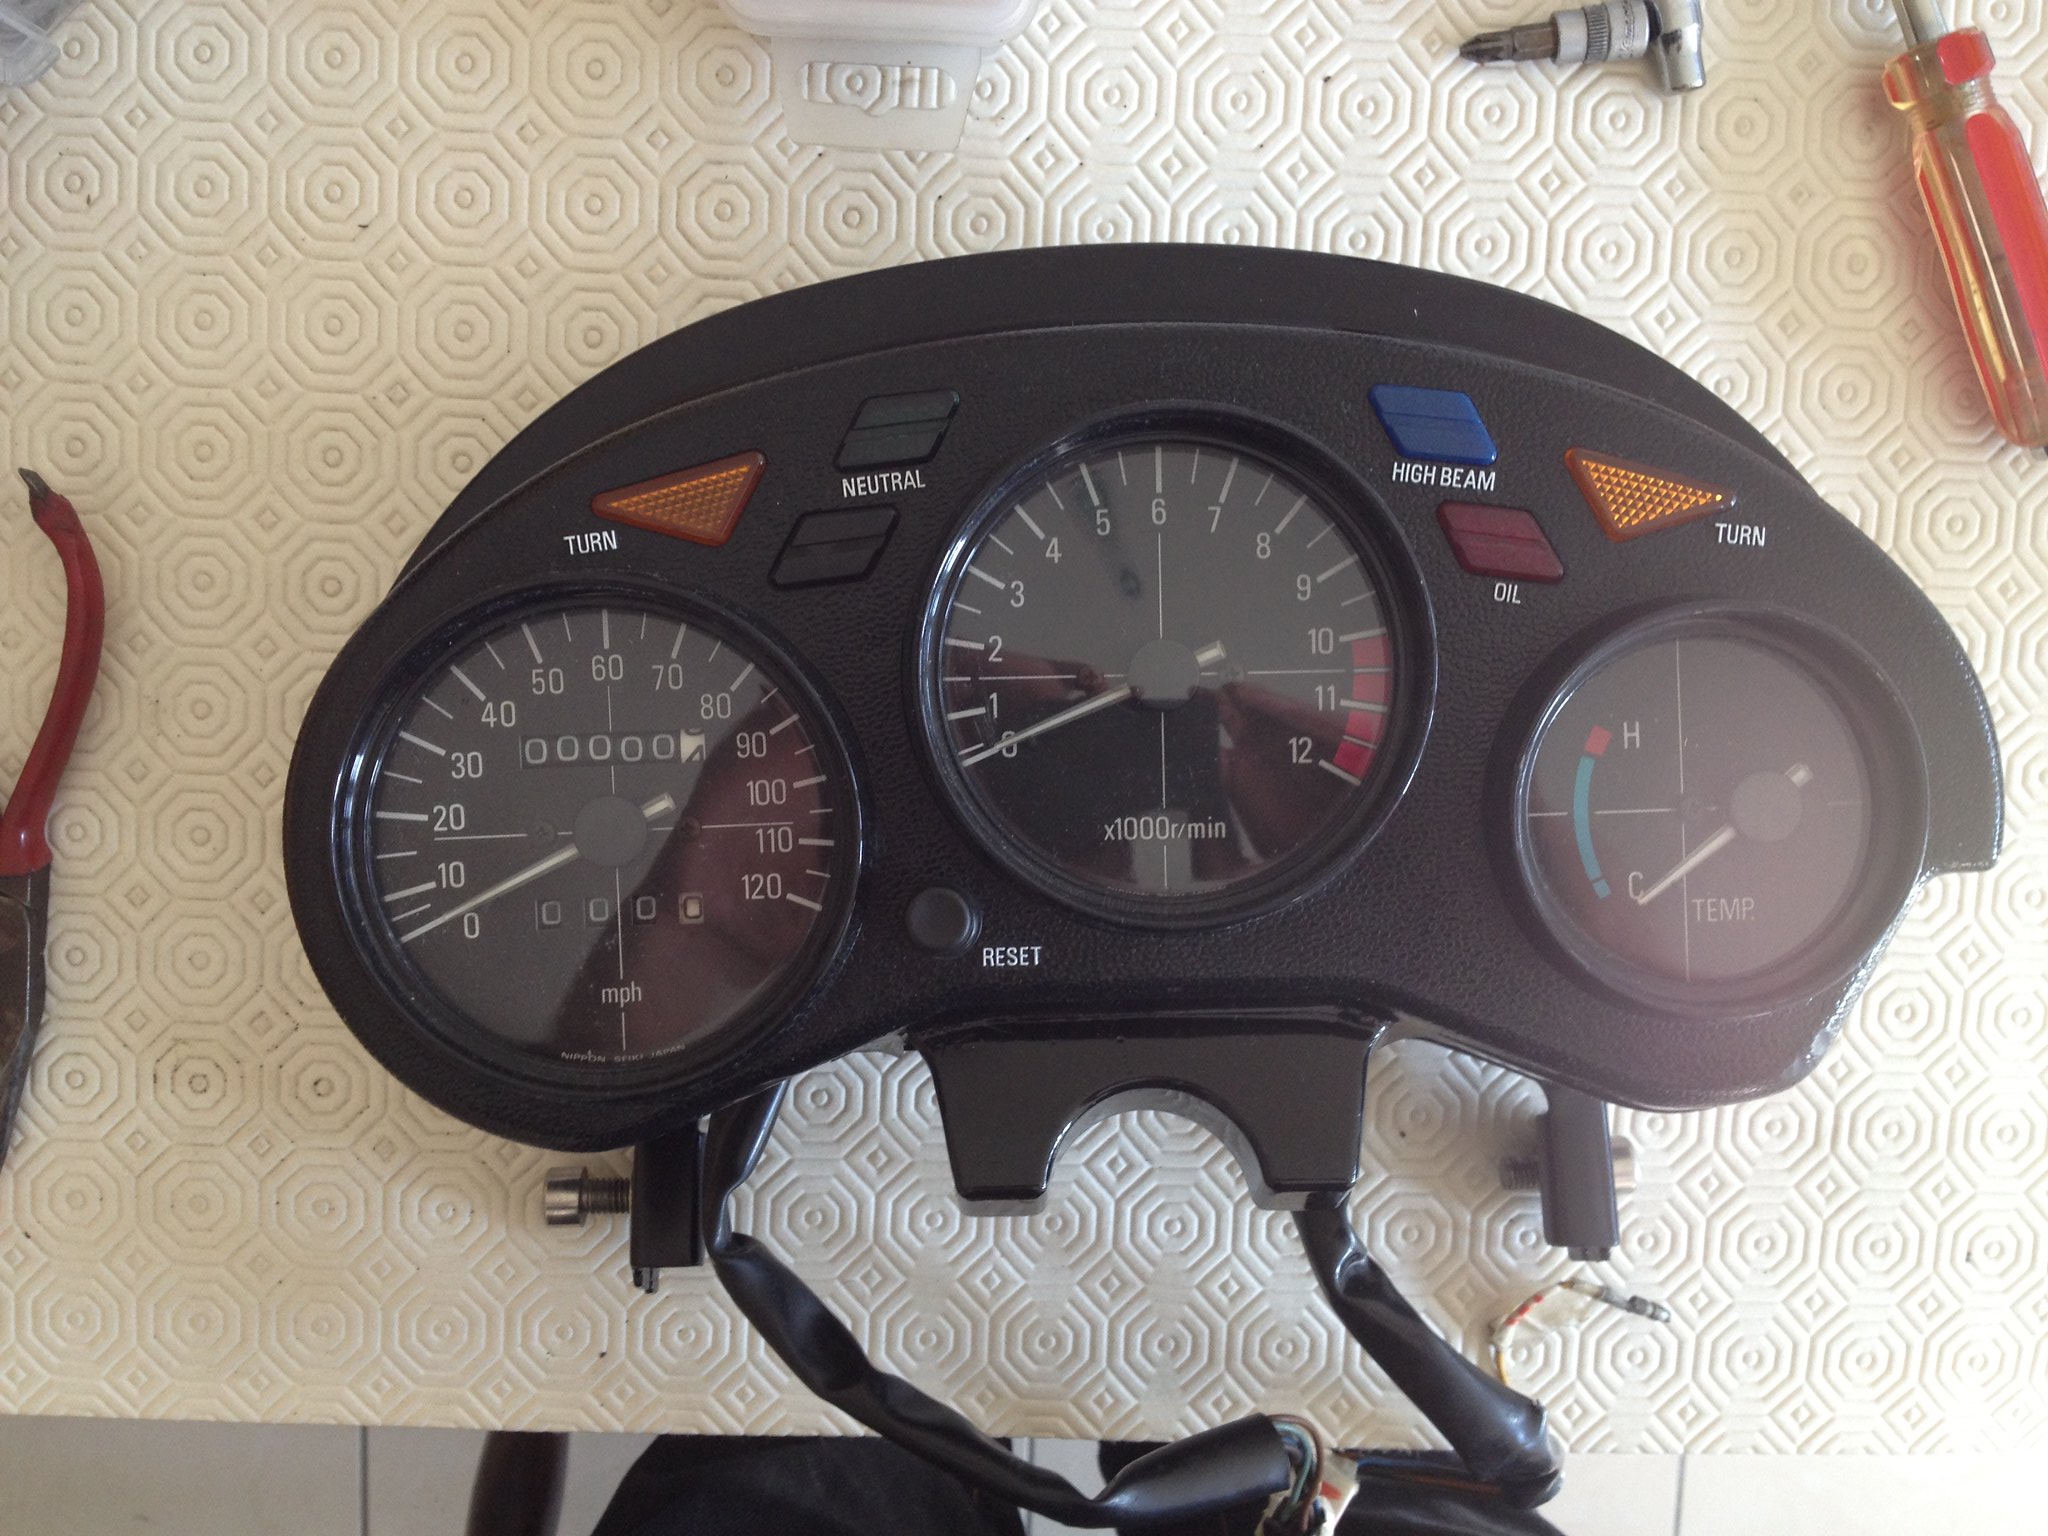
and the back with the cover i painted
Also picked up my frame
  and swingarm 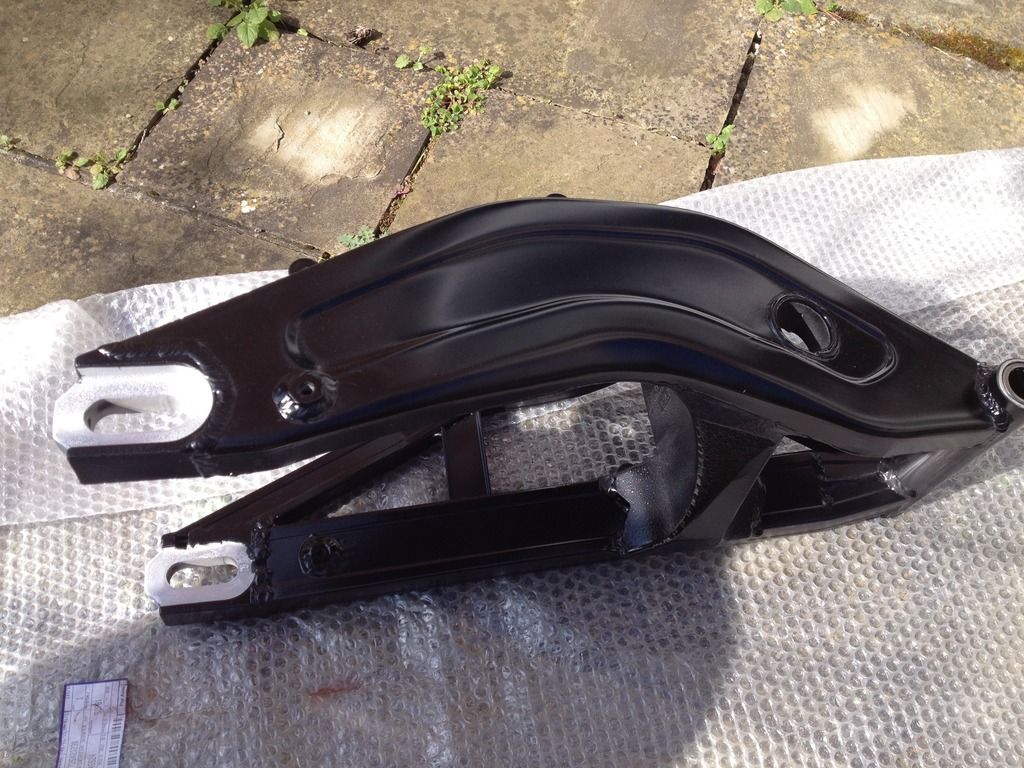 Plus a bellypan, this i bought some time ago, it is a genuine one and was black. The painter did this, it is all paint not stickers and the front mudguard 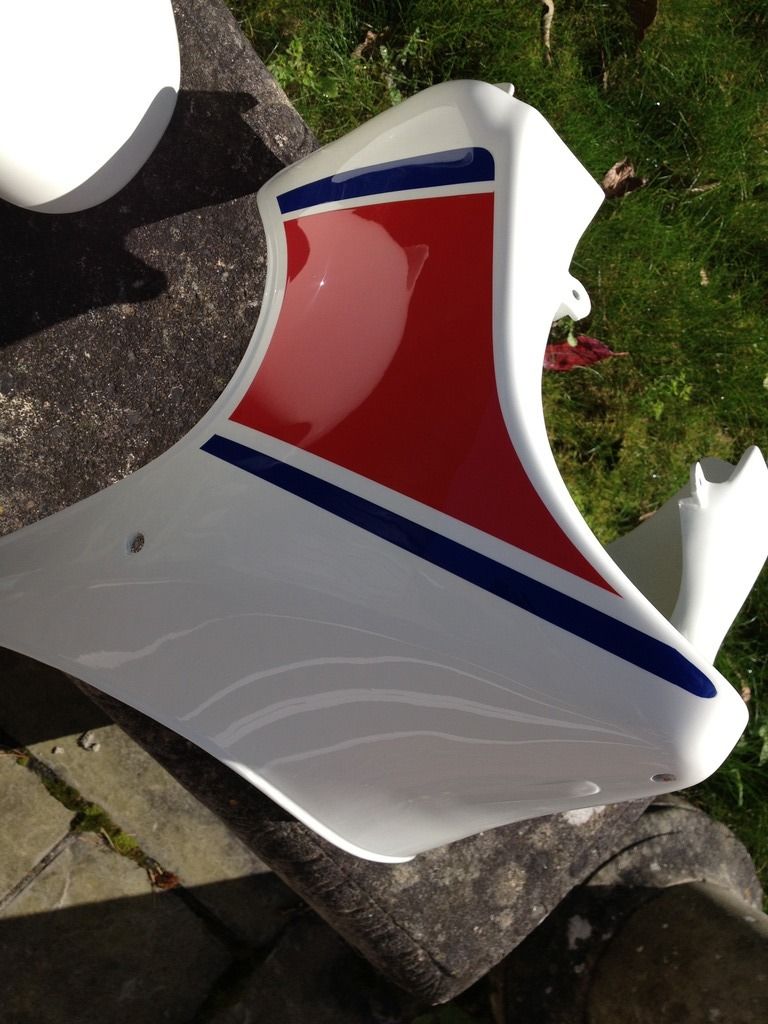 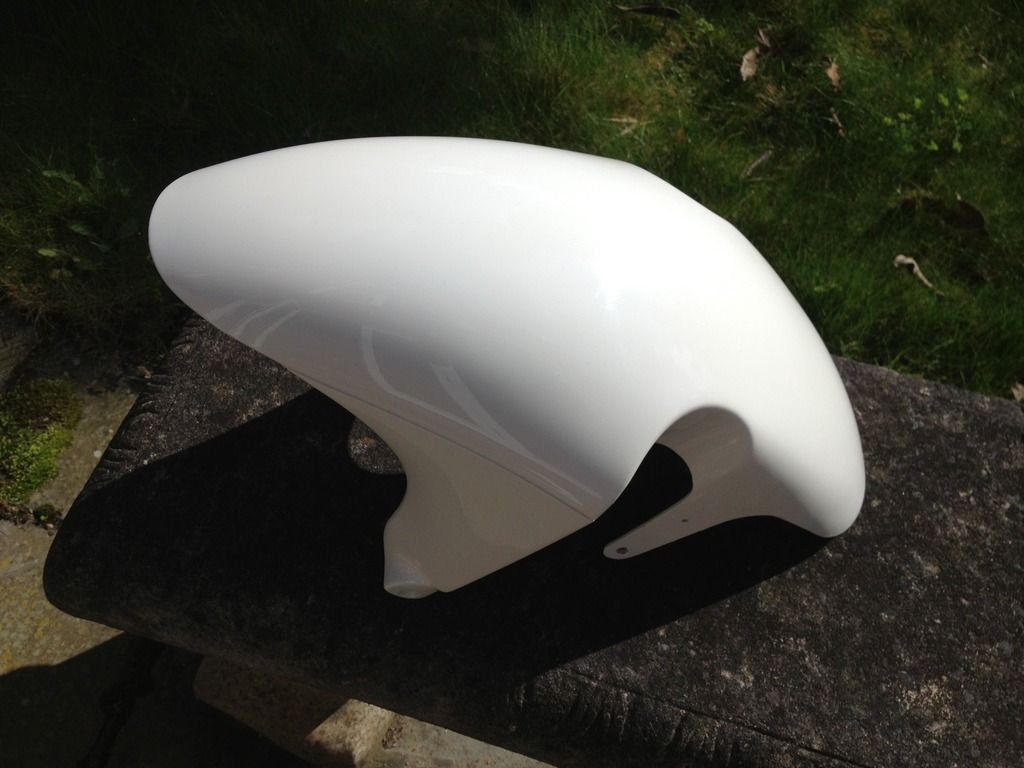 And while the sun was out, i cleaned up the fairing, fitted a new screen and bolts and put on the black plastic edging which i got from Norbo 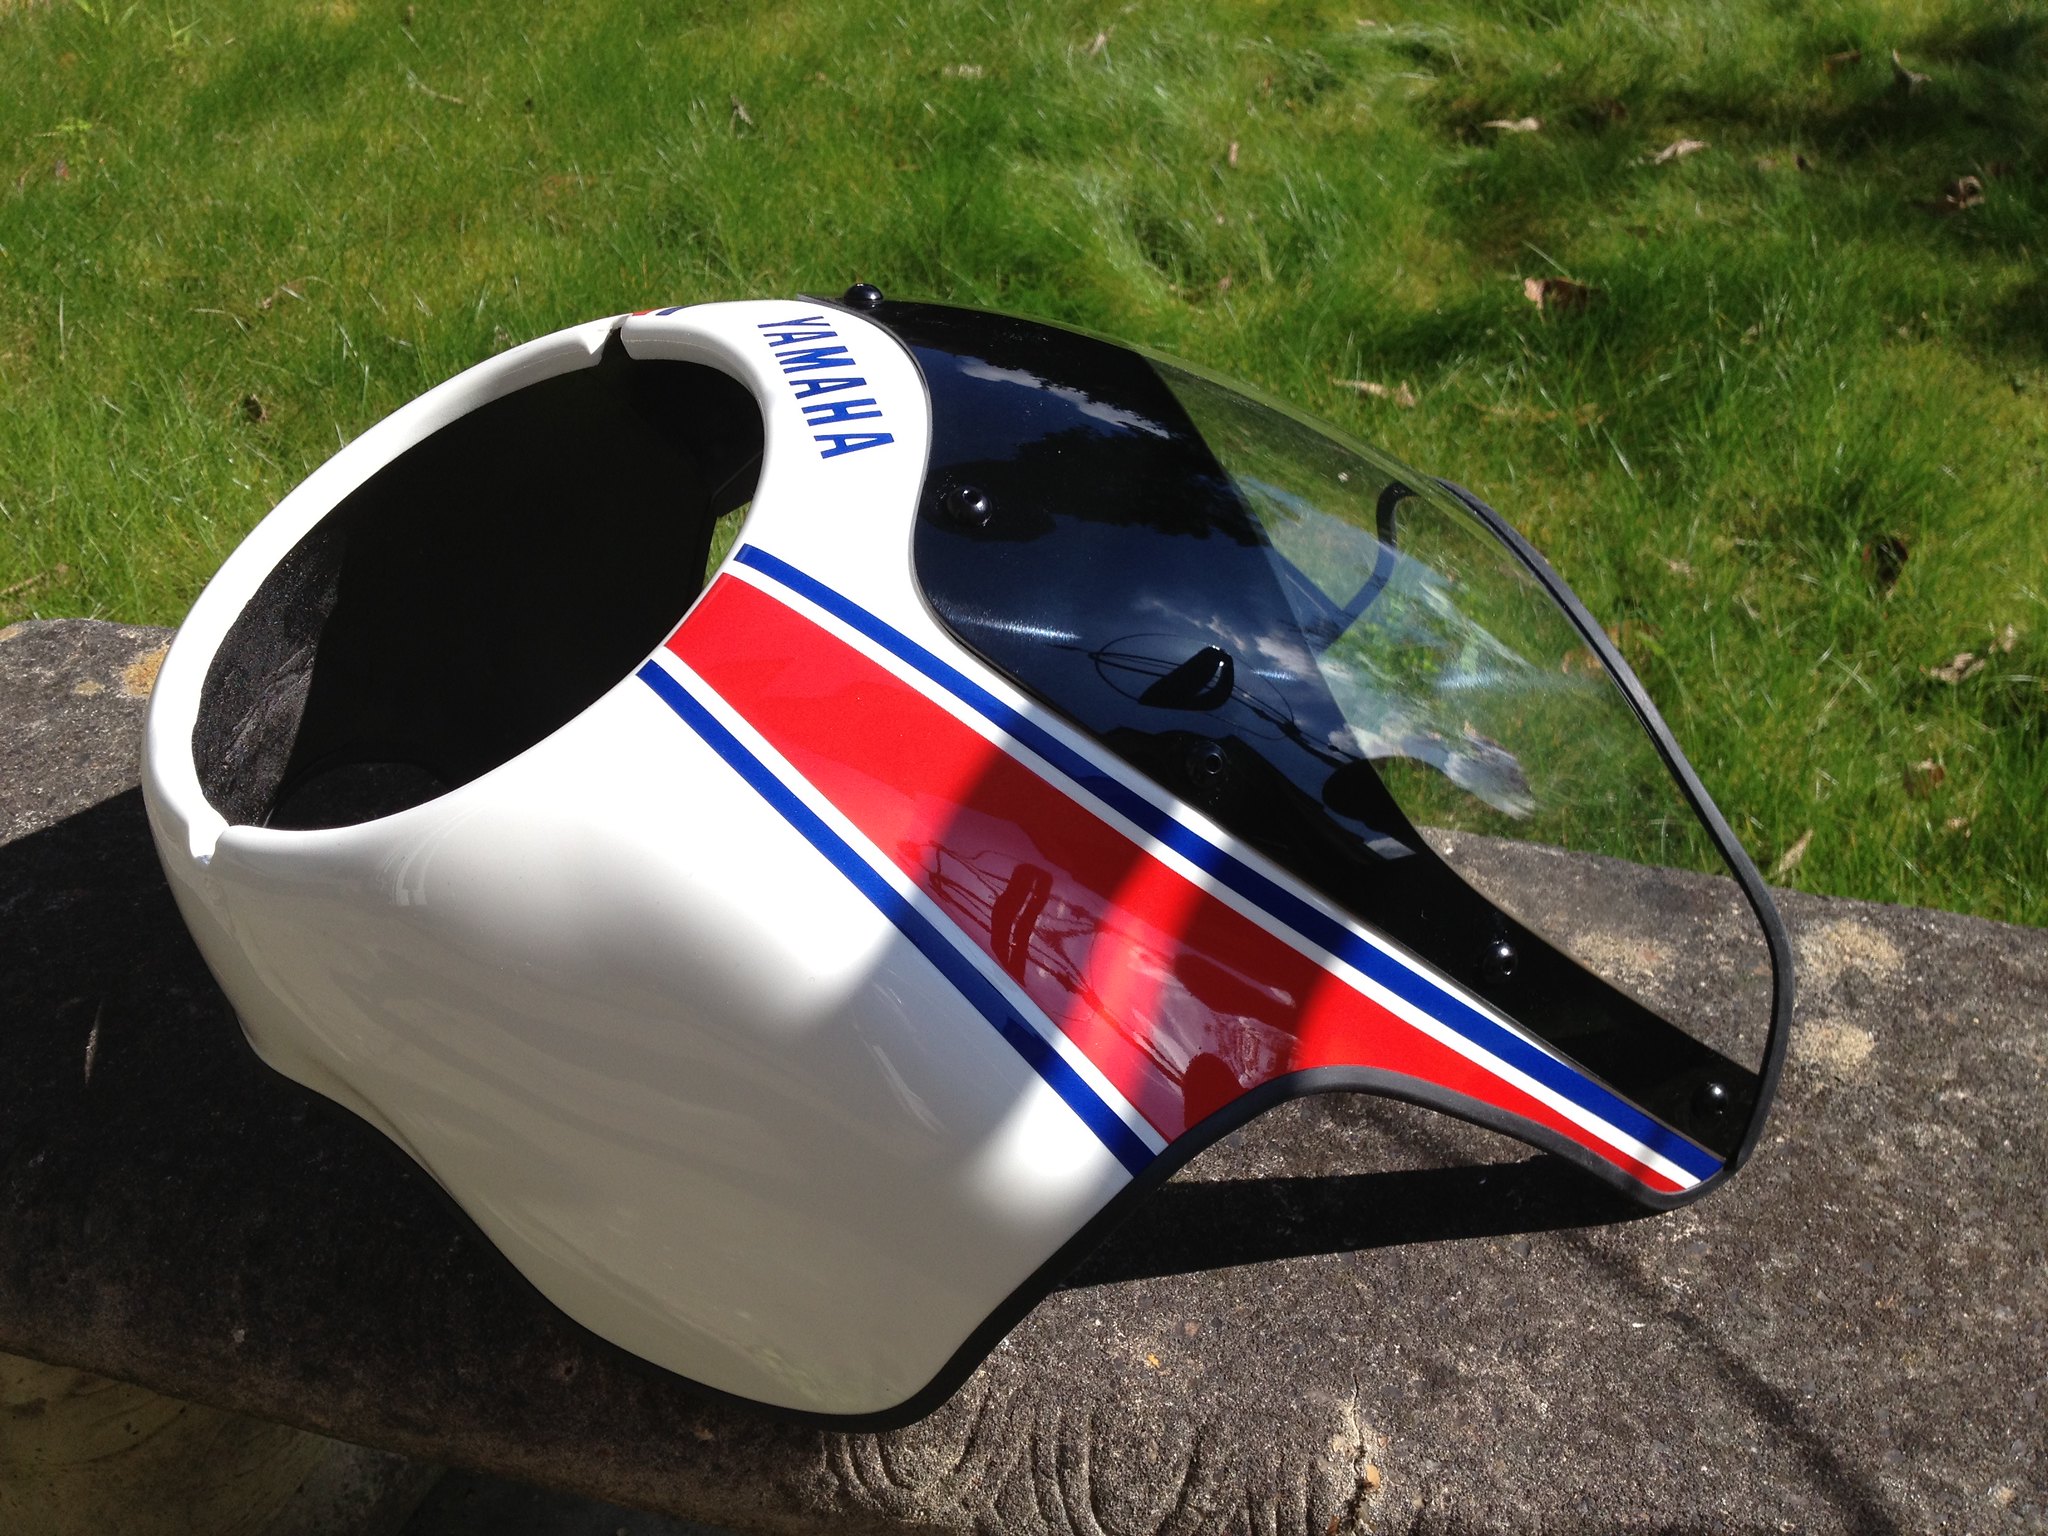
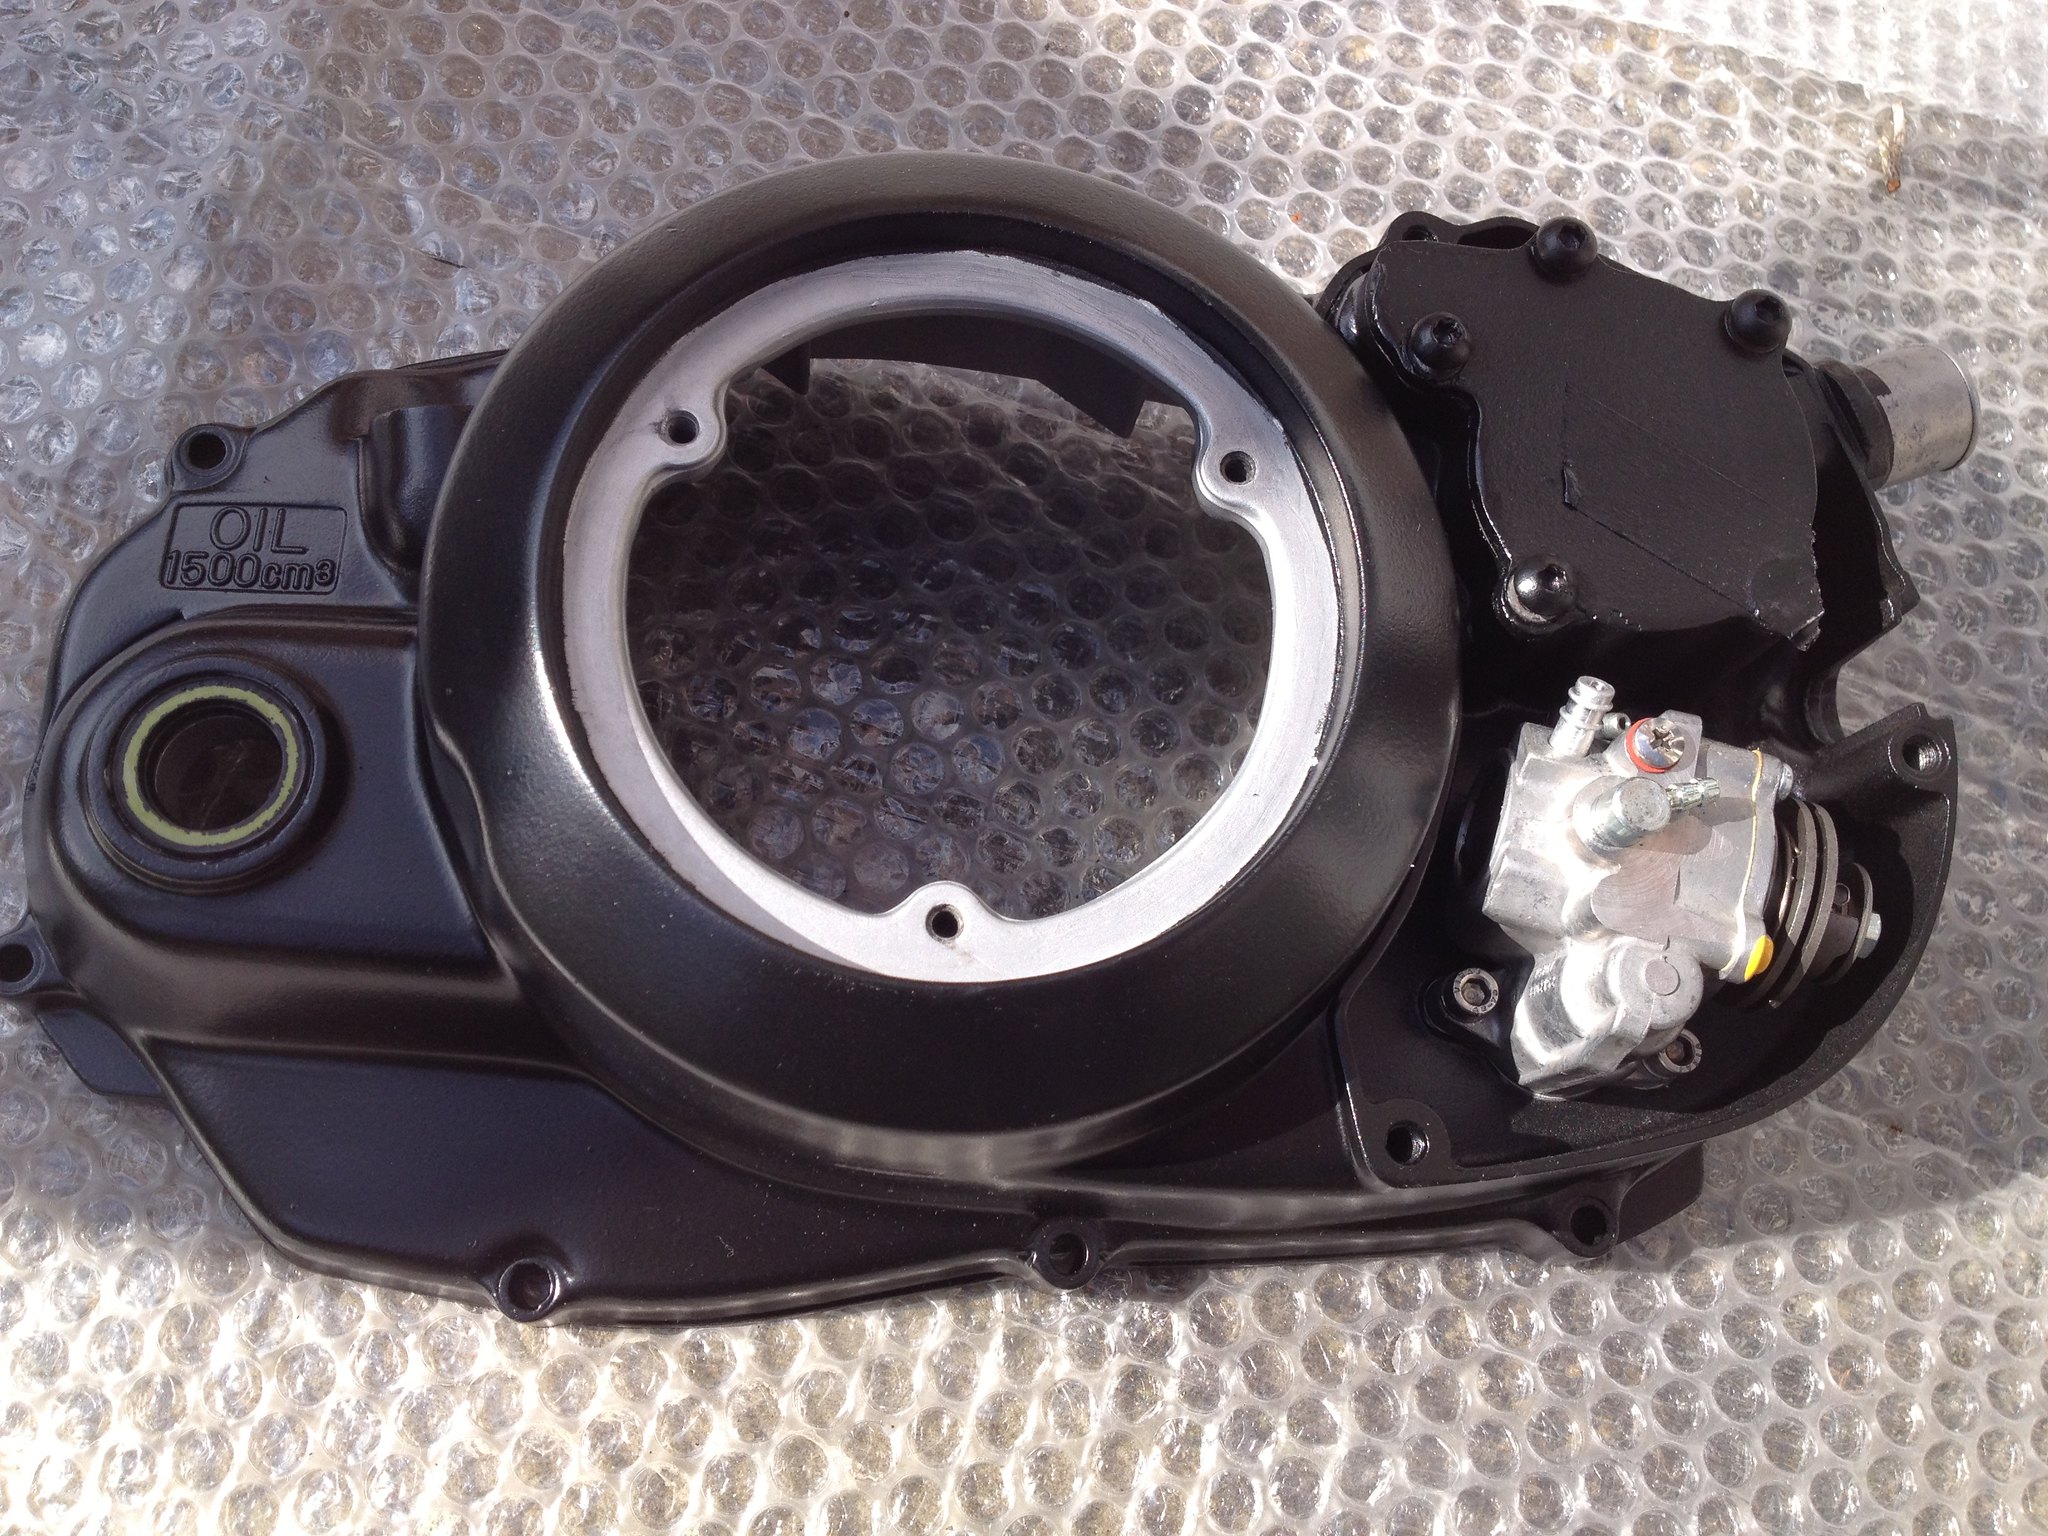
And finally, i got round to painting the clutch cover, fitted with a re-furb oil pump, thank you Arrow!
So that is all for now, next weekend i am planning to start the build, Hoorah!
PS, sorry about the pics being upside down on their edge etc, but flippin Photobucket!!
Mouse |
|
|
|
Post by ibby4585 on Apr 2, 2017 19:04:21 GMT 1
Looking great. Clocks look amazing mate.
|
|
|
|
Post by yamark on Apr 2, 2017 19:59:06 GMT 1
Great work Mouse, the frame and swingarm look "top draw" I know how fiddly the clocks can be, and decent 31k clocks parts are getting hard to find, so well done on sourcing and putting it all together |
|
|
|
Post by dusty350 on Apr 2, 2017 20:35:25 GMT 1
Excellent work Andrew, it's all looking fantastic Looks like the painter has come up trumps, that bellypan looks better than new. Let the build begin !! Dusty |
|
|
|
Post by mouse on Apr 4, 2017 7:26:23 GMT 1
Cheers chaps.
Have a slight problem with some of the paint on the frame and swingarm, i'm not happy with it. Soooooooo back to the painters on Sat, he has said he will sort it, still another 140mile round trip, but will pick it up next week to start the build over easter weekend.
Aaaaaaaaarh, oh well!!
Mouse
|
|
|
|
Post by dusty350 on Apr 4, 2017 7:39:12 GMT 1
Hi Andrew That's a pain mate  Still, it needs to be right and once it is you'll be happy you took the time and effort to get it sorted. All part of the rebuild process (unfortunately) That's the thing with well built bikes - standard or otherwise - it's the miles covered and the hassle endured to end up with the right finish that we can all forget about when viewing the finished bike. Dusty |
|
|
|
Post by Yogi on Apr 4, 2017 7:51:42 GMT 1
Hi mate
Your build is coming on a treat don't think I've ever seen that much pro,bolt at once
You've done a top job on the clocks they look the nuts,Gonna be another stunner on the road
Keep the pics coming Matt
|
|
|
|
Post by mouse on Apr 4, 2017 8:59:53 GMT 1
Hi Andrew That's a pain mate Still, it needs to be right and once it is you'll be happy you took the time and effort to get it sorted. All part of the rebuild process (unfortunately) That's the thing with well built bikes - standard or otherwise - it's the miles covered and the hassle endured to end up with the right finish that we can all forget about when viewing the finished bike. Dusty Your right Dusty, just one of those things. This is where my impatience gets the better of me, i should have left the frame with them! It is not too bad but i just know that it would always be niggling in my mind that it is not quite right if i don't get it done. However it will get sorted!! Mouse |
|
|
|
Post by mouse on Apr 4, 2017 9:02:50 GMT 1
Hi mate Your build is coming on a treat don't think I've ever seen that much pro,bolt at once You've done a top job on the clocks they look the nuts,Gonna be another stunner on the road Keep the pics coming Matt Thanks Matt, yes the clocks have come out well, but as i'm sure you know they are fiddly little f*****s! A nice working MPH speedo would finish them off, but they seem pretty rare, it seems 31k parts are harder to find then 4LO parts! All the best mouse |
|
|
|
Post by arrow on Apr 5, 2017 0:06:23 GMT 1
Fantastic build. Excellent work.
|
|
|
|
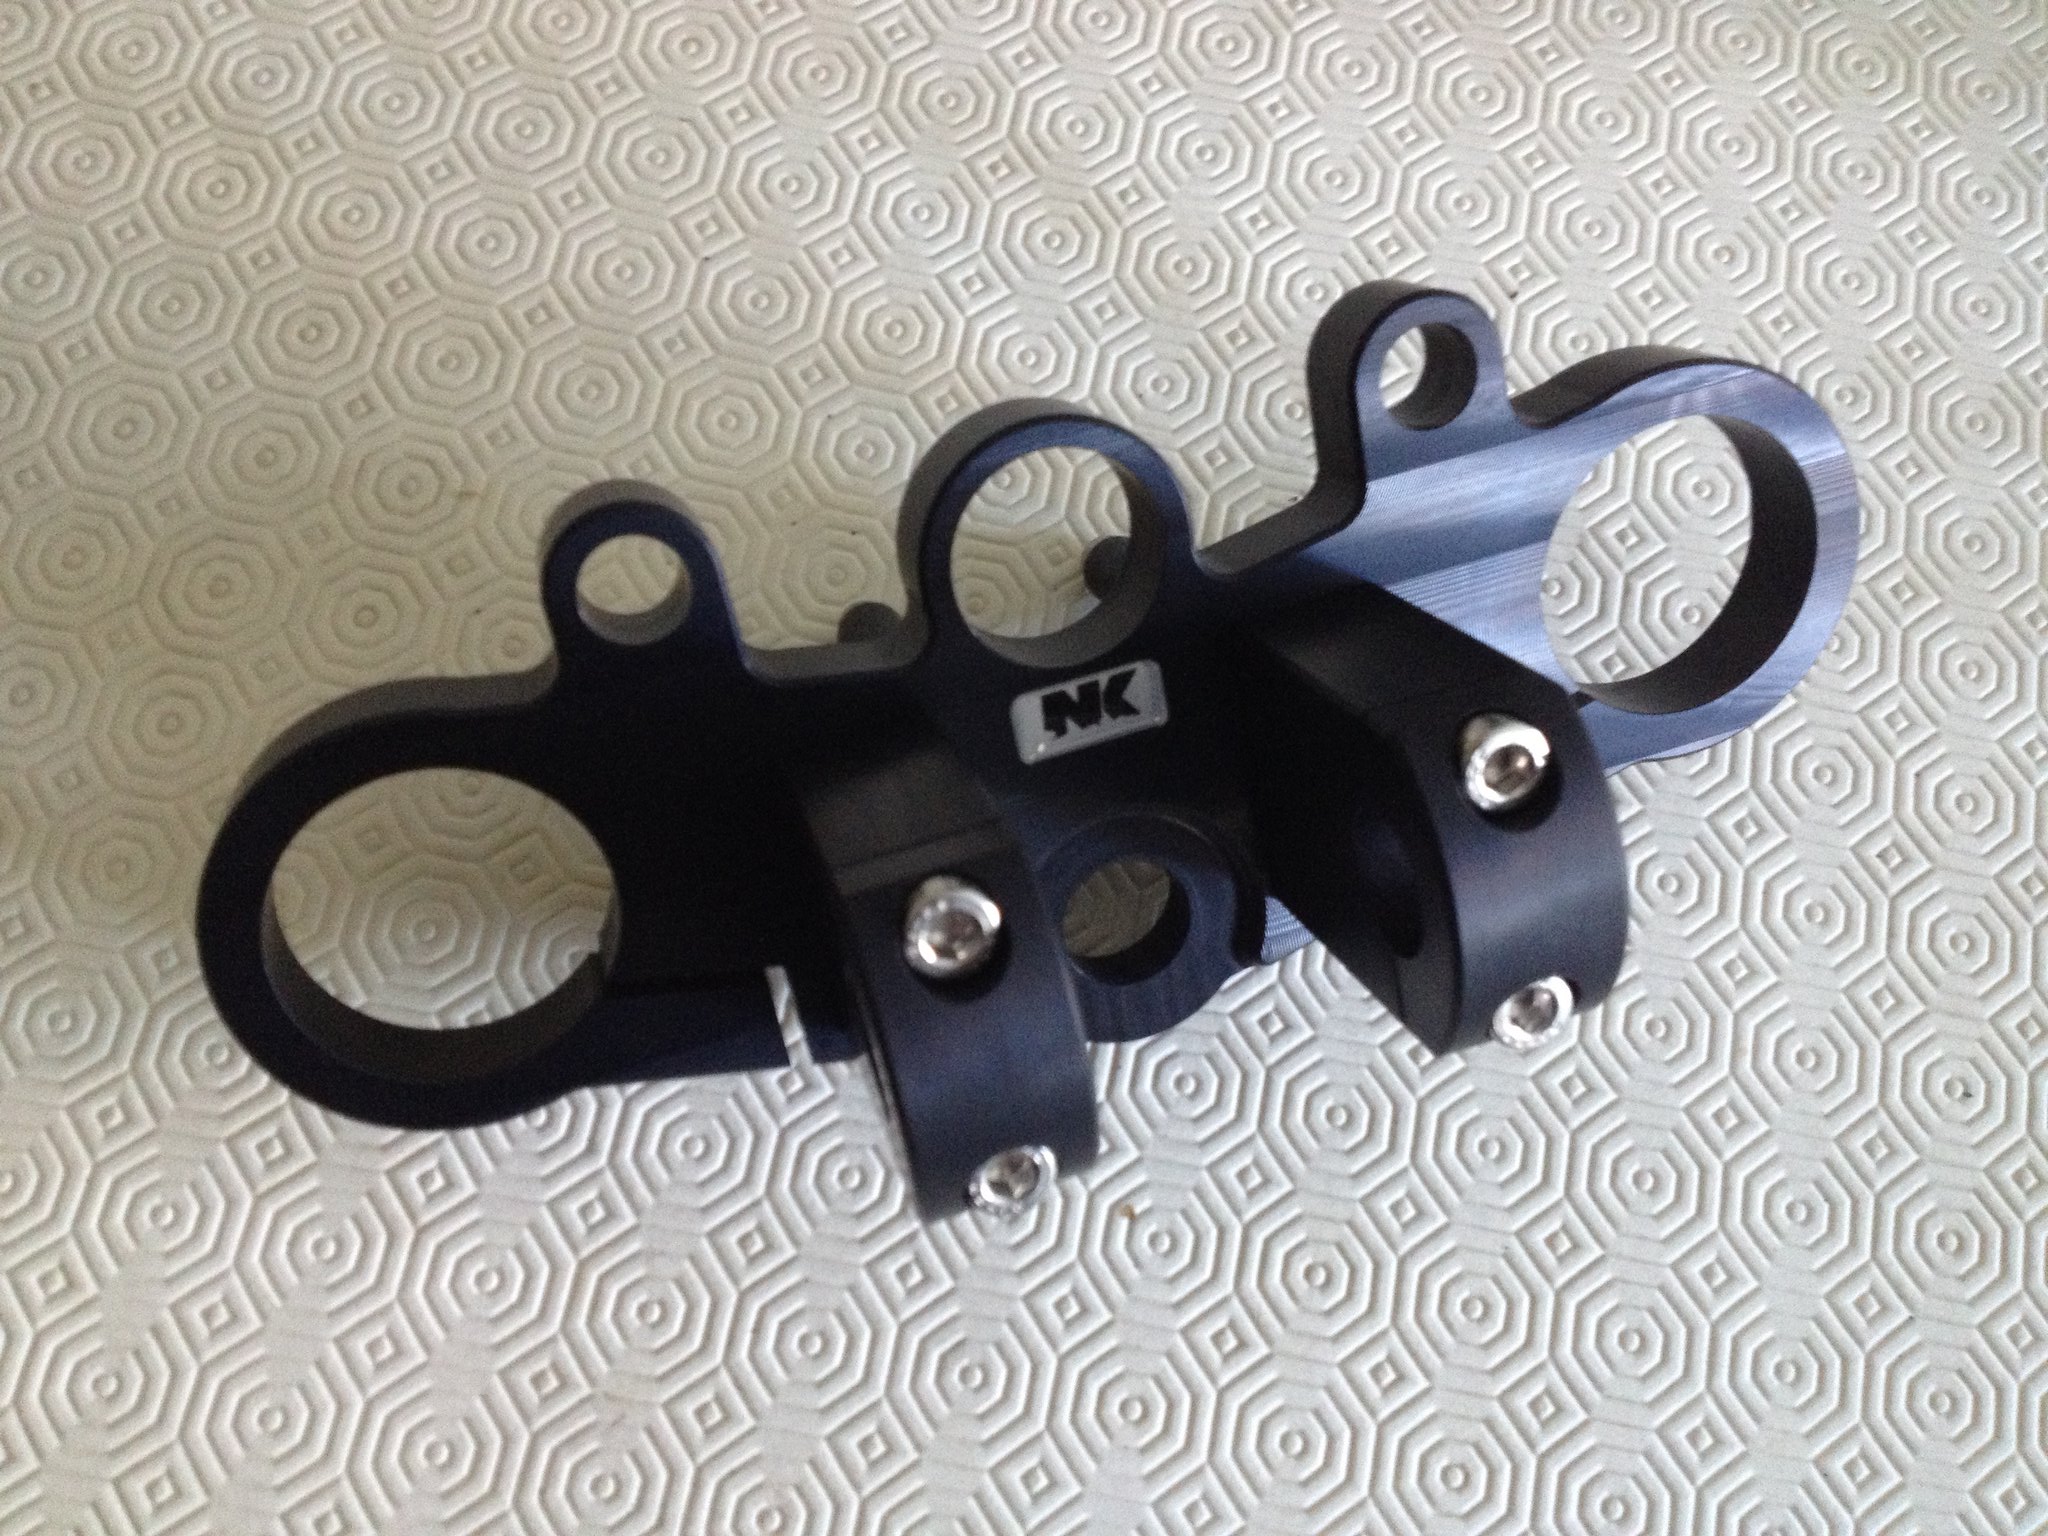
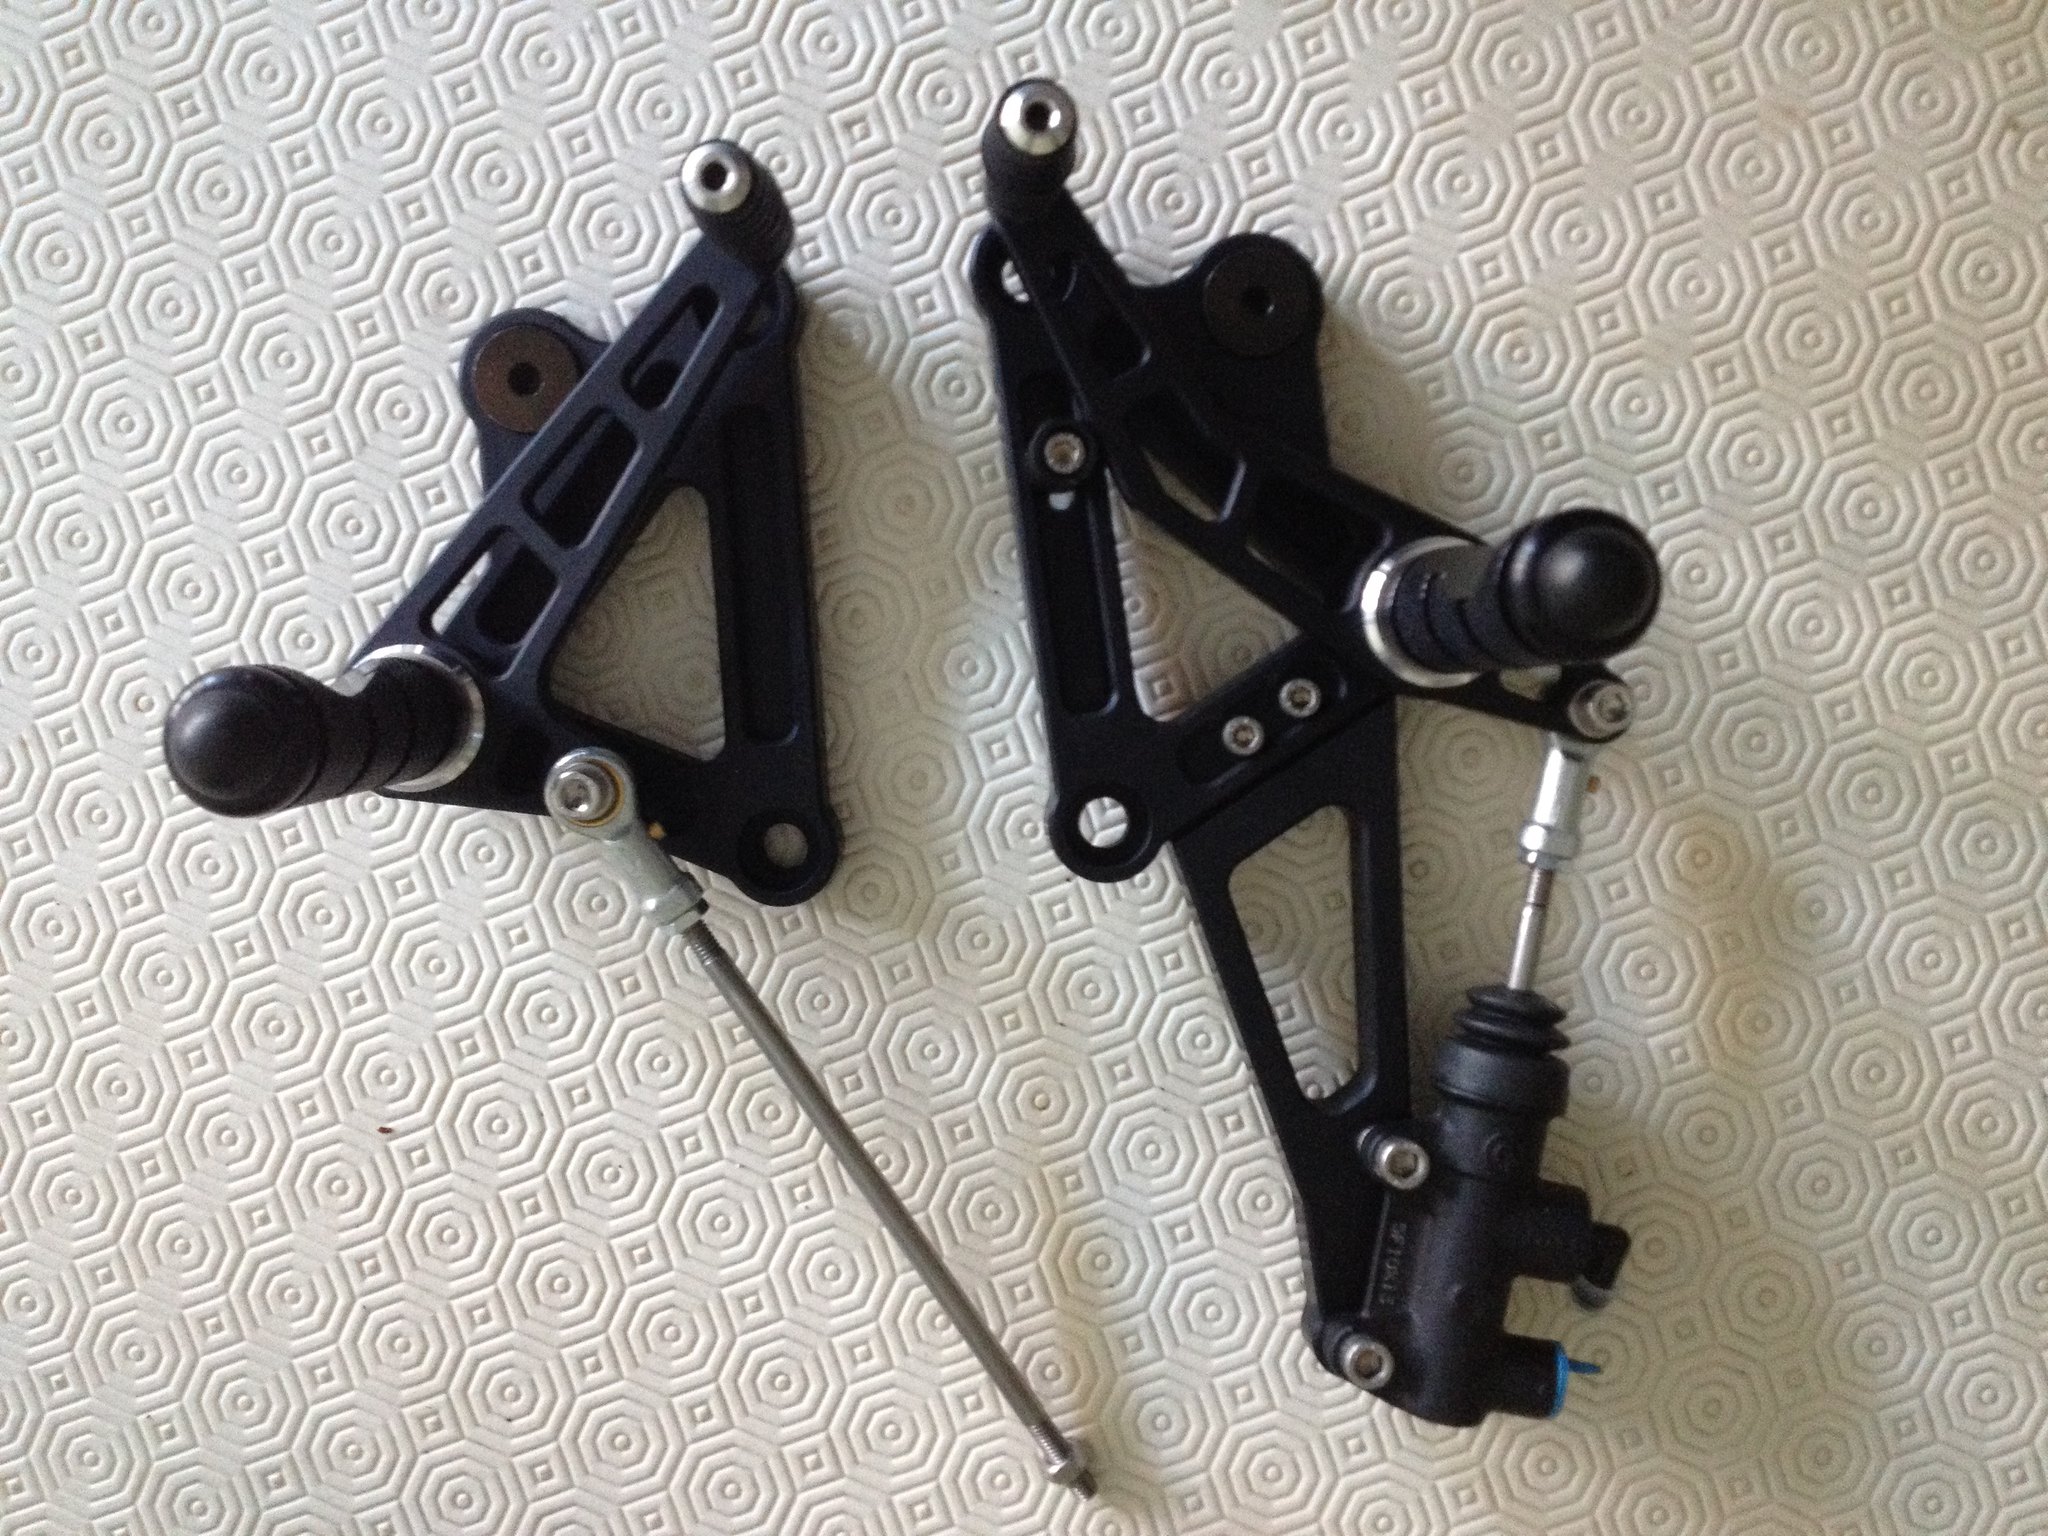
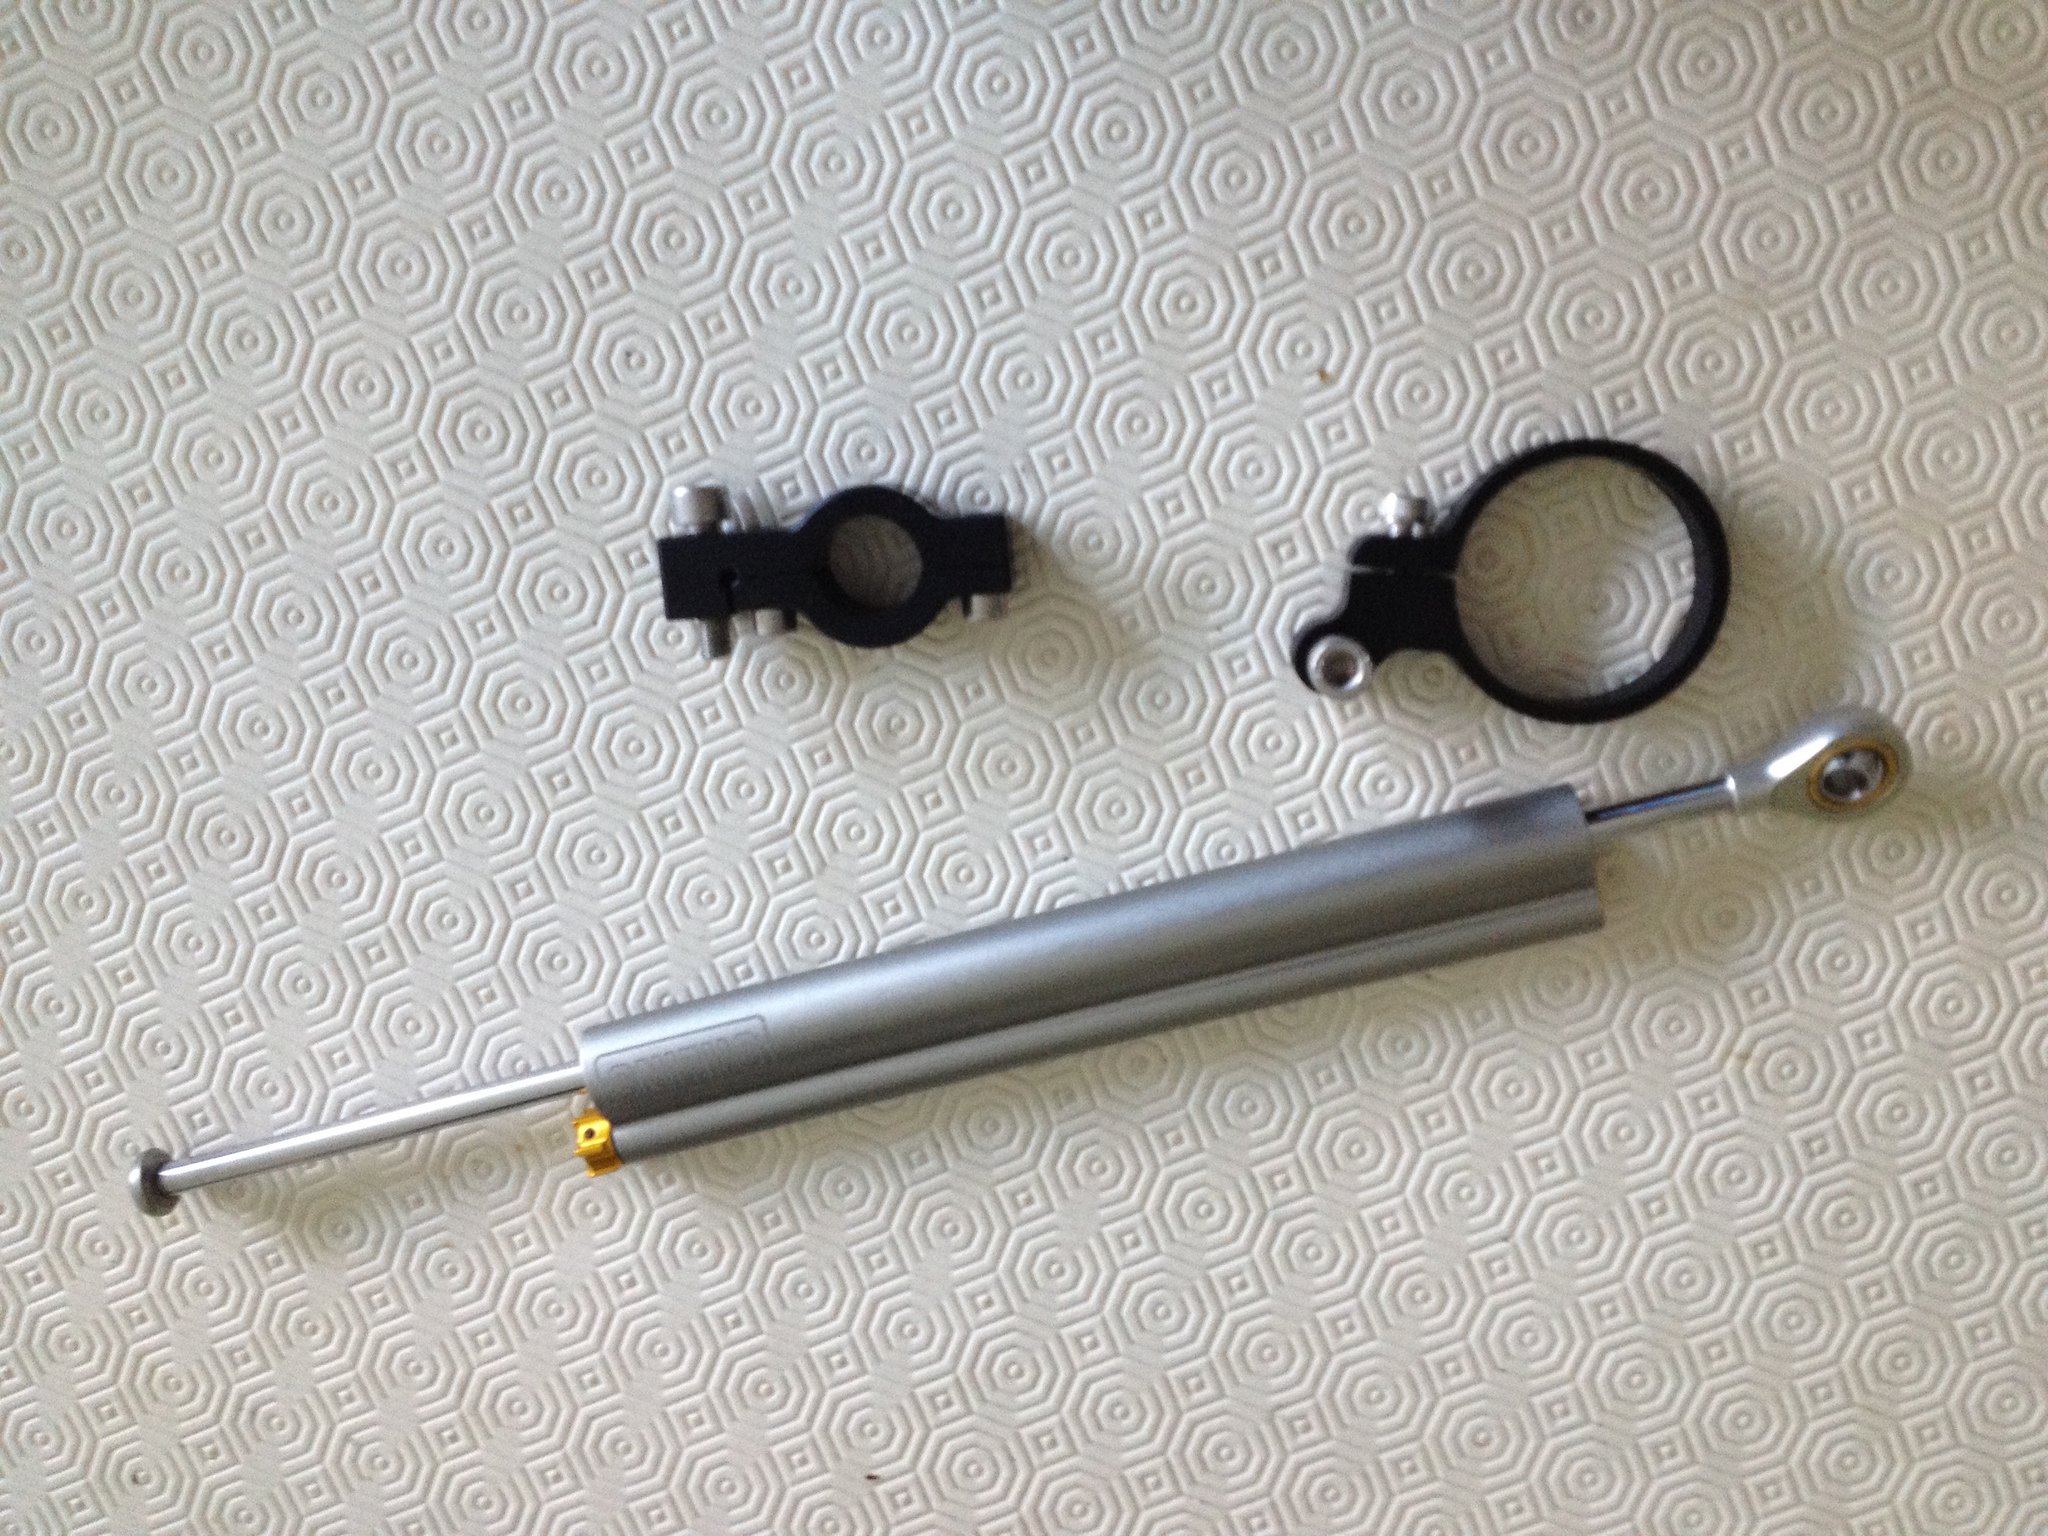
Post by mouse on Apr 8, 2017 17:11:11 GMT 1
|
|
|
|
Post by spudmab on Apr 8, 2017 20:17:28 GMT 1
Wow they look smart. Bet they weren't cheap. Worth the expense tho
|
|
|
|
Post by Topman350 on Apr 11, 2017 12:30:20 GMT 1
You're right about those batteries so light and great power too...the trick parts look so cool 👍
|
|
|
|
Post by mouse on Apr 14, 2017 16:57:01 GMT 1
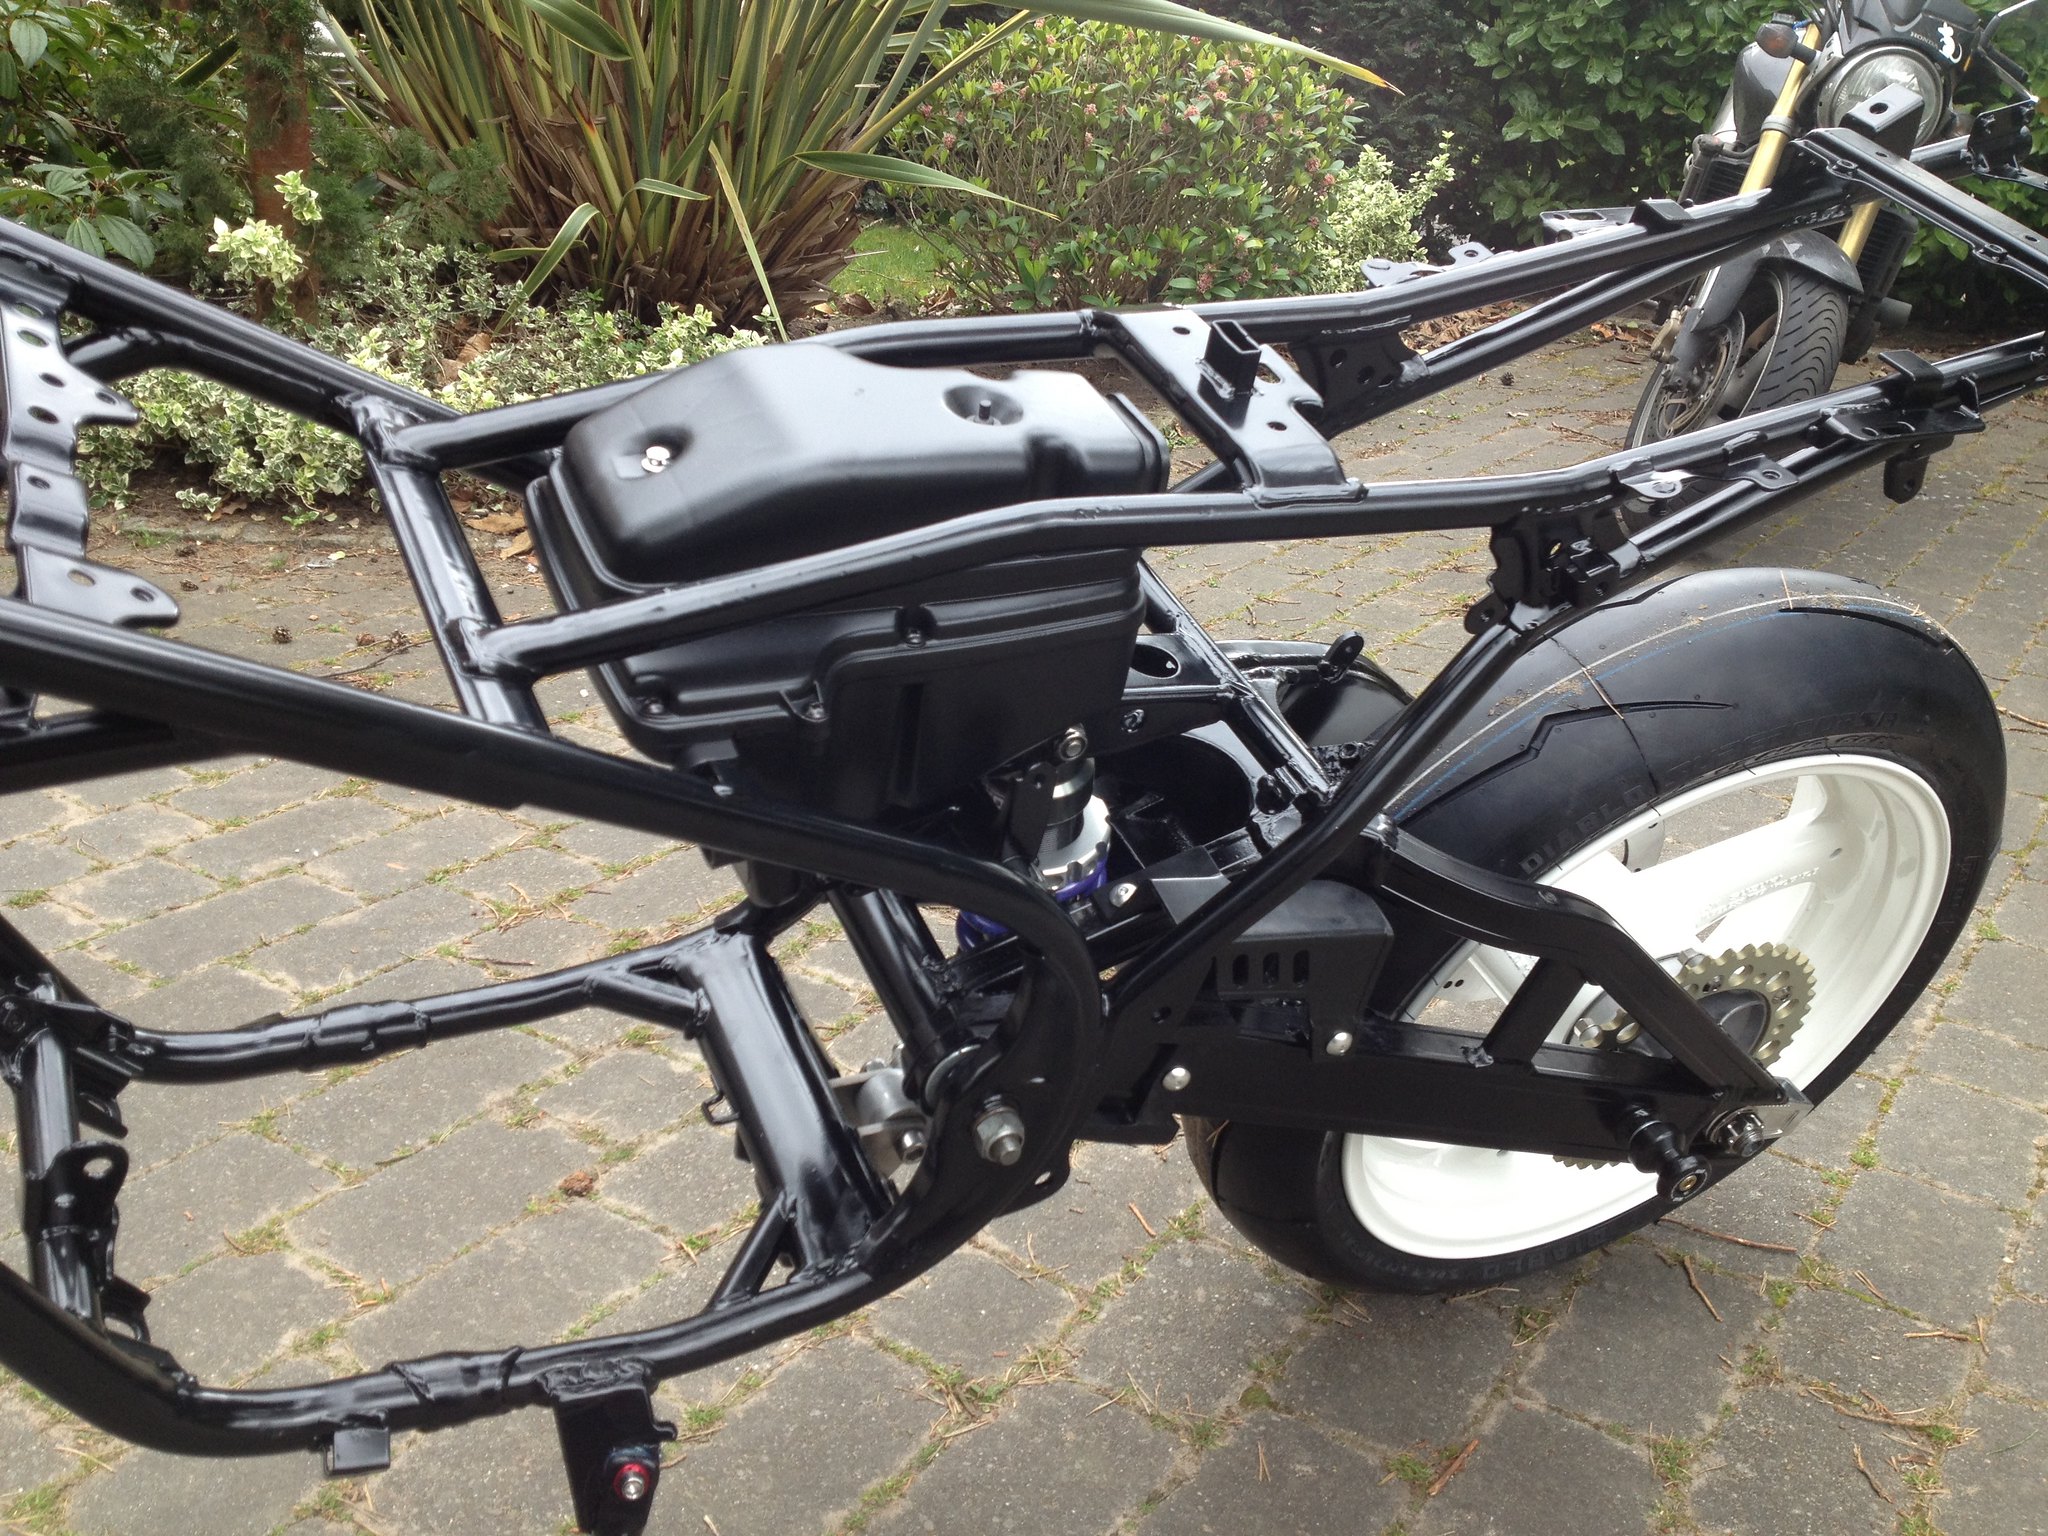
And were off, I knew there was another reason why it was called 'Good Friday'! The bits ready for assembly 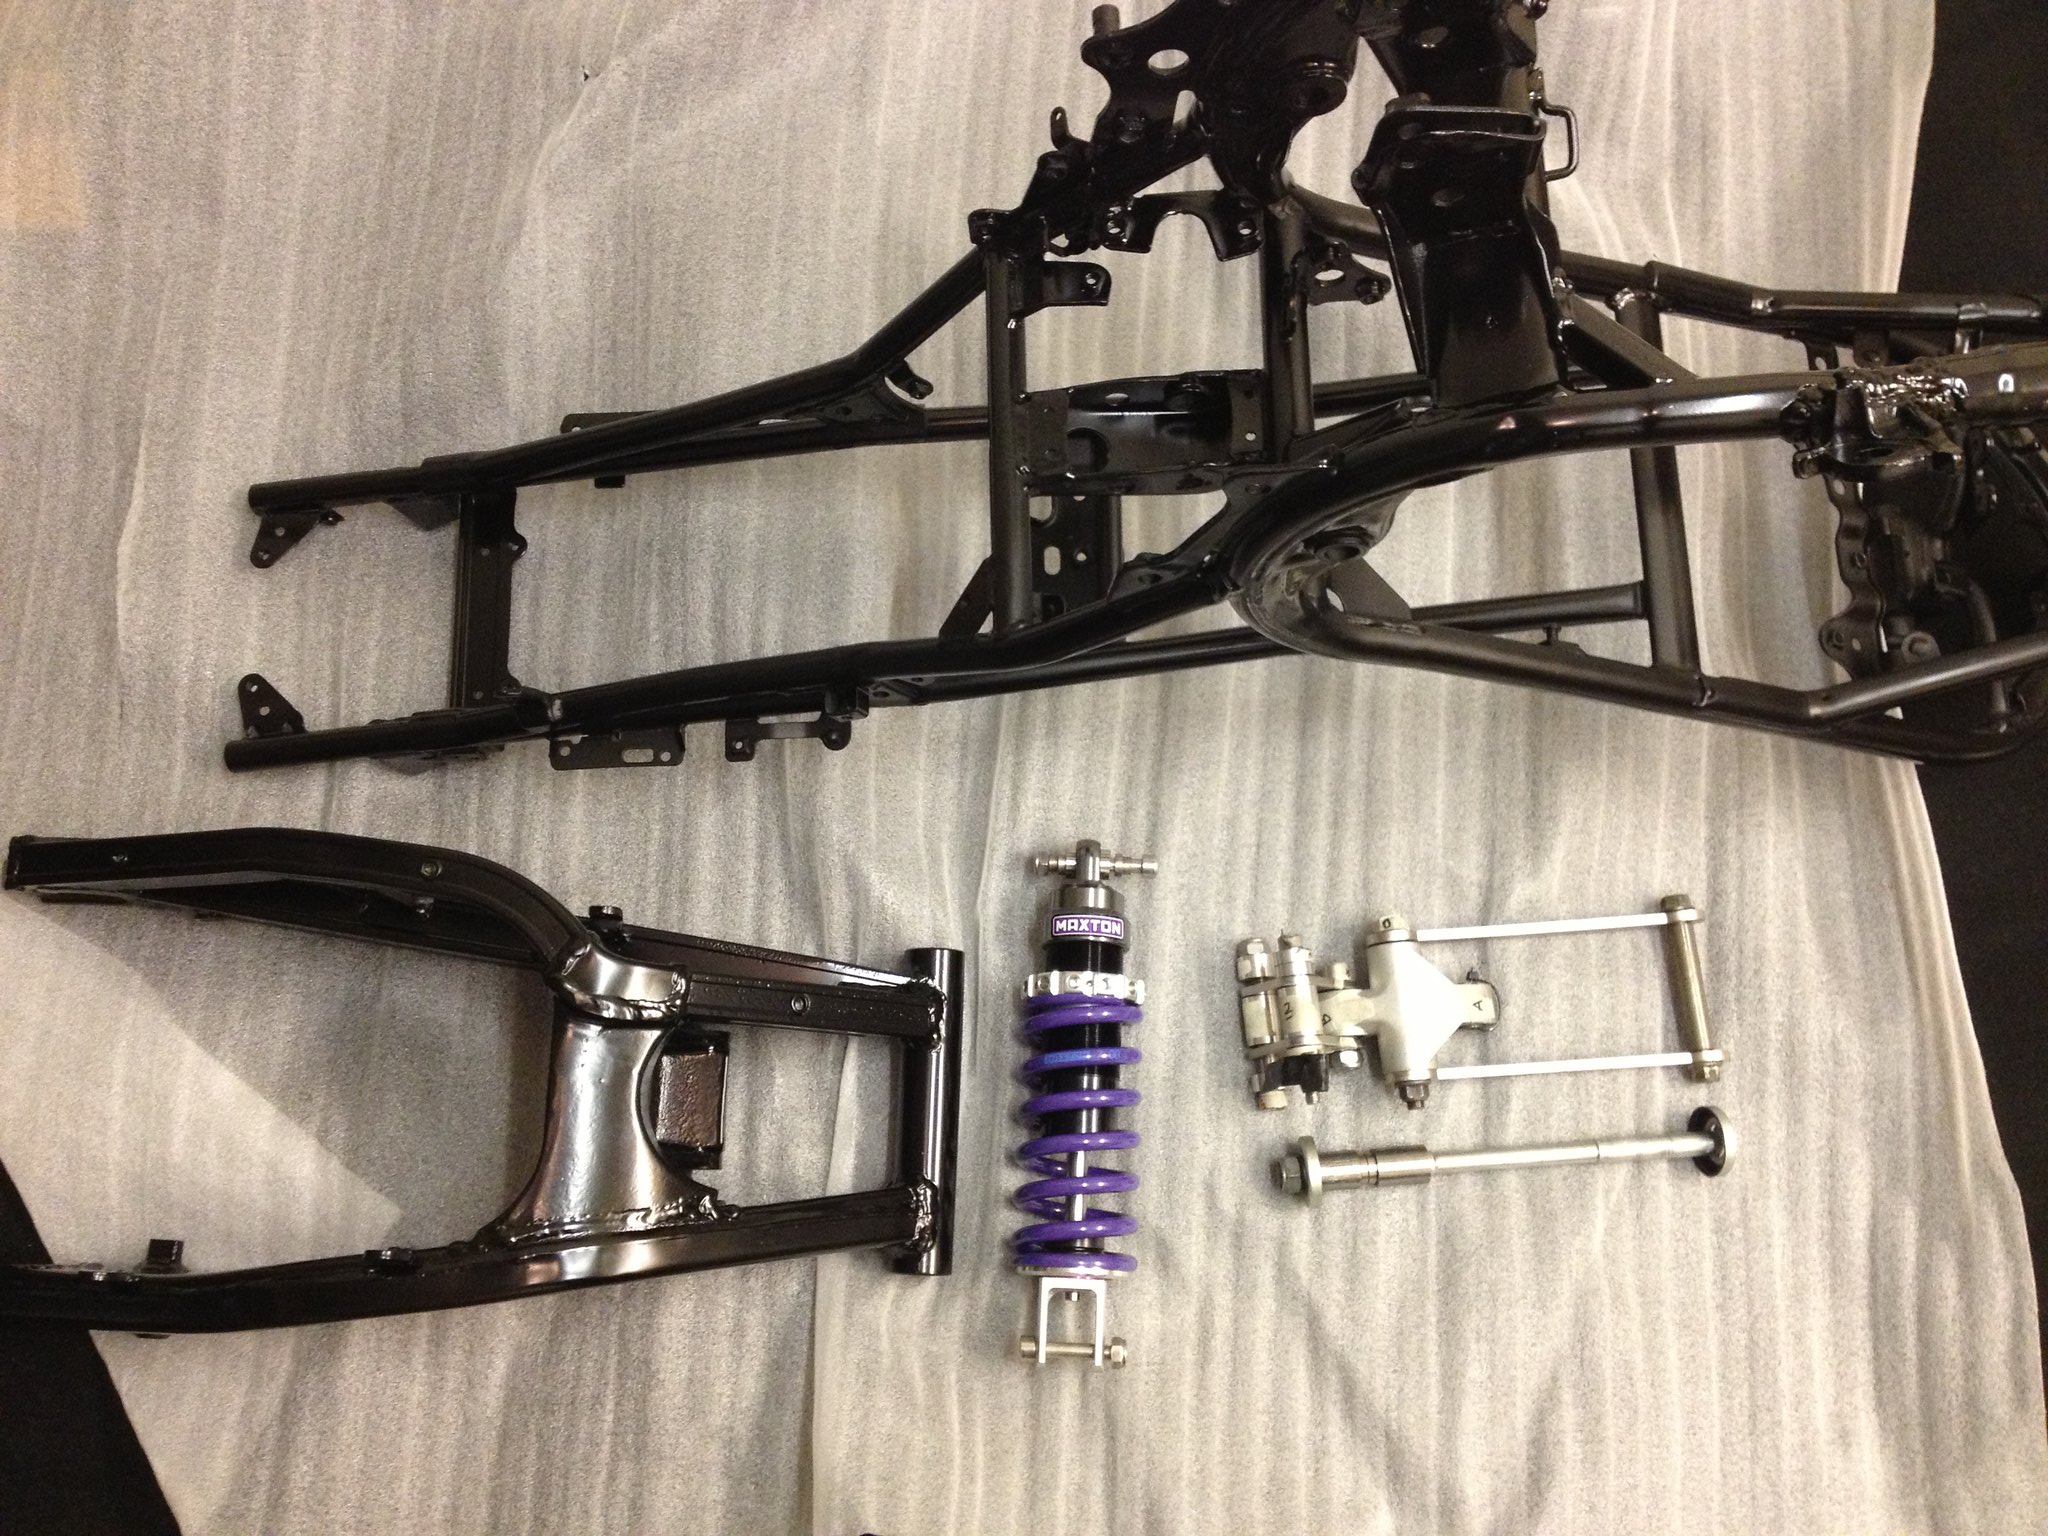
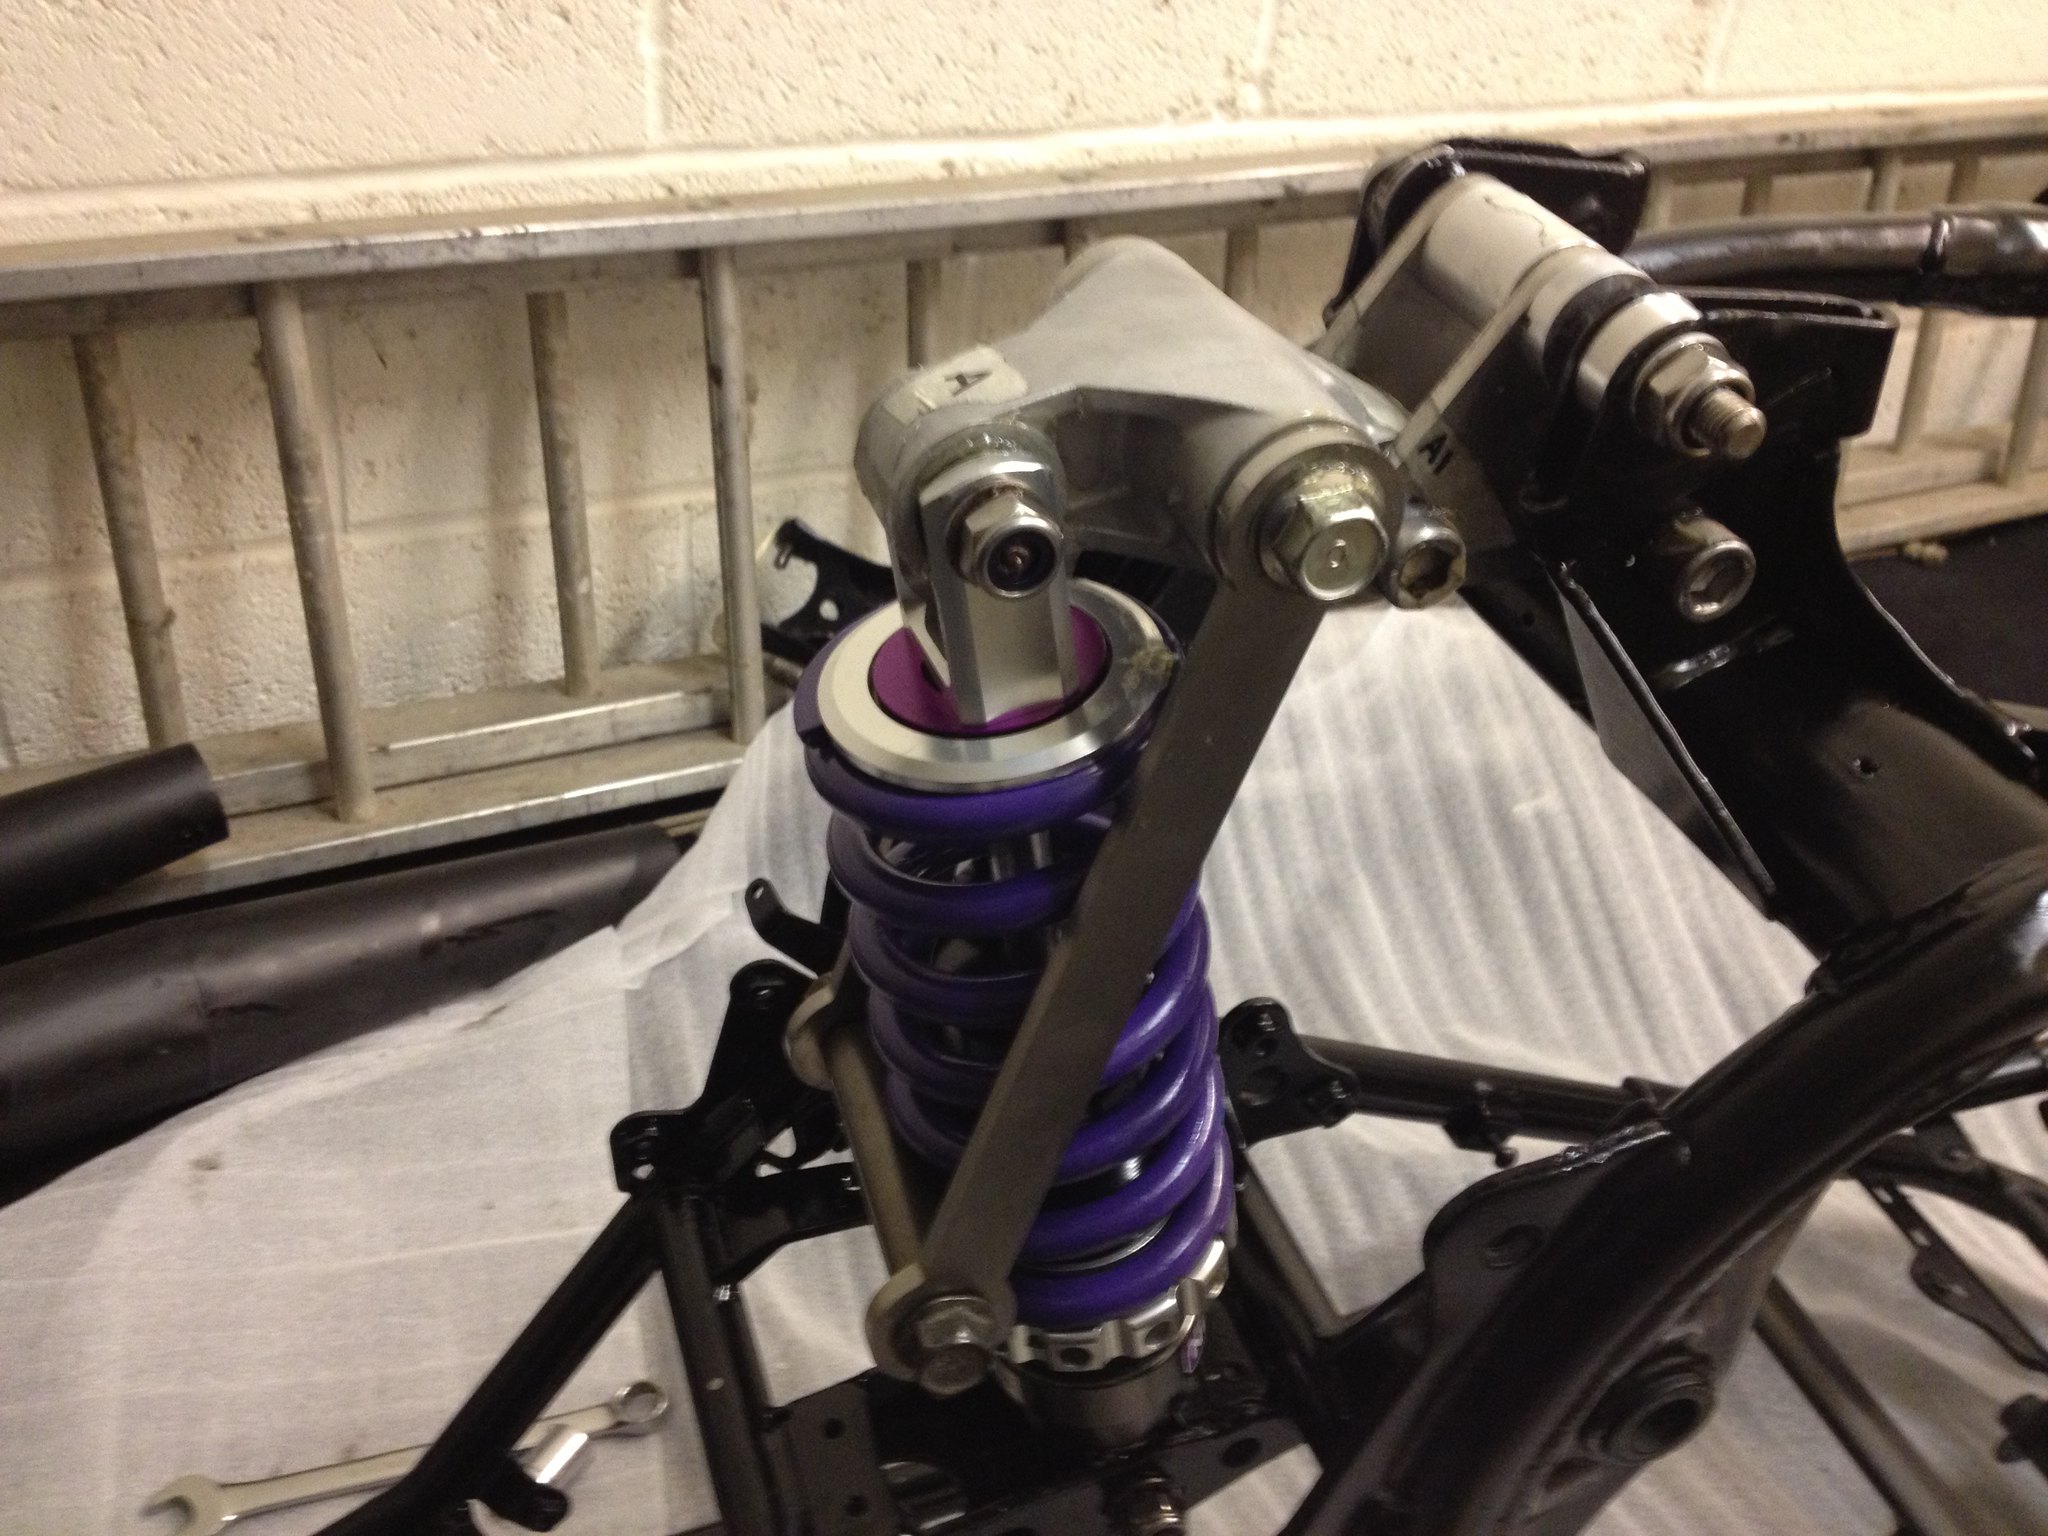
Swingarm and shock attached, took a bit of buggering about, but got there in the end
Forks and wheels on, a rolling chassis
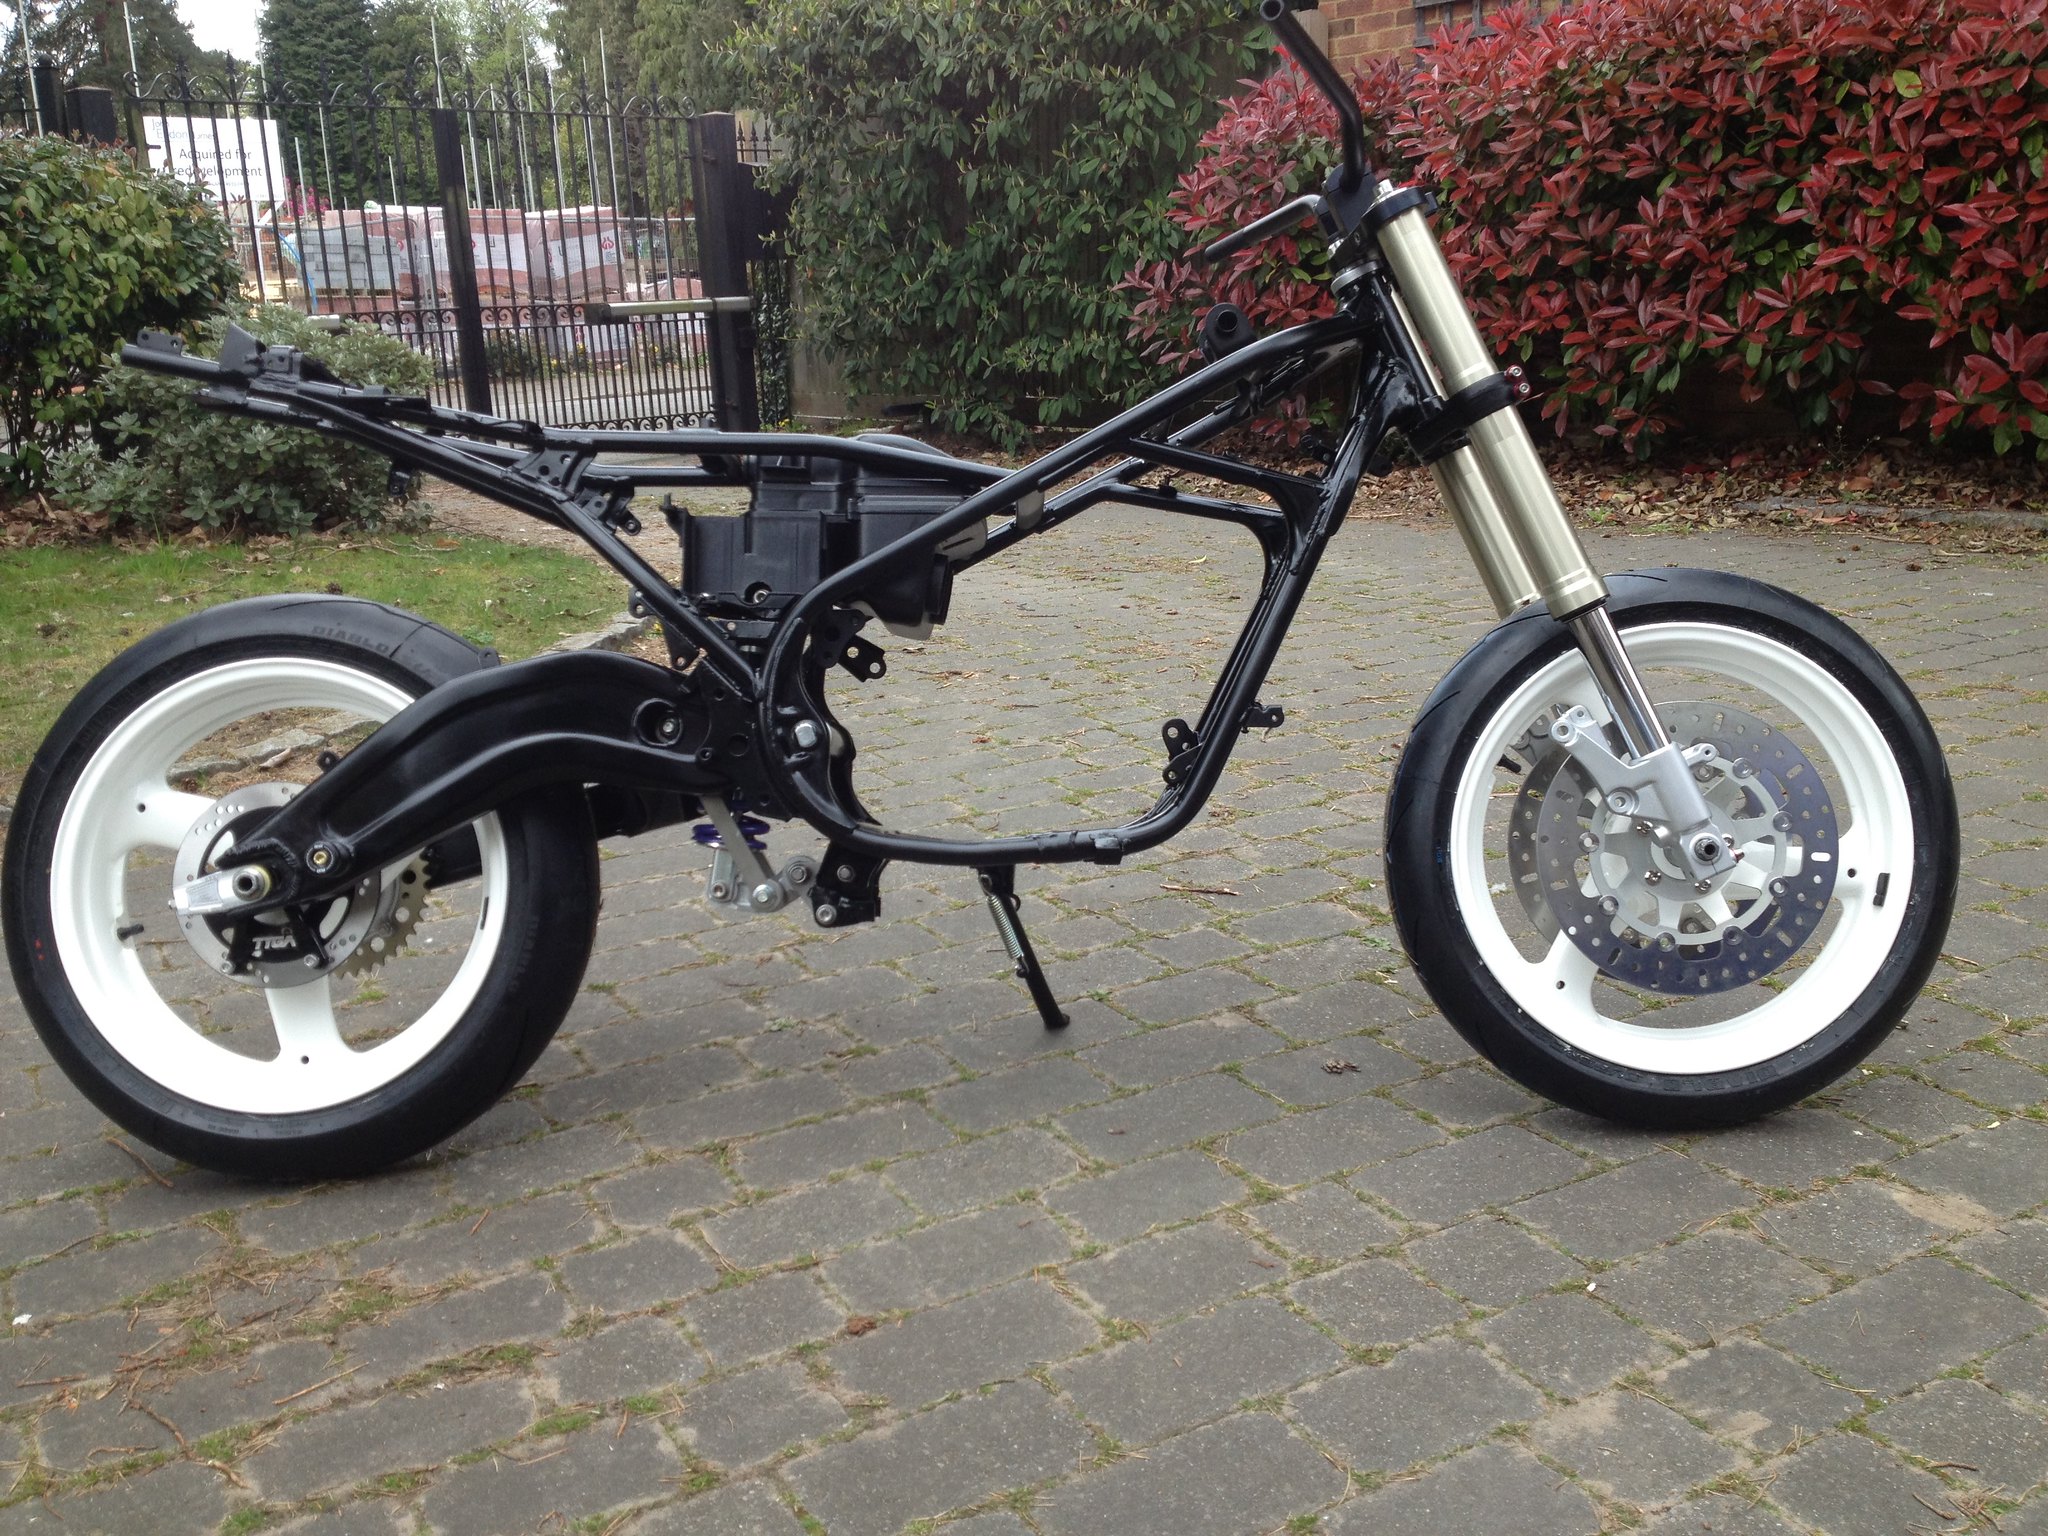
The airbox i repainted. Now properly attached to the frame and all bolted/screwed together properly, not with three bolts as it was when i got it!
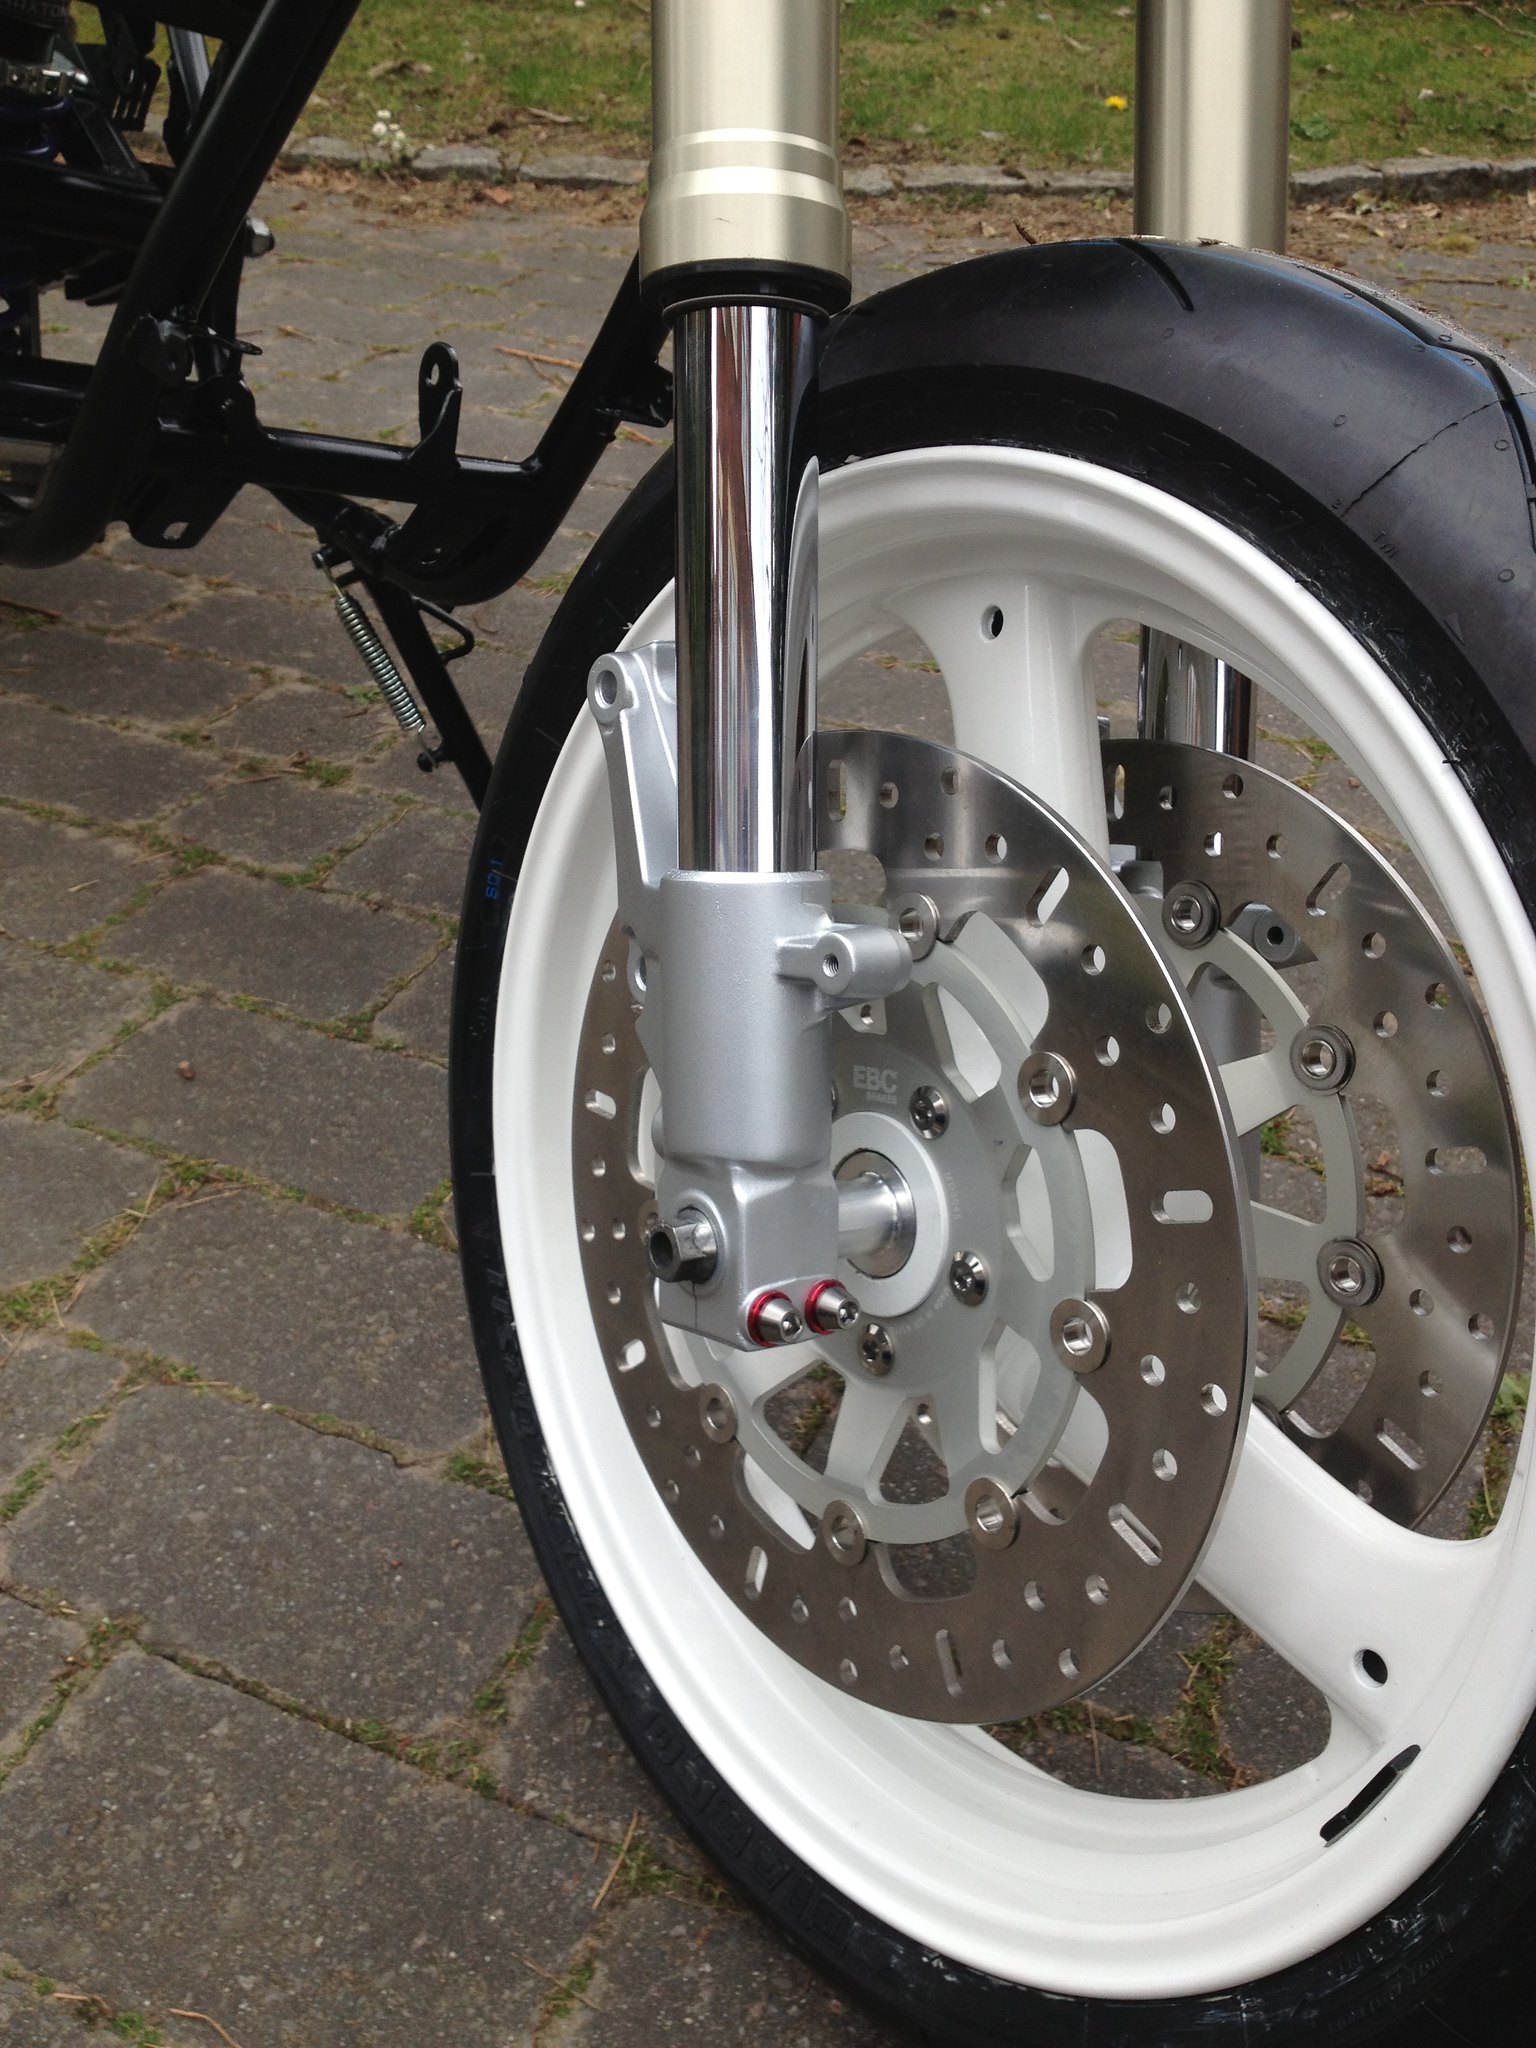
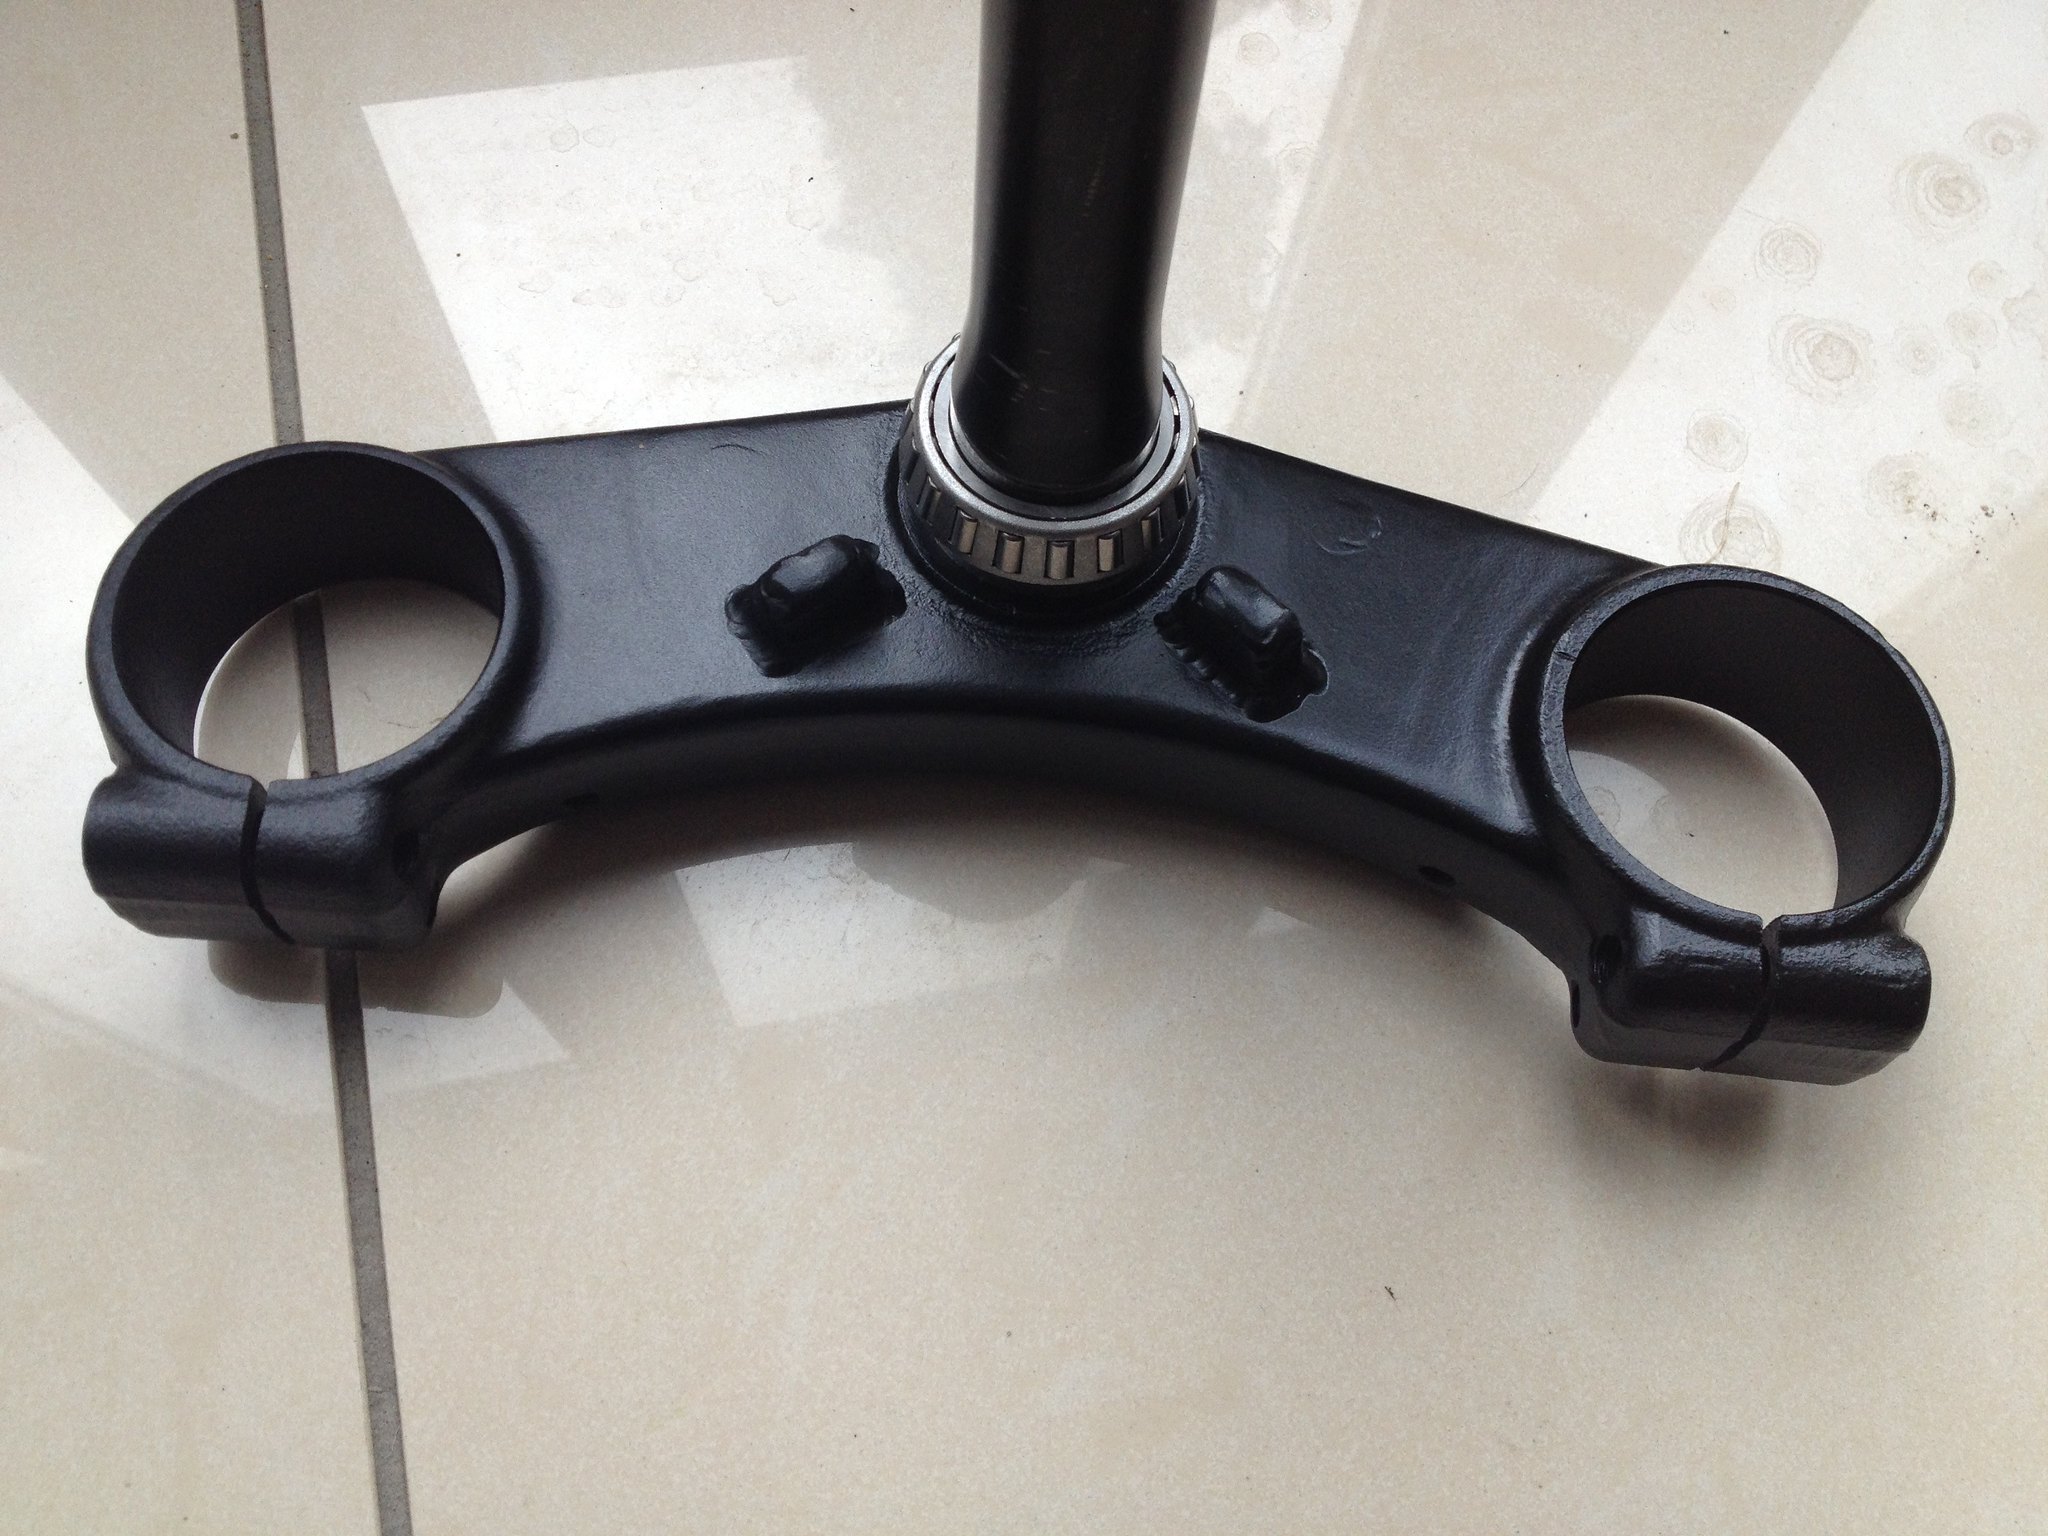
The front end with repainted fork knuckles, new discs and all titanium bolts
So engine in tomorrow i hope.
HOWEVER i have hit a snag, i have a new Tyga rear caliper hanger and a new brembo caliper to fit the hanger, but it doesn't! when you put one bolt in, the caliper fouls against the hanger so it is impossible to get the other bolt in. Also you can see that if you could get both bolts in the caliper pads are not in the correct place to bite on the disc, the disc is NOS RGV. Everything should work, it's driving me nuts!!! Has anybody else had this problem? Or does anyone else have this set up and it works??
More tomorrow
Mouse |
|
|
|
Post by dusty350 on Apr 14, 2017 17:51:44 GMT 1
Hi mate Wow, looking awesome already You don't hang about !! Have you got some pics of the rear wheel spacers each side of the wheel ? And can you offer the caliper up so we can see how far out it is. Dusty |
|
|
|
Post by mouse on Apr 14, 2017 19:11:27 GMT 1
Hi mate Wow, looking awesome already You don't hang about !! Have you got some pics of the rear wheel spacers each side of the wheel ? And can you offer the caliper up so we can see how far out it is. Dusty Cheers Dusty the spacers are from the tyga kit too and fit fine, they are VJ22 copys just made in ally. I will post a pic of the caliper and hanger tomorrow All the best Mouse |
|


 Still, it needs to be right and once it is you'll be happy you took the time and effort to get it sorted. All part of the rebuild process (unfortunately) That's the thing with well built bikes - standard or otherwise - it's the miles covered and the hassle endured to end up with the right finish that we can all forget about when viewing the finished bike.