Deleted
Deleted Member
Posts: 0
|
Post by Deleted on Feb 29, 2016 15:18:58 GMT 1
Hi Guys
I've just come into possession of a couple of CDI's a 52Y & 29k, I cant seem to find a thread on here regarding this.
Is there a way to test them to see if they are working (without blowing them up of course) off the bike, one has no plugs just wires, the other has plugs so would be easier?
One will fit my 31K the other not
I have a stator and flywheel to go with one of them, however haven't had a good enough look yet to see what stator and fly wheel I have, I can then decipher the fitment guide for stators and flywheels and cdi's
That said simple electrical tests would suffice
Thanks in advance
Howard |
|
Liamo
L plate rider.

Posts: 38 
|
Post by Liamo on Feb 29, 2016 15:59:18 GMT 1
Here is a list of CDI tests thats widely used around here.
I successfully used it to diagnose a shagged 29k CDI recently.
"The YPVS series have three different stators, rotors and CDI units
83-84 RZ350
The CDI of the first two years of construction (' 83 and ' 84) carries the marking 29 K-50. The 29K-50 CDI has a square four-fold plug, a t-shaped connector for the load coil (brown, green and red) , a two-fold plug for the Pick UP and a black ground wire. One can recognize the stator (marking ÇY) by the appearance of the load coils. This stator has a thicker coil in the center and on the right of and on the left of two smaller, which are curved like horns. The stator is marked ÇY and/or 2CY. It has two drillings and two long holes. The rotor has the marking 29L - 50
85 RZ350The 1985 31K has changed Stator and CDI. The CDI is marked 52 Y-50. The 52 Y-50 CDI has also only 8 connections (the other two to have 9). This CDI is missing the black-and-white cable, which serves to turn the engine off by the kill switch. The 85 stator is marked ÈZ or 8DX. The stator has two somewhat thicker load coils. Safe distinguisher of the 85 stator is the red-white cable at the load coil, which is always red with both other stators! A further indication is the missing connector for the "load coil", which into three individual plugs (brown, green and red-white) is divided. The Rotor has the marking 51L - 50 .86-95 RZ/RD350
The 86-95 CDI are marked 1UA - 50. The Stator looks outwardly like the ' 85 stator,but it has different plugs. A square four-fold plug, a flat connector for the load coil (brown, green and red) , a flat two-fold plug for the Pick UP and a black ground wire. The marking on the stator is 1FX. The rotor may posess the markings 1UA, -50,VCD 88,(1FY).
Combinations:The 86+ Stator functions only with the suitable rotor(VCD 88);The 86+ 1UA - 50 CDI will work without changes with a 85 31K bike. . The black white cable can remain free.
One can also use the 1UA-50 CDI with the 83/'84 31K stator(ÇY/2CY). In addition one must change the plugs going by that the cables "red" and "green" of the load coil must be exchanged . If one connects same colors, she does not function!
One can use the 85 (52Y- 50) CDI with the 84 or 86+ models. To connect an 85 cdi to an 86+ one connects the same colors and also put the black-and-white cable of the wiring harness to the black-yellow cable of the CDI. A second possibility is, black-and-white cables to the red cable to the CDI to also put (it functions both).To use an 85(52Y- 50) CDI on an 83-84 31K system you must exchange the colors red and green and put additionally the black-and-white cable of the wiring harness also to the black-yellow cable of the CDI. A second possibility is again to also put the black-and-white cable to the red cable to the CDI.
If the black-and-white cable remains free, one cannot turn the engine off
Chart Cipher:
The 84 29K- 50 CDI will work with an 84 stator and an 85 rotor.
The 85 52Y- 50 CDI will work with with the 84 rotor and 84 stator if you exchange R/Gr , S/W at S/G
The 85 52Y- 50 CDI will work with 85 rotor with 84 stator if you exchangeR/Gr , S/W at S/G
The 85 52Y- 50 CDI will work with 84 rotor with an 85 stator.
The 85 52Y- 50 CDI will work with an 86+ rotor with an 86+ Stator if you S/W at S/G
The 86+ 1UA- 50 CDI will work with an 84 rotor and an 84 stator if youexchange R/Gr .
The 86+ 1UA- 50 CDI will work with an with an 85 rotor with an 84 stator if you exchange R/Gr
The 86+ 1UA- 50 CDI will work with an 84 rotor with an 85 stator
The 86+ 1UA- 50 CDI will work with an 85 rotor and an 85 stator
The only thing I can't figure is what "S/W at S/G" stands for. Stripe?.....hmmmm
s/w = black/white
s/g = black/yellow
There is at least 3 CDI types on YPVS 350 Models:
29K-50 for 31K 83-84
52Y-50 for 57V/1JF 85-86
1UA-50 for 1WT / 1UA / 3DH1
? for 4CE6 (RD350R).
CDI Troubleshooting:
CDI theory
The CDI ignition takes a pulsed current generated by the low or high-speed charge coil (depending on engine RPM) and charges a capacitor. This stored charge is then discharged into the primary winding of the ignition coil causing the plugs to spark (both at once). The timing of this discharge to the coil is triggered by the arrival of a small electrical pulse generated by the pickup coil and electronically delayed to occur at the proper time by circuits internal to the CDI module. The ignition, engine run and side stand control unit provide a circuit to ground to "kill" the ignition. There is an old saying "garbage in equals garbage out" If any of these signals are missing or a short circuit to ground occurs in the "kill" circuit, the CDI will be unable to function properly.
Engine mechanical:
Suspected ignition problems are sometimes not that at all but other engine mechanical failures so before we test electricals lets first check the following basic items:
1. Engine has good compression and the difference between cylinders is small. Upper 90's for PSI is good for a cold engine (5 kicks with throttle wide open).
2. Carbs are mechanically balanced.
3. Check auto lube pump adjustment
4. Install a set of NEW plugs. The secondary winding of the ignition coil is attached to both plugs. In order to complete the circuit the current must flow down one plug wire to the plug, jump the gap, go thru the engine cylinder head to the other plug, jump that gap then go back up the wire to the coil. If you interrupt this circuit, neither plug will fire. If you do experience one plug sparking without the other, the circuit is being completed another way, perhaps through the plug wire insulation to the frame or perhaps internal to the ignition coil to the metal core which is bolted to the frame.
Engine electrical:
The RZ electrical connectors can corrode pretty bad. The engine vibration helps to maintain good contact but a bike that has set for a while can develop electrical "ghosts" quite easily. So lets start by separating, inspecting and re connecting all the electrical connections associated with the ignition system. When that is completed take the following readings. The following readings can be taken using the standard test leads that come with most digital volt ohmmeters. The RZ electrical system is connected together with molded nylon "molex" or "spaid" connectors. All the initial readings are taken with the circuit under their normal electrical load. This means that all the connectors are connected and you take the reading by sliding the test probe tip into the molded connector alongside the proper colored wire until it makes contact with the metal portion of the electrical connector. You need a digital voltmeter as the delay in the needle reaction of an analog meter might miss some of these very small signals
1. On the CDI bundle find the connector with the black wire with a white stripe running along it. Put the red test lead in along side this wire. Hold the black lead against the bare metal of a head bolt. Set the meter to read resistance. With the kickstand up, engine in neutral, the kill switch set to run and the ignition key to on you should see greater than 30K OHMS of resistance. If you turn off the key or kill switch the resistance should decrease to near 0.
ALL OF THE FOLLOWING READINGS ARE TAKEN DURING 5 RAPID KICKS! The object is to keep the engine rotating long enough for the digital meter to sample the signal and display a reading. This is easiest with the spark plugs removed, the plug wires connected to the plugs and the plug body connected to ground on the engine case to complete the circuit. What also works well is to tape the metal bodies of 2 spark plugs together, with the insulators pointing away from each other. Attach the spark plug wires to these and this will also complete the coil secondary circuit.
2. On the end of the CDI wiring harness you will find a 3-wire connector that has a brown, red and green wire. Slide your black probe in beside the brown wire and the red probe in beside the green wire. This is your low speed winding. Set the meter to read AC volts, turn on the ignition and kick the machine over 5 times quickly. You should see, while kicking, a reading of 25 Volts AC.
3. Now move the red test lead to the red wire (measuring brown to red) this is the high speed winding kick over the machine with the ignition on and you should see 4.5 Volts AC.
4. On the CDI bundle there is a 2-wire connector with a white with red stripe wire and a white with green stripe wire. This is your pickup coil connector. Slide your test leads in beside these 2 wires. When you kick the starter rapidly you should see 0.3 Volts AC
5. On the CDI bundle there is a 2-wire connector with an orange wire and a black wire. Slide the meter probes in beside these wires. This is the CDI output to the ignition coil primary winding.
When the starter is kicked rapidly, you should see 0.4 Volts AC.
If any of these voltages are missing one of 2 things is happening. Either the source device is not generating the signal or the destination device is shorted and the signal is being loaded down. If one of the signals is missing, separate the electrical connector for that signal (electrically unload it) and connect your meter to the source side and repeat the test. Here are the unloaded readings for the above listed signals
2. Low speed charge coil 50 Volts AC unloaded
3. High speed charge coil 4.5 Volts AC unloaded
4. Pickup coil 0.3 Volts AC unloaded
5. CDI output 24 Volts AC unloaded
In the case of signals 2,3 and 4 if the loaded test is bad and the unloaded test is good do a resistance test of the source device. The low speed coil (test 2) should read 225 ohms (or 133 ohms depending on engine type). The high-speed coil (test 3) should read 5.3 ohms and the pickup coil (test 4) should read 115 ohms. If the resistance check is good the CDI is most likely at fault.
In case the signal 5 load test is bad and the unloaded test is good, measure the resistance of the ignition coil primary winding. The primary winding resistance is around 0.33 ohms. If it is OK then the CDI is most likely at fault.
If all the above readings are good then check the secondary winding of the ignition coil, the measurement from one plug cap to the other should be about 23K ohms. The plug caps themselves "screw" (twist counterclockwise) off of the plug wires each plug cap should read about 10K ohm when measured by itself. The coil and plug wires alone should read 3.5K ohms. It is possible for the coil secondary to be breaking down under high voltage but measure just fine with the ohmmeter. If you are getting the proper signal on the black and orange wire to the coil with no spark out into NEW plugs, then the coil is probably at fault. I had this happen intermittently for about a year, I finally found it by connecting up a meter to the black and orange wires and taping it to the tank where I could see it. The next time the bike quit, while I was coasting in gear the input voltage was still there with no spark out, Good in, garbage out. told me it was the coil. One final word of caution. DO NOT ATTEMPT TO MEASURE THE OUTPUT SPARK VOLTAGE FROM THE IGNITION COIL! IT WILL DESTROY THE METER!
"
|
|
|
|
Post by Shytalk on Feb 29, 2016 21:23:24 GMT 1
AFAIK there is no off bike way to test the CDI.
|
|
Deleted
Deleted Member
Posts: 0
|
Post by Deleted on Mar 1, 2016 0:54:05 GMT 1
Hi Guys
Cheers for that info
I'll just have to jury rig them on and see if they work then
Howard
|
|
|
|
Post by mollers on Jun 10, 2017 18:16:34 GMT 1
Has anyone posted test guidance as detailed above for a 4L0 ??
|
|
|
|
Post by archloafer on Jun 12, 2017 15:08:26 GMT 1
Hi Guys
I've just come into possession of a couple of CDI's a 52Y & 29k, I cant seem to find a thread on here regarding this.
Is there a way to test them to see if they are working (without blowing them up of course) off the bike, one has no plugs just wires, the other has plugs so would be easier?
One will fit my 31K the other not
I have a stator and flywheel to go with one of them, however haven't had a good enough look yet to see what stator and fly wheel I have, I can then decipher the fitment guide for stators and flywheels and cdi's
That said simple electrical tests would suffice
Thanks in advance
Howard Rex's Speed Shop has the means to test them out, along with the stator. www.rexs-speedshop.com/He successfully tested and un-fu*ked my stator after Westcountry Windings f*cked it in the first place, and tested out the 3 CDI's I'd collected, gratis. He's got some videos of his testing rig on YouTube: Anyway, depending on how badly you want them tested, might be worth having a word - he does appear to know his stuff. Cheers - David |
|
|
|
Post by mollers on Jun 12, 2017 18:47:43 GMT 1
Thanks Dave, will give him a buzz.
|
|
|
|
Post by fozzy17 on Feb 10, 2019 12:26:56 GMT 1
i have a n1 stator anyone know if this flywheel is compatable 032000-5630 VCD88 DENSO JAPAN
|
|
|
|
Post by fozzy17 on Feb 10, 2019 13:51:45 GMT 1
guys just posting this info here so someone searching this information will find it, this could be worth a sticky thread so a n1 should have a 52Y-50 cdi 51L-50 flywheel the only marking i can see on stator are 12DY 10 wires intotal 3 white and a blue on one plug white and green and white and red on another plug 1 brown female bayonet connector 1 Green female bayonet connector 1 black female bayonet connector 1 red and white female bayonet connector 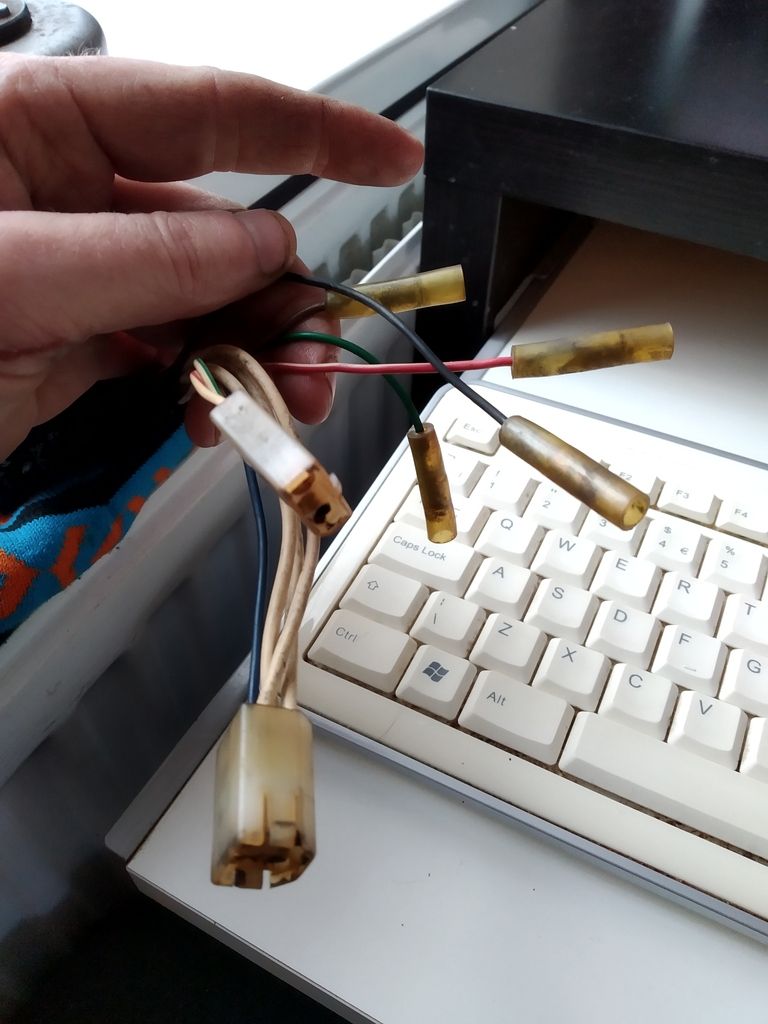 happy days |
|
Deleted
Deleted Member
Posts: 0
|
Post by Deleted on Feb 13, 2019 10:00:32 GMT 1
All i know is . with my cdi's that let me down . once they cooled down ,the bike would start normally but once it warmed up . its getting a lift home.
|
|
|
|
Post by rz350street on May 11, 2020 17:23:16 GMT 1
Has anyone posted test guidance as detailed above for a 4L0 ?? Hello, I know this is an old thread, but it's a top hit on google when I searched for this information. I went over the wiring diagrams yesterday and worked out how to do this test on the 4L0. Use at your own risk, but with these tests I received roughly the numbers described. Tests 1, 3, 5 are unchanged. 2 and 4 are described here with the original struck out and my amendments in bold. |
|
|
|
Post by headcoats on May 11, 2020 19:18:59 GMT 1
I know it has been mentioned the 29K CDI is a knacker but what are the stators like and the flywheels ?
|
|
|
|
Post by rich on May 12, 2020 12:26:14 GMT 1
Stators and flywheels don't usually give much grief on any model and not much between them with regards reliability. The problem with the 29K-50 CDI fitted to the LC2 is it suffers from dry solder joints on the PCB inside meaning the fault will often be intermittent or temperature related. Unfortunately you can't get inside to repair them as the PCB is embedded in a potting compound with glass beads.
I would go for the best condition stator/flywheel combo you can find.
|
|
|
|
Post by abar121 on May 12, 2020 12:40:42 GMT 1
Quick question, how is the pickup coil signal generated for timing? I can't see a sensor?
Thanks.
|
|
|
|
Post by rich on May 12, 2020 16:55:17 GMT 1
Quick question, how is the pickup coil signal generated for timing? I can't see a sensor? Thanks. The trigger coil is on the outside of the stator and there are raised pickups on the rotor |
|


