|
|
Post by nikfubar on Dec 14, 2009 12:28:53 GMT 1
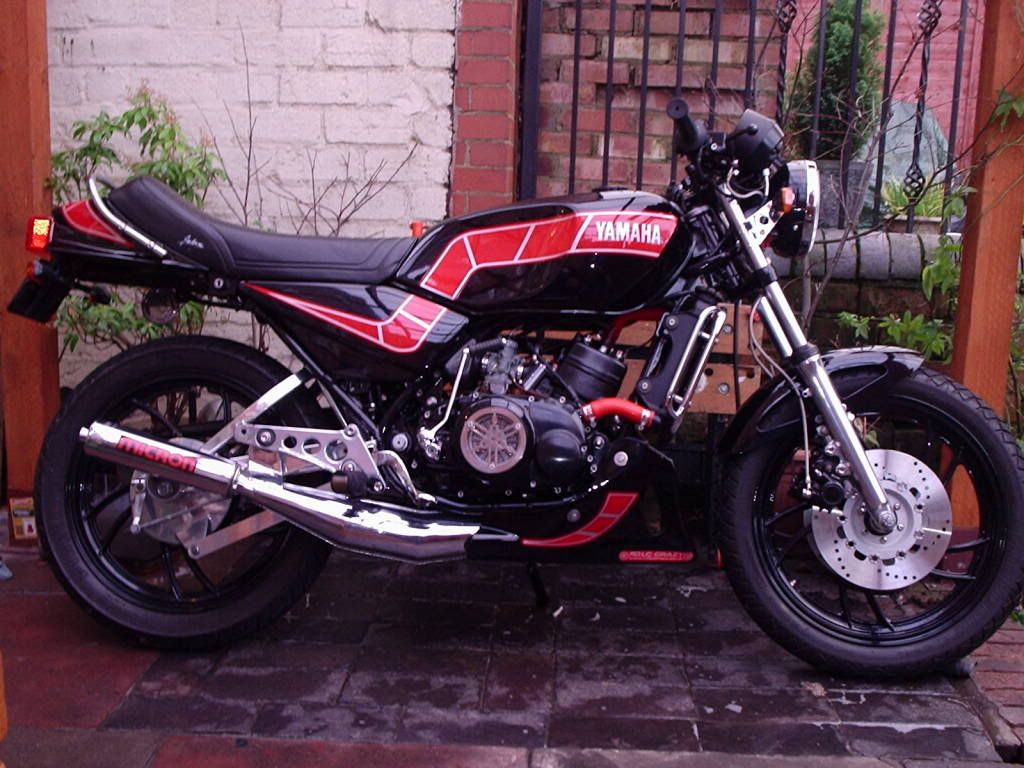
This is my second hybrid project is was posted on the other forum but for anyone who hasn't seen it. I decided to incorperate as many parts from other bikes as i could. Started with this old nail from evilbay.  Stripped it all down and junked most of it. Ground off all the redundant lugs and brackets then fitted RGV front end, boring I know but it works. Drilled and bolted on risers to the top yoke for the Renthal bars. Next was to fit the RGV swing arm, had local engineering firm make up the spindle slieves. I decided not to use the bolt on linkage kit and weld my own brackets on the frame. The position of the lower mount is vital to ensure the swing arm operates correctly so measured how far down and out from the centre of the spindle the mounting point is from a stock RGV.   Decided to use an R6 rear shock, fitted this to the linkage then decided on the ride height which would determine the top mount position for the shock. Fabricated some mounting plates and braces and tack welded it all on.  I fancied something different for the back end and decided to use a Mito single seat unit and subframe so cut off the old frame offered up the new sub-frame and found it didn't fit  Much cutting, welding & grinding later, jobs a goodun. Also had to relocate the battery mounts & fit lugs for the seat, oil tank and back brake reservoir.  Next was to weld on some lugs to mount the rear sets which were from a Honda fire blade. Then strip every thing back down do all the welds properly, grind down and send for powder coat. While the frame and wheels were being powder coated I rebuilt & polished the forks and had the discs rebuilt by ABE engineering. Now for the nice bit, putting together all the refurbished parts  Any bolts I couldn't replace with stainless steel I nickel plated.  Next to go on was the rear sub-frame, oil tank from a Honda melody, battery and rear brake reservoir. I also fabricated an undertray from stainless steel. I don't like round headlights so I got a small nose fairing and fabricated a mounting frame which will also mount the clocks & indicators.   |
|
|
|
Post by spondonchris on Dec 14, 2009 17:06:24 GMT 1
Thats going to look cool, lot of work but im guessing your enjoying it, i love non standard stuff and modifying bikes realy gives you pride of ownership when its finally done and on the road. Keep the pictures comng as you get further on with it.
|
|
|
|
Post by garcharles on Dec 14, 2009 20:52:12 GMT 1
People like you make me sick LOL. I just wish I had just a 1/4 of your talant so that i could have a go at a hybrid. Keep posting pics so that we can see how it comes together.
|
|
|
|
Post by guiri on Dec 14, 2009 23:14:37 GMT 1
top job nick,like the lizard as well.....
|
|
|
|
Post by nikfubar on Dec 15, 2009 13:50:46 GMT 1
looking nice Nik , strangly familuar though! ;D ;DI did say it was posted on other forum ;D Got to do something to kill time at work. |
|
|
|
Post by bryan on Dec 15, 2009 19:06:14 GMT 1
top job with the different rear subframe and lower link mounting.
|
|
|
|
Post by Norbo on Dec 15, 2009 19:44:41 GMT 1
Some really good work on that bike looks exceptional cant wait to see more as it progresses..
|
|
|
|
Post by nikfubar on Dec 16, 2009 0:18:30 GMT 1
Next to go in was the freshly painted engine with home made lexan clutch window, NOS radiator, Renntec grill & samco hoses.  Next to go on was a set of KR1S carbs with foam pod filters and all the handlebar controls, I used RGV switch gear re-wired and connected to the RD plugs so that I could use handlebar controls for the choke.  The next nightmare was wiring  because most of the electronics have been relocated and i've used digital clocks I had to pull the loom completely to bits and start again   Four evenings, 20 hours later it's sorted & it all works   Nice shiny black chrome exhausts from Gibsons, carbon fibre front mudguard and rear hugger & a nice set of 6 pot Hyabusa front calipers. That should stop the bugger ;D & the Fire blade rear sets.  Had to fit a Talon 12mm off set front sprocket to line up with the fatter rear wheel, plus luuverly Renthal gold O ring chain.  |
|
|
|
Post by Norbo on Dec 17, 2009 12:46:14 GMT 1
WOW not thats inpresive
|
|
|
|
Post by nikfubar on Dec 17, 2009 16:32:49 GMT 1
Cheers Norbo. ;D And we continue: First start up, Vapour dash works great    Next to sort was the HEL brake lines. You can also see the magnet and pick up for the speedo.   The side stand fouled the new foot rests so I made a new one out of 20mm tube. Also the gear change linkage worked the other way to the RD one so I made a new linkage and nickel plated it. Well happy with result. ;D  Last to do was the paintwork, couldn't find a painter locally so did it myself with rattle cans. 2 primers, 4 base coats rubbed down, masked off for the white blocks. Then three coats of laquer. ;D Well happy with result.   Check out the tiny Oxford Nano indicators, single LED which is brighter than a 21W bulb, a must have  Also cut out the panels in the plastic infills below the tank and fitted mesh, more bling  That was the maiden voyage and it started to missfire then got worse and worse Finally discovered I'd twisted the crank, the welds had broken. That'll teach me to thrash it first time out. To be continued  |
|
|
|
Post by vin on Dec 17, 2009 18:26:05 GMT 1
Very nice mate  As above shame about the crank but I'm sure it will go back better than ever |
|
Deleted
Deleted Member
Posts: 0
|
Post by Deleted on Dec 17, 2009 22:15:37 GMT 1
I can't believe you crank talk about cheesed off. I can't imagine what a downer that must have been. Was it the engine from the F2 pictured at the top of the thread? Beautiful bike. It's a credit to you. |
|
|
|
Post by nikfubar on Dec 18, 2009 0:11:19 GMT 1
Yeah. it was the engine from the donor bike, that was one of the main reasons I bought it because it was supposed to have a top engine was given the reciepts from Bortec for a complete bottom end rebuild and reciepts from Stan stevens for top end rebuild. I've now just finished rebuilding engine. When I stripped it down you could see it hadn't been done long ago but apart from the knackered crank I found the selector forks were completely knackered & it hadn't been rebored only honed. Still running on original standard pistons, whole top end was 31K and bottom end F2 Ended up replacing all selector forks, seals, crank, pistons and rings. Trouble is bought the bike over a year ago. Someones been ripped off, eather him if he had the work done on this engine or me if he changed engines  |
|
|
|
Post by bryan on Dec 18, 2009 17:31:36 GMT 1
my LCs been together for 2 years now, thrashed for about 3000mls per year and not missed a beat yet.
Worth getting them sorted, as they arnt much trouble then.
Some under tollerance centre pins about, which was the trouble with Pauls (2CL) newly rebuilt crank that also twisted after only 40 miles. It had a new pin, centre webs, conrods and main bearings and was rebuilt by a reputable guy. It too was welded but still twisted.
|
|
Deleted
Deleted Member
Posts: 0
|
Post by Deleted on Dec 19, 2009 10:29:44 GMT 1
My engine's in bits as we speak. It didn't pack up but I thought this winter it needed some work. Turned out to be bigger job than expected.
The crank's generally ok apart from shagged seals and bearings but I need a re-bore to 1st oversize, new pistons & con-rods etc. Hopefully back together soon with a fresh lick of paint.
Fingers crossed for the Summer.
|
|
|
|
Post by nikfubar on Dec 26, 2009 23:05:47 GMT 1
Well seeing as I had to pull the whole engine to bits, thought I would do a bit of mild tuning so I ported the intakes, transfer & exhaust ports. ;D   Then I polished and rebuilt the power valves.  Resprayed the casings, barrels and head with PJ1 and rebuilt the engine with replacement crank, new gear selectors, new pistons, rings, small ends and casing/crank seals. Also took the opportunity to nickel plate the head bolts and engine mounts, more bling ;D Re-jetted the PWK28s (cheers Headcoats) & all seems to be running great with no flat spots, 150 main, 42 pilots, JJH needles on clip 5, pilot screw 1&1/4 turns out. All I need now is some dry weather ;D |
|
|
|
Post by mellow on Dec 28, 2009 22:24:19 GMT 1
Nice job there m8.Hope the engine holds out for ya |
|
|
|
Post by jessy03 on Dec 29, 2009 14:44:14 GMT 1
super job mate, you know your stuff and your attention to detail is superb.
|
|
|
|
Post by vin on Dec 30, 2009 10:48:01 GMT 1
Very nice work Nick |
|
|
|
Post by nikfubar on Jan 3, 2010 17:59:14 GMT 1
Just fitted a set of stainless chain adjusters from sharpyg. Very nice ;D  |
|
|
|
Post by nikfubar on Jan 3, 2010 20:20:02 GMT 1
While the frame and wheels were being powder coated I rebuilt & polished the forks and had the discs rebuilt by ABE engineering. Hi ya, can you just explain a bit further on the disc rebuild, what exactly did they do? Cheers, Steve. Hi Steve When I wanted wavey discs I could not get any off the shelf items for the VJ22. So I sent my old discs to ABE who removed the old discs from the carriers, lazer cut new wavey discs and riveted them back on to my carriers. I believe you can now buy off the shelf items ;D Cheers Nick |
|
|
|
Post by nikfubar on Jan 4, 2010 0:31:30 GMT 1
Hi Steve It is fairly common to fit new discs to old carriers if they are not worn but some places do not rivet the discs back on they use circlipped connectors THESE CAN BE DANGEROUS SO AVOID. Sorry to shout |
|
|
|
Post by nikfubar on Jan 4, 2010 16:33:21 GMT 1
Hi Steve
It's about the same cost, just ordered a new set of wavey discs off the shelf for my RSVR and they are the same price.
I think the only benefit is that they do not make wavey discs for many bikes due to the amount of different carriers, whereas the actual discs are easy to manufacture as they are cut from a flat piece of steel.
Cheers
Nick
|
|
rd125lc85
Drag-strip hero
 my 350lc
Posts: 212
|
Post by rd125lc85 on Jan 9, 2010 22:45:05 GMT 1
hi i was wondering how you did the oil feeds to the carbs
thanks adam
|
|
|
|
Post by nikfubar on Jan 10, 2010 1:10:24 GMT 1
Hi Adam Fairly simple job First, use a pair of pliers to pull the brass injectors out of an old set of carbs. On the L/H PWK there is a blank lug, drill this half way through with a 4mm drill then the rest of the way through with a 1.2mm drill. Glue the injector into the 4mm hole with araldite or loctite, ensuring you dont block the 1.2mm hole. On the R/H PWK the lug has a brass vacume pipe, pull this out with pliers then drill and tap to M6. Get a 6mm allen bolt which does not quite go all the way through. Put a nut on it and clamp in vice then drill half way through with 4mm drill then the rest of the way through 1.2mm. Glue this into the boss and then glue the injector into the bolt. Leave overnight for the glue to set, job done ;D If you need a vacume pipe for the fuel tap fit another pipe, I used a non-vacume tap. Hope this helps Nick |
|
|
|
Post by nikfubar on Feb 12, 2012 22:19:14 GMT 1
|
|
|
|
Post by shane2011 on Feb 17, 2012 17:35:42 GMT 1
that is one nice looking bike you have there!!!
|
|
|
|
Post by Norbo on Feb 18, 2012 10:08:40 GMT 1
I know i know i realy should . the barrels are still of but the 68mm cool head has arived from the U.S now im still wating for the paint to come back from dream mashean who are pinstriping betwen the blocks i allso added some lettering and am having the holl thing laquered to give it a real quolity look. I have added a lot of stuff cince i had the bike so it looks a little diferent now. i hope you like what i have done nick.
|
|
|
|
Post by bandit123456 on Mar 25, 2012 21:24:44 GMT 1
very nice
|
|
|
|
Post by seahorse83 on Jul 16, 2013 1:57:24 GMT 1
you win again Nick, nice bike mate, see you have revised your clip position, and kept the JJH.
You must have a mito graveyard near by, bloody nice bike, shame about the crank, I suppose its what's on the inside that counts. 31k top end is still respectable, and I see you have done some freshen up porting ta boot. Like the paint, . Nice work.
|
|


 because most of the electronics have been relocated and i've used digital clocks I had to pull the loom completely to bits and start again